1
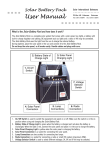
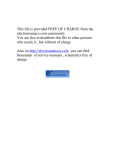
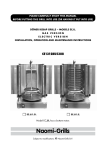
LED Lamp
for Solar Home System - 2.5W
Indoor application
User Manual
AEH-LB02-U25W-BD
LED Lamp for Solar Home System – 2.5W
All rights reserved
Specifications subject to change without prior notice
2
Dear Customer,
Thank you for purchasing Schneider Electric’s LED Lamp for Solar Home
System – 2.5W. Now you will be able to illuminate your home with energy
efficient LED Lamp. With light output equivalent to 7W CFL this is an
ideal lamp for entire family.
Schneider Electric’s LED Lamp for Solar Home System has been
carefully designed, manufactured and factory tested to give you trouble
free service. To get maximum benefits from your LED Lamp, please read
the instructions in this manual carefully before use.
This user manual applies to the following product :
Product Reference Number Product Description
AEH-LB02-U25W-BD
LED Lamp for Solar Home System – 2.5W
3
IMPORTANT NOTES
How to use this Manual
This manual explains how to install and operate the LED Lamp for Solar
Home System – 2.5W
Product Safety
• This product must not be used under inflammable environment.
4
CONTENTS
INTRODUCTION……………………………………………….… 6
PACKAGE CONTENTS……………………………….….….….. 7
PARTS IDENTIFICATION…………………………….……..…... 7
TECHNICAL SPECIFICATIONS………………........………….. 8
INSTALLATION PROCEDURE…………………..…….…..…... 9
OPERATION PROCEDURE…………………….…….………... 12
TROUBLESHOOTING ……………………….…………….…… 13
WARRANTY TERMS AND CONDITIONS…………................ 14
WARRANTY CARD………………………………………….…... 15
CUSTOMER CARE CENTRE…………………………….…….. 15
5
INTRODUCTION
LED Lamp for Solar Home System - 2.5W is a highly reliable and energy
efficient lamp for indoor application.
This LED Lamp is suitable for Solar Home System with 12 V solar charge
controller and battery. The light output of the LED Lamp is equivalent to
7 W CFL and sufficient to illuminate a room of 10’ x 10’ size. It is
designed to operate with same level of brightness from 10.8 – 20 V DC.
This LED Lamp can be fixed to the wall or mounted to the ceiling. It can
be easily tied to the pole or hanged to the wall. An external switch needs
to be connected in series with the LED Lamp and the solar charge
controller to operate the lamp.
6
PACKAGE CONTENTS
LED Lamp
DC Plug
Strap
Screws - 2 Nos.
M3.5 X 19 mm
PARTS IDENTIFICATION
DC Input terminal
LED
Transparent cover
Hook
LED – Light Emitting Diode
7
TECHNICAL SPECIFICATIONS
Product Reference Number
AEH-LB02-U25W-BD
LED Lamp – 2.5W
Power consumption
2.5W
Input voltage
10.8 – 20 V DC
Efficiency of electronic circuit
Greater than 85 %
Maximum light output
Equivalent to 7W CFL
Color of LED’s
White
Number of LED's
21
LED Life
50000 hours*
Environment
Operating temperature
-10 to 55°C
Storage temperature
-10 to 55°C
Relative humidity
90%
Ingress protection
40
*5.5 hours usage per day
8
INSTALLATION PROCEDURE
1. Mounting methods for LED Lamp
1.1 Mount the LED Lamp on the wall.
Use the mounting screw template printed on the packing box of the
lamp to drill the holes. Use the screws provided to fix the LED Lamp
on the wall.
75 mm
Mounting Screws
1.2 Hang the LED Lamp on the wall
Use the hook provided with the lamp to hang the LED Lamp on the
wall.
9
1.3 Tie the LED Lamp to the pole.
Use the strap provided inside the packing box of the lamp to tie the
LED Lamp to the pole.
2. Prepare the cable assembly to connect LED Lamp to the solar
charge controller.
Use 2 core, 1.5 mm2 cable to connect the LED Lamp to the solar
charge controller.
Connect one end of the BLACK cable to the -ve terminal and RED
cable to the +ve terminal of the DC Plug through a switch as shown
below.
Switch
RED cable
+ve
BLACK cable
-ve
10
3. Connect the LED Lamp to the solar charge controller.
Connect the other end of the BLACK cable to the -ve output terminal
and RED cable to the +ve output terminal of the solar charge
controller.
Connect the DC Plug to the input terminal of the LED Lamp as shown
below.
RED ca
ble
BLACK
cable
RED cable
le
BLACK cab
Note 1 : This lamp can be powered by Schneider Electric supplied solar charge
controller or with any 12 V solar charge controller.
Note 2 : An external switch needs to be connected in series with the LED Lamp
and the solar charge controller to operate the lamp.
11
OPERATION PROCEDURE
Ensure that the solar charge controller is powered from solar panel or
battery. Switch ON the external switch to operate the LED Lamp.
Switch
TYPICAL INSTALLATION
1. LED Lamp mounted on the wall
2. LED Lamp hanged on the wall
12
3. LED Lamp tied to the pole
TROUBLESHOOTING
Symptom
Possible cause
Solution
Lamp is not glowing
Battery has reached
the cut-off voltage
Charge the battery
through solar charge
controller.
Cable from the LED
Lamp to the solar
charge controller is
reverse connected
Ensure that the cable
from the LED Lamp
to the solar charge
controller is
connected with
correct polarity. If
not, reverse the
connection.
If all the above are checked and still the problem exists, contact your
local dealer.
13
WARRANTY TERMS AND CONDITIONS
The warranty card entitles the purchaser of AEH-LB02-U25W-BD to
enjoy a warranty period of 3 years from the date of purchase.
This warranty is valid only for manufacturing defects and does not cover
defects due to external damages such as the following:
• Improper usage, maintenance or modifications.
• Natural calamities such as fire, flood or other acts of God.
• Breakage of plastic components, including the product
housing.
This warranty is made void if:
• The warranty void sticker is tampered or removed.
• The warranty card is misplaced.
• The product is opened and serviced by any person not
authorized by Schneider Electric.
For parts replaced during servicing, only the remaining warranty period of
the original product applies.
14
WARRANTY CARD
This warranty is valid only if the card is filled in completely, signed and
stamped by the dealer on the date of purchase.
WARRANTY CARD
Models
AEH-LB02-U25W-BD
Serial Number
Name of the Dealer/Supplier
Address
Date of Purchase
Dealer’s Signature
and Stamp
CUSTOMER CARE CENTRE
In case of any queries related to the product, please contact your local
dealer.
15
990-5558