1
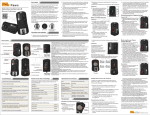
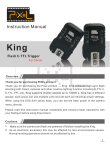
Wireless Timer Remote Control
TW-282
中国制造
PSM40 V11.01
Contents
Overview
Cautions
TW-282 introduction
The name of each part
Prepare for install and use
Install and replace the battery
Fix the receiver(TW-282RX)
Turned on/off the power
Channel Setting
Open the background light of display
Receiver connected with the camera
Shooting control
Single shooting
Continuous shooting within one sec
03
04
05
06
09
09
11
12
13
14
15
16
16
17
1
Overview
Thank you for purchasing high-performance PIXEL products
shooting
Delay shooting
Timing plan for shooting
19
20
23
First of all, thank you for purchasing product of Wireless Timer Remote Control
TW-282. The shooting ways included single shooting, continuous shooting within
one sec, BULB shooting, user-defined time-delay and timing plan for shooting.
Low consumption of LCD display will make you be clear at a glance of the using
status and using plan.
Before use this product, you must read and fully understand this manual, then
learn to use the camera to ensure you are familiar with the operation properly.
Through this manual you can easily handle the operation method and the
attentive things.
This manual is current update of 1st Feb, 2012. Please contact
to PIXEL distributor for further information, if interesting of the
combining usage with products released after this day.
2
3
TW-282 introduction
Cautions
The batteries should not install anti-polarity; Otherwise the batteries may leak
corrosive liquids, heat or explosion.
Make sure the camera and receiver (TW-282RX) are powered off before install
it.
When connected the remote cable with the device, do not pull the wires.
As this is an electronic product accessory; some of the environment causes
may affect the working. However this is hardly ever to get this situation.
This product can't be strong vibration, or may lead to product failure.
For a long time non-use, please remove the battery to prevent leakage of
corrosive liquids and damage the product.
Do not put it in high temperature, such as a closed car under direct sunlight, the
control panel and other high-temperature areas.
Keep dry, don’t use wet hand contact with the product, it must not be
immersed in water or exposed to rain, and this may lead to not work properly.
Do not use flammable and explosive gases in violation of this warning may
cause an explosion or fire.
Because this product include battery, regarding how to use battery, please
operate it strictly according to related rules, otherwise it may cause explosion,
fire or physical injury.
4
Using the wireless remote control technology to achieve shutter’s external
socket with camera for remote control .
FSK 2.4GHz wireless controls system, which more reliability and stability, 15
channels available.
Operating distance range up to 80M or above.
LCD display is showing channel, power, function mode, it's easy to understand
and operate.
Ultra-low power standby, transmitter (TW-282TX) uses 2pcs AAA batteries,
which standby time over four years; the receiver (TW-282RX) uses 3V CR-2
lithium battery, which more than 400 hours of standby time.
Different shutter connect cable can be connect with different brand cameras.
It can control multiple cameras simultaneously.
The camera can be single shooting, continuous shooting within one sec,
BULB shooting and user-defined delay and timing plan shooting.
Set the parameters for timing shooting.
3
5
The name of each part
The name of each part
Please check all included items after open the packing, if missing, please contact
the dealer.
1. Transmitter (TW-282TX) ------- 1pc
3. Shutter connect cable ---------- 1pc
4. Manual(this manual) ------------ 1pc
1
2
6
3
4
7
1
2
3
11
10
4
9
8
Receiver (TW-282RX)
6
5
6
7
8
9
10
11
Low battery voltage icon
Power button/channel
reduce button
Indicator light
Background light button/
channel increase button
Channel display screen
Battery hatch
Battery compartment
Output control signal interface
Hot shoe fixed mount
Hot shoe fixed nut
Quick release plate hol ding nut
13
9
2. Receiver (TW-282RX) ---------- 1pc
Here are the names of each part:
5
10
12
8
7
6
5
1
2
3
4
11
1
2
3
4
5
6
7
8
9
10
11
Transmitter(TW-282TX)
12
13
Background light button
Left move button
Decrement button
Release button
Setting/Enter button
Right move button
Increment button
Timing plan start/stop button
Display
Indicator light
Battery hatch
Product back sticker
Item code
7
Preparation for installation and use
The name of each part
CLDC0
Display of transmitter
9
CL- CLDC1 DC2
CLE3
CLN3
CLL1
CLS1
CL- CLUC1 CB1
10 11 12 13
1
Install and replace the battery
1
2
The transmitter(TW-282TX)
2
3
4
5
6 7 8
Display of transmitter
1
3
5
7
9
11
13
8
Before use, you should read the user manual of your camera carefully and well
understand the manipulation and functional setting. The function setting of
camera may influence this item’s efficiency control of the camera.
Timing plan function area
Function area
Continuous shooting within one sec icon
Delay shooting icon
The icon of delay time
The icon of interval time
The icon of channel
Shutter connect cable
1 Input plug
2 Shutter connect plug
2
4
6
8
10
12
Time display area
Single shooting icon
shooting icon
Low battery voltage icon
The icon of exposure time
The icon of timing shots
The low battery voltage icon[
]will twinkle or the character
become dim obvious when the power is not enough, that
means the low battery voltage has already influence the normal
work of the device, which needs to replace the battery in time.
The transmitter uses 2pcs AAA batteries; Please follow the
steps to replace the battery if needed.
1. Slide and open the battery hatch.
9
Preparation for installation and use
2. Follow the signs of positive [ + ] and negative [ - ] in the
battery compartment to install the battery correctly.
You should pay attention to the polarity of battery because of the
wrong installation will make the device work abnormally, or even
physical injury.
3. Close the battery hatch.
The receiver(TW-282RX)
TW-282RX
The low battery voltage icon[
]will twinkle when the power is
not enough, that means the low battery voltage has already
influenced the normal work of the device, which needs to
replace the battery in time. The receiver uses CR-2 lithium
battery; Please follow the steps to replace the battery if needed.
1. Slide and open the battery hatch.
2. Follow the signs of positive [+] and negative [-] in the
battery compartment to install the battery correctly.
You should pay attention to the polarity of battery because of the
wrong installation will make the device work abnormally, or even
physical injury.
3. Close the battery hatch.
10
Preparation for installation and use
Fix the receiver (TW-282RX)
Receiver can be fixed on the top of camera, rack of camera accessory or tripod.
Fix the receiver on the hot shoe of camera.
Lock hot shoe fixed nut tightly when you fix it.
Loosen hot shoe fixed nut when you remove the receiver. Do not
forcibly pull it, in order to avoid damage to the receiver and
camera.
Fix the receiver on the rack of camera accessory.
Fix the receiver on the tripod.
1. Fix the Receiver on the quick release plate through
bottom nut.
2. Attach the quick release plate on the tripod.
Make sure to fix the receiver firmly so that it will not slide.
11
Preparation for installation and use
Turned on/off the power
The transmitter(TW-282TX)
1. Press any button once, and turn on the power of transmitter.
2. The transmitter stays in the single shooting mode when you
turn on the power; timing plan and channel setting will not
be changed.
3. T h e d i s p l a y s h o w s t h e s i n g l e s h o o t i n g i c o n a n d
communication channel.
4. The transmitter without any operation (except timing plan or
implementing BULB status) will shut down automatically
after one minute.
The receiver(TW-282RX)
2s
12
1. Hold the power button for 2sec to turn on the [ POWER ]
Green LED light will be flash every 2sec and the screen
displays communication channel.
2. After turn on the power, the set timing communication
channel remain effectively.
3. The receiver does not turn off automatically. In the poweron state, press power button 2s and the receiver will be
turned off.
Preparation for installation and use
Channel setting
Channel setting for transmitter(TW-282TX)
]or right move button[
]will
1. Press left move button[
move the functional icon to the channel icon[
]. Press
2. Setting/Enter button to change the channel, you will see
the channel number is flashing.
]or decrement
3. Thought pressing increment button[
button[
] to adjust the channel number.
4. Press Setting/Enter button again to save the present channel.
Channel setting for receiver(TW-282RX)
1. Turn on the power; the channel is default as the last time
setting.
2. Press [+CH] and [CH-] button enter to channel setting,
the channel icon [CH] on the screen will be flashing.
3. [+CH] is increase the numbe, [CH-] is reduces the number.
4. P ress [+CH] and [CH-] button at same time, or no-action for
10 second, can save and exit.
* The channel of transmitter and receiver should be the same for shooting effectively.
13
Preparation for installation and use
Preparation for installation and use
Open the background light of display
Receiver connected with the camera
The transmitter(TW-282TX)
Press and hold the background light button for 2 seconds, the
background light will be turned on.
Open the background light and press the button twice each 6
seconds, the background light will keep lit.
The background light will not be close by hand; it will turn off
after 6 seconds automatically without any operation.
2s
The receiver(TW-282RX)
Press and hold the background light button for 2 seconds, the
background light will be turned on.
2s
14
Open the background light of the receiver and press the button
twice each 6 seconds, the background light will keep lit.
The background light will not be close by hand; it will turn off
after 6 seconds automatically without any operation.
1. Make sure your receiver has been installed in place and to
ensure that cameras and receivers are shut down.
2. First, insert the input plug of the shutter connect cable into
the receiver's output control signal socket in place.
The timer remote control will not be able to control the camera if the
shutter connect cable didn’t insert correctly.
3. Fix the camera on the tripod or other fixed frame. Open the
protective cover of external shutter socket and put the
shutter plug of shutter connect cable in place, then make
sure it has been fixed firmly.
For most of camera shutter socket, there is a mis-plug interface,
please note insert direction so as to avoid damage to shutter socket.
4. Turn on the receiver's power and then the camera's power.
15
Shooting control
Shooting control
Sketch map for selecting function mode:
Single shooting function
Press
Press
Press
Press
Press
Press
Continuous shooting
within one sec function
shooting function
3. Full-press the release button and transmitter will send
signal of shooting. The red indicator will light for a while, the
camera start shooting.
Delay shooting function
The instruction is under the premise that the receiver and camera have been
connected tightly, and turned on the power of camera and receiver. The detail
instruction of remote shooting will be showing as follow.
Single shooting
1. In the power-on state, set the single shooting icon [
move button[ ]or right move button[ ].
Continuous shooting within one sec
] by pressing the left
In the sleeping state, press any key to wake up transmitter to enter single shooting mode.
2. Half-press the release button and transmitter will send signal for focusing, the
green indicator will lit on the transmitter and receiver, and the camera is in the
focusing state until the release or full-press the button.
16
Make sure to set the camera function to be [
].
When the camera function is set to be[
], it may cause continuous
shooting.
It will be shooting every sec if camera is set as [ BULB ], it may cause
the problem of under or over exposure. .
When the camera function is set to be [ ], the camera will execute
delay shooting.
1. In the power-on state, move the transmitter’s activities icon to continuous shooting
within one sec icon[ ] by pressing the left move button[ ]or right move button[
].
Continuous shooting within one sec second is the firs patent function which issued by
Pixel limited Enterprise, it'll support spacing continuous shooting within one sec and
never change the single shooting mode.
17
Shooting control
Shooting control
shooting
2.
Half-press the release button and transmitter will send
signal for focusing, the green indicator will lit on the
transmitter and receiver, and the camera is in the focusing
state until the release or full-press the button.
3. Full-press the release button, red indicators of the
transmitter and receiver will be lit, keep fully press the button,
the transmitter will send signal of shooting continuously, the
indicators will blink red and green light in turn. The camera
will start to shot, and the shooting speed will be one photo per
sec.
4. Release the release button, the transmitter stop sending signal for shooting and
the camera will stop shooting.
Make sure to set the camera function to be [
].
When the camera function is set to be [
], it may cause continuous shooting.
It will be shooting every sec if camera is set as [ BULB ], it may cause the problem of under
or over exposure.
When the camera function is set to be[
18
], the camera will execute delay shooting.
1. In the power-on state, move the transmitter's activities
icon to
shooting icon[
] by pressing the left move button
[ ]or right move button[ ].
2.Half-press the release button and transmitter will send
signal for focusing, the green indicator will lit on the
transmitter and receiver, and the camera is in the focusing
state until the release or full-press the button.
3.Full-press the release button, transmitter will send BULB
signal. The red indicator of transmitter starts flashing and start
timing, the indicator of receiver will keep lighting. The transmitter continuous
output shooting signal. Camera enters into exposure shooting continuously.
4. Press the release button again, the transmitter stop sending out the BULB
shooting signal and the time also stopped on screen displays.
Make sure to set the camera function to be [
].
When the camera function is set to be [
], the camera only shoot once but not BULB
shooting.
When the camera function is set to be [
],the camera will be continuous shooting.
When the camera function is set to be [
], the camera will be delay shooting once.
19
Shooting control
Shooting control
Delay shooting
The delay shooting function of TW-282 can user-defined the delay time and shots.
Delay shooting setting
1. In the power-on state, move the transmitter’s activities
icon to delay shooting icon[
] by pressing the left move
button[
]or right move button[
]. Press the set button
entering the delay setting for adjusts the shooting numbers.
The delay shooting icon[ ],number of shooting [
]will blink
at the same time.
2. Press button[
]settings shot number can be increased,
press button [ ], settings shot number can be reduced. It can
be set between 1 to 99 sheets .
3. Press button[
]enter into the delay setting of delay
] , delay shooting time
shooting. the delay shooting icon[
value[ ]will blink at the same time.
4. Press the button[ ], set the delay time increased, press
button[
], set the delay time reduced. It can be set between
1 to 59 seconds.
20
5. After set up the new parameters, press the set button, save and exit settings.
When enter to the delay shooting set, the transmitter will save the
previous setting.
By pressing the left button[
]or right button[
], convert shooting
numbers and delay time settings.
Gently press button[ ]once to set numerical increased, hold it on,
set the value rapidly increased; Press the button[ ]once to set the
numerical reduced, hold on to set the values rapidly reduced.
Operate the delay shooting
1. Press the left button[
]or right button[
], move the
transmitter’s activity icon to the delay shooting icon[
].
2. Half-press the release button and transmitter will send
signal for focusing, the green indicator will lit on the
transmitter and receiver, and the camera is in the focusing
state until the release or full-press the button.
3. Full-press the release button, transmitter will send all the
delay shooting information to receiver, the transmitter
starts to delay countdown, and red indicator blink quickly
and enter to the delay shooting mode.
21
Shooting control
Shooting control
Timing plan for shooting
4. When countdown is completed, receiver will follow the setting shots output a
signal per second to control shooting.
5、 Before delay time planning completed, press either transmitter button or
receiver button or other , will terminate this planning.
Make sure to set the camera function to be [
].
When the camera function is set to be [
], it will start continuous shooting.
It will be shooting every sec if camera is set as [ BULB ], it may cause the problem of under
or over exposure.
When the camera function is set to be [
shooting.
], the camera will perform one or more delay
When the camera lens focus function is set to be [ M ],the camera will not execute focusing
action if half-press the release button of the transmitter.
When the camera lens focus function is set to be [ AF ], even receiving the shooting signal
the camera will not shoot at the moment as most of camera don't seize focus.
22
Delay time setting
1. In the power-on state, move the functional activities icon to
the delay timing program icon[
]by pressing the left move
button[ ]or right move button[ ].
2. Press the set button, enter the delay time for ‘second bit’
setting.
3. By pressing button[
]or[
],enter into the setting for “minutes” and “hours”, as
the sketch map.
The
shot
number
of
timing
plan
setting
Press
Press
Press
Press
Press
Press
Press
Press
Delay time of timing
plan--hours setting
Delay time of timing
plan--minutes setting
Exposu
-re
time
of
timing
plan
setting
Delay time of timing
plan--seconds setting
Gently press button[
]once to set numerical increased, hold it on, set the value rapidly
increased; Press the button[
]once to set the numerical reduced, hold on to set the
values rapidly reduced.
4. Press the set button, save and exit settings.
23
Shooting control
Shooting control
Exposure time setting
Interval time setting
1. Press left move button[
]or right move button[
],
move the transmitter’s activities icon to the exposure
timing program icon[
].
2. Press the set button, enter the delay time for ‘second
bit’ setting.
3. By pressing button[ ]or[ ],enter into the setting for “minutes” and “hours”,
as the sketch map.
Delay
time
of
timing
plan
setting
Press
Press
Press
Press
Press
Press
Press
Press
Exposure time of timing
plan--hours setting
Exposure time of timing
plan--minutes setting
Interval
time
of
timing
plan
setting
Exposure time of timing
plan--seconds setting
Gently press button[
]once to set numerical increased, hold it on, set the value rapidly
increased; Press the button[
]once to set the numerical reduced, hold on to set the
values rapidly reduced.
4. Press the set button, save and exit settings.
24
1. Press left move button[ ]or right move button[ ], move
the transmitter’s activities icon to the interval timing program
icon[
].
2. Press the set button, enter the interval time for “second bit”
setting.
3. By pressing button[ ]or[ ],enter into the setting for “minutes” and “hours”, as
the sketch map.
Exposu
-re
time
of
timing
plan
setting
Press
Press
Press
Press
Press
Press
Press
Press
Interval time of timing
plan--hours setting
Interval time of timing
plan--minutes setting
The
shot
number
of
timing
plan
setting
Interval time of timing
plan--second setting
Gently press button[
]once to set numerical increased, hold it on, set the value rapidly
increased; Press the button[
]once to set the numerical reduced, hold on to set the
values rapidly reduced.
4. Press the set button, save and exit settings.
25
Shooting control
Shooting control
Search the timing plan
The shot number setting
1. Press left move button[
]or right move button[
],
move the transmitter’s activities icon to the icon of timing
shots [
].
2. Press the setting button enter to set the number of photo
in timing plan' s, Press [
] to increase the photo number;
Press [
] to reduce the photo number. 1-99photo number
is available, when the screen display [ -- ] means this is
unlimited to take the photo.
3. By pressing button[ ]or[ ],enter into the
setting for “ exposure time” and “ delay time” ,
“interval time” as the shown picture.
Interval
time
of
timing
plan
setting
4. Press the set button, save and exit settings.
26
Press
Press
Press
Press
Delay
time
of
timing
plan
setting
1. Press left move button[ ]or right move button[ ],move transmitter’s activities
icon to timing plan icon which can check the related timing project.
2. When check the related projects, if need adjust the parameters, only press the
set button to enter the relevant project settings, press the set button again to exit
and save your setting. Move the icons sequence showed as below.
Delay
shoot
-ing
functio n
Press
Press
Press
Press
Press
Press
Press
Press
Press
Press
Delay time
Exposure time
Interval time
Singl e
shoot
-i ng
func ti on
Number of photo
Execute timing plan
1. Press the left move button[
]or right move button[
],
move the activities icon to any icon among the timing plan
shooting area.
]; transmitter
2. Press the timer plan start/stop button [
sends the information to receiver. The green light of receiver
will be flash twice every 2 sec; that' s mean the receiver is
completely to receive information and start operate correctly. Timing plan will be
working in the receiver and send the control signal to the camera.
27
Shooting control
TW-282 Specification
3.Transmitter' s screen will display the running conditions of timing plan, but it will
not send any command to the receiver. This is only showing the receiver
running conditions and for reference only.
Type : FSK 2.4 GHz wireless control system
Transmission distance:
80 meters or above
Channel:
15 channels
Standby time: Transmitter : more than 4 years(using two 1.5V AAA batteries)
Receiver :
400 hours (using CR-2 lithium battery)
Transmitter: 149mm×49.5mm×24mm
Dimensions (W ×H ×D) :
Press the timing plan start/stop button[ ]of the transmitter before the timing plan executing
completely, the transmitter and receiver will stop regularly scheduled executing.
When the timing plan is running on the receiver, press any button of receiver to stop the
operation.
The following examples illustrate the timing plan running: delay time[
]=5
seconds, exposure time[
] = 1 second, shooting interval[
]= 6 seconds,
shooting number[
] = 3.
N=1
N=2
Receiver:
63mm×38mm×31mm
Transmitte: 70.5 g
39.5 g
Receiver:
N=3
Now you can start to use unique high-performance Wireless Timer
Remote Control TW-282. If you have any questions, you can contact
Shooting
output
the local distributor. Or visit the website http://www.pixelhk.com.
Focusing
output
0
28
Weight ( with ba ttery):
1
2
3
4
5
6
7
8 9 10 11 12 13 14 15 16 17 18 19 20 21 22 23
29