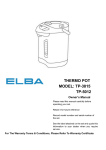
1
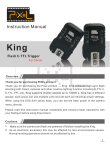
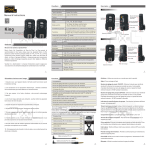
New
Opas
Transceiver
Instruction Manual
Use Instruction: Set the Opas on the Flash as RX mode
while the one on the Camera Hot Shoe as TX mode. The
new version is compatible with the old version but the
Opas on the Camera Hot Shoe must be an old version.
Overview
Thank you so much for purchasing PIXEL product -- Opas. Opas is a professional grouping flash
transceiver which can be activated off-camera
trigger, off-camera flash group control and shutter
remote shooting. Opas also activate the camera
shooting and flash trigger together. Opas is using
global free FSK 2.4GHz which is more stabilized.
Caution
1. Make sure the camera and flash are powered off
before installing the Opas.
2. As an electronic accessory this may be affected
by rare environmental causes. Normal working
operations should not be affected by this.
3. Drops or shocks will lead to product failure.
4. When not in use for long durations, please
turned off the transmitter and the receiver's
power and remove the battery.
5. The batteries should be installed correctly.
Reverse polarity may cause batteries to leak
corrosive liquids, heat or explosion.
6. When connecting the cable with the device, do
not pull directly on the wires.
7. Do not store in a high temperature, such as an
enclosed car under direct sunlight, the
dashboard and other high-temperature areas.
8. Keep dry, do not contact wet hands with the
product. Do not immerse in water or exposed to
rain as this may lead to failure of the device.
9. Do not use near flammable gases. Failure to
follow this warning may cause explosion or fire.
10. This product includes batteries; please strictly
follow the instruction for proper operation.
Failure to follow this may cause explosions, fire
or personal injury.
Name of each part
For Nikon
For Canon
Hot Shoe
PC Socket
Group Button
Group Indicator
Channel Switch
Indicator light
For Nikon
Test/Shutter
Button
USB Socket
3.5mm Socket
For Canon
Hot Shoe
Trigger Pin
Name of each part:
Antenna: Soldered RF external antenna
Eyelet: Use the Strap to hold the device
Test/Shutter Button: Flash power test or 2steps
shutter remote
Channel Switch: 4 different channels for
communication
Antenna
Eyelet
1/4
Screw
Nut
Mode Switch
Power Switch
Mounting Foot
Battery
Compartment
Indicator Light: Power, wireless communication or
command indicator.
Battery Compartment: Compartment for 2pcs AA
battery.
1/4 Screw Nut: Suitable to attach on tripod or screw
PC Socket: No function when the device is
transmitter mode; output signal with the device is
receiver mode.
Group Button: 3 individual buttons for group
A/B/C.
Power Switch: The device is turned off when
switch to [
]; the device is turned on when switch
to [
]。
Hot Shoe Trigger Pin: If connected on the camera
hot shoe, that will be a transmitter mode.
3.5mm Socket: Using for control the shutter or
studio light.
USB Socket: Upgrade firmware or DC 5V power
input.
Mode Switch: Mode option , Switch to TX mode
when the device install on the camera . Switch to
RX mode when the device insert to the lights .
Included items
Please check the package and make sure the
below items are already in the box. If there's
missed anything, please contact with the distributor
directly.
Opas Transceiver
1PC
Bag
1PC
Hot Shoe Protector
1PC
Strap
1PC
Instruction Manual
1PC
DL-3.5 Cable
1PC
DL-1/4 Cable
1PC
For Canon
DL-E3 Cable
DL-N3 Cable
1PC
1PC
For Nikon
DL-DC0 Cable
DL-DC2 Cable
1PC
1PC
Basic function
Trigger the speedlite
Trigger the studio light, out door light
Camera shutter control
Master camera control the slave camera shooting
Press the flash attached receiver button to
activate shutter control and flash trigger together.
PC socket for trigger speedlite, studio and out door light.
USB socket for power supply, shutter or flash
trigger signal. For using those function mu st
be under receiver mode
3.5mm socket for shutter or flash trigger signal.
Using with all AA type battery
Support 1/4 screw nut holding or Strap holding.
Ultra long distance range up to 400m.
Compatible with high voltage flash or studio light.
FSK 2.4GHz wireless system which qualified
CE/FCC/NCC…etc.
Specification
Mode
Digital FSK 2.4GHz
Function
Mode
Manual trigger , shoot
Distance
Range
up to 400M
Shutter Sync
Speed
1/320S*(Sync speed may have
little inaccuracy as different
camera model)
Compatible
Camera
Canon、Nikon
Compatible
Flash
Canon/Nikon/Metz/Sigma/
Sunpak/Nissin flash and studio
light
Battery Type
AA x 2pcs (or DC 5V)
Shutter Mode
Single shoot
Channel
4
Group
3
Trigger
Method
Hot shoe
Standby
400Hrs (2pcs 1.2V 2400mAH
rechargeable battery)
Holding
Method
Tripod screw nut, hot shoe foot,
rope
Description
Below operation is after installed battery.
Channel setting: Transmitter and receiver must be
the same channel for operation.
Test/Shutter Button: Press the test button on
transmitter side to test the receiver side flash.
Press the button on receiver side to activate flash
and shutter signal.
Signal Indicator Light: When the indicator shown
as blue which means is sending or receiving data;
when the indicator shown as red which means is
stand-by mode.
Group Indicator Light: When the indicator is on
which means is under operation at current group.
When A light flashes, it means device failure.
Low power status:Group Indicator B flashes once
at a internval of 1 second means low power.
3.5mm Socket: Output signal is same as USB
socket which support shutter control and flash
Prepare to use
Battery installation
Follow the battery sign [ + ] and [ - ] in the battery
compartment
AA
AA +
+
-
-
Turn on power
Opas power switch is a 2steps switch.
Slide to [ ] to turn off; slide to [ ] to
turn on.
Channel Setting
1. Slide the channel switch to change channel
2. Channel change as follow: CH1 → CH2 → CH3 → Ch4
CH1
CH2
CH3
CH4
* 2 transceivers must be set as the same
channel .
CH1
Transceiver 1
CH1
Transceiver 2
CH1
CH2
Transceiver 1
Transceiver 2
When Opas is using with King, the channel is
corresponded with:
CH1=L1 CH2=L2 CH3=L3 CH4=L2+L3
Group setting
1. When receiving the signal, the device will be
waken up and shown the valid group.
2. Press [Group Button] to on/off the group.
3. Valid Group: A/B/C/A.B/A.C/C.B/A.B.C.
* When A/B/C indicator light is on which mean the
transmitter is synchronizing the receiver.
Testing:
1.Check the power.
2.Check 2 transceivers are on the same channel
3.Check the receiver device is covered within
transmitter device group
Test the transceiver receiver mode as below.
The device on flash should set to RX mode.
Device Connection
Receiver Installation
PC
1 2 3 4
1
1
2
1) Attach the quick release plate on the transceiver
1/4 screw nut.
PC
1 2 3 4
2
2) Quick release plate attach on tripod ball head.
Connect the Transceiver to Hot Shoe
1. Release the transceiver mounting foot.
2. Plug the transceiver on the camera hot shoe.
3. Tight and lock the mounting foot on camera
hot shoe.
The device on camera should set to TX mode.
Connect the transceiver to camera via
3.5mm cable.
The device on camera should set to TX mode.
1. Plug the 3.5mm cable
into transmitter 3.5mm
socket.
2. Plug the 3.5mm cable
to camera shutter
release socket.
The shutter cable has various models to match
with different camera.
Connect the transceiver with speedlite
1. Unlock the Speedlite locking screw
2. Insert the Speedlite onto the
transceiver hot shoe socket as figure.
3. Use the flashes locking method to lock onto
the transceiver.
4. The device on flash should set to RX mode.
Connect the transceiver with studio light
1. Fix the transceiver on
the holder.
2. According to use the
DL-3.5 or DL-1/4 on the
studio light socket.
3. Insert 3.5mm plug into
receiver 3.5mm output
socket.
4. Insert the other plug
side to the studio light
socket.
The device on flash
should set to RX mode.
Figure Explanation
Press the button (on flash side transceiver) to
activate camera shooting; in the mean time,
flash and shutter are synchronized.
The device on flash should
set to RX mode.
The device on camera
should set to TX mode.
*The same group cannot be set on two RX, otherwise, the two
lights cannot synchronized.
Flash grouping trigger
The device install on the camera is transmitter ,
the device insert to the flash is receiver .
Receiver A、 B、 C will operate when transmitter set at A、 B、 C.
Receiver A、B will operate when transmitter set at A、B.
Receiver B will operate when transmitter set at B.
Receiver A will operate when transmitter set at A.
Off-camera flash trigger
Transceiver attaches on camera hot shoe to trigger
the off-camera flash.
Set the device as RX mode
Set the device as TX mode
Off-camera studio light
Set the device as TX mode
Set the device as RX mode
Off-camera speedlite
Shooting Control
Remote Shooting
Set the device as RX mode
Set the device as TX mode
Press shutter button to activate camera shooting
* Make sure set the lens as MF mode.
Master camera control the slave camera
Transceiver 1
Set the device as RX mode
Slave Camera
Transceiver 2
Set the device as TX mode
Master Camera
Half press release button of master camera, the
main-control camera and all slave cameras will
focus; fully press to activate all cameras shooting.
Caution
1. As camera response times can vary a little, there
may be a slight delay between the cameras
shooting. (or firing instead of shooting)
2. If cannot find the focus point; camera will not
shoot even receiving the shooting signal. At this
moment you should change the focus mode into
manual mode “MF”.
3. If not using the specific transmitter, the slave
camera cannot activate focus mode.
Thank you for purchasing PIXEL product and read
this instruction manual carefully. If you have any
question please kindly to contact our local dealer
or visit to http://www.pixelhk.com
The information updated at 1st March ,2012.
Please contact the PIXEL reseller to get the
information if you want to use this product
combined with other latest product, which
published after this date.
PSM48 V20.01