1
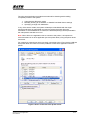
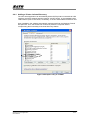
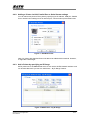
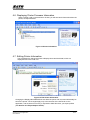
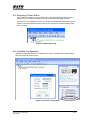
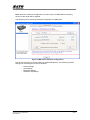
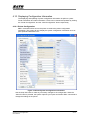
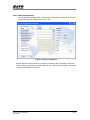
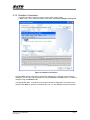
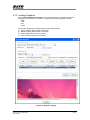
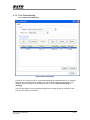
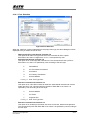
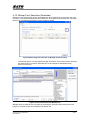
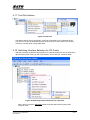
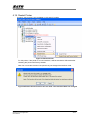
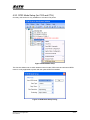
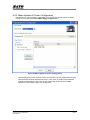
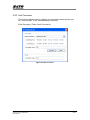
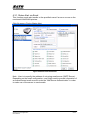
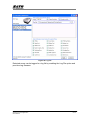
User Manual
SATO All-In-One Printer Control Application
Read this User Manual before and during usage of the above product.
Keep this document handy for future reference.
SATO All-In-One Application
User Manual
1-53
Software License Agreement
PLEASE READ THE FOLLOWING TERMS AND CONDITIONS
BEFORE USING THIS PRODUCT. BY INSTALLING THE
PRODUCT YOU THEREBY INDICATE YOUR ACCEPTANCE OF
THESE TERMS AND CONDITIONS. SHOULD YOU DISAGREE
WITH ANY OF THE TERMS OR CONDITIONS LISTED BELOW,
PROMPTLY REMOVE ALL FILES RELATED TO THIS PRODUCT
FROM YOUR HOST PLATFORM AND RETURN THE PRODUCT
TO SATO CORPORATION.
1.
9.
SATO Corporation warrants that for ninety (90) days after
delivery, the Software will perform in accordance with
specifications published by SATO Corporation, and that the
distribution media will be free from defects in material and
workmanship. SATO Corporation does not warrant that the
Software is free from all bugs, errors and omissions.
10.
Your exclusive remedy and the sole liability of SATO
Corporation in connection with the Software is replacement
You explicitly agree to accept a non-exclusive license to use
of defective distribution media upon their return to SATO
the Software identified on the distribution media solely for your
Corporation. SATO Corporation will not be liable for any loss
own customary business or personal purposes. Your local
or damage caused by delays in furnishing a Software Product
and national laws govern this Agreement.
2.
or any other performance under this Agreement.
Henceforth, “Software” shall refer to the digitally encoded,
SATO Corporation does not warrant that the functions contained in
machine-readable data and program. The term “Software
the Software will meet your requirements or that the operation of
Product” includes the Software identified on the distribution
the Software will be uninterrupted or error free.
media, including any accompanying documentation. The
term “Distribution Media” refers to any method by which the
3.
4.
not limited to Floppy Disks, CD-ROM, Magnetic Tape and
country, such as the Rights in Technical Data and Computer
On-Line distribution via the Internet. The Software Product is
licensed (not sold) to you, and SATO® either owns or
Software clause at FAR 242.227- 7013, subdivision (b) (3) (ii)
licenses from other vendors who own all copyright, trade
duplication or disclosure is subject to restrictions applicable to
secret, patent and other proprietary rights in the Software
restricted rights software as set forth in FAR 52.227-19 (c) (2)
Product.
or equivalent rules.
agree to maintain the Software Product and other proprietary
THE PARTIES AGREE THAT ALL OTHER WARRANTIES,
information concerning the Software Product in strict
EXPRESS OR IMPLIED, INCLUDING WARRANTIES OF
confidence and to establish reasonable procedures regulating
FITNESS FOR A PARTICULAR PURPOSE AND
access to and use of the software.
MERCHANTABILITY ARE EXCLUDED.
You agree not to duplicate or copy the Software except that you
SATO Corporation reserves the right to make changes and/or
may make one backup copy. You agree that any such copy
improvements in the Software without notice at any time.
LOST PROFITS, LOST DATA, BUSINESS INTERRUPTIONS
OR ANY OTHER DIRECT, INDIRECT, INCIDENTAL OR
or any portion of the Software Product separate from the
CONSEQUENTIAL DAMAGES ARISING OUT OF THE USE
printer(s), without the prior written consent of SATO
OF OR INABILITY TO USE THIS PRODUCT, EVEN IF SATO
Corporation.
CORPORATION HAS BEEN ADVISED OF THE POSSIBILITY
You may not modify or prepare derivative works of the
Product over a network, by telephone, or electronically
using any means; or reverse engineer, decompile or
disassemble the Software.
You may transfer the Software Product with the printer(s), but
only if the recipient agrees to accept the terms and conditions
of this Agreement. Your license is automatically terminated if
you transfer the Software Product and printer(s).
8.
IN NO EVENT WILL SATO CORPORATION BE LIABLE FOR
You shall not sub-license, sell, lease, or otherwise transfer all
Software Product. You may not transmit the Software
7.
or subparagraph (c) (1) (ii), as appropriate. Further use,
To protect the proprietary rights of SATO Corporation, you
on the original.
6.
Use, duplication or disclosure by the Government is subject
to restrictions as set forth in the relevant guidelines of your
shall contain the same proprietary notices as those appearing
5.
11.
Software Product is delivered to the end user, including but
OF SUCH DAMAGES, OR ANY DAMAGES CAUSED BY
ABUSE OR MANIPULATION OF THE SOFTWARE. SOME
STATES DO NOT ALLOW THE EXCLUSION OR LIMITATION
OF LIABILITY FOR CONSEQUENTIAL OR INCIDENTAL
DAMAGES, SO THE ABOVE LIMITATION MAY NOT APPLY
TO YOU.
YOU ACKNOWLEDGE THAT YOU HAVE READ THIS
AGREEMENT, UNDERSTAND IT, AND AGREE TO BE BOUND
BY ITS TERMS AND CONDITIONS. NEITHER PARTY SHALL BE
This License remains in force until terminated, and may be
BOUND BY ANY STATEMENT OR REPRESENTATION NOT
terminated by agreement between you and SATO
CONTAINED IN THIS AGREEMENT. NO CHANGE IN THIS
Corporation, or by SATO Corporation, if you fail to comply with
AGREEMENT IS EFFECTIVE UNLESS WRITTEN AND SIGNED
the terms of this License if such failure is not corrected within
BY PROPERLY AUTHORIZED REPRESENTATIVES OF EACH
thirty (30) days after notice. When this License is terminated,
PARTY. BY INSTALLING THIS SOFTWARE PRODUCT, YOU
you shall either return to the place you obtained them from, or
AGREE TO ACCEPT THE TERMS AND-CONDITIONS OF THIS
destroy, the printer and all copies of the Software and
AGREEMENT.
documentation.
SATO All-In-One Application
User Manual
2-53
Copyrights
The contents of this document are proprietary information of SATO Corporation and/or its
subsidiaries in Japan, the U.S and other countries. No part of this document may be
reproduced, copied, translated or incorporated in any other material in any form or by any
means, whether manual, graphic, electronic, mechanical or otherwise, without the prior
written consent of SATO Corporation.
SATO Corporation and/or its subsidiaries in Japan, the U.S and other countries make no
representations or warranties of any kind regarding this material, including, but not limited
to, implied warranties of merchantability and fitness for a particular purpose. SATO
Corporation shall not be held responsible for errors contained herein or any omissions
from this material or for any damages, whether direct, indirect, incidental or consequential,
in connection with the furnishing, distribution, performance or use of this material.
SATO Corporation reserves the right to make changes and/or improvements in this
product and document without notice at any time.
Trademarks
SATO is a registered trademark of SATO Corporation and/or its subsidiaries in Japan, the U.S
and other countries.
AIX is a registered trademark of International Business Machines Corporation.
Cisco is a registered trademark of Cisco Systems, Inc.
EPSON is a registered trademark of Seiko Epson Corporation. J2SE, Java, and Solaris are
trademarks of Sys Microsystems, Inc.
Linux is a registered trademark of Linus Torvalds.
Microsoft and Windows are registered trademarks of Microsoft Corporation.
Pentium is a registered trademark of Intel Corporation.
Unix is a registered trademark of UNIX System Laboratories, Inc.
Software updating disclaimer
While all efforts have been taken to ensure accuracy and currency of the information
contained herein, there are instances where the contents of this document may be
outdated. In that case, proceed to SATO worldwide websites (www.satoworldwide.com)
to check whether an updated document has been made available for your reference.
Alternatively, you can consult your nearest authorized SATO technical representative, as
listed on the back cover, to obtain the relevant information about SATO All-In-One
Software.
Version 1.0.37.0
© 2010 SATO Corporation. All rights reserved.
SATO All-In-One Application
User Manual
3-53
Table of Contents
Table of Contents.......................................................................................... 4
1. Overview .................................................................................................. 6
1.1.
Supported Models of SATO Printers .............................................. 6
2. System Requirements ............................................................................ 7
3. Setup ........................................................................................................ 8
4. Using the All-In-One Application......................................................... 12
4.1.
4.2.
4.3.
4.4.
4.5.
4.6.
4.7.
4.8.
4.9.
4.10.
4.11.
4.12.
4.13.
4.14.
4.15.
4.16.
4.17.
4.18.
4.19.
4.20.
4.21.
4.22.
Overview....................................................................................... 12
Summarized Features List............................................................ 12
Multi-Lingual Support.................................................................... 13
Adding a Printer............................................................................ 13
4.4.1. Adding a Printer via Auto-Discovery ................................ 15
4.4.2. Adding a Printer via LAN, Parallel Port or Serial Comm
settings ............................................................................. 16
4.4.3. Add a Printer by specifying an IP Range ......................... 16
Navigating the Treeview ............................................................... 17
4.5.1. Creating folders ................................................................ 17
4.5.2. Renaming folders ............................................................. 17
4.5.3. Relocating printers via Drag-and-Drop ............................ 17
Displaying Printer Firmware Information ...................................... 18
Editing Printer Information ............................................................ 18
Enquiring Printer Status................................................................ 19
Interface Configuration ................................................................. 19
Displaying Configuration Information ........................................... 21
4.10.1. Printer Configuration ........................................................ 21
4.10.2. Label Configuration .......................................................... 22
Export/Import Profile..................................................................... 23
Graphics Conversion .................................................................... 24
Loading Graphics ......................................................................... 25
4.13.1. Dithering Effect................................................................. 26
Font Downloading......................................................................... 27
4.14.1. Font Selection .................................................................. 28
Bitmap Font (fixed size) Download............................................... 30
Firmware Download...................................................................... 31
4.16.1. MB200i and MB400i......................................................... 31
4.16.2. CL, CG, CT, LM, S84 and GT .......................................... 32
4.16.3. GL ................................................................................ 36
Test Print feature .......................................................................... 37
Switching Interface Selection for CG Printer ................................ 37
Restart Printer .............................................................................. 38
RFID Mode Setup (for CG2 and CT4i) ......................................... 39
Sending Printer Command Strings............................................... 40
Saving and Applying Printer Profiles ............................................ 40
SATO All-In-One Application
User Manual
4-53
4.23.
4.24.
4.25.
4.26.
4.27.
4.28.
4.29.
4.30.
4.31.
Mass Update of Printer Configuration .......................................... 42
Application Configuration.............................................................. 43
Configuration of Network Interface Card ...................................... 44
Check for Newer Version of Application....................................... 45
Changing Communication Protocol of GL4 .................................. 46
Send SBPL Print File to Printer Driver ......................................... 47
IP Assignment .............................................................................. 48
Unit Convertor .............................................................................. 49
Status Alert via Email ................................................................... 50
5. Planned Features .................................................................................. 52
SATO All-In-One Application
User Manual
5-53
Overview
1
The SATO All-In-One application for printer remote control was developed to achieve the
following goals:
-
To simplify the SATO printer configuration and operation processes for end-users
To allow remote configuration and control of SATO printers that are compatible with this
application
To consolidate as many of the separate software printer utilities as possible into a
integrated application
1.1. Supported Models of SATO Printers
Currently only the following models of SATO printers are supported by the current version of
the SATO All-In-One application:
-
CL4e/CL6e Series
CG2/CG4 Series
GT4e Series
GL4e Series
M-10e
MB2i / MB4i
M84SE Series
M84 Pro Series
CT4i Series
LM Series (step 2)
S84 Series
DR308e
LM4 Series
LT408
D5xx Series
The SATO All-In-One application will be undergoing continual refinement, and it is expected
that other SATO printer models will be supported in future, in line with customer demand.
SATO All-In-One Application
User Manual
6-53
System
Requirements
The minimum system requirements for the SATO All-In-One Application are
♦
♦
♦
2
A computer with at least a 450MHz Pentium® CPU with 128 MB of RAM, running
Windows 2000, Windows XP, Windows Server 2003 or Windows Vista platforms.
Installed .NET Framework 2.0 (or higher version)
At least one supported model of SATO printer that can connect to the computer
running this application
Standard SBPL commands are sent to SATO printers to update configuration settings or to
retrieve data. The data will then be presented in a meaningful and graphical interface for the
software user.
All-In-One
Application
User
- Communicate with
printers using
TCP/IP, USB, LPT
or RS232 with SBPL
- The complexities
of configuration
and SBPL
commands are
hidden from users
- Handle all different
commands and
operational
parameters among
the various printer
models
- User will see a
unified approach
to configure and
administrate
various models of
SATO printers.
- Present control
information in a
friendly graphical
user interface
Figure 1 System Overview
Currently, SATO All-In-One Application does not require a database system. The only
scenario where persistent data is needed is during the exporting of application profile into
XML files.
SATO All-In-One Application
User Manual
7-53
3
Setup
After obtaining the installation software, double click on the setup file to install the application.
Figure 2 Setup screen
SATO All-In-One Application
User Manual
8-53
Figure 3 License Agreement
In order to have access to the “Next” button to proceed with the installation, the user must
agree with the License Agreement by clicking on the “I Agree” radio button.
SATO All-In-One Application
User Manual
9-53
Figure 4 Installation folder
Figure 5 Confirmation
Click the “Next” button to start the installation.
SATO All-In-One Application
User Manual
10-53
Figure 6 Installation in progress
Figure 7 Installation Complete
The program can then be launched from the Start Button->All Programs->SATO->SATO AllIn-One Application program group.
SATO All-In-One Application
User Manual
11-53
4
Using the All-InOne Application
4.1. Overview
The SATO All-In-One Application works on the following paradigm:
IEEE1284/
RS-232C
LAN/ WLAN
1
USB
CONNECT
Link to supported
printer(s) via AutoDiscovery or via
manual entry
2
ORGANIZE
Use the graphical treeview
structure to organize connected
printers into groups using
custom folders & display names.
3
CONTROL
Configure/control
any SATO printer
regardless of its
location in the world.
SATO All-In-One Application
User Manual
CT4xxi
S84xx
DR308e
CG2/4
LT408
D500/12
9
10
11
12
13
14
15
16
M84xxSE
8
MB2/4xxi
6
7
M-10e
4
5
GL4xxe
3
Auto-Discovery
Saving and loading Printer
Configuration
Displaying and setting of Printer
Configuration
Firmware Download
Concurrent download firmware to
multiple printers
Send and query SBPL command
True Type Font Download
(Expanded Memory/Cartridge)
Graphics Download
Supported Interface
LAN
RS232c
IEEE1284 Parallel Port
USB
Test Print
LAN Interface Card Configuration
Format Download to Keypad
Bitmap Font Download (Internal
Memory)
GT4xxe
1
2
LM4xxe
Feature
CL4/6xxe
4.2. Summarized Features List
O
O
O
O
O
O
O
O
O
O
X
O
O
O
O
O
O
O
O
O
O
O
O
O
O
O
O
O
O
O
O
O
O
O
O
O
O
O
O
O
O
O
O
O
O
O
O
O
O
O
X
O
O
O
O
O
O
O
O
O
O
O
O
O
O
O
O
O
X
O
O
O
O
O
X
O
X
O
X
O
X
O
O
O
X
O
X
O
X
O
X
O
O
O
O
O
X
O
O
O
O
O
O
O
O
O
O
O
O
O
X
O
O
O
O
O
O
O
X
O
O
O
O
O
O
O
X
O
O
O
O
O
O
O
X
X
O
O
O
O
O
O
X
O
O
O
X
O
O
X
X
O
O
O
O
O
O
O
X
O
O
O
O
O
O
O
X
O
O
O
O
O
O
O
X
O
O
O
O
O
O
O
O
O
O
O
O
O
O
O
O
O
O
O
O
O
O
O
X
O
O
O
O
O
O
O
X
O
12-53
Note: For troubleshooting purposes, SATO All-In-One Application generates a log file to
capture important debugging information such as error codes. By default, the log file is
created at c:\ directory and the file name is SATO_All-in-one.log.
The default directory can be changed from the dialog box in Option->Preferences. Refer
to Section 4.24 Application Configuration for details.
When reporting bugs or problems, copy the log file to the systems support team.
The default directory can be changed from the dialog box in Option->Preferences. Refer
to Section 4.24 Application Configuration for details.
4.3. Multi-Lingual Support
Figure 8 Multi-Lingua Support
This version of All-In-One tool supports English and Traditional/Simplified Chinese.
User can change the language setting at the Options->Preferences.
4.4. Adding a Printer
Only SATO printers, specifically those supported by this All-In-One application, can be
detected and added. Currently, the following interfaces are supported:
♦
♦
♦
♦
LAN (Wired and Wireless, TCP/IP)
Serial Communication (RS232c)
Parallel Port (IEEE 1284)
USB (Plug & Play)
For printers using SILEX Network Interface card (such as GT and CL), it is
necessary to use the SILEX firmware which supports bi-directional communications
on port 9100, i.e., version A1.2.3 and above.
* For SAI-SILEX firmware, it is necessary to add the printer with Port no.: 1024.
SATO All-In-One Application
User Manual
13-53
The All-In-One Application provides three methods for detecting and/or adding
compatible printers to the system:
1.
2.
3.
Using the Auto-Discovery mode
Manually entering an IP Address, or Parallel Port/Serial Comm settings
Specifying a range of IP Addresses
In any of the above modes, the system will attempt to handshake with the target
printer(s) and issue an appropriate command to retrieve the printer firmware
information. If the handshake is successful, the detected printer(s) will be presented in
the main panel’s treeview as an icon.
Note: When All-In-One Application tries to connect to the printer, it is important to
ensure that there is no other application (such as printer driver) using the printer at the
same time.
For example, a printer driver which is actively connecting to the CT412i via the USB port
with printer driver will cause connection problems to All-In-One Application with this
printer.
Figure 9 Active connection from printer driver
SATO All-In-One Application
User Manual
14-53
4.4.1. Adding a Printer via Auto-Discovery
The All-In-One Application can automatically detect SATO printers connected via USB
interface, the SILEX network interface card (CL and GT series), or the standard built-in
LAN interface (new CT4xxi series, CG Series), or the GL Series Network Interface card.
Upon installation, the software automatically registers itself into the Windows Firewall
Exception list. Thus, the firewall can continue to protect the computer without
compromising the functionality of the Auto-Discovery feature.
Figure 10 Exception entry in FireWall
SATO All-In-One Application
User Manual
15-53
4.4.2. Adding a Printer via LAN, Parallel Port or Serial Comm settings
You can add a new printer to the system by specifying its IP Address, USB port, Parallel
Port or Serial Comm settings such as network port, communication port and baud rate.
Figure 11 Add New Printer
Note: GL printer with Standard Protocol is able to be added with this method. However,
it might take a little longer.
4.4.3. Add a Printer by specifying an IP Range
SATO printers such as MB200i/400i which do not use the SILEX Network Interface card
can be auto-detected if you use the “Add Printer – By IP Range” feature.
Figure 12 Add Printer - By IP Range
SATO All-In-One Application
User Manual
16-53
It takes the application approximately one second to probe each IP address in the IP
range to determine whether it is a SATO printer (by checking the vendor code in the MAC
address). Thus, if you specify a wide IP range, the application may take an unacceptably
long time to complete the task. Therefore, a “Cancel” button is provided to allow you to
cancel the operation.
4.5. Navigating the Treeview
After all target SATO printers have been successfully detected or registered into the
application, they will appear in a Tree view as icons (See Figure 12 below) representing a
Node. You can manage the nodes in this view (hereafter called the treeview) in various
ways, as follows.
Nodes
Figure 13 Treeview
4.5.1. Creating folders
By default, detected printers will populate the treeview as nodes at the root. However,
just as with any standard treeview in Windows Explorer, you can also create your own
folders in the root, and then drag-and-drop any registered printer to and from any folder
or root area.
By creating folders, you can organize connected printers into groups meeting particular
criteria such as “all GL printers on the Production Floor” or “All compact printers in the
Packaging Dept” . You can then control printers in that group more conveniently rather
than individually select different printers when needed.
The only limitation is that your custom folders must contain a non-blank name, and the
folder name cannot be “root” or “main”. Also, within the same level, the same folder
name cannot be repeated.
4.5.2. Renaming folders
The folder name and the “display” of the printer can be renamed on the treeview. Click
on the folder name and wait for the text editing cursor to appear, then type the new
name.
4.5.3. Relocating printers via Drag-and-Drop
A node icon can be moved in and out of the root area or folders easily. Just make sure
the source and target locations are visible, then drag the icon and drop it in the target
location.
SATO All-In-One Application
User Manual
17-53
4.6. Displaying Printer Firmware Information
When a printer node on the treeview is clicked, you will see basic information about the
printer, as depicted below.
Figure 14 Printer Information
4.7. Editing Printer Information
You are allowed to change the printer’s Display Name and the Model, which are
displayed next to the node icon.
Figure 15 Edit Printer Information
Changing the Display Name/Model does not affect the printer. No command will actually be
sent to the printer. The changes apply only to the treeview of the SATO All-In-One
application, and are stored in memory or exported to XML files when you export profiles
(See Section 4.11 Export/Import Profile).
SATO All-In-One Application
User Manual
18-53
4.8. Enquiring Printer Status
For printers connected by LAN, the SATO All-In-One application periodically sends a
status-probing command and display the printer status for monitoring purposes.
This feature is not available to printers connected via Parallel Port and RS-232. This is
based on the assumption that local printers (non LAN) can be monitored locally rather
than via remote.
Figure 16 Status Monitoring
4.9. Interface Configuration
Interface Configuration feature is available for CT, MB, CG printers and e-series models
that connected with LAN interface.
Figure 17 Interface Configuration
SATO All-In-One Application
User Manual
19-53
Note: When the “Interface Configuration” window is open, the ENQ Status monitoring
function of the printer will be stopped.
The following picture shows the Interface Configuration for MB printer:
Figure 18 MB-series Interface Configuration
This function supports concurrent setting to multiple MB printers. The following interface
settings can be configured on this functionality:
-
RS232 settings
IrDA settings
Bluetooth settings
Wireless LAN settings
SATO All-In-One Application
User Manual
20-53
4.10. Displaying Configuration Information
The displaying and updating of printer configuration information is split into 2 parts:
Printer information and Label information. These can be viewed and updated by clicking
the “Printer Configuration” and the “Label Configuration” button respectively.
4.10.1. Printer Configuration
SBPL commands will be sent to the printer to retrieve the printer configuration
information. The screen will only display the system configuration Information such as
print speed and darkness level.
Figure 19 Printer System Configuration Information
Use the drop-down lists to make any necessary changes to the configuration. When the
“Submit” button is pressed, the system captures your inputs and issues SBPL commands to
change the settings in the printer.
SATO All-In-One Application
User Manual
21-53
4.10.2. Label Configuration
The remaining configuration data contains label configuration information. The unit of
measurement will be changed from “dot” to “mm”.
Figure 20 Label Configuration
Use the drop-down lists to make any necessary changes to the configuration. When the
“Submit” button is pressed, the system captures your inputs and issues SBPL commands
to change the settings in the printer.
SATO All-In-One Application
User Manual
22-53
4.11. Export/Import Profile
The effort and time required to populate the application’s treeview with the correct
printers and folders, need not be repeated every time you start the All-In-One
application. By saving the “profile” of already detected printers into a file (in XML format),
the application will not normally need to auto-detect printers on the network again, unless
you force the software to do so.
The profile can also be exported to other computers connected to the same printers, so
that the same treeview information can be restored without delay.
The following information is captured in the XML profile file:
- Folder Information
- Name
- Tree Level
- Printer type
- Name
- Model
- DisplayName
- Firmware Version
- Folder Name
- Interface Type
- IP Address
- Mac Address
- Port
- Baud rate
- Parity
- DataBits
- StopBit
- HandShake
- PortName
Click File->Export Profile or File->Import Profile to download or upload the printer
configuration profiles.
SATO All-In-One Application
User Manual
23-53
4.12. Graphics Conversion
This utility provides conversion functions from raster graphics files
(*.BMP;*.GIF;*.JPG;*.PNG) into SBPL commands. Click Tools->Graphic Conversion.
Figure 21 Graphics Conversion
Click the Open button to browse for the desired graphics file. A preview of the file will be
displayed. You can also edit the graphic by using the Stretch or Center button, or reset the
changes using the Normal button.
The appropriate SBPL commands for printing the file will be displayed in the bottom-most
window. Click Save to save the commands into a file, or click Close to end the conversion.
SATO All-In-One Application
User Manual
24-53
4.13. Loading Graphics
Click Tools->Graphics Download. This function allows you to upload and store the
graphics into the memory of a printer. It supports the following graphics formats:
- BMP
- JPG
- GIF
- PNG
The function supports the following types of uploading formats:
1) SATO Graphics (ESC+GR/GI command)
2) Bitmap Images (ESC+GT/GC command)
3) PCX Images (ESC+PI/PY command)
4) Logo in Internal Flash (FD command)
Figure 22 Graphics loading
SATO All-In-One Application
User Manual
25-53
4.13.1. Dithering Effect
For Bitmap and PCX files, the Dithering effect feature is available to allow downloading
of graphics with color fading effects.
Figure 23 Dithering Effect
SATO All-In-One Application
User Manual
26-53
4.14. Font Downloading
Click Tools->Font Download.
Figure 24 Font Download
Full set of True Type Font (TTF) can be downloaded to the extended memory or cartridge.
Whereas only selected size font (bitmap font) can be downloaded to internal flash. The
following shows the steps of downloading full set of TTF into extended memory or
cartridge.
The Font information can be reused and applied onto another printer by using the “Load
List” and the “Save List” functions.
SATO All-In-One Application
User Manual
27-53
4.14.1. Font Selection
Figure 25 Font Selection
When the “Add Font” option is selected from the popup-menu (5), the above dialog box will be
displayed to let you select the font to load.
-
Without specifying international character set
This option is for User TrueType Font load. The command will have a prefix
ESC+RD<x>00, where x ranges from ‘u’ to ‘z’, to be specified by user.
Standard international character set
This option is for Code Page 850 character set. The command will have a prefix of
ESC+RD<x>10, where x is specified by user according to the font style:
F
FuturaIIBook
G
CG Triumvirate Condensed
P
CG Palacio
S
CG Century Schoolbook
V
Univers Medium
u,v,w,x,y,z
-
Extension international character set
This option is for a font that contains an extension international character set such as
Arabic and Thai. The command will have a prefix of ESC+RD<x>20, where x is
specified by user according to the font style:
V
Univers Medium
t
CG Times
T
Angsana UPC
u,v,w,x,y,z
-
User True Type Font
User True Type Font
Extension international character set
This option is for double-byte character sets such as Chinese, Korean and Japanese.
The command will prefix with ESC+RD<x>00, where x is specified by user according to
the font style:
SATO All-In-One Application
User Manual
28-53
C
Simplified Chinese (GB2312)
C
Traditional Chinese (Big5)
K
Korean (HYGungSo-Bold)
u,v,w,x,y,z
SATO All-In-One Application
User Manual
User True Type Font
29-53
4.15. Bitmap Font (fixed size) Download
Bitmap font with specific size can be downloaded into the Internal Flash of the printer using FD
command. The font downloaded with this method can be recalled using the ESC+RF command.
Refer to the command specifications of each model for details.
Figure 26 Selecting Internal Flash for Bitmap Font Download
The Refresh button is to get updated storage information of the Internal Flash. Note that
the storage space is used for both Bitmap Font and Graphics downloaded using
ESC+FD command.
Figure 27 Download Fixed Size Bitmap font
Multiple range of character set is possible by selecting the character while holding down the
[Ctrl] key. It is able to span across different Character Set.
SATO All-In-One Application
User Manual
30-53
4.16. Firmware Download
4.16.1. MB200i and MB400i
Select any MB200i and MB400i printer from the treeview, right click on it and choose
Firmware Download from the popup menu. The firmware must be loaded using RS232c
interface.
Figure 28 MB Firmware download
SATO All-In-One Application
User Manual
31-53
4.16.2. CL, CG, CT, LM, S84 and GT
Figure 29 Boot or Flash Download
User is to select the download mode: Boot or Flash Download.
Boot Download mode
Figure 30 Boot Download mode
User is advised to take extra precautions when using this function. Instruction on the dialog
must be strictly followed. This process is carried out with a mixture of human interventions of the
SATO All-In-One Application
User Manual
32-53
printer and the application.
When the first firmware file is completed, user is to set the printer (by pressing button on the
printer) to ensure it is on “Program Download” mode before the next file is sent from the
application. Failure in doing so might cause unexpected exceptions and damages to the printer.
Figure 31 Executing next firmware file
SATO All-In-One Application
User Manual
33-53
Figure 32 Download Complete
When the downloading processing is complete, user is to perform a default setting on the
printer, manually.
Please note that the downloading process must be complete without interruptions of the
connectivity to the printer.
* Important: for downloading of emulation firmware, it is important to refer to the respective
firmware download manual for the correct procedure. Certain types of firmware require
downloading of font file in order to get the firmware upgrade process working. The sequence of
files to download also has to be strictly followed.
SATO All-In-One Application
User Manual
34-53
Flash Download Mode
This function supports firmware loading of GT/CG/CL/CT/LM/S84 with the following
limitation:
- Older CL firmware that does not provide the Auto Download and the Restart
command will not be supported
The download process is automatic, where the All-In-One tool automatically sends the next
firmware file and restarts the printer to perform factory clear + default setting after download
completes.
It supports concurrent firmware loading to multiple printers (of the same model).
Figure 33 Firmware Download for CL and GT
SATO All-In-One Application
User Manual
35-53
4.16.3. GL
This function currently supports firmware loading via a LAN interface. The FTP protocol is
used to transfer the firmware file from host to printer.
The printer will automatically restart after the firmware loading is complete.
Figure 34 GL Firmware loading
SATO All-In-One Application
User Manual
36-53
4.17. Test Print feature
Figure 35 Test Print
This feature allows user to send built-in Test Print commands to any registered printer.
The user can invoke the standard test print functions such as User Test Print or Factory
Test Print, in either small or large label sizes.
4.18. Switching Interface Selection for CG Printer
After the CG printer is added to the application, the interface selection can be switched by
right-click the printer to bring up the Context Menu, and choose the “Interface Mode”.
Figure 36 Switching Interface Selection for CG Printer
Note: User is required to manually restart the printer after switching the printer
interface mode.
SATO All-In-One Application
User Manual
37-53
4.19. Restart Printer
Currently, this function is only available on CG and GT models.
Figure 37 Restart Printer
For CG printer, if the printer is on LAN interface, it will be switched to USB mode after
restarting the printer with Factory Default.
Note: Do not use this function if the printer has just changed the interface mode.
Figure 38 Restart Printer Function will not work if the Interface Mode has changed
SATO All-In-One Application
User Manual
38-53
4.20. RFID Mode Setup (for CG2 and CT4i)
Currently, this function is only available on CG2 and CT4i printer.
Figure 39 RFID Mode Setup
This function allows user to switch between normal mode, RFID mode and enhanced RFID
mode. It is only applicable to printer with the optional RFID kit installed.
Figure 40 RFID Mode Setup Dialog
SATO All-In-One Application
User Manual
39-53
4.21. Sending Printer Command Strings
Right-click a printer icon from the treeview and choose Send SBPL Command from the
popup menu. This function allows the user to send SBPL commands in both text format and
file format. The user can also use it to retrieve printer response from the command.
The response of the printer is displayed in both ASCII and HEX formats.
Figure 41 The Send Printer command
4.22. Saving and Applying Printer Profiles
Figure 42 Saving and Applying a Printer Configuration
SATO All-In-One Application
User Manual
40-53
This feature is necessary for users
who need to apply a set of tested
settings to many printers at once.
For Saving Printer Configuration, an
SBPL command will be executed to
retrieve the Printer Configuration of
the selected printer. The information is
then saved into an XML file specified
by the user.
For Applying Printer Configuration, the
command will be executed after
reading the XML file which is specified
by the user.
An example of the XML file is shown
here (Figure 30).
Figure 43 XML File
SATO All-In-One Application
User Manual
41-53
4.23. Mass Update of Printer Configuration
This feature is to apply a printer configuration to more than one printer (within the same
model) concurrently. Click Tools->Mass Apply Configuration.
Figure 44 Mass Update of Printer Configuration
After selecting the printer model, the user can choose the printer configuration file (that
was previously saved as explained in section 4.22). A list of printers of the selected
models will be displayed. User can hold the Control Key to perform the multiple
selections of the printer to apply the configuration.
SATO All-In-One Application
User Manual
42-53
4.24. Application Configuration
Some aspects of the application can be configured at Options->Preferences
Figure 45 Preferences Dialog
This should be the only proper way to change the application configuration information.
Configuration files should not be modified without advice from SATO technical staff.
SATO All-In-One Application
User Manual
43-53
4.25. Configuration of Network Interface Card
For SATO Printers equipped with Network Interface Card, the network properties (such as
IP address and Wireless settings) can be configured by choosing the “Interface
Configuration” function.
Figure 46 Configuration of Network Interface Card
SATO All-In-One Application
User Manual
44-53
4.26. Check for Newer Version of Application
The application offers a feature to help user to check if a newer version of the application is
available on the website.
Figure 47 Check for Update
If there is a newer version, the following dialog will be displayed.
Figure 48 Found newer version
If the user clicks the “Yes” button, an Internet Browser will be opened to bring the user to the
application download page.
SATO All-In-One Application
User Manual
45-53
4.27. Changing Communication Protocol of GL4
The communication protocol of GL4 printer can be configured by right-clicking on the GL printer
node, and then choose “Communication Protocol”.
Figure 49 Changing Communication Protocol of GL4
The printer is not required to be restarted after this operation.
This function is only applicable for GL4 printer with LAN/WLAN interface mode.
SATO All-In-One Application
User Manual
46-53
4.28. Send SBPL Print File to Printer Driver
This function allows sending of SBPL print file to SATO printer driver.
The print file will be sent to the print through the interface defined in the
driver properties->Port Setting.
Note that the driver settings such as Print Speed or Print Darkness will
not be applicable to the print file.
Click Tools->Send SBPL to Printer Driver
Figure 50 Send SBPL to Printer Driver
Only SATO printer drivers installed in the PC will be displayed.
If the print file is to be printed more than once, and delay is needed in between
the print files, then check the Interval checkbox and input the time delay value
(in mili-second, 1 second = 1000 mili-second).
SATO All-In-One Application
User Manual
47-53
4.29. IP Assignment
This function allows user to perform quick search of all Sato printers connected to
network. Some network configurations such IP and SubnetMask settings are possible.
Click file menu->Tools->IP Assignment Tool
Figure 51 IP Assignment Tool
Figure 52 Network Setting
SATO All-In-One Application
User Manual
48-53
4.30. Unit Convertor
This function allows user to perform unit conversion among dots, mm,
cm, inch and hex, in the corresponding resolution.
Click file menu->Tools->Unit Conversion
Figure 53 Unit Convertor
SATO All-In-One Application
User Manual
49-53
4.31. Status Alert via Email
This function sends alert emails to the specified users if an error occurs on the
monitored LAN/WLAN printers.
Click file menu->Tools->Status Alert
Figure 54 Email Alert Notification
Note : User is to specify the address of out-going email server (SMTP Server).
Depending on the email configuration, user might need to provide information of
an authenticated email account under the “Mail Server Authentication” in order
to make use of the server to send emails.
SATO All-In-One Application
User Manual
50-53
Figure 55 Log File
Detected errors can be logged in a log file by enabling the Log File option and
provide a log filename.
SATO All-In-One Application
User Manual
51-53
Planned Features
5
The following are features that will likely be implemented in the near future:
- Support of other models
- Listing of available fonts and graphics in the printer memory (downloaded using FD
command)
However, SATO reserves and maintains the right to make changes to the software at any time
without prior notice.
SATO All-In-One Application
User Manual
52-53