1
AccuRange AR3000™ Distance Measurement Sensor
User’s Manual
Rev. 1.9
For use with AR3000™
January 25, 2010
Acuity
A product line of Schmitt Industries, Inc.
2765 NW Nicolai St.
Portland, OR 97210
www.acuitylaser.com
AR3000 User’s Manual
Rev 1/10
Limited Use License Agreement
YOU SHOULD CAREFULLY READ THE FOLLOWING TERMS AND CONDITIONS BEFORE OPENING THE PACKAGE
CONTAINING THE COMPUTER SOFTWARE AND HARDWARE LICENSED HEREUNDER. CONNECTING POWER TO THE
MICROPROCESSOR CONTROL UNIT INDICATES YOUR ACCEPTANCE OF THESE TERMS AND CONDITIONS. IF YOU DO NOT
AGREE WITH THEM, YOU SHOULD PROMPTLY RETURN THE UNIT WITH POWER SEAL INTACT TO THE PERSON FROM
WHOM IT WAS PURCHASED WITHIN FIFTEEN DAYS FROM DATE OF PURCHASE AND YOUR MONEY WILL BE REFUNDED BY
THAT PERSON. IF THE PERSON FROM WHOM YOU PURCHASED THIS PRODUCT FAILS TO REFUND YOUR MONEY, CONTACT
SCHMITT INDUSTRIES INCORPORATED IMMEDIATELY AT THE ADDRESS SET OUT BELOW.
Schmitt Industries Incorporated provides the hardware and computer software program contained in the microprocessor control unit, and licenses
the use of the product to you. You assume responsibility for the selection of the product suited to achieve your intended results, and for the
installation, use and results obtained. Upon initial usage of the product your purchase price shall be considered a nonrefundable license fee unless
prior written waivers are obtained from Schmitt Industries incorporated.
LICENSE
a.
You are granted a personal, nontransferable and non-exclusive license to use the hardware and software in this Agreement. Title and
ownership of the hardware and software and documentation remain in Schmitt Industries, Incorporated;
b.
the hardware and software may be used by you only on a single installation;
c.
you and your employees and agents are required to protect the confidentiality of the hardware and software. You may not distribute,
disclose, or otherwise make the hardware and software or documentation available to any third party;
d.
you may not copy or reproduce the hardware and software or documentation for any purpose;
e.
your may not assign or transfer the hardware and software or this license to any other person without the express prior written consent of
Schmitt Industries Incorporated;
f.
you acknowledge that you are receiving only a LIMITED LICENSE TO USE the hardware and software and related documentation and
that Schmitt Industries Incorporated retains title to the hardware and software and documentation. You acknowledge that Schmitt Industries
Incorporated has a valuable proprietary interest in the hardware and software and documentation.
YOU MAY NOT USE, COPY, MODIFY, OR TRANSFER THE HARDWARE AND SOFTWARE, IN WHOLE OR IN ANY PART,
WITHOUT THE PRIOR WRITTEN CONSENT OF SCHMITT INDUSTRIES, INCORPORATED.
IF YOU TRANSFER POSSESSION OF ANY PORTION OF THE HARDWARE OR SOFTWARE TO ANOTHER PARTY, YOUR LICENSE
IS AUTOMATICALLY TERMINATED.
TERM
The license is effective until terminated. You may terminate it at any other time by returning all hardware and software together with all copies
of associated documentation. It will also terminate upon conditions set forth elsewhere in this Agreement or if you fail to comply with any term
or condition of this Agreement. You agree upon such termination to return the hardware and software together with all copies of associated
documentation. In the event of termination the obligation of confidentiality shall survive.
12 MONTH LIMITED WARRANTY
EXCEPT AS STATED BELOW IN THIS SECTION THIS PRODUCT IS PROVIDED “AS IS” WITHOUT WARRANTY OF ANY KIND,
EITHER EXPRESSED OR IMPLIED, INCLUDING, BUT NOT LIMITED TO, THE IMPLIED WARRANTIES OF MERCHANTABILITY
AND FITNESS FOR A PARTICULAR PURPOSE.
Schmitt Industries Incorporated does not warrant that the functions contained in the product will meet your requirements or that the operation of
the product will be uninterrupted or error free.
Schmitt Industries Incorporated does warrant as the only warranty provided to you, that the product which is furnished to you, will be free from
defects in materials and workmanship under normal use for a period of twelve (12) months from the date of delivery to you as evidenced by a
copy of your warrant receipt.
LIMITATIONS OF REMEDIES
Schmitt Industries Incorporated’s entire liability and your exclusive remedy shall be:
1.
the replacement of any hardware and software not meeting Schmitt Industries’ “Limited Warranty” and which is returned to Schmitt
Industries Incorporated or an authorized Schmitt Industries dealer with a copy of your purchase receipt, or
2.
if Schmitt Industries Incorporated or the dealer is unable within ninety (90) days to deliver a replacement product which is free of defects in
material or workmanship, you may terminate this Agreement by returning the product and your money will be refunded to you by the dealer from
whom you purchased the product.
IN NO EVENT WILL SCHMITT INDUSTRIES INCORPORATED BE LIABLE TO YOU FOR ANY DAMAGES, INCLUDING ANY LOST
PROFITS, LOST SAVINGS OR OTHER INCIDENTAL OR CONSEQUENTIAL DAMAGES ARISING OUT OF THE USE OR INABILITY
TO USE SUCH PRODUCTS EVEN IF SCHMITT INDUSTRIES INCORPORATED OR AN AUTHORIZED DEALER HAD BEEN
ADVISED OF THE POSSIBILITY OF SUCH DAMAGES, OR FOR ANY CLAIM BY ANY OTHER PARTY.
SOME AREAS DO NOT ALLOW THE LIMITATIONS OR EXCLUSION OF LIABILITY FOR INCIDENTAL OR CONSEQUENTIAL
DAMAGES SO THE ABOVE LIMITATION OR EXCLUSION MAY NOT APPLY TO YOU.
GENERAL
You may not sublicense, assign or transfer the license or the hardware, software, and documentation except as expressly provided in this
Agreement. Any attempt otherwise to sublicense, assign or transfer any of the rights, duties or obligations hereunder is void.
This Agreement will be governed by the laws of the United States and the State of Oregon, United States of America.
Should you have any questions concerning this Agreement, you may contact Schmitt Industries Incorporated by writing to:
Schmitt Industries Incorporated
2765 NW Nicolai St.
Portland, Oregon 97210 USA
YOU ACKNOWLEDGE THAT YOU HAVE READ THIS AGREEMENT, UNDERSTAND IT AND AGREE TO BE BOUND BY ITS
TERMS AND CONDITIONS. YOU FURTHER AGREE THAT IT IS THE COMPLETE AND EXCLUSIVE STATEMENT OF THE
AGREEMENT BETWEEN YOU AND SCHMITT INDUSTRIES INCORPORATED AND ITS DEALER (“US”) WHICH SUPERSEDED
ANY PROPOSAL OR PRIOR AGREEMENT, ORAL OR WRITTEN, AND ANY OTHER COMMUNICATIONS BETWEEN US RELATING
TO THE SUBJECT MATTER OF THIS AGREEMENT.
AR3000 User’s Manual
Rev 1/10
Procedures for Obtaining Warranty Service
1. Contact your Acuity distributor or call Schmitt Industries, Inc. to obtain a return
merchandise authorization (RMA) number within the applicable warranty period.
Schmitt Industries will not accept any returned product without an RMA number.
2. Ship the product to Schmitt Industries, postage prepaid, together with your bill of sale
or other proof of purchase. your name, address, description of the problem(s). Print the
RMA number you have obtained on the outside of the package.
This device has been tested for electromagnetic emissions and immunity and has
been found to be in compliance with the following directives for class B equipment:
EN 61326/A3:2003
This device complies with part 15 of the FCC Rules. Operation is subject to the
following two conditions:
(1) This device may not cause harmful interference, and (2) this device must accept
any interference received, including interference that may cause undesired
operation.
Note: This equipment has been tested and found to comply with the limits for a Class A
digital device, pursuant to part 15 of the FCC rules. These limits are designed to provide
reasonable protection against harmful interference when the equipment is operated in a
commercial environment. This equipment generates, uses, and can radiate radio
frequency energy and, if not installed and used in accordance with the instruction manual,
may cause harmful interference to radio communications. Operation of this device in a
residential area is likely to cause harmful interference in which case the user will be
required to correct the interference at his or her own expense.
This manual copyright © 2008, Schmitt Industries, Inc.
AR3000 User’s Manual
Rev 1/10
i
AR3000 User’s Manual
Rev 1/10
ii
User’s Manual for the
AR3000™ Series Distance Measurement Sensors
Rev. 1.9
For use with AR3000
Table of Contents
1.
INTRODUCTION ...............................................................................................................................................1
1.1.
GENERAL OVERVIEW ..................................................................................................................................1
1.2.
DEFINITION OF TERMS .................................................................................................................................2
1.3.
QUICK START INSTRUCTIONS ......................................................................................................................2
1.3.1.
Mounting and Power connection ...........................................................................................................2
1.3.2.
Serial Data Wires ..................................................................................................................................3
1.3.3.
Analog Output Signals ...........................................................................................................................3
1.3.4.
Alarm Signals.........................................................................................................................................3
2.
GENERAL DESCRIPTION...............................................................................................................................4
2.1.
2.2.
2.3.
2.4.
2.5.
2.6.
2.7.
2.8.
2.9.
3.
PRINCIPLES OF OPERATION .........................................................................................................................4
MECHANICAL DIMENSIONS .........................................................................................................................4
INSTALLATION.............................................................................................................................................5
LASER SAFETY ............................................................................................................................................5
PILOT LASER ...............................................................................................................................................6
LASER BEAM PROFILE .................................................................................................................................7
SENSOR MAINTENANCE...............................................................................................................................7
SENSOR SERVICE .........................................................................................................................................7
SENSOR SPECIFICATIONS .............................................................................................................................7
INSTALLATION AND CHECKOUT...............................................................................................................8
3.1.
MOUNTING ..................................................................................................................................................8
3.2.
CABLING .....................................................................................................................................................8
3.2.1.
Standalone Cabling ...............................................................................................................................9
3.2.2.
Serial Connection to a Host Computer ..................................................................................................9
3.3.
POWER ON ................................................................................................................................................10
3.3.1.
Serial Communications Check.............................................................................................................10
3.3.2.
Sensor Output Check ...........................................................................................................................10
4.
SIGNAL AND POWER INTERFACE............................................................................................................12
4.1.
SENSOR CABLE WIRE COLORS AND FUNCTIONS .......................................................................................12
4.1.1.
Power Supply (Blue, Gray/Pink or Tan)..............................................................................................12
4.1.2.
Shield (Clear).......................................................................................................................................13
4.1.3.
Serial Communications RS232 or RS422 (Brown, White, Gray, Pink)................................................13
4.1.4.
Analog Output (Yellow, Gray/Pink or Tan) .........................................................................................14
4.1.5.
Alarm Outputs (Red/Blue or alternate Orange, Violet) .......................................................................15
4.1.6.
Laser Trigger (Green) .........................................................................................................................16
5.
SERIAL INTERFACE OPERATION.............................................................................................................17
5.1.
SERIAL HARDWARE INTERFACE ................................................................................................................17
5.1.1.
Communications Protocol ...................................................................................................................17
5.1.2.
Show Model Identifications (ID)..........................................................................................................18
5.1.3.
Show Online Help (ID?) ......................................................................................................................18
AR3000 User’s Manual
Rev 1/10
iii
5.1.4.
5.2.
5.2.1.
5.2.2.
5.2.3.
5.3.
5.4.
5.5.
5.5.1.
5.5.2.
5.5.3.
5.5.4.
5.5.5.
5.5.6.
Baud Rate (BRx) ..................................................................................................................................18
SERIAL DATA OUTPUT (SD, SF, TE).........................................................................................................19
Serial Data Format (SDx y).................................................................................................................19
Data Units Scale Factor (SFx.xxxxxx).................................................................................................20
Serial Output Termination Character (TEx)........................................................................................21
ERROR MESSAGES .....................................................................................................................................21
PILOT LASER CONTROL (PLX) ..................................................................................................................21
DISPLAYING, CONFIGURING AND RESETTING PARAMETERS ......................................................................22
Displaying current settings (PA) .........................................................................................................22
Show Hardware Status (HW)...............................................................................................................22
Show Internal Temperature (TP) .........................................................................................................22
Reset all Parameters (PR) ...................................................................................................................22
Perform Diagnostic Reset (DR) ...........................................................................................................22
Auto Start (ASx) ...................................................................................................................................23
ANALOG OUTPUT OPERATION (QA, SE).........................................................................................................24
5.6.
5.7.
6.
ANALOG OUTPUT ZERO-POINT AND SPAN-POINT (QAX Y)........................................................................24
ERROR MODE (SE0, SE1 OR SE2).............................................................................................................24
ALARM OUTPUT OPERATION (Q1, Q2, SE).............................................................................................25
6.1.
6.2.
7.
ALARM OUTPUT (Q1W X Y Z / Q2W X Y Z) ................................................................................................25
ERROR MODE BEHAVIOR FOR THE ALARM SWITCHES (SE0, SE1 OR SE2).................................................26
PERFORMANCE AND OPTIMIZATION ....................................................................................................27
7.1.
7.1.1.
7.1.2.
7.1.3.
7.1.4.
7.2.
7.3.
7.4.
7.5.
7.6.
8.
MEASUREMENT MODES ............................................................................................................................27
Perform Distance Measurement (DM) ................................................................................................27
Start Distance Tracking Mode (DT) (<Esc> to stop)..........................................................................27
Perform Velocity Measurement (VM) ..................................................................................................27
Start Velocity Tracking Mode (VT) (<Esc> to stop) ...........................................................................28
SAMPLES AVERAGED (SAX)......................................................................................................................28
MEASUREMENT FREQUENCY (MFX) .........................................................................................................28
MEASUREMENT WINDOW (MWX Y) .........................................................................................................29
DISTANCE OFFSET (OFX.XXX) ..................................................................................................................29
SET ORIGIN (SO).......................................................................................................................................29
EXTERNAL TRIGGER OPERATION ..........................................................................................................30
8.1.
8.2.
9.
10.
START EXTERNAL TRIGGER MODE (DF) (<ESC> TO STOP) .......................................................................30
TRIGGER DELAY (TDX Y) .........................................................................................................................30
HARDWARE STATUS DISPLAY ..................................................................................................................31
SERIAL COMMAND QUICK REFERENCE .........................................................................................32
AR3000 User’s Manual
Rev 1/10
iv
1.
Introduction
This section is a guide to getting started with the AR3000 and this manual. The AR3000 has a
number of configurable parameters, a minimum of which must be set before the sensor can be used
the first time. However, once the parameters are set, the sensor will default to that configuration until
changed by the user.
The recommended order for reading the manual is:
•
General Overview – Gives a brief understanding of the sensor operation.
•
Operating Guidelines – Provides a few important safety tips.
•
Definition of Terms – An aid for proper communication.
•
Quick Start Instructions – This should provide the information necessary to connect the
sensor and verify its operation, either with a serial terminal program at 9600 baud, or by
connecting the current loop or Alarm Output interface.
•
General Description – Gives important laser, operation, mechanical, and mounting
information.
•
Installation and Checkout – Tailor the application. Use the other chapters for reference:
Signal and Power Interface – how to hook everything up
Serial Interface Operation – modes and formats
Analog Output Operation – current loop scaling
Alarm Output Operation – alarm switch settings
Trigger Input Operation – external trigger
Performance Optimization – Sample Rate, Background Elimination, Exposure control
AR3000 Command Set – explains all commands for customizing the application
1.1.
General Overview
The AR3000 is a pulsed time-of-flight rangefinder that measures distance using a laser beam, a
photodiode, and a microprocessor. The rangefinder works based on time of flight measurement
by emitting high-frequency pulsed laser light which is diffusely reflected back from the target.
This return signal is compared with a reference clock. From the amount of time, a resulting
distance is determined with great accuracy. The maximum range measurement for the device is
~10,000 feet (3000 m) using special reflective targets such as 3M 3000X reflective sheeting. On
normal diffuse surfaces, the maximum range is 980 feet (300 m). The Class 2 visible pilot laser
makes it simple to aim the rangefinder which uses a Class 1 infrared (invisible) diode. Speed and
accuracy performance vary depending on target surface reflectance. The AR3000 technical data
sheet specifies sensor performance standards.
A variety of configuration settings can be selected via the serial port. The complete list of
settings is found in the AR3000 Command Set chapter and each setting is discussed in detail in a
specific operation chapter.
The Sample Rate can be specified and the sensor has maximum capability of 2000 samples per
second. Sampling may be turned on and off. It can even be triggered using an input signal wire or
a serial command.
Measurement output is in the form of serial data (RS232 or RS422 models) and analog output (420mA current loop). Special order sensors include Profibus®, or SSI interfaces. Those interface
configurations are not discussed in this manual. Contact Acuity for details.
AR3000 User’s Manual
Rev 1/10
1
Do not point the pilot laser at any person, particularly a person’s eyes or face.
Do not attempt to disassemble the sensor. Improper disassembly will destroy the optical
alignment of the sensor and necessitate factory repairs.
Do not operate the sensor in areas where the sensor case is exposed to direct sunlight for
extended periods or where the air temperature is more than 60°C (140°F) or less than -40°C
(-40°F).
Avoid excessive vibration and shocks. The sensor contains securely mounted but precisely
aligned optical components.
Do not scratch the lenses on the front face of the sensor. Keep the lenses clean with expert
optical procedures. The lenses are glass with an anti-reflection coating. Avoid the use of organic
cleaning solvents.
Do not touch the lenses with bare fingers. The oils are very difficult to remove.
Operate only with DC supply voltages up to 30 volts.
1.2.
Definition of Terms
Sensor – The complete AR3000 measurement device.
Target – The object of measurement. The relative distance from the sensor to the target is
measured by the sensor.
Laser, Laser beam – This light (infrared measurement laser or visible pilot laser) is emitted from
the sensor, reflected from the target, and collected by the camera lens.
<Range> – The maximum relative distance measurable by the sensor.
Range – 1. <Range>, 2. The region over which the target can be measured. At the near end of the
range the sensor measures zero. At the far end of the range the sensor measures its
maximum value (its Range value).
1.3.
Quick Start Instructions
This will get the sensor running in its factory default configuration after selecting a measurement
mode. For full instructions use the individual sections of this manual for mounting, power
connections, data connections and configuration.
Only one output type (Serial or Analog) is needed to indicate sensor operation.
1.3.1. Mounting and Power connection
Mount the sensor in such a way that the case is not twisted or warped. Use three screws
through M4 X 6 threaded mounting holes on the sides or bottom of the AR3000 sensor. The
laser should be aimed at a target such that the distance from the sensor face to the target can
be measured.
Attach the cable’s 12-pin connector to the plug on the rear of the sensor while the power is
off.
Connect the Supply + (Blue) and Ground (Gray/Pink or alternate Tan in some cables) wires
of the sensor cable to a 10 to 30 volt DC power supply (or use the sensor’s power supply if it
came with one).
AR3000 User’s Manual
Rev 1/10
2
1.3.2. Serial Data Wires
Quick suggestion: Connect the wires to a 9 pin D-SUB male connector that can be plugged
into a COM port of a PC (RS232): Black (Ground) to pin 5, White (Transmit) to pin 2, and
Brown (Receive) to pin 3. Start a HyperTerminal program on the PC and set it for that COM
port at 115200 baud, 8 bit, 1 start, parity: none, 1 stop, no flow control.
To view distance measurements and verify functionality, type DT<Enter>. The sensor will
report its present measurements 100 times per second in millimeters. If a target surface is
placed in the measurement range of the sensor, the screen should display distance
information. The distance is measured from the start of the measurement range. If there is no
target in the measurement range, the sensor will output an error code. Note: This command
mode can only be stopped by sending an escape (<Esc>) character.
1.3.3. Analog Output Signals
Quick suggestion: connect a DVM (digital volt meter) to the wires: Gray/Pink or alternate
Tan to Common, Yellow to mA input.
The default mode is 4-20mA current loop. The meter should read near 4 mA when a target is
placed in the laser beam near 1 m range and 20 mA near 300 m range.
1.3.4. Alarm Signals
Use the Status display on the rear of the AR3000 sensor to view the activity of the Q1 and Q2
alarms.
AR3000 User’s Manual
Rev 1/10
3
2.
General Description
The AR3000 is a laser diode based distance measurement sensor for ranges up to 980 feet (300m) on
regular surfaces and up to 9800 feet (3000 m) using a reflective target. The accuracy is generally
specified with a linearity of +/- 0.8 inches (20mm) at 100 Hz. Linearity will vary depending on pulse
frequency, distance averaging, temperature and surface reflectivity of the target surface.
Two versions of the AR3000 are available. The standard model (with a 2 mrad laser divergence) and
a 10 mrad model. See the data sheet for performance details.
2.1.
Principles of Operation
The AR3000 uses the time of flight of light to measure distance. The laser beam is projected from
the housing’s smaller lens (top) and shines on a target surface, where it creates a spot. From the
target, the laser light is scattered in all directions. The sensor’s larger lens collects a portion of the
reflected light, which is focused on a photo detector and converted to an electrical signal which is
used to determine a distance.
2.2.
Mechanical Dimensions
The following diagram shows the mechanical dimensions for the AR3000. The sensor has three
M4 X 6 threaded holes on each side and on the bottom surface for mounting to a fixture. The
cable is for power and all communication (serial, analog, trigger, power, etc.). It has a 12-pin
M18 flange-mount plug (Binder series 723). The outer case of the sensor is extruded aluminum
with powder-coated paint for corrosion resistance.
Figure 1 Mechanical layout of AR3000 sensor
AR3000 User’s Manual
Rev 1/10
4
2.3.
Installation
The AR3000 sensor is typically installed by affixing the sensor to a machined bracket with
threaded bolts through the three mounting holes on either of the sensor’s sides or the bottom.
Their location is shown in the mechanical drawing of Figure 1. The laser should be aimed at a
target such that the distance from the sensor face to the target can be meausured.
2.4.
Laser Safety
The AR3000 has two lasers, a measurement laser and an aiming Pilot laser. The laser used for
measurements is a Class 1 laser device in accordance with EN60825-1:2001. Laser radiation
emitted by Class 1 lasers is entirely harmless to the human eye and no precautions are necessary.
The laser used for the aiming Pilot laser is Class 2. This laser device should not be aimed at the
human eye. Installers of laser sensors should follow precautions set forth by ANSI Z136.1
Standard for the Safe Use of Lasers or by their local safety oversight organization. In the event of
accidental, short time laser exposure, the human eye is sufficiently protected by its own aversion
response (blinking). This natural reflex may be impaired by medication, alcohol and drugs.
Although the product can be operated without taking special safety precautions, refrain from
directly looking into the laser beam. Do not direct the laser beam at other people to avoid
potential eye hazards.
2 mrad
10 mrad
Figure 2 Laser safety labels for AR3000
The laser safety classification reflects worst case situations. User settings or maintenance cannot
increase the level of laser radiation. Do not attempt to loosen any screws or open the sensor
housing.
AR3000 User’s Manual
Rev 1/10
5
2.5.
Pilot Laser
The Class 2 visible pilot laser is emitted from a small window between the two large lenses on the
front of the AR3000 distance measurement sensor. Its purpose is to help users aim and align the
sensor to a distant target. In the factory default startup mode, the pilot laser is enabled and flashes
at a frequency of 2 Hz.
Figure 3 - Location of Pilot Laser on front face of AR3000
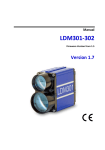
The pilot laser is not aligned to emit in a direction parallel with the measurement laser. Instead,
its beam intersects with that of the measurement laser at a distance of 246 feet (75 m). The pilot
laser axis makes a 0.002° angle with the horizon. The figure below shows the tolerance on pilot
laser positioning in relation to the invisible measurement laser as a function of the distance to an
object being measured. The rectangular shape is the relative size of the infrared measurement
laser. The red-dashed circle is the perimeter inside which the pilot laser could appear. The pilot
laser is much smaller than the tolerance circle
Measurement
Laser Spot Size (IR)
Location Tolerance
of pilot laser (visible)
Pilot location tolerance
at 10 meters
Pilot location tolerance
at 75 meters
Pilot location tolerance
at 125 meters
Figure 4 Tolerance of 2 mrad Pilot Laser location relative to the infrared measurement laser
AR3000 User’s Manual
Rev 1/10
6
at 1 m
at 25 m
at 5 m
at 50 m
at 10 m
Figure 5 Tolerance of 10 mrad Pilot Laser location relative to the infrared measurement laser
2.6.
Laser Beam Profile
The invisible measurement laser beam emitted from AR3000 sensor has a rectangular profile that
expands (diverges) as its distance from the sensor increases. This table indicates the approximate
beam dimensions at different distances from the sensor.
Laser spot height x width (mm[in])
Distance from sensor
(meters[feet])
Standard 2 mrad Sensor
10 mrad sensor
1[3]
25x53[1.0x2.1]
9x14[0.35x0.55]
10[33]
40x54[1.6x2.1]
14x104[0.55x4.1]
50[160]
106x57[4.2x2.2]
34x504[1.3x20]
100[330]
190x61[7.5x2.4]
59x1004[2.3x40]
500[1600]
856x95[34x3.7]
259x5004[10x200]
1000[3300]
1690x137[67x5.4]
509x10000[20x390]
Note that the specified divergence (2 mrad or 10 mrad) is for the faster expanding laser axis and
that the height expands faster on the 2 mrad model while the width expands faster on the 10 mrad
model.
2.7.
Sensor Maintenance
The AR3000 sensor requires little maintenance from the user. The sensor lenses should be kept
clean of dust buildup as a part of regular preventative maintenance. Use compressed air to blow
dirt off the window or use delicate tissue wipes. Do not use any organic cleaning solvents on the
sensor. If a sensor does not function according to specifications, contact Schmitt Industries, Inc.
Do not attempt to loosen any screws or open the sensor housing.
2.8.
Sensor Service
The AR3000 sensor has no user-serviceable parts. Refer all service questions to Schmitt
Industries, Inc. Do not attempt to loosen any screws or open the sensor housing.
2.9.
Sensor Specifications
Go to http://www.acuitylaser.com/pdf/ar3000-data-sheet.pdf
AR3000 User’s Manual
Rev 1/10
7
3.
Installation and Checkout
3.1.
Mounting
Mount the sensor in such a way that the case is not twisted or warped. Using three hard points
along the front and back edges or a slightly compliant mounting system are the best methods. Do
not clamp or squeeze the sensor case excessively. If the case is distorted, the sensitivity and
accuracy of the sensor may be affected. Note that the sensor’s Zero Point is the same as the plane
created by the front-most cover plate around the lenses.
3.2.
Cabling
The AR3000 has a multipurpose cable with solder tail wires. The standard cable, Schmitt p/n
CBA300201, is 6.6 feet (2 m). Longer cable lengths are available. Connection and termination
according to the instructions is essential for correct sensor operation. Read the wire descriptions
in Section 4.1 for connection information.
Connect the cable’s 12-pin connector (Binder series 425) to the sensor’s plug (Binder series 723,
M18 size) on the back cover of the AR3000 sensor. Be sure to tightly secure the connection.
Figure 6 Back cover with 12-pin plug and pin arrangement
Figure 7 Interface cable
AR3000 User’s Manual
Rev 1/10
8
3.2.1. Standalone Cabling
To use the AR3000 without a serial connection to a host computer, the only connections
necessary are the power and ground wires, the analog output wires, and optionally the alarm
output wires connecting to data display, recording, or control equipment. See Signal and
Power Interface (section 4) for wire connections. This method assumes that the sensor has
been previously configured using the serial interface to designate startup parameters and
settings.
In 4-20mA analog output mode, the best accuracy and linearity for the current loop is
obtained with a 500-ohm load to current loop return at the measurement point. The alarm
outputs can be used to indicate the analog output validity.
The two alarm output wires can be used to connect to control equipment. These signals can
also indicate the sensor’s measurement validity.
3.2.2. Serial Connection to a Host Computer
Connect a 15 or 24 volt power supply to the power and ground lines of the sensor cable. See
Signal and Power Interface (section 4) for wire connections. Only the power and ground need
be connected for operation in addition to the serial interface. For testing use a terminal
emulation program such as the Windows® HyperTerminal. HyperTerminal is included in
most versions of Microsoft Windows. To access HyperTerminal, follow these links:
START > PROGRAMS > ACCESSORIES > COMMUNICATIONS > HYPERTERMINAL
After naming the connection and choosing an icon, choose the COM port that the AR3000 is
connected to. In the next configuration screen, set to 115200 baud, 8 bits, no parity, 1 stop
bit and no flow control to communicate with a sensor in the default configuration. Free
demonstration software is also available through the Acuity website.
RS232 model: A 9-pin serial D-sub serial female connector can be attached to the serial
output wires to connect the AR3000 directly to an IBM-PC compatible 9-pin serial port.
white
brown
green
yellow
grey
pink
blue
red
black
violet
grey/pink (tan)
red/blue (orange)
TxD
A
RxD
B
2
3
C
D
5
E
F
VCC
G
H
D-Sub9
GND
J
K
GND
L
24V
(10-30V)
M
Figure 8- Wiring configuration for 9-pin connector for RS232 serial communications
AR3000 User’s Manual
Rev 1/10
9
RS422 model: An RS422 adapter must be used to connect the AR3000 to an IBM-PC
compatible computer. The RS422 wires are as follows:
white
brown
green
yellow
grey
pink
blue
red
black
violet
grey/pink (tan)
red/blue (orange)
A
B
RX+
RX-
C
D
E
F
G
TX-
DTE
RS422
TX+
VCC
H
J
K
L
GND
24V
(10-30V)
M
Figure 9- Wiring configuration for RS422 serial communications
3.3.
Power On
Caution: be sure that the laser will not cause an eye hazard.
When power is applied the red pilot laser beam will be emitted from the front of the AR3000 and
blink with a frequency of 2 Hz (default mode). The terminal emulator will show the sensor’s
firmware revision and serial number. The sensor will not transmit measurement readings until a
measurement mode is selected (see section 7.1 for more details). To begin measuring in Distance
Tracking mode, type DT<Enter>. Distance readings will scroll up the HyperTerminal window
and the units will be in meters. Note: This command mode can only be stopped by sending an
escape (<Esc>) character.
3.3.1. Serial Communications Check
If no information is received over the serial port, check the power supply and serial wire
connections. The sensor may be in a configuration that prevents serial communication, such
as being set at the wrong baud rate.
Type PR<Enter> to reset the sensor to the factory defaults (excluding the baud rate). If the
sensor’s baud rate is unknown, then the BR115200<Enter> command must be issued from
the HyperTerminal program while set at each of the AR3000’s possible baud rates until the
AR3000 accepts the command and sets the baud rate to 115200. 115200 is the standard baud
rate for the AR3000. The possible baud rates are 9600, 19200, 38400, 57600, 115200,
230400, and 460800.
3.3.2. Sensor Output Check
If the sensor output value is in error, check that the sensor and target are stationary and stable,
that the target is at least 20 inches (0.5 m) from the sensor’s zero point, and that the laser
beam is hitting the target. If ERROR codes are transmitted, perform the correction for that
ERROR code (see section 5.3).
AR3000 User’s Manual
Rev 1/10
10
Verify that the target is of sufficient reflectance by verifying that the “TARGET” LED on the
rear of the sensor is Yellow or Green. Do not use retro reflective targets at ranges closer
than 300m.
Distance offset settings may alter the values output by the sensor. Reset the sensor to the
factory default to remove their effect (PR command).
The sensor may need to warm up for 5-10 minutes before reaching full accuracy. Leave it on
for a few minutes and re-check the sensor accuracy.
AR3000 User’s Manual
Rev 1/10
11
4.
Signal and Power Interface
The AR3000 has a multipurpose cable (sensor cable) with solder tail wires. Connection and
termination according to the instructions is essential for correct sensor operation. Read the wire
descriptions for connection information.
Figure 10 AR3000 multipurpose cable with 12 conductors plus shield and corresponding pin arrangements
4.1.
Sensor Cable Wire Colors and Functions
The tables below shows the wiring on systems ordered without power supplies.
Wire Color (alternate)
Green
Yellow
Blue
Red/Blue (Orange)
Violet
Black
Gray/Pink (Tan)
Clear
Red
Pin
C
D
G
M
K
J
L
H
Function in All Modes
External Trigger Input (3V to 30 V)
Analog output (4-20 mA current loop)
Supply Voltage +24V (10- 30 VDC)
Alarm Output 1 (Q1)
Alarm Output 2 (Q2)
Ground (serial)
Ground (Power supply common return)
Shield
Not connected
Table 1 Non-Serial Wire Connections
The serial communications wires can be used for either the RS232 or RS422 model. The RS422
model has a 120 ohm terminating resistor between the receiving pair’s wires (RX+ and RX-).
Wire
Brown
White
Gray
Pink
Pin
B
A
E
F
Function in Selected Serial Mode
RS232 models
RxD – Receive Data
TxD – Transmit Data
Not connected
Not connected
RS422 models
RX– : Receive Data –
RX+ : Receive Data +
TX- : Transmit Data TX+ : Transmit Data +
Table 2 Serial Wire Connections
4.1.1. Power Supply (Blue, Gray/Pink or Tan)
The Gray/Pink wire (or alternate Tan in some cables) is the Power Supply Common return,
also named Ground. It carries the return current for the power supply and the analog signals.
AR3000 User’s Manual
Rev 1/10
12
The Blue wire is the Power Supply Input to the sensor. The sensor requires +24 VDC power
and consumes <5 W without the heater and 11.5 W when the automatic heater is on.
Power supplies from 10 VDC to 30 VDC may be used. Higher voltages will result in
excessive current drawn by the over-voltage protection circuitry and may cause permanent
damage. 24 VDC should be used when the heater may be needed. Voltages less than 10 VDC
may result in inaccurate measurement readings or the AR3000 not even turning on.
4.1.2. Shield (Clear)
The un-insulated wire is the cable and case shield and is connected to ground inside the
sensor. It should also be connected to ground at the power supply end of the cable.
4.1.3. Serial Communications RS232 or RS422 (Brown, White, Gray, Pink)
Both the RS232 and RS422 models are compatible with the associated ANSI communication
standards. The desired model (RS232 or RS422) must be selected when ordering the
AR3000.
See Serial Interface Operation (section 5) for information on commands and data.
RS232 model: RS232 is normally used for slower speeds and shorter distances of
communications. A standard 9-pin D-SUB RS232 serial female connector can be built to
interface with an IBM or compatible computer using connection the pins below.
Color
White
Brown
Black
n/c
Pin
2
3
5
1, 4, 6
n/c
7, 8
Transmit data from sensor
Receive data to sensor
Signal ground reference
DCD, DTE, DCE – These three signals can be tied together to satisfy
some PC signal requirements for hardware handshake.
CTS, RTS – These two signals can be tied together to satisfy some PC
signal requirements for hardware handshake.
Table 3 RS232 Model Serial Connections
RS422 model: RS422 is normally used for faster speeds and longer distances of
communications. Two wires, usually twisted together, carry each differential (noise-immune)
signal. There are no standard PC connections. A special adapter is required to connect to a PC
to an RS422 model.
Color
White
Brown
Pink
Gray
Black
Receive data to sensor (+)
Receive data to sensor (-)
Transmit data from sensor (+)
Transmit data from sensor (-)
Signal ground reference
Table 4 RS422 Model Serial Connections
AR3000 User’s Manual
Rev 1/10
13
4.1.4. Analog Output (Yellow, Gray/Pink or Tan)
The Gray/Pink wire (or alternate Tan in some cables) is the return signal for the Analog
Output. It is also the power supply ground. The analog signal for distance is a 4-20 mA
current loop. Sensor error signaling can be configured to output either 3 mA or 21 mA.
In Current Loop mode the Yellow wire delivers a current proportional to the measured
distance.
white
A
brown
B
green
C
yellow
grey
pink
blue
red
black
violet
grey/pink (tan)
red/blue (orange)
D
QA
E
F
G
4-20 mA
R<500 Ohm
VCC
H
J
K
L
GND
24V
(10-30V)
M
Figure 11 Wiring Diagram for Analog output
The best conversion to voltage is obtained by connecting a 500-ohm load resistor (1/4 Watt
minimum) between the Yellow and Gray/Pink (alternate Tan) wires at the measurement
point. This gives a 2 volt to 10 volt output range.
See Analog Output Operation (section 5.6) for mode selection and scaling options. This will
pass the signal at full speed (2000 samples per second). To filter better at slower speeds, use a
0.047 uF capacitor (200 samples per second) or a 0.47 uF capacitor (20 samples per second).
Figure 12 Wiring Diagram for Analog output with filter
AR3000 User’s Manual
Rev 1/10
14
4.1.5. Alarm Outputs (Red/Blue or alternate Orange, Violet)
The Red/Blue or alternate Orange (Q1) and Violet (Q2) wires are the Alarm Outputs.
See Alarm Output Operation (section 6) for operation options and details.
The Alarm Outputs are open collector PNP transistor switches to the positive power supply
(VCC). When a Alarm Output is not active, its output will be high impedance and no current
will flow through it. When a Alarm Output is active (On) it can source up to 200mA of
current. A current limiting circuit will protect the output in the case of a short circuit.
The load for the output should be connected to ground (Gray/Pink or alternate Tan wire).
The voltage on the Alarm wire must not exceed the limits of the Power Supply connection
voltages (Blue and Gray/Pink or Tan wires), or excessive current may flow into the sensor
and cause damage.
white
A
brown
B
green
yellow
grey
pink
blue
red
black
violet
grey/pink (tan)
red/blue (orange)
C
D
E
F
G
VCC
H
J
K
L
M
Q2
GND
24V
(10-30V)
Q1
Figure 13 Wiring diagram for Alarm Outputs
AR3000 User’s Manual
Rev 1/10
15
4.1.6. Laser Trigger (Green)
The Green wire is the Trigger input. It is normally left unconnected to enable the laser.
The trigger input is intended for triggering a distance measurement with an external signal
that is applied as a voltage on the green wire. A voltage between 3.0 V and 30 V is a HIGH
input and a voltage between 0 V and 1.5 V is a LOW input. It is for the user to specify a
desired delay time and a pulse flank to be selected for synchronization. The user must select
the DF measurement mode setting in the AR3000. An <Esc> character must be sent to exit
the trigger mode.
white
brown
green
yellow
grey
pink
blue
red
black
violet
grey/pink (tan)
red/blue (orange)
A
B
TRIG
C
D
E
F
VCC
G
H
J
K
GND
L
24V
(10-30V)
M
Figure 14 Wiring diagram for Trigger Input
If a switch is used, the input may need a debouncing circuit to prevent multiple triggers or
triggers on the wrong edge.
Figure 15 Debounce circuit for Trigger Input switch
AR3000 User’s Manual
Rev 1/10
16
5.
Serial Interface Operation
5.1.
Serial Hardware Interface
The serial port is available as either an RS232 or RS422 model, which must be selected when
placing an order for the AR3000 sensor.
5.1.1. Communications Protocol
The easiest way to configure the AR3000 is by using a PC with a serial (RS232 or RS422)
communication port and a terminal emulation program. The communications protocol uses the
ASCII format. Commands that set a parameter value can be used to query the parameter by
typing the command without any numbers.
{command}<Enter>
Executes command or displays parameter
{command}{parameter[ parameter[..]]}<Enter> Sets the command parameter. The
command is followed by an optional space and then the parameter. More parameters may
be required. A space is required to separate the parameters. Parameters not entered are
taken as zero.
For example:
Type AS<Enter> to display the current Autostart setting.
Type ASID<Enter> to set the current Autostart setting to the ID mode.
Before an operating session begins, users should configure the AR3000 sensor with parameters
that meet the particular measuring site conditions and requirements. All valid parameter
settings will be preserved on turning the AR3000 sensor off and restored when it is turned
back on. They can only be replaced with new value entries or changed back to their default
values by running an initialization routine. Below is a short view of the commands accepted
through the AR3000 (RS232 or RS422) communications protocol:
Command Description
ID
Displays the sensor’s manufacturing data and serial numbers
ID?
Displays the Online Help menu
Measurement Modes
DT
Starts continuous repetitions of distance results - DM (<Esc> to stop)
VM
Single velocity measurement of 25 results
VT
Starts continuous repetitions of velocity measurements - VM (<Esc> to stop)
DF
Starts external hardware trigger measurement mode (<Esc> to stop)
DM
Single distance result of SA measurements
Status
TP
Queries inner temperature
HW
Hardware status
PA
Displays all parameter values
Setup Parameters
AS
Queries / sets Autostart command
PL
Queries / sets pilot laser mode for aiming
PR
Resets all parameters to standard values
DR
Resets the device to simulate “cold start”
AR3000 User’s Manual
Rev 1/10
17
SF
OF
SO
MW
MF
SA
TD
SE
Q1
Q2
QA
BR
SD
TE
Queries / sets scale factor
Queries / sets user-specified offset
Sets current distance as negative offset
Queries / sets measurement window
Queries / sets sampling frequency
Queries / sets number of samples to be averaged before outputting a result
Queries / sets trigger delay
Queries / sets error mode (0, 1, 2)
Queries / sets Alarm 1 output
Queries / sets Alarm 2 output
Queries / sets endpoints for Analog output
Queries / sets baud rate
Queries / sets output format (decimal/hex)
Queries / sets terminator for ASCII serial mode (RS232/RS422)
Table 5 Online Help Menu for AR3000
5.1.2. Show Model Identifications (ID)
Type ID<Enter> to display the AR3000 manufacturing data in this order: product code,
firmware version, firmware data, firmware time, serial number, date of manufacture and time
of manufacture.
5.1.3. Show Online Help (ID?)
Type ID?<Enter> to display the AR3000 online menu of available parameters and settings
similar to the table in section 5.1.1
5.1.4. Baud Rate (BRx)
This parameter specifies the serial baud rate. The Baud Rate can only be specified via the
serial interface and it requires the host device to change its own Baud Rate after commanding
the sensor to change. The standard setting for baud rate is 115200 baud and it is not affected
by the PR (parameter reset) command.
Type BR<Enter> to display the current baud rate.
Type BR x<Enter> to specify the baud rate.
The serial port will respond by displaying the new value.
x: baud rate value. Allowed values are 9600, 19200, 38400, 57600, 115200 (standard),
230400, and 460800 baud.
Examples
BR9600<Enter>
BR115200<Enter>
AR3000 User’s Manual
Rev 1/10
Set the baud rate to 9600
Set the baud rate to 115200
18
5.2.
Serial Data Output (SD, SF, TE)
The Serial Data Format units, and errors are selectable using the Serial Output Control command.
Serial data is transmitted from the AR3000 as characters (bytes) of 8 data bits with no parity and
1 stop bit. The sample data sent represents calibrated distance readings.
Available formats are decimal, hexadecimal, and binary (SD).
Signal strength and/or internal temperature may also be transmitted (SD).
Distance output, normally in meters (velocity in m/s), may be scaled by the scale factor (SF).
A distance offset value (OF) is applied to the output value.
The ASCII termination character may be selected from several options (TE).
5.2.1. Serial Data Format (SDx y)
These parameters specify the serial output format (decimal, hexadecimal, or binary) and
whether the signal strength and/or the internal temperature are sent. The factory default
setting is SD0 0 for distance-only output in decimal format.
Type SD<Enter> to display the current output format settings.
Type SD x y<Enter> to specify the new format and data. The parameters must be separated
by a space. Non-entered parameters are taken as 0.
The serial port will respond by displaying the new values.
x: strength and temperature data selector according to the following chart
y: format selector according to the following chart
Formats for both distance (DM) and velocity (VM) measurements are shown.
SD0 y
SD1 y
SD2 y
SDx y
Command
(Decimal)
(Hexadecimal)
(Binary)
SDx 0
3 bytes
DM D 001.234
H0004D2
VM D-000.002 001.234
HFFFFFE 0004D2
Distance
3+3 bytes
SDx 1
3+1 bytes
DM D 001.234 00556
H0004D2 022C
VM
D
000.002
001.234
00556
H000002
0004D2
022C
Distance+Strength
3+3+1 bytes
SDx 2
3+2 bytes
DM D-001.234 +29.2
HFFF62E 124
HFFFFFE FFF62E 124
Distance+Temperature VM D-000.002 -001.234 +29.2
3+3+2 bytes
SDx 3
3+1+2 bytes
DM D 001.234 00556 +29.2
H0004D2 022C 124
Distance+Strength+ VM D-000.002 001.234 00556 +29.2 HFFFFFE 0004D2 022C 124
3+3+1+2 bytes
Temperature
Table 6 Serial Output format selection chart
Each format has certain characteristics. The first character indicates the data format.
Decimal
D
The most significant bit of the character is a ‘0’.
Hexadecimal H
The most significant bit of the character is a ‘0’. The
value is equivalent to the corresponding decimal value
with the decimal point removed.
Binary
1xxxxxxx
The most significant bit of the character is a ‘1’. Only
3-byte values (Velocity or Distance) start with a ‘1’. The
most significant byte is first.
AR3000 User’s Manual
Rev 1/10
19
Velocity command reports the velocity as the first number (if velocity commanded).
Decimal
-0123.456
sign (space or ‘-’), 4+3 decimal digits plus space
Hexadecimal FFFFFE
24 bit 2’s complement number plus space
21 bit 2’s complement number
Binary
1BBBBBBB 0BBBBBBB 0BBBBBBB
The Distance is reported in units determined by the scale factor (see section 5.2.2).
Decimal
-0123.456
sign (space or ‘-’), 4+3 decimal digits
Hexadecimal FFFFFE
24 bit 2’s complement number
Binary
1BBBBBBB 0BBBBBBB 0BBBBBBB
21 bit 2’s complement number
The signal strength value follows distance and does not have units, but typically ranges from
<600 to >3400. The AR3000’s performance is optimized when 1500 < Signal Strength <
3400.
01956
space plus 5 digits
Decimal
Hexadecimal
07A4
space plus 16 bit number
The 7 most significant bits of the 14 bit
Binary
0BBBBBBB [0BBBBBBB]
number (only the first, most significant
byte is transmitted)
Temperature is reported in °C and follows distance and/or signal strength. The internal
temperature is typically about 8°C warmer than the external temperature.
Decimal
+23.4
space, sign (‘+’or ‘-’), 2+1 decimal digit
Hexadecimal
00EA
space plus 16 bit 2’s complement number
Binary
1BBBBBBB 0BBBBBBB
14 bit 2’s complement number
5.2.2. Data Units Scale Factor (SFx.xxxxxx)
This parameter specifies the distance scale factor (multiplier). The default setting is 1.0
(SF1), which generates the sample result in meters. The units are not labeled.
Type SF<Enter> to display the current scale factor.
Type SF x<Enter> to specify the scale factor.
The serial port will respond by displaying the new value.
x: scaling factor multiplier (from meters). The resolution is approximately 0.000001. The
allowed range of the scale factor is from -10.000 to -0.001 and from 0.001 to 10.000.
Direct conversion to inches (39.3701) or millimeters (1000.0) is not possible.
Examples
SF1<Enter>
SF3.24084<Enter>
AR3000 User’s Manual
Rev 1/10
Scale factor = 1.0
Scale factor = 3.24084
20
Output in units of meters
Output in units of feet.
5.2.3. Serial Output Termination Character (TEx)
This parameter specifies the output termination for the serial transmission. The factory
default setting is Carriage Return Line Feed (TE0).
Type TE<Enter> to display the current termination character code.
Type TE x<Enter> to specify the serial output termination setting.
The serial port will respond by displaying the new value.
x: Code representing the termination according to the following chart. Binary mode has
no termination characters.
x
0
1
Hexadecimal 0x0D0A 0x0D
Description
CR LF
CR
2
0x0A
LF
3
0x02
STX
4
0x03
ETX
5
0x09
Tab
6
0x20
Space
7
0x2C
Comma
8
0x3A
Colon
9
0x3B
Semicolon
Table 7 Parameters for serial output line termination
5.3. Error Messages
The AR3000 will automatically generate error code messages in the ASCII output stream. Some
of these errors may also be represented through the analog and alarm output functions. See the
sections for Current Loop Output and Alarm Switches for error handling in those output modes.
Red Status LED: Contact Schmitt Industries, Inc. for technical support.
Below is a list of the error codes that may be transmitted over the serial output.
Code
Description
E02
No target
E04
Defective laser
Remediation
Check for measuring distance to local target
Change measurement window limits (MW)
Contact Schmitt Industries, Inc. for technical support
Table 8 Error Code descriptions
5.4. Pilot Laser Control (PLx)
This parameter specifies one of four operating modes for the pilot laser. The factory default is
PL2 (blinking at 2 Hz).
Type PL<Enter> to display the current pilot laser setting.
Type PL x<Enter> to specify the pilot laser setting.
The serial port will respond by displaying the new value.
x: specifies the pilot laser behavior:
0 Off – no pilot laser
1 On – pilot laser is on continuously
2 Flash – Pilot laser is blinking on and off at 2 Hz
3 Flash – Pilot laser is blinking on and off at 5 Hz
AR3000 User’s Manual
Rev 1/10
21
5.5. Displaying, Configuring and Resetting Parameters
As the AR3000 sensor is configured for specific requirements, it may be helpful to view the
settings that are saved in the sensors EEPROM. Below are list of commands that allow users to
view or reset parameters.
5.5.1. Displaying current settings (PA)
Type PA<Enter> to display the current AR3000 settings as shown below:
measure frequency[MF]............2000(max2000)hz
trigger delay/level[TD]..........0.00msec 0
average value[SA]................20
scale factor[SF].................1.000000
measure window[MW]...............-5000.000 5000.000
distance offset[OF]..............1.000
error mode[SE]...................1
digital out[Q1]..................20.000 10.000 1.000 1
digital out[Q2]..................1.000 30.000 0.500 1
analog out[QA]...................1.000 300.000
RS232/422 baud rate[BR]..........115200
RS232/422 output format[SD]......dec (0), value (0)
RS232/422 output terminator[TE]..0Dh 0Ah (0)
SSI output format[SC]............bin (0)
pilot laser [PL].................2
autostart command[AS]............ID
5.5.2. Show Hardware Status (HW)
Type HW<Enter> to display a specific list of diagnostic information for the AR3000 sensor.
The information can be interpreted by a technician at Acuity.
5.5.3. Show Internal Temperature (TP)
Type TP<Enter> to display the sensor’s internal temperature.
This will output the sensor’s internal temperature in the format [–]000.0 (°C). This may be
helpful information if the sensor will be installed in environments which exceed the
temperature specification for the unit -40 to 140°F (-40 to 60°C).
5.5.4. Reset all Parameters (PR)
Type PR<Enter> to restore the AR3000 to factory default settings. This command does not
affect the baud rate.
The serial port will respond by displaying all of the new settings (like the PA command).
5.5.5. Perform Diagnostic Reset (DR)
Type DR<Enter> to perform a diagnostic reset of the AR3000, simulating an actual voltage
break situation. This command may prove useful for testing the behavior of the AR3000
when power is applied.
AR3000 User’s Manual
Rev 1/10
22
5.5.6. Auto Start (ASx)
Autostart defines the command that will be activated when the AR3000 is powered on. The
factory default command for Autostart is ID.
Type AS<Enter> to display the Autostart command.
Type ASx<Enter> to set a new Autostart command.
The serial port will respond by displaying the new command.
x
Represents any of the following commands (without parameters).
ID, ID?
Display the requested information
DM, VM, TP, HW Measure and display the requested values.
DT, DF, VT
Enter the continuous mode (requires <Esc> to stop)
PA, MF, TD, SA
SF, MW, OF, SE
Q1, Q2, QA, BR
SD, TE, PL, AS
Display the requested settings
BB, AB, SC
Display the requested settings (SCSI and fieldbus models)
Example
ASDT<Enter>
AR3000 User’s Manual
Rev 1/10
The AR3000 sensor will begin in the distance tracking mode after
power-up. Note that only an <Esc> character can stop distance
tracking.
23
Analog Output Operation (QA, SE)
The analog output uses two wires in the basic configuration see section 4.1.4.
The analog output is updated with each sample result according to combination effected by the
measurement frequency and the sample averaging. The analog output will deliver a current which
increases linearly from 4 mA at the Zero-point to 20 mA at the Span-point.
5.6.
Analog Output Zero-point and Span-point (QAx y)
These parameters specify the Zero-point (4 mA value) and Span-point (20 mA value) for the
analog output signal. The factory default setting is QA1.000 300.000 for a Zero-point (x) of 1
meter and a Span-point (y) of 300 meters.
Type QA<Enter> to display the current analog output Zero-point and Span-point.
Type QA x y<Enter> to set the parameters, which must be separated by a space. The space
before parameter x is optional. Values not entered are taken as zero. The combinations of
parameters x and y are compared to sample results, which are affected by the scale factor and
distance offset values (SF and OF - See section 7.2).
The serial port will respond by displaying the new values.
x specifies the analog output Zero-point (4 mA value) with a resolution of approximately
0.001.
y specifies the analog output Span-point (20 mA value) with a resolution of approximately
0.001.
It may be desirable to assign the Zero-point and Span-point to anywhere within the sensor’s
measurement range. The Zero-point may be a value larger than the Span-point. In this case, the
range will increase as the sample result decreases.
5.7.
Error Mode (SE0, SE1 or SE2)
This parameter specifies the behavior of the AR3000 analog output signals during error
conditions E02 (common) and E04 (See Error Messages section 5.3 for more information). The
default setting is SE1. This parameter also affects the alarm output error mode. See section 6.2.
Type SE<Enter> to display the current error mode.
Type SE x<Enter> to specify the error mode.
The serial port will respond by displaying the new values.
x: specifies the analog output behavior during an error condition:
0 will cause the AR3000 to output and hold the last valid analog output
1 will cause the sensor to output 3 mA to report an error
2 will cause the sensor to output 21 mA to report an error
AR3000 User’s Manual
Rev 1/10
24
6.
Alarm Output Operation (Q1, Q2, SE)
The AR3000 comes standard with two, dedicated digital alarm switches. See the wiring in section
1.3.4 Alarm outputs operation may also be referred to as digital or limit outputs. Users of the
AR3000 laser sensor may wish to monitor the position of an object and receive an alarm if it moves
beyond set distance limits. To do this, users establish parameters of a measurement window using
commands described below. The alarm output is updated with each sample averaged.
6.1.
Alarm Output (Q1w x y z / Q2w x y z)
The default settings for both Q1 and Q2 are: 0.000 0.000 0.000 1 . The parameters for Q1 and
Q2 specify the behavior of the output signals alarm 1 and alarm 2, correspondingly. Note that
alarm 1 (Q1) and alarm 2 (Q2) act independently of each other.
Type Q2<Enter> to display the current settings for alarm switch output 2 (Q2).
Type Q1 w x y z<Enter> to set the parameters, where w, x, y, and z represent the parameter
values, which must be separated by spaces. The space before parameter w is optional. The values
have a resolution of approximately 0.001. Values not entered are taken as zero. The combinations
of parameters w, x, and y are compared to sample results, which are affected by the scale factor
and distance offset values (SF and OF - See section 7.2).
The serial port will respond by displaying the new values.
w is the parameter for the start of the measurement range where the alarm becomes active.
The resolution of this parameter is three decimal places (0.001).
x is the parameter for the length of the measurement range over which the alarm is active.
The resolution of this parameter is three decimal places (0.001, x ≥ y ≥ 0).
y is the parameter for the hysteresis over which the alarm output will remain stable between
active and inactive. The hysteresis parameter eliminates the alarm output from toggling
wildly when crossing a single location w by providing a dead band (y) where the output
won’t change. The resolution of this parameter is three decimal places (0.001, x ≥ y ≥ 0).
z is the parameter for setting the behavior of the alarm output signal during the active range,
high (on) or low (off). z can be 0 (bottom figure: LOW or OFF) or 1 (top figure: HIGH or
ON).
Figure 16 Alarm Output parameter characteristics
AR3000 User’s Manual
Rev 1/10
25
6.2.
Error Mode behavior for the alarm switches (SE0, SE1 or SE2)
This parameter specifies the behavior of the AR3000 alarm output signals during error conditions
E02 (common) and E04 (See Error Messages section 5.3 for more information). The default
setting is SE1. This parameter also affects the analog output error mode. See section 5.7.
Type SE<Enter> to display the current alarm and analog output mode setting.
Type SE x<Enter> to set the new value, where x represents the value.
The serial port will respond by displaying the new value.
x: specifies the alarm output behaviors during an error condition:
0 cause the AR3000 to output and hold the last valid alarm state
1 force the following behavior for both alarm 1 and alarm 2 based on the z parameter
of the corresponding Q1 or Q2 command.
z = 0 error forces the alarm output HIGH
z = 1 error forces the alarm output LOW
2 force the following behavior for both alarm 1 and alarm 2 based on the z parameter
of the corresponding Q1 or Q2 command.
z = 0 error forces the alarm output LOW
z = 1 error forces the alarm output HIGH
AR3000 User’s Manual
Rev 1/10
26
7.
Performance and Optimization
7.1.
Measurement Modes
The AR3000 will not begin measuring and reporting until the user selects a measurement mode.
Once initiated, the distance will be measured, and when a sample result is computed, it will be
sent on both the serial, analog, and alarm signals. See section 5.2 to specify the serial format,
section 5.6 to specify the analog behavior, and section 6 to specify the alarm behavior.
The sample result values are affected by the scale factor and distance offset values (SF and OF See section 7.2).
Users may select among several measurement modes that will optimize the sensor’s speed or
accuracy performances for the specific measuring application.
The overall data output speed will depend on the ratio between the sensor’s measurement
frequency (MF) and the averaging function (SA).
7.1.1. Perform Distance Measurement (DM)
This command causes the AR3000 to performs one set of measurements and generates the
output(analog, alarm, and serial) based on the resulting average.
Type DM<Enter> to initiate a single distance measurement. This command does not change
any configuration settings.
The time required for each measurement depends on the number of averaged samples (SA)
and the preset measuring frequency (MF). With the factory default settings the DM command
takes 10 ms to complete.
7.1.2. Start Distance Tracking Mode (DT) (<Esc> to stop)
In the Distance Tracking mode, the AR3000 performs continuous distance measurements
(like repeating the DM command) until stopped with the Escape character (0x1B) via the
serial port (<Esc> key in HyperTerminal).
Type DT<Enter> to start the distance tracking mode. This command does not change any
configuration settings.
Type <Esc> to stop tracking the distance. Note: This is the only way to stop.
The output rate of measured values depends on the number of averaged samples (SA) and the
preset measuring frequency (MF). With the factory default settings, DT mode will generate
sample results at 100Hz.
7.1.3. Perform Velocity Measurement (VM)
This command causes the AR3000 to takes 25 averaged samples, after which it will use those
25 samples to calculate a resulting velocity. The alarm and analog outputs are updated for
each sample (at the DT mode rate), but only one serial output is generated after the 25
samples are complete. The maximum measurable velocity is 100 m/s. With the factory
default scaling factor (SF1) the velocity units will be m/s.
AR3000 User’s Manual
Rev 1/10
27
Type VM<Enter> to initiate a single velocity measurement. This command does not change
any configuration settings.
The time required for each measurement depends on the number of averaged samples (SA)
and the preset measuring frequency (MF). With the factory default settings the VM command
takes 250 ms to complete.
7.1.4. Start Velocity Tracking Mode (VT) (<Esc> to stop)
In the Velocity Tracking mode, the AR3000 performs continuous velocity measurements
(like repeating the VM command) until stopped with the Escape character (0x1B) via the
serial port (<Esc> key in HyperTerminal). The alarm and analog outputs are updated for each
sample (at the DT mode rate), but only one serial output is generated for each 25-sample
result. The maximum measurable velocity is 100 m/s. With the factory default scaling factor
(SF1) the velocity units will be m/s.
Type VT<Enter> to start the velocity tracking mode. This command does not change any
configuration settings.
Type <Esc> to stop tracking the velocity. Note: This is the only way to stop.
The output rate of measured values depends on the number of averaged samples (SA) and the
preset measuring frequency (MF). With the factory default settings, the VT mode will
generate alarm and analog output results at 100Hz and velocity results (serial port) at 4Hz.
7.2.
Samples Averaged (SAx)
This sets the number of distance measurements to be acquired and averaged for each distance
result. The factory default for this setting is 20.
Type SA<Enter> to display the current number of measurements to average per sample.
Type SA x<Enter> to change the value, where x is the new value. The allowed range of x is from
1 to 30000.
The serial port will respond by displaying the new values.
⎛
⎛ D1 + D 2 + D 3 + ... + D SA
SA
⎝
The calculation is: SampleResult = OF + ⎜⎜ SF ⋅ ⎜
⎝
⎞⎞
⎟ ⎟⎟ where Dn is a
⎠⎠
single distance result from a laser pulse, SA is the number of measurements to average per
sample, SF is the current scaling factor (section 5.2.2), and OF is the current offset value (section
7.5).
7.3.
Measurement Frequency (MFx)
The sets the rate at which distance measurements are acquired each second. Each measurement
consists of a single laser pulse, so this also sets the rate of emitted laser pulses. The factory
default for this setting is 2000 Hz.
Type MF<Enter> to display the current number of measurements to be acquired per second.
Type MF x<Enter> to change the value, where x is the new value. The allowed range of x is
from 1 to 2000 (Hz).
The serial port will respond by displaying the new values.
The time to measure a distance sample is SA/MF (the sample rate is MF/SA).
AR3000 User’s Manual
Rev 1/10
28
Examples:
MF1000, SA1000
MF2000, SA1000
MF2000, SA20000
7.4.
sample time = 1 second
sample time = 0.5 second
sample time = 10 second
rate = 1 sample/second
rate = 2 samples/second
rate = 0.1 sample/second
Measurement Window (MWx y)
This sets a window of allowed sample results for the AR3000. Targets detected outside the limits
x and y will return an error (E02 - no target). Factory default setting is MW-5000.000 5000.000.
The resolution of these values is three decimal places.
Type MW<Enter> to display the current measurement window values.
Type MW x y<Enter> to set the new measurement window values, where x and y are the
window limit values separated by a space. The values have a resolution of approximately 0.001
and x must be less than y. The values are not checked for plausibility. The parameters x and y are
compared to sample results, which are affected by the scale factor and distance offset values (SF
and OF - See section 7.2).
The serial port will respond by displaying the new values.
This command may be useful to set to mask sources of interferences in front of or behind the
targeted measurement locations.
7.5.
Distance Offset (OFx.xxx)
This sets an offset that is added to the scaled average before generating a result. The factory
default offset is 0.000.
Type OF<Enter> to display the current offset.
Type OF x<Enter> to change the offset, where x is the new value, which may have a sign and
has an approximate resolution of 0.001. The value is not checked for plausibility.
The serial port will respond by displaying the new values.
See section 7.2 for more information.
7.6.
Set Origin (SO)
This command takes a single distance result and sets its negative value as the new offset. This
adjusts the sample result to be zero at the current location. Note that this command changes the
value of the OF (distance offset) parameter. The sensor will then generate distance values relative
to the newly-assigned zero location.
Type SO<Enter> to adjust the offset value such that the current location is zero.
AR3000 User’s Manual
Rev 1/10
29
8.
External Trigger Operation
The AR3000 can operate with a hardware trigger that has been connected according to the diagram in
Section 4.1.5. To operate with an external hardware trigger, the AR3000 must operate in the Trigger
Measurement Mode, started by the Start Trigger command (DF).
The Trigger Delay (TD) settings affects the External Trigger operation.
8.1.
Start External Trigger Mode (DF) (<Esc> to stop)
This command causes the AR3000 to enter the External Trigger mode. The AR3000 will then
remain in the External Trigger mode until stopped with the Escape character (0x1B) via the serial
port (<Esc> key in HyperTerminal). While in the External Trigger mode the AR3000
continuously waits for external trigger events. On receipt of each trigger event, the AR3000 emits
a single laser pulse and acquires a single distance measurement. These measurements are counted
and stored until the count matches the Samples Averaged parameter value (SA), and then the
Sample Result is computed and the outputs are generated (serial, analog, and alarms). For
example, if SA is set to 20, then 20 triggers are required to get a single result (see section 7.2).
The ‘trigger event’ response to the external trigger input signal is specified with the Trigger
Delay parameters (TD – See section 8.2).
Type DF<Enter> to start the External Trigger mode. This command does not change any
configuration settings.
The serial port will respond with external trigger on ...
Type <Esc> to stop waiting for an external trigger. Note: This is the only way to stop.
The serial port will respond with external trigger off.
The time to get a result depends on the number of samples averaged (SA) and the setting for
trigger delay (TD). The measurement frequency parameter (MF) is ignored in the External
Trigger mode.
8.2.
Trigger Delay (TDx y)
The Trigger Delay parameters specify the delay and transition edge used in the External Trigger
mode. The factory default setting is TD0.00 0
Type TD<Enter> to display the current trigger delay values.
Type TD x y<Enter> to set the new trigger delay values. A space must separate the values.
The serial port will respond by displaying the new values.
x: The delay time has units of milliseconds (ms) with a resolution of approximately 0.01ms.
The allowed range for the delay is 0 to 300 ms.
y: The transition edge has a value of 0 or 1.
0
falling edge – trigger input transition from HIGH to LOW
1
rising edge – trigger input transition from LOW to HIGH
Example:
TD8.5 0<Enter>
AR3000 User’s Manual
Rev 1/10
Sets the trigger event to happen 8.5ms after the trigger input signal
falls (external input goes from HIGH to LOW).
30
9.
Hardware Status Display
The rear panel of the AR3000 distance measurement sensor includes a display of several, colored
LED’s with labels. These indicators represent the status of the unit’s ability to function without using
queries through the serial interface.
LED
Term
Target
Signal Strength
of return signal
Status
Operational
readiness state
Q1
Alarm 1
Q2
Alarm 2
Link
Bus State
Color
Description
OFF
No return signal
Red, pulsed
Signal too low (<600)
Red, steady
Low signal (600 – 1000)
Yellow
Signal (1000-1500)
Green, steady Ideal signal (1500 – 3400)
Green, pulsed Strong signal (>3400)
OFF
Not ready
Red
Sensor defect, contact Acuity
Green
Ready
Off
Off
Yellow
Active
Off
Off
Yellow
Active
Used only with optional SSI or Profibus
Table 9 Status Display Indications
AR3000 User’s Manual
Rev 1/10
31
Figure 17- Rear
panel of AR3000
10. Serial Command Quick Reference
Command Name
AR3000 Configuration Data Settings (Serial)
Serial
Serial Code / Function / Setting
Command
Factory Default
Model identification
ID
Displays the sensor’s manufacturing data and serial numbers
Online Help Menu
ID?
Show’s menu of possible configurations
Distance tracking mode
DT
Start continuous Measurement Tracking (<Esc> to stop)
Velocity measurement
VM
Single velocity measurement after 25 distance samples
Velocity tracking
VT
Start continuous Velocity Tracking with 25 sample intervals (<Esc> to stop)
Trigger mode
DF
External hardware trigger mode (<Esc> to stop)
Take single sample
DM
This serial command causes a single distance reading
Temperature display
TP
Displays AR3000 internal temperature (usually 8°C above ambient)
Hardware status
HW
Reports internal diagnostics information (temperatures and voltages)
Pilot Laser Control
PL
Queries / set pilot aiming laser ON, OFF, or blinking characteristics
PL2 (blink 2 Hz)
SDx y
Queries / sets output format including distance, signal strength and
temperature
SD0 0
Used to obtain output in units other than meters.
SF1.0
ASCII output format
Scale factor
SFx.xxxxxx
Program Offset
OFx.xxx
Serial command
terminator
Set current distance to
zero
Measurement window
Queries / sets offset to measured values
TE
Queries / sets termination character
SO
Takes a single sample and assigns it the zero point
MWx y
Masks interference outside the limits x and y
Measurement Frequency
MF
Queries / sets pulse rate of AR3000
Averaging Function
SA
Queries / sets number of samples to be averaged before outputting a value
OF0.000
TE0 (CR LF)
MW-5000.000
5000.000
MF2000
SA20
SE0
Hold last valid measurement for analog and alarm switches
Error mode for Alarm
Switch
SE1
Analog: 3mA; Alarm High to Low
Alarm 1 (Q1) output
Q1w x y z
Queries / sets the range, length, hysteresis and behavior of alarm switch Q1
Q1 0 0 0 1
Alarm 2 (Q2) output
Q2w x y z
Queries / sets the range, length, hysteresis and behavior of alarm switch Q2
Q2 0 0 0 1
SE2
Analog: 21mA; Alarm Low to High
Analog output
QAx y
Queries / sets the zero and span point for the 4-20mA signal
Setting a Trigger delay
TDx y
Queries / set Delay for x with y flank
9600 BR9600
115200 BR115200 (standard)
19200 BR19200
230400 BR230400
38400 BR38400
460800 BR460800
57600 BR57600
Queries / set which modes and parameters will become active after power
up of AR3000
Baud rate
BRx
Autostart configuration
ASx
Cold-start simulation
DR
Simulates a cold start with power reset
Reset to factory default
PR
Returns all sensor settings to factory default
Table 10 Serial Command Quick Reference
AR3000 User’s Manual
Rev 1/10
SE1
32
QA1.000 300.000
TD0 0
BR115200
ASID