1
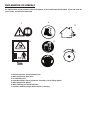
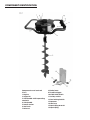
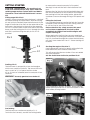
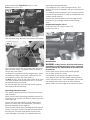
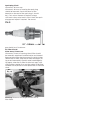
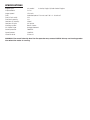
ST
O
P
M
200M LE
HO
ER
G
G
I
D
Protect yourself and others by observing all safety information, warnings, and cautions. Failure to
comply with instructions could result in personal injury and/or damage to product or property.
Please retain instructions for future reference!
ROSSPOWER
RPPHA200MM
Please read and save these instructions. Read through this owner’s manual carefully before using product.
Protect yourself and others by observing all safety information, warnings and cautions. Failure to comply with
instructions could result in personal injury and/or damage to product or property. Please retain instructions for
future reference.
WARNING! The operator of this machine is advised that reactive torque may occur when the
rotating auger makes contact with hard debris. Therefore a firm hold with both hands is essential.
PETROL ENGINE
SPECIFIC SAFETY INSTRUCTIONS
• Petrol or diesel powered engines must never be used in unventilated or closed spaces. The exhaust fumes are
highly dangerous and can Cause”Carbon Monoxide Poisoning” which will cause drowsiness and death.
• The engine must not be run at speeds that exceed the maximum set speed. Operating an engine at excessive speeds increases the hazard of personal injury. Do not tamper with components, which may increase or
decrease the governed speed.
• Never leave the engine running unattended near a building or near a canvas or plastic structure I.e. Tents etc.
• Always use the correct fuel as stated in the user manual and on the rating plate.
• To prevent fire, always stop the engine when refuelling and never over fill the fuel tank. Always clean up spilt
fuel immediately.
• Do not run the engine in or near an explosive atmosphere.
• Check the fuel system periodically for leaks. Seals and hoses should be checked for signs of deterioration or
chafing. Check for loose or missing clamps damaged fuel tank or filler cap. All defects should be corrected
before further use.
• Do not allow the engine to run out of fuel while in use. The fuel contains the lubrication that protects the
engine.
• Before transporting in a vehicle, drain all fuel to prevent leakage.
• Store the engine in a well-ventilated area with the fuel tank empty.
HOLE BORER
SPECIFIC SAFETY INSTRUCTIONS
Before using the hole borer the operator must be informed of the manufacturers safety instructions and instructions for use.
• The machine must only be operated by a trained person.
• Use the hole borer only in daylight or in good artificial light.
• Always start the hole borer carefully with your feet well away from the auger bit.
• Do not leave the hole borer unattended when the engine is running.
• Do not use the hole borer barefoot or in open toed sandals. Always wear suitable clothing, gloves and safety
shoes.
• Use the hole borer in soil only, do not use to bore holes in excessively rocky ground.
• Do not bore holes in an area where there may be hidden gas and water pipes or electricity and other cables.
• Ensure the auger bit is attached to the gearbox output shaft securely.
• Do not use a damaged or worn auger bit.
• Do not carry the hole borer with the engine running, the auger bit should not rotate when the engine is
idling.
• Keep hands and feet away from the rotating auger bit at all times.
• Always ensure that the engine is switched off and the spark plug cap is removed before making any adjustments.
• Before using your hole borer always visually inspect it to see if any parts are worn or damaged. Replace damaged parts before using the machine.
GENERAL SAFETY RULES
WARNING! Read all instructions Failure to fol-
low all instructions may result in injury or death.
Save These Instructions
1) WORK AREA
a) Keep work area clean and well lit. Cluttered and
dark areas invite accidents.
b) Do not operate petrol augers in explosive atmospheres, such as in the presence of flammable liquids,
gases or dust. Petrol augers create sparks which may
ignite the dust or fumes.
c) Keep children and bystanders away while operating a petrol auger. Distractions can cause you to lose
control.
2) PERSONAL SAFETY
a) Stay alert, watch what you are doing and use common sense when operating a petrol auger.
Do not use a petrol auger while you are tired or under
the influence of drugs, alcohol or medication. A moment of inattention while operating petrol augers
may result in serious personal injury.
b) Use safety equipment. Always wear eye protection.
Safety equipment such as dust mask, non-skid safety
shoes, hard hat, or hearing protection used for appropriate conditions will reduce personal injuries.
c) Avoid accidental starting. Ensure the switch
is in the off position.
d) Remove any adjusting key or wrench before turning the petrol auger on. A wrench or a key left attached to a rotating part of the petrol augers may
result in personal injury.
e) Do not overreach. Keep proper footing and balance
at all times. This enables better control of the petrol
auger in unexpected situations.
f) Dress properly. Do not wear loose clothing or jewellery. Keep your hair, clothing and gloves away from
moving parts. Loose clothes, jewellery or long hair can
be caught in moving parts.
4) PETROL AUGER USE AND CARE
a) Do not force the petrol auger.
b) Do not use the petrol auger if the switch does
not turn it on and off. Any petrol auger that cannot
be controlled with the switch is dangerous and must
be repaired.
c) Disconnect the spark plug before making any
adjustments, changing accessories, or storing petrol
augers. Such preventive safety measures reduce the
risk of starting the petrol auger accidentally.
d) Store idle petrol augers out of the reach of children
and do not allow persons unfamiliar with the petrol
auger or these instructions to operate the petrol
auger. Petrol augers are dangerous in the hands of
untrained users.
e) Maintain petrol augers. Check for misalignment or
binding of moving parts, breakage of parts and any
other condition that may affect the petrol augers
operation. If damaged, have the petrol auger repaired
before use. Many accidents are caused by poorly
maintained petrol augers.
f) Keep cutting tools sharp and clean. Properly maintained cutting tools with sharp cutting edges are less
likely to bind and are easier to control.
g) Use the petrol auger, accessories and tool bits
etc,. in accordance with these instructions and
in the manner intended for the particular type
of petrol auger, taking into account the working conditions and the work to be performed. Use
of the petrol augers for operations different from
EXPLANATION OF SYMBOLS
An explanation of the symbols/icons that appear on the machine and the labels. These are here for
your safety and must be observed.
2
1
3
4
5
6
5m
1) Read Instruction manual before use.
2) Wear protective foot wear.
3) Use outside only
4) Keep bystanders away minimum 5 metres, risk of flying debris.
5) Wear protective gloves.
6) Wear hearing and eye protection.
7) Caution! Rotating auger when motor is running.
7
COMPONENT IDENTIFICATION
Components and controls
(Pic.1)
1 Engine
2 Auger bit
3 Side handle (with operating
controls)
4 Side handle
5 Recoil starter
6 fuel tank
7 Exhaust
8 Choke lever
9 Throttle trigger
10 STOP/RUN switch
11 Safety switch
12 Fuel mixing bottle
13 Spanner
14 Hex keys
15 Spark plug wrench
16 Spark plug
GETTING STARTED
CAUTION: The operator of this machine is ad-
vised that reactive torque may occur when the
rotating auger makes contact with hard debris.
Therefore a firm hold with both hands is essential.
Fitting auger bits (Pic.2)
Caution. Always ensure that the hole borer is switched
off before making any adjustments. With the locking
pin and split pin removed place the hollow end of the
auger bit onto the drive shaft on the underside of the
hole borer. Line the hole in the shaft of the auger bit
(Pic.2)(2.1) with the hole on the drive shaft of the hole
borer, push the locking pin (Pic.2)(2.2) through the hole
and lock in position using the split pin (Pic.2)(2.3)
provided.
to measure the correct amount of oil to petrol.
Warning! Do not mix the fuel in the hole borer fuel
tank.
Measure the fuel into the fuel mixing bottle then add
the correct proportion of two stroke oil according to
the markings on the fuel mixing bottle. Agitate the
container to ensure thorough mixing of the petrol and
oil.
Filling the fuel tank
Use a suitable funnel to transfer the fuel mix from the
container to the hole borer fuel tank, taking care not
to spill any fuel or over fill the fuel tank.
Please note that for safety reasons this product has been supplied with the fuel system
completely drained of fuel and the engine will
require“running in”.
When starting for the first time you may experience
some difficulty in starting the hole borer. Once the fuel
has fully circulated through the system the hole borer
will start. Once started and “run in ” future starting will
be easier.
Starting the engine (Pics.4 to 7)
Gently agitate the fuel mix by gently rocking the hole
borer backwards and forwards a few times.
This will ensure that the two stroke oil has not settled
out from the petrol.
Set the choke lever to the On position Pic.4)
Fuelling (Pic.3)
The hole borer is powered by a two stroke engine
which uses a petrol oil fuel mix. The correct fuel mixture is a ratio of 25:1 of petrol and two stroke
oil i.e. 25 parts of unleaded petrol to one part of two
stroke oil.
WARNING! Use only genuine two stroke oil.
If the carburettor requires “priming”, pump the clear
rubber priming button (Pic.5) until fuel appears in the
clear rubber priming button.
Fuel mixing
The fuel tank has a maximum capacity of 1.1L.
To mix the fuel correctly, use the fuel mixing bottle
Make sure that the STOP/RUN switch is in the
RUN position (Pic.6) (6.1).
mencing the boring operation.
If the auger bit hits a stone, hard ground etc., the
rotation may stop immediately and give a hard torque
reaction.
It is required that the operator has a firm grip on both
handles during operation in order to compensate for a
sudden torque reaction.
Remove any jammed debris from the auger bit and
examine for any damage before recommencing
work.
Stopping the engine (Pic.8)
Push the STOP/RUN switch to the STOP
position (Pic.8)(8.1).
Hold down the hole borer firmly with one hand.
With the other hand grip the recoil starter cord handle
Maintenance
WARNING: Always ensure that the hole borer is
(Pic.7) and pull slowly until resistance is felt indicating
that the recoil starter is engaged. When resistance is
felt pull the cord sharply.
Continue this procedure until the engine starts. When
the engine has been successfully started and is running smoothly return the choke lever to
the OFF position. Press in the safety switch lever (Pic.6)
(6.2) then squeeze the throttle lever (Pic.6) (6.3),until
the desired setting is achieved.
To stop the auger bit from rotating, briefly squeeze
then release the throttle lever.
Operating the petrol auger
This product requires the use of two hands to ensure
safe operation.
Make sure that the hole boring operation does not involve the risk of contact with electric cables. gas mains,
water pipes etc.
Inspect the work area before starting. Remove any
objects or debris that could be thrown, jammed or
become entangled in the auger bit.
Adopt a stable stance always keeping the hole borer in
front of your body. Grip the handles with both hands
ensuring you can safely operate the control levers.
Allow the auger bit to reach full speed before com-
switched off and the spark plug cap is removed
before making any adjustments or maintenance
procedures.
Always wear sturdy gloves when handling auger
bits, as they can be very sharp.
Re-lubricate all moving parts at regular intervals.
If the body of the hole borer needs cleaning,wipe it
with a soft damp cloth. A mild detergent can be used
but nothing like alcohol, petrol or other cleaning
agent. Never use caustic agents to clean plastic parts.
Spark plug (Pic.9)
After every 10 hours use
After every 10 hours of running the spark plug
should be removed. Check the colour of the
deposits on the end of the spark plug; it should
be a “Tan” colour. Remove all deposits using a
stiff brush a brass wire brush is ideal. Check the spark
plug gap and adjust if required. The correct
gap should be 0.7 to 0.8mm.
Air filter (Pic.10)
After every 4 hours use
After every 4 hours of running, the air filter should
be removed, examined for deterioration and cleaned.
Remove the air filter housing cover (Pic.10)(10.1) then
remove the air filter. Clean the air filter thoroughly using an environmentally friendly water based degreasing agent, when the air filter ha dried out apply sufficient ordinary engine oil to coat the whole of the filter.
Squeeze out any excess oil and replace the air filter and
cover.
Warning! Never run the engine without the air
filter fitted.
SPECIFICATIONS
Engine type:
Displacement: Auger speed:
Fuel:
Fuel/Oil mix ratio :
Fuel tank capacity:
Gearbox oil capacity:
Gearbox oil type:
Starting system:
Air cleaner type:
Sound pressure:
Sound power:
Vibration level:
Air-cooled 2-stroke, Single Cylinder Petrol Engine 51.7cc 170 /min Unleaded petrol ( Do not use E10) + 2 -Stroke oil.
25:1 1.1L 250ml SAE 80-90 Recoil starter Sponge element 100dB(A) 110dB(A) 3.58m/s2 WARNING! The sound intensity level for the operator may exceed 85dB(A) always use hearing protection when the motor is running.
NOTES
NOTES
WARRANTY
Our goods come with guarantees that cannot be excluded under the Australian Consumer Law. You are entitled
to a replacement or refund for a major failure and for compensation for any other reasonably foreseeable loss or
damage. You are also entitled to have the goods repaired or replaced if the goods fail to be of acceptable quality
and the failure does not amount to a major failure.
This product is covered by a 12 month warranty.
This warranty will not apply:
(i) where this product has been subjected to misuse, abuse, accident or want of care;
(ii) where this product has been used for a purpose for which it was not designed or is not suited;
(iii) where the service of this product has been undertaken by a non-authorised person or company or if nonapproved parts have been used;
(iv) where this product has been used for industrial purposes.
Should service become necessary during the warranty period, the purchaser should contact an Authorised Service Centre or J W Ross. In order to obtain warranty service, the purchaser must present the store receipt showing the name of the retailer and the date of purchase.
The period of the warranty begins from the original date of purchase, notwithstanding any
subsequent repair or parts replacement.
Purchaser shall be responsible for all transport charges to and from the Authorised Service
Centre.
Damage in transit is not covered by this warranty. The purchaser should remove from the product any liquids (if
applicable) before sending the tool for service or repair. The tool should be packed securely to prevent damage.
WARRANTY EXCLUSIONS
Wear parts or service related parts required when performing normal and regular maintenance of this product
are not covered by warranty unless it is found to be defective by an Authorised Service Centre. These include,
but are not limited to: Spark Plugs, Carburettor Adjustments, Lubricants, Engine Tune-ups, Filters.
Distributed in Australia by J W Ross and Sons ( Australia ) Pty Ltd.
PO Box 352 North Ryde BC, NSW, 1670
For you local service centre: www.jwross.com.au
Ph:1800 251 338
The J.W. Ross policy is one of continuous improvement and the company reserves the right to alter designs,
colours and specifications without notice.
For information on all ROSS products
please visit: www.rosstools.com.au
The ROSS logo and Bull device are trademarks of J.W. Ross Pty Ltd.