1
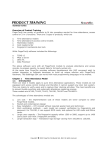
Easy Data Centralization with Webster
User Guide
CONTENTS
3-4
1 • Introducing Webster
Webster - An Introduction
5-14
2 • Installing & Configuring Webster
15-18
3 • Managing FingerTec Terminals in WebsteR
19-21
4 • Managing Users in Terminals & Webster
Installing the System
Configuring Webster
Adding Terminals into Webster
Editing Terminals in Webster
Deleting Terminals in Webster
Searching for Terminals
Controlling the Terminals
Understanding the Basic Information of Webster
Uploading, Transferring, and Exporting User Data
Searching for Users
Editing and Deleting Users
22-23
5 • Managing Transactions Logs in Webster
Sorting Transaction Logs
Exporting Transaction Logs
Reading Transaction Logs
24-26
6 • Checking the Webster Command and System Log
27-28
7 • Real-Time Transaction and Users
Webster Command
System Log
Monitoring Real-Time Transactions
Monitoring Real-Time User Enrollment
29-33
8 • Managing, Administrating, and Maintaining
Webster
Managing Administrators
Managing & Maintaining the Database
1• Introducing Webster
Webster – An Introduction
FingerTec Webster is a web platform that facilitates all FingerTec terminals to be integrated
with a web application. It is built on the latest Microsoft Technology, Visual Studio .NET
2010 with the .NET Framework 4.0 as the system architecture, and runs on Microsoft Internet Information Services (IIS), supports MySQL database, and centralizes data from all
FingerTec terminals through web to server in a real-time manner.
To use Webster, you will need to perform the installation at a server with a static IP address (Webster IP) to work as a host for FingerTec terminals to connect to. With Webster,
FingerTec terminals can be installed at any location and still be able to connect to Webster
as long as the terminals are connected to the server via LAN or WAN.
Once the Webster IP is inserted in the terminals, the Webster User Interface would show
the terminal status as Online. The terminals will start to send data (e.g. User data, enrollment, transaction records, etc.) in real-time back to Webster through an active connection.
In the event of a connection failure, the terminals will store the data into a buffer memory
and resume sending the data once the connection is established again, hence avoiding any
loss of data and records. Take a look at the diagram below for a better illustration:
TA103R
router
router
192.168.1.2
Branch 1
TCMS V2 Software
router
Internet
Websterserver
router
192.168.1.3
Third Party Software
219.93.242.2
TA200 Plus
Branch 2
Internet
router
WAN
Web Based Client
Webster consolidates the data from FingerTec terminals into the MySQL database of the
same server. MySQL is one of the most popular, reliable and fast open source database that
facilitates software integration and data extraction. Software specialists will be able to integrate the raw data into their existing software or system, thus producing a complete and
automated time attendance processing and third party software integration. To sum it up,
Webster is a web based intermediate that links up FingerTec terminals, the MySQL database
and a 3rd party software into a total web-based solution which allows access to users at anytime and any location via an Internet browser.
To highlight the differences between the conventional connection method and the Webster
connection method, refer to the table below.
CONVENTIONAL CONNECTION
WEBSTER CONNECTION
• Data is stored in each individual FingerTec
terminal.
• Data will be centralized and stored in the Webster server.
• Data is uploaded to the Webster server in a
real-time manner.
• TCMSv2 along with any third party software
will be able to login to Webster to download
data for processing.
• Once Webster is installed on the server, all terminal management will be web-based. There’ll
be no need for additional installations on the
client PC.
• After the installation of Webster, simply configure the terminals at multiple-sites to connect to the Webster server.
• Data will need to be downloaded into the
TCMS V2.
• Data is downloaded into a single TCMS V2
software making it difficult to enable data
sharing between applications.
• An installation of the TCMSv2 or BioBridge
is a must to control and manage the terminals.
• For multiple-site installation, configuration on the router / port forwarding needs
to be done at each router on each site.
Webster provides a User Interface for system administrators to browse the attendance
records stored in the MySQL database. This will be raw data downloaded from the terminals,
which show the user ID, date, and time of verification. The system integrator and software
developers can fully utilize the records from the MySQL database, to process time attendance analysis and payroll calculations accordingly.
Webster also provides a simple User Interface for system administrators to transfer user data
among FingerTec terminals. Users will not need to re-enroll at new terminals should they
relocate to a new workstation / office. This is useful for companies with multiple branches
and outlets where employees relocations are common and often occur.
Note
Webster is not a complete time attendance solution. It is only an intermediate to facilitate FingerTec
terminals into a web-based management, and consolidate data into a centralized database. It does not
provide any attendance analysis, but only raw data
viewing line by line. It does not provide attendance
reports, because it is not integrated with any calculation logic. It cannot change any access control
settings in FingerTec terminals, such as time zones,
door lock settings etc.
For more optimized and advanced time attendance
and access control configuration, FingerTec recommends that you use the complimentary bundled
software, TCMS V2 or the web-based attendance
solution, TimeTec.
2• Installing & Configuring Webster
Installing the System
For Webster to function properly, these components need to be installed first:
Information Services
• Internet
.Net Framework 4.0
• Microsoft
server
• MySQL
Connector ODBC 3.51
• MySQL
• FingerTec Webster
Make sure the server has been installed with the above components before attempting to
install Webster. The install shield will run a test to check that the components have been
installed before proceeding with the installation.
Installing the Internet Information Service (IIS)
The IIS comes with the Windows Operating System and should be installed by the administrator. To install it, follow the steps below.
Go to Control Panel > Program
& Features > Turn Windows feature on or off > Check Internet
Information Service checkbox to
install IIS > Follow the on-screen
instructions to finish the installation of IIS.
installing Microsoft .Net Framework 4.0
Download the installation file at http://www.microsoft.com/download/en/details.
aspx?id=17851 > Run the installation file and follow the instructions to start to install Microsoft .Net Framework 4.0
Read and accept the license agreement > The installation requires an Internet connection
to download and install the component into the server. Make sure an Internet connection is
available. > Follow the on-screen instructions to complete the installation.
installing the MySQL server v5.5
Webster requires the MySQL server version 5.5 to run smoothly. Download the installation
file at http://www.mysql.com/downloads > Run the installation file to begin installation.
Click Next > Read and accept the License Agreement > Click Next to proceed.
Select Typical > Click Install to begin the installation process.
Wait for the installation of the MySQL to be complete > Check the checkbox to Launch the
MySQL Instance Configuration Wizard > Finish > Start to configure the MySQL server.
If the server is installed with an older version of MySQL server, the system will advise the
administrator > Select to use the latest version, v5.5.8 > Next > Select Detailed Configuration and Click Next
Select Developer Machine > Click Next > Select Multifunctional Database > Click Next
Select Database Support (DSS)/OLAP > Click Next
Select Standard Character Set > Click Next
Uncheck Modify Security Settings if the administrator does not want to change the default
login name and password of the MySQL server (default login name = root, password =
<blank>) > Click Next
If the Administrator would like to change the login name and password, check Modify
Security Settings and insert login password to proceed.
10
Click Execute > Wait for the system to complete the configuration > Click Finish to end
the process.
installing the MySQL Connector ODBC 3.5.1
Webster requires the MySQL Connector ODBC 3.51 to work with the MySQL database.
Download the installation file at http://www.mysql.com/downloads/connector/
odbc/3.51.html
Run the installation file > Click Next > Read and accept the License Agreement > Click
Next
11
Select Typical > Click Next > Click Install > Click Finish
INSTALLING WEBSTER
After successfully installing the previous components, you may proceed to install FingerTec Webster.
Run the Setup.exe file to begin installation. For Windows Vista, Windows 7 and Windows 8
users, right click and select Run As Administrator to run the Setup.exe.
Click Next and insert the relevant information. Click Next to continue.
12
Insert the IP address of the MySQL server. Insert “localhost” if the MySQL server has been
installed in the same server. Insert the Login ID and Password to connect to the MySQL
server and click Next. Select Complete and click Next to continue.
Click Install to begin the installation. Once the process is complete, click Finish to continue.
Now, Webster and its components are successfully installed into the server.
13
To run Webster: Open Internet Browser > Insert the IP address of the Webster server in
the address bar (e.g. 192.168.1.201/Webster) > Fill in default login username and password
(default login username: admin; password: admin) > Click Login.
Configuring Webster
Now that Webster is successfully installed, it is time to set some basic configuration. Click
on System Configuration to start configuring the Webster.
Auto refresh interval: Defines how fast Webster refreshes its database to publish the latest information.
Real-time monitoring row: Justifies how many rows to
be displayed as real-time records on a page.
Number of grid rows per page: Justifies how many
rows to be displayed on a page.
You may configure the System Email Settings if the administrator would like Webster to
send an email to the administrator if he/she forgets the login username and password.
This function requires an SMTP Server address.
Email: Email address to be used.
Password: Login password of the email address.
14
3 • Managing FingerTec Terminals in Webster
The Terminal List page displays all the FingerTec terminals that are connected to the Webster server.
Searching a terminal by serial number, device name or IP address
Basic command buttons
Display table of device information.
Adding Terminals into Webster
The administrator does not need to add FingerTec terminals manually into Webster. The
terminals connect to Webster automatically by referring to the Webster IP address which
has been preset in the terminal settings.
Set COMM option in the FingerTec terminal
Insert IP address, Gateway and Subnet
mask
Insert Webster IP address (static IP address of the Webster server)
Restart
terminal to take effect.
The terminal takes time to connect to the Webserver IP address. Once connected, the
administrator will see the basic information of the terminal displayed on the Terminal List
as below:
Check the following settings if the page does not display any information of the terminals:
• Internet connection – Make sure the Webster server and the terminals are connected to
the Internet.
• Firewall and Antivirus settings of the Webster server.
• IP address, Gateway, Subnet mask and Webster IP address set in the terminal.
15
Editing Terminals in Webster
Click the Edit button next to the relevant FingerTec terminals to edit the basic information
of the terminals.
Now the administrator can insert or change the Device ID of the terminals. It is recommended to name the terminals for easy reference, for example, “Time Clock at HQ”. Click
Update to save changes.
Deleting Terminals in Webster
The administrator can delete any of the terminals via Webster if it is not in use. Click Delete
and OK to confirm and delete the terminal.
BATCH PROCESSING – DELETE OR EDIT
In case the administrator wants to edit or delete multiple terminals, this can be done by
batch processing: Select relevant terminals
Select Batch Edit or Batch Delete
Searching for Terminals
An administrator can search for a terminal by its serial number, device number or IP address. Insert either one information into the relevant data field and click Search to find the
terminal. The results will be displayed at the bottom in a table format (section
).
16
Controlling the Terminals
Section
lists the basic command buttons that allow you to interact with the FingerTec
terminals. The administrator must select the terminals by checking the checkbox next to
the serial number of terminal, then select the relevant command.
Check reader: Identifies the connectivity status of the
terminal, Online (terminal is connected to Webster) or
Offline (terminal is not connected to Webster). It is advisable to check the connectivity status of the terminal
before starting an operation.
Reload Option: If an administrator changes any connection settings in the terminals, the administrator
must refresh the information in Webster by clicking this
button.
Reboot: Restarts the terminal remotely.
Get Info: Downloads basic information from the terminal and displays it in the table, for example, firmware
version, algorithm version, total number of users, etc.
Clear log: Deletes all stored transaction logs in the terminal. Once deleted, the transaction logs are unable to
be restored or retrieved again. Only perform this operation if the terminal is almost reaching its storage limit.
Make sure that you have already retrieved and stored
all the transaction logs into the Webster server before
performing this step.
Clear All Data: Deletes all user information and transaction logs stored in the terminal. This is to initialize the
terminal by emptying its buffer memory.
Transfer Data To Device: to copy all user information
from 1 terminal and transfer them to another terminal.
Webster needs a LAN/WAN connection to send commands to the terminals. If the connection is disrupted or the terminal is shut down, Webster will not be able to send commands to it. In this situation, Webster will then keep and queue the commands and execute
them? when the connection or terminal resumes operation. It is recommended to check
the Real Time Webster Command page (Chapter 7 Monitoring) to check the status of the
commands.
In the example below, an administrator is trying to copy user information from Terminal ID
1 to transfer them to Terminal ID 2. The steps are shown below:
1. Select the terminal to copy data
Click Transfer Data To Device
2. Webster will alert you to define the destination of terminal
to transfer the data to. Select the terminal and click OK. The
screen will display a Success message. However, the operation might be pending due to an unavailable connection.
To double check the status, go to Real Time Webster Command.
17
3.Go to Monitoring
Real Time Webster Command. In this window, Webster lists all the
commands that are queued or completed.
4. When Webster completes the data transfer or any other command, the status will change
to “Completed”.
Always check the Real Time Webster Command to confirm the command is completed. For
more explanation, view Chapter 6.
Understanding the Basic Information
of Terminals
Section
is the check list of FingerTec terminals. The administrator can view the details
of the FingerTec terminals as it appears in the table.
Serial no: 7-digit serial number of the connected terminals.
Device ID: The Device number set in FingerTec terminals, varying from 1 to 999. No duplication of number
is allowed. The administrator can set the Dev ID and
update the changes to terminals.
Device Model: The specific model of the FingerTec terminal.
Description: The assigned name of the terminal for a
more accurate reference, for example: Time Clock at
HQ. The administrator can set the name of each terminal by editing the terminal information.
Firmware version: The firmware version of the terminal. This is an important reference to a FingerTec
technical person to troubleshoot the terminal during
a system failure. The administrator does not have any
authorization to edit this.
Algorithm Version: The algorithm version supported by
18
the FingerTec terminal.
Platform: The version of core board of FingerTec terminals. This is an important reference to a FingerTec
technical person to troubleshoot the terminal during
a system failure. The administrator does not have any
authorization to edit this.
Transaction count: Total transaction logs (attendance
records) saved in the terminal. All of these logs have
already been uploaded to the Webster database. The
count is as an alert to the administrator about storage
limit of the terminal.
User count: Total users stored in the terminal.
FP Count: Total fingerprints stored in the terminal.
IP Address: The unique IP address of the terminal.
Last Activity: The most recent upload time of terminal
data (users or transaction logs) to Webster.
Created time: The date and time that the terminal first
connected to Webster.
4 • Managing Users in Terminals & Webster
FingerTec terminals always uploads user information (user ID, privileges, fingerprints,
passwords, and cards) to Webster after enrollment, and publishes it onto the User page.
The process is fully automatic and does not require the administrator to regularly download the information from terminals. The User page is divided into 3 sections.
Searching users by user ID, name or serial number of terminal.
Basic command button.
Table to display user data.
Uploading, Transferring, and Exporting
User Data
Although user information is automatically updated from the terminals to Webster, the
administrator can also add user information to the terminals via Webster by uploading
and transferring data.
UPLOADING USERS
This process creates new users in the terminal
without the user actually enrolling at the terminal. The administrator can upload user ID, password and Card ID to the terminal.
To create and upload new users: Select terminal by serial number
Create new user ID
(does not exist in the terminal)
Name the
User
Insert Card ID (optional)
Define
privilege Insert password (optional)
Click
Upload User.
19
UPLOADING TEMPLATES
This process uploads fingerprint templates of users into the terminals. The administrator can
copy and paste the fingerprint templates between terminals.
To copy users’ fingerprint: Select terminal by serial number
Select a user ID
Select
Fingerprint ID (number of fingerprint enrolled, start from 0 to 9)
Copy content in the
Template column
To paste users’ fingerprint: Select terminal by serial number
Fingerprint ID
Select Valid
Click Upload Template
Select a user ID
Select
Paste the copied template into the Template column
The fingerprint template is now uploaded into the terminal as the user’s fingerprint.
TRANSFERRING USER DATA
This process allows the administrator to transfer user data
(user ID, fingerprints, cards, password, etc) among FingerTec terminals. This is to ease the process of enrollment
so that the user does not have to repeatedly enroll at all
the FingerTec terminals.
To transfer users: Select users from the table
terminal to transfer the users to
Transferring user data does
not delete the user data
from any terminals.
Click Transfer Data To Device
Click OK to proceed
EXPORTING USERS
The administrator may export user information
into a check list format for reference and record
purposes. There are three formats that the data
can be exported into which are csv, txt or xls format.
20
Note
Select
Searching for Users
The administrator is able to search for user information on the Webster database. The users
can be searched either by the User ID, Name or Serial Number of terminals that the user in
enrolled into. Just insert either information into the data fiels and the results will be displayed in a table at the bottom of the page.
Editing and Deleting Users
The administrator has the authorization to edit and delete users in the Webster server and
FingerTec terminals. Any editing or deleting operation takes immediate effect in the terminals. You may choose to edit or delete a single user, or multiple users at a time.
To edit a single user: Click Edit next to the user ID column
(optional)
Select Privilege
Define User Group
automatically updates the changes to the terminal.
Insert Name and Card ID
Click Update to proceed
Webster
To edit multiple users: Select users
Click Batch Edit at the bottom A new window will
pop up
Insert name and Card ID (optional)
Select Privilege
Define User Group
Click Update to proceed
Webster automatically updates the changes to the terminal.
To delete one user: Click Delete next to the user
ID Click OK to confirm to delete Webster automatically updates the changes to the terminal
to delete the user.
To delete multiple users: Select users
Click
Batch Delete at the bottom of the page
Click
OK to confirm to delete
Webster automatically
updates the changes to the terminal to delete the
users.
21
5 • Managing Transactions Logs in Webster
Every time a user verifies to report their attendance at a terminal, the transaction logs (attendance records) get uploaded to Webster immediately. This makes the Webster a realtime attendance recording server. In the event of a connection failure, the terminals then
save the transaction logs into its buffer memory, to be uploaded to Webster the moment
the connection to Webster resumes.
The sorting data field
Export button
The table displaying transaction details
Sorting Transaction Logs
The administrator can choose to view the transaction logs by serial number of the terminals or by date range.
To sort by serial number:
Insert serial number of
terminal into the Serial
Number column
Click
Search
Transaction
logs will be displayed in a
table.
22
To sort by Date Range: Insert the start and end date
Click Search
Transaction logs will be displayed in
a table.
Exporting Transaction Logs
Transaction logs can be exported into CSV, TXT or XLS formats. The exported file can be
used as data to be imported into a 3rd party software for further processing.
To
export
transaction:
Click Export
Define serial
number of the terminal
Define start and end date
Select format of export file
Click Export to proceed.
Reading the Transaction Logs
Transaction logs in Webster can be retrieved and viewed by the administrator anytime. Each
code/number represents an important piece of data:
Serial no: The serial number of the terminal, which
uploaded the transaction log
User ID: User ID of the verified user
Verify Code: The type of verification used (0
– card/password, 1 – fingerprint)
Check Type: Status defined at the time of verification (indicated by the user during verification, 0
– Check In, 1 – Check Out, 2 – Break, 3 – Resume, 4
– OT in and 5 – OT Out)
Work Code: The number inserted by users during
verification to indicate the reason of attendance
reporting. For more details see the explanation in
the Hardware user manual for FingerTec models
Check Time: Date and time of verification
23
6 • Checking the Webster Command and System Log
The connection between Webster and the terminals can be affected by many factors, such
as a congested or slow network, the shutting down of terminals, etc. These reasons cause
the data transfer between Webster and the terminals to be delayed. As discussed earlier,
in such situations, the terminals will save the data and transaction logs into the buffer
memory and resumes the upload when a connection is established again. The same process is done by Webster.
When the administrator is trying to send a command to the terminals when the connection is down, Webster will store the command into its own buffer memory and will resend
the data when the connection resumes. It is advisable to check the page Webster Command to see the status of command, which will be one of the following:
Completed: Webster has completed the data upload or commands to the terminals.
Pending: Webster is waiting to upload data or send
commands to the terminals.
The Webster Command page also displays other important information, such as:
Serial no: Showing which terminal Webster will be
connecting to
Command: Displays he name of the command or
data transfer between Webster and the terminals
Status: Show the status of the commands: Completed or Pending
24
Request time: The date and time that Webster started to send the data or command
Response time: The date and time that the terminal
responded to Webster
Complete time: The date and time that the data
transfer or command is completed (only appears if
Status = Completed)
These logs are important for the administrator to be informed of the communication status
between Webster and the FingerTec terminals. The administrator can filter the logs according to the serial number of terminals, or types of status.
Webster Command
The records in Webster Command are all historical records and not real-time logs. It is recommended that the administrator view the Real Time Webster Command page (under Monitoring) to view all real-time commands/data transfer between the terminals and Webster.
System Log
System log refers to administrative records stored in each terminal. It records any operation
done by the administrator, for example, registration of a new user by fingerprint. The administrator will not be able to see these records at the terminal itself. However the terminal
saves these records into its buffer memory, and uploads them to Webster when a connection
is established.
These records can be viewed and read by clicking on Terminal System Log.
25
The Terminal System Log page is displayed in a table format. Each column displays the
following:
Serial number: The serial number of the terminal that
sent the system log to Webster
Log time: The date and time that the operation occurred
Description: The operation done at the terminal
Created time: The date and time that the record was
uploaded to Webster
If the administrator would like to monitor the real-time operations occurring at the terminal, go to the Real Time Terminal System Log page under Monitoring for details. Whenever
an operation occurs at the terminal, the administrator will be informed immediately.
26
7 • Monitoring Real-Time Transactions & Users
Monitoring Real-Time Transactions
Real Time Transaction is a page that displays real-time verifications that occur at the terminals. Webster receives and publishes all transactions received from connected terminals
to inform the administrator about activity at the terminals.
The transactions are displayed in a table format which contains the following columns:
Serial no: The serial number of the terminal which
uploaded the transaction log.
User ID: The user ID of the verified user.
Check Type: Status defined at the time of verification (indicated by the user during verification, 0
– Check In, 1 – Check Out, 2 – Break, 3 – Resume, 4
– OT in and 5 – OT Out)
Verify Code: The type of verification used (0 – card/
password, 1 – fingerprint)
WorkCode: The number inserted by users during
verification to indicate the reason of attendance reporting. For more details see the explanation in the
Hardware user manual for FingerTec models
Check Time: Date and time of verification
27
Monitoring Real-Time User Enrollment
Besides real-time transactions, Webster also displays real-time user enrollment records
from all terminals. The administrator can view and be informed of new users, which terminal he/she is enrolled in, together with the date and time of enrollment.
Serial no: The serial number of the terminal in which
the new user has been enrolled in
Privilege: The privilege of the user (0 – normal user, 1
– Enroller , 2 – Administrator, 3 – Supervisor)
User ID: The assigned new user ID
User Group: TBA
Name: The name of the new user
Created time: Date and time of verification
Card Number: The card ID enrolled.
28
8 • Managing, Administrating, and Maintaining Webster
Managing Administrator
Webster only allows administrators access to manage terminals, users and transactions.
Super administrators, on the other hand, are able to set and assign new supervisors, and
control the authority level of supervisors. The super administrator is assigned to the first
person that logs into Webster. To maintain a level of security with Webster, it is recommended that each administrator and supervisor be assigned with different levels of access
which can be controlled and monitored by a username and password.
Click User Management to view the details of administrators.
The administrators can be viewed and sorted by User ID, name, and email. The Membership Status displays the status of each individual administrator, whether they are active
(access allowed) or inactive (access denied).
29
The table below displays the levels of authority of all the different administrators. Each
function can be allowed or denied to each administrator.
User: Authority to view/edit/delete users in Webster
and FingerTec terminals
Terminal System Log: Authority to view/delete the
system logs
Transaction View: Authority to view transaction logs
of the users
User Management: Authority to view/edit/delete
administrators
Terminal List: Authority to view/edit/delete terminals
in Terminal List
If allowed, the figure “1” will be displayed under that function, and if denied, the figure “0”
will be displayed under that function.
In the example above, the administrator has the authority to view/edit/delete users in the
User page.
30
ADDING A NEW ADMINISTRATOR
To add new administrator: Click the Add New User button
Fill in the relevant informa-
tion into the table.
Define the authority level in each data field
ate User to complete the process.
Check the checkbox to enable
Click Cre-
A new administrator is now created and published on the main page.
To update the authority level of an administrator: Click the Update Privilege button
Select the User ID of the administrator
save settings.
Redefine the authority level
Click Update to
31
To update the basic information of an administrator ONLY: Click Edit next to the relevant administrator
Update the information
Click Update to save settings.
Managing & Maintaining the Database
It is advisable to perform housekeeping from time to time to maintain the Webster MySQL
database and secure the data. If the database size is too big, it is recommended to purge/
delete some old data before proceeding to backup database.
32
Administrators have the authority to do the following:
Backup database: to backup database into SQL
statement to store for future reference.
Maintenance: to reclaim the unused space and to
defragment the data file, to optimize the database.
Restore database: to restore SQL statement from
backup file.
Clear/Purge database: to clear/purge old/unused
data file. Administrator can define the date range
to clear/purge.
• To backup database
Select types of database
Click Backup
Select location to save the SQL statement.
• To do maintain database
Select types of database
Click Maintenance to proceed
• To clear database
Select type of database
Click Purge
Define date range
Click Purge to proceed
• To restore database
Click Choose File
Select the SQL statement
Click Upload to proceed.
33
Easy Data Centralization with Webster
© 2015 Timetec Computing Sdn Bhd. All rights reserved.• 042015