1
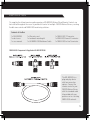
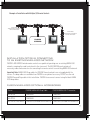
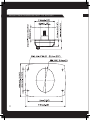
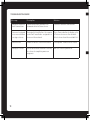
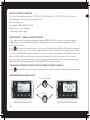
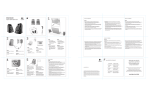
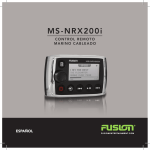
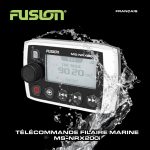
MS - N R X 20 0 i
MARINE
ENGLISH
WIRED
REMOTE
F U S I O N E N T E R TA I N M E N T. C O M
WA RN IN GS A ND C A UT IONS
Do not attempt to open the unit’s chassis. There are no user-serviceable parts or adjustments
inside. Take care when handling.
C A RE A N D M A INT E NA NC E
As with all products with a chrome finish exposed to the harsh Marine environment, a little care
will help to preserve the finish and prevent corrosion. Fusion recommends that you clean any salt
water and/or salt residue from the remote with a damp cloth soaked in fresh water. Always fit the
protective cover when not in use.
R E GISTER YO UR P RODUC T ONL INE :
For your own peace of mind, register your product purchase online at
www.fusionentertainment.com
All FUSION True Marine Products are backed by a 3 Year Limited Consumer Warranty and by
registering your product you can be assured that if the unexpected occurs we’ll have your details
and be ready to help.
R EC O RD YO UR P RODUC T DE T A IL S H E R E :
SERIAL NUMBER
AFFIX RECEIPT HERE
2
DATE OF PURCHASE
CO N TEN TS
• USER INTERFACE AND CONTROLS������������������������������������������������������������������������������������������������������ pg 4
Control Panel Layout������������������������������������������������������������������������������������������������������������������������������� pg 4
Button function���������������������������������������������������������������������������������������������������������������������������������������� pg 4
• INSTALLATION�������������������������������������������������������������������������������������������������������������������������������������� pg 5
Fusion Remote Control Network������������������������������������������������������������������������������������������������������������� pg 6
Connecting the MS-NRX200i to the 700 Series��������������������������������������������������������������������������������������� pg 6
Connecting the MS-NRX200i to the MS-RA205 Stereo��������������������������������������������������������������������������� pg 7
Example of Installation with Multiple (3) Remote Controls
pg 7
Connecting to an Existing NMEA 2000 Network������������������������������������������������������������������������������������� pg 7
NMEA 2000 Optional Accessories����������������������������������������������������������������������������������������������������������� pg 7
• MOUNTING............................................................................................................................................. pg 8
Mounting diagram������������������������������������������������������������������������������������������������������������������������������������ pg 8
• OPERATION............................................................................................................................................ pg 9
Power On/Off............................................................................................................................................. pg 9
Assigning the remote to a stereo������������������������������������������������������������������������������������������������������������ pg 9
Volume adjustment���������������������������������������������������������������������������������������������������������������������������������� pg 9
Backlight brightness������������������������������������������������������������������������������������������������������������������������������� pg 9
Troubleshooting Guide............................................................................................................................ pg 10
• SiriusXM® SATELLITE RADIO������������������������������������������������������������������������������������������������������������� pg 11
• NMEA2000 OPERATION���������������������������������������������������������������������������������������������������������������������� pg 11
NMEA2000 Repeater mode������������������������������������������������������������������������������������������������������������������� pg 11
NMEA2000 Repeater sentences������������������������������������������������������������������������������������������������������������ pg 12
NMEA2000 Repeater Messages������������������������������������������������������������������������������������������������������������ pg 13
• SPECIFICATIONS�������������������������������������������������������������������������������������������������������������������������������� pg 15
• LICENSING........................................................................................................................................... pg 15
3
U S ER IN TERFA C E A ND C ONT ROL S
CON TRO L PA N E L L A YOUT
B UTTON F UNCT I O N
POWER
Press to turn the unit ON — (Stereo &
Remote) Press and hold for 2 seconds to
power OFF — (Stereo & Remote)
MUTE
Press once to mute/un-mute audio
SOURCE
Press to cycle available sources.
Note: Press to find stereos when
‘no stereo found’ message is displayed.
MENU
Press to enter menu system. Press to
return to previous screen. Press and
hold to exit the menu structure. Press to
exit NMEA mode.
PLAY/PAUSE
Short Press
iPod/MTP/USB/CD/BT – Pause/Resume
current track.
DVD - Pause/Resume current video playback.
AM/FM/VHF - Press to cycle through
tuning modes (auto, manual, presets).
SiriusXM (USA Only) – Press to cycle
through tuning modes (channels, presets)
Press and Hold
AM/FM/SiriusXM/VHF – Store the
current station/channel as a Preset
4
BACK/PREVIOUS
Short Press
iPod/MTP/USB/CD/BT – Select the
previous track.
DVD – Select previous chapter
AM/FM/VHF – Start tuning down the
frequency spectrum or channel.
(Auto/Manual tuning mode) or previous preset
(Preset mode).
SiriusXM (USA Only) – Step down the channel list.
Press and Hold
iPod/USB/CD – Rewind the current track.
DVD - Rewind video playback.
AM/FM/VHF – Fast station/channel stepping.
SiriusXM (USA Only) – Fast browse down the
channel list. Release button to select channel.
FORWARD/NEXT
Short Press
iPod/MTP/USB/CD/BT – Select the next track.
DVD - Select next chapter
AM/FM/VHF - Start tuning up the frequency
spectrum or channel. (Auto/Manual tuning
mode) or previous preset (Preset mode).
SiriusXM (USA Only) – Step up the channel list.
Press and Hold
iPod/USB/CD – Fast forward the current track.
DVD – Fast Forward video playback.
AM/FM/VHF –Fast station/channel stepping.
SiriusXM (USA Only) – Fast browse up the
channel list. Release button to select channel.
ROTARY ENCODER
Turn to adjust volume, move up or down a
menu structure, or adjust a specific setting
item. Press to select a highlighted option,
confirm a setting.
I NS TA LLA TIO N
To complete the ultimate marine audio experience MS-NRX200i Marine Wired Remote Controls can
be installed throughout the vessel to provide full control of multiple FUSION Marine Stereos, creating
flexible zone control and NMEA 2000 monitoring solutions.
Contents of the Box
1 x MS-NRX200i
1 x dust cover
1 x user manual
1 x Warranty card
1 x hardware mounting kit
1 x 6M NMEA 2000 Backbone Cable
1 x NMEA 2000 T-Connector
1 x NMEA 2000 female Terminator
1 x NMEA 2000 in-line Terminator
NMEA 2000 Components Supplied with MS-NRX200i
The MS-NRX200i is a
plug and play device
with two connection
options. Connect the
remote control to your
FUSION Marine Stereo
with the standard cable
kit provided with your
purchase or to a existing
NMEA 2000 network.
5
INS TA LLA TIO N OP T ION 1:
F USIO N REM O T E C ONT ROL NE T WO R K
Connecting a FUSION Network
To avoid exceeding the power loading limitations of a FUSION remote control network the maximum number of
devices supported on a FUSION network is;
1. One FUSION Stereo Head Unit (MS-IP700i, MS-AV700i, MS-RA205, MS-BB300, MS-UD650, MS-AV650, MSUD750, MS-AV750).
2. Up to three MS-NRX200i remote controls.
For installations requiring a greater number of devices or connecting to other NMEA 2000 equipment the
installation of a full NMEA 2000 network is required. Refer to Option 2.
Connecting the MS-NRX200i to a FUSION Stereo
NMEA 2000
TEE-CONNECTOR
NMEA 2000
FEMALE TERMINATOR
NMEA 2000
INLINE TERMINATOR
NMEA 2000
BACKBONE CABLE - 6M
FUSION Stereo Powered Network
Powered Drop Cable
Supplied with Stereo
FUSION
STEREO
For the MS-IP700i, MS-AV700i, MS-RA205 and MS-BB300 stereos use the red Powered Drop Cable supplied
with the stereo.
For the MS-UD650, MS-AV650, MS-UD750 and MS-AV750 stereos the WIRED REMOTE cable is located in the
wiring loom at the rear of the stereo.
Important Note: To provide power to the remote controls on the FUSION remote control network ensure NRX
POWER is enabled in the setting menu. Press the ‘Menu’ button and select ‘SETTINGS’ > ‘NRX POWER’ select
ON (MS-UD650, MS-AV650, MS-UD750 and MS-AV750 only).
6
Example of Installation with Multiple (3) Remote Controls
NMEA 2000
TERMINATOR LOCATED AT
END OF NETWORK
NMEA 2000
TERMINATOR LOCATED AT
END OF NETWORK
FUSION
STEREO
INST A LLA TIO N OP T ION 2: C ONNE C T I N G
TO A N EX ISTIN G NME A 2000 NE T WO R K
FUSION’s MS-NRX200i wired remote controls are capable of operating over an existing NMEA 2000
network, removing the need to wire back to the stereo unit. The MS-NRX200i pack contains all
necessary cables and connectors for connecting the remote control to an existing NMEA 2000 network.
Important Note: NMEA 2000 Drop cables for FUSION Stereo head units are not supplied with the
stereos. The drop cables are available from FUSION as an optional accessory. DO NOT use the red
FUSION Powered Drop cable in this installation. FUSION stereos must connect using the black NMEA
2000 drop cables.
F U SIO N N M EA 2000 OP T IONA L A C C E S S O R I E S
Stereo
FUSION NMEA 2000 Drop Cable
FUSION NMEA 2000 T-Connector
MS-AV700i
CAB000852
CAB000581
MS-IP700i
CAB000852
CAB000581
MS-RA205 & MS-BB300 CAB000863 (Included with MS-BB300)
CAB000581 (Included with MS-BB300)
7
MOUN TIN G D IA GRA M ( NOT T O S C AL E )
8
OPERA TIO N
POWER ON/OFF
Press
to turn on the remote control. The FUSION Marine Stereo will power on if currently OFF.
Note: If the remote control is configured to display NMEA 2000 data sentences the power on sequence
becomes a two-step process. See NMEA Repeater section below.
Press
to MUTE the audio when the stereo is ON. Press and hold
to turn the stereo and remote control OFF.
ASSIGNING THE REMOTE TO A STEREO
Press the ‘Menu’ button and select ‘SETTINGS’ > ‘STEREO’. Select the desired stereo from the list of
available devices on the network.
ASSIGNING THE REMOTE TO A ZONE
Press the ‘Menu’ button and select ‘SETTINGS’ > ‘ZONE’ > ‘ASSIGN’. Select the desired zone from the
list of available zones. Press the ‘Menu’ button to exit.
Note: Due to space limitations on the MS-NRX200i display the full zone name is not displayed if ALL
ZONES is selected.
VOLUME ADJUST
Turn the ‘Rotary Encoder’ to adjust volume levels. Press Encoder to move highlight
(if remote is assigned to ALL ZONES).
ZONE 1 > ZONE 2 > ZONE 3 > ZONE 4 > ALL ZONES >
BACKLIGHT BRIGHTNESS
Press the ‘Menu’ button and select ‘SETTINGS’ > ‘LCD’. Turn the ‘Rotary Encoder’ to adjust Brightness or
Contrast. Press the ‘Rotary Encoder’ to step between Brightness and Contrast. Press the ‘Menu’ button to exit.
After a period of inactivity the remote turns off the display backlight (Default). To disable this function
Press the ‘Menu’ button and select ‘SETTINGS’ > ‘POWER SAVE’. Press the ‘Rotary Encoder’ to
enable/disable the function. Press the ‘Menu’ button to exit.
9
TROUBLESHOOTING GUIDE
10
Message
Description
Solution
Waiting for network
check connections
Power detected on network. No
communication to/from stereo.
Check all network connections.
Stereo not assigned
press source button
to assign a stereo
During initial installation the remote
control will need to be assigned to a
stereo on the network.
Press Source button to display a list
of Fusion stereos on the network.
Select stereo from the available list.
Stereo off line
Unable to detect stereo on network.
Check power connection to stereo.
Waiting for stereo
Stereo detected on network. Waiting
for stereo to complete power-on
sequence.
Wait for stereo to power on.
SiriusX M ® SA T E L L IT E RA DIO
(USA only) - Requires optional SiriusXM® Vehicle Connect Tuner and subscription (not included) connected to
FUSION Stereo.
Only SiriusXM® brings you more of what you love to listen to, all in one place. Get over
140 channels, including commercial-free music plus the best sports, news, talk, comedy and entertainment.
Welcome to the world of satellite radio. A SiriusXM Vehicle Tuner and Subscription are required. For more
information, visit www.siriusxm.com
For additional SiriusXM operation information refer to the FUSION Stereo user manual
The user manual contains information regarding the following;
• SiriusXM installation and activation information.
• SiriusXM operation information.
• A trouble shooting guide to assist the user with installation and information regarding
SiriusXM status and error messages.
NMEA 2000 R E P E A T E R ( NME A 200 0 N E T W O R K O N L Y )
The remote control will also serve as an NMEA repeater displaying NMEA navigation data or vessel
performance data from other NMEA devices on an existing NMEA 2000 network.
NMEA 2000 REPEATER MODE
SELECTING NMEA 2000 DATA SENTENCES TO DISPLAY
Press the ‘Menu’ button and select ‘SETTINGS’ > ‘NMEA MONITOR’. Select the NMEA data to be
displayed from the list of available data. Press the ‘Menu’ button to exit.
•
•
•
•
•
Wind Direction
Wind Speed
Depth
Speed over Ground
Speed through Water
•
•
•
•
•
Heading
Position
Water Temperature
Atmospheric Pressure
ETA
SELECTING THE DISPLAY METHOD
The remote control can be configured to automatically cycle through the selected NMEA 2000 data.
Press the ‘Menu’ button and select ‘SETTINGS’ > ‘NMEA Monitor’ > ‘CYCLE SCREENS’.
Select from the following options. Press the ‘Menu’ button to exit.
• Off
• 2 seconds
• 5 seconds
• 10 seconds
11
SELECTING UNITS OF MEASURE
Press the ‘Menu’ button and select ‘SETTINGS’ > ‘NMEA Monitor’ > ‘SET UNITS’. Select from the
following options. Press the ‘Menu’ button to exit.
Direction: Magnetic
True Speed: KM/H, MPH, KTS, M/S
Depth: Metres, Feet, Fathoms
Temperature: deg C, deg F
POWER ON/OFF — NMEA 2000 REPEATER MODE
If the remote control has been configured to display NMEA 2000 data sentences it can be turned on
independently of the FUSION Marine Stereo. This permits the user to monitor NMEA data without
turning on the stereo.
Press
to turn on the remote control. The remote control will enter NMEA 2000 repeater mode and
will NOT turn on the stereo. The stereo can be turned on from the remote control by pressing the Menu
key to exit the NMEA 2000 repeater mode. To return to the repeater mode press and hold the Source key.
When in NMEA 2000 repeater mode the remote will monitor the state of the stereo. If the stereo is
turned on then the remote will allow the user to change volume and mute the stereo, play, pause and
skip track (back and forwards) without leaving NMEA 2000 repeater mode.
TURNING ON THE REMOTE CONTROL WITH THE MARINE STEREO TURNED ON
Press
to turn ON the remote control. It will detect the stereo is on and enter the remote control mode.
CHANGING REMOTE CONTROL MODE
Press and Hold
Press
REMOTE CONTROL MODE
12
NMEA2000 REPEATER MODE
NMEA 2000 R E P E A T E R ME S S A GE S
PGN Number
PGN Data FieldFUSION Supported
127250
Heading Sensor Reference
0 = True,Yes
1 = Magnetic,Yes
128259
Speed Water Reference Type
00 = Paddle WheelYes
01 = Pitot TubeYes
02 = Doppler LogYes
03 = Correlation Log (Ultra-Sound)Yes
04 = EM Log (Electro - Magnetic)
Yes
128267
Water Depth
Offset add/subtractYes
129025
Position
Lat/LonYes
129026
COG/SOG
COG Reference
0 = True,Yes
1 = Magnetic,Yes
129029
GNSS Position DataYes
130306
Wind Data
Wind reference
0x00 = Theoretical Wind (ground referenced,
referenced to True North; calculated using COG/SOG)
No
0x01 = Theoretical Wind (ground referenced, referenced
to Magnetic North; calculated using COG/SOG)
No
0x02 = Apparent Wind (relative to the vessel centerline)
Yes
0x03 = Theoretical (Calculated to Centerline of the vessel,
referenced to ground; calculated using COG/SOG)
No
0x04 = Theoretical (Calculated to Centerline of the vessel,
referenced to water; calculated using Heading/Speed through Water)
No
130310Water Temp & Air PressureYes
130311Water Temp & Air PressureYes
13
PGN Number
PGN Data Field
FUSION Supported
130312TemperatureYes
Temperature Source
00 = Sea TemperatureYes
01 = Outside TemperatureNo
02 = Inside TemperatureNo
03 = Engine Room TemperatureNo
04 = Main Cabin TemperatureNo
05 = Live Well TemperatureNo
06 = Bait Well TemperatureNo
07 = Refrigeration TemperatureNo
08 = Heating System TemperatureNo
09 = Dew Point TemperatureNo
10 = Wind Chill Temperature, Apparent
No
11 = Wind Chill Temperature, Theoretical
No
12 = Heat Index TemperatureNo
13 = Freezer TemperatureNo
130314
Actual Pressure
Pressure Source
00 = Atmospheric PressureYes
01 = Water PressureNo
02 = Steam PressureNo
03 = Compressed Air PressureNo
04 = Hydraulic PressureNo
130577
Direction Data
COG Reference
0 = True,Yes
1 = Magnetic,Yes
SOG
Yes
STW
Yes
129284
Navigation Data
ETA Date
Yes
Bearing, Origin To Destination Waypoint No
Bearing, Position To Destination Waypoint
No
Destination Waypoint NumberNo
Destination Wpt LatitudeNo
Destination Wpt LongitudeNo
Waypoint Closing VelocityNo
14
SPEC IFIC A TIO NS
OPERATING VOLTAGE: 10.8 - 16VDC Negative ground
CURRENT CONSUMPTION: @12V 110mA
NMEA 2000 LEN: 3 (150mA)
OPERATING TEMPERATURE: 0 to 50 °C (from 32 to 122°F)
STORAGE TEMPERATURE: -20 to 70 °C (from -4 to 158°F)
LI C EN SIN G
Sirius, XM and all related marks and
logos are trademarks of SiriusXM Radio
Inc. All rights reserved.
NMEA 2000 - is a Registered
Trademark of the National Marine
Electronics Association, Inc.
F C C C O M PLIANC E S T A T E ME NT
This equipment has been tested and found to comply with the limits for a Class B digital device pursuant
to part 15 of the FCC Rules. These limits are designed to provide reasonable protection against harmful
interference in a residential installation. This equipment generates, uses, and can radiate radio
frequency energy and if not installed and used in accordance with the instructions, may cause harmful
interference to radio communications. However, there is no guarantee that interference will not occur
in a particular installation. If this equipment does cause harmful interference to radio or television
reception, which can be determined by turning the equipment off and on, the user is encouraged to try to
correct the interference by one of the following measures:
• Reorient or relocate the receiving antenna
• Increase the separation between the equipment and receiver
• Connect the equipment into an outlet on a circuit different from that to which the receiver is connected
• Consult the dealer or an experienced radio/TV technician for help.
15
F U S I O N E N T E R TA I N M E N T. C O M
© Copyright 2015 by Garmin Limited. All rights reserved. Product specifications, design and prices are subject to change without notice.
Product availability may vary between sales regions. 190-01823-00