1
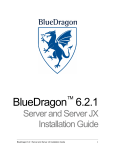
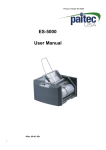
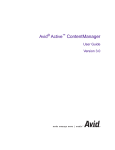
iRB 1.1 Installation Instructions Section 1. Introduction 1.1. What is Chyron iRB? iRB is Chyron’s Intelligent Rundown Builder. iRB is an option for Chyron’s CAMIO server and provides the same type of drag-and-drop workflow as is found exclusively in MOS (Media Object Server) -based Newsroom Computer Systems such as Avid iNews or AP’s ENPS. iRB brings the same MOS workflow to anyone with a PC and Internet Explorer on your facility’s LAN. 1.2. What is required to use iRB? In order to use iRB, the following components must be installed: On the CAMIO server: On the User PC Workstation: LUCI ActiveX Client 2.1.0.14 (or higher) CAMIO 3.2.0.0 (or higher) software Internet Explorer 7.0 (or higher) iRB Software Option Microsoft Silverlight 3.0 (or higher) Lyric Templates for LUCI (http://www.microsoft.com/silverlight/ .NET Framework 3.5 resources/install.aspx) Microsoft SQL Server Internet Information Services (IIS) 1.3. What is not required to use iRB? Since iRB does not work through the newsroom system, no iNews MOS gateway is required for iRB to function. Even though the CAMIO workflow may be utilized in the newsroom, iRB functions as its own MOS Gateway, even when CAMIO is supporting both Newsroom and iRB workflows simultaneously. The iNews MOS Gateway is required only for Rundowns created inside of iNews Newsroom systems. 1.4. Is the iRB option licensed per Seat or User? Chyron does not charge per Seat or User to install or use the LUCI ActiveX client. The license agreement allows installation of the LUCI ActiveX client on every computer in your facility. iRB requires the Silverlight plugin, which is distributed free of charge by Microsoft. 1.5. Can CAMIO support a Newsroom System and iRB at the same facility? iRB supports both types of workflow running simultaneously. Television stations and production facilities are busy sites, constantly engaged in a wide range of production tasks. Chyron recognizes that some facilities do not already have a Newsroom Computer System in place. The goal of iRB is to bring the drag-and-drop workflow benefits of MOS to all areas of your facility, providing a streamlined, efficient workflow experience similar to that of a Newsroom Computer System.\ Chyron Document 2A12331 Revision 0 1 CAMIO iRB Option User Guide Section 2. iRB Option Installation You may wish to refer to Section 3 for more information on iRB’s requirement of ASP.NET and IIS. The configuration settings in Section 3 are not visible until the software is installed. 2.1. Software Package Contents iRB is packaged in a single self-extracting executable comprised of the following files: Irb.msi setup.exe 2.2. Software Installation Instructions 1. Locate the iRB installer and double-click it to start the iRB installation. This opens the dialog for extracting the installer package files to a local destination. Once a destination file has been selected, click on the Install button. In addition to extracting the setup.exe and iRB.msi files, it will launch the setup.exe and next begin the installation wizard. Chyron Document 2A12331 Revision 0 2 CAMIO iRB Option User Guide 2. The welcome page appears. Click Next to proceed. 3. The second page of the installation wizard requests configuration of iRB for IIS, which will host the iRB Silverlight application and web services. Select the IIS website and specify the virtual directory to which iRB should be installed. The web site and virtual directory selected will dictate the address of the hosted iRB application. For example, if the default IIS web site is hosted on port ‘80’ in the virtual directory ‘Irb’, then iRB will be reachable at http://localhost:80/Irb. Click Next to continue. Chyron Document 2A12331 Revision 0 3 CAMIO iRB Option User Guide 4. The third page of the installation wizard requests configuration of the endpoint address of the iRB Web Service, allowing iRB’s Silverlight client to communicate with the iRB server. You must specify an address (either IP or hostname) that is accessible to remote clients in order for the iRB client to work properly on machines other than the one on which iRB has been installed. Click Next to continue. 5. The installation wizard next requests configuration of the iRB database properties which the iRB server will use to store and fetch persistent Rundown data. In most deployments, the iRB server and database will reside on the same machine. In such cases, the default value of the Database Host field can remain ‘localhost’. The Database Name field is, by default, ‘Irb’. Unless your facility has a conflicting database bearing this name, this value need not be changed. Click the ‘Next to continue. Chyron Document 2A12331 Revision 0 4 CAMIO iRB Option User Guide 6. The installation wizard next requests host information for the CAMIO server which will be used by iRB for thumbnail retrieval and publication of rundowns. In most deployments, iRB will reside on a CAMIO server, so this value can remain ‘localhost’. If this isn’t the case, specify the IP address or hostname of the remote CAMIO server. Click ‘Next to continue. 7. The next page of the installation wizard is the last before installation takes place. To begin installation, click ‘Next. Chyron Document 2A12331 Revision 0 5 CAMIO iRB Option User Guide 8. The installation wizard proceeds, displaying a progress bar. 9. Once the wizard has completed the installation, the Installation Complete message will appear. Click Close to continue. Chyron Document 2A12331 Revision 0 6 CAMIO iRB Option User Guide 2.3. Updating from a prior version of iRB to the current version Use the Windows Add/Remove Programs Control Panel to remove the existing version of iRB. Follow the install instructions shown in Section 2.2 to install the new version of iRB. During installation of the new version of iRB, the installation wizard will detect a database name conflict; the installation wizard will prompt the user to Use Existing Database or Overwrite Database. Choosing to Use Existing Database will upgrade the database to its most recent revision. Overwriting the database will destroy all existing data and build a new database from scratch. Chyron Document 2A12331 Revision 0 7 CAMIO iRB Option User Guide Section 3. Additional Installation Notes 3.1. .NET Framework 3.5 The .NET Framework 3.5 and IIS are required for iRB running on the CAMIO server. Launching iRB’s setup.exe file will prompt for installation of both these programs if they are not already present on your machine. Once these requirements are satisfied, the installation of iRB will commence. See Chyron document 2A02326 for information on IIS and CAMIO. 3.2. ASP.NET ASP.NET is also required by iRB. ASP.NET is automatically registered with IIS upon installation of iRB. As directed in Microsoft’s TechNet knowledge base, ASP.NET must be enabled, following installation of IIS. To enable ASP.NET by using IIS Manager 1. In IIS Manager, expand the local computer, and then click Web Service Extensions. 2. In the details pane, click ASP.NET, and then click Allow. Note If your applications require ISAPI, CGI, ASP, WebDAV, or other extensions to operate, you will need to enable those extensions as well. These instructions and more information on ASP.NET are available in Microsoft’s TechNet knowledge base, at http://www.microsoft.com/technet/prodtechnol/WindowsServer2003/Library/IIS/44f16c37f727-4244-9813-2289e13dadba.mspx?mfr=true . 3.3. MSDE and Mixed-Mode Authentication To change MSDE to mixed mode authentication after iRB installation requires editing the registry. For more information on MSDE security and authentication, see the Microsoft Help and Support page at http://support.microsoft.com/kb/325022. Chyron Document 2A12331 Revision 0 8 CAMIO iRB Option User Guide 3.3.1. Default Login Mode By default, the value of the LoginMode Windows registry subkey is set to 1 for Windows Authentication. To turn on Mixed Mode authentication after you install MSDE, you must change this value to 2. The location of the LoginMode subkey depends on whether you installed MSDE as the default MSDE instance or as a named instance. If you installed MSDE as the default instance, the LoginMode subkey is located in the following registry subkey: HKLM\Software\Microsoft\MSSqlserver\MSSqlServer\LoginMode If you installed MSDE as a named instance, the LoginMode subkey is located in the following registry subkey: HKLM\Software\Microsoft\Microsoft SQL Server\Instance Name \MSSQLServer\LoginMode 3.3.2. Modifying the Default Login Mode As with any changes to your system’s Registry, this process must be carried out cautiously. Follow these steps exactly. To change the value of LoginMode to 2, follow these steps: 1. 2. 3. 4. In Control Panel, open Services. Stop MSSQLSERVER and all other related services (such as SQLSERVERAgent). On the Start menu, click Run, type regedt32, and click OK to start Registry Editor. Locate either of the following subkeys. Use the first if you have installed MSDE as the default MSDE instance. Use the second if you have installed MSDE as a named instance. o HKEY_LOCAL_MACHINE\Software\Microsoft\MSSqlserver\MSSqlServer\ -or- o 5. 6. 7. HKEY_LOCAL_MACHINE\Software\Microsoft\Microsoft SQL Server\Instance Name\MSSQLServer\ In the right pane, double-click the LoginMode subkey. In the DWORD Editor dialog box, set the value of this subkey to 2, verify that the Hex option is selected, and then click OK. Restart the MSSQLSERVER service and the SQLSERVERAgent service for this change to take effect Chyron Document 2A12331 Revision 0 9 CAMIO iRB Option User Guide Section 4. Licensing your iRB Software Following the iRB installation seen in the preceding sections, the software must be licensed for use. In most situations, this will involve reprogramming the dongle security device that is physically present inside your CAMIO server. The process is similar to licensing new Lyric options. 1. 2. Log into the CAMIO SERVER. Locate the SafeNet folder in the directory where your CAMIO server’s current version of Lyric is installed. (For example, “C:\Program Files\Chyron\Lyric 7.1\SafeNet”.) Continued next page Chyron Document 2A12331 Revision 0 10 CAMIO iRB Option User Guide 3. Find ChyronOptions.exe in the SafeNet folder, and double-click it to launch the application. The Chyron Options dialog opens. 4. Click on the CAMIO tab. If no CAMIO tab is visible, contact Chyron Customer Service by phone at (631) 845-2132 for help in acquiring the latest version of the ChyronOptions.exe. Click the Field Activate button at the bottom of the Chyron Options dialog. The Field Activation Utility launches: 5. Chyron Document 2A12331 Revision 0 11 CAMIO iRB Option User Guide 6. Click the Get Locking Code button as seen above, and a string of alphabetical characters will populate the text field above the button. 7. Using the Copy to Clipboard button or the Save Locking Code to a File save your Locking Code text in an e-mailable form. 8. button, o Copy to Clipboard allows the locking code text string to be pasted into Windows Notepad or directly into an email. o Save locking code to a file creates a *.loc file, which the user will name, retaining the .loc extension. This file may be emailed as an attachment when needed. (Note that .loc files may be opened in word processing applications if need be. Also take note that the Locking Code should be saved locally. Saving the .loc file to a network location may cause the Field Activation Utility to freeze.) 9. Contact Chyron Customer Service by phone at (631) 845-2132. You will be asked to e-mail your locking code to your Customer Service representative. Your Customer Service representative will supply you with a new license code by e-mail or phone. If by e-mail, the license code you receive will be in the form of a License Code File with the extension .lic. Save the e-mailed file to a convenient location. 10. Use the Load License code from a file 11. open it. Alternately, you may paste it from a text file using the button, or enter it directly into the text field using your keyboard; this last method is not recommended, as it introduces the possibility of error during text entry. Click the Update License button. button to browse to the License Code File and The Success dialog appears. The Chyron Options dialog appears below, with the desired options enabled, and the most recent version numbers entered. Note: The Major Version and System Type windows, along with the iRB checkbox may remain shaded in gray, but if the fields are populated as seen below, the option has been enabled as desired. Chyron Document 2A12331 Revision 0 12 CAMIO iRB Option User Guide 12. 13. Close the Chyron Options dialog with the Windows button. Start iRB. The new option will be ready to use; refer to the iRB User Manual, Chyron Publication Number 2A02331 Revision 0. For further assistance with iRB installation issues, please call Chyron Customer Service at 631-845-2132. © 2009 Chyron Corporation 5 Hub Drive, Melville, NY 11747 631 - 845 - 2000 [email protected] www.chyron.com Chyron Document 2A12331 Revision 0 13