1
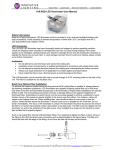
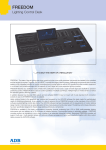
Optical Fiber • Custom LED • Drivers & Transformers • Control Systems
SRC 174 User Manual
Features
192 Channels, 12 Scanners consisting of 16 channels each
30 Banks of 8 programmable scenes
Variable speed and fade time control
Blackout master button
LCD display and LED signal lights
Specifications
Power: 9V – 12V DC
Audio: Line in, 100mv – 1vpp
Midi: 5 pin multiple socket
Dimensions: L 482 mm x W 135 mm x H 85 mm
Weight: 2.75 kg
Ports: 1 x male XLR3 pin connector
1 x female XLR3 pin connector
Diagram
1
2
3
4
5
6
7
8
Scanner Selection
Scenes Button
Auto/Del
Music/Bank Copy
LCD Display
Bank Up/Down
Tap/Display
Blackout
9
10
11
12
13
14
15
Chase Buttons
Page Select
Midi/Rec
Program
Channel Sliders
Speed Slider
Fade Time Slider
1. Scanner Selection: lighting fixture identification is access here. Each scanner consists of 16 DMX
channels; the first 8 channels on Page A and the remaining 8 channels on Page B.
2. Scenes Buttons: for storing and loading scenes
3. Auto/Del: switches from Manual to Auto mode; deletes scenes and chases
4. Music/Bankcopy: switches from Manual to Music mode / copies scenes or chases
5. LCD Display: shows current activity or programming status
6. Bank Up/Down: scrolls through Banks for scene storage
7. Tap/Display: sets speed time manually / switches value display between percentage or 0-255
8. Blackout: pauses light output
9. Chase Buttons: for storing and loading chases
10. Page Select: selects Page A or B
11. Midi/Rec: controls midi operations / records programs
12. Program: access programming mode
13. Channel Sliders: control intensity of the selected lighting fixture
14. Speed Slider: control scene transition speed
15. Fade Time Slider: control cross fade between scenes
-1111 – 8838 Heather St. Vancouver BC Canada V6P 3S8 • Ph: 1-604-874-4405 Fx: 1-604-321-0445 • www.bllighting.com • [email protected]
Optical Fiber • Custom LED • Drivers & Transformers • Control Systems
Programming Scenes
Adding Scenes
1) Press and hold down Program until the light indicating program begins to flash.
2) Tap on the Scanner corresponding to the DMX address to the lighting fixture(s). Switch from pages
using Page Selection.
3) Move the Channel Sliders to a desired colour.
4) Note: if the fixture(s) is unresponsive, try changing the DMX polarity from the back panel.
5) Press Midi/Rec to record the colour
6) Select the bank number by using Bank Up/Down and press the Scene number to store the colour.
All of the indicator lights will flash 3 times to signal completion.
7) Test the scene by pressing the Scene number with stored colour.
8) Repeat steps 3 to 6 to add more scenes.
9) Once finished, press and hold Program to exit.
Deleting Single Scenes
1) Press and hold down Program until the light indicating program begins to flash.
2) Press Bank Up/Down to switch to the correct bank number
3) Press and hold down Auto/Del
4) Press the Scene number to be deleted. All of the indicator lights will flash 3 times to signal
completion.
Deleting All Scenes
1) Turn off the SRC174 unit.
2) Press and hold down Program and Bank Down buttons. All of the indicator lights will flash 3 times
to signal completion.
Copying Scenes
1) Press and hold down Program until the light indicating program begins to flash.
2) Scroll through the bank using Bank Up/Down to locate the desired scene to copy.
3) Press the Scene button to load the scene.
4) Press Midi/Rec to record the scene.
5) Press Bank Up/Down to select the bank number to be copied to
6) Press Scene number to store the copied scene. All of the indicator lights will flash 3 times to signal
completion.
Copying a Bank of Scenes
1) Press and hold down Program until the light indicating program begins to flash.
2) Scroll through the banks with Bank Up/Down to the desired bank to copy.
3) Press Midi/Rec to copy the bank
4) Scroll through to the desired location of the bank using Bank Up/Down.
5) Press Music/Bank Copy to finish. All of the indicator lights will flash 3 times to signal completion.
Programming Chases
Copying a Scene into a Chase
1) Press and hold down Program until the light indicating program begins to flash.
2) Press the desired Chase number to be programmed.
3) Press the desired Scene number to be copied.
4) Press Midi/Rec to finish copying. All the indicator lights will flash 3 times to signal completion.
-2111 – 8838 Heather St. Vancouver BC Canada V6P 3S8 • Ph: 1-604-874-4405 Fx: 1-604-321-0445 • www.bllighting.com • [email protected]
Optical Fiber • Custom LED • Drivers & Transformers • Control Systems
Copying a Bank of Scenes into a Chase
1) Press and hold down Program until the light indicating program begins to flash.
2) Press the desired Chase number to be programmed.
3) Use Bank Up/Down to scroll to the desired bank to be copied.
4) Press Music/Bank Copy followed by Midi/Rec to finish copying. All the indicator lights will flash 3
times to signal completion.
Inserting an Existing Step in a Chase
1) Press and hold down Program until the light indicating program begins to flash.
2) Press on the desired Chase number to add a scene to.
3) Press Tap/Display to show the chase steps on the LCD display.
4) Use Bank Up/Down to scroll to the desired step. The new step will be inserted after the displayed
step.
5) Press Midi/Rec to record a scene.
6) Select the bank number by using Bank Up/Down and choose the desired Scene number to insert.
7) Press Midi/Rec again to finish inserting. All the indicator lights will flash 3 times to signal
completion.
Running the Scenes
Auto Mode
1) Press Auto/Del to move indicator light to Auto mode. The scenes will be cycle.
2) Press Bank Up/Down to change the bank number.
3) Use the Speed Slider to control scene time.
4) Use the Fade Time Slider to control cross scene time.
5) Speed can be override by pressing Tap/Display twice. The time between the two presses will
replace the slider time.
6) To run chase, press the desired Chase number and it will temporarily replace the current running
bank.
Manual Mode
1) Press Auto/Del to move indicator light to Manual mode.
2) Press the desired Scanner buttons to turn on corresponding fixtures.
3) Use the Channel Sliders to control the light output.
4) Scenes can be loaded by pressing Scene numbers.
5) To run chase, press the desired Chase number
6) Press Tap/Display to show the steps on the LCD display.
7) Use Bank Up/Down to scroll through the chase steps.
-3111 – 8838 Heather St. Vancouver BC Canada V6P 3S8 • Ph: 1-604-874-4405 Fx: 1-604-321-0445 • www.bllighting.com • [email protected]