1
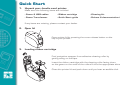
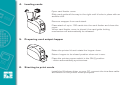
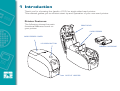
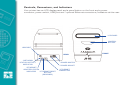
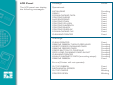
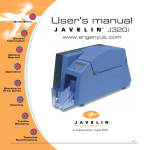
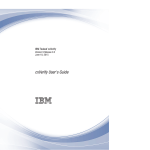
R
User's manual
J110i & J110m
C
NBS Technologies - February 2008
Rev. D
Quick Start
1.
Unpack your Javelin card printer
Make sure the following items are included:
- Power & USB cables
- Power Transformer
- Ribbon cartridge
- Quick Start guide
- Cleaning kit
- Drivers & documentation CD
If any items are missing, please contact your dealer.
2.
Open lid
Open printer lid by pressing the cover release button on the
top of your printer.
3.
Loading ribbon cartridge
Peel protective wrapper from adhesive cleaning roller by
gently pulling on the tape.
Insert the ribbon cartridge with the cleaning roller facing down,
so the gears on the ends of the rollers fit into the appropriate slots.
Close the printer lid and push down until you hear an audible click.
2
4.
Loading cards
Open card feeder cover.
Slide card guide all the way to the right until it locks in place with an
audible click.
Remove wrapper from card stack.
Place stack of up to 100 cards into the card feeder and close the
cover.
When card feeder cover is closed, the card guide locking
mechanism will automatically be released.
5.
Preparing card output hopper
Raise the printer lid and rotate the hopper down.
Return hopper to its closed position when not in use.
Place the printer power switch in the ON (|) position
- ribbon automatically synchronizes.
6.
Starting to print cards
Install the Windows driver on your PC, connect the interface cable
and switch on the printer when prompted.
3
Table of Contents
1
Introduction..............................................................................
6
Printer features
Controls, connectors, and indicators
LCD panel
2
Installation and Setup................................................................
9
General information
Unpacking the printer
Loading ribbon cartridge
Loading cards
Card output hopper
Installing the print driver software and setting driver options
Connecting your printer
Printing a test card
3
Printing a Card..........................................................................
17
Creating a sample card
Printing a sample card
4
Cleaning...................................................................................
19
When to clean
How to clean
Cleaning the printhead
5
Troubleshooting.........................................................................
22
Print quality issues
Ethernet connection and adapter
6
Technical Specifications..............................................................
General
Colour printing
Bar code
Cards
Card dimensions
Ribbon cartridges
Interface
Printer dimensions
Electrical
Environmental
Options
28
4
Appendix A Encoder..........................................................................
31
Magnetic card stripe encoder
Introduction
Media loading orientation
Magnetic encoder cleaning
Appendix B Single Card Feeding..........................................................
33
Card SenseTM single card feed mode
To install Card SenseTM
Setting up the printer driver
Printing a single card
Appendix C Connecting to a Network...................................................
36
Appendix D Accessories & Supplies.....................................................
37
Ribbons
Cards
Other consumables
Accessories
Appendix E Warranty Information.......................................................
40
Printers
Printheads
Supplies
Spare parts
Appendix F Technical Support..........................................................
41
How to return your printer
Appendix G Declarations of Conformity.............................................
42
5
1
1Introduction
Introduction
Thank Thank
you for choosing
the Javelin the
J360i
Card Printer.
you for choosing
Javelin
J110i/m single sided card printer.
This manual
guides
you
to
efficient
start
up
and operation
youroperation
new Card Printer.
This manual guides you to efficient
start upof
and
of your new card printer.
Printer
Features
Printer
Features
The following
shows theshows
main functional
features found on your J360i Printer.
The following
the main
PRINTHEAD
functional features found on
your printer.
CARD FEEDER
CARD FEEDER COVER
LID OPEN BUTTON
RIBBON CARTRIDGE
OUTPUT HOPPER
2
6
Controls, Connectors, and Indicators
Your printer has an LCD display panel and a panel button on the front and a power
connector, power switch, USB port and *optional Ethernet connectors/indicators at the rear.
LCD PANEL
CONTROL
BUTTON
USB PORT
REAR
*NETWORK
STATUS/ACTIVITY
INDICATOR
FRONT
POWER SWITCH
POWER SOCKET
*ETHERNET
ADAPTER STATUS
*ETHERNET RESET
INDICATOR
BUTTON
(RECESSED)
*ETHERNET
CONNECTOR
7
LCDPanel
Panel
LCD
Message
The
LCD
panel
The
LCD
panel
can display
can
display messages:
the
the
following
following messages:
Operational:
INITIALISING
READY
DOWNLOADING DATA
PRINTING MONO
MAG ENCODING
PRINTING CYAN
PRINTING YELLOW
PRINTING MAGENTA
PRINTING BLACK
PRINTING OVERLAY
DOWNLOADING FW
CLEANING PRINTER
Mode
Scrolling
Fixed
Fixed
Fixed
Fixed
Fixed
Fixed
Fixed
Fixed
Fixed
Fixed
Fixed
Warnings:
CLEAN PRINTER
REMOVE RIBBON THEN CLOSE HEAD
INSERT FEEDER CLEANING CARD
REMOVE FEEDER CARD
PRESS BUTTON TO CONTINUE
FEED LONG CLEANING CARD IN EXIT
CLEANING PRINTER
INVALID MAGNETIC DATA (encoding stops)
REMOVE RIBBON
Fixed
Scrolling
Scrolling
Scrolling
Scrolling
Scrolling
Scrolling
Scrolling
Fixed
Errors (Printer will not operate):
OUT OF RIBBON
MECHANICAL ERROR
OUT OF CARDS
PRINTER OPEN
Fixed
Fixed
Blinking
Blinking
8
2 Installation and Setup
General Information
This section will guide you through the installation and setup of your printer.
This consists of the following procedures, which should be performed in the order
presented.
Unpacking the printer
Installing the print driver software and setting driver options
Loading a ribbon
Loading cards
Connecting the printer to your computer
Connecting power
Printing a test card to verify printer operation
The printer should be placed in a location that allows easy access to all sides.
The printer should never be operated while resting on its side or upside down.
Electric Shock Caution: Limit AC power supplied to the printer to 110 ~ 230 volts,
60 ~ 50 Hertz. Limit excess current draw to 16 amps or less, using an associated
circuit breaker or other such device.
Never operate the printer in a location where operator, computer, or printer can get wet.
Personal injury could result.
The printer must be connected to an earthed electrical power source and properly
protected against electrical surges and grounding faults; the electrical reliability of the
printer is based on the reliability of the mains power source and with the earth connection.
The printer’s power supply is an internal unit that can only be serviced or replaced by
trained and authorised personnel.
9
Unpacking the Printer
Your printer ships in a carton and protective anti-static bag.
Keep all packaging material in case you need to move or reship the printer.
Inspect the shipping container to ensure that no damage has occurred during shipment.
If any damage is apparent, file a claim with the shipper.
Please ensure that you have a clean and nearly dust free environment for proper
operation and storage of the printer.
Make sure the following items are included with your printer:
Drivers &
documentation CD
Ribbon cartridge
Cleaning kit
Quick
Start!
Transformer
Power & USB cables
Quick start guide
If any items are missing, please contact your dealer.
10
Loading Ribbon Cartridge
Your printer requires approved ribbon cartridges (see appendix C). The resin thermal
transfer and dye sublimation ribbons are specifically designed for your printer.
Note: i series printers require the use of i series ribbons for full colour printing.
Each ribbon cartridge includes an integrated adhesive cleaning roller assembly that is
used to clean the cards entering the printer. Improper cleaning will reduce printer life
and degrade print quality.
When the ribbon is completely used, change the whole cartridge assembly.
1.
Place the printer power switch in the OFF (0) position.
Electrostatic discharge caution:
DO NOT TOUCH the printhead or the electronic
components on the printhead.
Discharge of electrostatic charge from the
human body or other surfaces can damage
the printhead or other electronic components
2.
Open printer lid by pressing the cover
release button on the top of your printer.
3.
Peel protective wrapper from adhesive
cleaning roller by gently pulling on the tape.
4.
Insert the ribbon cartridge with the
cleaning roller facing down, so the gears on the
ends of the rollers fit into the appropriate slots.
5.
Close the printer lid and push down until you
hear an audible click.
6.
Place the printer power switch in the ON (|) position
- ribbon automatically synchronizes.
RIBBON CARTRIDGE
ADHESIVE CLEANING
ROLLER
11
Loading Cards
1 Introduction
To help you load, print and collect cards, the printer has a card feeder & output hopper
Thank you for choosing the Javelin J360i Card Printer.
This manual
guides
you tois
efficient
startloading
up and operation
yourhold
new up
Card
The card
feeder
used for
cards, itofcan
toPrinter.
100 (30mil) cards.
Note:
DO NOT bend cards or touch print surfaces as this can reduce print quality.
The surface of the cards must remain clean and dust free. Always store cards in
Printer Features
an enclosed container. Ideally, use cards as soon as possible. If cards stick
together, carefully fan or shuffle them.
The following shows the main functional features found on your J360i Printer.
For cards with magnetic stripe refer to appendix A for loading instructions.
Load cards into card feeder as follows:
1
Open card feeder cover.
2
Slide card guide all the way to the right until it locks in place with an audible click.
3
Remove wrapper from card stack.
4
Place stack of up to 100 cards into the card feeder and close the cover.
When card feeder cover is closed, the card guide locking mechanism will
automatically be released.
2
12
1 Introduction
Hopper
ThankCard
you for Output
choosing the
Javelin J360i Card Printer.
This manual guides you to efficient start up and operation of your new Card Printer.
This item is used for collecting printed cards.
1. Raise the printer lid and pull the hopper down.
Printer Features
2. Return hopper to its closed position when not in use.
The following shows the main functional features found on your J360i Printer.
HOPPER
2
13
Installing the print driver software and setting driver options
1 Introduction
Thank Printing
you for choosing
the printer
Javelin J360i
Card the
Printer.
with this
requires
Windows printer driver and your card design/issuing
This manual
guides
you
to
efficient
start
up
and
operation
of your new
Card Printer.
software or printer command level programming
through
the printer interface.
The printer can be used with any Windows 2000, Windows server 2003, Windows XP or
Windows Vista software application program, using the drivers provided on CD with the
Printer
Features
printer.
The following shows the main functional features found on your J360i Printer.
This section contains information on the printing of a sample card using the Windows
printer driver.
Note: If updating the printer driver from a previous version, before installing the updated
printer driver, always update the firmware to the correct version first. Then delete the
existing version from your PC using the add/remove program.
Installing the print driver
To install the printer driver automatically on all operating systems, use the Javelin
Install Wizard.
Note: Ensure that you have administrative privileges to perform this installation, or contact
your IT department.
The Install Wizard will walk you through the appropriate installation steps. The Wizard will:
Automatically launch when the driver CD is inserted.
From the main menu of your documentation CD, select "DRIVERS" from the
subsequent menu. The Install Wizard will walk you through the appropriate steps.
Delete previous versions of the driver and clean up any necessary registry entries. You
must select "Remove" from the install options to remove any previous driver versions.
2
14
Connecting your printer
Caution: Limit electrical power supplied to the printer to 24 v DC. Limit
excess current draw to 16 amps or less, using an associated circuit breaker or
other such device. Never operate the printer in a location where operator,
computer, or printer can get wet. Personal injury could result. The printer must be
connected to an earthed electrical power supply and properly protected against
electrical surges and grounding faults. The power supply pack can only be replaced
by the same product from the manufacturer.
1.
Place the printer in a location that allows easy
access to all sides. The printer should never be
operated while resting on its side or upside down.
2.
Remove the yellow CAUTION label from the
back of the printer.
3.
Ensure that the printer’s power switch
in the OFF (O) position.
4.
Insert the power supply plug into the power
socket, attach the power cord (120v or 230v)
to the power supply, then plug the power cord
in to a grounded electrical socket of the proper
voltage and type.
USB
PORT
POWER SWITCH
ETHERNET PORT
5.
Attach USB cable to printer and computer.
Note:If your printer has the optional Ethernet interface,
POWER SOCKET
connect the Ethernet cable to the printer and to the
Ethernet nectwork.
Important: Do not connect the USB and Ethernet interfaces at the same time.
6.
Place the printer’s power switch in the ON (|) position.
The Found New Hardware window will open.
Caution: Intermittent or unpredictable operation may occur from unsecured
connectors. If damaged, the power cable must be replaced by an exact equivalent.
The socket should always be easily accessible to power off the printer.
15
Printing a Test Card
With ribbon and cards loaded, your printer is ready to print. To check the operation
of the printer, you should print a test card. (Printing a test card does not require that the
printer be connected to your computer or network, but power must be applied.)
1
Set the printer’s power switch (on the back of the printer) to the OFF (O) position.
2
While pressing the printer’s front panel button, switch the printer ON (|).
3
Hold the panel button until the LCD display panel reads ‘PRINT TEST CARD’.
4
Release the panel button, and the test card will print.
This is an example of the test card:
16
3 Printing a Card
Printing with this printer requires the Windows Printer Driver, your card design/issuing
software or printer command level programming through the printer interface.
The printer can be used with any Windows 2000, Windows Server 2003, Windows XP or
Windows Vista software application program, using the drivers provided on CD with the printer.
Refer to chapter 2 for instructions on installing the printer driver.
Creating a Sample Card
Before you begin a new printing session, print a sample card to ensure that the cards will be
printed correctly. Follow the steps below to print your first card using the Javelin branded
True ColoursTM card printer ribbon cartridge and the Windows printer driver.
1
2
3
4
5
6
7
8
Go to the Microsoft Word Software.
If the J110i/m printer was not selected as the default printer, go to file> select printer and
choose Javelin J110i/m card printer from the printer names list. Close the print dialog
box.
Go to file>page setup.
Select the size tab, and under paper size, choose card. Under orientation, select landscape
or portrait.
Select the margins tab, and set the top, bottom, left and right margins to O (zero).
Press OK to close page setup window.
The card appears on the window.
Design a card with both black and colored text and with coloured pictures similar to the
sample card shown below.
Note: For the J110m, design a card with
text and pictures in the same monochrome
colour as the ribbon.
17
Printing a Sample Card
Once you completed creating your sample card, you are ready to print. Ensure your
printer has a Javelin branded True ColoursTM card printer ribbon cartridge installed
and there are cards in the feeder. Refer to chapter 3 for instructions on installing the
ribbon and loading the cards
Print your sample card as follows:
1
Select file>print to open the print dialogue box. Ensure the following settings in the
print dialogue box:
Printer name: - Javelin J110i/m card printer
Print to file: - Unchecked
Page range: - All
Number of copies: - 1
Collate: - Unchecked
Print what?: - Document
Print: - All pages in range
Pages per sheet: - 1 page
Scale to paper size: - No scaling
2
3
4
5
Click the OK button.
The printer will feed in a card and start printing. The data download time will vary
depending on the complexity of the card design and the processing speed of the
computer.
Once the printing is completed, the card is ejected from the printer into the card
hopper.
Remove the sample card and check for any discrepancies. If the sample card is
correct, your printer is ready to produce more cards.
18
4 Cleaning
Caution: PROTECT YOUR FACTORY WARRANTY!
The recommended maintenance procedures must be performed to maintain your factory
warranty. Other than the recommended cleaning procedures described in this manual,
allow only Javelin authorized technicians to service the printer.
NEVER loosen, tighten, adjust, or bend, etc. a part or cable inside the printer.
NEVER use a high pressure air compressor to remove particles in the printer.
Your printer includes a simple cleaning system using pre-saturated cleaning cards
provided. The regular use of these cards will clean and maintain important parts of your
printer that cannot be reached: including printhead, the transport rollers and the magnetic
encoder station (optional feature).
When to Clean
After approximately 1000 color cards have been printed, the printer LCD will prompt CLEAN
PRINTER, or when print quality has been degraded.
How to Clean
1
Leave power on.
2
Press and hold the control button for 5 seconds.
3
When the cleaning cycle is initiated, the LCD message REMOVE RIBBON THEN CLOSE
LID will display.
4
After the ribbon is removed and the lid is closed, the message EMPTY FEEDER THEN
CLOSE COVER will display.
5
If the lid is opened and closed without removing the ribbon, the REMOVE RIBBON THEN
CLOSE LID message will remain.
19
6
Once the cover is closed, the firmware will eject any card inside the printer. The message
EJECTING CARD will display.
7
The LCD will then display FEED LONG CLEANING CARD IN EXIT. When the card sensor
registers the presence of the cleaning card, the rollers should take the card into the
printer.
8
When the cleaning process is done, the printer will eject the cleaning card. If the card
sensor still senses the cleaning card, the message REMOVE LONG CLEANING CARD will
display.
FEEDER CLEANING CARD
PRINTER PATH CLEANING CARD
9
Once the long cleaning card is no longer sensed by the exit card sensor, the message
INSERT FEEDER CLEANING CARD will display. Open the feeder cover and insert the
feeder cleaning card.
10
When the feeder cleaning card has been sensed by the feeder card sensor, the
message CLOSE FEEDER COVER will display.
11
When feeder cleaning is complete, the message REMOVE FEEDER CLEANING CARD will
display.
12
After the card is removed, the LCD will display READY.
You may now reload the ribbon and cards and continue printing.
20
Cleaning the Printhead
Use of the cleaning cards will normally do an adequate job of cleaning the printer. However, a
separate printhead cleaning, using swabs, can remove more stubborn deposits when print
anomalies persist. To avoid deposits, only use foam-tipped swabs.
Caution: Never use a sharp object to scrape deposits from the printhead.
Permanent damage to the print head will result.
1
Place the printer power switch in the OFF (0) position.
2
Open printer lid by pressing cover release button and open cover fully to reveal printhead
mounted to inside of cover.
3
Clean printhead by moving alcohol-moistened swab tip side-to-side across printhead
elements. Only use moderate force.
4
Allow two to three minutes for the printhead to dry before placing the printer power
switch in the ON (|) position.
5
To reorder cleaning cards and swabs, see Appendix D.
21
5 Troubleshooting
This section offers solutions to potential problems you may experience with your printer.
Print Quality Issues
This section will help you resolve print quality problems The print quality is dependent on several
factors. The two most important factors that will increase your print quality are cleanliness and
card stock. To diagnose and fix print quality problems, follow the troubleshooting
procedures below:
Example 1:
Small spots appear on the printed card with a non-printed area or a different
colour.
Possible Cause: Contamination on the card surface
Solutions:
Check that cards are stored in a
dust free environment.
Use a different supply of cards.
Possible Cause:Cleaning roller not installed.
Dust inside the printer
and/or dirty cleaning roller.
Solutions:
Perform a cleaning of the printer (ref. chapter 5).
Check that the protective cover was removed
from the ribbon cartridge cleaning roller
(ref. chapter 3).
If printing one card at a time, replace the
cleaning roller located at the front of the printer.
(ref. appendix B).
22
Example 2:
There are non-printing horizontal lines (white) on the card surfaces.
Possible Cause: Ribbon cartridge is not correctly positioned.
Solutions:
Ensure that the ribbon is properly rolled onto the
ribbon cores of the cartridge and that there are
no wrinkles in the ribbon.
Replace ribbon cassette.
Possible Cause: Printhead is dirty.
Solutions:
Clean the printhead
Possible Cause: Printhead elements are damaged (e.g. scratched or burnt).
Solutions:
Call your Javelin dealer or NBS customer service for printhead replacement
information.
Example 3:
Printing shows very pale or inconsistent results.
Possible Cause: Ribbon cartridge have been stored improperly or is damaged.
Solution:
Change ribbon cartridge and print again.
Possible Cause: Cards may not meet specifications.
Solution:
Use a different supply of cards.
Possible Cause: Contrast and/or intensity may be set to values
which are too high.
Solution:
Adjust contrast and/or Intensity values in software.
Possible Cause: Dust or embedded contamination on elements of the printhead.
Solution:
Perform a cleaning of the printhead (Ref. Chapter 4).
23
Example 4:
Printing shows blurry printed image.
Possible Cause: Ribbon cartridge may not be correctly positioned.
Solution:
Check that the ribbon is properly rolled onto the ribbon cores of the cartridge,
with no wrinkles.
Replace ribbon cartridge, making sure it locks in place, and print again.
Possible Cause: Ribbon may not be synchronized on the correct
colour panel position.
Solution:
Open lid, then close lid to synchronize ribbon.
Possible Cause: Cards may not meet specifications.
Solution:
Use a different supply of cards.
Possible Cause: Dust or embedded contamination inside the printer and/or dirty cleaning roller.
Solution:
Clean the printhead.
Replace cleaning roller.
Example 5:
No printing on the card.
Possible Cause: Ribbon cartridge may not be installed in the printer.
Solution:
Check for ribbon cartridge in the printer
Possible Cause: Cards may not meet specifications.
Solution:
Use a different supply of cards.
Possible Cause: Cable on printhead may be disconnected.
Printhead elements may be scratched or burnt.
Solution:
Call your Javelin dealer or NBS customer service for printhead repair or
replacement information.
24
Troubleshooting the Ethernet Connection and Adapter
Resetting to Factory Defaults
To reset the Ethernet adapter configuration parameters to the factory defaults, press the
recessed Ethernet reset button and hold it in while turning the printer power on. Keep the
Ethernet reset button pressed until the status indicator light turns green, then release the
Ethernet reset button. To print a configuration card, press and hold the Ethernet reset button
until a card starts to print.
Ethernet Adapter Status Indicator
A bi-color status indicator displays the operational status of the Ethernet adapter.The
following conditions might occur:
1
During normal operation, the LED is solid green for more than 30 seconds. This indicates
all the hardware is functioning properly and the Ethernet adapter has detected the
presence of the network. It does not mean the Ethernet adapter has an IP address or is
attached to a printer queue.
2
If the LED is rapidly flashing green (9 times/sec), the Ethernet adapter has not detected
the presence of a network cable. To solve the problem:
Verify that the network cable is appropriate for the network and has an RJ-45 connector.
Turn the printer power off. Remove the network cable from the Ethernet adapter.
Plug the network cable back in until you hear a positive click. Check the other end of
the cable in the same manner. Turn the printer power on. If the Ethernet adapter still
does not detect a cable, continue.
Connect the Ethernet adapter to a known good network connection. If the Ethernet
adapter is still unable to detect the network cable, contact technical support for
assistance.
25
3
If the LED is slowly flashing green (1 time/sec), the Ethernet adapter is trying to print a
job.If the job does not print, check the following:
Verify that the printer has media and ribbon. If the printer is showing any errors, it is
unlikely that the Ethernet adapter can send data to the printer. The LED continues to
blink until the printer malfunction is resolved or until the printer is turned off.
Flashing red indicates the Power On Self Test (POST) is in progress.
4
If the LED is solid red for more than 30 seconds, the Ethernet adapter has failed the
POST. A failed POST can be caused by any of the following:
The printer attached to the Ethernet adapter device is malfunctioning. Turn the printer
power off, wait 10 seconds, then turn the printer back on. If the Ethernet adapter still
fails the POST, the Ethernet adapter has a hardware problem that can be fixed only by
replacing or returning the unit. Contact technical support for repair or replacement
information.
5
If the LED is alternately flashing red and green for longer than 2 minutes, the Ethernet
adapter is in firmware-download mode. This means it is waiting for new firmware data
to be sent before it continues normal functioning. Perform the following:
If the Ethernet adapter was purposely put into firmware-download mode, finish the
download with the proper update utility. Contact the NBS web site at
http://www.nbstech.com to download this utility.
Contact technical support for help recovering this unit.
26
Network Status/Activity Indicator
A bi-color status/activity LED indicates network speed, established link, and network activity.
1
If the LED is off, no link was established.
2
If the LED is solid green, a 100Base link is established.
3
If the LED is flashing green, a 100Base link is established and network activity has been
detected.
4
If the LED is solid orange, a 10Base link is established.
5
If the LED is flashing orange, a 10Base link was established and network activity has
been detected.
Network activity detected by this LED does not mean the activity is data for the print server.
The activity is all activity on the network seen on the Ethernet adapter.
27
6 Technical Specifications
1 Introduction
Thank you for choosing the Javelin J360i Card Printer.
This manual guides you to efficient start up and operation of your new Card Printer.
General
Integrated card feeder-and-flipper
TM
drop-in ribbon cartridge
Load-N-Go
Printer
Features
16-digit LCD display
The following
shows
the main functional
found
your J360iServer
Printer. 2003 and Windows Vista
Drivers
for Windows
2000, features
Windows
XP,onWindows
Colour Printing
Colour dye sublimation or monochrome thermal transfer printing
30 seconds per card full colour single sided (YMCKO)
7 seconds per card monochrome printing
Bar Code
Code 39, Code 128 B & C with & without check digit
2 of 5 & 2 of 5 interleaved
UPC-A, EAN 8 & EAN 13
PDF-417 2D bar code and other symbologies can be printed via Windows drivers
Cards
Types: PVC, PVC composite.
Card width/length: ISO CR-80-ISO 7810, 54mm (2.12”) x 86mm (3.38”)
Magnetic stripe-ISO 7811
Smart card -ISO 7816-2
Card thickness: 30 mil (.76mm) (+/- 10%);
20 - 40 mil (0.5 - 1.0mm) with optional single card feeder
Card feeder capacity:100 cards (30 mil)
Card output hopper capacity: 45 cards (30 mil)
2
28
Card Dimensions
ISO standard dimensions
for plain card:
ISO standard dimensions
for magnetic stripe card:
29
Ribbon Cartridges
Load-N-GoTM ribbon cartridge with integrated card-cleaning roller
i Series technology featuring contact-chip-based ribbon detection
YMCKO: 200 cards/cartridge
Monochrome: 1000 cards/cartridge in black, blue, red, green silver or gold
850 cards/cartridge in white
Interfaces
USB 1.1 (cable included)
USB 1.1 and built-in Ethernet (optional)
Printer Dimensions
Width:
201mm
Depth:
328mm
Height:
235mm
Weight:
4.5kg
(7.9”)
(12.9”)
(9.25”)
(10lbs)
Electrical
110 ~ 240 Volts AC, 50 ~ 60 Hz (auto switching)
8MB image memory standard
FCC class B, CE, UL and CUL (J110i) or NRTL (J110m) approved
Environmental
Operating temperature: 60°F to 86°F (15°C to 30°C)
Operating humidity: 20% to 65% non-condensing
Storage temperature: 23°F to 158°F (-5°C to 70°C)
Storage humidity: 20% to 70% non-condensing
Ventilation: Free air
Options
Magnetic encoder (30 mil cards only), 3 track HiCo/LoCo
CardSenseTM single card-feed mode
30
Appendix A Encoder
Magnetic Card Stripe Encoder
This section contains information on the additional operations of the J110i/m printer with
magnetic card stripe encoder.
Introduction
Operation and maintenance requirements for the printer with the optional magnetic card
stripe encoder. The magnetic encoder can be set for either high or low coercivity.
Media Loading Orientation
Caution: ONLY USE cards that comply with ISO 7810 & 7811 standards for magnetic
stripe cards. The magnetic stripe must be flush to the surface of the card to
work properly. Never use cards which have taped-on magnetic stripes.
The magnetic encoder is a factory installed item with
the read/write head positioned below the card path,
available with HICO or LOCO encoding.
When loading cards with magnetic stripes into the
card feeder, please ensure that the magnetic stripe
is facing the left side of the printer, and closest to
the bottom edge of the card feeder.
MAGNETIC
STRIPE
Note:NBS approved HICO & LOCO PVC cards are available.
(Ref. printer media list).
31
Magnetic Encoder Cleaning
Use the standard cleaning card process as described in chapter 4. This cleans the most
important parts of the printer; including the printhead, transport roller and magnetic stripe
encoder.
ISO Standard Encoding
Track #
Field Separator
Track Density
Valid Characters
# of characters
1
^
210 BPI*
Alphanumeric
(ASCII 20~95†)
79‡
2
=
75 BPI*
Numeric
(ASCII 48~62)
40‡
3
=
210 BPI*
Numeric
(ASCII 48~62)
107‡
*Bits per inch
†Except the "?" character
‡Including Start, Stop, and LRC characters. Also note that these 3 characters are automatically
managed by the magnetic encoder according to the ISO standard norms.
Note: Refer to the card printer programmer’s manual for complete programming information.
32
Appendix B Single Card Feeding
Card SenseTM Single Card Feed Mode
Printing a single card without using the feeder
For operating the printer in single card feed mode, the printer requires that the operator install
an optional Card SenseTM single card feed kit. In single card feed mode, the printer will only
accept cards through the front slot, not from the card feeder.
To install Card SenseTMsingle card feed kit:
1
Set printer to OFF.
2
Open the lid and remove the ribbon cartridge.
Important: Make sure the output hopper
remains closed.
3
BLACK ROLLER
Install the black roller from the
single card feed kit into the blue tabs
at the front of the printer.
HOLD ROLLER DOWN FIRMLY and
SWITCH PRINTER BACK ON.
TABS WILL RAISE and
LOCK ROLLER INTO PLACE.
33
CLEANING ROLLER
4
Open the lid of the card cleaning cartridge
and insert the cleaning roller.
5
Peel protective wrapper from cleaning roller
by gently pulling on the blue tape.
Discard the wrapper.
6
Slide the card cleaning cartridge into
the slots provided at the front of the
CLEANING CARTRIDGE
printer. An alignment tab is located
on the left side of the card cleaning
cartridge to ensure proper installation.
7
Replace the ribbon cartridge.
8
Close the printer lid and push down
until you hear an audible click.
34
1 Introduction
Setting up the printer driver
Thank you for choosing the Javelin J360i Card Printer.
1 guides
Go to
properties
This manual
youprinter
to efficient
start up and operation of your new Card Printer.
2
Select the device settings tab
3 Features
Select single feed properties
Printer
4 shows
Select
single feed
support
The following
theenable
main functional
features
found on your J360i Printer.
5
Click the apply button.
Important: You can disable single feed support and return to printing cards from
the hopper. You do not have to remove the components of the single card feed kit in
order to operate in normal mode.
Printing a single card
1
Switch power on.
2
Insert a single card into the slot at
the front of the printer, directly above
the card output hopper.
The printer will take the card.
Do not feed more than one card at a time.
2
35
APPENDIX C Connecting to a Network
Card printers can be connected to an Ethernet network in three ways:
Printer Sharing
In printer sharing, the printer is
connected locally to the host
computer and configured to be
shared to other client
computers.
Client computers connect to the
printer over the network through
the host computer.
External Print Server
(Jet Direct)
Internal Print
Server
A stand alone device that acts
as a server on the network
specifically for receiving print
jobs and passing them to the
printer.
Client computers connect to the
print server over a network.
Similar to an external
print server, except the
print server is integrated
into the printer.
This removes the need
for a separate power
supply and separate
device drivers.
This is the simplest way
to network a printer.
36
Appendix D Accessories & Supplies
Please contact your Javelin dealer to place an order for accessories and supplies.
IMPORTANT NOTICE:
Only TrueColoursTM colour ribbon cartridges supplied by Javelin dealers can be used in this printer.
RIBBONS
INTELLIGENT JAVELIN TRUECOLOURSTM ENCODED RIBBONS.
Each cartridge includes a cleaning roller.
NBS part no.
61133511
YMCKOi
(200 cards)
61133111
Black
(1000 cards)
61133112
Blue
(1000 cards)
61133113
White
( 850 cards)
61133114
Red
(1000 cards)
61133115
Green
(1000 cards)
61133116
Gold
(1000 cards)
61133117
Silver
(1000 cards)
Note : Y = Yellow, M = Magenta, C = Cyan, K = Black , O = Overlay
37
PLASTIC CARDS (per 1000 cards)
PVC 30 mil (0.76 mm)
92000009
Plain white cards
92000011
Plain white cards (with low coercivity magnetic stripe)
92000007
Plain white cards (with high coercivity magnetic stripe)
9104523-020
Plain white 30 mil 3-up breakaway key tags
92000700
Plain black cards
92000701
Plain silver cards
92000702
Plain gold cards
9104523-121
Plain white security cards with embedded security star opacity mark
9104523-122
Plain white security cards with lock & key colourshift ink image
PVC Composite 60/40 30 mil (0.76 mm)
9104524-101
Plain white cards
9104524-103
Plain white cards (with high coercivity magnetic stripe)
9104524-120
Plain white security cards with embedded world globe hologram design
38
OTHER CONSUMABLES
61100909
Printhead (J120i - J110i - J110m - J100i)
61100922
Cleaning kit: Print engine cleaning cards (4) & feeder cleaning cards (4)
61100916
Cleaning swab kit (25)
61152270
Hand applied laminate patches (World Globe hologram)
ACCESSORIES
24050000
Single card feeder
39
Appendix E Warranty Information
PRINTERS
NBS JAVELIN printers (excluding printhead) are warranted against defects in material or
workmanship. Proof of purchase or shipment date is required to validate the warranty. This warranty
is subject to normal usage and becomes void if the equipment is modified, improperly installed or
used, damaged by accident or neglect, or if any parts are improperly installed or replaced by the user.
PRINTHEADS
The original printhead is covered by an unlimited number of passes warranty.
The warranty period begins on purchase date. To qualify for this warranty, the printhead must be
returned to NBS or to an authorised dealer. Customers are not required to purchase NBS supplies
(media and/or ribbons) for warranty qualification. However, if it is determined that the use of other
manufacturers' supplies has caused any defect in the printhead for which a warranty claim is made,
the user is responsible for all charges required to repair the defect. The warranty becomes void if the
printhead is physically worn or damaged; also if it is determined that failure to follow the preventive
maintenance schedule listed in the user's manual has caused defects in the thermal printhead for
which a warranty claim is made.
SUPPLIES
These are warranted to be free from defect in material and workmanship provided the user has
complied with storage, handling and usage guidelines established for supplies used with NBS Javelin
printers.
SPARE PARTS
All parts, maintenance kits, options kits, and accessories are warranted to be free of defects in
material and workmanship. This warranty becomes void if the item is modified, improperly installed or
used, or damaged by accident or neglect.
Notes: Failure to exercise caution to protect the equipment from electrostatic discharge damage,
adverse temperature and humidity conditions or physical abuse, including, but not limited to, improper
packaging, shipping, service or repairs performed by personnel not authorised by NBS or an
authorised dealer may void the warranty. NBS or its authorised dealer will, at its option, repair or
replace the equipment or any parts which are determined to be defective within this warranty period,
and which are returned to NBS or its authorised dealer. NBS specifically disclaims the implied
warranties of merchantability and fitness for a particular purpose. For full warranty terms, including
the length of warrantly period, please contact the Javelin dealer from whom you purchased your
40
printer.
Appendix F Technical Support
If for any reason you require product technical support, please contact the distributor where you
purchased your equipment. If they cannot help you, or at their direction, contact NBS.
For support in Europe, Middle East,
Africa and Asia Pacific:
For support in North and
South America:
NBS TECHNOLOGIES
7 BYFLEET TECHNICAL CENTRE
CANADA ROAD
WEST BYFLEET
SURREY KT14 7NB
UNITED KINGDOM
NBS TECHNOLOGIES
10925 BREN ROAD EAST
MINNEAPOLIS MN 55343
UNITED STATES OF AMERICA
Tel: +44 1932 351531
Fax: +44 1932 351382
Tel:
1 800 565 9033 or
+1 (952) 912 9423
Fax: +1 (952( 912 9439
Email: [email protected].
Email: [email protected]
Web: www.nbstech.com
HOW TO RETURN YOUR PRINTER
If you have purchased your printer from an NBS distributor, please first contact them on their return
procedures.
Alternatively, contact the appropriate NBS Technical support department (details above) for
instructions before shipping your printer.
Only complete goods in their original packaging with a valid Returned Materials Advice
(RMA) number clearly marked on the outside can be accepted for return to NBS.
41
Appendix G Declarations of Conformity
European Council Directive
Compliance to Standards
89/336/EEC
modified by
92/31/EEC
and
93/63/EEC
EMC Directive
EN 55022-B
EMC Directive
EN 500082-1,
1992
Low voltage
Directive
EN 60950
73/23/EEC
modified by
593/68/EEC
RF Emissions
control
Immunity to
Electromagnetic
Disturbances
Product Safety
Models: J110i & J110m conforms to the following specification:
FCC Part 15, Subpart A, Section 15.107(a) and
Section 15.109(a) Class A digital device
Supplemental Information:
This device complies with Part 15 of the FCC rules. Operation is subject to the following two
conditions: (1) This device may not cause harmful interference , and (2) this device must accept any
interference received, including interference that may cause undesired operation.
Note:
This equipment has been tested and found to comply with the limits for a class A digital device,
pursuant to Part 15 of the FCC Rules. These limits are designed to provide reasonable protection
against harmful interference when the equipment is operated in a commercial environment. This
equipment generates, uses, and can radiate radio frequency energy and, if not installed and used in
accordance with the instruction manual, may cause harmful interference to radio communications.
Operation of this equipment in a residential area is likely to cause harmful
interference in which case the user will be required to correct the interference at his own expense.
INDUSTRY CANADA NOTICE
This device complies with Industry Canada ICES-003 class A requirements.
Cet équipement est conforme à l’ICES-003 classe A de la Norm Industrielle Canadienne.
42
TRADEMARKS
JAVELIN is a registered trademark of NBS Technologies. Windows and MS-DOS are registered
trademarks of Microsoft Corp. All other marks are trademarks or registered trademarks of their
respective holders.
COPYRIGHT NOTICE
This document contains information proprietary to NBS. This document and the information
contained within is copyrighted by NBS and may not be duplicated in full or in part by any person
without written approval from NBS. While every effort has been made to keep the information
contained within current and accurate as of the date of publication, no guarantee is given or
implied that the document is error-free or that it is accurate with regard to any specification. NBS
reserves the right to make changes, for the purpose of product improvement, at any time.
PRODUCT DISPOSAL
Do not dispose this product in unsorted municipal waste.
This product is recyclable and should be recycled accordingly
to your local standards.
43