1
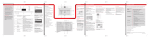
March, 2007
From the manufacturer
Please read this user manual carefully before attempting to operate the
appliance and store it in a safe place for future reference.
This appliance and it’s packaging are produced by processes that minimize
waste and respect the environment.
Please help us to continue this effort to protect the environment by using
the appliance efficiently and dispose of the packaging in a responsible
manner.
Your safety
For the User
PLEASE READ THIS SECTION
THOROUGHLY BEFORE
ATTEMPTING TO OPERATE THE
APPLIANCE !
Read the following before using.
It may cause fire if you do not follow the instructions when cleaning
the hood.
The hood must not be directly heated by the fire or other heat
sources.
The exhaust air that the hood sucks from cooking must not be
ejected to the flue which is used for exhaust emission of gas
combustion or other fuels.
The room must be well-ventilated when the hob is being used.
Installation
•
This appliance must be installed by a qualified technician.
•
It is dangerous to modify any part of this appliance.
•
The manufacturer declines all responsibility in case of failure to adopt
proper safety measures.
•
Ensure the location in which this appliance is installed has good,
permanent ventilation.
Page 2
•
In ducted mode, there must be one or more permanent air inlet. The air
collected must not be discharged into a duct used to blow off smoke
from other appliances fed with electricity.
•
The distance between the bench top to the lower part of the hood must
not be at less than 65 cm or higher than 75 cm.
•
Use an electrical connector with earth that is correct for your location.
•
Check that the voltage in your area correspond to the appliance as
indicated on the rating label.
•
Do not connect the hood to a duct that carries combustion fumes (e.g.
fireplace).
Child Safety
•
This appliance should be operated by adults only.
•
During Use
•
This product is designed for domestic use only and should never be
used for commercial applications.
•
After using, always ensure that all controls are in the “OFF” position.
•
When frying with a gas flame, take particular care not to allow the oil
or grease in the pan to catch fire.
•
Cleaning, Maintenance & Service
•
Clean the grease filters often (at least once monthly) . Heavy oil deposits is a
fire hazard.
•
Never attempt to repair this appliance by yourself. Always refer to
qualified Service Technicians.
•
For your safety, insist on original parts.
Page 3
•
Always switch off the electricity and unplug the connection before
conducting maintenance or cleaning.
Electric Chord
•
Ensure the supply chord is not exposed to heat, chemicals or sharp
objects.
•
If the supply chord is damaged, it must be replaced by the manufacturer
or its service agent or a similarly qualified person in order to avoid a
hazard.
Description
1. Aluminium grease filters
2. Canopy
3. Main flue
4. Extension flue
5. Control buttons
Page 4
Ducted or Re-circulating mode
•
Depending on your requirement, this appliance can be configured to
operate in the ducted or re-circulating modes.
•
DUCTED MODE : Fire proof ducting system of 150 mm diameter vent the
fumes through a suitable outlet. In the ducted mode, only the aluminium
grease filters are installed.
•
RECIRCULATING MODE : Fumes are filtered for grease and odour
through the aluminium grease filters and the charcoal filters respectively
and re-introduced into the kitchen environment. In re-circulating mode,
both the aluminium grease filters and the charcoal filters must be installed.
3 Speed Control
•
The hood is equipped with a 3 speed mechanical/electronic control.
•
Use the low speed for simmering, medium speed for light cooking. Use
the high speed for frying or heavy cooking.
Instructions for use
A. Push Button Control Panel
Turns off the hood
Low speed setting
Medium speed setting
High speed setting
Turns the light on / off
Page 5
B. Electronic Control Panel
Touch
Touch
Touch 3 seconds
Touch
Touch
Touch 3 seconds
Touch
Touch
Touch 3 seconds
Low speed setting
Off
Delay off five minutes
Medium speed setting
Off
Delay off five minutes
High speed setting
Off
Turbo setting 1000m3/hr seven minutes
Turns the light on / off
Delay off timer: This program is used to clear the kitchen of fumes
after cooking & without supervision. The hood continues to run for 5
minutes then shut down automatically.
Turbo setting: This program is used to handle intensive cooking e.g.
deep frying, when activated, the motor is boosted to deliver the highest
airflow of 1000m3/hr for a period of 7minutes after which the setting
returns to
high speed setting. To protect the motor, the turbo setting
can only be activated once every hour.
Page 6
Cleaning & Maintenance
Always switch off and unplug first !
•
SURFACES : Wash with warm soapy water and a soft sponge. Never
use abrasive detergent, scouring pads, steel wool or solvents on any
part of this appliance as this will cause irreparable damage.
•
ALUMINIUM GREASE FILTERS : Wash in the dishwashers or
soak the panels in a degreasing agent for an hour, then rinse off and dry
before re-installing
•
CHARCOAL FILTERS (only in re-circulating model) : Charcoal
cannot be reused. They must be replaced with the appropriate types
once a year or depending on the frequency of appliance usage.
•
For this appliance to function effectively, regular maintenance is a
must.
•
Clogged filters restrict airflow and may cause the motor to overheat.
Page 7
Safety information
For the Installer
Connection to the electrical supply
•
Electrical connection must be made only in accordance to local
standards and laws.
•
Ensure that the electrical supply complies with the setting on this
appliance, otherwise, do not connect.
•
The electrical connection of this appliance must be earthed. If unsure,
check with a qualified electrician. Colour code:
Green & yellow = EARTH
Blue = NEUTRAL
Brown = LIVE
•
Ensure that the power supply chord is free from any heat source or
sharp objects.
•
Replacement halogen bulbs must not exceed 20W.
Levelling Device
When mounting the hood on the wall, the level can be adjusted by turning
the two screws on the motor housing.
Page 8
Installation
•
Use suitable bolts to mount the appliance on a secure surface.
•
The minimum distance between the bench top and the lowest part of
the hoods must not be less than 65cm or more than 75cm.
•
The location of the installation must have permanent openings for
ventilation.
•
Regulations concerning the discharge of air have to be fulfilled.
•
It is strongly recommended that the hood be installed right over the
exhaust air from cooking.
•
It is better not to install the outlet of the pipe in the wind direction,
which can prevent the exhaust air from flowing backards due to the big
wind.
•
It is best to install the hood 65-75cm above the cooker.
•
Fasten the components for the exhaust outlet with screws. To ensure
good ejection of exhaust air, the pipe must not be bended for too many
times.
Page 9
Troubleshooting
Symptoms
Possible Cause
Action
Check that the plug
No go
No electrical supply
is connected.
Check that the main
switch is turned on.
Aluminium grease
Clean the filters and
filters clogged
replace when dry
Charcoal grease
Replace charcoal
filters clogged
filters with new sets
Motor running but
Butterfly valve
Contact technician
no airflow
jammed
Poor airflow
High temperature
The kitchen is not
Motor cuts after a
safety device activated
sufficiently ventilated
few minutes
The hood is installed too
The hood must be
near the cooking stove
least 65cm from stove
Charcoal filters not
In re-circulating mode,
installed
charcoal filters must be
Strong cooking
smell
Oil dripping onto
stove
Whirring sound
installed
Oil cup missing or not
Remove aluminium filter
installed
and replace oil cup
Alumnium grease filter
Wash the alumnium
saturated
grease filters
Foreign object in contact
Contact technician
with fan blade
Page 10
For reliable service and original parts: