1
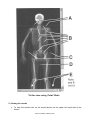
Standard Operating Procedure Equipment / Procedure: DEXA whole body scanner Filename: 2012.1214SOP_DEXA_scan Assessor’s name & date: Reviewer’s name & date: Review Date: Richard Metcalfe, December 2012 Rebecca Travers, December 2012 December 2014 2012.1214SOP_DEXA_scan DEXA whole body scanner Using DEXA Scanner for assessment of body composition and bone mineral content Safety Information: IMPORTANT: Only those who have completed the required Ionising Radiation (Medical Exposure) and in-house training for this procedure and who have read and understood the risk assessment may perform this procedure. Investigators using this technique must have read the following risk assessment: o 2013.0103RA_DEXA_scan To be done prior to beginning the scan: In order to perform a scan make sure the following has been done: Ethics approval has been acquired and informed consent has been signed. Any issues relating to research population has been addressed eg. Is there a risk of pregnancy? DEXA room has been booked (extn. 3636 Sports Injury Clinic) Participant will be wearing the same clothes if doing a repeat scan Participant needs to void before scan and weighing. You have recorded the participant’s height and mass. Mass should be done immediately prior to scan so there will need to be scales in the DEXA room. Record mass in the log book (see Appendix I for copy of log book). You may want to standardise diet and hydration status. This will be study specific but generally subjects should be fasted and have drunk a predetermined volume of water at least 1 hour prior to scan. Participant is NOT: wearing any metal, this includes watches, earrings, necklace, rings and bracelets. Female participants are not wearing underwired bras. Register your name with Radiation Protection Officer Pete Jewell and Simon Roberts once you have done the required IR (ME) R training. Courses can be found at www.sghrpc.co.uk. On entry to the room: Clear the space around the bed, removing any equipment that surrounds the table. Remember that the table moves so make sure everything is out of the way. Move the physio bed out of the way. Carefully move the computer unit. Turn on the computer then turn on DEXA table immediately after (this is important as it has been known to play up if it is done in the wrong order) 2012.1214SOP_DEXA_scan Log in on QDR-82228. password: 82228 Put ‘DEXA Scan in Progress’ sign on the door, move sign from ‘Free’ to ‘Do not disturb’ You are now ready to start. Perform a Daily QC Scan Open up the Hologic QDR 82228 Icon Click on ‘Daily QC’ Check the position of the purple bed cover as this can move as people get on and off the bed. At the top of the table make sure the black line is in line with the screw. The DEXA arm will project a red laser cross on the bed. Get the Spine Phantom (located under the computer) and line the block up with the spine parallel to the long axis of the bed. Line up the red laser cross hairs with the small white circle on the phantom. Cross hairs should be towards the feet end of the table. Check the laser runs straight through to the small dot at the end of the block. Make sure this is placed as accurately as possible. Click ‘Continue’ on the screen. The machine should start scanning. Upon completion the message ‘Daily QC has passed’ appears. If it doesn’t pass a scan cannot be performed but this is extremely rare. Briefly look at the plot to check the graph. Click ‘Plot’ then BMC. The dot should be within the 2 lines. (it won’t pass without it being in the lines but it’s always worth checking) Click ‘Close’ and put spine carefully back in its place. Click ‘Continue’. If DEXA prompts to do an AirScan This is prompted for once a week. It is best practice to do it when prompted and will take an additional 7 minutes. There is no need to do it more than this. Click ‘ok’ and the machine will run the scan. Once finished it will give an SD value. Record both high and low values in the log book. The low value must be below 2. This number is recorded to identify any trends in the value and pre-empt a problem. If the number is only just below 2, so long as it hasn’t been steadily increasing over time, this is normal and the machine is ready to use. Performing the scan on a participant. Double check that the informed consent form has been signed. If this is a repeat scan it is a good idea to get the previous scan up on the screen to check the position. o It is not possible to get the previous scan image up whilst performing the current scan as the software only lets you do one thing at a time. One way to look at the previous scan whilst performing a scan is to do a Print Screen of the existing scan prior to going through the procedure for the new scan and pasting it into Word Pad. You can then look between the two software programmes as you set up for the current scan. (To access previous scan click ‘Analyse Scan’ from the main screen, tab to ‘analysed scans’ find patient in the list) 2012.1214SOP_DEXA_scan 1. Participant Position: After the participant has changed into appropriate clothing ask them to lie on the bed. Supine position is preferred, flat on the back with the head nearest the computer. It is essential to get the position of the participant accurate as it will make the analysis a lot easier and more precise: o First position the body so that the head is as close to the black marker at the head end of the table as possible. o Align the body so that the head and spine line up exactly with the central long axis of the table. Use the black marker at the head of the mat to help. o Ask the participant if they feel like their spine is straight. It is hard to judge exactly as it cannot be seen so it is always good to check by asking them. o The legs should be apart and the feet turned in. o The arms should be as wide as possible. Ask the participant to bend at the elbow to allow for maximum area between the arm and the torso. Lower arms should be straight and hands flat. It is important here that there is sufficient room between the hand and the side of the body as you need a clear line for the analysis. It may help with larger participants to have the hands on the side. If you are concentrating on body composition rather than bone mineral density this positioning will be ok. Once the participant is lying there they will have to remain in that position for approximately 10minutes and they must remain still. If the participant is taller than length of the bed then position the person so that their feet are off the bottom rather than the head. 2. Performing the scan On the computer click the icon ‘Perform Scan’ a list of scans appears.0 If it is a first time scan click ‘New Patient’ and fill in the fist name, surname, DOB, ethnicity, sex, operator (your initials), height and weight, leave the rest blank. Click OK. If this is a repeat scan, it will miss this step and go straight to the next step. Your patient should be selected on the list. Click ok. On the next screen fill in the participant’s height and weight as recorded from the scales that morning, put your initials in the operator box and leave accession number blank. Click OK On ‘Patient Confirmation’ select the type of scan that you want. It usually will be ‘Whole Body’ Final check of participant. Click ‘Start’. Stand as far back as possible in the room. The scan itself will take 7minutes. At the end of the scan, the prompt ‘Analyse scan’ will appear. Click it. Now you have the 2 choices: ‘Analyse whole body scan’ or ‘Compare to previously analysed scans’. 3. Analysing the scan You can now perform the analysis on the computer located in Eastwood 22/23 Resting Laboratory, however you will need to ‘archive’ the scans to save them to the external harddrive and then ‘restore’ them to the computer in Eastwood before re-archiving to your H drive or shared area (X drive). See point 8 for instructions. 2012.1214SOP_DEXA_scan If you are coming at it without having performed the scan immediately prior to this then on the main page click the ‘analyse scan’ button at the bottom of the screen. Select the can you want, click ok and it will then take you through to the following; On a First time scan If you are doing a scan for the first time choose ‘Analyse whole body scan’ Make sure ‘Whole Body Fan Beam’ is selected in the white box. Click Next A picture of the scan will now appear. Repeat scan and you wish to compare to previous scan. Choose the option ‘Compare to previously analysed scans’ A list of previous scans will appear. Select the previous scan. Click Next. The 2 scans appear side by side. You can use the previous scan to match region placement. NB. You cannot alter the regions on the previous scan, only the current scan. If you want to reposition the regions on the previous scan you have to come out of this analysis and go into the previous scan location (from the main screen click ‘Analyse scan’ tab to analysed scans find previous scan in list). Analysis In order to perform the analysis you may need to adjust the image display brightness by using the sun and moon contrast button on the bottom left. Click to use this function and change contrast by moving the black dot around. To come out of it, click the sun and moon again. Define the regions using the Line Mode and Point Mode in the Regions toolbox on the left hand side. View the results by clicking on the results box on the top right. It is possible to interchange between the results page and the regions page to allow for further modification of the lines. It is best practice for the same person to analyse all the scans in a study. If this is not possible then at least the same person should analyse the pre and post scan of the same participant. 4. Location of the Regions A detailed pictorial version of this can be found in the DEXA User Manual page 11-12 in the Eastwood 22/23 postgraduate room 4.5 or see the next few pages for diagrams. In the Line Mode, click and drag the top line so that it is just under the mandible. Click and drag the small horizontal line in the spine to the approximate level of T12L1. If this is hard to see then change the contrast. Click and drag the horizontal line above the pelvis just above the iliac crest. Click and drag the vertical line on either side of the chest to bring each one close to the chest. Click and drag the vertical line either side of the spine to bring each one close to the spine Click and drag the vertical line on either side of the legs to bring each one close to the leg 2012.1214SOP_DEXA_scan Click and drag the bottom centre vertical line to separate the legs and feet. To fine tune, change from Line Mode to Point Mode. Click on the point on the left shoulder and drag so that it is positioned between the head of the humerus and scapula. Repeat for right side. Click the left points along the spine, matching the curvature where possible. Repeat for right side. If needed, click the left/right point above the iliac crest and drag it out to include the soft tissues of the chest and thighs. Click and drag the lower point of the triangle below the pelvis. Depending on what you are analysing for will affect the position of this point: o For body composition, make sure the point is as close to the pelvis as possible so that the upper thigh soft tissue is included in the leg region NOT in the trunk region; i.e. There should be no leg soft tissue in the triangle. o For bone mineral density position the point so that is bisects the femoral necks. Use the scroll bar to scroll the image to the bottom of the scan. Click and drag the points near the feet to include as much of the soft tissue in the legs and feet as possible without including the hands and fingers. NB. If this is unavoidable, it is better to include some of the hand and fingers than to chop off the outer thigh soft tissue. 2012.1214SOP_DEXA_scan 2012.1214SOP_DEXA_scan 2012.1214SOP_DEXA_scan To fine tune using Point Mode 5. Viewing the results To view the results click on the results button on the upper left hand side of the screen. 2012.1214SOP_DEXA_scan You will see a table on the right hand side with the figures. To get the body composition results click on the ‘BCA’ button of the left hand side. If you are not happy with the results or your region placement you can return to the region screen by clicking ‘regions’ on the top left side of the screen. Record the DEXA value for total mass in the log book. Check that the manual mass measurement and DEXA measured mass are within 1kg. If the values differ first check the mass on the scales, if they still differ perform either another scan or rearrange for another scan 24hrs later or another chosen time. 6. Schoeller Correction It has been suggested that the particular model of DEXA used overestimates fat free mass (FFM).1 This was established by comparing results from 7 independent studies, with DEXA found to overestimate FFM by approximately 5%. In this correction the value for fat free mass is reduced with the discrepancy added to fat mass (FM). BMC remains unchanged. This particular correction factor is employed by the company that manufacturers the scanner 2, and is built in to newer versions of their software. It is up to each investigator to decide if this correction factor should be employed, with special note taken if comparing between data sets from different studies, as not all studies will have used the correction factor. The calculations required are listed below. It should be noted that in the case of correcting results the original values from the DEXA scan are used to calculate the corrected values. Therefore even when the data is corrected the investigator should still have access to the “raw” values. N.B. the correction factor is employed after obtaining the results from the scan; the method for completing the scan is exactly the same. FFM (corrected) = 0.946 * FFM (measured) FM (corrected) = DEXA weight – (FFM(corrected) + BMC) Fat % = 100 (FM (corrected) / DEXA weight) A worked example… Person X original data Weight 100kg, BMC 3.5kg, Fat free mass 80kg, Fat mass 16.5kg, Fat % 16.5 FFM (corrected) = 0.946 * 80kg FFM (corrected) = 75.68kg FM (corrected) = 100kg – (75.68kg + 3.5kg) FM (corrected) = 20.82kg Fat % = 100 (20.82 / 100) 2012.1214SOP_DEXA_scan Fat % = 20.82 Person X corrected data Weight 100kg, BMC 3.5kg, Fat free mass 75.68kg, Fat Mass 20.82kg, Fat % 20.82 Original references 1 Schoeller, D.A., Tylavsky, F.A., Baer, D.J., Chumlea, W.C., Earthman, C.P., Fuerst, T., Harris, T.B., Heymsfield, S.B., Horlick, M., Lohman, T.G., Lukaski, H.C., Shepherd, J., Siervogel, R.M. and Borrud, L.G. (2005). QDR 4500A dual-energy x-ray absorptiometer underestimates fat mass in comparison with criterion methods in adults. American Journal 2 Kelly, T.L., Wilson, K.E. and Heymsfield, S.B. of Clinical Nutrition, 81:1018-25. (2009). Dual Energy X-Ray Absorptiometry Body Composition Reference Values from NHANES. PLoS one, 4 (9): e7038. 7. Printing the report Exit the results screen by pressing ‘Close’ The Exit Analysis window appears. Click the ‘Report’ button. Follow the prompts, you can go straight to print or view the report first. Click Exit and you will return to the main screen. It is a good idea to Archive your scan once you have analysed it. 8. Archiving your scan It is good practice to archive your scans once they have been analysed. These can be retrieved as and when necessary. On the main screen click ‘Archive scan’ on the right side of the screen. At the top of the screen in ‘Archive Location’ click on the drop down menu and select the F drive. This is the internal hard drive. A list of scans appears underneath, you can either click ‘select all’ or select only the ones that you wish to archive (Ctrl + Click on scan) Click ‘Archive Scans’ Upon completion it should say x out of x scans archived successfully OK. It is good to archive to 2 different locations so repeat the procedure, Click Browse and on archive location change it to the G: Directory, the external hard drive. To restore an archived scan On the grey toolbar on the main page choose ‘Archive’ Click Restore Scans. A list of patients appears. Find you patient and select it. Click Restore Scans. You can select a few different ones using the CTRL function on keyboard. To locate the restored file On the main page go to ‘analyse scan’ along the bottom Tab to ‘Analysed scans’ 2012.1214SOP_DEXA_scan Your scan should now appear on the list Select it and click ‘Next’ Choose your analysis method – it’ll usually be ‘Whole body’ You can compare this to a previous scan providing that scan is not in the Archive 9. Backing up the System This should be done once a week, if the button is flashing this means the system is in need of backing up. On the main screen click ‘System Back Up’ A new screen will appear showing the destination for the back-up. This will automatically default to the last place so do not change this. At present it will say the F: Drive. But this will be changing to the X: Drive once the computer has been networked. Click OK. For a hard copy please look in the Health and Safety folder in UBSA Research Lab or for any further information consult the User Manual located in Eastwood 22/23 4.5. 2012.1214SOP_DEXA_scan Appendix I – DEXA Log Book Please fill out every time a scan is performed. This is for monitoring the machine’s technical operation and must be completed every time. Date Operator QC Pass Air scan SD high Air scan SD Low End of Document 2012.1214SOP_DEXA_scan Mass on scales DEXA calculated mass


![製2016-p47-50 [4DG,濁色度,サンコリ,ABS,FIA]pdf用](http://vs1.manualzilla.com/store/data/006571507_2-511ffc2cc8f862ae294766156a2d15df-150x150.png)