1
5. Setting up the device
5. Setting up the device
5.1. Switching on
Once the installation is complete, you can start the device by applying the current loop. Check beforehand once
again that all the electrical connections are correct.
Starting sequence
For 1 second during the switching-on process, the segment test (8 8 8 8 8) is displayed, followed by an indication
of the software type and, after that, also for 1 second, the software version. After the start-up sequence, the
device switches to operation/display mode.
5.2. Standard parameterization:
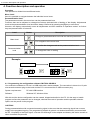
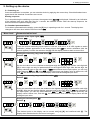
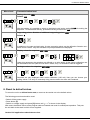
To be able to parameterize the display, press the [P] key in operating mode for 1 second. The display then
changes to the menu level with the first menu item TYPE.
Menu level
Parameterization level
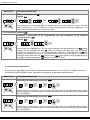
Selection of the input signal, TYPE:
Default: sens
There are several measuring inputs options: 0-20 mA, 4-20 mA or 0-10 VDC signals as works
calibration (without application of the sensor signal) and Sens as sensor calibration (with the
sensor applied). Confirm the selection with [P] and the display switches back to menu level.
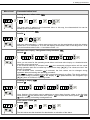
Setting the measuring range end value, END:
Default: 1000
Set the end value from the smallest to the highest digit with [▲] [▼] and confirm each digit with
[P]. A minus sign can only be parameterized on the highest value digit. After the last digit, the
display switches back to the menu level. If Sens was selected as the input option, you can only
select between noca and cal. With noca, only the previously set display value is taken over, and
with cal, the device takes over both the display value and the analogue input value.
Setting the measuring range start/offset value, offs:
Default: 0000
Enter the start/offset value from the smallest to the highest digit [▲] [▼] and confirm each digit
with [P]. After the last digit the display switches back to the menu level. If Sens was selected as
the input option, you can only select between noca and cal. With noca, only the previously set
display value is taken over, and with cal, the device takes over both the display value and the
analogue input value.
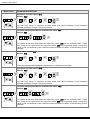
Setting the decimal point, dot:
Default: 0
The decimal point on the display can be moved with [▲] [▼] and confirmed with [P]. The
display then switches back to the menu level again.
5