1
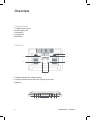
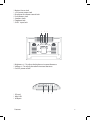
7” Open Frame
User Manual
Index
Safety and Warnings
4 Main Supply
4 Main Adaptor
5 FCC Radiation Exposure Statement
5Warning
Overview
6 Components
6Features
Operating Instructions
8
Accessories
9
Troubleshooting
10
Power Supply Unit Electrical Data 10
2
Quick Start
Thank you for purchasing an Outform i Display 7” open frame unit.
Before you start to use your new i Display 7” open frame unit, please read the user
manual carefully to enjoy i Display performance and a longer service life.
Keep this manual in a safe place for future reference.
In the interest of continually improving our product, i Display reserves the right to
update or modify information contained in this manual.
The screen and the illustration shown in this manual were produced during the
development stage and may differ from the actual product. Unless otherwise
specified. For further information or support, please contact:
[email protected]
3
Safety and Warnings
Main Supply
This equipment is designed to operate from a 100-240 Volt, 50/60Hz AC main
supply. The use of other power sources may damage this equipment. Check that
the voltage marked on the rating plate located at the rear of the power adaptor
states 100-240V. The manufacturer will NOT accept responsibility for damage or
injury caused by connecting to the wrong voltage.
Main Unit
This device complies with CE/FCC regulations.
Main Adaptor
The power adaptor supplied is compatible with a standard main socket. NB. If the
power adaptor or lead gets damaged, it must be replaced by a qualified service
agent with an approved adaptor of the same type and rating.
Operation is subject to the following two conditions: (1) this device may not cause
harmful interference, and (2) This device must accept any interference received,
including interference which may cause undesired operation. This equipment
has been tested and found to comply with the limits for a Class B digital device,
pursuant to Part 15 of the FCC Rules. These limits are designed to provide
reasonable protection against harmful interference in a residential installation.
This equipment generates uses and can radiate radio frequency energy and, if
not installed and used in accordance with the instructions, may cause harmful
interfer¬ence to radio communications. However, there is no guarantee that
interference will not occur in a particular installation. If this equipment does cause
harmful interference to radio or television reception, which can be determined by
turning the equipment off and on, the user is encour¬aged to try to correct the
interference by one or more of the following measures:
Reorient or relocate the receiving antenna.
Increase the separation between the equipment and receiver.
4
Main Supply / Main Adaptor
Connect the equipment into an outlet on a circuit different from that to which the
receiver is connected.
Consult the dealer or an experienced radio / TV technician for help. In accordance
with FCC requirements, changes or modifications not expressly approved by
manufacturer could void the user’s authority to operate this product.
FCC Radiation Exposure Statement
This equipment complies with FCC radiation exposure limits set forth for an
uncontrolled environment. This equipment should be installed and operated with
minimum distance 20cm between the radiator & your body
Dangerous voltage constituting a risk of electric shock is present inside this
equipment.
This mark is applied to show the equipment conforms to European safety and
electro-magnetic compatibility standards.
There are important operating and maintenance instructions in the literature
accompanying this equipment.
Warning
The main plug shall be the main disconnect device and shall remain operable at all
times.
Never let anyone push objects into holes and ventilation slots.
Do not expose this product to dripping or splashing or place any objects filled
with liquids on or near the product.
Do not place a naked flame source such as lighted candles on or near this product.
Do not attempt to repair this product yourself; always get a qualified service agent
to carry out adjustments or repairs.
FCC Radiation Exposure Statement / Warning
5
Overview
Components
1. 7” Digital Open Frame
2. Power Supply Unit
3. Screwdriver
4. User Manual
5. Mid-frame
Features
C
A1
A3
A2
A4
B
A. I Display eyeholes for wall mounting.
B. I Display standard screw holes for I display accessories
C. Speakers
1 2 3
6
4
5
6 7
Components / Features
1. Motion Sensor Jack
2. ± 5V power output Jack
3. IR receiver for remote control Jack
4. Push Buttons Jack
5. Speakers Jacks
6. Earphone Jack
7. 9V DC input Jack
1
2 3
1. Brightness+/-: To adjust the brightness increase/decrease
2. Volume+/-: To adjust the volume increase/decrease
3. On/Off: power on/off
1. SD card
2. Mini USB
3. USB port
Features
1
2
3
7
Operating Instructions
Quick Start
Turning on
1. Plug into power supply
2. Display will automatically load movie and play
3. If you get a picture with the words: “Please insert S.D or USB stick”, please go to
Playing other movies / change content
Playing other movies / change content
1. Prepare a USB stick with new content.
2. Make sure the content is copied onto the USB stick in the following manner: folder
0 is for the loop movie, folder 1- 6 are for Push Button activated movies, folder MS
is for Motion Sensor activated movie.
3. Connect the USB stick to the I Display USB port. The content which was in the
internal memory will be deleted and replaced with the new content being copied
from the USB stick, this process will be shown on the screen. After the content is
copied, the unit will start playing the new content automatically. The USB stick can
now be removed.
4. Connect a push button to one of the 6 push button sockets.
5. Press the push button.
6. (NB: when a motion sensor is connected to the unit, it will pick up movement
within 5 meters and start to play the movie allocated to the motion sensor)
Important note:
• The video file name is not important but the folder name must be as stated.
• Make sure the video content is in a format supported by the unit.
Playing content from SD Card
1. Insert an SD card to the unit. Make sure the content is copied onto the SD card in
the following manner: folder 0 is for the loop movie, folder 1- 6 are for Push Button
activated movies, folder MS is for Motion Sensor activated movie.
2. The unit will play the content of the SD card automatically.
Copying New Content to Internal Memory
1. Prepare a USB stick with the new content.
2. Make sure the content is copied in folders named: 0,1,2,3,4,5,6,MS inside USB stick
Folder 0 is for the loop movie, folder 1-6 are for Push Button activated, folder MS is
for Motion Sensor activated
8
Quick Start
4. Connect the USB stick to i-Display USB socket. The content which was in the
internal memory will be deleted and the new content in the USB stick will be
copied automatically. After the content is copied, the unit will start playing the
new content automatically. The USB stick can now be removed.
Important: If you no longer require the old content to be played, you will need to
delete the old content.
Recommend content format
Video Formats
• Resolution: 720X400.
• Video Format: XVID (.AVI).
• Frame Rate: 25 frames per second (Up to 30 frames).
• Audio code: MPEG-1 Audio layer 3 160Kbps.
Picture Formats
• Format: JPEG
• Resolution: 720X400
Accessories
• M00009 I-DISPLAY OPEN FRAME USB CABLE Extends the USB socket by 50cm
• M00002 I-DISPLAY OPEN FRAME PUSH BUTTON 50CM (a variety of PB are
available. Please log on www.i-display.com for more info) Plays the content stored
in folders 1-6 (Each PB plays content from a different folder according to the socket
they are connected to)
• M00003 I-DISPLAY OPEN FRAME MOTION SENSOR When connected to the
open frame, the unit will goes in to SB mode (black screen). When the MS detects
movement, it plays the content stored in folder MS one time and then goes back
to SB mode (unless it detects movement again)
• M00005 I-DISPLAY OPEN FRAME EXTERNAL SPEAKER Used to enhance the
volume. When external speakers are connected the sound comes out from the
internal and external speakers together.
• M00004 I-DISPLAY OPEN FRAME IR CABLE Enables the use of the remote control
by which the following functions can be changes: volume / brightness / contract
• M00006 SMALL FRONT PLASTIC FRAME FOR 10.2” OPEN FRAME
Quick Start
9
All accessories are purchased separately
For more information on the range of accessories, please log on to
www.i-display.com
Troubleshooting
Problem
Troubleshooting
Not recognized USB/SD card
1. Make sure the content is copied in right
folders (see page 8)
2. Inside content is not compliant with
video/audio/picture formats (see page 9)
3. Disconnect any power supply for 1
minute, insert the USB/SD card first and then
connect the power supply.
4. USB/SD card is damaged; try to inserting
another USB/SD card.
Cannot copy content to SD card
1.Make sure the SD card is “unlock”
2. Make sure the content is copied in folders
named: 0 inside SD card
Cannot turn on LCD
1.Make sure the power supply unit is
plugged into electricity
2. Make sure to turn on power switch in the
back
Remote controller does not work
Make sure to take off the plastic tab from
the remote controller
Power Supply Unit Electrical Data
Power Adaptor: Input 100-240V 50/60Hz, 0.3A ; Output 5V, 1500mA.
Produced by: HONOR ELECTRONIC CO.LTD
10
For further information or support, please contact: [email protected]