1
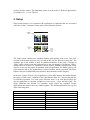
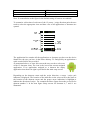
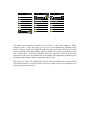
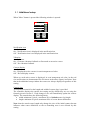
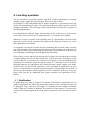
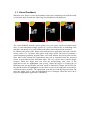
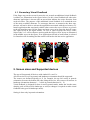
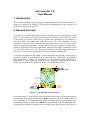
Jet Launcher 1.0
User Manual
1. Introduction
This document describes how to operate Android application called Jet Launcher. Jet
launcher is property of JetKeys LTD and ideas implemented in the software are
protected by US patent 6,597,345.
2. General Concept
Jet Launcher is Android application which is resident service in Android device. The
service is registered to receive the touch screen user interface events from the corners
of the screen in all times so the user can launch new application in any instance of
time and within any application and any screen view. The launching of new
application is gesture based events that are initiated in one of the four corners of the
screen. Lunching an application occurs whenever the user touches on the corners,
which are typically not used by applications, and swipe his finger towards the center
of screen. The corner area is "L" shaped with default corner leg length optimized to
your device. You may also change this size in Jet Launcher setup screen.
To activate an application the length of swipe should be long enough so the finger up
is outside a quarter of cycle referred as "no activation zone". Each corner can launches
three applications. Totally 12 application can be launched. Each application is
launched by a swipe operation, referred also as "shortcut" illustrated at the below
figure. The 12 shortcuts are numbered from 1 to 12 as illustrated below.
Figure 1 - Jet launcher zones geometry
Any touch in the "L" shape corner area, the initial contact zone, will be interpreted by
Jet Launcher. If the finger up location is inside a quarter of cycle area with a radius of
twice the corner, the no launching zone, no action will be taken. If a swipe follows the
touch and the finger up location is outside the no launching zone, the launching zone,
Jet launcher will launch an application according to the angle between the finger up
location and the corner. The launching zones of each of the 12 different applications
are numbered 1 – 12, see Figure 1.
3. Setup
Setup main function is to customize the application or shortcuts that are associated
with each of the 12 shortcuts. Setup main screen illustrated below
screen
title
Jet Launcher Setup
10 9
8
11
12
7
More
Help
no
launching
zone
Share
1
6
2
5
3 4
Corner
disable
radio
button
The setup screen contains four standard desktop grid spacing icons rows. Two rows
are laid at the bottom and two rows are laid at the top just after the screen title. The
reminder gap in the middle is used for additional buttons of the setup. Clicking on
"Help" opens a help screen that explains how to use Jet launcher. Clicking on "Share"
enables the user to share Jet Launcher with his friends. Standard Google share menu
(similar to the one that opens in standard Android application like Photo gallery will
opens and the link to the application in Android market will be provided. The More
button will open an additional setup window (described later in this chapter).
In the four corners of the 4 x 4 icon grid there is four radio buttons that enable/disable
the usage of each corner. Adjacent to the radio burtons there are 3 arrows that hint the
Jet launcher operation. For each swipe direction there is an icon that displays the
current application or shortcut assigned to each corner / swipe direction pair. The
figure illustrates the default Jet Launcher setup which are standard Google
applications that come with every Android phone. The default application list is given
in the following table:
1
2
3
4
5
6
7
8
9
Phone
Messaging
Email
Contact
Calendar
Clock
Calculator
Camera
Setting
10
11
12
Market
Browser
Google search
Note: In contradiction to the figure in the default setting all corners are enabled!
To customize a direction of each one of the 12 corner / swipe direction pairs the user
need to select the appropriate icon and then a list of all applications or shortcuts are
opened.
The application list contains all the applications or shortcuts you have on the device
identical to the one you have in the home desktop. To find quickly an application a
quick search field is also provided.
As mentioned above, to enter this screen the user needs to select one
of the 12 shortcuts icons. The icon is the icon of the current assigned
application. If no application assigned to a shortcut the empty
application icon shown in right is provided in the main setup screen.
Depending on the shortcut corner and the swipe direction, a corner / swipe pair
indicator is displayed. The location of the indicator on the screen will be the same as
the location of the shortcut corner and the proper arrow indication is highlight to
indicate the direction of swipe. For example the above figure shows the set screen for
shortcut number 2. In the next figure setup screens for shortcuts 6, 7 and 11 are
illustrated.
Customize shortcuts
10 9
Browser
8
11
Calculator
12 Calender
7
Clock
Contacts
Email
2
3 4
3 4
10 9
Browser
10 9
Browser
11
8
Calculator
12 Calender
Camera
1
3 4
6
5
1
7
11
8
Calculator
12 Calender
Camera
Camera
Clock
Clock
Contacts
Email
2
6
5
1
Contacts
Email
2
7
6
5
The quick search field is located next to the corner / swipe pair indicator. When
entering corner / swipe pair setup screen a list of all applications installed in the
device is shown. If the list is bigger then the screen the user can scroll the list. To help
the user find the desired application quickly a quick search option is provided to the
side of the corner / swipe pair indicator. The user enters the search field and then
presses the search icon. An updated list is provided by the application containing only
the application that there name contains the search string.
When the user selects an application from the list the application is associated with
the shortcut and the screen pop back to the main setup screen. The updated icon is
displayed for the set shortcut.
3.1. Additional setup
When "More" button is pressed the following window is opened.
Notification icon
A radio button
On – Notification icon is displayed in the notification bar
Off – Notification icon is not displayed in the notification bar
Vibration
A radio button
On – Generate vibration feedback on first touch on an active corner
Off – No vibration feedback
Corners display
A radio button
On – Display the active corners in semi transparent red color
Off – Do not display corners
When on, each active corner is displayed, in semi transparent red color, in the real
size and location (as demonstrated for all corners in the above figure) in all time. Note
that in the additional setup window the corners are always displayed regardless of this
setting.
Corners size
Two up/down controls for the length and width of corners legs is provided.
The controller displays the current size setting and by default they are set using the
formula given in section 2. Each change of size will immediately update the corners
display. The controls have the following limits:
• width: minimum 5 pixels, maximum 50% of default corner leg length
• length: minimum 10 pixels maximum 20% of screen shorter dimension.
Note: that the actual corner length only change the size of the initial contact but not
influence other zones definitions so the no launching zone is not effected by this
setting
4. Lunching operation
The Jet Launcher is accessible anytime regardless of which application is currently
running, using a simple directional gesture from one of the corners!
Jet Launcher is fully independent and is another alternative to your home-screen app
which still functioning the same. The application shortcuts don't interfere with the
running applications. The following section will describe in details the UI options of
launching applications.
User should slowly slide his finger from the edge of one of the corners of the screen.
If the swipe does not cross the "no launching zone", Jet launcher does nothing.
Whenever a swipe is crossing to the launching zone JL (Jet launcher) will wait for the
finger up event to decide its action. Depending on the finger up location, one of the
three applications is launched.
Jet Launcher is designed for quick and easy launching and it assumes that eventualy
user will remembers the corner/swipe direction pair that launches an application. A
fast swipe provides a quick launching operation and no visual feedback is given to the
user other then performing the desired application launching.
If the swipe is slower and the user did not raise his finger for more then three seconds
a visual feedback, describe in more details later, will be presented. The purpose of the
visual feedback is to give the user a reminder of JL setting so she can finish the quick
launching even when she forgot the current setting. JL is intended to use for frequent
launching shortcut for applications like writing message, memo, update your status.
Anytime with one short swipe (shortcut) a user can launch an application. In most
cases no visual feedback is provided and when the user lifts his finger the location of
the lift up will determine which application will be launched. If the user swipe the
finger back into the no launching zone (regret operation) no application will be
launch.
4.1. Notification
If notification icon setup is enabled, Jet launcher will display a notification icon in
Android notification bar. When the notification window opens a notification item will
be displayed. Tap on the item will toggle Jet Launcher between enable and disable
modes. When Jet Launcher is disabled, Jet Launcher will not capture UI events in the
corners so the running application will be able to capture the UI events from all screen
area.
4.2. Visual Feedback
When the user finger is cross the boundary between no launching zone and the touch
is more then three seconds the following visual feedback will displayed.
The visual feedback include a green quarter of a cycle on the corner of initial contact
zone, a semi transparent orange quarter of a cycle to indicate the no launching zone
and three red quarter of a cycles indicate the other corners that did not activated.
In addition, the point of the finger touch and the three application associate with the
corner create a 2 x 2 cell box in the place of the finger touch. The first cell contains a
semi-transparent gradually degraded blue circle that indicate the touch point and the
three other cells contains the applications that can be launched from the activated
corner in accordance to their activation angle. The 2 x2 cell box move with the finger
location. When the finger does not cross the no-launching zone, none of the
application icons are highlighted (left screen). When the finger is crossing the no
launching zone the application icon that would be launched if finger will be lifted in
the current location is highlighted (see the three screens on the right each associated to
a different finger position). The application icons always track the finger position and
when the finger cross a zone the highlighted icon is changed. When the user lifts is
finger the highlighted application is launched.
4.3. Secondary Visual Feedback
If the finger stay on the screen for more the six seconds an additional visual feedback
is added (see illustration in the figure below). In this visual feedback all other nine
shortcuts application is shown with an arrows that indicate the swipe direction from
each red corner. The purpose of this additional visual feedback is to remind the user
of the entire available shortcuts. To encourage that user to memories the short cuts,
the user will not be able to activate the application associated with the red corners. To
launch application that associated with the other corners the user will have to go back
to the no launching zone, lift the finger and start a new swipe from the desired corner
(the right screen in the figure below). In case of object overlap the active corner
objects (the 2 x 2 cell box that are moving with the finger will be on top as illustrated
in the middle screen in the figure. If no application selected or back button is selected
Jet Launcher will do nothing and the control will back to the last active application.
5. Screen sizes and Supported devices
The app will supported all devices with Android 2.x and 3.x.
All screen sizes as well as portrait and landscape orientation should be supported.
The corners are defined logically so if, for example, the top left corner in portrait
orientation, become the bottom left after tilting the device, this corner will activate in
landscape orientation shortcuts 1 - 3 while in portrait shortcuts 10 - 12.
Visual feedback is designed for best viewed in portrait mode, nether the less the same
drawing code will be used in landscape as well (no changes is required to make visual
feedback looks good in landscape mode).
Setting is done only in portrait orientation.