1
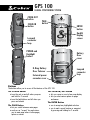
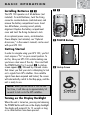
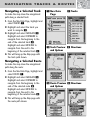
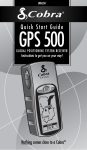
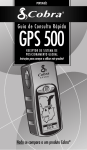
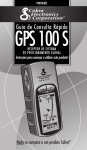
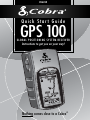
ENGLISH
Quick Start Guide
GPS 100
GLOBAL POSITIONING SYSTEM RECEIVER
Instructions to get you on your way!
Nothing comes close to a Cobra®
GPS
100
GLOBAL POSITIONING SYSTEM
ZOOM OUT
button
ZOOM IN
button
PAGE
button
ENTER
button
Backlit
display
screen
Lanyard
connector
loop
POWER and
Backlight
button
Battery
Door
cover
D-Ring Battery
Door fastener
Lanyard
connector
loop
External power
connector cover
Buttons
The buttons allow you to access all the features of the GPS 100:
The POWER Button
• turns the unit on and off when you press
and hold for 2 seconds
• turns the backlight on and off when you
press and release
The PAGE Button
• lets you switch between main pages
• works as an “escape” key and returns
you to main page when in other pages,
options or menus
The ZOOM IN/OUT Button
• lets you zoom in or out of any map display
• lets you select various options on pages
and menus
The ENTER Button
• use to accept any highlighted selection
• use to mark current location as waypoint
by pressing and holding for 2 seconds
1
B A S I C O P E R AT I O N
Installing Batteries The GPS 100 operates on 2 AA batteries (not
included). To install batteries, twist the D-ring
connector counterclockwise (anticlockwise) and
remove the battery compartment cover. Insert
two AA batteries, ensuring correct polarity
alignment. Replace the battery compartment
cover and twist the D-ring clockwise to lock.
As an optional power source, an Automotive
Power Adapter (not included, see “Optional
Accessories,” in the owner’s manual) can be used
with your GPS 100.
POWER Button
Getting Started
In order to navigate using your GPS 100, you first
must acquire a “fix” on your current position. To
do this, take your GPS 100 outside making sure
you have a clear view of the sky. Press and hold
the POWER button for 2 seconds . A start-up
screen appears , followed by a second screen
that shows you that your unit is attempting to lock
on to signals from GPS satellites. Once satellite
signals have been acquired and locked, the screen
will automatically switch to the Map page, and the
unit is ready to use.
NOTE: When you use the GPS 100 for the
first time, it will take up to approximately 50
seconds to lock on to the GPS satellites.
Turning on the Display Backlight
When the unit is turned on, pressing and releasing
the POWER button will turn on the display backlight.
The display will remain lit for 15 seconds as long
as no other buttons have been pressed.
Startup Screen
2
F I V E M A I N PA G E S
Everything you need to navigate using
your GPS 100 is found on five main
pages or screens. Once power is on, you
may switch among the five main pages
by pressing the PAGE button .
PAGE Button
Map Page
Gauges Page
Trip Meter
Page
Nav Data
Page
System Page
Map Page displays a map of your
current position and GoTo, track, or
route during navigation.
Gauges Page displays a compass
that shows your current travel
direction or next waypoint direction.
Trip Meter Page displays
selectable fields with information
about your current location or
navigation.
Nav Data Page enables you to
access waypoint, track, and route
features such as creating, deleting
or navigating.
System Page enables you to
access the various settings and
formats.
Selecting Options
From any of the five main pages, press
and release the ENTER button to display
that page’s Options menu. Use the ZOOM
IN/OUT button to scroll through the menu
sections, then press the ENTER button to
select the highlighted option. Press the
PAGE button to return to the main menu.
3
WAY P O I N T S
Navigating with Waypoints
The Nav Data page gives you access to
navigational features. From this page, you
can create and store up to 500 waypoints
(a specific location that you can mark and
recall), view the "GoTo" direction to any
waypoint , edit information about a
waypoint, delete a waypoint, preview a
waypoint on the map, or sort or search a
list of waypoints. For each waypoint, you
can choose a name and assign a symbol.
NOTE: Whenever navigation is in
progress, a "hiker" icon will appear at the
lower right hand corner of Map page and
Gauges page .
Nav Data Page Hiker Icons
Go To
Waypoint
Navigate
Track
Navigate
Route
“GoTo” on
Map Page
“GoTo” on
Gauges Page
Add New
Waypoint
Waypoint
Info Screen
New Waypoint
Enter Manually
1. Highlight and select WAYPOINTS .
2. Highlight and select MANUAL .
3. Edit or accept the default name and
symbol. Enter the new waypoint's
location and elevation . (Elevation
does not need to be entered to save a
manual waypoint.)
4. Highlight and select SAVE .
Mark Current
1. Highlight and select WAYPOINTS .
2. Highlight and select MARK CURRENT .
3. Edit or accept the default name and
symbol .
4. Highlight and select SAVE .
Waypoint Shortcut: To mark a new
waypoint using your current location, press
and hold the ENTER button for 2 seconds.
A confirmation window will pop up.
4
TRACKS & ROUTES
About Tracks and Routes
Route
Tracks
Select Clear
Clear Log
You can select two or more waypoints
to create a route . Your GPS 100
will show you the way to follow the
route accurately.
You can also create and store up to 10
tracks . Your GPS 100 automatically
keeps a record of your progress as you
travel and gives you a graphic representation
of the track you have taken. You also can
make the unit guide you in the reverse
direction along the same track.
Clearing the Track Log
The GPS 100 has 2000 active track log
points available to you. Once the track log is
full, no additional tracks can be stored until
the log is cleared. To clear the track log:
1. From the Nav Data page, highlight using
the ZOOM IN/OUT button and select
TRACKS by pressing the ENTER button to
display the tracks screen .
2. Highlight and select CLEAR to
clear the log of all travel that has been
recorded. The unit automatically restarts
recording your travel.
3. Press the PAGE button to return to
the main page.
PAGE Button
N AV I G AT I N G T R A C K S & R O U T E S
Navigating a Selected Track
To make the map show the navigational
path along a selected track:
1. From the Nav Data Page, highlight and
select TRACKS .
2. Highlight and select the track you
want to navigate .
3. Highlight and select NAVIGATE .
Highlight and select FORWARD to
navigate from the beginning to the
end of the selected track .
Highlight and select REVERSE to
navigate from the end to the
beginning of the selected track .
4. This will bring up the Map page with
the track path shown.
Nav Data
Page
5
Tracks
Track Preview Directions
and Options
Navigating a Selected Route
To make the map show the navigational
path along the route:
1. From the Nav Data Page, highlight and
select ROUTE .
2. Highlight and select NAVIGATE .
Highlight and select FORWARD to
navigate from the beginning to the
end of the selected route .
Highlight and select REVERSE to
navigate from the end to the
beginning of the selected route .
3. This will bring up the Map page with
the route path shown.
Route Preview Directions
and Options
S T O P P I N G N AV I G AT I O N
G A U G E S PA G E
Stopping Navigation
6
Stopping Nav
To stop current navigation (GoTo, Route, or Track),
highlight and select STOP NAV . Highlight and
select YES to stop. Highlight and select NO to
make current navigation continue. Press the PAGE
button to return to the main page .
Gauges Page
The Gauges page is a visual “pointer” that
indicates the direction of travel to follow to reach
your next waypoint , and shows you with
arrows whether you are on or off (to left or right
of) course. The display also shows you
how far (feet, miles, meters or kilometers) off
course you are currently.
PAGE Button
Satellite Connection Lost or Off
Whenever satellite lock is lost or GPS is turned Off,
certain animation icons (below) appear on screen
and continue until GPS is On and/or satellite lock
is re-acquired.
On Course
Animation sequence that appears when satellite
lock is lost
Animation sequence that appears when GPS is
turned Off
Right of
Course
Left Of
Course
T E S T WA L K
7
Go for a Test Walk
Test your knowledge of GPS 100 basics by taking a walk around the block.
1. Load batteries per instructions and take your GPS 100 outdoors. Be sure you have
a clear, unobstructed view of the sky. Turn your unit on by pressing and holding
the POWER button for 2 seconds. Allow time for your GPS 100 to acquire satellite
lock and a “fix” of your current location. When ready the unit will automatically
switch to the Map page. (Remember, you can toggle among the 5 main pages by
pressing the PAGE button.)
2. From the Map page, experiment by selecting options per instructions. For example,
you may want to mark your current location as your first waypoint, and then walk
around your neighborhood marking various points along your path from start point
to end point. (See diagram below.) Then navigate back to your start point by
accessing the Nav Data page, and selecting Navigate and REVERSE to lead you back
the way you came.
Note: When navigating back to your original start point, intentionally walk off
course to familiarize yourself with how the unit shows you where you are relative
to the route or track as shown on the Gauges page.
Keep practicing until you are comfortable using the many features of your GPS 100.
Always refer to your GPS 100 User’s Manual for more detailed instructions.
Important Note
The Quick Start Guide is intended only as a handy reference to review the basics of
operating your GPS 100. For a full understanding of how to use your GPS 100 properly,
please consult the GPS 100 User’s Manual. Read it carefully to become familiar with your
unit’s numerous features. You will be amazed at its capabilities.
The Cobra® line of quality products includes:
CB radios
®
microTALK radios
Radar/Laser Detectors
GPS
Safety Alert
Traffic Warning Systems
®
Accessories
HighGear™ Accessories
For more information or
to order any of our products,
please visit our website:
www.cobra.com
Nothing comes close to a Cobra®
Printed in China
Part No. 480-042-P
©2003 Cobra® Electronics Corporation
6500 West Cortland Street
Chicago, IL 60707 USA