1
INSTALLATION
M
&
OPERATION
O
D
E
GUIDE
L
OS-20
Indoor/Outdoor Loudspeaker.
Niles Audio
Corporation
12331 S.W. 130 Street
Miami, Florida 33186
Tel: (305) 238-4373
Fax: (305) 238-0185
Printed in Taiwan
®
© 1999 Niles Audio Corporation. DS00199A
B
L E N D I N G
A N D
A
H
I G H
F
I D E L I T Y
RC H I T E C T U R E
®
INTRODUCTION
Thank you for choosing the OS-20 Indoor/Outdoor Loudspeaker from Niles.
With proper installation and operation, you'll enjoy years of trouble-free use.
Niles manufactures the industry's most complete line of custom installation
components and accessories for audio/video systems. For a free full line catalog
write: Niles, Catalog Request, P.O. Box 160818, Miami, Florida 33116-0818
TABLE OF CONTENTS
INTRODUCTION
2
FEATURES & BENEFITS
3
PARTS GUIDE
6
INSTALLATION CONSIDERATIONS
7
PAINTING THE OS-10
12
INSTALLATION
15
OPERATION
18
SPECIFICATIONS
19
WARRANTY REGISTRATION CARD
21
LIMITED WARRANTY
22
The OS-20 marries unparalleled listening satisfaction with the freedom to listen
to music anywhere! You can use them indoors and outdoors (even on a boat).
The extraordinary sonic performance of the OS-20 was achieved by harmonizing unique and proprietary technology with the most advanced manufacturing
methods and materials available.
INTRODUCTION
CONGRATULATIONS
The OS-20 is a two-way speaker in an acoustic suspension enclosure. The cabinet is shaped to fit neatly into corners or eaves. It is supplied with a swiveling
mounting bracket for easy installation anywhere. In addition, our engineers
constructed the OS-20's to withstand the stresses and strains of the world outside! For the first time, serious listeners can enjoy a concert on the green in
their own back yard.
©1999 Niles Audio Corporation. All rights reserved. Niles reserves the right to change product specifications without
notice. Niles, the Niles logo and Blending High Fidelity and Architecture are registered trademarks of Niles Audio
Corporation. OmniMount is a registered trademark of OmniMount Systems.
2
Precision Crossover
An electronic dividing network inside the cabinet precisely distributes the
music to the woofer and the tweeter. The two-way design of the OS-20’s
crossover provides excellent stereo imaging and low distortion.
ElastoDynamic™ Hybrid Dome Tweeter
In the past, every weather-resistant speaker has disappointed listeners with a
fatiguing and harsh treble sound caused by tweeter ringing. In the course of
developing our weather-resistant tweeter, we determined that tweeter ringing
can be damped out by a microscopically thin elastomeric coating on a natural
fiber dome substrate. The result is a transparently clear, sweet, natural sounding
tweeter which still maintains extended frequency response.
Rigid, Acoustically Inert Enclosure
The cabinet of the OS-20 is composed of mineral filled polypropylene. This
material is extremely non-resonant. All you hear is the music.
Low Diffraction Grill and Front Baffle
The grill of the OS-20 has hundreds of precisely sized perforations, creating an
acoustically transparent grill. The front baffle is gently curved in a radius optimized for the best sound. Sound waves emanating from the woofer and the
tweeter are not reflected by the surrounding parts of the speaker.
Tapering Shape
The cabinet of the OS-20 is shaped so that the speaker will tuck discretely
away into corners or under eaves.
Long Throw Polypropylene Woofer
Swiveling Bracket
The unusually stiff and light polypropylene cone, the butyl rubber surround, the
substantial magnet, and the rigid steel basket are all optimized for large excursions of the woofer. In this way, the five and a quarter inch cone can create the
same deep bass output of a much larger speaker moving small distances in and
out. The end result is rich satisfying bass from a compact, weather-resistant
loudspeaker.
The U-shaped bracket and bracket knobs allow the OS-20 to be pointed at the
optimum listening position and locked into place quickly and easily.
Eight Ohm Impedance
The OS-20's are designed to be part of a multi-room audio system. The OS20's eight ohm impedance makes them compatible with virtually any amplifier.
In addition, this permits multiple pairs of OS-20’s to be wired to a single amplifier with a Niles speaker selector.
FEATURES & BENEFITS
FEATURES & BENEFITS
FEATURES & BENEFITS
Easy Three-Way Mounting System
1. The OS-20 can be hung from a nail using the nail hole on the bracket.
2. The bracket can be screwed into the mounting surface using your hardware.
3. The OS-20 is equipped with 1/4-20 threaded inserts for OmniMount® or
custom brackets.
Stable Shelf Placement
The rubber inserts on the bracket knobs serve as one of the speaker's feet when
the OS-20 is placed directly on a shelf or desktop without the bracket. In addition, two feet are molded into the base of the cabinet to give added stability.
3
4
Gold plating gives you a corrosion-free high quality speaker wire connection.
The connectors' five-way design allows you to use any of the most popular wire
terminating methods.
Easy Finger-Sized Access
The binding posts are mounted upside down in a molded recess on the back of
the OS-20. This prevents water from pooling at the connection. The recess is
large enough to fit your fingers, so you can easily loosen or tighten the speaker
connections.
PARTS GUIDE
e
a
f
PARTS GUIDE
FEATURES & BENEFITS
Premium Gold-Plated Five-Way Binding Posts
b
c
d
b
Weather-Resistant Construction
d
The hardware is made of stainless steel or brass, and the binding posts are plated with gold. The bracket and grill are made of aluminum (oxidation is self-limiting with aluminum) and it is powder coated (powder-coating gives absolutely
even coverage everywhere) for the ultimate rust-proof construction. The enclosure itself is shatterproof. The OS-20’s components are weather-resistant, UVresistant, salt-water corrosion-resistant, and immune to damage from temperature extremes (-50 to over 200 degrees Fahrenheit).
g
h
h
f
i
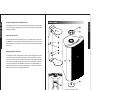
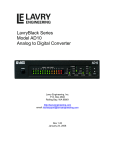
Figure 1 OS-20 Parts Guide
j
5
a. Bracket
f.
Bracket Knob
b. Nail Hole
g. Grill
c. Wire Hole
h. Cabinet
d. Screw Hole
i.
Binding Posts
e. Rubber Insert
j.
Threaded Inserts
6
INSTALLATION CONSIDERATIONS
INSTALLATION CONSIDERATIONS
INSTALLATION CONSIDERATIONS
Tools and Materials Required
• A wire stripper
• A pencil
• A level (optional)
• Three screws or bolts suitable for the mounting surface
• The proper screwdriver for your mounting hardware
• A drill bit of the right size and type
• An electric drill
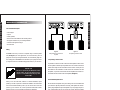
Wiring
The OS-20 connects to your receiver or amplifier using 2-conductor speaker
wire (See Figure 2). For most applications, we recommend using 16 or 18
gauge wire. For wiring runs longer than 80 feet, we recommend 14 gauge wire.
The binding posts of the OS-20 will accommodate up to 12 gauge wire directly. Larger sizes can be accommodated using spade, banana, or pin connectors.
TECH TIP
Wire size is expressed by its AWG (American Wire
Gauge) number. The lower the number, the larger
the wire, i.e. twelve AWG is physically larger than
fourteen AWG.
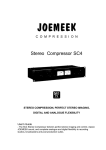
Figure 2
Wiring directly from a receiver or
amplifier
Figure 3
Incorporating a volume control
Incorporating a Volume Control
It’s possible to control the volume of the sound at the speaker location. Plan to
wire the system so that each pair of speakers has it’s own volume control. Niles
makes a wide range of indoor and outdoor volume controls. Consult your local
Niles dealer for more information. Volume controls are connected in line with
the speaker, so you must connect the wire from the amplifier to the volume control and then from the volume control to the speaker (See Figure 3).
Recommended Amplifier Power
When you run wire inside walls, outdoors or in marine installations, special
jacketing or conduit is required for a trouble-free installation and conformation
to the local and national building codes. If you are not sure of the correct wire
jacket or type of conduit to use, consult a professional audio/video installer,
building contractor, or the local building and inspection department.
7
We recommend an amplifier with a power rating of five to one hundred watts
per channel for optimum performance. Ironically, most speakers are not damaged by large amplifiers but by small amplifiers. If you are playing at high volume, a small amplifier will run out of power very quickly. When an amplifier
runs out of power it creates damaging “clipping” distortion. A large amplifier
will play at the same volume without distorting. See the section "Operation" for
more information about clipping distortion.
8
The OS-20’s dispersion pattern is very broad. The speaker is very sensitive and
will handle a lot of amplifier power. This allows good sound quality over an
extremely large listening area. However, if a single pair is positioned to provide
coverage of a very large room or patio, you will have “hot spots” of loud sound
when you are near the speakers. The best way to avoid hot spots for a large
space is to use several pairs. A good rule of thumb is a pair of speakers for
every 200 to 400 square feet of listening area. Your local Niles dealer is a good
source for advice on speaker placement for your particular installation.
When using more than one pair, it is usually best to alternate a left channel and
then a right channel, so that you never have a "left next to a left".
The position of the speakers and the surroundings around them play a very
important role in how a stereo image is created. You should experiment to find
the very best position for your speakers. Here are some guidelines to make the
process quick and easy.
Make sure you are not blocking or reflecting the sound off of furniture or other
objects. You should have a direct line of sight with the front of the speaker. To
determine the best position, measure the distance between the ideal listening
position and the wall you plan to mount the speakers on. Try to place the speakers so that they are at least one-half the listening distance apart (this maintains a
large, pleasant stereo "image") and less than the entire listening distance (this
avoids a "hole-in-the-middle" effect). For example; if you are ten feet back from
the wall, the speakers should be between five and ten feet apart (See Figure 4).
You can control the speakers bass output by placement. This is called the
boundary effect. You will get more bass response by mounting the OS-20
directly to a wall or other flat surface (any boundary close to the speaker will
reinforce the bass frequencies). You can increase the bass output even more by
mounting the OS-20 in a corner or under an eave (See Figure 5) This type of
placement gives the speaker two boundaries, both reinforcing the bass sounds.
Of course, if you wish to hear less bass, try moving the speaker away from the
boundary (See Figure 6).
INSTALLATION CONSIDERATIONS
INSTALLATION CONSIDERATIONS
Placing the OS-20 for the Best Sound Quality
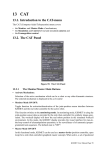
Speaker
Placement
Zone
10'
5'
10'
Figure 5
Placement for more bass output
Figure 4
Illustration depicts the optimum
placement zone for a listening
distance of ten feet.
9
Speaker
Placement
Zone
Figure 6
Placement for
less bass output
Mounting Methods
The OS-20 can be mounted either horizontally or vertically. The bracket knobs
will keep the speaker angled correctly in any position once they are tightened.
You can choose from three mounting methods to attach the OS-20 to the wall,
ceiling, or other mounting surface.
10
PAINTING THE OS-20
The enclosure, the brackets, and the grills of the OS-20 can all be painted to
match the surroundings. Because we want you to preserve the acoustic qualities of the grill, please paint the grill according to the grill painting instructions.
Make sure you pick a paint that is appropriate for the mounting location. There
are interior and exterior varieties, and even paint for marine uses. If you are not
sure what paint to use, consult a paint store professional or a painter.
PAINTING THE OS-20
INSTALLATION CONSIDERATIONS
1. If the speaker is never going to be exposed to sudden accidental impacts,
wind, waves or earthquakes you can simply hang it on a nail using the nail
hole(s) of the bracket (See Figure 7).
Tools Required
Nail Mounting
Screw Mounting
OmniMount or Custom Bracket Mounting
Figure 7 The OS-20 can be mounted three ways.
2. The safest and most secure way to mount the speaker is by screwing it to the
mounting surface using your own hardware (suitable for the surface you are
mounting to) and the bracket supplied with the speaker (See Figure 7).
3. There are threaded brass inserts on the back of the OS-20 for attaching an
OmniMount or a custom bracket (See Figure 7). This allows you to position the
speaker at unusual angles or distances from the mounting surface.
• A spray can of primer paint (Krylon Sandable Spray Primer #1318)
• The correct paint for the surroundings (oil or water based paint is fine)
• A paint brush or applicator if the paint is not in a spray can.
• A paper clip or a corkscrew (for removing the grill)
• Masking tape
• 2 paint masks (supplied)
• A damp cloth and a dry cloth
Preparing to Paint
1. Separate the parts of the speaker. You should remove the brackets and the
bracket knobs. Remove the grill by hooking it with a bent paper clip or the tip
of a corkscrew and pulling it away from the cabinet (See Figure 8).
Safety First!
Be careful to use hardware that is designed for the surface you are mounting to.
The OS-20 with the bracket weighs 8-1/2 pounds. If you are not sure of a safe way
to mount the speakers, consult a professional installer or a building contractor.
Figure 8
Removing the grill using a paper clip
You will maximize the useful life of the speaker, by placing the speaker so that
it receives less exposure to the elements. Look for the best overall compromise
between sound quality, convenience, and exposure. Do not compromise safety.
11
12
If you are using an applicator or brush and a can of paint, thin the paint first.
Thick paint will tend to clog the grill holes.
3. Mask off the binding posts and the brass threaded inserts on the back panel
with masking tape.
Replacing the Grill
4. Mask off the threaded inserts on the top and bottom with masking tape.
5. Protect the front of the speakers by inserting the supplied paint masks in
place of the grills.
Carefully fit the grill into its recess so that it is barely in place. Starting with one
corner, go around the speaker, pushing the grill in a little bit each time. You
should be gentle, the aluminum grill can be easily bent out of shape. You will
feel a positive “snap” when it is fully in place.
PAINTING THE OS-20
PAINTING THE OS-20
2. Wipe off the other sides of the cabinet, the bracket, bracket knobs, and grill
with a damp cloth. Do not touch or rub the speakers on the front baffle. Make
sure everything is dry before masking.
Painting the Cabinet, Bracket Knobs and Bracket
1. Apply two thin coats of a primer to the cabinet and knobs. We recommend
Krylon Sandable Spray Primer #1318. The bracket doesn't require a coat of primer.
2. Allow the primer to completely dry.
3. Apply the finish color.
4. Allow the paint to completely dry.
5. Carefully remove the masking material.
6. Do not reattach the speaker to the bracket until the bracket is mounted. Try
to keep all handling of the freshly painted parts to a minimum.
Painting the Grill
The grill is important to the sound of the OS-20. Do not fill the holes of the grill
with paint. The grill is constructed of aluminum with a perfectly even powder
coat overall. This powder coat is an ideal primer.
If you are using a spray paint, use two thin coats without any primer. If you are
using a compressor and a spray gun, use the finest, most diffuse setting. Practice
on paper if you are not experienced in painting with spray paint.
13
14
Mounting the Bracket
Connecting the Speaker
1. Separate the two conductors of the speaker wire so that at least two inches
of each conductor are free.
1. Remove the bracket knobs and the bracket from the speaker.
2. Strip one half inch of insulation from the end of each conductor of the
speaker wire.
2. Hold the bracket up to the mounting surface. The speaker can be mounted
either horizontally or vertically. Hold the bracket so that the speaker wire fits
through the large, circular wire hole in the bracket. Align the bracket to be
square with the surroundings (use a level for accuracy).
3. If you have any connectors (gold pins or bananas) which you prefer to use,
affix them to the stripped wire ends now. Only gold plated connectors should
be used outside as they will not tarnish or corrode.
3. Mark the locations of the three oval-shaped screw holes (See Figure 9). Be
sure to use all of the holes.
4. Use the bracket knobs to attach the speaker to the bracket. Do not tighten the knobs completely. Angle the speaker so that the rear terminals are
accessible.
INSTALLATION
INSTALLATION
INSTALLATION
4. Drill pilot holes into the mounting surface.
Figure 9
Mounting the
OS-20
5. Connect one stripped wire end (or connector) to the black and one to the
red terminal. Pay attention to the markings on the wire. Each speaker must be
connected to the amplifier in the same way.
Speaker Phase
Speaker wire has two conductors. One conductor is attached to the negative (-)
terminals and one conductor is attached to the positive (+) terminals of both
your speaker and your amplifier. Usually, the wire is marked for your convenience. There are different ways to mark the wire; a stripe on one wire, a
ribbed area of one conductor you can only feel, different colors of metal wire
on each conductor, or there might be a fabric strand or string wound into one
of the conductors. Of course, there are some wires which appear completely
identical. Be careful to avoid mistakes. If you do, one speaker will be playing
out of “phase” with the other speaker. An out-of-phase pair of speakers work
against each other and the sound of the two speakers playing together will be
lacking in bass and “phasey” sounding. If you suspect the sound is not right
and you cannot see any markings on the wire, try this simple test:
15
5. Pull the speaker wire through the wire hole in the center of the mounting
bracket. Align the bracket so that the holes all line up.
1. Point the speakers at each other, rather than at you.
6. Use your hardware to attach the bracket to the mounting surface.
2. Play some music with the amplifier or radio set to Mono.
16
OPERATION
4. Turn off the amplifier and reverse the connections on one speaker only.
Listening at Higher Volumes
5. Repeat the listening test with the same setting of the volume control. When
the sound has a richer bass and is slightly louder the speakers are working
together or “in-phase”.
Outdoors there are no walls to reflect and contain the sound. It requires more
power to achieve a reasonable volume of sound outside than it does when you
are indoors. You also frequently find yourself very far from the speaker. It is
possible to turn the volume so high that the amplifier runs out of power. This
creates “clipping” distortion.
OPERATION
INSTALLATION
3. Stand so you are the same distance from each speaker and listen to the richness of the bass and the loudness of the sound.
Final Adjustments
1. After checking that the speaker is in phase and works correctly, angle the
speaker for the best sound.
2. Tighten the bracket knobs using only your hands. Use of any power tools
may over-tighten the knob, and strip the threads of the insert.
3. Check that the entire installation is safe and secure.
Clipping distortion makes treble sound very harsh and unmusical. When you
hear harsh sounding treble from any good speaker indoors or outdoors, turn the
volume down immediately! Those harsh sounds are masking some much more
powerful ultra-high-frequency sound spikes which will quickly damage any
fine loudspeaker.
Cleaning
You can clean the OS-20's with a dampened soft cloth or paper towel. If the
speaker is mounted high up on a wall or ceiling, use a broom to gently brush it
off. Hosing off the speaker is not recommended, as the tweeter is a precise
mechanism which might be damaged by a high pressure stream of water.
17
18
SPECIFICATIONS
SPECIFICATIONS
PLEASE FILL OUT THE
WARRANTY REGISTRATION
CARD ON THE REVERSE SIDE,
DETACH, AND MAIL TO:
Recommended Amplifier Power
Five to one hundred watts per channel
Niles Audio Corporation
Warranty Registration Dept.
P.O. Box 160818
Miami, Florida 33116-0818
Nominal Impedance
8 Ohms
Frequency Response
68 Hz to 21kHz, plus or minus 3 dB (on axis)
Wiring Requirements
Sixteen to eighteen gauge 2-conductor (unshielded or shielded) wire for runs
up to eighty feet. Fourteen gauge 2-conductor (unshielded or shielded) wire for
runs up to two hundred feet.
Temperature Extremes
-50° to 200° Fahrenheit
Dimensions (Speaker without U-Bracket)
9-7/8" Wide x 13" High x 7-1/4" Deep
Dimensions (Speaker with U-Bracket)
9-7/8" Wide x 13" High x 9" Deep
Weight (Speaker and Bracket)
8-1/2 lbs.
19
DETACH HERE
Sensitivity
91 decibels for 2.83 volts of Pink Noise, measured at 1 meter on axis
LIMITED WARRANTY
Model Purchased___________________________________
________________________________________
Niles Audio Corporation ("NILES") warrants its outdoor loudspeaker products to the original
purchaser to be free of manufacturing defects in material and workmanship for a period of two
years from date of purchase.
Serial Number___________________________________________________________________________
Dealer Name and Location________________________________________________________________
_______________________________________________________________________________________
❑ Dr.
❑ Miss
❑ Mr.
❑ Mrs.
❑ Ms.
Name______
____________________________________________________________________________
Address_______________________________________________________________________________
____________________________________________________________________________
___________
City___________________________________________State______
__________Zip__________________
Telephone (___________)_________________________________________________________________
Please take a moment to fill out our warranty registration card. The information helps us to
get to know you better and develop the products you want
Age:
❏ Under 25
❏ 25-34
❏ 35-44
❏ 45-54
❏ 55 & over
Income:
❏ Under $24,999
❏ $25,000-$34,999
❏ $35,000-$44,999
❏ $45,000-$59,999
❏ $60,000-$74,999
❏ $75,000-$99,999
❏ Over $99,999
Occupation:
❏ Arts/Entertainment
❏ Business Owner
❏ Engineer
❏ Finance/Accounting
❏ General Office
❏ Management
❏ Professional
❏ Sales/Marketing
❏ Student
❏ Tradesperson
Musical tastes:
(Please check all that
apply)
❏ Alternative
❏ Classical
❏ Country
❏ Jazz
❏ New Age
❏ Popular
❏ R&B
❏ Rock
❏ Other__________
____
How did you hear
about Niles?
❏ Architect/Developer
❏ Custom Installer
❏ Direct Mail
❏ Friend/Family
❏ In-Store Display
❏ Interior Designer
❏ Magazine Ad
❏ Mail-Order Catalog
❏ Newspaper Ad
❏ Product Brochure
❏ Product Review
❏ Retail Salesperson
What magazines do
you read?
1. ____
__ ________________
2. ___________________
3. ___________________
Who will install the
product?
❏ Custom Installer
❏ Electrician
❏ Friend
❏ Myself
Which factor(s) influenced the purchase of
your Niles product?
(Please check all that
apply)
❏ Ease of Use
❏ Price/Value
❏ Product Features
❏ Quality/Durability
❏ Reputation
❏ Style/Appearance
❏ Warranty
Do you . . . ?
❏ Own a House. If yes,
how many square feet?
__________________
❏ Own a Town House/
Condominium/Co-op
❏ Rent an Apartment
❏ Rent a House
Are you interested in
receiving literature on
other Niles products?
❏ Yes
❏ No
Are there products/
capabilities that you
would like to see
introduced?
____________________
____________________
____________________
____________________
____________________
____________________
____________________
DETACH HERE AND RETURN TO: Niles Audio Corporation Warranty Registration Dept. P.O. Box 160818 Miami, Florida 33116-0818
Date Purchased (month/day/year)___________________________________________________________
This Warranty is subject to the following additional conditions and limitations. The Warranty
is void and inapplicable if NILES deems that the product has been used or handled other than
in accordance with the instructions provided by the manufacturer, including but not limited to
damage caused by accident, mishandling, improper installation, abuse, negligence, or normal
wear and tear, or any defect caused by repair to the product by anyone other than NILES or an
authorized NILES dealer.
WARRANTY & REGISTRATION
WARRANTY REGISTRATION CARD
To obtain warranty service, take the unit to the nearest authorized NILES dealer, who will test
the product and if necessary, forward it to NILES for service. If there are no authorized NILES
dealers in your area, you must write to NILES and include your name, model and serial number of your unit, along with a brief description of the problem. A factory Return Authorization
Number will be sent to you. DO NOT RETURN ANY UNIT WITHOUT FIRST RECEIVING
WRITTEN AUTHORIZATION AND SHIPPING INSTRUCTIONS FROM NILES.
If the above conditions are met, the purchaser's sole remedy shall be to return the product to
NILES, in which case NILES will repair or replace, at its sole option, the defective product
without charge for parts or labor. NILES will return a unit repaired or replaced under warranty
by shipping same by its usual shipping method from the factory (only) at its expense within the
United States of America. THERE ARE NO OTHER WARRANTIES, INCLUDING WITHOUT
LIMITATION, EITHER EXPRESS OR IMPLIED WARRANTIES OF MERCHANTABILITY OR FITNESS FOR A PARTICULAR PURPOSE, WITH RESPECT TO THE PRODUCT.
REPAIR OR REPLACEMENT AS PROVIDED UNDER THIS WARRANTY IS THE EXCLUSIVE
REMEDY OF THE CONSUMER/PURCHASER. NILES SHALL NOT BE RESPONSIBLE FOR
ANY INCIDENTAL OR CONSEQUENTIAL DAMAGES EXCEPT TO THE EXTENT PROVIDED
(OR PROHIBITED) BY APPLICABLE LAW.
Some states do not allow the exclusion or limitation of incidental or consequential damages,
so the above limitation may not apply to you. This warranty gives you specific legal rights,
and you may also have other rights which vary from state to state.
For the name of your nearest authorized NILES dealer contact:
NILES AUDIO CORPORATION, INC.
P.O. BOX 160818, Miami, Florida 33116-0818.
Please fill in your product information and retain for your records.
Model_________
___________________________________________________________________________
Serial No._____
____________________________________________________________________________
Purchase Date____
_________________________________________________________________________
22