1
The LegalOffice LA Administrator
Manual
© Peapod LegalOffice Ltd 2013
Version: 2.6.3.8 - 10 June 2014
The LOLA Administrator Manual 1
Contents
Contents .................................................................................................................................................... 2
Key ........................................................................................................................................................... 4
Navigation .............................................................................................................................................. 4
Italics ..................................................................................................................................................... 4
Bold ....................................................................................................................................................... 4
Enter or Amend your Firm’s Details .............................................................................................................. 4
Entering Accounts Preferences ................................................................................................................. 5
Additional Company Information ............................................................................................................... 5
Setting Company Preferences ..................................................................................................................... 8
........................................................................................................................................................... 10
File Updates.......................................................................................................................................... 10
Time Recording ........................................................................................................................................ 11
Intuitive Time Recording ........................................................................................................................ 11
Method 1 .......................................................................................................................................... 11
Method 2 .......................................................................................................................................... 11
Method 3 .......................................................................................................................................... 11
Time Recording in Units (Private cases only) ............................................................................................ 12
Activity Codes .......................................................................................................................................... 12
Adding a New Activity Code.................................................................................................................... 12
Amending an Activity Code..................................................................................................................... 13
Deleting an Activity Code ....................................................................................................................... 13
Copying Activity Codes from one Case Type to another. ............................................................................ 13
Copy Activity Charging Rates throughout A Case Type .............................................................................. 13
Importing LAA Rates/Fees ......................................................................................................................... 13
Attendances ............................................................................................................................................. 14
Dates and Tasks ....................................................................................................................................... 15
Add a New Date or Task ........................................................................................................................ 15
Assign Dates ......................................................................................................................................... 16
Set Access Rights for Dates and Tasks .................................................................................................... 16
Amend a Date or Task ........................................................................................................................... 16
Delete a Date or Task ............................................................................................................................ 16
Departments ............................................................................................................................................ 17
Add, Delete or Amend a Department ....................................................................................................... 17
File Locations ........................................................................................................................................... 18
Text Message Phrases............................................................................................................................... 19
Add, Amend or Delete a Text Message Phrase ......................................................................................... 19
Text Messaging Credits .......................................................................................................................... 19
Users ...................................................................................................................................................... 20
Add a New User .................................................................................................................................... 20
User Experience .................................................................................................................................... 20
User’s Access Rights .............................................................................................................................. 21
HR Data on Users .................................................................................................................................. 22
Other Options ....................................................................................................................................... 22
Amend a User’s details .......................................................................................................................... 23
Archive a User ...................................................................................................................................... 23
Restore an Archived User ....................................................................................................................... 24
Print a list of Users ................................................................................................................................ 24
Legal Services Commission ........................................................................................................................ 24
Import Codes........................................................................................................................................ 24
Import Procurement Codes (LAA) ........................................................................................................... 24
LAA Setup............................................................................................................................................ 24
Making Cases Confidential ......................................................................................................................... 24
Set the location for password protected files ............................................................................................ 24
Retrieve the Password for a Case............................................................................................................ 25
Version: 2.6.3.8 - 10 June 2014
The LOLA Administrator Manual 2
Mandatory Fields ...................................................................................................................................... 26
Miscellaneous Fields.................................................................................................................................. 27
Marketing ................................................................................................................................................ 28
Set Marketing Criteria ............................................................................................................................ 29
Customising the Marketing Information Box Labels ................................................................................... 29
Create a Marketing ‘Mortgage With’ List .................................................................................................. 31
Money Laundering Documents ................................................................................................................... 33
Set up a List of Acceptable Documents .................................................................................................... 33
Workflows ............................................................................................................................................... 34
Add a New Workflow ............................................................................................................................. 34
Case Data ......................................................................................................................................... 34
Add Items to a Workflow ....................................................................................................................... 35
........................................................................................................................................................ 35
Word, Excel and PDF .......................................................................................................................... 35
Forms ............................................................................................................................................... 35
Dates ................................................................................................................................................ 35
Labels ............................................................................................................................................... 35
Links ................................................................................................................................................. 35
Outlook Template .............................................................................................................................. 36
Delete an Item from a Workflow ............................................................................................................. 36
Copy an Existing Workflow ..................................................................................................................... 36
Delete a Workflow ................................................................................................................................. 36
Reassign a Workflow ............................................................................................................................. 37
Letters..................................................................................................................................................... 37
General ................................................................................................................................................ 37
Mergefield Codes .................................................................................................................................. 37
Linked Files .......................................................................................................................................... 37
Amend Existing Letters or Document Templates ...................................................................................... 38
Create Letters that Use the Multiple Recipient Option ............................................................................... 38
Check a Template for Invalid Mergefield Codes ........................................................................................ 38
Using the Letter Wizard ......................................................................................................................... 39
Contacts .................................................................................................................................................. 41
Managing the Contacts Database ........................................................................................................... 41
Contact Types ...................................................................................................................................... 41
Add a New Contact Type .................................................................................................................... 41
Edit the Description of a Contact Type ................................................................................................. 42
Delete a Contact Type ........................................................................................................................ 42
File Categories ......................................................................................................................................... 42
ID Types ................................................................................................................................................. 43
Sources of Work ....................................................................................................................................... 43
Backup .................................................................................................................................................... 44
Cases ...................................................................................................................................................... 44
Export Case Details to Excel ................................................................................................................... 44
Clear Data ............................................................................................................................................ 44
Case Types .............................................................................................................................................. 44
E-Learning. .............................................................................................................................................. 45
Contact Peapod ....................................................................................................................................... 46
Headquarters ........................................................................................................................................ 46
Address ................................................................................................................................................ 46
DX ....................................................................................................................................................... 46
Wales ................................................................................................................................................... 46
Northern Ireland ................................................................................................................................... 46
This Manual is a guide to the Administrator menu available to all Users with Administrator access rights to the
LegalOffice LA (LOLA) system.
If you have any queries, you can browse to - http://www.legaloffice.com and click Support Login, to log a call
with us online that we will deal with as soon as possible. This is the quickest way to get an answer to any query
that you have. Alternatively you can telephone our helpline on 0845 683 2518.
Version: 2.6.3.8 - 10 June 2014
The LOLA Administrator Manual 3
Key
In this manual there are certain conventions used to identify actions and describe details that you will see on the
screen when using the program.
Navigation
Where chevrons are used this signifies how you navigate to the menu item that needs to be clicked from the
tabs that appear at the top of the window. For example, Administrator>Configuration>Company Details
means point to the Administrator tab and from the items that appear, point to Configuration and then click on
Company Details.
Italics
Where a word appears in italics, this is describing the name of a box on the screen
Bold
Where a word or words in a paragraph are in bold, this describes the name of a button in the window
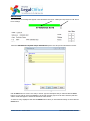
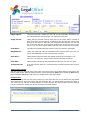
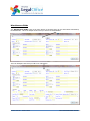
Enter or Amend your Firm’s Details
Select the Administrator>Configuration>Company Details option from the menu bar at the top of the
Window this opens the Enter Company Details Screen. NB Only a User with combined Administrator and Partner
User Access Rights can do this.
Here you may either fill in or amend your Company Details. Then click Save and the Close button to confirm.
If you have more than one branch then after saving the details for your Head Office as Branch 1, click on the
New button and enter the details of the next branch in your organisation. Continue until you have entered details
for all your branches that will use the system.
The Email: field is for a general address for the Firm.
Version: 2.6.3.8 - 10 June 2014
The LOLA Administrator Manual 4
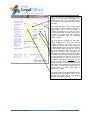
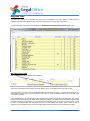
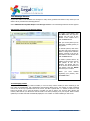
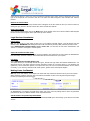
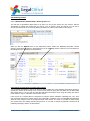
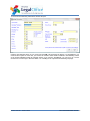
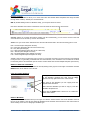
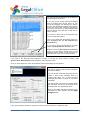
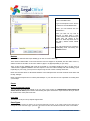
Entering Accounts Preferences
The Fields and boxes on the lower left of
the Company Details Screen relate to
setting up the Accounts part of the
system.
Here you enter your Firm’s Year-end
date; select whether you wish to use a
cash accounting system and invoke the
Cheque printing option that is available
in Accounts.
You can also choose how much to
automate the system by ticking the Auto
Bill No Box. This will make the system
generate sequential bill numbers when
Users create bills. The same is true for
Invoices received from suppliers and
Proforma Bills created by Users. Select
each by clicking their tick-boxes. The
fields on the right allow you to specify
what number the next Bill, Invoice or
Proforma will be.
Additional Company Information
The fields on the right hand side of the Company Details Window allow you to configure the system.
Version: 2.6.3.8 - 10 June 2014
The LOLA Administrator Manual 5
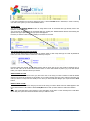
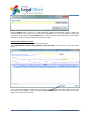
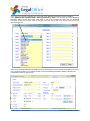
You can enter the Text Messaging Access
details if you have bought that facility. The
mobile number you enter is included in every
text as the one from which the text message
was sent.
The Credits box allows you to see how many
text credits you have remaining and the +
button allows you to choose a bundle of
credits to purchase from our 200, 500, 1,000,
5,000 credit bundles. An email is then sent to
us using your outlook email and you will be
invoiced accordingly and your remaining
credits increased.
The Auto Ref No; Forename No and Prefix:
Fields determine how LOLA will generate
reference numbers when new cases are
created. Auto Ref No: determines the number
of Alpha Characters from the Client’s surname,
or the Company Name, that will go in front of
the Case Reference number that LOLA will
assign to a Client. The Forename No.
determines how many letters are taken from
the Client’s Forename and put after the letters
from the Surname. You can have up to 4 from
the Surname and 3 from the Forename. If
instead you complete the Prefix box, you can
specify a single letter or number that will
appear at the start of the Clients reference. In
either case, the remainder of the reference will
be numeric. You can choose letters from the
client’s name or a single prefix letter or
number but not both.
The Bank Rec Bank is the default bank that the
Automatic Bank reconciliation system in the
Accounts side of LOLA will use when running
the bank reconciliation function.
Version: 2.6.3.8 - 10 June 2014
The LOLA Administrator Manual 6
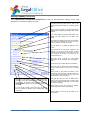
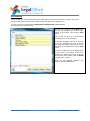
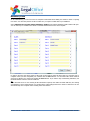
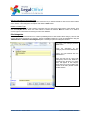
Your firms Land Registry Key number goes
here.
If your Firm does publicly funded work, the
LAA Contract Type and Account Number are
entered on this page as are the Criminal
Schedule number and Legal Help Schedule
number.
If your firm use a Microsoft Exchange Server
you should enter the Exchange Server name
or its IP address here so that the system can
use the Outlook diary functions that exist in
LOLA Our Support Staff will set this up for you.
Your Peapod Client ID and password are
entered on this page so that LOLA can interact
with our Support Centre when you log a call
over the internet.
If you have purchased the Postcode Anywhere
module (which enables LOLA to complete
addresses for you from Post Code data) you
enter the account number and serial number
here.
Here you set the date that your Holiday Year
runs from.
Version: 2.6.3.8 - 10 June 2014
The LOLA Administrator Manual 7
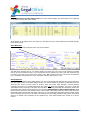
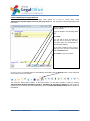
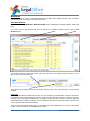
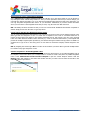
Setting Company Preferences
Select Administrator>Configuration>Preferences to bring up the preferences selection screen. Click
Save & Close to confirm the options you want.
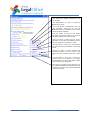
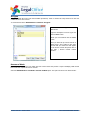
Key Dates from the system can be sent to the
User’s personal Outlook diary or to a public shared
diary.
This is your Firm’s policy for the intervals between
sending letters regarding outstanding bills (Credit
Control).
If you chase debts by sending emails rather than
letters, this reply address will be used in the
emails.
The system will update its files over the Internet as
new versions are released. Tick this box to ensure
that your software is always up to date.
You can check for an update by clicking on this
button
This option allows an auto archive reference to be
selected. You can set a specific number at which
you want this referencing to start and from that
point onwards, each case you archive will be
incremented by one.
When this option is turned on, case analysis
information will be displayed when completing a
case.
By ticking here you enable Cash Flow Forecasting
When this option is ticked LOLA will automatically
use the latest version of a form from our Cloud
server.
When turned on, this option will remove a case
permanently when choosing to delete a case from
the File menu. When turned off, LOLA will move
the deleted case to the recycle bin.
By turning on this option, you turn on the intuitive Time
recording , which will automatically time record on a case
as soon as it is opened in LOLA. By then clicking the
“Click to Start” the timer will be paused as default until
you click it.
You can choose to make a case read only if the WIP on
the case exceeds the budget. Only an Administrator can
override this.
Version: 2.6.3.8 - 10 June 2014
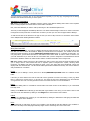
This gives the option for users to delete Review
Dates. Turning this off would mean all users would
be unable to change the date type of a review date
and the user assigned.
Ticking here will stop non Partners or Cashiers
from writing off time in the Time Records
Emails dragged into LOLA, will be added to the
Case History.
The LOLA Administrator Manual 8
In public funded cases you can choose to have
LOLA update Case Budgets Automatically if they
are exceeded.
Only Administrators can enter or amend the
Archive Ref on a case.
You can set whether non-administrator users see
Daily Timesheets. Ticking the box will keep
timesheets private. If not ticked every user will be
able to see others timesheets.
Enter the number of days from Date Opened
required for the first Review Date on a new case. If
left blank the default of 1 month will apply.
When this option is ticked LOLA will send a
notification via the Tasks and Messages screen to
any user assigned as an ‘Attendee’ to a date.
When this option is turned on the Case Dates and
the Office Diary screens will default to tasks being
shown.
Turning this option on allows automatic time
recording of emails in and out. Emails on LAA
matters are time recorded as Letter Out or Letter
In.
You can choose to record time in Units of 6
minutes and/or you can choose to use Intuitive
Time Recording or you can choose neither of these.
See the effect of your choice below.
By turning on this option you are choosing to use
the integrated Digital Dictation package with LOLA,
this allows you to save to and retrieve dictated files
from the Case History.
Version: 2.6.3.8 - 10 June 2014
The LOLA Administrator Manual 9
File Updates
The ‘Update Method’ drop down allows administrators to control when LOLA updates are sent out to their
users. The options are ‘WEB’ and ‘FILE’.
When an Administrator logs in and an update is available, they will be prompted as such and by clicking ‘Yes’ will
download the latest update files from the Peapod website, into the ‘L:\Legaloffice\System\Updates’ folder and
the update will be executed from there.
All LOLA users will automatically use the ‘FILE’ method of updating and so when logging in, or using the check
for updates button LOLA will execute the update from your ‘L:\Legaloffice\System\Updates’ folder, instead of all
users downloading from our Peapod Website.
Version: 2.6.3.8 - 10 June 2014
The LOLA Administrator Manual 10
Time Recording
Intuitive Time Recording
If you configure LOLA to use Intuitive Time Recording, a ‘clock’ will appear in the main screen at the top when a
User opens LOLA. NB. A User must have Fee Earner status to use Intuitive Time Recording
The Clock starts whenever a User performs an action, such as opening another case, moving to another part of
the same case, or refreshing the screen. The clock will capture the amount of time a User spends on a case
accurately. As the User moves between cases, the time on the clock is saved for each case, until it has been
committed to the Time Records. The clock can be paused, and re-started by clicking on it. It will change from
blue to red when paused.
N.B. If the “Click to Start” option is ticked in the company preferences then the timer is paused by default until
clicked.
There are three Methods to commit time recorded by the clock to the Time Records, all will result in (a) the clock
restarting from 00:00 and (b) the time being added as a ‘Preparation’ Activity Code, charged at the Users Time
Recording Rate 1.
Method 1
All outstanding time will be committed to the Time Record for each case viewed when LOLA is closed. The Daily
Timesheet will then pop-up and show the User all their time entries, for the day.
Method 2
When a case is closed, the outstanding time on that case, will be committed to the Time Records.
Method 3
Click the Save button next to the clock. This allows the User total control over when to commit time spent on a
case. Using this method allows the User to round up the time to the nearest 6th minute (unit), and enter a
description of the work done on the case. The NC button (non-chargeable) does the same, but commits the
entry to the AA.001 admin Case, without any value. This keeps a record of the time spent but does not charge
the client’s Time Record.
Intuitive Time Recording will not work for any LOLA user who is not a Fee Earner (FE).
There are 5 virtual clocks for each Case in LOLA. Any FE that logs on to a Case is assigned a Clock. If a FE
leaves a Case without committing time, then that uncommitted time is saved in the clock allocated to that FE.
Therefore if there are 5 FEs with Uncommitted time on a Case, A 6th FE that opens it, will be warned which 5
th
other FEs have uncommitted time. The 6 FEs time will have to be recorded manually.
LOLA will only commit time, if the clock has more than a minute recorded on it.
Version: 2.6.3.8 - 10 June 2014
The LOLA Administrator Manual 11
Time Recording in Units (Private cases only)
If 'Time Recording in Units' is set as a Preference and a User produces a Letter or Call In/Out, the item will be
charged at one tenth of the Activity Rate Value assigned to that activity. For example, if you set a Letter In rate
of £10, the total value of the line entry will be £1.00. If you do not select Time Recording in Units then when a
User creates a letter with a Letter In rate of £10, the total value of the line entry will be £10. This is a system
wide choice so all Users must operate Time Recording under the same conditions. If you have also ticked the
Intuitive Time Recording box then when a User clicks the Commit button on a Case, LOLA will ask if they want
to round up the time recorded to the nearest unit of 6 minutes.
Activity Codes
Select the Administrator>System Setup> Activity Codes option. This opens the Activity Time Recording
Rates window and shows the codes that are set as a default in the system under a “Non-Specific” Case Type.
N.B. If you want to use the same Activity Codes for all Private work then do not add new codes to other Case
Types. All other Case Types will then see the list of Activity Codes set in the Non-Specific Case Type list. This
means that if you want to change Activity Codes across all private Case Types you only have to change those in
the Non-Specific Case Type.
Alternatively, if you prefer, you can set different Activity Codes in each Case Types. N.B. Public Funded work has
Case Types in the range 1800 – 1899 and the Activity Codes and rates for these are fixed. They update as
necessary with the automatic software updates. To see the Activity Codes for any particular Case Type, click the
arrow for the Select Required Nominal drop-down box.
Then click on the Case Type you require and the window will display the Activities associated with that Case
Type. The rates set for each Activity appear in the boxes on the right hand side of the window, when you click on
the Activity. You can add, amend or delete these activities and change the rates applicable to each one.
Adding a New Activity Code
At the bottom of the window are control buttons that allow you to create a new Activity Code. Click the New
button. The Code and Description boxes will clear allowing you to make a new entry.
Version: 2.6.3.8 - 10 June 2014
The LOLA Administrator Manual 12
Type in a new code (which must be different from an existing one) and give it a description. If the Activity is only
to apply to one particular Case Type select its number from the NomNo drop-down box. Once you have set up
an Activity Code in one Case Type you can save that Code to all the Case Types in the system by clicking the
Save to all Nominals button. You may find it easier to just work with the Non-Specific Case Type as it will be
simpler to maintain your Activity Codes across the Firm if everyone uses exactly the same set. N.B. If a “MISC”
activity code is added , you can use it to bill fees along with standard time recording entries in the same bill. (see
User manual for how to use this activity type)
Amending an Activity Code
To amend a Code click on it in the grey box to the left of it in the main window so that the details appear in the
boxes at the bottom. Overtype those details in the Description box and then click the Save button.
N.B. The CO,CI,EO,EI,FO,FI,LO,LI,XO & XI activity codes are now reserved by the system and cannot be
amended
Deleting an Activity Code
To delete a Code click on it in the main window so that the details appear at the bottom. Then click the
Del/Abn button. Confirm your wish to delete the Code when asked. If LOLA has already recorded any time
using the type of Activity Code that you want to delete (in any kind of Case Type) it will not allow the Activity
Code to be deleted.
Copying Activity Codes from one Case Type to another.
In order to simplify the creation of Activity Codes you can copy codes from one Case Type to another. Click the
Import button then Select the Case Type whose Activity Codes you want to copy. Then click Import.
The codes from that Case Type will now appear in the original Case type. In order to complete the copy, click the
Assign Nominal Button and confirm your wish when asked.
Copy Activity Charging Rates throughout A Case Type
If you want the same rates to apply to each Activity Code in a Case Type set the rates up for one Activity Code
and then click the Repeat Rates Throughout Nominal Button. This will copy the rates set for that Activity to
all the other Activities in the Work Type
Importing LAA Rates/Fees
There is now an option to import LAA codes, Rates and fixed fees under the System Setup menu under the
Administrator function.
Version: 2.6.3.8 - 10 June 2014
The LOLA Administrator Manual 13
Attendances
You can choose the headings that appear in the Attendance Note Form. Clicking the drop-down box will show a
list of headings
Select the Administrator>System Setup> Attendances option. This will open the Attendances window.
Click the New button to create a new entry in the list. Type the description that you want and click the Save
button. You can edit any entry by highlighting it in the grid (click the grey box to the left of the item) and then
edit the details that appear in the box at the bottom of the window.
To delete an entry, highlight it then click the Delete button. When you have finished working on the list click the
Close button.
Version: 2.6.3.8 - 10 June 2014
The LOLA Administrator Manual 14
Dates and Tasks
You will find a number of pre-installed key dates but an Administrator can add, amend or delete these as
required. Key Dates have alphabet Type-codes and Tasks have Type-codes that are numbers.
To open the Dates / Task Types window select the Administrator>System Setup> Date Types option.
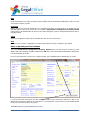
Add a New Date or Task
Click the New button at the bottom of the Window.
The boxes at the bottom of the Window will clear allowing you to put in details of the new Date or Task.
Enter the code in the Type box first. Remember that the code must be unique. It cannot be the same as any
codes already in the system. Type a description for the Date or Task then decide whether to link this date to the
next stage in a matter.
In the example below, you can see that the Decree Nisi Date is “linked” to the Decree Absolute Date. This means
that the Decree Absolute date will appear in the Fee Earner’s Diary in 43 days time from the date the Decree Nisi
Date was activated in the Workflow. You can also attach a Word Document, an Email or a form to a Date or Task
so that it is produced when the User clicks the Doc or Email buttons that appear when a Date or Task is
activated. In this example a letter to the Client advising Decree Nisi has been received is linked to the date.
Version: 2.6.3.8 - 10 June 2014
The LOLA Administrator Manual 15
If you wish to abandon the new entry rather than save it, click the Del/Abn button. Otherwise, in order to add any
new date to the system you must click the Save button.
Assign Dates
You can use the ‘ASSIGN DATES’ button to assign dates under an unwanted date type already used in the
system to a new Date Type.
You can do this by highlighting the unwanted date type, clicking the ‘ASSIGN DATES’ button and selecting the
specific Date Type required from the pop-up list that appears.
However, be cautious when using this facility as it cannot be reversed.
Set Access Rights for Dates and Tasks
You can choose which types of Users are able to amend, delete or mark a Key date type or a task. By default all
Dates and Tasks can be edited or deleted or marked by everyone.
However ticking the relevant Access Rights tick box will set which type of User can modify a particular type of
date or task. This can be useful where Partners want to ensure that certain key dates (e.g. Case File Review
Dates) can only be marked as done by a Partner.
Amend a Date or Task
To amend a Date or Task click on the grey box at the side or the entry you wish to amend so that the details
appear in the boxes at the bottom of the window. If you want to change the Type Code, make sure that the new
code you choose is unique and not already in use. Once you have made the changes you require click the Save
button.
Delete a Date or Task
To delete a Date or Task click on the grey box next to the entry you wish to delete. Once its details appear in the
boxes at the bottom of the window click the Del/Abn button. Click yes when asked to confirm the deletion.
Tip
Using Type codes that have some reference to the description of the Date or Task will help Users recall them
when using the system and will avoid clashes when you add new codes.
Version: 2.6.3.8 - 10 June 2014
The LOLA Administrator Manual 16
Departments
In order to get the full benefits of the Office Diary you should allocate each user to a Department even if that
department is just the Firm itself.
Add, Delete or Amend a Department
Select Administrator>System Setup> Departments and the Departments window will open.
To create a New department click the
New button then type the details in the
box at the bottom of the Window,
including that departments direct dial
number and fax number if applicable and
click the Save button.
To delete a department select it by
clicking on the grey box next to the
description. The description will now be
in the box at the bottom of the window.
Click the Delete then click yes to
confirm.
To amend a department description,
click on the grey box next to its
description then make the change
required in the box at the bottom of the
window then click the Save button.
When you have finished organising your
phrases, click the Close button.
Version: 2.6.3.8 - 10 June 2014
The LOLA Administrator Manual 17
File Locations
You can specify a list of File Locations that Users will be able to see in the Client panel for a matter. This can be
useful for tracking where Files should be within the premises that the Firm practices from.
To create a list of File Locations Select Administrator>System Setup> File Locations
This opens the File Locations window
To create a new location, click the New button
and type the description into the box at the
bottom of the window. Then click the Save
button
N.B. you can only have up to 50 characters
(including spaces) in any description.
To amend a description, click on the grey box
next to the description you want to change
then make the change required in the box at
the bottom of the window then click the Save
button.
To delete a location select it by clicking on the
grey box next to the location in the list of
locations. The location will now be in the box
at the bottom of the window. Click the Delete
then click Yes to confirm.
When you have finished organising your
locations, click the Close button
Version: 2.6.3.8 - 10 June 2014
The LOLA Administrator Manual 18
Text Message Phrases
If your firm wants to use standard text messages to notify clients, providers and others of key events you can
define a list of precedent text-message phrases.
Select Administrator>System Setup> Text Message Phrases. The Text Message Phrases window appears.
Add, Amend or Delete a Text Message Phrase
To create a new phrase, click
the New button and type the
phrase into the box at the
bottom of the window the n
click the Save button
N.B. you can only have up to 50
characters (including spaces) in
any phrase.
To amend a phrase, click on the
grey box next to the phrase you
want to change then make the
change required in the box at
the bottom of the window then
click the Save button.
To delete a phrase select it by
clicking on the grey box next to
the phrase in the list of
phrases. The phrase will now
be in the box at the bottom of
the window. Click the Delete
then click yes to confirm.
When
you
have
finished
organising your phrases, click
the Close button
Text Messaging Credits
You purchase texts messaging credits in bundles, to see how many of these credits you have remaining yu can
look under the Administrator tab, Configuration and Company details screen. The number of credits remaining
can be seen at the top right-hand side of the screen, and this is paired with a ‘+’ button to add more. This
button will prompt you to enter the number of credits you wish to add to your account. After entering the
number, LOLA will use your Outlook to send an email to our offices, notifying us of your request. When we have
updated your credits LOLA will automatically display the new number of credits remaining on this screen.
Version: 2.6.3.8 - 10 June 2014
The LOLA Administrator Manual 19
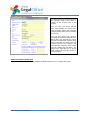
Users
Select Administrator>System Setup> Users. The Users window appears. This shows all the Users registered
to use LOLA in the top part of the window.
At the bottom of the window is the area where you can add new Users, amend existing User’s details and take
Users off the system.
Add a New User
Click the New button at the bottom of the User Access window.
The field boxes will clear and you can add the details of the New User. The Logon ID will default to the initials
that you put into the Initials box, but you can amend these and the password you give to the User will be what the
User has to type in the Logon screen when opening LOLA. N.B. a password can be no more than 10 characters
long, a password strength indicator can be seen when entering a password for a user.
User Experience
In this part of the window under Ledger Options, you can set the default view that the User will see when they
look at a ledger in LOLA. In the Other Options section, you can set whether the windows in LOLA fade in and out
when the User moves from one screen to another. Users who access LOLA through a Terminal Services
connection must have the Terminal Services tick box ticked. Tip: On slower computers, it is best to un-tick the
Fade Effects tick box as doing so will make LOLA run faster. The setting Mergefield Doc determines whether the
Mergefield Codes Document opens when the User selects the Administrator>Letters>Amend Letters option
(see the Letters section for more details on this). If the tick box is ticked then when the Letters Folder opens the
Mergefield Codes Document will open at the same time. If it is not ticked the Mergefield Codes document will not
open. The default is for the box to be ticked. The Intuitive Time Recording (Feeearner Only) option, when ticked
will turn on Intuitive Time Recording for the specified user, if this hasn’t already been turned on for all fee
earners.
Version: 2.6.3.8 - 10 June 2014
The LOLA Administrator Manual 20
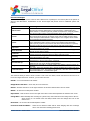
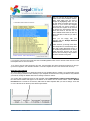
User’s Access Rights
There are various types of User. Each one has a different set of privileges to use various parts of the system as
shown in the table below. Combinations of User Access Rights will provide access to additional options and
buttons.
Type
Administrator
Cashier
Partner
Supervisor
Bill to Accounts
Fee Earner
Secretary
User
Accounts Set Up
Complete Cases
Letters/Workflows
Access Rights Granted
Gives access to the Administrator Menu of LOLA; the ‘Delete Case’ option under
the File menu and the delete button in Time Recording. If Administrator and
either ‘Partner’ or ‘Cashier’ rights are granted as well, then the ‘Company Details’
and ‘Import Codes’ buttons in the Administrator Menu can be accessed.
Gives full access to the Accounts part of LOLA including Month End and Year
End routines and Full Access to Reports unless User is ticked as well, in which
case, the Reports will be limited to Client Ledgers, Time Ledgers, Client Checks
and Unpaid/Receipted Disbursements.
Gives access to all the client, time and financial reports available in the system.
In the administrator menu access is given to the ‘Retrieve Case Passwords’
option (as only a partner can protect a case with a Password when it is opened).
Partners are also the only type of User that can authorise Posting Slips.
This User’s name will appear in the Supervisor dropdown list allowing them to be
set as the Supervisor of a Case.
Gives the User the ability to post a Bill they create in the Time Recording pane
directly into the Client’s Ledger.
Gives the User access to the Case Management System and Client Ledger
reports and lets the User have dates and tasks assigned to them.
This User’s name will appear in the Secretary dropdown list allowing them to be
set as the Secretary on a Case.
Gives access to the Case Management part of LOLA but no access to the
Administrator or the Accounts menus or Reports.
Gives the user access to the System Set Up of the Accounts. This option is only
effective if the user is not already an Administrator.
Gives the user the ability to Complete Cases. This defaults to being turned on for
all users.
This option allows the specified User to amend Workflows and Letters (only) from
the Administrator menu. This option is only effective, if the User does not already
have Partner/Director, or Administrator rights.
The minimum detail you have to enter to create a user is the User Name, Initials and Password and tick one of
the Access Rights tick-boxes. However, you can add a lot more:Roll No – to record a Solicitor’s roll number.
Budget Hours and Value – These may be set for each User.
Branch - Click the down arrow to the right of this box to select the Branch where the User works.
Mobile – for the User’s mobile phone number.
Department – Click the down arrow to the right of this box to select the Department in which the User works.
Charge Rate – When Manually time recording on a private case, then LOLA will use the charge rate for the fee
earner chosen, if it is entered in this rate field; instead of the case charge rate seen on the
client screen.
Direct Dial – for the User’s direct dial telephone number.
Fee Earner Grade and Rates –
Version: 2.6.3.8 - 10 June 2014
Select the Fee Earner’s Grade and set three charging rates and a mileage
rate to use when time recording private work.
The LOLA Administrator Manual 21
Start Date – The date that the User joined the Firm.
Date of Birth - Pretty obvious really!
Qualification – The User’s qualification (used in Client Care Letters)
NLIS User Name and Password - If the User uses the National Land Information Service Hub their
Username and Password can go in here.
Email – The User’s email address
Holiday Allowance – You can enter the User’s annual holiday allowance and if the User uses the Diary system,
LOLA will keep a record of sickness and holidays taken.
HR Data on Users
Clicking the HR Data button will bring up a screen where you can enter additional information about the User.
Once you have put in the details click the Save button then Close. If you change your mind and decide not to
create the new User click the Abandon button.
Other Options
This area allows you to make various settings for a User
Version: 2.6.3.8 - 10 June 2014
The LOLA Administrator Manual 22
Ledger Options -
These boxes determine whether the User will see only outstanding transactions and
all columns when they look at a ledger. Tick whichever is preferred.
Assign Ltrs/Cls -
Ticking this box will mean that any work done on the system will be recorded as
being done by the person logged in. Un-ticking the box will show the work as being
done by the Fee Earner to whom the case is assigned rather than the User who did
the work (unless the User and Fee Earner assigned are one and the same). If the
User is a non- fee earner then the initials of the Fee Earner for the Case are recorded.
Fade Effects –
This makes the transitions between windows as they are opened or closed fade.
Mergefield Doc –
Ticking this option will make the Mergefield Codes document open every time you
click on the Administrator>Letters>Amend Letters command.
Show Diary -
Ticking this box makes the Office Diary appear whenever the User begins to use
LOLA. If it is un-ticked, the system will just show the main page on start up.
Show KPI’s
Ticking this box will open the KPI Dashboard every time the User logs on to LOLA.
Terminal Services
If the User accesses LOLA via a Terminal Services connection then this box needs to
be ticked.
Amend a User’s details
Click the grey box to the right of the User’s name in the list of Users so their details appear in the boxes at the
bottom of the window. Make the changes that are required and click the Save button. Clicking the Close button
before clicking the Save button will cancel any changes made to the User’s details.
Archive a User
You cannot delete a User from the system. However if a User leaves the Firm you can archive their User details
which will stop their access the system. Click the Archive tick box. You will be asked to confirm your action. If
you choose Yes, you will then be asked whether you wish to transfer any cases and dates from the Archived
User to a current User. Clicking Yes will open the Choose Feeearner window
Version: 2.6.3.8 - 10 June 2014
The LOLA Administrator Manual 23
Select the Fee Earner to whom you want to transfer the Archived User’s cases, dates by clicking the arrow on the
right of the drop-down box, and then click OK. The cases and dates assigned to the Archived User will then
transfer.
Restore an Archived User
Click the Show all tick box and any Archived Users will appear in the list. Select the User you want to restore by
clicking the grey button to the left of their entry in the list and then click OK.
Print a list of Users
If you click the printer button next to the New button at the bottom of the User’s Access window LOLA will print
the list of Users as they appear in the grid at the top of the window.
Legal Services Commission
Import Codes
NB. You should only run this option if told to do so by Peapod Technical support. This will import new LAA
Activity Codes. BE AWARE that clicking this button will overwrite any activity codes previously stored in LOLA.
Select Administrator>System Setup> Import Codes. NB. You will need to have both ‘Administrator’ and
‘Partner’ or ‘Cashier’ User rights to see this option.
Import Procurement Codes (LAA)
An ‘Import Procurement Codes’ option has now been added to the System Set Up menu under the Administrator
tab. This facility will ensure that you have all the latest Procurement Codes on your system.
LAA Setup
Select Administrator>System Setup> LAA
This option allows you to manually amend case types, amend case type codes and amend standard fees. You
should not have to use these options as all the information needed for LAA work will be in your database and
updated by LOLA’s automatic updates. The options are here just so that manual amendments can be made if
necessary. If you need any assistance with these options, please contact the Peapod Helpline.
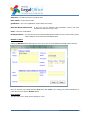
Making Cases Confidential
NB. Only a User with Partner access rights can do this and only at the time the New Case is put on the system.
When a Partner creates a new Case, they can make it inaccessible to other Users by password protecting it.
Do this by completing the Password box.
An Administrator or a Partner can make those cases even more secure by telling LOLA to store any password
protected case files in a different location to the unprotected cases.
Set the location for password protected files
Select the Administrator>System Setup> Secure Server Path option which brings up the Secure Case Path
window.
Version: 2.6.3.8 - 10 June 2014
The LOLA Administrator Manual 24
Click the Browse button to browse to a location where the password protected files should go. Ideally, the
location should be a drive where access is restricted to Administrators of your Firm’s computer systems. Once
you have found the location click the Set Path button to confirm. Only cases whose passwords are created after
this location has been set will have their files stored in this location.
Retrieve the Password for a Case
NB. Only a User with Partner access rights can use this option
Select Administrator>System Setup>Retrieve Case Passwords. This will bring up the Case Search
window.
Use the Case Search window to find the case for which you require the password. Click on the grey box to the
left of the case to highlight it in blue then click the Get Password button. A box will appear on the screen
telling you the password for that case.
Version: 2.6.3.8 - 10 June 2014
The LOLA Administrator Manual 25
Mandatory Fields
As an Administrator, you can force Users to complete certain fields when adding new clients to LOLA or opening
new cases. Your Firm may wish to do this to make sure you capture certain data in your database.
Select Administrator>System Setup>Mandatory Fields and the Define Mandatory Fields window will open.
You can select up to 10 fields in the Client or Contacts windows that a User must complete.
Do this by using the drop down arrows at the right of each Field to select the boxes that you want the User to
complete. Once you have completed your selection click the Save button. You can amend the chosen fields at
any time by altering your choices and clicking the Save button. If you want to stop a field being mandatory use
the delete button to clear it from the Field box.
Tip
If you find that Users are not entering all the information required, then make the fields that they are missing
out mandatory. Those fields will have a # symbol with a yellow background next to them so that User’s can see
what fields they must complete when creating cases and contacts
Version: 2.6.3.8 - 10 June 2014
The LOLA Administrator Manual 26
Miscellaneous Fields
The ‘Miscellaneous Fields’ (seen on the ‘More’ button on the client page) can now have labels customised by
the administrator . This is an example of the screen you will see on Private matters
This is an example of the screen you will see on LAA matters
Version: 2.6.3.8 - 10 June 2014
The LOLA Administrator Manual 27
If you are logged in as Admin, simply change the text in the labels, on any case. The changes will be reflected
throughout the system.
Marketing
You can use LOLA as a marketing tool to send marketing information to your Clients on a selective basis. As an
Administrator, you can define the categories used during a search of your database, in order to select which
Clients should receive what marketing material.
Version: 2.6.3.8 - 10 June 2014
The LOLA Administrator Manual 28
Set Marketing Criteria
Select Administrator>System Setup> Marketing>Data1.csv
This will open a spreadsheet called Data1.csv in which you can put the criteria your Firm requires. Edit this
spreadsheet by putting each criteria that you want in a row in column A, then save the file. You can save a
second, third and fourth set of criteria by clicking the Data2.csv, Data3.csv and Data4.csv file options.
When you click the Market button in the Add/Amend Contact window the Marketing Information window
appears. These labels will appear in the dropdown list of the Marketing One box. What you put in the Data2.csv
file will appear in the Marketing Two dropdown list.
Customising the Marketing Information Box Labels
You can change the labels for each of the boxes on the left hand side of the Marketing Information window by
opening the window when looking at any contact screen and then typing the new labels into the label fields.
After typing these in, the new title for each label will appear throughout LOLA. Using this facility will make it
much easier for Users to remember what each box means.
Users can set up a complex pattern of categories by using the options available in Marketing One, Two, Three
and Four boxes and the four number options seen underneath. In addition, Users can add additional information
about the client using the boxes on the right hand side of the window. As a result, it is possible to define exactly
who should receive the mailings that are being sent out. If you wish to exclude any particular contact from all
marketing campaigns, click the Do Not Mail box.
Version: 2.6.3.8 - 10 June 2014
The LOLA Administrator Manual 29
If you wish, you can make completing any of the fields in the Marketing Information window mandatory.
Select Administrator>System Setup> Marketing>Mandatory Fields. This will open the Define Marketing
Mandatory Fields window. Now select which fields a User must complete once they open the Marketing
Information window for a contact. Click on the grey box to the right of each drop down box and choose the
appropriate field title.
When a User opens the Marketing Information window, the fields that you have marked as Mandatory will have a
red # mark next to them. A User will not be able to close the Marketing Information window until they have
completed the fields you have chosen.
Version: 2.6.3.8 - 10 June 2014
The LOLA Administrator Manual 30
Create a Marketing ‘Mortgage With’ List
In
order
to
populate
the
list
of
‘Mortgage
With’
options
for
a
User
to
choose
from,
select
Administrator>System Setup> Marketing>Mortgage With List. This will open the Marketing Mortgage With
List window.
Click the New button to create a new
entry in the List.
Type the details in the Mortgage With
box.
Click Save.
You can edit an entry by clicking on
the grey box to the left of the entry
and then typing the amendments in
the Mortgage With box.
If you want to delete an entry, click on
the grey box to the left of it and then
click the Delete button.
Click Close to close the window
In order to carry out a mailing based on the Marketing Information click the Reports button on the LOLA shelf
at the bottom of the main window.
This opens the Report Writer window. In the Report Writer you can either generate a report by selecting
General>Client Reports>Marketing (G1.8) or Marketing by Fee Earner (G1.8a) this will produce a
report based on the criteria you select. Alternatively choose the Excel>Marketing in Excel option to produce a
Spreadsheet.
Version: 2.6.3.8 - 10 June 2014
The LOLA Administrator Manual 31
In each case the Marketing Information window will open.
Configure the Marketing boxes as you require and click OK. This generates the Report or a Spreadsheet if you
chose the Excel option. In each case, you will see the contacts whose details contained in the Marketing section
of the Contact Database match the selected criteria. If you save the Spreadsheet, you can use it as a source
document for a mail merge in Microsoft Word or as a mailing list for a professional marketing campaign.
Version: 2.6.3.8 - 10 June 2014
The LOLA Administrator Manual 32
Money Laundering Documents
LOLA allows the Firm to set which Money Laundering Documents it is prepared to accept as proof of identity. The
Administrator sets up that list.
Set up a List of Acceptable Documents
Select Administrator>System Setup> Money Laundering Documents.csv
A Spreadsheet opens allowing you to put in Column A the list of documents. That list will then appear in the
Document One, Two and Three dropdown boxes in the Money laundering Contact Files window.
Version: 2.6.3.8 - 10 June 2014
The LOLA Administrator Manual 33
Workflows
In LOLA it is simple to create or change Workflows that Users follow when dealing with their cases. A Workflow
can contain Letters, Documents, Forms, Dates and Tasks.
Add a New Workflow
Select Administrator>Workflow> Workflow Setup and the Add/Amend an Existing Workflow window will
open.
If you wish to add a new Workflow that does not appear in the Workflow dropdown window, click the New
Workflow button.
The Workflow dropdown window will clear and the cursor will move to the Workflow Name box where you can
type the name for the new Workflow.
Then select the Case Data type that the User will see when they click on the Case Data button for this particular
workflow.
Case Data
This area of LOLA holds the details about a case. The User accesses it to put data about a case into LOLA and to
review details of the contacts assigned to the case. In the Case Data Page box there are a number of case types.
Selecting a Case Data Page that matches with a Workflow will give the User a selection of Contact Types and
Data details that are relevant to that type of work. Selecting a General Case Data Page will give the User every
Contact Type and Data details that LOLA has.
Once you have made the appropriate choice of Case Data page click the Save button. If you wish to abandon the
creation of the new Workflow, click the Abn button instead.
Version: 2.6.3.8 - 10 June 2014
The LOLA Administrator Manual 34
You may choose to add each item to your New Workflow separately or you may copy everything from an existing
Workflow and edit the entries that you have copied.
Add Items to a Workflow
N.B. Before you add items to a Workflow read the section of this Manual dealing with Letters as this explains
about creating template documents that are items within a Workflow.
First, select the Workflow you want to edit by selecting it in the Workflow dropdown box.
The item you add will appear immediately above the row with the black triangle on the left. In order to save time
moving items around, select the row below the one where you wish your new item to appear before adding it.
To add an item click on the button for the type of item you wish to add, from the row of buttons at the bottom
of the Add/Amend an Existing Workflow window.
Word, Excel and PDF
To add one of these items, you need to navigate through the folder structure of your PC to find the file of the
item that you wish to add to the Workflow. Whilst you can add items from anywhere, it is sensible to have the
master file saved somewhere in the L:\LEGALOffice\System\Letters folder or a subfolder of that folder. You
can group letters, spread sheets and PDFs in sub folders of the Letters folder to make it easier to find the one
you want. Remember if you move the file out of the folder after you have assigned it to a Workflow then the link
between the Workflow and the file will be broken and the workflow automation will no longer work.
N.B. When adding a Word Document to the workflow the ‘Files of Type’ drop down has been amended so that
you no longer need to select DOCX files from a separate option. Throughout the system, choosing ‘Word
Document’, will display both DOC and DOCX file types. This is the same with Excel Workbooks, which now
display both XLS and XLSX files. The file format DOCM (Word Macro-Enabled Document) can now be added to
and produced from a workflow.
Forms
If the item you are adding is a Form, these are in the L:\LEGALOffice\Formslib folder or a subfolder of that
folder.
If the item you have added is one that the User will need to generate more than once during a case (e.g. Blank
letter to Client) then tick the Keep In To Do tick box. This stops the item from disappearing from the Workflow
once generated. The User can then generate another of the same item later on from the Workflow.
Dates
N.B. before adding Dates to a Workflow read the Dates and Tasks section of this Manual, so you understand
how they work.
Clicking on the Date button will bring up the Date/Task Types window. From here, you can select a date or task
and insert it into the Workflow by clicking on the Assign button at the bottom of the window.
Labels
To break up a Workflow into sections you can add labels by clicking the label button and typing the label that
you want to appear in the Workflow.
Links
You can add links to web pages as part of your workflow. This will add the web site address to the workflow so
that Users can easily access web pages that they might need to visit during the course of the Case.
Version: 2.6.3.8 - 10 June 2014
The LOLA Administrator Manual 35
Outlook Template
A facility has been added to allow you to enter field codes into Outlook Email Templates and merge the data
through LOLA workflow, similarly to a word document.
N.B. By double-clicking an item in Workflow Setup, you can open the file to review.
Next to the Workflow item buttons at the bottom of the window there are three drop down boxes:
Position: Allows you to assign the position number of an item. Alternatively, you can use the arrows on the side
of the Window to move an item up or down the Workflow
Action: How you set the action determines how the item will be dealt with in the Time Recording part of LOLA.
DOC = Document (Not charged as an item)
FO = Form Out (Charged at the rate set for Forms Out)
KD = Key Date (Not charged)
LO = Letter Out (Charged at the rate set for Letters Out)
PDF = PDF File (Not charged as an item)
XLS = Excel Spreadsheet (Not charged as an item)
Lnk = Internet Hyperlink (Not charged as an item)
C Type: Links a Letter to a particular type of Contact. If a Case has more than one of that Contact Type assigned
to it by the User, on generating a General letter from the Workflow, LOLA will ask the User to select the contacts
to which they wish to send the letter (see the section Create Letters that Use the Multiple Recipient option below).
Delete an Item from a Workflow
To delete an item from a Workflow, select the item by clicking in the grey box to the right of it and then click the
Delete button at the bottom of the window.
Copy an Existing Workflow
To copy a Workflow select the Workflow you wish to copy
in the Workflow dropdown box then click the Copy
button in the top right hand corner of the window.
The name of the Workflow you are copying from will
appear below the button.
Next select the Workflow you wish to copy to, from the
Workflow dropdown box.
Then click the Paste button. Choose Yes to confirm the
action when asked.
Delete a Workflow
If you want to delete a Workflow that you no longer use click the inactive tick-box next to the Workflow name at
the top of the window. This will not delete the Workflow from LOLA but will mean that a User cannot select it
when creating a new case or changing a Workflow type.
Version: 2.6.3.8 - 10 June 2014
The LOLA Administrator Manual 36
Reassign a Workflow
It is possible to re-assign the name and number of existing workflows in a batch. This facility is largely for
OFFICECase Users who may wish to put their Workflows in a different order when upgrading to LOLA. If you
wish to carry out this operation, please contact our Helpline and a member of our Support Team will assist you.
Letters
General
The templates that LOLA uses to generate letters and documents in a case are standard Microsoft Word
documents containing Mergefield Codes that use the Word mail merge function to merge data from the LOLA
database into the template. If you want to add new template letters to LOLA you should include Mergefield
Codes in those templates which merge the data from the “Case Data” file into the template letter or document.
Template letters are stored in the L:\LEGALOffice\System\Letters Folder. What you name your own letters and
where you place them within the Letters folder is very important. LOLA only allows two folder levels beneath the
Letters Folder. It also requires unique names for its template letters and documents.
When LOLA creates a letter from a Workflow, it will look through the Letters folder and open the first template
that it finds with a name that matches the template name in the Workflow. Therefore, it is essential not to have
duplicate file names in different folders. To this end the LOLA template letters need prefixes to differentiate
between different work types (e.g. “CP - Letter to solicitors” may be the commercial purchase version of the
blank letter to solicitors and “F - Letter to solicitors” the family version). Following this principle, each
Department can determine the layout and content of their blank letters.
Following the above protocols you can create your own letters from scratch. In order to get the letters to use
information from the database you need to have an understanding of how Mergefield Codes work in Microsoft
Word.
Mergefield Codes
To find out what the available Mergefield Codes are, select Administrator>Letters>MergeField Codes or
from the Add/Amend an Existing Workflow window click the MergeField Codes button. This action compiles a
Word document that contains all of the Mergefield Codes that are available. You can copy and paste the relevant
Codes from this document into your letter templates.
To find which Mergefield Codes are relevant to the letter or document you are creating, open the Case Data
page for the Case type where you intend to assign the letter or document. Then hover your mouse over the
fields that you want to take the information from. A pop up will appear giving you the name of that field. Copy
that Mergefield into the position in your letter where you want the information to appear.
Linked Files
In addition to using Mergefield Codes in template letters LOLA also uses the Microsoft Word function
INCLUDETEXT to bring other files into a letter when it is created. Typically, the INCLUDETEXT statement is in the
first line of the template so that the file that contains the header MergeField Codes for that contact type will
merge into the final version of the letter created. The Header file contains everything from the first line of the
Addressee to the Salutation. It works this way so you have one header file for each Contact Type. In the future if
you need to change your letterhead, you only have to change the header for the contact type rather than change
all the letters you have in the system.
To see the files linked to a template letter, open it and while holding the ALT key press F9. You will now see the
details of fields that held in the document. At the top of the letter you will see something like:
{INCLUDETEXT“L:\\LEGALOffice\\System\\Letters\\Header_Client.doc”\*MERGEFORMAT}. This example shows
that the Header_client.doc file will merge into this file when LOLA creates a letter from it. To change the
Header_ file link, edit the INCLUDETEXT statement. To enable faster merging of documents Microsoft Word
stores linked files. So the details that you see when you hold down the Alt key and press F9 will not change until
you refresh the link. To refresh the links in a document, select all the text (Hold down CONTROL and press A)
then press F9. You should do this every time you open a template letter to edit it so that what you see on the
screen is the latest version of the files linked to the template.
Version: 2.6.3.8 - 10 June 2014
The LOLA Administrator Manual 37
Amend Existing Letters or Document Templates
Select Administrator>Letters>Amend Letters. This will take you to the Letters folder so you can browse to
any existing document and add merge fields to it. Once you have opened the document you want to change, you
can make any changes necessary to it. If you have the MergeField Codes document open at the same time, you
can copy and paste MergeField Codes from it to your document. Alternatively if you have another document
where you know there is the Mergefield Code that you want, copy the Code from that document.
N.B. This facility has been amended so that you can now choose EXCEL Workbooks and Outlook Templates to
amend. Simply choose from the ‘Files of Type’ drop-down.
Create Letters that Use the Multiple Recipient Option
You can create template letters that allow the User a choice as to whom to write to from multiple Contacts of the
same type that are assigned to a case. To create such a template it has to link to a General header file. A
number of letters have been linked to the Header_General.doc file for this purpose. They are in the “General
Letter Set” folder and their filename ends in General (e.g. “Letter to Insurance General.doc”). This template will
provide the multiple recipient option provided (a) it is actioned through a workflow and (b) when it is added to a
workflow the C Type is set to “IN” and (c) there is more than one Insurance Company contact assigned to the
case.
N.B. By assigning the contact type “ALL” to a letter in the workflow you will be able to generate multiple letters
for contacts of any type assigned on a case.
Check a Template for Invalid Mergefield Codes
The merging of data from the database to a template document will fail if there is an invalid Mergefield Code in
the template. This function allows you to analyse letters in a folder to check if they have any invalid MergeField
Codes. Select Administrator>Letters>Letters Analysis to open the Letters Analysis window. Click the
Browse button and navigate to the folder that contains the files you wish to check. Select the first file in the
folder and click the Open button.
Version: 2.6.3.8 - 10 June 2014
The LOLA Administrator Manual 38
Now you will see all the files in that
folder in the Letters Analysis window.
Next, select which ones you want to
analyse by highlighting them. You can
do this either by holding down the left
button on your mouse and dragging
over the files you want to process. If
all the files are together in the list click
on the first one, then hold the shift key
down and click on the last one. To
select individual files hold the Ctrl key
down and click on each file you wish to
process.
Once you are happy with your
selection click the Analyse Selected
Letters button.
LOLA will then go through each letter
and will produce a text file listing those
files with invalid Mergefield Codes. If
no invalid MergeField Codes are found,
LOLA will report ‘Success’ next to the
button. NB. Processing a large number
of letters will take a long time.
If you receive a list of the documents that have invalid MergeField Codes use the Amend Letters function to edit
the template letter or document listed.
If you wish to stop the Letter Analysis at any time, right click within the Letters Analysis window and on the popup menu that appears, click ‘Deselect All Files’. LOLA will complete the scan of the current letter and stop.
Using the Letter Wizard
The Letter Wizard allows you to change the format of your template letters in a batch. It is an automatic process
so you are strongly advised to take a backup of your template documents before using the Wizard. Any mistakes
you make in running the Wizard with incorrect settings cannot be undone.
You can also link a header and footer to each template. Select Administrator>Letters>Letters Wizard then
the Letter Wizard window will appear. At the bottom of the window are the control buttons. Click the Browse
For Files button to search for the directory that holds the letter templates that you want to change. Then click
on one of the files in the directory and click the Open button.
Version: 2.6.3.8 - 10 June 2014
The LOLA Administrator Manual 39
The Letter Wizard will then bring all the files from
that directory into its window.
If you only want to change certain files highlight
them by holding down the left button on your
mouse and dragging over the fields you want to
process. If all the files are together in the list click
on the first one and then hold down the shift key
and click on the last one. To select individual files
hold the Ctrl key down and click on each file you
wish to process.
If you want to check a file in the list double click
on it and it will open in Word.
Once you are happy with the selection of files you
have highlighted click the Set Properties For
Selected button.
If you want to change all the files in the folder
click the Set Properties For All Files button.
N.B. Do not use the Set Properties For All Files
button if you are linking a header or file to your
templates and the header or footer file are in the
same directory as the one you are processing.
If you want to see Microsoft Word making the changes to the files you have chosen to change, select
Options>Show Word Working before clicking the “Set Properties” button
Once you have clicked one of the “Set Properties” buttons the Settings window appears.
In this window, you can enter the settings that
you want to apply to each document selected in
the previous window.
You can also link a file that will merge into the
header or footer of the document when it is
created using LOLA. (e.g. A Word document
containing the header or footer of your firm’s
letterhead)
You can also link a file such as a general header
that will merge into the top of the body of the
document when it is created using LOLA.
Once you are happy with all the settings for the
documents you have selected, click the Apply
Changes button.
If you are processing a number of documents LOLA may take a long time to complete the task.
Version: 2.6.3.8 - 10 June 2014
The LOLA Administrator Manual 40
Contacts
Managing the Contacts Database
As an administrator you can use the Administrator> Contacts>Contacts Database option to edit or delete
contacts from your contact database. Choosing this option will open the Add Amend / Contact Details window in
the same way as selecting a contact from the Address Book. You will probably want User to keep the contact
details up to date but we have included this menu option for completeness.
Contact Types
LOLA is pre-configured with various contact types but you may come across a contact type that is not listed in
the Contact type list.
Select the Administrator> Contacts>Contact Types option and the Add / Amend Contact Types window will
appear.
Add a New Contact Type
Click the New button. Each contact type must have a unique Code of up to 5 letters or numbers which you enter
in the Code box. Then type the description of the contact into the Description box and click the Save button.
When creating new Contact Type codes it is best to use a code that has some relevance to the description.
N.B. Users will not be able to produce letters through Workflows to any new Contact Types that you add
although they will be able to produce blank letters to them. They can however use the >Assign Contact To
Case As Anybody option for those contacts that LOLA does not have a specific Contact Type for, as explained
in the User Manual.
Version: 2.6.3.8 - 10 June 2014
The LOLA Administrator Manual 41
Edit the Description of a Contact Type
To edit the Description of a Contact Type select it from the list, so that the details are in the boxes at the bottom
of the window. Then change the Description and click the Save button.
Delete a Contact Type
Select the Contact Type you wish to delete so that the entry is in the boxes at the bottom of the window. Then
click the Del/Abn button. Click “Yes” when asked to confirm the deletion. N.B. Be careful not to delete a
Contact Type for which there are existing records in the database.
File Categories
A User can store useful documents for a contact by attaching them to that contact. When doing so, the User will
need to allocate the document to a Category. The list of available categories is set by an Administrator using the
Administrator> Contacts> File Categories option. This brings up the File Categories window.
To create a new Category click the
New button.
Type the description for the
Category then click the Save button.
When you have finished click the
Close button.
Once you have set up a list of File
Categories, when a User attaches a
Document the list that you create
here will appear in the Category
drop down box in the Contact Files
section of the Add / Amend Contact
Details window.
Version: 2.6.3.8 - 10 June 2014
The LOLA Administrator Manual 42
ID Types
This option tracks the forms of ID documentation provided by client or contact via a drop down box on the new
contacts and new case screens.
To create this list select Administrator> Contacts> ID Types.
To create a new ID Type click on the
New button.
Type the description for the ID Type and
click the Save button.
When you have finished click the Close
button
Once you have set up a list of Sources of
Work when a User creates a New Case
the list that you create here will appear
in the Source of Work drop down box in
the Add / Amend Contact Details
window.
Sources of Work
LOLA can track the Sources from which the Firm receives work and produce a report identifying which clients
have come from a particular Source of Work.
Select the Administrator> Contacts> Sources of Work option. This opens the Sources of Work window.
Version: 2.6.3.8 - 10 June 2014
The LOLA Administrator Manual 43
To create a new Source of Work
click on the New button.
Type the description for the Source
of Work and click the Save button.
When you have finished click the
Close button
Once you have set up a list of
Sources of Work when a User
creates a New Case the list that you
create here will appear in the
Source of Work drop down box in
the Add / Amend Contact Details
window.
You can archive Sources of Work by
highlighting them and ticking the
Archive tick box
Backup
There are two elements that require backing up in order to restore LOLA fully:
There will be a shared folder on the server that the users are mapped to. By default, the drive letter used is L:\
and the location of the share on the server will be C:\Apps or D:\Apps depending on your setup
There is also an SQL database that needs to be backed up. The default location for this is on the server is
<shared folder>\legaloffice\database and will comprise of two files called LOLASQL.mdf and LOLASQL_log.ldf.
Depending on your setup, you may need to stop the SQL services in order to backup these files.
Please note that the above are the default locations of the backup files but can all be checked via the share and
the SQL manager.
Please note that Peapod will not routinely take backups or your data and are not responsible for looking after
your backups.
Cases
Export Case Details to Excel
You can export to Excel basic details of all your active cases. Select the Administrator>Case>Export All
Active Cases To Excel option. Beware that selecting this option will start the export function and if you have a
lot of active cases it may take some time.
Clear Data
This function is only for use by Peapod Support Staff.
Case Types
To manage Case Types you have to go to the Accounts part of LOLA. If you want to add a new case type or
change the name of a Case Type, open LOLA Accounts from the LOLA shelf at the bottom of the LOLA window.
Version: 2.6.3.8 - 10 June 2014
The LOLA Administrator Manual 44
In the Accounts – LOLA window select File>System Setup>Nominal Setup and the Nominal Ledger (Case
Type) Setup window will appear.
N.B. If you create new case types or change the descriptions of existing ones then your actions will apply to both
Case Management and Accounts because the Nominal Income Accounts are the Case Types. Be sure to agree
any changes you propose to make with your Accounts Department or Bookkeeper before they are made.
To add a new Nominal / Case
Type click the New button.
Then assign a number for the
Case Type. Private Case Types
must have numbers between
1000 and 1799. Public funded
Case
Types
must
have
numbers between 1800 and
1899 so that LOLA provides
the correct time recording
rates. Type a description for
the Case Type and click the
Update button.
To amend the description of a Case Type, click on the grey box to the left of the one you want to change. Its
details will appear in the boxes at the bottom of the window. Change the description and click the Update button.
E-Learning.
There are now E-Learning modules available through the LOLA Help Menu.
These modules are a series of help videos, which demonstrate how to perform tasks within LOLA.
To access these, please ensure that you have entered your relevant support centre log in details entered into the
company details, then navigate to Help menu and the choose the E-Learning.
Version: 2.6.3.8 - 10 June 2014
The LOLA Administrator Manual 45
Contact Peapod
Headquarters
Sales Email: [email protected]
Sales Tel 1: 0845 683 2517 (National)
Sales Tel 2: 0208 941 8818 (London)
Fax: 0845 683 2519
Helpline: 0845 683 2518
DX: 115274 Hampton
Website: www.legaloffice.com
Address
Peapod LEGALOffice Ltd
Unit 1 Caste Business Village
Station Road
Hampton
Middlesex
TW12 2BX
DX
Peapod LEGALOffice Ltd
DX: 115724
Hampton
Wales
Merlin House
1 Langstone Business Park
Priory Drive
Newport
NP18 2HJ
Tel: 01633 415373
Fax: 01873 880 832
Email: [email protected]
Northern Ireland
Peapod LegalOffice (N.I.) Ltd
76 Main Street
MOIRA
BT67 0LQ
Tel: 028 9261 3110
Fax: 0845 683 2519
Email: [email protected]
Version: 2.6.3.8 - 10 June 2014
The LOLA Administrator Manual 46