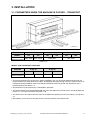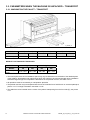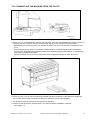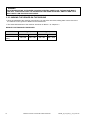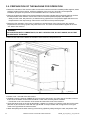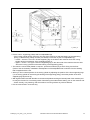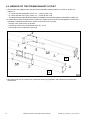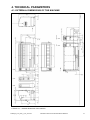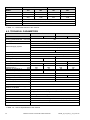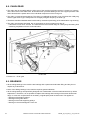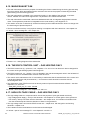
1
INDUSTRIAL CYLINDER DRYING IRONERS IRONING CYLINDER DIAMETER 320 mm IRONERS WITH INSERTING WIDTH OF: 1600 mm 2000 mm ORIGINAL INSTALLATION, MAINTENANCE AND USER'S MANUAL 545098 G Publication date: 2 Jan 2014 TABLE OF CONTENTS 1. BASIC INSTRUCTIONS AND INFORMATION ............................................................. 6 1.1. IRONING INSTRUCTIONS – PURPOSE OF THE MACHINE .............................................................6 1.2. IRONING INSTRUCTIONS – INCORRECT USE OF THE MACHINE..................................................6 1.3. IRONING INSTRUCTIONS – USER RECOMMENDATIONS ..............................................................7 2. SAFETY INSTRUCTIONS ............................................................................................. 8 2.1. OPERATION WARNINGS ..................................................................................................................8 2.2. WARNINGS FOR TRANSPORT AND STORAGE.............................................................................10 2.3. SYMBOLS ON THE MACHINE.........................................................................................................10 2.4. LOCATION OF THE SERIAL LABEL ON THE MACHINE .................................................................11 2.4.1. SERIAL LABEL OF THE MACHINE FOR GAS HEATING............................................................12 3. INSTALLATION........................................................................................................... 13 3.1. PARAMETERS WHEN THE MACHINE IS PACKED - TRANSPORT ................................................13 3.2. PARAMETERS WHEN THE MACHINE IS UNPACKED - TRANSPORT ...........................................14 3.2.1. MACHINE ON THE PALLET - TRANSPORT...............................................................................14 3.2.2. DISMANTLING THE MACHINE FROM THE PALLET..................................................................15 3.2.3. MOVING THE IRONER ON THE GROUND ................................................................................16 3.3. INSTALLATION REQUIREMENTS ...................................................................................................17 3.3.1. WORKING CONDITIONS OF THE MACHINE.............................................................................17 3.3.2. SPACING REQUIREMENTS.......................................................................................................18 3.4. LEVELLING THE MACHINE ON THE FLOOR..................................................................................19 3.5. CONNECTION TO THE STEAM EXHAUST .....................................................................................20 3.5.1. INSTALLATION OF SEVERAL IRONERS ...................................................................................22 3.6. ELECTRIC CONNECTION ...............................................................................................................23 3.7. GAS HEATING (ONLY APPLICABLE TO MACHINES WITH GAS HEATING)...................................29 3.7.1. GAS CONNECTION - INSTALLATION........................................................................................29 3.7.2. CONNECTING TO AN EXHAUST SYSTEM - INSTALLATION FOR THE GAS HEATED MACHINES....30 3.7.3. OPERATING INSTRUCTIONS - FOR MACHINES WITH GAS HEATING........................................31 3.7.4. TRANSITION TO OTHER GAS TYPE............................................................................................33 3.8. PREPARATION OF THE MACHINE FOR OPERATION ...................................................................34 3.9. REBUILD OF THE STEAM EXHAUST OUTLET ...............................................................................36 4. TECHNICAL PARAMETERS ...................................................................................... 37 4.1. EXTERNAL DIMENSIONS OF THE MACHINE.................................................................................37 4.2. TECHNICAL PARAMETERS ............................................................................................................38 5. OPERATING THE MACHINE...................................................................................... 39 5.1. MAIN SWITCH .................................................................................................................................39 5.2. CONTROL PANEL / KEYBOARD - CONTROL .................................................................................39 5.2.1. OPL CONTROL...........................................................................................................................40 5.2.2. CONTROL OF THE COIN VERSION, CPS VERSION.................................................................42 5.2.3. COIN SLOT.................................................................................................................................44 5.2.4. CENTRAL PAYMENT SYSTEM (CPS)........................................................................................44 5.3. CONTROL PANEL / KEYBOARD – USER CONFIGURATION ...........................................................45 5.4. OPERATING INSTRUCTIONS .........................................................................................................47 545098_G_Pub_date_2_Jan_2014.doc ORIGINAL INSTALLATION AND USER'S MANUAL 3 5.4.1. ACTIVATION.............................................................................................................................. 47 5.4.2. SWITCHING ON THE FEED ...................................................................................................... 47 5.4.3. SETTING THE PARAMETERS OF IRONING ............................................................................. 47 5.4.4. STARTING IRONING ................................................................................................................. 48 5.4.5. HEATING PROCESS – BEGINNING OF IRONING .................................................................... 48 5.4.6. IRONING.................................................................................................................................... 49 5.4.7. COMPLETION OF IRONING ...................................................................................................... 49 5.5. SAFETY BAR .................................................................................................................................. 50 5.6. HAND CRANK ................................................................................................................................. 51 5.7. PEDAL OF INSERT TABLE STOP / START SYSTEM *................................................................... 52 5.8. OCS SYSTEM - CHECKING OF CYLINDER EDGES OVERHEATING *.......................................... 53 5.8.1. * SENSOSPEED ® SYSTEM......................................................................................................... 53 5.9. TROUBLESHOOTING ..................................................................................................................... 53 5.9.1. ERROR MESSAGE - E7 - STARTING (IGNITION) UNIT ERROR - G VERSION ONLY...................... 54 5.9.2. ERROR MESSAGE E9 - AIR-FLOW SWITCH ERROR - G VERSION ONLY.............................. 55 5.10. EMERGENCY STOP OF THE MACHINE....................................................................................... 55 5.11. REMOVAL OF STUCK LINEN ....................................................................................................... 56 5.12. POWER SUPPLY CUT .................................................................................................................. 56 6. MAINTENANCE AND ADJUSTMENTS ......................................................................57 6.1. SAFETY INSTRUCTIONS FOR MAINTENANCE ............................................................................. 57 6.2. CLEANING OF THE MACHINE........................................................................................................ 57 6.2.1. CLEANING THE GAS BURNER - FOR MACHINES WITH GAS HEATING................................. 58 6.3. IRONING CYLINDER........................................................................................................................ 59 6.3.1. SHORT-TERM STANDSTILL, EVERYDAY IRONING CYLINDER MAINTENANCE ..................... 59 6.3.2. BURNISHED STEEL CYLINDER ................................................................................................ 59 6.3.3. BURNISHED CYLINDER WITH A HARD-CHROME LAYER ....................................................... 59 6.3.4. CLEANING THE IRONING CYLINDER....................................................................................... 60 6.4. IRONING BELTS ............................................................................................................................. 61 6.4.1. TIGHTENING THE IRONING BELTS.......................................................................................... 61 6.4.2. REPLACEMENT OF IRONING BELTS ....................................................................................... 61 6.5. INSERT TABLE FEEDING BELTS .................................................................................................. 62 6.5.1. TENSIONING OF THE INSERT TABLE FEEDING BELTS ......................................................... 62 6.6. UPPER PRESSURE ROLLER RIBBONS......................................................................................... 63 6.7. TOP PRESSURE ROLLER.............................................................................................................. 63 6.7.1. REPLACEMENT OF THE PADDING OF THE PRESSURE ROLLER ......................................... 63 6.8. CHAIN GEAR .................................................................................................................................. 64 6.9. BEARINGS ...................................................................................................................................... 64 6.10. SCRAPERS ................................................................................................................................... 65 6.11. TEMPERATURE SENSORS – OPERATING AND SAFETY SENSORS......................................... 66 6.12. ELECTRICAL INSTALLATIONS - MAINTENANCE ........................................................................ 67 6.13. FREQUENCY INVERTER.............................................................................................................. 67 6.14. MAIN DRIVE MOTOR.................................................................................................................... 67 6.15. MAIN EXHAUST FAN .................................................................................................................... 68 6.16. THE ESYS CONTROL UNIT – GAS HEATING ONLY .................................................................... 68 6.17. HIGH-VOLTAGE CABLE – GAS HEATING ONLY.......................................................................... 68 6.18. IGNITION AND IONIZING ELECTRODE – GAS HEATING ONLY.................................................. 69 4 ORIGINAL INSTALLATION AND USER'S MANUAL 545098_G_Pub_date_2_Jan_2014.doc 6.19. AIR FLOW SWITCH – GAS HEATING ONLY .................................................................................69 6.20. INSERT TABLE DRIVE – CLUTCH * ..............................................................................................70 6.21. LAUNDRY EARTH LEAKAGE TRIP – ZKOUŠENÍ ..........................................................................70 6.22. PUTTING THE IRONER OUT OF OPERATION..............................................................................70 7. PUTTING THE MACHINE OUT OF SERVICE ............................................................ 71 7.1. MACHINE DISCONECTION .............................................................................................................71 7.2. MACHINE DISPOSAL ......................................................................................................................71 7.2.1. POSSIBILITY OF THE MACHINE DISPOSAL BY THE SPECIALIZED COMPANY......................71 7.2.2. POSSIBILITY OF THE MACHINE DISPOSAL BY OWN POTENTIAL..........................................71 545098_G_Pub_date_2_Jan_2014.doc ORIGINAL INSTALLATION AND USER'S MANUAL 5 1. BASIC INSTRUCTIONS AND INFORMATION 1.1. IRONING INSTRUCTIONS – PURPOSE OF THE MACHINE The machine is only designed for ironing of flat linen (bed linen, table cloths, kitchen towels, towels, handkerchiefs and other types of flat linen) made from linen, cotton, wool, silk, polyacrylic and polyester fibres. Place linen with optimal residual humidity of 50% ± 10% into the ironer. The ironer will execute final drying. Linen with higher residual humidity must first be tumble dried or predried. Moisten linen which is too dry to prevent the linen from getting stuck on the ironing belts at the output trough and to prevent the production of static electricity. Linen must be properly rinsed off. Failure to observe this instruction will lead to the linen turning yellow or to laundry detergent and impurities deposits staining the ironing cylinder. Linen must be sorted out according to the type and selected ironing temperature. Pockets must be empty and any objects that could damage the linen as well as the machine must be removed. Pay extra attention when ironing synthetic and printed fabrics so that the fabric does not adhere to the ironing cylinder. We do not recommend ironing covers and duvets. Check that the linen is suitable for ironing and if so, what the suitable temperature is. The producer of the machine bears no liability for damage incurred to the fabric due to failure to observe the instructions. 1.2. IRONING INSTRUCTIONS – INCORRECT USE OF THE MACHINE ! WARNING THIS MACHINE IS DESIGNED FOR INDUSTRIAL IRONING AND DRYING OF FLAT LINEN WASHED IN WATER. ANY OTHER USE DIFFERENT FROM THE INTENDED USE WITHOUT A WRITTEN PERMISSION OF THE PRODUCER IS CONSIDERED TO BE INCORRECT. Do not iron linen with materials designed to retain moisture. The machine is not intended for ironing linen that contains metal, plastic, fibreglass or foam rubber elements. The machine is not intended for ironing linen that contains hard components that could damage the ironing belts or the ironing cylinder surface. The machine is not intended for ironing linen with buttons. Do not leave linen in the machine! If the width of the linen does not match the width of the machine, alternate inserting the linen on the right and on the left to keep a balanced use of the machine. Do not disconnect the power supply if the temperature of the machine is above 80°C, except in extraordinary cases. Do not put the machine in operation at maximum speed during the heating and cooling phase. Do not turn off the machine unless the ironing belts are dry and do not iron at temperatures below 80°C as it can cause oxidization of the ironing cylinder. Do not iron synthetic fabrics at high temperatures. 6 ORIGINAL INSTALLATION AND USER'S MANUAL 545098_G_Pub_date_2_Jan_2014.doc 1.3. IRONING INSTRUCTIONS – USER RECOMMENDATIONS The machines described in this manual have the following ironing capability: o Linen width – 1,655m (model 160). o Linen width – 2,070m (model 200). The ironing speed can be set to 1 – 6m/min according to the type of linen and its humidity. The temperature of the ironing cylinder can be set up to 180°C according to the type of linen; to iron the aforementioned types of linen, set the temperature to 160°C at the most. The ironing parameters are displayed on the control panel. The machines are supplied in the following versions: o OPL version – control panel with the possibility to change all the optional parameters; designed for qualified operators. o COIN version – the machine is equipped with an incorporated payment system, with partially accessible control panel (start, stop, indication of remaining time of the prepaid cycle) with preset ironing parameters; the optional parameters may only be changed by an authorized person. o CPS version – coin version with an external payment system, with partially accessible control panel (start, stop, indication of remaining time of the prepaid cycle) with preset ironing parameters; the optional parameters may only be changed by an authorized person. Machines are supplied with the following heating options: o E – electric heating o G – gas heating The minimum temperature oscillation can be adjusted by well-trained operators who can change the set temperature and ironing speed on the control panel according to the type of linen and its residual humidity. To obtain the maximum capacity of the ironer: o Prevent drops in temperature by selecting the minimum possible ironing speed. o Start ironing when the set temperature is reached (the “start” light is not flashing). o The distance between the individual pieces of inserted linen should not be greater than the length of the input conveyor to ensure smoothness of ironing. o Eliminate times when the ironer running at the working temperature does not iron. o Group linen according to the fabric composition or to the residual humidity. o Adjust the speed and temperature to the specific needs of the particular type of linen. o Turn off the ironer (the “stop” light is flashing = cooling mode) before inserting the last piece of linen in order to decrease energy consumption. The ironer will use the accumulated heat in the ironing cylinder and the cooling time of the machine will be shorter. Insert linen onto the input conveyor from the right and left side alternately (if the linen is wider than half of the inserting width of the machine) or gradually from left to the right so that the load of transferring heat to the ironed linen is evenly distributed on the entire ironing cylinder. Carefully insert the linen in the ironer as it is not possible to release the linen when inserted incorrectly. To obtain the best results, we recommend ironing flat pieces of linen hem first (towels, bed sheets etc.). If the linen has to be ironed twice to dry, there is a risk that it will turn yellow; the same applies if the roller slows down too much. If the linen is not dry after the first ironing, it may be caused by the following: o The washer has a low spinning capacity; in this case we recommend a short flash drying (5-10 min) in a tumble dryer. o The linen is too thick. o The speed is too high. Check that the pieces to be ironed are not wider than the maximum inserting width. o In this case, do not iron folded pieces of linen; it is not possible to obtain the expected quality of drying/ironing for excessive width. o If possible, use the entire width of the ironing cylinder. If the linen comes out damp from the ironer, decrease the ironing speed until you reach the required quality. o Linen coming out from the machine with a dampness of about 8% is considered to be optimally ironed. If linen is starched, there is a risk of staining the ironing cylinder or having the linen stick to the cylinder. The productivity and quality of ironing depends on washing. Make sure all the conditions are met. 545098_G_Pub_date_2_Jan_2014.doc ORIGINAL INSTALLATION AND USER'S MANUAL 7 2. SAFETY INSTRUCTIONS 2.1. OPERATION WARNINGS ! WARNING TO MINIMIZE THE RISK OF FIRE, ELECTRIC SHOCK, SERIOUS INJURIES TO PEOPLE OR DAMAGE TO PROPERTY, PLEASE READ AND OBSERVE THE FOLLOWING INSTRUCTIONS: Study the complete instructions, i.e. this “Original installation, maintenance and user's manual”, thoroughly prior to the installation, operation and maintenance of the machine. The manual also includes the Spare Parts Catalogue, which is not standardly supplied with the machine. Ask your supplier / producer for the Spare Parts Catalogue. Proceed according to the instructions provided in the manuals and always keep them near the machine for later use. Always contact your supplier, service worker or producer in case of any problems you do not understand. Always adhere to the safety instructions provided in the manual and the warnings and notices on the labels of the machine. Observe all valid and basic security measures and regulations. The machine must not be operated by children. Make sure there are not any people (children) or animals near the machine prior to its activation. When ironing, fasten up your clothing, ties, pendants, bracelets and long hair. Do not operate the machine with broken or missing parts or open covers. The machine may only be turned on when all the covers are in place. Do not insert fabrics that contain flammable or combustible agents into the machine. Do not store any combustibles near the machine. Keep the surface of the machine clean and free from flammable materials. The machine produces steam that must be efficiently exhausted out of the room. Do not store and spray any combustibles near the machine. Prevent unauthorized manipulation of the control panel. The OPL version (without the coin slot) is only intended for qualified operators. Use protective gloves when manipulating the hot ironed linen. The high temperature of the ironing cylinder may cause serious burns. Avoid touching the hot parts of the machine. The machine must be connected to the power supply via a fixed feed. The machine must be connected to the power supply, earthing, ventilation or gas in accordance with the Installation Manual pursuant to the local standards and the connection must be executed by qualified persons with a relevant valid permit. All regulations valid for the connection to the local electrical supply system (TT / TN / IT etc.) must be observed. The machine is equipped with a frequency converter. Do not change the converter parameters settings. Unauthorized changes may cause a serious injury, fire, damage to the machine etc. Check the condition of earthing, exhaust functionality of the machine and the safety bar regularly. Do not use the ironer when the safety bar for finger protection is damaged! Any changes in the installation of the machine contrary to the manual must be approved by the producer. Otherwise the producer/supplier is not liable for any potential injuries or damages caused to people and property. Any interference in the functions of the machine is not permissible and the producer rejects any and all liability in such cases. 8 ORIGINAL INSTALLATION AND USER'S MANUAL 545098_G_Pub_date_2_Jan_2014.doc ! WARNING ALWAYS DISCONNECT THE MACHINE FROM THE POWER SUPPLY AND ALL OTHER POTENTIAL ENERGY SUPPLIES BEFORE INTERFERING WITH THE MACHINE. THE IRONING CYLINDER MUST BE COOLED DOWN. THE MAIN SWITCH CIRCUIT TERMINALS ARE LIVE EVEN WHEN THE MAIN SWITCH IS OFF! GAS HEATED VERSION In case of gas leakage, shut the main gas supply, air out the room, avoid manipulating any electric switches and turning on any electric appliances, smoking, using open fire and call the service. The exhaust of the gas heated ironer must not be connected with the exhaust of a dry cleaning machine or dry cleaning presses under any circumstances. Do not disable or change the factory settings of any gas heating components and devices. The parameters of the adjustment, type of gas, permissible gas pressure and gas appliance category are stated on the serial label of the machine. Any adjustment to another type of gas or pressure may only be executed with the producer’s consent and by authorized service staff. Observe the minimal room ventilation recommended by the producer. All potential gas heating components are subject to a special permit. They may only be replaced with original spare parts supplied by the producer in case of damage. ALL VERSIONS Installation and repairs may only be provided by an authorized service organization with the relevant permit from the producer. The guarantee may be annulled in case of failure to observe the instructions stated in this manual. Original or identical parts must be used as spare parts for this machine. Return all the panels to their original position and secure them by the original method after a repair. This is a protective measure against electric shock, injury, fire and/or damage to the property. The instructions and warnings described in this manual do not include all the possible conditions and situations that may occur during the installation of the machine. They shall be understood in the general sense. Caution and carefulness are factors that cannot be solved by the structure of the machine. These factors must be ensured by the qualification of persons who install, operate or maintain the machine. Notes: o The equivalent noise level at the place of operation is lower than 57 dB (A). o This machine does not contain parts with asbestos. 545098_G_Pub_date_2_Jan_2014.doc ORIGINAL INSTALLATION AND USER'S MANUAL 9 2.2. WARNINGS FOR TRANSPORT AND STORAGE ! WARNING WHEN TRANSPORTING AND STORING THE MACHINE, DO NOT PUSH, PULL OR PUT A STRAIN ON THE COMPONENTS PROTRUDING FROM THE MACHINE (OPERATING ELEMENTS, BUTTONS, SWITCHES, CRANK, POWER SUPPLY SCREW FITTING, GAS SUPPLY SCREW FITTING ETC.). MAKE SURE THAT THESE COMPONENTS ARE PROTECTED TO PREVENT DAMAGE DURING MANIPULATION AND INSTALLATION OF THE MACHINE. The consumer must observe the instructions of the producer concerning transport, manipulation and storage of the products when providing the shipment. The producer is not liable for any potential damages to the machine during transport in this case. The ambient temperature for transport and storage must not exceed -25°C and +55°C. The relative humidity during transport and storage must not exceed 50%. The product must be protected from mechanical damages and weather effects when stored in an open area. If possible, leave the machine in the transport packaging or at least on a wooden transport pallet until the final installation of the machine in the structural foundation in the laundry room. The installation method is described in chapter 3, “INSTALLATION”. 2.3. SYMBOLS ON THE MACHINE The main switch (OPL version: on the front left side) is also used as the emergency stop button. In case of emergency, turn to the “off” position. Warning, dangerous voltage, electric appliance. Hot surfaces. Do not touch the labelled areas after the machine has been heated. Risk of contact with the moving parts of the machine. Do not touch the labelled areas when manipulating the linen. Instruction label for inserting linen. Information about incorrect and correct insertion of linen into the ironer. If you frequently iron pieces of linen that are narrower than the inserting width of the machine, we recommend every five minutes to skip the centre of the ironing cylinder a few times and alternate between the right and left edge of the insert table. This will cool down the ironing cylinder edges overheated by the ironed linen. 10 ORIGINAL INSTALLATION AND USER'S MANUAL 545098_G_Pub_date_2_Jan_2014.doc 2.4. LOCATION OF THE SERIAL LABEL ON THE MACHINE P_545092_01 Picture 2.4. The machine serial label (picture 2.4., note 1) (the gas version includes data, adjustment and type of gas) is located on the back left side. o The picture shows the COIN or CPS version with the main switch on the rear panel. The main switch of the OPL version is located on the front left side. 545098_G_Pub_date_2_Jan_2014.doc ORIGINAL INSTALLATION AND USER'S MANUAL 11 2.4.1. SERIAL LABEL OF THE MACHINE FOR GAS HEATING Picture 2.4.1 POSITION DESCRIPTION POSITION DESCRIPTION A Model P Gas pressure (mbar) B Producer logo + address Q Production year C Approval R Gas consumption (m³/h or kg/h) D Serial number S Motor output (kW) E Phase T Total input power (kW) F Voltage (V) U "Country" in customer language G Frequency (Hz) V "Category" in customer language H Fuse (A) W "Gas" in customer language I Heat input power (kW) X "Pressure" in customer language J Country Y Heat input power K "Total" in customer language Z Gas consumption L Code of drawing 1 "Type" in customer language M Category 2 IP – execution of internal protection N Gas type 3 Code of gas set O Appliance design type 4 Product identification number Table 2.4.1 12 ORIGINAL INSTALLATION AND USER'S MANUAL 545098_G_Pub_date_2_Jan_2014.doc 3. INSTALLATION 3.1. PARAMETERS WHEN THE MACHINE IS PACKED – TRANSPORT P_545092_02 Picture 3.1. DIMENSION MODEL A (mm / inch) 160 B (mm / inch) 200 160 200 Machine + pallet 2190 / 86.22 2610 / 102.76 1260 / 49.61 with the box (max.) Table 3.1.A C (mm / inch) 160 200 800 / 31.50 WEIGHT FOR TRANSPORT PURPOSES HEATING E (kg / lb) G (kg / lb) MODEL 160 200 160 200 Machine + pallet with the box (max.) 485 / 1070 560 / 1235 465 / 1026 540 / 1191 Table 3.1.B The total requirements for the space for system installation may only be usually determined through the project based on the detail plans of the object. All passages and gaps through which the machine has to be transported during installation must have sufficient dimensions that comply with the dimensions of the packed machine, see table 3.1.A. All operations must be executed by a manipulation specialist. The packed machine may be transported with the use of the skids from a fork-lift truck or a manual pallet jack, picture 3.1. For weight information see table 3.1.B. The skids have to be inserted into the centre of the pallet if transporting from the front side (F), see picture 3.1. Alternatively, the machine can be packed in an enclosed wooden heat-treated crate. 545098_G_Pub_date_2_Jan_2014.doc ORIGINAL INSTALLATION AND USER'S MANUAL 13 3.2. PARAMETERS WHEN THE MACHINE IS UNPACKED – TRANSPORT 3.2.1. MACHINE ON THE PALLET – TRANSPORT P_545092_04 Picture 3.2.1 DIMENSION MODEL Machine + pallet A (mm / inch) 160 200 B (mm / inch) 160 200 2185 / 86.02 2600 / 102.36 1220 / 48.03 Table 3.2.1.A C (mm / inch) 160 200 755 / 29.72 WEIGHT FOR TRANSPORT PURPOSES HEATING E (kg / lb) G (kg / lb) MODEL 160 200 160 200 Machine + pallet (max.) 470 / 1037 535 / 1180 445 / 982 510 / 1125 Table 3.2.1.B The total requirements of the installation space may only be determined on the basis of the detailed plans of the building. All passages and gaps through which the machine has to be transported during installation should be large enough to encompass the dimensions of the packed machine, see table 3.2.1.A. All operations must be executed by a manipulation specialist. The packed machine may be transported with the use of the skids from a fork-lift truck or a manual pallet jack, picture 3.2.1. For weight information see table 3.2.1.B. The skids have to be inserted into the centre of the pallet if transporting from the front side (F), see picture 3.2.1. 14 ORIGINAL INSTALLATION AND USER'S MANUAL 545098_G_Pub_date_2_Jan_2014.doc 3.2.2. DISMANTLING THE MACHINE FROM THE PALLET P_545092_06 Picture 3.2.2.A Picture 3.2.2.A – to dismantle the machine from the pallet, you have to disassemble the fixation console (1) from both side of the machine and put the supporting legs (2)-4x into the basic transport position. o Disassemble the anchoring bolts (3)-4x, release the safety nuts (4)-4x and remove the fixation console (1)-2x. o Put the supporting legs (2)-4x into the basic transport position so that the height between the bottom surface of the supports (5) and the bottom surface of the supporting legs (2) is about 80mm, or corresponding to the height of the fork-lift truck skids. o Tighten the safety nuts (4)-4x and fix the position of the supporting legs (2)-4x at the same time. P_545092_07 Picture 3.2.2.B Picture 3.2.2.B – you can use a fork-lift truck inserted from the front side (F) under both main supporters at the centre of the machine, between the stands, to take off the ironer from the pallet. This operation must be executed by a manipulation specialist. Position the machine to the required place in accordance with the installation conditions. o See chapter 3.4. 545098_G_Pub_date_2_Jan_2014.doc ORIGINAL INSTALLATION AND USER'S MANUAL 15 ! WARNING WHEN TRANSPORTING THE IRONER ON SKIDS, BE EXTRA CAREFUL AS THE MACHINE MIGHT SLIDE OFF. THE SUPPORTS OF THE IRONER AND THE SKIDS ARE STEEL, SMOOTH AND THUS THEY HAVE A LOW FRICTION COEFFICIENT. 3.2.3. MOVING THE IRONER ON THE GROUND Since the pedestal of the machine is a solid unit, you may also use rollers, sliding bars or a truck to move the machine on the ground in addition to the fork-lift truck. The external dimensions of the machine are shown in table 4.1.A, chapter 4.1. WEIGHT FOR TRANSPORT PURPOSES HEATING E (kg / lb) G (kg / lb) MODEL 160 200 160 200 Machine + pallet (max.) 435 / 959 490 / 1081 410 / 904 465 / 1026 Table 3.2.3 16 ORIGINAL INSTALLATION AND USER'S MANUAL 545098_G_Pub_date_2_Jan_2014.doc 3.3. INSTALLATION REQUIREMENTS 3.3.1. WORKING CONDITIONS OF THE MACHINE Ambient temperature: +15°C to +40°C; the average ambient temperature must not exceed +35°C for a period of 24 hours. Altitude: up to 1,000m. Relative humidity: from 30% to 70% without condensation. The machine is not designed for an environment where it may be directly hit with splashing water. Do not store and install the machine at places where it would be exposed to weather effects or excessive humidity. In case of moisture condensation on the machine, the water must not run down the walls and covers of the machine or cover the floor. The producer is not liable for corrosion of the machine caused by failure to establish the specified ventilation in the room (e.g. vapours, aggressive chemical elements or cleaning process). ! WARNING DISSOLVENTS FUMES FROM DRY-CLEANING MACHINES CREATE ACIDS IN CONTACT WITH HOT SURFACES. THESE ACIDS ARE CAUSTIC AND CAUSE CORROSION. MAKE SURE THAT THE AIR IN THE ROOM WHERE THE IRONER IS USED IS FREE FROM SUCH FUMES. If there are several machines and/or boilers in the same room with forced ventilation or conventional ventilation, the total cross-section of the outwards opening must be at least the sum of the cross-sections for each machine. In order to prevent draught, do not place the machine with conventional ventilation between machines with forced exhaust and ventilation openings. 545098_G_Pub_date_2_Jan_2014.doc ORIGINAL INSTALLATION AND USER'S MANUAL 17 3.3.2. SPACING REQUIREMENTS ! WARNING FAILURE TO OBSERVE THE REQUIRED DIMENSIONS AND SPACING OF THE MACHINE FROM THE WALLS MAY IMPEDE OR PREVENT SERVICE MAINTENANCE OF THE MACHINE. P_545092_08 Picture 3.3.2 DIMENSION MODEL A (mm / inch) 160 Optimum 200 160 C (mm / inch) 200 1200 / 47.24 Minimum Optimum B (mm / inch) 160 200 600 / 23.62 (1) 1500 / 59.05 1900 / 74.80 (2) - - 800 / 31.49 Table 3.3.2 600 / 23.62 - 200 / 7.87 Table 3.3.2. – required dimension parameters related to picture 3.3.2 o Optimum (1) is the optimum dimension for maintenance and service. o Optimum (2) is the dimension that must be observed if the machine may be moved forward for maintenance and service so that dimension C increases when the machine is moved. 18 ORIGINAL INSTALLATION AND USER'S MANUAL 545098_G_Pub_date_2_Jan_2014.doc 3.4. LEVELLING THE MACHINE ON THE FLOOR ! WARNING THE MACHINE MUST BE PLACED ON A FLAT, SMOOTH AND DUST-FREE SURFACE WITH DOWNSLOPE BELOW 0.5%. P_545092_09 Picture 3.4.A Picture 3.4.A – checking the lengthwise and crosswise horizontal position of the machine with water level. o The machine is levelled by adjusting the supporting legs (2)-4x, picture 3.4.B. o Release the safety nuts (4) and turn the supporting legs in the required direction, if needed (tighten = the machine goes down at the place of the leg) to put the machine in the position shown in picture 3.4.A. o Tighten the safety nuts (4) at fix the position of the supporting leg (2) at the same time. P_545092_10 Picture 3.4.B It is possible that the front supporting legs will have to be adjusted again after the test run to eliminate the potential axial movement of the ironing cylinder. o See chapter 3.8. 545098_G_Pub_date_2_Jan_2014.doc ORIGINAL INSTALLATION AND USER'S MANUAL 19 3.5. CONNECTION TO THE STEAM EXHAUST ! WARNING THE MACHINE MUST BE CONNECTED TO THE EXHAUST LINE IN COMPLIANCE WITH ALL VALID STANDARDS AND REGULATIONS AND IT MUST BE LOCATED IN A WELL-VENTILATED ROOM. The machines are delivered in two steam exhaust versions: o A – steam exhaust backwards: picture 3.5.A o B – steam exhaust to the right side: picture 3.5.B o The dimension and other parameters that concern the installation of the exhaust system are shown in the pictures above and table 3.5. If the machine version does not correspond with your requirements for the output pipeline, version A can be rebuilt into version B or version B into version A. o The change of exhaust version from one to the other is described in chapter 3.9. o The machine may only be rebuilt by an authorized service organization with a relevant permit from the producer. HEATING E MODEL D m1 Pz m2 P2 max T2 mm / inch maximum flow without the loss of pressure m³/h permitted loss of pressure on the exhaust side (Pa) (1) flow at the maximum permitted loss of pressure on the exhaust side Pz max m³/h maximum pressure at zero flow maximum steam exhaust temperature °C / °F G 160 200 160 200 978 / 38.50 1186 / 46.69 978 / 38.50 1186 / 46.69 605 650 650 700 130 - 150 (2) 150 - 180 (3) 130 - 170 425 450 480 500 320 60 / 140 Table 3.5 85 / 185 Table 3.5. – Table with parameters to pictures 3.5.A and 3.5.B o (1) – static pressure measured at P. o The output chimney on the machine has an external diameter of D 150mm / 5.9“, the connecting pipe must have an internal diameter d 150 mm. o (2) – valid for the 50 Hz version, see chapter 3.7.2. o (3) – valid for the 60 Hz version, see chapter 3.7.2. The steam exhaust must be led separately from any other piping and it must be installed according to picture 3.5.A or 3.5.B by the shortest way outside the building. The diameter of the piping must not be smaller than the output from the machine, i.e. 150mm / 5.9“. The permitted static pressure, Pz, within the range stated in table 3.5., must be measured at the measuring point, P; it represents the permitted resistance (loss of pressure) of the entire exhaust system. o If the required pressure loss Pz of the exhaust system is low, the ironer can be fitted with an additional exhaust flap valve (length 300 mm) with measuring point P, (code: 547192) – special accessories, supplied on request. o If the required pressure loss Pz of the exhaust system is high, the system must be fitted with an auxiliary exhaust fan. o See also chapter 3.7.2. Use galvanized sheet metal with smooth internal surface for the piping. Supply of fresh air which exceeds the consumption m1 specified in table 3.5 at least twice must be provided for the area where the ironer operates. o A supply of clean air necessary for burning must be provided in case of gas heating: 2 m³/h per 1 kW. 20 ORIGINAL INSTALLATION AND USER'S MANUAL 545098_G_Pub_date_2_Jan_2014.doc P_545092_11 Picture 3.5.A P_545092_12 Picture 3.5.B 545098_G_Pub_date_2_Jan_2014.doc ORIGINAL INSTALLATION AND USER'S MANUAL 21 3.5.1. INSTALLATION OF SEVERAL IRONERS P_545092_13 Picture 3.5.1 Picture 3.5.1 – joint exhaust system for several ironers If several ironers are installed for one joint exhaust pipeline, the pipeline has to be executed in such a way so that each machine works with the same (the lowest, if possible) value of air resistance. NUMBER OF IRONERS Minimum clearance - di (mm) 1 2 3 4 5 150 220 280 350 400 Table 3.5.1 Table 3.5.1 – Table with dimension parameters to picture 3.5.1 ! WARNING CHECK FOR LEAKAGE BETWEEN THE INDIVIUDAL JOINTS OF THE EXHAUST SYSTEM. 22 ORIGINAL INSTALLATION AND USER'S MANUAL 545098_G_Pub_date_2_Jan_2014.doc 3.6. ELECTRIC CONNECTION ! WARNING THE MACHINE MUST BE CONNECTED TO THE POWER SUPPLY, EARTHING, VENTILATION OR GAS SUPPLY ACCORDING TO THE INSTALLATION MANUAL PURSUANT TO THE LOCAL STANDARDS AND THE CONNECTION MUST BE EXECUTED BY QUALIFIED PERSONS WITH A RELEVANT VALID PERMIT. THE REGULATIONS VALID FOR THE CONNECTION TO THE LOCAL ELECTRICAL SUPPLY SYSTEM (TT / TN / IT ETC.) MUST BE OBSERVED. CONNECTION OF THE MACHINE WITHOUT RESIDUAL CURRENT DEVICE IN THE LAUNDRY ROOM The machine is designed for the connection to electric distribution network according to the specifications in the order. It is connected to four-conductor (TN-C) and five-conductor (TN-S) three-phase electric distribution networks with a voltage of 380-415V 50/60Hz and 208-240V/50-60Hz. There is a one-phase version for gas heated machines for systems of 208-240V/50-60Hz. The connection to individual electrical supply system is shown in picture 3.6.A. If the machine is not equipped with the main switch, all electric feeds from the power supply must be equipped with a disconnecting device according to standard EN 60204-1, chapter 5.3. Picture 3.6.A Picture 3.6.A – connection of the machine to TN-C and TN-S electrical supply system without the residual current device o 1 – Phase conductor o 2 – Protection conductor o 3 – Fusing of power supply o 4 – Machine o 5 – Laundry electrical switchboard o 6 – Main switch = inlet terminal Before you connect the machine, check that the voltage and frequency values on the serial label of the machine correspond with your network; see picture 2.4. Make sure that the supply voltage is always and under any circumstances within the range of the limits stated in table 4.2. 545098_G_Pub_date_2_Jan_2014.doc ORIGINAL INSTALLATION AND USER'S MANUAL 23 If there are large distances in your electric installation, you will probably have to use cables with larger crosssections to reduce any voltage loss. If the machine is connected to the network near a high-performance transformer (500 kVA and more within the distance of up to 10m) or near a capacitive phase shift compensator, it is necessary to connect an induction step-back relay into the supply feed otherwise the frequency convertor may be damaged. Contact your seller for more information. CONNECTION OF THE MACHINE WITH RESIDUAL CURRENT DEVICE IN THE LAUNDRY ROOM We recommend installing a residual current device in the laundry room in order to increase the safety of operators or service workers during maintenance and work on the electric devices of the machine. The main contacts of the protector must correspond with the specified input of the machine. The connection of the residual current device and connection of the machine to such an electrical supply system is shown in picture 3.6.B. Picture 3.6.B 24 ORIGINAL INSTALLATION AND USER'S MANUAL 545098_G_Pub_date_2_Jan_2014.doc Picture 3.6.B. – connection of the machine to TN-C and TN-S electrical supply system with the residual current device o 1 – Phase conductor o 2 – Protection conductor o 3 – Protection of the feed o 4 – Machine o 5 – Laundry electrical switchboard o 6 – Main switch = inlet terminal o 7 – Residual current device – see table 3.6.A ! WARNING IF THE EN 60519 STANDARD MUST BE OBSERVED AT THE PLACE OF INSTALLATION, THE OPERATION OF THE MACHINE MUST BE PROTECTED WITH A PRELIMINARY RESIDUAL CURRENT DEVICE. HEATING E MODEL Voltage Heating power G 160 (V) 400 (kW) Maximum current (A) Residual current device, minimum rated current (A) 200 230 400 24.3 160 230 27.9 200 400 / 230, 3 (1) AC - 38 65 43 75 6 63 80 63 Table 3.6.A 80 10 Table 3.6.A – residual current devices RESIDUAL CURRENT DEVICE (RCD) In some countries, RCD is known as “earth leakage trip” or “Ground Fault Circuit Interrupter” (GFCI) or “Appliance Leakage Current Interrupter” (ALCI) or “earth (ground) leakage current breaker” Specifications: o Actuating current: 100mA (if not available/permitted, use 30mA current, preferably a selective type with a time lag. o Do not install more than two machines per 1 RCD (only 1 machine in case of 30mA). o Type B. There are components inside the machine that use DC voltage and thus “Type B” RCD is required. (Type B has a better output than Type A and Type A is better than Type AC). o Always install RCD if permitted at the place of installation. RCD might not be permitted (see also IEC 60364) in some earthing systems (IT, TN-C etc.). o The control circuits of the machines are usually equipped with an isolating transformer. Thus RCD might fail to report errors in the control circuits (the fuse/fuses of the isolating transformer may detect such an error). ! WARNING PROTECTIVE EARTHING: THE EARTHING WILL REDUCE THE RISK OF ELECTRIC CURRENT ACCIDENTS IN CASE OF FAILURE, MALFUNCTION OR CURRENT LEAKAGE AND IT WILL SERVE AS A MEANS OF PROTECTION BY PROVIDING MINIMUM RESISTANCE TO THE ELECTRIC CURRENT. THUS IT IS VERY IMPORTANT AND IT IS THE RESPONBILITY OF THE PERSON WHO EXECUTES THE INSTALLATION TO PROVIDE A CORRESPONDING EARTHING OF THE MACHINE AT THE PLACE OF INSTALLATION. ALL GOVERNMENT STANDARDS, LOCAL STANDARDS AND REQUIREMENTS MUST BE OBSERVED. 545098_G_Pub_date_2_Jan_2014.doc ORIGINAL INSTALLATION AND USER'S MANUAL 25 SUPPLY CONDUCTORS AND PROTECTION The supply conductors or cords that connect the machine to the electrical supply system must have copper core conductors. The cross-section of the supply conductors depends on the method of heating and on the overall electric input of the machine. The short circuit or overload protection of the supply cable must be ensured by circuit breakers or fuses in the distributor of the laundry room. o The recommended fuse values for the supply protection for the individual machine versions are shown in table 3.6.B. HEATING E MODEL G 160 Voltage (V) Heating power 380 - 415 (kW) Supply protection (A) 200 208 - 240 380 - 415 24.3 50 160 208 - 240 200 380 - 415 / 208 - 240 27.9 80 Table 3.6.B 50 80 10 The recommended cross-sections of the supply conductors are shown in table 3.6.C. Supply protection (US) Circuit breaker (A) Fuses (A) Min. cross-section of phase conductors (mm²) (AWG) Min. cross-section of the protective conductor (mm²) (AWG) 16 (15) 10 (10) 1.5 (AWG 15) 1.5 (AWG 15) 20 (20) 16 (15) 2.5 (AWG 13) 2.5 (AWG 13) 25 (-) 20 (20) 4 (AWG 11) 4 (AWG 11) 40 (40) 32 (30) 6 (AWG 9) 6 (AWG 9) 63 (-) 50 (50) 10 (AWG 7) 10 (AWG 7) 80 63 16 16 Table 3.6.C CABLE PREPARATION ! WARNING THE MACHINE IS DESIGNED ONLY FOR A FIXED FEED POWER SUPPLY! Use a cable or cord with copper conductors for the connection. Adjust the ends of the conductors as shown in picture 3.6.C. Always leave the green-yellow conductor (protective) a bit longer so that it is disconnected as the last one in case the cable is pulled out accidentally. If using a cable (solid copper conductors), strip the insulation of individual cores only to such a length so that the stripped parts do not protrude from the terminal after the conductor has been connected to the machine (8 – dimension “X”). When using a cord (stranded copper conductors), you can strip the insulation of the individual cores in the same way as in the cable or you can use pressing ferrules (7). If so, you must use ferrules with insulated necks so that contact with the live part is prevented after the connection of the conductor. 26 ORIGINAL INSTALLATION AND USER'S MANUAL 545098_G_Pub_date_2_Jan_2014.doc 1. Green – yellow – protective conductor 2. Black – phase conductor 3. Brown – phase conductor (three-phase version) 4. Blue – neutral conductor (one-phase version) 5. Black – phase conductor (three-phase version) 6. Blue – neutral conductor (three-phase version, valid for gas heating). 7. The neck of the pressing ferrule must be insulated so that contact with the live part (conductor) is prevented when the main switch is off. P_545092_19 8. Strip the insulation of the supply cable conductors so that the stripped parts do not protrude from the main switch clamp (supply terminal). Picture 3.6.C TAUTNESS OF THE SUPPLY CABLE You can bring the cable to the machine in two ways: o From the cable channel (from below) o From the cable grid (from above) If you bring the cable from above, you should prevent the cable from slacking in front of the cable bushing inlet; see picture 3.6.D. This will protect the bushing or the machine from condensed water running down. MECHANICAL PROTECTION OF THE CABLE When you run the cable through the bushing (2), tighten the bushing sealing nut. This will compress the rubber ring in the bushing that mechanically protects the cable and also serves as sealing against water. If the mechanical protection is not sufficient, use a safety cleat (3). POINT OF CONNECTION The point of connection of the supply cable is on the main switch of the machine (1). The phase terminals are marked as U, V and W. Connect the protective conductor directly to the earthing terminal located on the inner left side of the machine. The terminal is marked as PE. 1. Main switch 2. Bushing 3. Cleat 4. External earthing terminal 5. Internal earthing terminal P_545092_20 Picture 3.6.D. 545098_G_Pub_date_2_Jan_2014.doc ORIGINAL INSTALLATION AND USER'S MANUAL 27 PROTECTIVE CONNECTION OF MACHINES For security reasons, the machine has to be connected to the protective connection of the laundry room. For this purpose, use the external earthing terminal of the machine (4) in picture 3.6.E, located on the back bottom left side of the machine. The protective conductor for this connection is not included in the delivery of the machine. The cross-section of the protective conductor must correspond with the values in table 3.6.C. If the cross-section of the supply cable is smaller than 2.5mm², we recommend selecting a conductor with the minimum cross-section of 4 mm² for the protective connection. The protective connection also eliminates the adverse effects of static electricity on the machine operation. P_545092_21 Picture 3.6.E Picture 3.6.E – protective connection of the machines o 1. Machine, rear view o 2. Protective connection of the laundry room o 3. External earthing terminal of the machine o 4. Protective conductor, connection of the machines 28 ORIGINAL INSTALLATION AND USER'S MANUAL 545098_G_Pub_date_2_Jan_2014.doc 3.7. GAS HEATING (ONLY APPLICABLE TO MACHINES WITH GAS HEATING) ! WARNING! IT IS MANDATORY THAT THE INSTALLATION OR REPAIRS OF THE GAS SYSTEM IS DONE BY AN AUTHORISED COMPANY ONLY. ALL USED MATERIALS (REDUCTION VALVE, MANUAL VALVE, INCOMING PIPING ETC.) AND THE GAS INSTALLATION OF THE MACHINE MUST BE IN COMPLIANCE WITH STANDARDS VALID IN THE COUNTRY IN WHICH THE MACHINE IS USED. Each machine is specified for use with the type of gas which is stated on its rating plate / serial label only (chapter 2.4.). Never use different type of gas or different working connecting pressure of gas from what is stated on the rating plate / serial label (chapter 2.4.). Generally speaking, it is forbidden to install the gas heated machines into cellars or into rooms that have insufficient air ventilation - see (chapter 3.5.) (in such cases consult the company that provides the gas). The machine must be installed in compliance with standards valid in the particular country. In order to increase safety of the gas equipment, it is important to install gas leak detector near the equipment. It is mandatory to place a dry-powder extinguisher inside the room. The extinguisher must be located at a visible place and its size must be of min. 12 kg! 3.7.1. GAS CONNECTION - INSTALLATION The installing company must carry out the connection of the machine to the gas system according to the laundry room design. The machine is factory set according to the type of gas stated in the purchase order. For possible options please refer to the tab. 3.7.1. o The table shows basic overview. The manufacturer reserves the right to changes. HEATING APPLIANCE CATEGORY G GAS TYPE GAS CONNECTING PRESSURE EN 437:2003+A1:2009 I 1a I 2E, I 2H I 2H I 2L I 2LL I 2S I 2E+ I 3+ I 3B/P I 3B/P I 3P I 3P mbar G110 8 G20 20 G20 25 G25 20, 25 G25 20 G25.1 25 G20 + G25 20 / 25 G30 + G31 28 - 30 / 37 G30 - G31 50 G30 - G31 28 - 30, 37 G31 50 G31 37 tab. 3.7.1. – basic types of appliance categories The rating plate states the appliance category (in compliance with EN 437:2003+A1:2009) even in cases that the appliance is installed in a country that does not require CE certification. The opening for gas connection is located in the rear wall of the left stand. See (picture 4.1), table 4.2. 545098_G_Pub_date_2_Jan_2014.doc ORIGINAL INSTALLATION AND USER'S MANUAL 29 Before the assembly or disassembly of the external connection pipe onto / from the opening for gas connection G ¾“, the left side cover must be removed first (see chapter 3.8). During this assembly / disassembly, the outgoing pipe (pos. 5, fig. 3.7.3.A) must be secured so that its inadvertent turning is prevented. Such undesirable turning of the pipe might lead to leak in the gas system or damage of the gas valve components! The opening for gas connection is designed only for use with external connecting pipe with a cap nut G ¾“ fitted with gasket that is resistant to the used gases. In order to assure correct working pressure, install near each machine an external gas pressure reducing valve-regulator the function of which is to adjust the pressure inside the piping to the specified operating pressure (the valve is not supplied with the machine). o Installation of the reduction valve is necessary in case that the gas connection pressure exceeds the permitted value. o The gas connecting operating pressure stated in the table 3.7.1., is the pressure of gas at open gas valve and stable burning of the gas burner. Install a manual gas valve on an easily accessible place in such distance that the length of the piping from the valve to the connecting point of the machine is lower than 2m (max.). Install a pressure gauge between the machine pressure reducing valve and the manual valve. The pressure gauge serves the purpose of inspecting the pressure value. The piping between the manual valve and the machine must be fixed and of sufficient gas flow necessary for each machine. Make sure that the inside diameter of the incoming pipe connected to the machine is not smaller than ½“ (min. 12.7 mm) - which applies to the whole length of the pipe. The connections must always be fitted with a leak-proof sealing of a material that is resistant to the utilized gas. 3.7.2. CONNECTING TO AN EXHAUST SYSTEM - INSTALLATION FOR THE GAS HEATED MACHINES The rules stated in chapter 3.5., and table 3.5., are valid. In addition, for the gas heated machines the specified value of permitted loss of pressure on the side of the exhaust (pz) must be adhered to. o (2), (3) is a parameter that is valid for a cold run of the machine (measured and installed without the intervention of heating). – The whole gas heating system is set and type-approved at this permissive range of flue (exhaust) system resistance. At this range; the heating system shows optimal parameters as regards the gas consumption, performance, gas combustion emissions and operational safety. – If, after the installation and before the machine is started with heating for the first time, the loss of pressure is lower than the permitted value, then it is necessary to increase the flue (exhaust) system resistance (extend the length of the piping, install components with higher resistance, install a screen on the outlet of the flue piping etc.). – If, after the installation and before the machine is started with heating for the first time, the loss of pressure is higher than the permitted value, then it is necessary to decrease the flue (exhaust) system resistance (shorten the length of the piping, install components with lower resistance, install an auxiliary exhaust fan on the outlet of the flue piping etc.). The parameter pz is of a fundamental importance for the correct functionality of the gas heated machines: o In case that the flue (exhaust) system is outside the permissive pz range, a change of the machine emission and consumption parameters occur. It may lead to problems with ignition of the flame or, as a consequence of excessively high resistance of the flue (exhaust) system, the gas heating is altogether prevented through the actuation of the safety air-flow switch that automatically switches the heating system off – see chapter 5.9.2. – The Safety air-flow switch is activated (it shuts down the heating system) when the resistance on the exhaust side, measured at the P point – see chapter 3.5., picture 3.5.A., 3.5.B., exceeds the value of pz max ~ 180 / 200 Pa ( 50 / 60 Hz) at the operating temperature. 30 ORIGINAL INSTALLATION AND USER'S MANUAL 545098_G_Pub_date_2_Jan_2014.doc 3.7.3. OPERATING INSTRUCTIONS - FOR MACHINES WITH GAS HEATING The machine is fitted with a pressure gas burner. The burner needs permanent income of fresh air-through the grille situated in the side cover of the left stand. The minimum air flow necessary for gas heating is: For the length version 160: min. 36 m³/hour. For the length version 200: min. 46 m³/hour. Each individual type of gas and its respective gas operating connection pressure always has one exact setting of the throttle valve (2) and of the Venturi tube (1) and one data / parameter set of the ESYS control unit (3) – see picture 3.7.3.A. At the same time, each machine has the safety air-flow switch (4) set individually. This safety valve prevents the operation of the gas heating system in case that the resistance – max. loss of pressure on the exhaust side pz max see (tab.3.5.) exceeds the permitted limit, or if it is damaged – see chapter 5.9.2. It is prohibited to tamper with or modify in any way the setting or programming of the components – see also the Transition to other type of gas – chapter 3.7.4. Picture 3.7.3.A - gas heating In the right front face of the heater - (picture 3.7.3.B) - there is a lid for a short-term visual inspection of the flame. o After the right cover has been disassembled (picture 3.8.A) and the two screws HEX8 (2) have been loosened, the lid (1), picture 3.7.3.A., can be tilted. o It is prohibited to permanently operate the machine with the tilted lid!! It would change its emissions and efficiency in an essential manner. 545098_G_Pub_date_2_Jan_2014.doc ORIGINAL INSTALLATION AND USER'S MANUAL 31 o For the purposes of servicing and inspections; the ordinary lid can be replaced by a special technological lid with a probe for check measurements of gas combustion emissions. Picture 3.7.3.B - lid for visual inspection of the flame. In the rear wall of the right stand, there is an outlet of residual waste heat (1) - (picture 3.7.3.C). o Do not cover the outlet! - otherwise there is a risk of machine overheating. o Warning - hot air - the temperature of the outgoing air on the outlet may locally exceed 100°C. Danger of burning! Picture 3.7.3.C - outlet of the residual waste heat 32 ORIGINAL INSTALLATION AND USER'S MANUAL 545098_G_Pub_date_2_Jan_2014.doc 3.7.4. TRANSITION TO OTHER GAS TYPE ! WARNING! IT IS MANDATORY THAT THE INSTALLATION OR REPAIRS OF THE GAS SYSTEM IS DONE BY AN AUTHORISED COMPANY ONLY. ALL USED MATERIALS (REDUCTION VALVE, MANUAL VALVE, INCOMING PIPING ETC.) AND THE GAS INSTALLATION OF THE MACHINE MUST BE IN COMPLIANCE WITH STANDARDS VALID IN THE COUNTRY IN WHICH THE MACHINE IS USED. IT IS PROHIBITED TO CHANGE THE TYPE OF USED GAS UNLESS THIS GAS IS AUTHORISED BY THE MANUFACTURER AS SUITABLE FOR SUCH CONVERSION AND UNLESS THE CONVERSION IS DONE BY A COMPANY THAT IS AUTHORISED FOR THIS PURPOSE BY THE MANUFACTURER. THE CONVERSIONS TO ANY OTHER CATEGORIES, TYPES AND PRESSURES OF GAS THAN THOSE WHICH ARE SPECIFIED AND APPROVED OF BY THE MANUFACTURER OR CONVERSIONS CARRIED OUT BY PERSONS/COMPANIES THAT ARE NOT AUTHORISED TO DO SO BY THE MANUFACTURER ARE NOT ALLOWED AND IN SUCH CASES THE MANUFACTURER WAIVES ALL RESPONSIBILITY FOR POTENTIAL DAMAGES. The machine is approved as a Category 1 machine, i.e. the customer/user is not allowed to convert it to a different category. To convert a gas heated machine to a machine of a different category is generally possible by two methods (which both can be done by a person authorised by the manufacturer only): o The transition to a different gas is only possible within the approved categories (tab. 3.7.1.) by replacing the Venturi tube by a new, differently set and coded Venturi tube (1) and by the replacement of the ESYS control unit (3) by a new control unit which is coded and has different parameters. See (picture 3.7.3.A). This change must be accompanied by adding a new part to the existing rating plate / serial label of the machine. The new part must specify the new category of the gas appliance and type, pressure and consumption of gas. o The transition to a different gas is only possible within the approved categories (tab. 3.7.1.) - this can also be achieved by re-setting or rather replacement and new coding of the Venturi tube (1) a by reprogramming and new coding of the ESYS control unit (3) - see (picture 3.7.3.A). This change must be accompanied by adding a new part to the existing rating plate / serial label of the machine. The new part must specify the new category of the gas appliance and type, pressure and consumption of gas. This activity may only be carried out by a person that is authorised to do so by the manufacturer and has the following: – Special communication software ESYS, which allows reprogramming of the ESYS control unit. – Data files of the parameter sets of the individual gas heating versions. – Flue gas analyser necessary for setting the Venturi tube. – Set of original labels for recoding the components. For complete information including configuration data for gas version read instruction 545159. The manufacturer recommends carrying out the transition from one gas type to another by the first of the above described methods, i.e. by replacing the components. 545098_G_Pub_date_2_Jan_2014.doc ORIGINAL INSTALLATION AND USER'S MANUAL 33 3.8. PREPARATION OF THE MACHINE FOR OPERATION Before the actuation of the machine make sure that the machine has been installed (media supplies, steam exhaust, location of the machine, sufficient ventilation of the room etc.) according to the specified installation principles and pursuant to the standards valid in the relevant country. Remove the protective paper from the area between the ironing cylinder and ironing belts (as linen) before the first activation of the machine. Use the hand crank to remove the protective paper, see chapter 5.6. o Slowly turn the crank, see picture 5.6, so that the ironing cylinder turns. The protective paper will come out in the space above the output trough. Remove the entire sheet of the protective paper. Before the first activation of the ironer, manually run several pieces of dry linen through the machine. Impurities from the ironing cylinder may stick to the linen. The same recommendation applies to the first “hot” start of the machine. ! WARNING WHEN WORKING WITH COMBUSTIBLES, DO NOT USE OPEN FIRE, DO NOT SMOKE, DO NOT EAT AND VENTILATE THE ROOM! Remove both side covers before the actuation of the machine, see picture 3.8.A. P_545092_40 Picture 3.8.A Picture 3.8.A – removal of the side covers Gradually insert the spanner (IMBUS HEX 4) into the two openings in the upper part of the side covers so that it fits in the hidden screw inside the stand. Loosen each screw by about 3 threads. o First lift the cover in the direction of the arrows and then slide it out of the machine. Screw the hand crank on the pin as described in chapter 5.6, picture 5.6. Push the crank pin into the mesh (direction P) and screw the crank with the right thread on the pin thread until it is tightened. Turning the crank to the right drives the entire machine. Watch both pulleys of the axial control (1) of the ironing cylinder by slowly turning the crank, see picture 3.8.B. 34 ORIGINAL INSTALLATION AND USER'S MANUAL 545098_G_Pub_date_2_Jan_2014.doc P_545092_41 Picture 3.8.B Picture 3.8.B – supporting pulleys and front adjustable legs o If the ironing cylinder quickly moves to one side of the machine so that the bearing of the supporting pulley (1) starts turning, slowly execute (1/4 thread) a correction by the front adjustable leg: – loosen = unscrew = turn left = lift the supporting leg on the side of the machine where the ironing cylinder touches the bearing of the supporting pulley or: – tighten = screw = turn right = lower the supporting leg on the other side of the machine than the side where the ironing cylinder touches the bearing of the supporting pulley. The machine can be fitted (based on request - special accessories) by a set for fixing it to the floor. (Code of the set: 549405). Installation and adjustment of the adjustable feet is obvious from the drawing that is supplied with the set. When you find a neutral position of the ironing cylinder by adjusting the position of the front supporting legs (i.e. the ironing cylinder is not touching the bearing of the supporting pulley), secure the position of the front supporting legs by the nut (2). With highest caution and with the side covers removed (without touching the internal parts of the machine) and to verify the function for a necessary period of time during the mode without heating, turn on the machine and: o Check visually, or by listening, that the machine is running without any obvious defects. Put the covers back in a reverse way. 545098_G_Pub_date_2_Jan_2014.doc ORIGINAL INSTALLATION AND USER'S MANUAL 35 3.9. REBUILD OF THE STEAM EXHAUST OUTLET The machines are supplied in two versions as far as the steam exhaust system is concerned – picture 3.9 , chapter 3.5. o A – steam exhaust backwards: picture 3.9. – version A and 3.5.A. o B – steam exhaust to the right: picture 3.9. – version B and 3.5.B. o The dimensions and other parameters related to installation of the exhaust system are described in chapter 3.5. In case that the version of machine does not meet your requirements as far as the outlet pipeline is concerned, it is possible to rebuild the machine from version A into version B or vice versa. o Change of the guide screen (2) position o Interchange of the screw plugs positions (5), (6) – 2 pcs o Interchange of the components (3) and (4) B A Picture 3.9. This rebuild can only be carried out by authorized servicing organisation with respective manufacturer's authorisation. 36 ORIGINAL INSTALLATION AND USER'S MANUAL 545098_G_Pub_date_2_Jan_2014.doc 4. TECHNICAL PARAMETERS 4.1. EXTERNAL DIMENSIONS OF THE MACHINE Picture 4.1 Picture 4.1 – external dimensions of the machine: 545098_G_Pub_date_2_Jan_2014.doc ORIGINAL INSTALLATION AND USER'S MANUAL 37 HEATING E G MODEL 160 200 160 200 A 2084 2500 2084 2500 B 1664 2080 1664 2080 D 978 1186 978 1186 (1) STEAM EXHAUST BACKWARDS (2) STEAM EXHAUST TO THE RIGHT SIDE BASIC ADJUSTMENT / MAY BE CHANGED Table 4.1 Table 4.1 – external dimensions of the machine. (3) 4.2. TECHNICAL PARAMETERS HEATING E MODEL Ironing cylinder diameter G 160 200 mm / inch Ironing speed 160 200 320 m / min 1.0 - 6.0 (1.0, 2.0, 2.5, 3.0, 3.5, 4.0, 5.0, 6.0) 380 -415V 3AC + N 50/60 Hz 208 - 240V 3AC 50/60 Hz Electrical supply system 380 - 415/440V 3AC ( - N) 50/60 Hz - 208 - 240V 1AC 50/60 Hz Motor output kW 0.18 Fan power kW 0.095 / 0.125 (50 / 60 Hz) Other output kW Heating power (1) kW 24.3 27.9 Heating power (1) (2) Total installed electric input Maximum air flow without the pressure loss (3) Capacity of the ironer (4) Power consumption (5) kW kW 24.7 28.3 m³/h kg/h kWh 605 62 21.4 650 70 27.3 Gas connection Gas consumption (5) (6) Gas types Maximum gas pressure Noise level 0.08 0,17 25 0.5 30 0.5 650 58 700 72 - m³/h - 2,62 3,13 G20, G25, G30, G31, G110 mbar - 60 dB (A) G ¾” < 57 Execution of internal protection: Machine execution according CEN/TR 1749:2005 IP42 B22 (1) Maximum potential output (without regulation) (2) Qn(Hi) > valid for the basic gas G20, 20mbar (3) Including the air for the gas burner (4) ISO 9398-1 (5) Valid for 100% use according to ISO 9398-1 (capacity test) (6) Mn/Vn > valid for the basic gas G20, 20mbar Other technical parameters Tables 3.5, 3.6.A, 4.1 Table 4.2 Table 4.2. – technical parameters of the machine 38 ORIGINAL INSTALLATION AND USER'S MANUAL 545098_G_Pub_date_2_Jan_2014.doc 5. OPERATING THE MACHINE The producer reserves the right to change the specifications stated in this manual at any time without prior notification. The details stated herein are for information only as it is not possible to include all the specific details concerning the machine. This manual is valid for machines with the following software version: 1.06 and above o The software version is displayed on the screen in the initial sequence after the machine has been switched by the main switch. ! WARNING INCORRECT USE OF THE CONTROL SYSTEM MAY LEAD TO AN INJURY, DAMAGE TO THE ELECTRONIC PARTS OR DAMAGE TO THE MACHINE. The machine is controlled by a set of the following function units: o Main switch – chapter 5.1. – OPL version: on the front left side with an integrated emergency stop button function – COIN or CPS version: on the back left side. o Control panel / keyboard – chapter 5.2, 5.3, 5.4. – OPL version: fully accessible, in the upper left part. – COIN version: partially accessible under a protective cover, in the upper left part, with a coin slot and lockable box for coins/tokens on the front left side. – CPS version: partially accessible under a protective ocver, in the upper left part. o Safety bar – chapter 5.5. o Hand crank – chapter 5.6. – OPL version: on the right side, not removable. – COIN or CPS version: on the right side, removable. o Pedal of insert table stop / start system (special accessories) – chapter 5.7. o OCS – automatic autonomous system of checking overheating of the ironing cylinder's edges (special accessories) – chapter .5.8. 5.1. MAIN SWITCH Information about the main switch is also included in the following chapters: 1.3, 2.1, 2.3, 2.4, 4.1 and 5. Turn the main switch to the “ON” position – the display is lit. When the machine is turned on by the main switch, data about the software version, type of heating and inserting width appear on the display successively. o OPL version: the information about the preset speed and preset temperature is also displayed. The information about the preset speed and temperature remains active. o COIN version, CPS version: a flashing zero is displayed (no ironing time has been prepaid). When communicating with the dealer of producer, always provide information about the software version, serial number and model of the machine. 5.2. CONTROL PANEL / KEYBOARD - CONTROL The entire control unit has four levels of control with different authorization to modify the operating parameters. o Level 1 – initialization – factory configuration: Contains information with the software version number. All parameters necessary for controlling the ironer are set in the factory configuration. It is set in the production plant and its knowledge or potential modification is not substantial for the operators and thus this manual does not include it. Only trained staff may interfere with the initialization configuration and this can only be done in case of installation of a new programming panel, (see programming instructions 545088). o Level 2 – configuration – user configuration: Allows modification of some preset parameters directly by the keyboard, see chapter 5.3. o Level 3 – user, specifically for: – OPL version, see chapter 5.2.1 – COIN version, CPS version, see chapter 5.2.2 o Level 4 – customer COIN or CPS version, see chapter 5.2.2. 545098_G_Pub_date_2_Jan_2014.doc ORIGINAL INSTALLATION AND USER'S MANUAL 39 5.2.1. OPL CONTROL The user can access all the controlling and information buttons of the keyboard in the OPL version, shown in picture 5.2.1. There are 6 hidden, “dead” keys without any user functions on the right bottom side of the keyboard. 2 1 4 7 3 6 8 5 9 11 10 Picture 5.2.1 Picture 5.2.1 – keyboard, picture and description of the OPL version functions 1 – START button o Used for the actuation of the machine; activates all the machine systems o Used as a restart button after the confirmation of an error report by 10 (only in cases when the error report is accompanied with interruption of the machine operation, such as error message E6). 2 – START button LED light When the machine is turned on by the main switch, it has three operating modes: o Off – the machine is not running or it is in the mode of automatic cooling Or an error report is flashing on the display (deactivate by pressing 10). Or the machine is stopped by pressing the finger protection bar o Flashing – the machine is running and the heating system is active. The ironing cylinder is being heated to the set temperature o On – the machine is running and the ironing cylinder is heated at the set temperature 3 – TEMPERATURE button Used for displaying the preset temperature – indicated by the lit LED light 4. 40 ORIGINAL INSTALLATION AND USER'S MANUAL 545098_G_Pub_date_2_Jan_2014.doc 4 – TEMPERATURE button LED light o If on, the display shows the information about the set temperature followed by a period. OPL version: you can increase 8 or decrease 9 the required ironing temperature in the range of 0°C 180°C in steps of 5°C. The temperature is always automatically preset to 0 °C when the machine is turned on. The settings can be changed in the user configuration, see chapter 5.3. 5 – SPEED button o Used for displaying the preset speed – indicated by the lit LED light 6. 6 – SPEED button LED light o If lit, the display shows the information about the set speed OPL version: you can increase 8 or decrease 9 the required ironing speed in the range of 0 - 6 m/min in eight frequency steps: (1.0, 2.0, 2.5, 3.0, 3.5, 4.0, 5.0, 6.0 m/min). The speed is always automatically preset to 3.0 m/min when the machine is turned on. The settings can be changed in the user configuration, see chapter 5.3. 7 – multifunctional DISPLAY o In addition to the automatically displayed information after turning on the main switch, see chapter 5.1, and to the information displayed for the user configuration, see chapter 5.3, the following is displayed: o Set temperature when 4 LED light is on o o Set speed when 6 LED light is on Error report, see chapter 5.9. 8 – “+” button o Increases the values when 4 or 6 LED light is on 9 – “-“ button o o Decreases the values when 4 or 6 LED light is on Activation of the user configuration, see chapter 5.3. 10 – STOP button o Used for stopping the machine, activating the automatic end of ironing (automatic cooling) When you activate the 10 button, the heating system turns off but all the other systems continue working. It is possible to continue ironing. The system will automatically stop the machine when the ironing cylinder cools down below the temperature of 80°C. The system of automatic termination of ironing can be turned off by pressing 1. The system then works in the standard heating mode. o Used for confirming / deleting a potential error report and stops the sound alarm. 11 – STOP button LED light If the machine is turned on by the main switch, it has three operating modes: o Off – the machine is running o Flashing – the machine is running in the mode of automatic cooling (after pressing 10) o On – the machine is not running and the ironing cylinder temperature is below 80°C. 545098_G_Pub_date_2_Jan_2014.doc ORIGINAL INSTALLATION AND USER'S MANUAL 41 5.2.2. CONTROL OF THE COIN VERSION, CPS VERSION The COIN and CPS versions only allow users to access the controlling and information elements shown in picture 5.2.2. After removing the cover, the operator can access the keyboard 12, which is identical to the OPL version, picture 5.2.1, but the functions are different. The operator may not change the parameters of speed and temperature, both values are preset: o Speed – 3.0 m/min o Temperature – 140 °C The operator may change the following within the user configuration, see chapter 5.3: o Preset speed o Preset temperature o Time of ironing corresponding with the value of 1 coin and the minimum period of time that has to be paid for in order to run ironing. o Activate or deactivate the CSC parameter. There are 6 hidden, “dead” keys without any functions for the operator in the right bottom part. 2 1 7 12 11 10 Picture 5.2.2 Picture 5.2.2 – keyboard, picture and description of the COIN or CPS version functions: user version. 42 ORIGINAL INSTALLATION AND USER'S MANUAL 545098_G_Pub_date_2_Jan_2014.doc 1 – START button o Activates the machine when the minimum period of time has been paid for; activates all the machine systems o Used as a restart button after the confirmation of an error report by 10 (in cases when the machine stops with the error report) 2 – START button LED light o The same functions as described in chapter 5.2.1 + plus for COIN / CPS. o Flashing – the machine is heated up to the required temperature and it is waiting for the activation of the START button – 1. 7 – multifunctional DISPLAY o In addition to the automatically displayed information after turning on the main switch, see chapter 5.2, and to the information displayed for the user configuration, see chapter 5.3, the following is displayed: o Remaining prepaid time in minutes. The countdown is active when the decimal point in the displayed time is flashing o Error report, see chapter 5.9. 10 – STOP button o Used for stopping the machine, activating the automatic end of ironing (automatic cooling) When you activate the 10 button, the heating system turns off. – The countdown of the prepaid time is not interrupted. – The speed of the ironing cylinder is reduced to the minimum speed. – if the machine is not equipped with the stop / start system pedal – chap. 5.7., the belts of the insert table move at minimum speed. – if the machine is equipped with the stop / start system pedal – chap. 5.7., the belts of the insert table stop operating. – The system automatically stops the machine if the roller is cooled down below 80°C. – The system of automatic termination of ironing can be turned off by pressing 1. The system then works in the standard heating mode with heating and preset ironing speed. o Used for confirming / deleting a potential error report and stops the sound alarm for 30s. o For more information see chapter 5.4.4 and 5.4.5. 11 – LED indicator of the STOP button. o Identical functions as in the chapter 5.2.1. 545098_G_Pub_date_2_Jan_2014.doc ORIGINAL INSTALLATION AND USER'S MANUAL 43 5.2.3. COIN SLOT Picture 5.2.3 Picture 5.2.3 – machine version with the coin slot The payment system components in the ironer with the coin slot (COIN) are located on the front right side of the left stand. The coin slot – see the arrow in picture 5.2.3 – is used for entering coins / tokens. The operator uses the lockable and removable container for getting the coins / tokens – see the bottom arrow in picture 5.2.3. o The picture shows the version with two coin slots. Versions differ according to the customer’s specifications. For more information see chapter 5.4. 5.2.4. CENTRAL PAYMENT SYSTEM (CPS) Picture 5.2.4 – central coin system version Picture 5.2.4 The central payment system (CPS) ironer version does not contain any payment system components. The operator of the self-service laundry room has to provide information about the method of payment. For more information see chapter 5.4. 44 ORIGINAL INSTALLATION AND USER'S MANUAL 545098_G_Pub_date_2_Jan_2014.doc 5.3. CONTROL PANEL / KEYBOARD – USER CONFIGURATION The user configuration mode may only be accessed by pressing 9 immediately upon the activation of the machine by the main switch (within about 2 seconds after the activation). The individual items of the user configuration are displayed in the information mode. The item symbols and their current values are displayed in 1 second intervals. The editing mode may be accessed by pressing START – 1. You can change the current value of the configuration item by pressing “+” and “-” via 8 and 9. By pressing STOP– 10, you can leave the editing mode and return to the information mode. You can switch between the individual items of the user configuration in the information mode by pressing “+” and “-” via 8 and 9. The user configuration mode is terminated and the machine is activated by pressing “+” – 8 in the last item of the user configuration in the information mode (HtH item). USER CONFIGURATION / MENU DESCRIPTION OF MENU ITEMS VALUES CONDITION SYMBOL MIN MAX DEFAULT - tHy 4 20 15 (E) / 5 (G) Coin 1 (3) Co1 1 99 1 Coin 2 (3) Co2 1 99 1 t min_coin start (3) CSt Early start control (3) CSC 1 Off 99 On 1 On Ironing cylinder temperature - tE 0 180 0 (1) / 140 (2) Ironing cylinder speed - Spd Total time of operation INFO oPH 1 - 6 - 3 - Total time of heating INFO HtH - - - Temperature hysteresis (1) Settings for OPL (2) Settings for COIN / CPS (3) Only valid for COIN/CPS version INFO Information values, cannot be changed Table 5.3 – user configuration parameters, (for further information see the programming instructions - document no. 545088) 545098_G_Pub_date_2_Jan_2014.doc ORIGINAL INSTALLATION AND USER'S MANUAL 45 tHy – Temperature hysteresis o Value in °C that determines the level of decrease below the rated roller temperature value of 80°C for the system of automatic termination (automatic cooling) at which the ironing cylinder stops. Explanation: if tHy = 4, the machine with the active automatic termination system (LED light 11 is flashing) will be turned off at the temperature of 76°C. When the machine stops at this temperature, there may be a short-term increase in the temperature above 80°C, which leads to the overheated ironing cylinder error report when the machine is not running, see chapter 5.9. The tHy parameter needs to be increased in this case. Co1 – operating time for Coin 1. o Sets the period of the machine operating time (in minutes) for the value of Coin 1. Co2 – operating time for Coin 2. o If the machine is equipped with a coin slot for 2 different coin values, then it sets the machine operating time (in minutes) for the value of Coin 2. CSt – minimum time for the activation of the machine o Set the minimum time (i.e. the minimum value of entered coins) necessary for the activation of the machine. The machine cannot be activated unless the specified minimum time has been paid for. CSC – Check of premature ironing start-off, on (valid only for the COIN/CPS version) o If the machine is activated too early and the countdown of the prepaid amount starts, it is possible to deactivate the early start control. tE – preset required ironing cylinder temperature o OPL version – it is set after each activation of the machine; may be changed during ironing o COIN version, CPS version – cannot be changed during ironing SPd – preset required speed of the ironing cylinder o OPL version – it is set after each activation of the machine; may be changed during ironing o COIN version, CPS version – cannot be changed during ironing oPH – total operating time – for information only o Shows the operating time in hundreds of hours. HtH – total heating operation time – for information only o Shows the total heating operation time in hundreds of hours. 46 ORIGINAL INSTALLATION AND USER'S MANUAL 545098_G_Pub_date_2_Jan_2014.doc 5.4. OPERATING INSTRUCTIONS 5.4.1. ACTIVATION Before the actuation of the machine, make sure that it has been installed properly and that it complies with all the installation terms and conditions specified in this manual. 5.4.2. SWITCHING ON THE FEED See chapter 5.1. 5.4.3. SETTING THE PARAMETERS OF IRONING The following is possible after the introductory sequence of the displayed initialization data, see chapter 5.1: OPL version – it is possible to set both required ironing parameters: o speed o temperature COIN version, CPS version – it is possible to change the ironing parameters that are permanent for the users by the operator (after the removal of the cover) within the user configuration, see chapter 5.3: o speed o temperature Select the working temperature according to the type of linen to be ironed according to the following table (values are for information only): TEMPERATURE °C / ° F MATERIAL 85 / 185 Polyacryle, Polyamide 110 / 230 Polyester, Cellulose 135 / 275 Silk 150 / 302 Wool 170 / 338 Cotton 175 / 347 Linen SYMBOL Table 5.4.3 – recommended temperatures for basic types of linen 545098_G_Pub_date_2_Jan_2014.doc ORIGINAL INSTALLATION AND USER'S MANUAL 47 5.4.4. STARTING IRONING OPL version Press START – 1. o The machine will be activated. All the systems of the machine will be activated. Machine in warming-up mode. Ironing cylinder as well as the belts of the insert table are turning at the pre-set speed, see chapter 5.2.1., 5.3. COIN version, CPS version Insert the necessary number of coins into the coin slot or the central payment system of the laundry room. The prepaid time for ironing will be displayed in minutes.) If the prepaid time is not sufficient for starting ironing, the information on the display is flashing. The payment of the minimum time necessary for starting ironing is indicated by a beep. Press START – 1. o The machine will be activated. All systems of the machine are started. Machine is in warming-up mode. Ironing cylinder is turning at the minimum speed, see chapters 5.2.2 and 5.3. o Software inspection of a premature start – active CSC – chapter 5.3.: the insert table belts move at minimum speed: if during the warm-up stage a premature start of ironing or intervention in the safety bar occur, the count-down of the prepaid time will start regardless of the lower quality of ironing caused by the insufficiently heated ironing cylinder. o Hardware inspection of premature start – start / stop pedal - chapter 5.7.: the insert table belts do not move. o Software + hardware inspection of a premature start – active CSC – chapter 5.3. + stop / start system pedal – chapter 5.7., the insert table belts do not move: if during the warm-up stage a premature start of ironing (inserting of linen under the safety bar) or intervention in the safety bar occur, the count-down of the prepaid time will start regardless of the lower quality of ironing caused by the insufficiently heated ironing cylinder. 5.4.5. HEATING PROCESS – BEGINNING OF IRONING You must wait until the ironing cylinder is heated to the required temperature after the actuation of the machine. Approximate times necessary for heating the roller from 20°C to 170°C according to the type of heating: o E – approximately in 15 minutes o G – approximately in 10 minutes OPL version – the machine is prepared for ironing when the ironing cylinder is heated up to the required temperature, i.e. the 2 LED light stops flashing and is lit. o Generally, the heating process is terminated before the set temperature is reached (it differs for each type of heating) as the heating regulations takes into consideration that there is a certain level of heating inertia. o We recommend waiting for about 1 minute until the system stabilizes before you start ironing. COIN version, CPS version The machine is ready to commence ironing as soon as the required temperature is reached, i.e. after the warming-up stage has terminated. The sounder sounds intermittently and the countdown of the prepaid ironing time starts . The countdown of the prepaid ironing time is indicated by a flashing dot in the lower right-hand corner of the display. Ironing cylinder is turning at the minimum speed. o If the machine is not equipped with the stop / start system pedal – chapter 5.7., the insert table belts move at minimum speed. o If the machine is equipped with the stop / start system pedal – chapter 5.7., the insert table belts do not move. o The machine is waiting for the activation of the button no. 1 – START. o To activate the standard operation of the machine (required speed and operation of the insert table belts), press 1 – START. This will also stop the signal. 48 ORIGINAL INSTALLATION AND USER'S MANUAL 545098_G_Pub_date_2_Jan_2014.doc 5.4.6. IRONING When all the conditions for ironing are met, place the linen on the insert table (direction “IN” in picture 5.5) in accordance with the general recommendations provided in the following chapters: o 1.3. IRONING INSTRUCTIONS – USER RECOMMENDATIONS o 2.3. SYMBOLS ON THE MACHINE – label with instructions for inserting linen, information about the correct and incorrect placement of linen on the insert table. o If you permanently iron pieces of linen that are narrower than the inserting width of the machine is, we recommend skipping ironing through the centre of the ironing cylinder every five minutes and repeatedly, at least twice, iron alternately only via the right and left edge of the insert table. This will cool down the ironing cylinder edges overheated by the ironed linen. COIN version, CPS version The prepaid time can be extended any time during the ironing by inserting more coins. o If the machine is equipped with pedal of the insert table start / stop, the pedal can now be operated – see chapter 5.7. Check that the fabric can be ironed and what the ironing temperature is. If necessary, you can adjust the temperature and speed during ironing – valid only for the OPL version. Dry and ironed linen returns into the output trough, direction “OUT” in picture 5.5. You have to take the linen out and you can fold it immediately. 5.4.7. COMPLETION OF IRONING OPL version Turn off the machine by pressing 10 before the planned completion of ironing. This will activate the automatic cooling system (see chapters 5.2.1, 5.2.2 and 5.3). It decreases the energy consumption by using the heat accumulated in the ironing cylinder and shortens the cooling time. It prevents overheating the ironing cylinder. o The machine stops running when the temperature drops below 80°C. Only the control system will remain live. To turn off the machine completely, you must use the main switch. The ironing cylinder can be cooled down faster if you iron a few pieces of linen with dampness exceeding 50%. ! WARNING NEVER USE THE MAIN SWITCH OR THE SAFETY BAR TO TURN OFF THE MACHINE WHEN THE TEMPERATURE OF THE IRONING CYLINDER IS ABOVE 80°C AS IT MAY DAMAGE THE IRONING BELTS! COIN version, CPS version One minute before the pre-paid time ends, the sounder sounds (1 signal for the duration of 1s), indicating that the prepaid time is about to run out. o The heating turns off and the machine turns into the cooling mode when the prepaid time runs out. o The ironing cylinder turns at minimum speed. If the machine is equipped with the stop / start system pedal – chapter 5.7., then the insert table belts do not move. o As soon as the temperature drops below the 80°C value, the machine automatically stops operating. During the cooling stage, it is possible to return to normal ironing procedure by inserting more coins, see chapters 5.4.4, 5.4.5 and 5.4.6. 545098_G_Pub_date_2_Jan_2014.doc ORIGINAL INSTALLATION AND USER'S MANUAL 49 5.5. SAFETY BAR The safety bar, picture 5.5, is a security device that protects the operator’s fingers from accessing the dangerous area of the machine when placing linen on the insert table. Picture 5.5 Picture 5.5 – insert table with the safety bar, output trough. The machine stops running when the safety bar is pressed at any time during ironing (direction “P”). The machine can stop in different ways according to the intensity and way of pressing the safety bar: If the pressing is short (shorter than about 10s), one, max. two consecutive presses: o The machine stops running. If heating was active, it turns off (11 LED light is on). If the temperature of the ironing cylinder is above 80°C, Error Report 2 appears + signal. Deactivate by pressing 10. The machine is ready to be restarted. o Restart the machine by pressing 1. All the systems of the machine will be put into the same operation as before. If the pressing is long (longer than about 10s) or there are three consecutive presses, the same as above happens but the machine does not start running until the time lapse between the machine operation stopped by the bar and the restart of the machine (by pressing 1) is 10 s. If the pressing is soft and short (shorter than about 3s), the following may happen: o The machine stops running. If the heating was active, it does not turn off. o The machine will automatically return to the condition before when the bar is released. COIN version, CPS version If interference with the safety bar occurs in the warming-up or cooling stages (chapters 5.4.4., 5.4.5. and 5.4.7.), the operation of the machine is stopped only for the period during which the safety bar is being interfered with. As soon as the bar is released, the machine returns to the original operating mode. o If the CSC is activated (chapter 5.3.) and if during the warming-up stage an interference with the safety bar occurs, the prepaid time countdown automatically starts. The interference in the safety bar is accompanied by the FPA report on display 7 and a beep. 50 ORIGINAL INSTALLATION AND USER'S MANUAL 545098_G_Pub_date_2_Jan_2014.doc 5.6. HAND CRANK The hand crank, picture 5.6., is a mechanical device intended for manual control of the machine. It is located on the right side. Picture 5.6 Picture 5.6 – manual control crank It is used as an auxiliary emergency device when the machine is hot and it is not possible to get out the stuck linen or cool down the ironing cylinder during the operation for various reasons (blackout, mechanical failure etc.) to prevent damage to the ironing belts caused by high temperature. If needed, push the crank into the machine (direction “P”) and turn it in the direction "R". This will run the machine manually and allows: o Getting stuck linen out of the machine. o Inserting wet linen into the machine in order to accelerate the cooling phase when the ironing cylinder is too hot. The crank is installed in the machine so that it is not connected to the driving system of the machine. The crank is connected to the drive of the machine when it is pushed in the “P” direction, see picture 5.6. The system is equipped with a one-way claw clutch. The construction of the clutch ensures the default position of the crank is disengaged from the driving system in case the crank is pushed while the machine is running and no “P” pressure is applied. The design of the hand crank system ensures that with all the machine versions including the machines with electromagnetic clutch (version with the insert table stop / start pedal – chapter 5.7.) it is possible to manually operate the ironing cylinder with the ironing belts as well as the insert table belts. If disassembly of the right cover is necessary or if for any other operational reason it is necessary to remove the crank (1) from the machine, then remove the crank (1) by screwing it off in the direction (L) from the hub (2) while simultaneously securing the hub (2) against turning with an open-ended spanner HEX19. OPL version The crank (1) remains a part of the machine. COIN version, CPS version – the manufacturer recommends to unscrew the crank from the pin (2) only - so that it, if the need should be, it can be easily screwed back onto the pin (2) and used for manual operation of the machine. 545098_G_Pub_date_2_Jan_2014.doc ORIGINAL INSTALLATION AND USER'S MANUAL 51 5.7. PEDAL OF INSERT TABLE STOP / START SYSTEM * Pedal of insert table stop / start, picture 5.7., is a mechanism designed for interrupting or re-activating the operation of the feeding belts of the insert table. With the versions COIN and CPS, the system also simultaneously and automatically stops the insert table belts in the warming-up and cooling stages.The pedal is situated down, in front of the machine, underneath the front support. * Special accessory, supplied per customer's request, it is a part of some machine versions only. Picture 5.7. Picture 5.7 – pedal of the insert table stop / start system. The pedal unit is delivered with the pedal disassembled in order to facilitate transport. The pedal (1) is fitted with the supplied screwed joints (3) to the pedal arms which are parts of the machine front support. The pedal shall be fitted after the machine installation - chapter 3. The pedal for the insert table stop / start system is used as auxiliary equipment which allows stopping, for a necessary time, then starting the movement of the feeding belts of the insert table (2) while the machinery is operating. The stopping of the feeding belts for a necessary period of time allows the operator to spread and adjust the linen on the insert table before it enters the ironing machine. o If the feeding belts (2) of the insert table are moving and a short activation of the pedal (1) in the direction (P) occurs and then the pedal is released immediately, the movement of the feeding belts (2) stops. o If the feeding belts (2) of the insert table are not moving and a short activation of the pedal (1) in the direction (P) occurs and then the pedal is released immediately, the movement of the feeding belts (2) starts again. ! WARNING STOP THE FEEDING BELTS OF THE INSERT TABLE FOR A NECESSARY PERIOD OF TIME ONLY. NEVER LET THEM IDLE PERMANENTLY. THE HEATING OF THE IRONING MACHINE IS NORMALLY OPERATING WHEN THEY ARE IDLE. A DAMAGE TO THE FEEDING BELTS MAY THUS OCCURS. The pedal is rendered non-functional during any error message – chapter 5.9. o If, during an error message, the table is in the STOP state, it is necessary to put it back to operation by pressing the PEDAL (1) as soon as possible. This can be done immediately after the error message has been erased (confirmed) by pressing the button no. 10 – STOP. The OPL version The stop / start system pedal functions in all the machine operating modes with the exception of the automatic cooling stage (chapter 5.4.7.). Version COIN, version CPS The stop / start system pedal functions in the ironing stage only (chapter 5.4.6.) and does not function in the warming-up and cooling stage (chapters 5.4.4., 5.4.5. and 5.4.7.). 52 ORIGINAL INSTALLATION AND USER'S MANUAL 545098_G_Pub_date_2_Jan_2014.doc 5.8. OCS SYSTEM - CHECKING OF CYLINDER EDGES OVERHEATING * The OCS system (Overheating check system) is an automatic autonomous electronic device which - utilising the two edge thermal sensors of the ironing cylinder - prevents exceeding the 180°C temperature or the pre-set ironing temperature (see instructions – document no. 545088 – the “tSS parameter”) on the cylinder side where the overheating temperature values may be reached due to insufficient cooling down by the ironed linen. * Special accessory, supplied per customer's request, it is a part of some machine versions only. The autonomous electronic unit OCS is installed at the control card MCI10. The temperature sensors of the OCS system are parts of the scrapers support bar. The system may influence the indicated ironer capacity – depending on the extent of regulation. o Potential deactivation of the OCS system is only possible by disconnecting the hardware. The disconnection may only be carried out by trained staff. In case that the software shall be loaded into the control unit during a servicing procedure, the manufacturer recommends disconnecting the PWR connector from the OCS module. 5.8.1. * SENSOSPEED ® SYSTEM SENSOSPEED ® is an autonomous, combined, electronic regulation system which prevents overheating of the ironing cylinder edges and, to a limited degree, regulates the cylinder's speed. * It is a special accessory supplied per customer's request – it is a part of certain machines only. * The machine may be fitted with the SENSOSPEED ® by the manufacturer or it can be activated subsequently. It can also be deactivated in case that the machine is equipped with the OCS system (chapter 5.8.) If the machine is equipped with the OCS system (chapter 5.8.) with the tSS parameter = 3 (see instruction 545088), a software function which allows, to a limited extent, to automatically regulate the cylinder speed based on the current cylinder temperature . o If the current cylinder temperature is lower than the pre-set value, the machine automatically slows the cylinder down by one speed step. o If the current cylinder temperature is higher than the pre-set value, the machine automatically speeds up the cylinder by one speed step. o If the current temperature approximates the required pre-set temperature, the cylinder speed corresponds with the pre-set speed. o If the ironing speed is set to a minimum or maximum value (respectively), then the regulatory step can only be executed towards the higher or lower speed step (respectively). The system may, based on the extent of regulation, influence the specified ironing capacity of the machine. 5.9. TROUBLESHOOTING Any potential error reports are displayed in the area of 7 of the controlling keyboard. o In some cases, a sound alarm is activated by the error report. o If possible, the ironer continues running during an error report. The heating turns off. ERROR CODE ON THE DISPLAY ERROR DESCRIPTION NOTE E1 The temperature of the ironing cylinder is above 200°C. E2 The temperature of the ironing cylinder The machine is stopped, heating is off. The is above 80°C and the ironing cylinder is machine must be activated by the START not turning. button when the error is deleted from the display. 545098_G_Pub_date_2_Jan_2014.doc The machine is running, heating is off. ORIGINAL INSTALLATION AND USER'S MANUAL 53 ERROR CODE ON THE DISPLAY ERROR DESCRIPTION NOTE E3 Overload of the ventilator engine. Heating is off. If the machine was running before the operation error, it continues running and the error may be deleted when the ventilator engine cools down. E4 Short circuit of the heat sensing element. The machine is running, heating is off. The machine may only be turned off by the main switch. E5 Disconnected heat sensing element. The machine is running, heating is off. The machine may only be turned off by the main switch. E6 Malfunction of the drive (the frequency convertor does not signal that it is operating). The machine is stopped, heating is off. The machine must be activated by the START button when the error is deleted from the display. E7 Error of the starting unit. Applies to the G version only - see 5.9.1. The machine is running, heating is off. E8 Error of the safety bar during start. The keyboard is blocked, the machine is not running. It is only possible to turn off the machine and turn it on again when the bar has been repaired. E9 Error of the air-flow switch – manostat. Applies to the G version only - see 5.9.2. The machine may operate. The heating is switched off. Table 5.9. Table 5.9. – error reports ! WARNING IF THE IRONER STOPS AT A TEMPERATURE ABOVE 80°C, IT IS NECESSARY TO COOL DOWN THE IRONING CYLINDER USING DAMP LINEN AND THE HAND CRANK, SEE CHAPTER 5.6. Error reports may be deleted (confirm) and the signal turned off by pressing 10 – STOP. o If the error perseveres, the report will appear again in 30 seconds. o In case of Error Report 6, you must restart the machine by pressing 1 – START after confirming the report by pressing 10. o In some cases (e.g. Error Report 3), it is not possible to delete (confirm) the error by pressing 10. You must reconfirm the report until the machine removes the error and allows the confirmation (deletion) of the error report by pressing 10. The machine is equipped with a safety thermostat - sensor that turns off the heating when the ironing cylinder reaches the limit temperature of 210°C – chapter 6.11. o Turning off the heating by the safety thermostat is not indicated by any error report. The operator may continue ironing. The heating will be automatically renewed when the ironing cylinder cools down sufficiently. o Any potential damage to the safety thermostat is not indicated by any error report. Heating will not be active. The report on the activation of the safety bar, FPA is displayed at 7. This is not an error report. 5.9.1. ERROR MESSAGE - E7 - STARTING (IGNITION) UNIT ERROR - G VERSION ONLY In compliance with chapter 5.9., the keypad display may show the non-specified error E7 when any failure of the gas heating system occurs. The error message can be deleted (confirmed) by pressing the 10 – STOP button o An example of such rectifiable error is an unsuccessful first attempt to ignite the burner after the gas has been connected and the gas inlet is not sufficiently air-bled. If the fault state continues, the message is displayed again after approx. 30 seconds. If the error message E7 is displayed five times within one hour, then it cannot be deleted (confirmed) by pressing the 10 – STOP button. 54 ORIGINAL INSTALLATION AND USER'S MANUAL 545098_G_Pub_date_2_Jan_2014.doc o o o At such automatically non-rectifiable error it is necessary to switch the machine off by the main switch or directly restart the lit-up button on the ESYS control unit (3) - (picture 3.7.3.A) before it is possible to attempt the restart of the machine. If the gas inlet is open and has the correct connection pressure, if no intervention into the safety under-pressure switch (4) occurred – (pic. 3.7.3.A), if the safety thermostat is not activated and functioning (ironing cylinder temperature over 210°C), if the maximum loss of pressure on the exhaust is not exceeding pz max, which would be indicated by the E9 error message if no unauthorised intervention into / tampering with the settings occurred, if the display does not show any other error message and, despite all the above stated conditions, it remains impossible to put the gas heating system in operation (repeated indication of E7), then a more serious failure of the gas heating system occurred (such as breakdown of the equipment for ignition and flame detection or similar failure). The serious failures of the gas heating system that cannot be automatically rectified can only be detected and subsequently repaired by utilization of a special communicational software ESYS, which enables exact specification of the failure. Such diagnostics may be carried out by person/company authorised by the manufacturer only. 5.9.2. ERROR MESSAGE E9 - AIR-FLOW SWITCH ERROR - G VERSION ONLY When the machine is switched on by the main switch and before the ironing process starts, a check of open position (indicating idle state ) of the air flow switch 4 is carried out (see picture 3.7.3.A.). o if during this time the error message E9 is displayed, the air flow switch or its connections are damaged and the error message cannot be deleted (confirmed) by button no. 10 – STOP. o In this case, it is necessary to remove the cause of the fault and restart the machine. During ironing, the switched-on position of the air flow switch 4 is being checked (see picture 3.7.3.A.) indicating the non-exceeding of the permissive resistance pz max (table 3.5.) of the machine exhaust system - chapters 3.7.2. and 3.7.3. o If during this period of time error message E9 is displayed, it means that the air flow switch has opened due to exceeding the permissive resistance of the exhaust system pz max, or that a fault related to the exhaust fan occurred - error message E3, or a fault related to the functioning or connection of the air flow switch 4 occurred - see picture 3.7.3.A. o The error message can be deleted (confirmed) by pressing button no. 10 – STOP. If the cause has not been removed, the error message is displayed again within approx. 10 seconds. When the machine is stopped and before the main switch is switched off, a check of open position (indicating idle state) of the air flow switch 4 is carried out (see picture 3.7.3.A .). o If during this time the error message E9 is displayed, the air flow switch or its connection are damaged and the error message can be deleted by button no. 10 – STOP. o In this case, when attempting to re-start the machine by button no. 1 – STOP a re-indication of the E9 error message occurs, unless the cause of the error has been removed. 5.10. EMERGENCY STOP OF THE MACHINE OPL version – the machine may be stopped by pressing the main switch on the front left side of the machine, chapter 5, or by pressing down the safety bar, chapter 5.5, if the safety or health of the operators is at risk. COIN version, CPS version – in exceptional cases when the safety or health of the operators are at risk, the machine may be stopped by applying pressure on the safety bar (see chapter 5.5). ! WARNING RESTART THE MACHINE OR REMOVE THE STUCK LINEN WITH THE HAND CRANK, SEE CHAPTER 5.6, IMMEDIATELY UPON THE ELIMINATION OF THE CAUSE THAT STOPPED THE MACHINE. THEN COOL DOWN THE IRONING CYLINDER BELOW THE TEMPERATURE OF 80°C, FIRE HAZARD! 545098_G_Pub_date_2_Jan_2014.doc ORIGINAL INSTALLATION AND USER'S MANUAL 55 5.11. REMOVAL OF STUCK LINEN If the linen gets stuck inside the machine, turn off the machine using the main switch and use the crank to get the linen out. o For using the hand crank, see chapter 5.6. 5.12. POWER SUPPLY CUT ! WARNING WHEN THE TEMPERATURE OF THE IRONING CYLINDER IS ABOVE 80°C, THE IRONING CYLINDER MUST BE TURNED BY THE HAND CRANK, SEE CHAPTER 5.6. COOL DOWN THE IRONING CYLINDER, FIRE HAZARD! o o o 56 For using the hand crank, see chapter 5.6. The machine may be immediately activated when the power supply is restored. COIN version, CPS version – if the temperature of the ironing cylinder is above 80°C after the power supply has been restored, you have to press 1 – START. The drive of the ironing cylinder will start to prevent damage to the ironing belts (it is not necessary to insert more coins). The machine will automatically stop when the temperature drops below 80°C. ORIGINAL INSTALLATION AND USER'S MANUAL 545098_G_Pub_date_2_Jan_2014.doc 6. MAINTENANCE AND ADJUSTMENTS 6.1. SAFETY INSTRUCTIONS FOR MAINTENANCE ! WARNING MACHINE MAINTENANCE MAY ONLY BE CARRIED OUT BY TRAINED PERSONNEL. Before any handling of the machine apparatus occurs, it is necessary to make sure that: o the main switch is switched off o the main switch (breaker) of the laundry electrical switchboard is switched off and mechanically interlocked o none of the components is moving due to kinetic momentum o the machine has cooled down o the machine or its electrical switchboard are fitted with a sign „EQUIPMENT UNDER REPAIR“ (and all the other staff have been informed about the repair) o the gas feeding is closed (applicable to machines with gas heating) ! WARNING! COMPLY WITH THE INSTRUCTIONS BELOW - CHAPTER 6 MAINTENANCE AND SETTING. ! WARNING! THE USERS MUST NOT CARRY OUT ANY HANDLING OF THE EQUIPMENT WHICH IS NOT SPECIFICALLY STATED IN THE MAINTENANCE INSTRUCTIONS. SUCH HANDLING IS RESERVED TO AUTHORISED TECHNICAL SERVICING STAFF ONLY. Immediately after the cause of a machine operation interruption has been removed, restart the machine or remove the linen stuck in the machine utilizing the hand crank – chapter 5.6, and then allow the ironing cylinder to cool down to a temperature of less than 80°C – fire hazard! By following the hereby specified instructions, very good operation of the machine will be achieved, the risk of faults will decrease, and the service life of the machine will increase. 6.2. CLEANING OF THE MACHINE ! WARNING! IT IS NECESSARY TO CARRY OUT (MINIMUM TWICE A YEAR) AN OVERALL CLEANING OF THE MACHINE FROM LINT AND IMPURITIES. OTHERWISE, THERE IS A RISK OF FIRE! ONCE A MONTH – FOR MACHINES WITH GAS HEATING Clean (vacuum clean) suction chamber filter or the suction chamber - pos.(6) picture 3.7.3.A. placed in the left stand of the machine, accessible after the right cover of the machine has been removed. EVERY 3 MONTHS – FOR ALL MACHINE VERSIONS Clean (vacuum clean) the electrical components, contactors and the frequency inverter - all situated on the panel of the electrical switchboard in the lower section of the left stand. Then clean (vacuum clean) the ventilation grill of the motor and the programmer board. Clean (vacuum clean) all openings through which air is brought into the machine or taken away from it. Clean (vacuum clean) the area around the scraper blades and around the temperature sensors. Clean (vacuum clean) the area inside the machine after you have removed the: o side and rear covers o upper front cover o upper rear cover of the suction tunnel EVERY 6 MONTHS - FOR ALL MACHINE VERSIONS Clean (vacuum clean) the suction area of the fan - first remove the upper cover of the fan housing situated in the central lower section of the machine or disassemble the rear suction tunnel. Clean (vacuum clean) the extraction area of the fan - first disassemble the exhaust duct or its cover (depending on the position of the exhaust - backwards or to the right).. Clean (vacuum clean) the fan vanes. 545098_G_Pub_date_2_Jan_2014.doc ORIGINAL INSTALLATION AND USER'S MANUAL 57 EVERY YEAR (12 MONTHS) - FOR MACHINES WITH GAS HEATING Clean (vacuum clean) the gas burner - see chapter 6.2.1. 6.2.1. CLEANING THE GAS BURNER - FOR MACHINES WITH GAS HEATING Any intervention in the heating system components may only be carried out by an authorised, qualified person trained to do so. Disassemble the heating system components (see the Spare parts catalogue – section GAS HEATING). Keep disassembling until you reach the state as pictured in figure 6.2.1. o Remove the gas incoming pipe (pos. 41, 42 and 43) as a whole unit (do not disassemble to individual components); remove the four flange screws including the flange sealing - pos. 41. Remove the two screws (1) – picture 6.2.1 which attach the whole burner unit to the machine situated on the left end of the burner. Pull gently and remove the burner from the machine. Remove the Venturi tube together with its accessories so that it is possible to clean the inside of the burner tube. Caution! Make sure you do not damage the ignition electrode! Clean thoroughly the inside of the burner and vacuum clean its outer surface, i.e. the surface of the wire grating of the burner. Caution! Make sure you do not damage the wire grating! Reassemble the Venturi tube (including its sealing and other accessories) back to the burner and then reassemble the whole burner unit to the machine. o The right end of the burner must fit inside the V-shaped bracket which is a part of the right front face of the machine - inside. Check visually that it is fitting correctly! Carefully reassemble all heating system components back and carry out a short function test. Picture 6.2.1 Picture 6.2.1. – The gas burner before removal from the machine - burner left-end view 58 ORIGINAL INSTALLATION AND USER'S MANUAL 545098_G_Pub_date_2_Jan_2014.doc 6.3. IRONING CYLINDER In order to achieve high quality ironing, the ironing cylinder must be kept clean and shiny. The application of paraffin wax contributes to keeping the cylinder clean and shiny – treatment procedure. o When the machine stops automatically (after the automatic cooling mode when the temperature of the ironing cylinder is about 80°C): use the hand crank to apply protective wax, see chapter 5.6 : CLEANCOAT WAX (code: 502348) using the wax cloth (1600 x 1000 mm) : WAX CLOTH (code: 372021160100) Procedure: – Spread about 1dcl of the wax into the pocket of the wax cloth evenly along its length (the stated amount will last for at least 5 treatments). – Insert the impregnated cloth into the machine and run it through using the crank so that the ironing cylinder is waxed along the whole working width. – Insert the cloth pocket first and upwards so that the impermeable side of the cloth is in contact with the belts and the permeable side of the cloth is in contact with the ironing cylinder. If the quality of ironing drops significantly due to impurities on the cylinder surface, remove detergent sediments, starch sediments and salt from it – chapter 6.3.4. 6.3.1. SHORT-TERM STANDSTILL, EVERYDAY IRONING CYLINDER MAINTENANCE Maintenance by application of wax (see chapter 6.3.) must be carried out at least once a month. Apart from this regular monthly interval, the maintenance procedure must also be carried out in cases specified in chapters 6.3.2. and 6.3.3. The machines are produces with two versions of the ironing cylinders: o Highly burnished steel cylinder that requires everyday maintenance o Highly burnished steel cylinder with a protective hard-chrome layer that requires maintenance only in case of a long-term standstill. If you are not sure which ironing cylinder version you have, you can find it out: o Directly from the IPN code (it is a part of the identification sheet of the machine, i.e. the A4 sheet included in the external packaging of the machine) - the 19th position (digit) of the IPN code: S – burnished steel cylinder – see chapter 6.3.2. C – burnished steel cylinder with a hard-chrome layer – see chapter 6.3.3. o Indirectly from the serial number of the machine stated on the serial label of the machine through the dealer or producer. 6.3.2. BURNISHED STEEL CYLINDER The cylinder is treated during production and it is equipped with a protective paper sheet, see procedure in chapter 3.8. The cylinder must be treated if it does not run for at least 8 hours after the termination of the ironing cycle, see chapter 6.3. If the standstill is planned for more than 5 days, insert the protective wax paper into the machine after the wax treatment using the crank, chapter 5.6. Before you start the machine after the treatment, iron first several pieces of “technological” linen to dispose of the impurities with the protective wax. 6.3.3. BURNISHED CYLINDER WITH A HARD-CHROME LAYER Once an ironing cycle is finished and the machine is not used (for ironing) for at least 5 days, it is then necessary to carry out a treatment procedure - chapter 6.3. 545098_G_Pub_date_2_Jan_2014.doc ORIGINAL INSTALLATION AND USER'S MANUAL 59 6.3.4. CLEANING THE IRONING CYLINDER ! WARNING MAKE SURE THAT NO OTHER PERSON CAN INADVERTENTLY SWITCH THE MACHINE ON WHILE THE CLEANING IS BEING CARRIED OUT! Picture 6.3.4. Picture 6.3.4. – The roller system of the ironing unit. o Stop the machine and disconnect it from the power supply. o Remove the rear and side covers of the machine. o Lift and secure the lower tensioning roller (1) in the upper position, so called technological position, by screws M6x20 (2) or longer ones. o Disassemble the rear suction tunnel. o Disconnect all the ironing belts (3) one by one from the rear side of the machine and place them freely on top of the machine. o Slightly lift the upper pressure roller (4) by propping up (i.e. placing a support underneath) the pressure roller bearings (5). o Cover the belts with clean fabric so that they are protected against being soiled. o Start the cleaning; it is generally advisable to use very fine sand paper (grain size no. 300) for the removal of detergent sediments and calcium sediments. Use it only in the direction in which the linen moves. The cylinder cannot be driven when the ironing belts are loosened. Therefore; the movement of the cylinder can only be achieved manually by applying tangential pressure on its surface. o The sediments may also be removed by a weak solution of oxalic acid or a warm solution of acetic (vinegar) acid (applies to versions with ironing cylinder with a hard chrome layer only – see chapter 6.3.3.) ! WARNING REMEMBER TO CLEAN ALL THE SURFACES THAT HAVE BEEN TREATED BY A WEAK SOLUTION OF ACID SO THAT NO RESIDUES OF ACID REMAIN - THUS PREVENTING THE RISK OF CORROSION. WHEN WORKING WITH ACIDS, ALWAYS WEAR PERSONAL PROTECTIVE DEVICES (GLOVES, GOGGLES). 60 ORIGINAL INSTALLATION AND USER'S MANUAL 545098_G_Pub_date_2_Jan_2014.doc 6.4. IRONING BELTS The ironing belts are used for tensioning, finishing the drying and ironing process and transport of the ironed linen. They are manufactured from special, heat resistant, double layer fabric: Polyester / m-Aramid – NOMEX ®, with temperature resistances permanently up to 190°C and they are fitted with the Nomex layer towards the cylinder. 6.4.1. TIGHTENING THE IRONING BELTS The ironing belts are tensioned automatically - by the gravitation force of the tensioning roller (1) – picture 6.3.4.. They do not require any maintenance. 6.4.2. REPLACEMENT OF IRONING BELTS The individual ironing belts are replaced only in the case that they are damaged (torn). It is advisable to replace all the belts at one time. In the case that the belts are soiled by detergents or dust, wash them in conventional detergents. Their service life is thus prolonged and the ironing quality increases. Their service life is 2 years if operated for 40 hours a week and providing that all instructions specified in this manual are observed. The replacement procedure of the ironing belts is illustrated in the picture 6.4.2.: Picture 6.4.2. Picture 6.4.2. – Replacement of ironing belts o Switch the machine off by the main switch, secure, wait till it has cooled down. o Remove the machine side and rear covers and (if needed) the rear suction tunnel - see chapter 6.3.4. o Put the hand crank (chapter 5.6.) into working position and use it to turn the ironing belt (2) in a manner assuring that the fasteners connecting the ends of the belts together are accessible. o Lift and secure the lower tensioning roller (3) in the upper position, so called technological position, by screws M6x20 or longer ones - see picture 6.3.4. o Disconnect the old belt (2) and attach the new belt (1) to the old belt utilizing the fasteners. o Use the hand crank to wind up the whole length of the new belt onto the ironing cylinder. o Disconnect the old belt (2) and connect the new one (1) with the fasteners. o Repeat with all the belts. o Disengage the tensioning roller from the upper (technological) position. Then re-assemble all the disassembled components one by one. 545098_G_Pub_date_2_Jan_2014.doc ORIGINAL INSTALLATION AND USER'S MANUAL 61 6.5. INSERT TABLE FEEDING BELTS The feeding belts of the insert table (1) – picture 6.5.1. serve as a conveyor that transports the ironed linen to the machine ironing unit. The feeding belts are made of a special thermally resistant fabric based on 100% Polyester with the thermal resistance up to 180°C (for short periods of time). They are joined by special plastic sticks. 6.5.1. TENSIONING OF THE INSERT TABLE FEEDING BELTS The feeding belts (1) must be correctly tensioned. The tensioning is carried out by a flat bladed screwdriver after both the side covers have been removed - picture 6.5.1. Picture 6.5.1. Picture 6.5.1. – Feeding belts of the insert table – tensioning. o The feeding belts are tensioned by a micro-movement of the insert table (2) and they must be tensioned to the minimum possible initial tension so that they do not stop operating when the linen is inserted. o Inspect that the feeding belts stop operating when you apply slight pressure of your hand on the belt. When the belts are driven by a hand crank, the driving moment must be < 15 Nm without force oscillation during turning the crank. The upper branch of the incoming belts must fit closely by all its surface to the insert table. o Loosen the screws (3), then carry out the tensioning by inserting a flat bladed screwdriver into the slot (4) and by slight prising pressure applied on the table (2) in the direction P - evenly on both the sides. o Then tighten the screws (3) and check the tension is correct. 62 ORIGINAL INSTALLATION AND USER'S MANUAL 545098_G_Pub_date_2_Jan_2014.doc 6.6. UPPER PRESSURE ROLLER RIBBONS The upper pressure roller ribbons serve the purpose of separating the linen from the pressure roller. The fabric ribbons are made of thermally resistant material based on NOMEX ®. There are versions of machines with either one or two guide bars of ribbons. The ribbons are joined together either by knots or they are sealed by adhesive. The good operating condition of the ribbons shall be checked once a week. Missing ribbons must be replaced. New ribbons might be in an emergency joined by a knot. However; the knots get imprinted into the padding of the upper pressure roller. It is therefore recommended by the manufacturer to use the original method of joining the ribbons - sealing by adhesive (see picture 6.6.) 2 3 1 Picture 6.6. Picture 6.6.: – Upper pressure ribbons – sealing. o The ribbon (1) is sealed by hot-ironed sticking tape (2) The ends of ribbon are overlapped by approx. 15 mm. o Overlap – the sealed connection is made on the top of the upper pressure roller. Slide an aluminium plate (3) between the roller padding and the sealed joint. o The sealed joint is ironed by a hot iron (temperature 180°C for 30 seconds). o (2) – The sticking tape of the ribbons > FILM_FIT ADHESIVE (code: 549369). 6.7. TOP PRESSURE ROLLER Upper pressure roller (4) – picture 6.3.4. ensures that the linen is fed into the ironer by pressing the linen with a great force to the surface of the ironing cylinder. It also allows most of the water content of the linen to evaporate and it slows down the ironed linen carried by the ironing belts by stretching the linen tight. The surface of the upper pressure roller consists of a 5mm padding of NOMEX ® - see chapter 6.4. The NOMEX ® padding is helically wound and adhered to the specially varnished surface of the pressure roller and it is secured by rivets on the edges. 6.7.1. REPLACEMENT OF THE PADDING OF THE PRESSURE ROLLER The pressure roller is designed for a significantly long service life. The padding is applied to the roller by special technology. If damage to the padding occurs that requires its replacement, the manufacturer recommends replacing the whole pressure roller instead of just replacing the padding. 545098_G_Pub_date_2_Jan_2014.doc ORIGINAL INSTALLATION AND USER'S MANUAL 63 6.8. CHAIN GEAR The chain gear is accessible after the right cover of the machine has been removed - picture 6.8. It serves as the drive of the insert table roller. At the same time it provides braking action of the upper pressure roller and it determines the speed ratios of the individual components of the ironing unit. The chain (1) must be kept tensioned. The chain is considered tensioned if none of its branches visibly sag and the upper branch (2) is visibly lifted into a slightly triangular shape by the slider (4). The above described desirable state is achieved by movement (tensioning) of the transmission cog wheel (3). The chain must be kept lubricated, but not excessively so that no grease may drip off. o Lubricate the chain once a month. The manufacturer recommends usage of a heavy duty lubricating fluid containing molybdenum for the chain lubrication. Picture 6.8. Picture 6.8. – Chain gear 6.9. BEARINGS All the rolling bearings in the machine are bearings with a permanent lubrication filling and they do not require any maintenance. None of the sliding bearings in the machine requires grease lubrication. All the rolling bearings are specifically designed with consideration of the thermal load which they will be subjected to. Therefore; it is not possible to replace the bearings with bearings of the same dimensional range. In case such a replacement is necessary, original spare parts must be used. This applies to: o Bearings of the bearing pulleys o Bearings of the guide rollers o Bearings of the side supporting pulleys o Bearings in the electromagnetic clutch set 64 ORIGINAL INSTALLATION AND USER'S MANUAL 545098_G_Pub_date_2_Jan_2014.doc 6.10. SCRAPERS Scrapers are mechanical devices which serve the purpose of separating the linen from the ironing cylinder in case it does not separate itself from the ironing cylinder into the output trough. The set of scrapers (picture 6.10.) consists of several units (2) fitted on the scraper support bar (1). Each unit (2) contains 3 riveted scrapers. Each scraper consists of an arm made of sprung stainless sheet metal (3) to which a blade (4) is riveted. The blade is made of a special abrasion-resistant and thermally durable plastic. The blade is pressed towards the ironing cylinder. Picture 6.10. Picture 6.10. – Scrapers Correct position of scrapers towards the ironing cylinder is set by the manufacturer. Generally speaking; correct position is such a position which ensures a minimum but permanent downward pressure - i.e. contact of each blade (4) with the ironing cylinder. At the same time, the vertical edges of the blade (4) must be parallel with the vertical edges of the arm (3). o The downward pressure of a blade (4) to the ironing cylinder is determined by the position of the unit (2) – direction P on the support bar (1). The unit is secured by means of 2 screws (5). o Check weekly the correct position and cleanness of the blades (3) contact edges. o If, due to limited space, it is no longer possible to tighten the unit in the direction P, the blade (4) can be turned by 180° on the central rivet of the arm (3) and re-set into the correct position. 545098_G_Pub_date_2_Jan_2014.doc ORIGINAL INSTALLATION AND USER'S MANUAL 65 6.11. TEMPERATURE SENSORS – OPERATING AND SAFETY SENSORS Temperature sensors are electro-mechanical devices that serves the purpose of monitoring the temperature of the ironing cylinder surface. The basic temperature sensors (picture 6.11.) are operating sensors (1), which are connected to the control panel of the machine, and safety sensors (2) - see chapter 5.9. The sensors are fitted in the cradles of the flexible arms (3) which are attached directly to the support bar of the scrapers (4) by means of screws (5). The sensors are pressed towards the surface of the ironing cylinder. Picture 6.11. Picture 6.11. – Basic temperature sensors The basic temperature sensors are positioned next to each other in the middle of the machine. They are put in the correct position by the manufacturer. o The machine can also be fitted with two side operating sensors (positioned on the sides). They are of the same construction as the basic temperature sensor (1). These sensors are parts of the OCS system – see chapter 5.8. and they are connected to the OCS unit. Generally speaking; their correct position is such a position which ensures sufficient and permanent downward pressure of the sensor towards the surface of the ironing cylinder - the whole surface of the sensing area must be in contact with the surface of the ironing cylinder (idle or moving) in the whole range of operating temperatures. o Correct position of a sensor is achieved by correct setting of the arm (3) in the direction “P”. Correct position is indicated by slight bending. The sensor must be touching the ironing cylinder with all its surface. The sensor (1) must also return back to its original position after it has been tipped to its edge. o Check weekly the correct position and cleanness of contact areas and edges of the sensors (1) and (2). Operating sensor (1) – detector Pt 100 in bronze encasing. This component cannot be dismantled. If worn down, it must be replaced as a whole unit. o If at fault > error message E4 or E5 – see chapter 5.9. Safety sensor (2) - bimetallic thermostat of the R28 range, 210°C ± 5°C. This component can be dismantled. It contains heat-conductive mastic. If worn down, it is recommended to replace it as a whole unit. o If at fault > no error message – see chapter 5.9. 66 ORIGINAL INSTALLATION AND USER'S MANUAL 545098_G_Pub_date_2_Jan_2014.doc 6.12. ELECTRICAL INSTALLATIONS - MAINTENANCE Any repairs of the electrical installations can only be carried out by a person familiar with the technology who has suitable and valid authorisation. To find out faults, always use the electrical documentation which is part of the machine documentation. Make sure that after the repair has been finished all the electrical installations have been put to the original state. It is particularly important to re-connect all the protective cables (if they were disconnected during the repair. Make sure that all the electrical devices are correctly marked in accordance with the operating scheme. Once the repair is finished, check all the safety devices and their settings (limit switches, safety thermostat etc.) Regularly check the state of the machine's earthing. Incorrect earthing may lead to occurrences of static discharges which can cause malfunctioning of the machine and poor ironing quality. Check the state and tightness of the screw terminals of the main switch, contactors and in the case of a machine with electrical heating also of the fuse disconnectors and heaters. Check after the machine has been installed and then after every 1000 operating hours or after six months. 6.13. FREQUENCY INVERTER Frequency inverter (FC) is an electronic device which ensures variable and adjustable speed of the ironing cylinder. FC is installed in the left stand on the switchboard panel situated on the bottom right. The FC parameters are set by the manufacturer and any intervention may only be carried out by authorised personnel. Authorised personnel may (if necessary) load a new parametric set into the FC utilizing a special control panel: o I33_FC_PARAMETER LIST > code: 528333 o Parameter copy unit > code: 528334 The instructions for loading the 528333 parameters from the parameter copy unit into the FC - valid for authorised servicing only: o 1. Switch on the frequency inverter by manually switching the CFI contactor. o 2. Use the Menu button to select the option Main Menu on the display. o 3. Use the arrows to select the parameter set 1 – confirm with OK. o 4. Use the arrows to select the parameter 1-50 – confirm with OK. o 5. Use the arrows to set the PR1-50 to 2 - confirm with OK > it will copy the parameters into the inverter. o 6. Switch the inverter off. If at fault > part of the error message E6 – see chapter 5.9. 6.14. MAIN DRIVE MOTOR The machine is driven by a three-phase induction motor of 180 W rated power. It is supplied with power from the frequency inverter (chapter 6.13.) and it has an integrated worm-gear unit with transmission ratio i = 70 and implemented freewheel clutch with a rated transmitted moment of 50Nm. The motor unit is situated on the driving roller in the left stand of the machine. There is an arrow indicating the correct direction of rotation on the gearbox housing. o Connection to the main switch does not influence the correct direction of rotation. o If power supply is to be connected to the terminal block of the motor, it is necessary to check the correct direction of rotation - in the case that the connection is carried out incorrectly, there is a risk of damage to the gearbox freewheel! The gearbox has a permanent lubrication filling and it is maintenance-free. Check it once a week and focus on: o any potential leakage of the lubrication filling from the gearbox housing, o cleanness of the ventilation (aspirating) grill of the motor positioned in the lower section of the machine, o state of both the silentblocks, which catch the moment reaction of the motor with the gearbox, o If at fault > part of the error message E6 – see chapter 5.9. 545098_G_Pub_date_2_Jan_2014.doc ORIGINAL INSTALLATION AND USER'S MANUAL 67 6.15. MAIN EXHAUST FAN The main exhaust fan serves the purpose of extracting the fumes created during the ironing process away from the machine. With gas heated machine versions it also serves the purpose of extracting the waste gases arising from the burning process. The main exhaust fan is situated in the central fan housing, in the middle of the machine, in its lower section, between the main lower support bars. It is placed on an insulated movable bed. The main exhaust fan is radial with vanes bent backwards and with an integrated single-phase induction motor. The temperature protection is integrated into the motor winding - see diagram 6.15. The rotation of the fan is clockwise (if viewed from above) and its rotational direction does not change with the interchange of phases sequence. The fan is maintenance-free, it only requires cleaning in compliance with the instructions – see chapter 6.2. If at fault > error message E3 – see chapter 5.9. Picture 6.15. Picture 6.15. – Wiring diagram of the exhaust fan. 6.16. THE ESYS CONTROL UNIT – GAS HEATING ONLY The ESYS control unit (3) – picture 3.7.3.A., chapters 3.7.3. and 3.7.4 is an electronic device designed for the control of the gas heating system Premixengine ®. The ESYS control unit (3) – picture 3.7.3.A. is situated in the gas electromagnetic valve in the left stand of the machine and it is accessible after removal of the left cover. The control unit is maintenance free. It is necessary to make sure that the terminal block of the control unit is at all times fitted with a lid (lid screwed on) – this ensures a safe electrical connection with the electromagnetic valve. The diagnostics of the ESYS control unit is done by means of special communication software – see also chapters 3.7.4. and 5.9.1.: o COM_SET_ESYS_I33_G > code: 545156 If at fault > error message E7 – see chapters 5.9. and 5.9.1. 6.17. HIGH-VOLTAGE CABLE – GAS HEATING ONLY The high-voltage cable is a component which serves the purpose of (with gas heated machines): o high-voltage power supply (~15 kV) of the electrode – see chapter 6.18. for the ignition of the gas burner. o low current (~20nA) connection with the electrode – see chapter 6.18., for indication of ionisation flow over the electrode tips and thus the detection of flame in the gas burner. The high-voltage cable connects the ESYS control unit – chapter 6.16. with the ignition and ionizing electrode – chapter 6.18. The insulation and the terminations must be intact and undamaged. If at fault > part of error message E7 – see chapters 5.9. and 5.9.1. 68 ORIGINAL INSTALLATION AND USER'S MANUAL 545098_G_Pub_date_2_Jan_2014.doc 6.18. IGNITION AND IONIZING ELECTRODE – GAS HEATING ONLY The ignition and ionizing electrode is a component which serves the purpose of (with gas heated machines): o Ignition of the gas burner during which a high voltage spark discharges between the electrode tips. o The flame detection during which electric current flows between the electrode tips due to ionized air. The ignition and ionizing electrode (1) – picture 6.18. is installed on the left side of the burner under the cover of the combustion chamber. Its only entrance to the open space is through the connector termination. The whole electrode can only be accessed (for inspection or replacement) after the burner has been pulled out. Good functionality of the electrode can only be achieved if the ceramic insulator is undamaged (2),the connector termination is screwed tight (3), the edges of kanthal ® electrodes are sharp enough and their distance in the spark gap is correct (4). The distance shall be ~ 3 mm. o The spark discharge must occur in the spark gap (4) only. Picture 6.18. Picture 6.18. – Ignition and ionizing electrode. If at fault > part of error message E7 – see chapters 5.9. and 5.9.1. 6.19. AIR FLOW SWITCH – GAS HEATING ONLY The air-flow switch (4) – picture 3.7.3.A., chapters 3.7.3. and 3.7.4. is an electro-mechanical device which serves the purpose of monitoring sufficient under pressure in the exhaust system – chapter 3.5. The air-flow switch is situated in the upper left section of the switchboard panel and it is accessible after the removal of the left cover of the machine. The air-flow switch is set by the manufacturer and any intervention may only be carried out by authorised personnel. If necessary, an authorised technician may carry out the setting of the air-flow switch: o Finding the “ON” position on the contacts by loosening (turning left) the adjustment screw from the “OFF” state at a pre-set pressure ps (Pa) of the testing exhaust duct: – 50 Hz machine > ps (static pressure when machine cold) = 200 Pa – 60 Hz machine > ps (static pressure when machine cold) = 250 Pa If at fault > error message E9 – see chapters 5.9. and 5.9.2. 545098_G_Pub_date_2_Jan_2014.doc ORIGINAL INSTALLATION AND USER'S MANUAL 69 6.20. INSERT TABLE DRIVE – CLUTCH * Machines of the COIN version, CPS version and all versions fitted with the insert table stop/start pedal (chapter 5.7.) have the insert table drive fitted with an electromagnetic clutch. * Only a part of certain machines. The electromagnetic clutch serves the purpose of disconnecting / connecting the drive of the insert table which is independent of the ironing cylinder movement. The electromagnetic clutch unit is situated in the axes of the insert table roller, in the right stand, and it is accessible after the cover of the right stand has been removed. The maintenance of the clutch consists of the simple application of pressurised air to the whole clutch – procedure which blows off abrasive wear particles from the clutch disk surface (carry out once a week). 6.21. LAUNDRY EARTH LEAKAGE TRIP – ZKOUŠENÍ If the earth leakage trip is installed before the power cable supply, it is necessary to regularly check its function. The earth leakage trip is a very sensitive device which contributes to the improved safety of the machine and it requires a regular inspection. ! WARNING A QUALIFIED SERVICEMAN SHALL CHECK THE EARTH LEAKAGE TRIP AND ITS FUNCTIONING AT LEAST ONCE IN THREE MONTHS. THE TEST IS CARRIED OUT UNDER VOLTAGE BY PRESSING A TEST PUSH BUTTON ON THE EARTH LEAKAGE TRIP. THE EARTH LEAKAGE TRIP MUST SWITCH OFF! 6.22. PUTTING THE IRONER OUT OF OPERATION See chapters 6.3.1., 6.3.2., 6.3.3. 70 ORIGINAL INSTALLATION AND USER'S MANUAL 545098_G_Pub_date_2_Jan_2014.doc 7. PUTTING THE MACHINE OUT OF SERVICE 7.1. MACHINE DISCONECTION If the machine is still to be used, do a treatment of the ironing cylinder according to chapter 6.3.1., 6.3.2., 6.3.3. Turn off the outer power supply to the machine. Turn off the switch in the rear part of the machine. ! WARNING WAIT UNTIL THE MACHINE AND CONNECTIONS COOL DOWN Disconnect all power, steam and gas inlets. 7.2. MACHINE DISPOSAL ! WARNING TAKE ALL NECESSARY ACTION AND PRECAUTIONS WHEN DOING DISASSEMBLY OF THE MACHINE TO AVOID INJURIES BY GLASS OR SHARP METAL EDGES. 7.2.1. POSSIBILITY OF THE MACHINE DISPOSAL BY THE SPECIALIZED COMPANY Information concerning the WEEE-directive (Waste Electrical and Electronic Equipment, for European Unionmember states only): o For the production of the machine that you have purchased, natural resources are being reclaimed and used. The machine can contain substances which are dangerous for health and environment. o When you dispose of your machine, to avoid spreading of these substances in our environment and to reduce the pressure on our natural resources, we encourage you to use the collection, reuse and recycle system of your region or country. These systems reuse or recycle most of the components. o o o o o The symbol „crossed out bin on wheels ( )“ invites you to make use of these systems. If you wish more information concerning the systems for collection, reuse or recycling of disposed machines, you can take contact with the competent administration of your region or country (waste management). You can also take contact with us for more information concerning the environmental performances of our products. Please, consider that the WEEE directive is generally only valid for household machines. In some countries professional machines are added, in others not. Therefore the symbol ( ) may not be present. Info for dealers: Due to the diversity of the national legislations, manufacturer can not take all the measures to be in accordance with all national legislations of each member state. We expect that each dealer who imports our appliances into a member state (and puts it on the market) takes the necessary steps to be in rule with the national legislation (as the directive requires). 7.2.2. POSSIBILITY OF THE MACHINE DISPOSAL BY OWN POTENTIAL It is necessary to sort out the parts for metal, non-metal, glass, plastics etc, and bring them to recycle places. The sorted out materials has to be classified in waste groups. Offer the sorted waste to the company which is competent for further treatment. 545098_G_Pub_date_2_Jan_2014.doc ORIGINAL INSTALLATION AND USER'S MANUAL 71 IMPORTANT! MACHINE TYPE: PROGRAMMER: ELECTRONIC PROGRAMMER INSTALLATION DATE: INSTALLATION PERFORMED BY: SERIAL NUMBER: ELECTRIC SPECIFICATION: VOLTAGE .......... V ......PHASE ............HZ THIS SHEET MUST BE PROPERLY COMPLETED FOR ANY CONTACT WITH YOUR DEALER CONCERNING THE SAFETY OF THE MACHINE OR SPARE PARTS. KEEP THE MANUAL FOR FURTHER REFERENCES. DEALER: