1
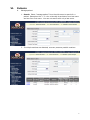
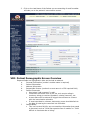
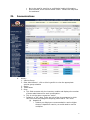
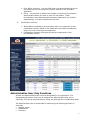
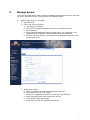
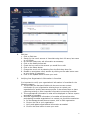
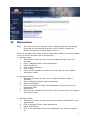
Maryland ImmuNet Immunization Registry Standard and Administrative User Guide I. Introduction II. Standard vs. Administrative User Roles III. Objectives Thank you for enrolling with the Maryland ImmuNet Immunization Registry. ImmuNet is a secure and confidential web-based immunization information system that houses immunization records for children and adults throughout Maryland. This document provides details on the two different types of user roles granted to healthcare providers throughout the state of Maryland. a. Standard User: This is the primary user of ImmuNet. The standard user adds, edits and finds patients, manages immunization information and prints immunization reports for patients. b. System Administrative User: In addition to having the ability to perform the standard user activities above, this is the main contact for ImmuNet within the health care organization. Only the administrative user is authorized for the maintenance of all organization specific information, including adding new users and setting up schools and clinicians, as well as maintenance of the inventory module if used by the organization. With the assistance of this document and the completion of the online training tutorial, training webinar and/or on-site training, participants should be able to: Search for existing patients in ImmuNet Add new patients in ImmuNet Edit patient demographic information and responsible persons Manage immunization information and update historical information Generate patient specific and organizational reports Add new users and edit existing users in ImmuNet Manage schools, physicians and clinicians Manage your vaccine inventory using the ImmuNet inventory module IV. Training Resources V. General ImmuNet Tools, Windows and Menus Help desk (Phone: 410-767-6606 or Email: [email protected]) Self-guided online training tutorial Online screen specific tool – light bulb User manual Training webinars (as needed, based on demand) Onsite training (as needed, based on demand and staff availablity) A. B. C. D. Orient by yellow bar on top of page, confirm organization, user name and role. Overview of tabs on top of page Left side menu overview 1. Patients 2. Immunizations 3. Reports ImmuNet Homepage 1. Announcements, Release Notes, Inventory Alert Preferences 1 VI. Patients A. Manage patient 1. Search: Select ―manage patient‖ from the side menu to search for a patient. Remember the 3 – 2 rule—minimally three letters from last name and two from first name. You can not search with only a last name. 2. If multiple matches are detected, a screen presents possible matches. 2 3. Click on the Last Name of the Patient you are searching for and ImmuNet will take you to the patient’s immunization screen. VIII. Patient Demographic Screen Overview Required fields are highlighted in blue and include an asterisk. a. b. c. d. e. f. Personal Information (mother’s maiden name is required) Patient Information Address Information Responsible Persons (mother’s current name is a CDC required field) Patient Comments Must select ―add comment‖ to add. Comments are chosen from a pick list, such as prior allergic reactions, allergy to vaccine ingredient, existing immunity, etc. A start date must be entered to trigger the comment to connect with the immunization schedule. If exact start date is unknown, data entry person should default to the date of entering the comment into ImmuNet. Patient Notes This is a free text field for any non-sensitive information that needs to be noted, such as ―Child has excessive fear of needles‖ or ―Child difficult to vaccinate due to biting.‖ 3 IX. Not to be used for sensitive or confidential medical information. Once entered, a user cannot delete a note. Contact the help desk for assistance. Immunizations A. History 1. Vaccine Group 2. Date Administered - click on blue hyperlink to view the appropriate vaccine group schedule 3. Series 4. Trade Name 5. Dose a. This field connects with the inventory module and displays the number of doses administered for each immunization. b. This is not the same concept as ―series‖ c. Default is a ―full‖ dose. There are only a few circumstances in which this field would be changed to anything other than a ―full‖ dose. (a) Hepatitis B i. Patients on dialysis are recommended to receive higher doses of Hepatitis B vaccine, so would need to use the multiplier. 4 (b) Influenza Multidose vials ii. Half of a 0.5 mL adult dose can be given as a valid 0.25 mL dose to a pediatric patient. Important to realize that this IS medically a valid FULL dose for that patient. However, for inventory tracking purposes in the system, you would use the ―half‖ multiplier. 6. Owned? a. If the value in the owned column is blank, the immunization DATA are OWNED by your organization. This would be a result of either manual data entry of this information or having sent it via data exchange. This is only an indication of the organization submitting the data, It has nothing to do with the organization that administered the shot to the child. b. If the value in the owned column is ―no,‖ the immunization DATA are NOT OWNED by your organization. Your organization did not enter the shot information into ImmuNet. Click on ―no‖ to find out who owns the shot information. Example: Org Name: CECIL COUNTY HEALTH DEPARTMENT Address 1: JOHN M BYERS HEALTH CENTER Address 2: ELKTON, MD 21921 Contact Name: XXXXX XXXXX Phone Number: (XXX) XXX-XXXX 7. Reaction a. This column represents any reaction the patient had after receiving the vaccine. A ―yes‖ in this column indicates there was a reaction. To view the reaction, click the hyperlink. 8. Hist? a. If this column indicates ―Yes,‖ this record is historical, meaning the immunization was administered by a provider at ANOTHER organization, not the organization that owns the data. If this column is blank, this indicates the immunization was administered by the organization that owns the data, i.e. entered the data into ImmuNet. 9. Edit B. Vaccines Recommended by Tracking Schedule 1. Yellow: earliest date allowed 2. Green: recommended 3. Blue: overdue 4. Pink: no longer recommended C. Add Immunizations (three ways to get to screen) 1. Select Add Immunization button 2. Record Immunization from Manage Patient 3. Add selected from recommendations D. Three methods of entering immunizations 1. From ImmuNet Inventory – use this field when you administered the shot to the patient and your organization is using the inventory module in the NYSIIS application. If you are not using the inventory module the system will not allow you to enter using this option. 5 2. From Other Inventory – use this field when you administered the shot to the patient but are not using the inventory module in the ImmuNet application. 3. Hist # - use this field to indicate the number of historical immunization administration dates you want to enter for the patient. These immunizations were administered at another organization (or multiple organizations). You did not administer the shot. E. Combination Vaccines 1. When adding combination vaccines select only one component of that combination vaccine. Based on the trade name provided, ImmuNet will plug in the rest of the vaccine components. 2. Combination Vaccines will display all vaccine components on the immunization history. Administrative User Only Functions At least one Administrative User must be designated for an organization. The designated staff person must then be assigned the Administrative User role in ImmuNet. This can be accomplished by calling and emailing the ImmuNet Help Desk. The Administrative User is responsible for performing the following functions in ImmuNet: Manage Access Maintenance Inventory 6 X. Manage Access From the ImmuNet Home Page, select the Manage Access/Account button from the top of the ImmuNet screen. Then perform the following steps: A. Add a single user into ImmuNet 1. Click Add User 2. Enter new user information a. Last Name, First Name b. User Id (first initial followed by last name, not case sensitive) c. Email Address d. When entering additional Administrative Users, you must enter your Organization’s full address, phone number and email address e. Click on the Save button, you will then be prompted to proceed to the modify access tab 3. Modify User Access a. Select ImmuNet from the application drop down list b. Org type can be left as All Types c. Select your Organization’s name for the Org. drop down list d. Select the User’s Role and modify their access e. Click on Add under Add Access f. Press Save to keep the updated information 7 B. Edit User 1. Click on Edit User 2. Search for the user’s account in ImmuNet using their full name, last name or a 3/2 Rule. 3. On the Edit Patient tab, edit information as necessary 4. Click on the Modify Access tab 5. Check the box next to the account you would like to edit 6. Click on the Select button 7. Change the user’s role by selecting from the Role drop down list 8. Disable or terminate a user’s account by clicking on the radio button next to your choice (if necessary) 9. Click on the Update button to save your work C. Verifying Your Organization’s Information in ImmuNet It is important to verify your organization’s information in ImmuNet for the following reasons: 1. This provides the Maryland DHMH with the most current contact information for your organization allowing them to contact your organization for quality assurance purposes. It also allows them to share upcoming training or other important information concerning ImmuNet. 2. This organizational information is what will be displayed on various reports generated in ImmuNet. 3. Accurate organizational information in ImmuNet will also allow other participating ImmuNet organization’s to contact you should the need arise. a. On the Manage Access/Account screen, click on Edit organization. b. Click on the link to your organization. c. Verify and update organizational information as needed. d. Click on the Save button to save your work. 8 XI. Maintenance Note: Information entered in Manage Schools, Manage Clinicians, and Manage Physicians will populate the drop down lists for specific fields on the Patient Information and Immunization screens. From the ImmuNet Home Page, find the Maintenance heading in the blue shaded column to the left and select one of the following: A. Manage schools 1. Administrative users can enter new and update existing schools into ImmuNet 2. Click on Manage Schools under Maintenance 3. Select Add School 4. Enter School information 5. Click on Save 6. Entries will be available from the School drop down list on the Patient Information screen. B. Manage physicians 1. Administrative users can enter new or update existing providers in ImmuNet 2. Click on Manage Physician under Maintenance 3. Select Add Physician 4. Enter the Physician or Health Care Organization’s information into the appropriate fields 5. Click on Save 6. Entries will be available in the Provider (PCP) drop down list on the patient Information screen C. Manage clinicians 1. Administrative Users can enter Clinician and Ordering Authorities for their organizations. 2. Click on Manage Clinician under Maintenance 3. Select Add Clinician 4. Click on the radio button next to the appropriate role. Roles are defined as: 9 Role Clinician Ordering Authority Ordering Authority/Clinician 5. 6. 7. 8. XII. Definition The clinician is the person who administers the immunization. The person who ordered the immunization. Check this option for a person that both authorizes and administers immunizations. Enter the clinician’s last name Double click on your organization’s name to move from the left column to the right hand column. Click on the Save button Entries can be selected from the drop down lists for the ―ordering authority‖ and ―administered by‖ fields on the Add Immunization screens. Inventory A. Managing inventory in ImmuNet is not a mandatory feature, although it could improve efficiency by allowing: 1. personnel to view it in one place (ImmuNet) 2. add new inventory (lots) as it comes in 3. update existing inventory 4. vaccine inventory automatically decrements as immunizations are recorded 5. receive reminders, and run reports based on inventory on hand and used B. Administrative users can set up the ImmuNet Inventory module by clicking on Manage inventory under the Inventory options. 1. Click on Show Inventory 2. Select Add Inventory 3. Enter individual lot information 4. Click on Save 5. Repeat this process for each lot in your inventory C. Modifying Quantity on Hand for a Vaccine Lot 1. Click on Manage Inventory under the Inventory options. 2. Press Show Inventory 3. Select the appropriate vaccine lot, by checking the box next to its Trade Name. 4. Click on Modify Quantity 5. Begin by selecting Add or Subtract from the drop down list. 6. Enter the number of doses that will be added or subtracted. 7. Select the reason for modifying the quantity from the drop down list 8. Click on the Save button to keep the updated information. D. Updating Inventory Alert Preferences - After the ImmuNet Inventory Module has been set up for your organization, administrative users can update inventory alert preferences. 1. Click on Manage Inventory under the Inventory options. 2. Select Update Inventory Alert Preferences 3. Enter the number of days prior to any lot’s expiration date to set up the Inventory that is going to Expire or Expired Lot’s with a Quantity alert. 4. Select whether you would like to establish Inventory that is Running Low By Vaccine Group or Inventory that is Running Low by Trade Name by clicking on the appropriate radio button. 5. If setting up the alert by Trade Name, enter the low-level alert number into the field next to Trade Name. 10 6. 7. If setting up the alert by Vaccine Group, enter the low-level alert numbers for each vaccine group listed. Notice that this alert separates public stock from private stock. After alerts have been updated, click on the Save button at the bottom of the screen. XIII. Reports A. Patient specific reports are available for each patient that has been entered into ImmuNet. To access the patient specific reports, click on the Reports button from either the Personal Information screen or Immunization History screen. 1. Vaccine Administration Report, DHMH Form 4500 2. Maryland 896 School Certificate 3. Immunization History Report 4. Immunizations Needed Report B. Most organization level reports are generated against the data mart. The data mart captures a snapshot of all data entered into ImmuNet every night at midnight. Therefore, information entered the day you run your reports will not be shown. Remember, these reports will only include data that has been entered into ImmuNet up until the night before. 1. Group Patients Reports – Allows users to generate either the Immunization History Report or Health Appraisal Form for a group of selected patients. 2. Reminder/recall – Allows users to create listings, letters, and mailing labels for patients that have become due or overdue for immunizations. 3. Manage custom letter – Use this option to create up to three Custom Letter templates for your organization. 4. Assessment report – This report compiles an organization’s immunization data into a useful format. 5. Benchmark Report – Allows ImmuNet users to retrieve a list and count of patients who have met an immunization benchmark or predefined series of benchmarks. 6. Ad Hoc List & Count Reports – Allows users to create customized reports using such criteria as date, vaccine group, ethnicity, and other factors. The report function produces two types of reports; one type produces lists with information about selected patients, the other type produces counts, either of patients or of information. 11