1
Spectrum™ Technology Platform
Version 9.0 SP2
Data Quality Guide
Contents
Chapter 1: Getting Started..................................................................................7
Introduction to Data Quality.................................................................................8
Chapter 2: Parsing..............................................................................................9
Introduction to Parsing.......................................................................................10
Defining Domain-Independent Parsing Grammars..........................................11
Culture-Specific Parsing.....................................................................................12
Defining a Culture-Specific Parsing Grammar............................................12
Assigning a Parsing Culture to a Record....................................................13
Grammars...................................................................................................20
Cultures......................................................................................................44
Domains.....................................................................................................46
Analyzing Parsing Results.................................................................................48
Tracing Final Parsing Results.....................................................................48
Stepping Through Parsing Events..............................................................49
Parsing Personal Names....................................................................................51
Dataflow Templates for Parsing.........................................................................51
Parsing English Names..............................................................................51
Parsing Arabic Names................................................................................52
Parsing Chinese Names.............................................................................54
Parsing Spanish and German Names........................................................56
Parsing E-mail Addresses..........................................................................57
Parsing U.S. Phone Numbers....................................................................60
Chapter 3: Standardization...............................................................................63
Standardizing Terms...........................................................................................64
Standardizing Personal Names..........................................................................65
Templates for Standardization...........................................................................66
Formalizing Personal Names.....................................................................66
Chapter 4: Matching..........................................................................................69
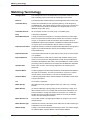
Matching Terminology........................................................................................70
Techniques for Defining Match Keys................................................................71
Match Rules.........................................................................................................73
Building a Match Rule.................................................................................74
Testing a Match Rule..................................................................................80
Sharing a Match Rule.................................................................................81
Viewing Shared Match Rules.....................................................................82
Creating a Custom Match Rule as a JSON Object.....................................82
Matching Records from a Single Source..........................................................82
Matching Records from One Source to Another Source.................................86
Matching Records Between and Within Sources.............................................89
Matching Records Against a Database.............................................................93
Matching Records Using Multiple Match Rules...............................................95
Creating a Universal Matching Service.............................................................97
Using an Express Match Key...........................................................................100
Analyzing Match Results..................................................................................102
Viewing a Summary of Match Results......................................................103
Viewing Record-Level Match Results.......................................................107
Analyzing Match Rule Changes...............................................................111
Adding Match Results...............................................................................112
Removing Match Results..........................................................................113
Example: Using Match Analysis...............................................................113
Dataflow Templates for Matching....................................................................115
Identifying Members of a Household........................................................115
Determining if a Prospect is a Customer..................................................117
Chapter 5: Deduplication................................................................................121
Filtering Out Duplicate Records......................................................................122
Creating a Best of Breed Record.....................................................................124
Chapter 6: Exception Records.......................................................................129
Designing a Dataflow to Handle Exceptions..................................................130
Designing a Dataflow for Real-Time Revalidation..........................................131
Chapter 7: Lookup Tables..............................................................................135
Introduction to Lookup Tables.........................................................................136
Data Normalization Module Tables..................................................................136
Advanced Transformer Tables..................................................................136
Open Parser Tables..................................................................................137
Table Lookup Tables.................................................................................138
Universal Name Module Tables........................................................................140
Name Variant Finder Tables.....................................................................140
Open Name Parser Tables.......................................................................140
Viewing the Contents of a Lookup Table........................................................141
Adding a Term to a Lookup Table....................................................................142
Removing a Term from a Lookup Table..........................................................142
Modifying the Standardized Form of a Term..................................................142
4
Spectrum™ Technology Platform 9.0 SP2
Reverting Table Customizations......................................................................143
Creating a Lookup Table...................................................................................143
Importing Data...................................................................................................143
Importing Data Into a Lookup Table..........................................................143
Using Advanced Import............................................................................144
Chapter 8: Stages Reference.........................................................................147
Advanced Matching Module.............................................................................148
Advanced Matching Module.....................................................................148
Best of Breed............................................................................................148
Candidate Finder......................................................................................154
Duplicate Synchronization........................................................................161
Filter..........................................................................................................164
Interflow Match.........................................................................................168
Intraflow Match.........................................................................................171
Match Key Generator...............................................................................174
Transactional Match.................................................................................177
Write to Search Index...............................................................................179
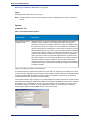
Business Steward Module................................................................................181
Business Steward Module Introduction....................................................181
Exception Monitor.....................................................................................181
Read Exceptions......................................................................................187
Write Exceptions.......................................................................................189
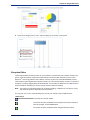
Business Steward Portal Introduction.......................................................190
Exception Counts.....................................................................................191
Exception Editor.......................................................................................193
Manage Exceptions..................................................................................222
Data Quality Performance........................................................................224
Data Normalization Module..............................................................................226
Data Normalization Module......................................................................226
Advanced Transformer.............................................................................227
Open Parser.............................................................................................230
Table Lookup............................................................................................232
Transliterator.............................................................................................235
Universal Name Module....................................................................................238
Universal Name Module...........................................................................238
Name Parser (DEPRECATED).................................................................239
Name Variant Finder.................................................................................254
Open Name Parser...................................................................................256
Chapter 9: ISO Country Codes and Module Support...................................273
Country ISO Codes and Module Support........................................................274
Data Quality Guide
5
Getting Started
In this section:
• Introduction to Data Quality . . . . . . . . . . . . . . . . . . . . . . . . .8
1
Introduction to Data Quality
Introduction to Data Quality
Data quality involves ensuring the accuracy, timeliness, completeness, and consistency of the data used
by an organization so that the data is fit for use. Spectrum™ Technology Platform supports data quality
initiatives by providing the following capabilities.
Parsing
Parsing is the process of analyzing a sequence of input characters in a field and breaking it up into
multiple fields. For example, you might have a field called Name which contains the value "John A. Smith"
and through parsing, you can break it up so that you have a FirstName field containing "John", a
MiddleName field containing "A" and a LastName field containing "Smith".
Standardization
Standardization takes data of the same type and puts it in the same format. Some types of data that
may be standardized include telephone numbers, dates, names, addresses, and identification numbers.
For example, telephone numbers can be formatted to eliminate non-numeric characters such as
parentheses, periods, or dashes.
You should standardize your data before performing matching or deduplication activities since standardized
data will be more accurately matched than data that is inconsistently formatted.
Matching
Matching is the process of identifying records that are related to each other in some way that is significant
for your purposes. For example, if you are trying to eliminate redundant information from your customer
data, you may want to identify duplicate records for the same customer; or, if you are trying to eliminate
duplicate marketing pieces going to the same address, you may want to identify records of customers
that live in the same household.
Deduplication
Deduplication identifies records that represent one entity but for one reason or another were entered
into the system multiple times, sometimes with slightly different data. For example, your system may
contain vendor information from different departments in your organization, with each department using
a different vendor ID for the same vendor. Using Spectrum™ Technology Platform you can consolidate
these records into a single record for each vendor.
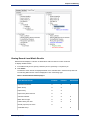
Review of Exception Records
In some cases you may have data that cannot be confidently processed automatically and that must be
reviewed by a knowledgeable data steward. Some examples of records that may require manual review
include:
•
•
•
•
Address verification failures
Geocoding failures
Low-confidence matches
Merge/consolidation decisions
The Business Steward Module provides a set of features that allow you to identify and resolve exception
records.
8
Spectrum™ Technology Platform 9.0 SP2
Parsing
In this section:
•
•
•
•
•
•
Introduction to Parsing . . . . . . . . . . . . . . . . . . . . . . . . . . .10
Defining Domain-Independent Parsing Grammars . . . . .11
Culture-Specific Parsing . . . . . . . . . . . . . . . . . . . . . . . . . .12
Analyzing Parsing Results . . . . . . . . . . . . . . . . . . . . . . . . .48
Parsing Personal Names . . . . . . . . . . . . . . . . . . . . . . . . . .51
Dataflow Templates for Parsing . . . . . . . . . . . . . . . . . . . .51
2
Introduction to Parsing
Introduction to Parsing
Parsing is the process of analyzing a sequence of input characters in a field and breaking it up into
multiple fields. For example, you might have a field called Name which contains the value "John A. Smith"
and through parsing, you can break it up so that you have a FirstName field containing "John", a
MiddleName field containing "A" and a LastName field containing "Smith".
To create a dataflow that parses, use the Open Parser stage. Open Parser allows you to write parsing
rules called grammars. A grammar is a set of expressions that map a sequence of characters to a set
of named entities called domain patterns. A domain pattern is a sequence of one or more tokens in your
input data that you want to represent as a data structure, such as name, address, or account numbers.
A domain pattern can consist of any number of tokens that can be parsed from your input data. A domain
pattern is represented in the parsing grammar as the <root> expression. Input data often contains such
tokens in hard-to-use or mixed formats. For example:
• Your input data contains names in a single field that you want to separate into given name and family
name.
• Your input data contains addresses from several cultures and you want to extract address data for a
specific culture only.
• Your input data includes free-form text that contains embedded email addresses and you want to
extract email addresses and match them up with personal data and store them in a database.
There are two kinds of grammars: culture specific and domain independent. A culture-specific parsing
grammar is associated with a culture and/or language (such as English, Canadian English, Spanish,
Mexican Spanish, and so on) and a particular type of data (phone numbers, personal names, and so
on). When an Open Parser stage is configured to perform culture-specific parsing, each culture's parsing
grammar is applied to each record. The grammar with the best parser score (or the first one to have a
score of 100) is the one whose results are returned. Alternatively, culture-specific parsing grammars can
use the value in the input record's CultureCode field and process the data according to the culture settings
contained in the culture's parsing grammar. Culture-specific parsing grammars can inherit properties
from a parent. A domain-independent parsing grammar is not associated with either a language or a
particular type of data. Domain-independent parsing grammars do not inherit properties from a parent
and ignore any CultureCode information in the input data.
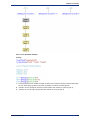
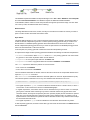
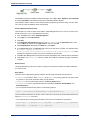
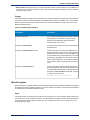
Open Parser analyzes a sequence of characters in input fields and categorizes them into a sequence
of tokens through a process called tokenization. Tokenization is the process of delimiting and classifying
sections of a string of input characters into a set of tokens based on separator characters (also called
tokenizing characters), such as space, hyphen, and others. The tokens are then placed into output fields
you specify.
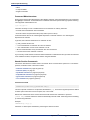
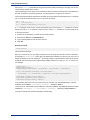
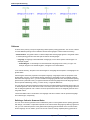
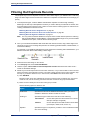
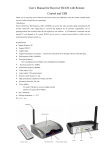
The following diagram illustrates the process of creating a parsing grammar:
10
Spectrum™ Technology Platform 9.0 SP2
Chapter 2: Parsing
Defining Domain-Independent Parsing Grammars
A domain-independent parsing grammar is not associated with either a language or a particular type of
data. Domain-independent parsing grammars do not inherit properties from a parent and ignore the
CultureCode field if it is present in the input records.
To define domain-independent parsing grammars:
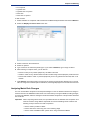
1. In Enterprise Designer, add an Open Parser stage to your dataflow.
2. Double-click the Open parser stage on the canvas.
3. Click Define Domain Independent Grammar on the Rules tab.
4. Use the Grammar Editor to create the grammar rules. You can type commands and variables into
the text box or use the commands provided in the Commands tab. For more information, see
Grammars on page 20.
5. To cut, copy, paste, and find and replace text strings in your parsing grammar, right-click in the
Grammar Editor and select the appropriate command.
6. To check the parsing grammar you have created, click Validate.
The validate feature lists any errors in your grammar syntax, including the line and column where
the error occurs, a description of the error, and the command name or value that is causing the error.
Data Quality Guide
11
Culture-Specific Parsing
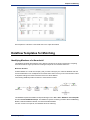
7. Click the Preview tab to test the parsing grammar.
8. When you are finished creating your parsing grammar, click OK.
Culture-Specific Parsing
Defining a Culture-Specific Parsing Grammar
A culture-specific parsing grammar allows you to specify different parsing rules for different languages
and cultures. This allows you to parse data from different countries in a single Open Parser stage, for
example phone numbers from the United States and phone numbers from the United Kingdom. By
default, each input record is parsed using each culture's parsing grammar, in the order specified in the
Open Parser stage. You can also add a CultureCode field to the input records if you want a specific
culture's parsing grammar to be used for that record. For more information, see Assigning a Parsing
Culture to a Record on page 13.
Note: If you want to create a domain-independent parsing grammar, see Defining Domain-Independent
Parsing Grammars on page 11.
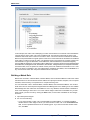
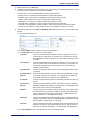
1. In Enterprise Designer, go to Tools > Open Parser Domain Editor.
2. Click the Domains tab.
3. Click Add.
4. Type a domain name in the Name field.
5. Type a description of the domain name in the Description field.
6. If you want to create a new, empty domain, click OK. If you want to create a new domain based on
another domain, do the following:
a) Select Use another domain as a template if you want to create a new domain based on another
domain.
b) Select a domain from the list. When you click OK in the next step, the new domain will be created.
The new domain will contain all of the culture-specific parsing grammars defined in the domain
template that you selected.
c) Click OK.
7. Define the parsing grammar for the global culture. The global culture is the default culture and is
used to parse records that have a culture for which no culture-specific parsing grammar has been
defined.
a) On the Grammars tab, select the new domain you created.
b) If you created a domain from a template, there may be cultures already listed.
• If there are cultures listed, select Global Culture then click Edit.
• If there are no cultures listed, click Add, select Global Culture then click OK.
c) On the Grammar tab, write the parsing grammar for the global culture. You can use the
Commands, Grammar Rules, and RegEx Tags tabs to insert predefined parsing grammar
elements. To enter a predefined element, place the cursor where you want to insert the element
then double-click the element you want to add.
The Commands tab displays parsing commands. For information about the commands available,
see Grammars on page 20.
The Grammar Rules tab displays grammar rules that you create in the Culture Properties dialog
box. For more information about creating grammar rules, see Defining a Culture's Grammar
Rules on page 44.
The RegEx Tags tab displays RegEx tags that you create in the Culture Properties dialog box.
For more information about creating RegEx tags, see Defining Culture RegEx Tags on page
45.
12
Spectrum™ Technology Platform 9.0 SP2
Chapter 2: Parsing
d) To check the grammar syntax you have created, click Validate. The parsing grammar validation
feature displays any errors in your grammar syntax and includes the error encountered, the line
and column where the error occurs, and the command, grammar rule, or RegEx tag where the
error occurs.
e) To test the results of your grammar with sample data, click the Preview tab. Under Input Data,
enter sample data you want to parse. Enter one record per row. Then, click the Preview button.
The parsed output fields display in the Results grid. For information about the output fields, see
Output on page 232. For information about trace, see Tracing Final Parsing Results on page
48. If your results are not what you expected, click the Grammars tab and continue editing the
parsing grammar and testing representative input data until the parsing grammar produces the
expected results.
f) Click OK when you are done defining the parsing grammar for the global culture.
8. Define a culture-specific grammar for each culture you want. To add culture-specific grammars, click
Add and define the grammar using the same steps as for the global culture. Repeat as needed to
add as many cultures as you need.
9. When you are done adding culture-specific parsing grammars, click OK.
The domain and cultures you have created can now be used in the Open Parser stage to perform parsing.
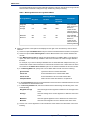
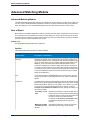
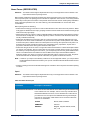
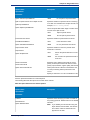
Assigning a Parsing Culture to a Record
When you configure an Open Parser stage to use culture-specific parsing grammars, the parsing
grammars for each culture are applied to each input record in the order the cultures are listed in the
Open Parser stage. However, if you want to apply a specific culture's parsing grammar to a record, you
can add a field named CultureCode. The field must contain one of the supported culture codes listed in
the following table.
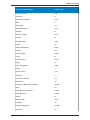
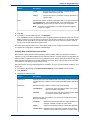
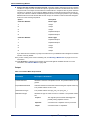
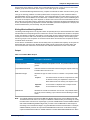
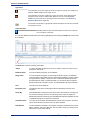
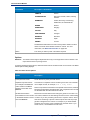
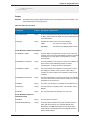
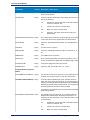
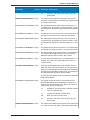
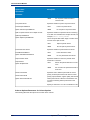
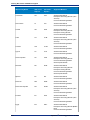
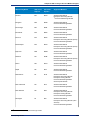
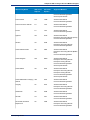
Culture Codes
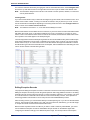
Culture codes consist of a two-letter lowercase language code and a two-letter uppercase country or
region code. For example, "es-MX" for Spanish (Mexico) and "en-US" for English (United States). In
cases where a two-letter language code is not available, a three-letter code is used, for example
"uz-Cyrl-UZ" for Uzbek (Uzbekistan, Cyrillic). A language is specified by only the two-digit lowercase
language code. For example, "fr" specifies the neutral culture for French, and "de" specifies the neutral
culture for German.
Note: There are two culture names that follow a different pattern. The cultures "zh-Hans" (Simplified
Chinese) and "zh-Hant" (Traditional Chinese) are neutral cultures. The culture names represent
the current standard and should be used unless you have a reason for using the older names
"zh-CHS" and "zh-CHT".
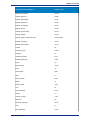
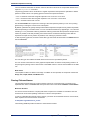
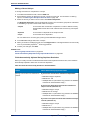
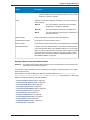
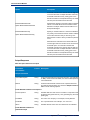
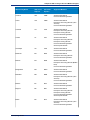
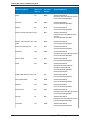
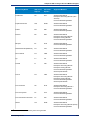
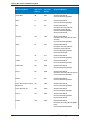
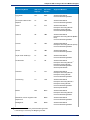
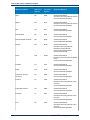
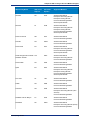
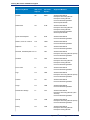
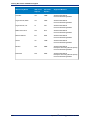
The following table shows the supported culture codes.
Language (Culture/Region)
Culture Code
Global Culture
Global Culture
Afrikaans
af
Afrikaans (South Africa)
af-ZA
Albanian
sq
Albanian (Albania)
sq-AL
Arabic
ar
Arabic (Algeria)
ar-DZ
Arabic (Bahrain)
ar-BH
Data Quality Guide
13
Culture-Specific Parsing
14
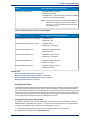
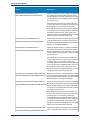
Language (Culture/Region)
Culture Code
Arabic (Egypt)
ar-EG
Arabic (Iraq)
ar-IQ
Arabic (Jordan)
ar-JO
Arabic (Kuwait)
ar-KW
Arabic (Lebanon)
ar-LB
Arabic (Libya)
ar-LY
Arabic (Morocco)
ar-MA
Arabic (Oman)
ar-OM
Arabic (Qatar)
ar-QA
Arabic (Saudi Arabia)
ar-SA
Arabic (Syria)
ar-SY
Arabic (Tunisia)
ar-TN
Arabic (U.A.E.)
ar-AE
Arabic (Yemen)
ar-YE
Armenian
hy
Armenian (Armenia)
hy-AM
Azeri
az
Azeri (Azerbaijan, Cyrillic)
az-Cyrl-AZ
Azeri (Azerbaijan, Latin)
az-Latn-AZ
Basque
eu
Basque (Basque)
eu-ES
Belarusian
be
Belarusian (Belarus)
be-BY
Bulgarian
bg
Bulgarian (Bulgaria)
bg-BG
Catalan
ca
Catalan (Catalan)
ca-ES
Chinese
zh
Chinese (Hong Kong SAR, PRC)
zh-HK
Chinese (Macao SAR)
zh-MO
Chinese (PRC)
zh-CN
Chinese (Simplified)
zh-Hans
Spectrum™ Technology Platform 9.0 SP2
Chapter 2: Parsing
Language (Culture/Region)
Culture Code
Chinese (Singapore)
zh-SG
Chinese (Taiwan)
zh-TW
Chinese (Traditional)
zh-Hant
Croatian
hr
Croatian (Croatia)
hr-HR
Czech
cs
Czech (Czech Republic)
cs-CZ
Danish
da
Danish (Denmark)
da-DK
Divehi
dv
Divehi (Maldives)
dv-MV
Dutch
nl
Dutch (Belgium)
nl-BE
Dutch (Netherlands)
nl-NL
English
en
English (Australia)
en-AU
English (Belize)
en-BZ
English (Canada)
en-CA
English (Caribbean)
en-029
English (Ireland)
en-IE
English (Jamaica)
en-JM
English (New Zealand)
en-NZ
English (Philippines)
en-PH
English (South Africa
en-ZA
English (Trinidad and Tobago)
en-TT
English (United Kingdom)
en-GB
English (United States)
en-US
English (Zimbabwe)
en-ZW
Estonian
et
Estonian (Estonia)
et-EE
Faroese
fo
Faroese (Faroe Islands)
fo-FO
Data Quality Guide
15
Culture-Specific Parsing
16
Language (Culture/Region)
Culture Code
Farsi
fa
Farsi (Iran)
fa-IR
Finnish
fi
Finnish (Finland)
fi-FI
French
fr
French (Belgium)
fr-BE
French (Canada)
fr-CA
French (France)
fr-FR
French (Luxembourg)
fr-LU
French (Monaco)
fr-MC
French (Switzerland)
fr-CH
Galician
gl
Galician (Spain)
gl-ES
Georgian
ka
Georgian (Georgia)
ka-GE
German
de
German (Austria)
de-AT
German (Germany)
de-DE
German (Liechtenstein)
de-LI
German (Luxembourg)
de-LU
German (Switzerland)
de-CH
Greek
el
Greek (Greece)
el-GR
Gujarati
gu
Gujarati (India)
gu-IN
Hebrew
he
Hebrew (Israel)
he-IL
Hindi
hi
Hindi (India)
hi-IN
Hungarian
hu
Hungarian (Hungary)
hu-HU
Icelandic
is
Spectrum™ Technology Platform 9.0 SP2
Chapter 2: Parsing
Language (Culture/Region)
Culture Code
Icelandic (Iceland)
is-IS
Indonesian
id
Indonesian (Indonesia)
id-ID
Italian
it
Italian (Italy)
it-IT
Italian (Switzerland)
it-CH
Japanese
ja
Japanese (Japan)
ja-JP
Kannada
kn
Kannada (India)
kn-IN
Kazakh
kk
Kazakh (Kazakhstan)
kk-KZ
Konkani
kok
Konkani (India)
kok-IN
Korean
ko
Korean (Korea)
ko-KR
Kyrgyz
ky
Kyrgyz (Kyrgyzstan)
ky-KG
Latvian
lv
Latvian (Latvia)
lv-LV
Lithuanian
lt
Lithuanian (Lithuania)
lt-LT
Macedonian
mk
Macedonian (Macedonia, FYROM)
mk-MK
Malay
ms
Malay (Brunei Darussalam)
ms-BN
Malay (Malaysia)
ms-MY
Marathi
mr
Marathi (India)
mr-IN
Mongolian
mn
Mongolian (Mongolia)
mn-MN
Norwegian
no
Data Quality Guide
17
Culture-Specific Parsing
18
Language (Culture/Region)
Culture Code
Norwegian (Bokmål, Norway)
nb-NO
Norwegian (Nynorsk, Norway)
nn-NO
Polish
pl
Polish (Poland)
pl-PL
Portuguese
pt
Portuguese (Brazil)
pt-BR
Portuguese (Portugal)
pt-PT
Punjabi
pa
Punjabi (India)
pa-IN
Romanian
ro
Romanian (Romania)
ro-RO
Russian
ru
Russian (Russia)
ru-RU
Sanskrit
sa
Sanskrit (India)
sa-IN
Serbian
sr
Serbian (Serbia, Cyrillic)
sr-Cyrl-CS
Serbian (Serbia, Latin)
sr-Latn-CS
Slovak
sk
Slovak (Slovakia)
sk-SK
Slovenian
sl
Slovenian (Slovenia)
sl-SI
Spanish
es
Spanish (Argentina)
es-AR
Spanish (Bolivia)
es-BO
Spanish (Chile)
es-CL
Spanish (Colombia)
es-CO
Spanish (Costa Rica)
es-CR
Spanish (Dominican Republic)
es-DO
Spanish (Ecuador)
es-EC
Spanish (El Salvador)
es-SV
Spanish (Guatemala)
es-GT
Spectrum™ Technology Platform 9.0 SP2
Chapter 2: Parsing
Language (Culture/Region)
Culture Code
Spanish (Honduras)
es-HN
Spanish (Mexico)
es-MX
Spanish (Nicaragua)
es-NI
Spanish (Panama)
es-PA
Spanish (Paraguay)
es-PY
Spanish (Peru)
es-PE
Spanish (Puerto Rico)
es-PR
Spanish (Spain)
es-ES
Spanish (Spain, Traditional Sort)
es-ES_tradnl
Spanish (Uruguay)
es-UY
Spanish (Venezuela)
es-VE
Swahili
sw
Swahili (Kenya)
sw-KE
Swedish
sv
Swedish (Finland)
sv-FI
Swedish (Sweden)
sv-SE
Syriac
syr
Syriac (Syria)
syr-SY
Tamil
ta
Tamil (India)
ta-IN
Tatar
tt
Tatar (Russia)
tt-RU
Telugu
te
Telugu (India)
te-IN
Thai
th
Thai (Thailand)
th-TH
Turkish
tr
Turkish (Turkey)
tr-TR
Ukrainian
uk
Ukrainian (Ukraine)
uk-UA
Urdu
ur
Urdu (Pakistan)
ur-PK
Data Quality Guide
19
Culture-Specific Parsing
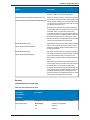
Language (Culture/Region)
Culture Code
Uzbek
uz
Uzbek (Uzbekistan, Cyrillic)
uz-Cyrl-UZ
Uzbek (Uzbekistan, Latin)
uz-Latn-UZ
Vietnamese
vi
Vietnamese (Vietnam)
vi-VN
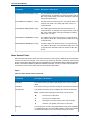
Grammars
A valid parsing grammar contains:
• A root variable that defines the sequence of tokens, or domain pattern, as rule variables.
• Rule variables that define the valid set of characters and the sequence in which those characters can
occur in order to be considered a member of a domain pattern. For more information, see Rule Section
Commands on page 25.
• The input field to parse. Input field designates the field to parse in the source data records.
• The output fields for the resulting parsed data. Output fields define where to store each resulting token
that is parsed.
A valid parsing grammar also contains other optional commands for:
• Characters used to tokenize the input data that you are parsing. Tokenizing characters are characters,
like space and hyphen, that determine the start and end of a token. The default tokenization character
is a space. Tokenizing characters are the primary way that a sequence of characters is broken down
into a set of tokens. You can set the tokenize command to NONE to stop the field from being tokenized.
When tokenize is set to None, the grammar rules must include any spaces within its rule definition.
• Casing sensitivity options for tokens in the input data.
• Join character for delimiting matching tokens.
• Matching tokens in tables
• Matching compound tokens in tables
• Defining RegEx tags
• Literal strings in quotes
• Expression Quantifiers (optional). For more information about expression quantifiers, see Rule Section
Commands on page 25 and Expression Quantifiers: Greedy, Reluctant, and Possessive Behavior
on page 33.
• Other miscellaneous indicators for grouping, commenting, and assignment (optional). For more
information about grouped expressions, see Grouping Operator ( ) on page 30.
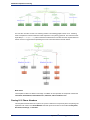
The rule variables in your parsing grammar form a layered tree structure of the sequence of characters
or tokens in a domain pattern. For example, you can create a parsing grammar that defines a domain
pattern based on name input data that contains the tokens <FirstName>, <MiddleName>, and
<LastName>.
20
Spectrum™ Technology Platform 9.0 SP2
Chapter 2: Parsing
Using the input data:
Joseph Arnold Cowers
You can represent that data string as three tokens in a domain pattern:
<root> = <FirstName><MiddleName><LastName>;
The rule variables for this domain pattern are:
<FirstName> = <given>;
<MiddleName> = <given>;
<LastName> = @Table("Family Names");
<given> = @RegEx("[A-Za-z]+");
Based on this simple grammar example, Open Parser tokenizes on spaces and interprets the token
Joseph as a first name because the characters in the first token match the [A-Za- z]+ definition and the
token is in the defined sequence. Optionally, any expression may be followed by another expression.
Example
<variable> = "some leading string" <variable2>;
<variable2> = @Table ("given") @RegEx("[0-9]+");
A grammar rule is a grammatical statement wherein a variable is equal to one or more expressions.
Each grammar rule follows the form:
<rule> = expression [| expression...];
Grammar rules must follow these rules:
• <root> is a special variable name and is the first rule executed in the grammar because it defines
the domain pattern. <root> may not be referenced by any other rule in the grammar.
• A <rule> variable may not refer to itself directly or indirectly. When rule A refers to rule B, which
refers to rule C, which refers to rule A, a circular reference is created. Circular references are not
permitted.
• A <rule> variable is equal to one or more expressions.
• Each expression is separated by an OR, which is indicated using the pipe character"(|).
• Expressions are examined one at a time. The first expression to match is selected. No further
expressions are examined.
• The variable name may be composed of alphabetic, numeric, underscore (_) and hyphen (-). The
name of the variable may start with any valid character. If the specified output field name does not
conform to this form, use the alias feature to map the variable name to the output field.
An expression may be any of the following types:
• Another variable
• A string consisting of one or more characters in single or double quotes. For example:
"McDonald" 'McDonald' "O'Hara" 'O\'Hara' 'D"har' "D\"har"
Data Quality Guide
21
Culture-Specific Parsing
• Table
• CompoundTable
• RegEx commands
Command Metacharacters
Open Parser supports the standard set of Java RegEx character class metacharacters in the %Tokenize
and @RegEx commands. A metacharacter is a character that carries special meaning in pattern matching.
The supported metacharacters are:
([{\^-$|]})?*+.
There are two ways to force a metacharacter to be treated as an ordinary character:
• Precede the metacharacter with a backslash
• Enclose it within \Q (which starts the quote) and \E (which ends it).
%Tokenize follows the rule for Java Regular Expressions character classes—not Java Regular
Expressions as a whole.
In general, the reserved characters for a character set are:
•
•
•
•
•
'[' and ']' indicate another set.
'-' is a metacharacter if in between two other characters.
'^' is a metacharacter if it is the first character in a set.
'&&' are metacharacters if they are between two other characters.
'\' means next that the character is a literal.
If you have any doubt whether a character will be treated as a metacharacter and you want the character
to be treated as a literal, escape that character using the backlash.
Header Section Commands
This section describes the header section commands. Some commands are optional. If a command is
optional, the default value or behavior is listed.
•
•
•
•
•
•
Tokenize Command on page 22 (optional)
Tokenize (None) on page 23
InputField Command on page 23 (required)
OutputFields Command on page 23 (required)
IgnoreCase Command on page 24 (optional)
Join Command on page 24 (optional)
Tokenize Command
%Tokenize([token set],[preserved set]);
This is an optional command. If not specified, the default is [\s], which is the regular expression default
for white space characters such as a space, tab, or line break.
Defines the characters that are used to tokenize a field and sets the characters to preserve.
[token set] is a list of characters used to automatically tokenize a field. Tokenizing refers to breaking
up a field using delimiters.
Example
%Tokenize([-\s],[-];
Tokenizes on white space and dashes, preserving the dash as a token.
22
Spectrum™ Technology Platform 9.0 SP2
Chapter 2: Parsing
Note: %Tokenize follows the Java RegEx syntax rules. Use the backslash character "\" to force Open
Parser to treat the hyphen and other metacharacters as ordinary characters. For example, the
hyphen character (-) can be used to specify either a literal hyphen or a range of characters. If
you set the value of %Tokenize to [(-)], Open Parser will interpret that to mean the range of
characters between the open parentheses "("and close parentheses")" characters. See
Command Metacharacters on page 22 for a complete list of reserved characters.
[preserved set] is a regular expression definition of a character set of those tokens in a token set
that are retained and will appear in the list of tokens. For example, if token set is space and hyphen, and
preserved set is hyphen, "before-after this" would be broken down into 4 tokens: 'before', '-', 'after' and
'this.
To use this command:
1. Position the cursor where you want the command inserted.
2. Double-click %Tokenize in the Commands list.
3. Click the Token Set arrow to select a RegEx value or type values in the Token Set text box.
There are several predefined RegEx tags that you can use to define the token set. For more
information, see Defining a Culture-Specific Parsing Grammar on page 12.
4. Optionally, select Characters to preserve check box.
5. Click the Token set characters to preserve arrow and select a value or type values in the text box.
6. Click OK.
Tokenize (None)
This is an optional command.
You can set Tokenize to None to stop field tokenization. When Tokenize is set to None, the parsing
grammar rule must include any spaces or other token separators within its rule definition.
To use this command:
1. Position the cursor where you want the command inserted.
2. Double-click %Tokenize(None) in the Commands list.
InputField Command
%InputField("name");
This is a required command. If not specified, an error occurs.
The name of the target input field.
Example
%InputField("PhoneNumber");
To use this command:
1.
2.
3.
4.
Position the cursor where you want the command inserted.
Double-click %InputField in the Commands list.
Type the input field name.
Click OK.
OutputFields Command
%OutputFields("name"->"alias", "name..."->"alias...");
This is a required command. If not specified, an error occurs.
Data Quality Guide
23
Culture-Specific Parsing
The name (or alias, if specified) must correspond to the name of a <variable> used in the Rule
section.
Example
%OutputFields("FirstName","LastName");
FirstName and LastName are fields that will be output from the stage. The respective values come
from FirstName and LastName grammar rules.
An alias allows you to have a rule with one name, but have the results output to a field of a different
name.
Example
%OutputFields("FN1"->"FirstName","FN2"->"FirstName", "LastName");
FirstName and LastName are fields that will be output from the stage. The value for FirstName
comes from FN1 or FN2 grammar rules (which is evaluated last) and LastName comes from the LastName
grammar rule.
To use this command:
1. Position the cursor where you want the command inserted.
2. Double-click %OutputFields in the Commands list.
3. Type the name of the rule or select it from the Rule list.
The name of each rule must correspond to a <variable> used in the Rule section. The rules that you
list here will be output as new fields as described previously.
1.
2.
3.
4.
Optionally, type the name of the alias or select it from the Alias list.
Repeat for each rule.
To delete a rule, select the row and then press Delete.
Click OK.
IgnoreCase Command
%IgnoreCase;
This command is optional. If not specified, all @RegEx commands are case sensitive. Case sensitivity
can also be set at the variable-level. For more information, see RegEx Command on page 25.
Sets a global default that all @RegEx commands are not case sensitive.
1. Position the cursor where you want the command inserted.
2. Double-click %IgnoreCase in the Commands list.
Join Command
%Join("Separator");
This command is optional.
If not specified, a single space is used if Tokenize is set to any value other than None. An empty string
(no characters) is used if Tokenize is set to None.
Example
%Join("-");
If the input field contains social security numbers, the social security number is output intact with hyphens.
To use this command:
1. Position the cursor where you want the command inserted.
2. Double-click %Join in the Commands list.
24
Spectrum™ Technology Platform 9.0 SP2
Chapter 2: Parsing
3. Type a single character in the text box.
4. Click OK.
Rule Section Commands
The rule section commands are:
•
•
•
•
•
•
•
•
•
•
•
RegEx Command on page 25
Table Command on page 26
CompoundTable Command on page 26
Token Command on page 27
Scoring Command on page 27
Rule ID Command on page 28
<root> Variable on page 29
rule|rule Command on page 30
Grouping Operator ( ) on page 30
Min/Max Occurrences Operator {min,max} on page 30
Exact Occurrences Operator {exact} on page 31
•
•
•
•
•
•
•
•
Assignment Operator (=) on page 31
OR Operator (|) on page 32
End-of-Rule Operator (;) on page 32
Commenting Operator (!) on page 32
Zero or One Occurrences Quantifier (?) on page 32
Zero or More Occurrences Quantifier (*) on page 33
One or More Occurrences Quantifier (+) on page 33
Expression Quantifiers: Greedy, Reluctant, and Possessive Behavior on page 33
RegEx Command
@RegEx ("expression"[,IgnoreCase|NoIgnoreCase])
This command is optional.
Matches a token to a regular expression and sets the casing option. Use the the global casing option
(%IgnoreCase) for the parsing grammar. For casing information, see IgnoreCase Command on page
24.
Example
<GivenName> = @RegEx("[A-Z]+",IgnoreCase)
For this rule to be true, a token must contain characters from A-Z one or more times and the casing of
those characters will be ignored.
Regular expressions describe a set of strings based on common patterns shared by each string in the
set. In Open Parser, they are used to search input data and output that data into the form you specify
as OutputFields. Regular expressions vary in complexity. After you understand the basics of how regular
expressions are constructed, you'll be able to create any regular expression. The syntax of the regular
expressions supported is that defined in the Java documentation with the following differences:
• Capturing groups and back references as defined by Java are not supported.
• Posix-style character set classes are supported when defined using Domain Editor RegEx tags.
• RegularExpression may not match an empty string. For example, @RegEx("[A-Z]?") or
@RegEx("[A-Z]?") are not allowed because an empty string would be invalid.
The use of ? or * is not restricted, however, these quantifiers may be used as long as the expression
does not match an empty string. For example, @RegEx("[A-Z]+\.?") is valid as only part of the
expression is optional.
Data Quality Guide
25
Culture-Specific Parsing
You can control how often the @RegEx command itself appears using * or ?. This restriction is just for
the regular expression inside of the @RegEx command.
To use this command:
1.
2.
3.
4.
Position the cursor where you want the command inserted.
Double-click @RegEx in the Commands list.
Select the expression name from the list or type a regular expression.
Select a casing option.
• Use global option means that the RegEx tag will use the case-sensitivity setting defined in the
grammar rule. If %IgnoreCase is defined in the grammar rule, RegEx commands will be case
sensitive. If it is not defined in the grammar rule, RegEx commands will not be case sensitive.
• Case insensitive means that the RegEx tag will ignore case distinction when matching alphabetic
characters.
• Case sensitive means that the RegEx tag will evaluate case distinction when matching alphabetic
characters.
5. Click OK.
Table Command
@Table ("table-name")
This command is optional.
Matches a token if it finds a matching entry in a table of the specified name. The definition of this table
used by the parser most likely will differ based on active culture. Table matching is case insensitive. For
example, If the token is "BROWN" and the table contains an entry for "Brown", it will be a positive match.
Example
@Table("Given Names")
This command checks to see if a token matches the Givens Names table in Table Management.
To use this command:
1. Position the cursor where you want the command inserted.
2. Double-click @Table in the Commands list.
3. Select the table name.
If you do not see the table you want, you must create the table in Table Management. For more
information, Introduction to Lookup Tables on page 136.
4. Click OK.
CompoundTable Command
@CompoundTable("name", min, max)
This command is optional.
Open Parser tables are processed so that compound terms (such as "Mary Jo," "Jo Beth," "National
Security Administration," and so on) are recognized. Any Open Parser table has this capability, so all
Open Parser tables can support compound and non-compound terms.
Example
@CompoundTable("GivenNames",1,3)
This command checks to see if a token matches the Givens Names table in Table Management and
matches the token if there is a minimum of one matching term or a maximum of three matching terms.
If there are zero matching terms or four or more matching terms, no match is made.
26
Spectrum™ Technology Platform 9.0 SP2
Chapter 2: Parsing
Provide the values for this commands as shown here:
•
•
•
•
name is the name of the table.
min is the value of the minimum number of terms matched to a table.
max is the value of the maximum number of terms matched to a table.
min and max must be a whole number.
To use this command:
1. Position the cursor where you want the command inserted.
2. Double-click @CompoundTable in the Commands list. If you do not want a minimum or maximum
number of occurrences, leave the appropriate field blank.
3. Select the table name.
If you do not see the table you want, you must create the table in Table Management. For more
information, Introduction to Lookup Tables on page 136.
4. Type the value of the minimum number of occurrences of the compound token in the Minimum field.
5. (Optional) Type the value of the maximum number of occurrences of the compound token in the
Maximum field.
6. Click OK.
Token Command
@Token
This command is optional.
Use this command to set the value of an expression to any matching token. When %Tokenize(NONE)
is used, it matches any single character regardless of %Tokenize.
Example
<root> = <a><b>;
<a> = @RegEx("[A-Za-z]+");
<b> = @Token+;
If your input is John Smith-Jones, John matches the first token and Smith-Jones matches the second
token because the expression does not limit the types of characters of the input data.
To use this command:
1. Position the cursor where you want the command inserted.
2. Double-click @Token in the Commands list.
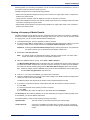
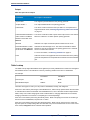
Scoring Command
:Score(Weight)
This command is optional.
Each expression in a rule variable can contain an optional scoring weight. The scoring weight is specified
by appending :Score(Weight), where weight is a whole number between 0 and 100, to the end of
the expression. The Scoring command can precede an OR operator (|) or the end-of-variable character
(;). If an expression does not have an explicit scoring command, a weight value of 100 will be presumed.
In this case, the parsing score will be 0 or 100. If a rule variable contains other rule variables, its score
value is averaged with the subordinate rules. For example, given the rule variable:
<root> = <a> <b> <c>;
<a> = 'a':Score (100);
<b> = 'b':Score (50);
<c> = 'c':Score (100);
Data Quality Guide
27
Culture-Specific Parsing
the score for <root> is calculated as 83 [(100+50+100)/3]. When calculating an average, the score is
rounded to the nearest whole number.
The total average score is output in the ParserScore field. The value of ParserScore will be between 0
and 100, as defined in the parsing grammar. 0 is returned when no matches are returned.
The scoring weight of parent expressions can affect the scoring weight of child expressions. For example,
rule <C> that can be referenced by rule <A> and <B> as follows:
<A> = <C>;
<B> = <C>:Score(50);
<C> = @Table("something"):Score(50);
If <A> is matched, it has a score of 100% (the default score) of the value of <C>, resulting in a scoring
weight of 50. But, if <B> is matched, it has 50% of the value of <C>, resulting in a scoring weight of 25.
To use this command:
1.
2.
3.
4.
Position the cursor where you want the command inserted.
Double-click :Score in the Commands list.
Type a value between 0 and 100 in the text box.
Click OK.
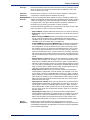
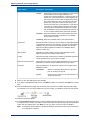
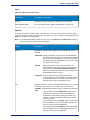
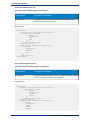
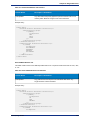
Rule ID Command
:RuleID("ID")
This command is optional.
When you create a rule, you can assign an ID to that rule by using this command. The ID is specified
by appending :RuleID("ID"), where "ID" is an alphanumeric identifier you give the rule. If you do not
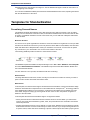
assign an identifier to the rule, Spectrum™ Technology Platform will generate a numeric ID for the rule.
If multiple rules exist, they will be numbered sequentially, based on run order ("1", "2", "3", and so on).
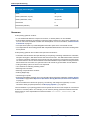
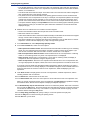
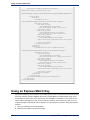
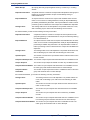
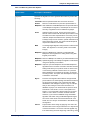
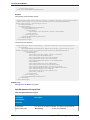
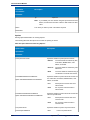
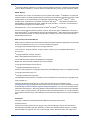
For example:
%IgnoreCase;
%InputField("Name");
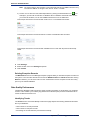
%OutputFields("FirstName", "LastName", "FirstName2", "LastName");
<root>=<FirstName><LastName> :RuleID("Name") |
<FirstName> '&' <FirstName2> <LastName> :RuleID("CompoundName");
<FirstName>=@Table("Given Names");
<FirstName2>=@Table("Given Names");
<LastName>=@Table("Family Names");
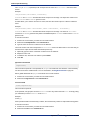
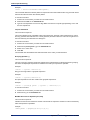
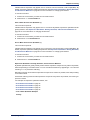
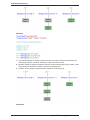
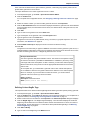
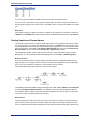
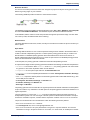
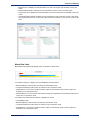
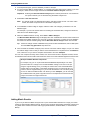
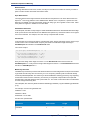
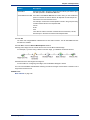
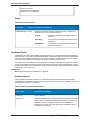
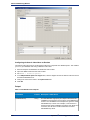
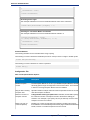
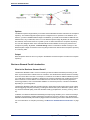
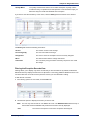
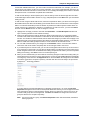
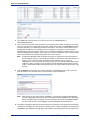
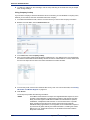
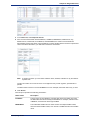
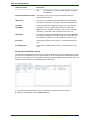
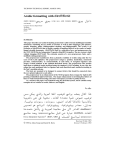
In the example above, the root rule contains two rules. The first one, with RuleID "Name", matches
FirstName and LastName: <FirstName><LastName> :RuleID("Name")
The second rule, with RuleID "CompoundName", matches FirstName and LastName but also includes
FirstName2: <FirstName> '&' <FirstName2> <LastName> :RuleID("CompoundName")
The output of these rules would look similar to the following:
28
Spectrum™ Technology Platform 9.0 SP2
Chapter 2: Parsing
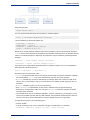
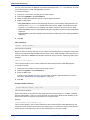
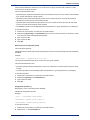
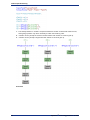
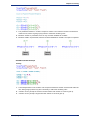
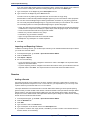
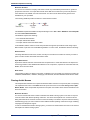
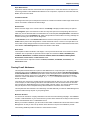
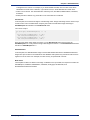
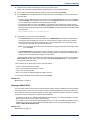
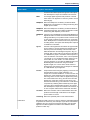
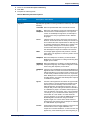
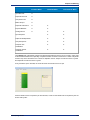
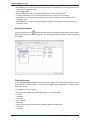
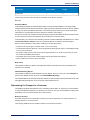
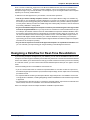
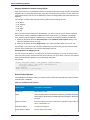
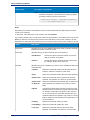
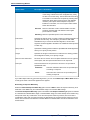
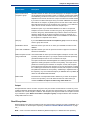
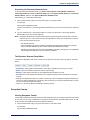
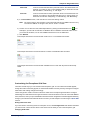
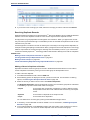
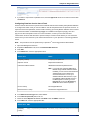
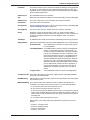
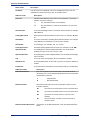
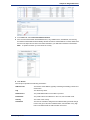
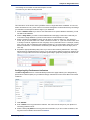
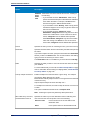
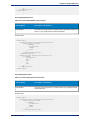
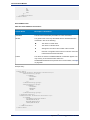
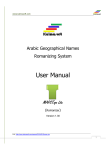
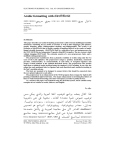
The example below shows the grammar without a user-defined RuleID.
%IgnoreCase;
%InputField("Name");
%OutputFields("FirstName", "LastName", "FirstName2", "LastName");
<root>=<FirstName><LastName> |
<FirstName> '&' <FirstName2> <LastName> ;
<FirstName>=@Table("Given Names");
<FirstName2>=@Table("Given Names");
<LastName>=@Table("Family Names");
The output of these rules would look similar to the following:
To use this command:
1.
2.
3.
4.
Position the cursor where you want the command inserted.
Double-click :RuleID in the Commands list.
Type an alphanumeric value in the text box.
Click OK.
<root> Variable
This command is required. If not specified, an error occurs.
Indicates the root variable. A root variable defines the sequence of tokens, or domain pattern, as rule
variables. Rule variables define the valid set of characters and the sequence in which those characters
can occur in order to be considered a member of a domain pattern.
Data Quality Guide
29
Culture-Specific Parsing
Example
<root> = <Title><GivenName><FamilyName>;
This command defines the domain pattern for a personal name that includes a title. Only personal names
that include a title will match this domain pattern.
To use this command:
1. Position the cursor where you want the command inserted.
2. Double-click <root> in the Commands list.
3. Type the root expressions for the root tag. Make sure there is an equal sign separating <root> and
the root expressions.
rule|rule Command
This command is required.
This control displays a list of available rules (output field rules, grammar rules inherited from a culture,
and any grammar rules defined in the current grammar) and then inserts the rules into the grammar in
the order that they are selected in the dialog box.
To use this command:
1.
2.
3.
4.
Position the cursor where you want the command inserted.
Double-click (<rule>[<rule>...]) in the Commands list.
Select one or more rules.
Click OK.
The selected rules are added to the Grammar Editor in the order you selected them.
Grouping Operator ( )
This command is optional.
This is the grouping operator. Wraps the selected text in parentheses to indicate expression grouping.
Use when a multiple-part expression is treated as a whole by an expression quantifier.
Example
<first> = (<given> <initial>)+;
OR (|) is also supported in a grouped expression.
Example
<first> = (<given>|<initial>)+;
Grouped expressions can also contain other grouped expressions.
Example
<first> = (<foreign given> | (<given> | <initial>)+)?;
To use this command:
1. Position the cursor where you want the command inserted.
2. Double-click ( ) in the Commands list.
Min/Max Occurrences Operator {min,max}
This command is optional.
Indicates a minimum and maximum number of times that an expression should occur and must directly
follow the expression quantified.
example
<FamilyName> = @RegEx("[A-Za-z]+"){1,2};
30
Spectrum™ Technology Platform 9.0 SP2
Chapter 2: Parsing
This command matches a minimum of one occurrence of a group of letters and a maximum of two
occurrences of the group of letters.
This command follows the form:
• expression{min,} means that expression must occur at least min times. The min value must be followed
by a comma and must be a whole number.
• expression{,max} means that expression must occur at most max times. The max value must be
followed by a comma and must be a whole number.
• expression{min,max} means that expression must occur at least min times and at most max times.
The min and max values must be whole numbers.
• The Min/Max operator must immediately follow the expression or group expression it is quantifying.
To use this command:
1. Position the cursor where you want the command inserted.
2. Double-click ({min,max}) in the Commands list. If you do not want a minimum or maximum number
of occurrences, leave the appropriate field blank.
3. Type a value for Min.
4. Type a value for Max.
5. Click OK.
Exact Occurrences Operator {exact}
This command is optional.
Indicates the exact number of times that an expression must occur and must directly follow the expression
quantified.
example
<FamilyName> = @RegEx("[A-Za-z]+"){3};
This command matches exactly three occurrences of a group of letters.
This command follows the form:
• expression{exact} means that expression must occur exact times. The exact value must be a whole
number.
• The Exact operator must immediately follow the expression or group expression it is quantifying.
To use this command:
1.
2.
3.
4.
Position the cursor where you want the command inserted.
Double-click ({exact}) in the Commands list.
Type a value for Exact.
Click OK.
Assignment Operator (=)
Required for <root> command and rule variables.
Indicates an assignment operator.
Example
<root> = <GivenName><FamilyName>;
<GivenName>= @Table("Given Names");
<FamilyName>= @Table("Family Names");
To use this command:
1. Position the cursor where you want the command inserted.
2. Double-click = in the Commands list.
Data Quality Guide
31
Culture-Specific Parsing
OR Operator (|)
This command is optional.
Indicates a conditional choice for one or more tokens.
Example
<root> = <GivenName><FamilyName> |
<FamilyName>;
<GivenName>= @Table("Given Names") | @RegEx("[A-Za-z]+");
<FamilyName>= @Table("Family Names");
Note: The vertical bar | is ISO Latin 1 0x7C and is the usual character used for OR. However, on
keyboards in some countries, a similar character (¦) exists, which ISO Latin 1 (0xA6). This
character is frequently confused with the vertical bar so the grammar syntax treats either character
as the symbol for OR.
To use this command:
1. Position the cursor where you want the command inserted.
2. Double-click | in the Commands list.
End-of-Rule Operator (;)
This command is required at the end of each expression.
Indicates the end of an expression.
Example
<root> = <GivenName><FamilyName>;
<GivenName>= @Table("Given Names");
<FamilyName>= @Table("Family Names");
To use this command:
1. Position the cursor where you want the command inserted.
2. Double-click ; in the Commands list.
Commenting Operator (!)
This command is optional.
The ! character is used to indicate comments. All characters that follow the ! character on the same line
are interpreted as comment. Comments are used to annotate the grammar rules as necessary to explain
the parsing grammar. Comments are not interpreted by Open Parser.
Example
! This rule checks to see if a token matches the Given
! Names table.
<GivenName>= @Table("Given Names");
To use this command:
1. Position the cursor where you want the command inserted.
2. Double-click ! in the Commands list.
3. Type the comment text on the same line following the ! character.
Zero or One Occurrences Quantifier (?)
This command is optional.
32
Spectrum™ Technology Platform 9.0 SP2
Chapter 2: Parsing
Indicates that an expression may appear zero or one times. Can be used with or without {Min,Max}. By
default, expression quantifiers exhibit greedy behavior. See Expression Quantifiers: Greedy, Reluctant,
and Possessive Behavior on page 33 for more information on changing this behavior.
To use this command:
1. Position the cursor where you want the command inserted.
2. Double-click ? in the Commands list.
Zero or More Occurrences Quantifier (*)
This command is optional.
Indicates that an expression may appear zero or more times. By default, expression quantifiers exhibit
greedy behavior. See Expression Quantifiers: Greedy, Reluctant, and Possessive Behavior on
page 33 for more information on changing this behavior.
To use this command:
1. Position the cursor where you want the command inserted.
2. Double-click * in the Commands list.
One or More Occurrences Quantifier (+)
This command is optional.
Indicates that an expression may appear one or more times. Can be used with or without {Min,Max}. By
default, expression quantifiers exhibit greedy behavior. See Expression Quantifiers: Greedy, Reluctant,
and Possessive Behavior on page 33 for more information on changing this behavior.
To use this command:
1. Position the cursor where you want the command inserted.
2. Double-click + in the Commands list.
Expression Quantifiers: Greedy, Reluctant, and Possessive Behavior
By default quantifiers are greedy. Greedy means that the expression accepts as many tokens as possible,
while still permitting a successful match. You can override this behavior by appending a '?' for reluctant
matching or '+' for possessive matching.
Reluctant matching means that the expression accepts as few tokens as possible, while still permitting
a successful match.
Possessive matching means that the expression accepts as many tokens as possible, even if doing so
prevents a match.
For examples of expression quantifier behavior, see:
•
•
•
•
•
Rule Section Commands on page 25
Rule Section Commands on page 25
Rule Section Commands on page 25
Rule Section Commands on page 25
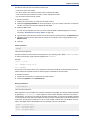
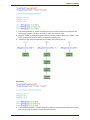
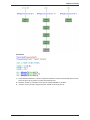
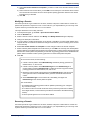
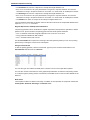
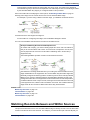
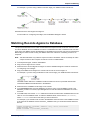
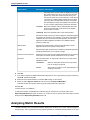
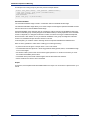
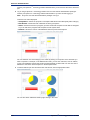
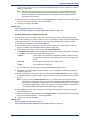
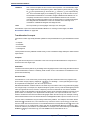
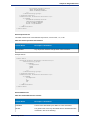
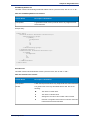
One or More Quantifier Example
Greedy
Data Quality Guide
33
Culture-Specific Parsing
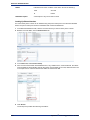
1. The Greedy behavior in <Field1> accepts the maximum number of tokens that match the rule,
while giving up tokens only when necessary to match the remaining rules.
2. <Field2> can only accept the minimum number tokens that <Field1> is forced to give up.
3. <Field3> can only accept a single token that <Field1> is forced to give up.
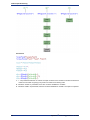
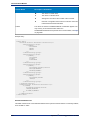
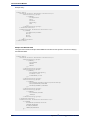
Reluctant
34
Spectrum™ Technology Platform 9.0 SP2
Chapter 2: Parsing
1. The reluctant behavior in <Field1> accepts the minimum number of tokens that match the rule
while giving up tokens only when necessary to match the remaining rules.
2. Because <Field2> is greedy, it accepts the maximum number of tokens given up by <Field1>, while
giving up tokens only when necessary to match the remaining rules.
3. <Field3>can only accept a single token that <Field2> was forced to give up.
Possessive
1. The possessive behavior in <Field1> accepts the maximum number of tokens that match the rule,
while not giving up any tokens to match the remaining rules.
Data Quality Guide
35
Culture-Specific Parsing
2. Because <Field1> is possessive, there are no tokens available for <Field2>. 3. Because <Field1>
is possessive, there are no tokens available for <Field3>.
3. The input is not parsed.
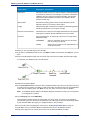
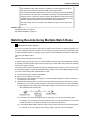
Zero or More Quantifier Example
Greedy
1. The Greedy behavior in <Field1> accepts no tokens or the maximum number of tokens that match
the rule, while giving up tokens only when necessary to match the remaining rules.
2. Because <Field1> is greedy, <Field2> only accepts the minimum number tokens that <Field1> is
forced to give up. Since the minimum for <Field2> is zero, zero tokens match this rule.
3. Because <Field1> is greedy, <Field3> only accepts a single token that <Field1> rule is forced to
give up.
36
Spectrum™ Technology Platform 9.0 SP2
Chapter 2: Parsing
Reluctant
1. The reluctant behavior in <Field1> accepts no tokens or the minimum number of tokens that match
the rule while giving up tokens only when necessary to match the remaining rules.
2. Because <Field2> is greedy, it accepts the maximum number of tokens given up by <Field1>, while
giving up tokens only when necessary to match the remaining rules.
3. <Field3> can only accept a single token that <Field2> is forced to give up.
Data Quality Guide
37
Culture-Specific Parsing
Possessive
1. 1. The possessive behavior in <Field1> accepts no tokens or the maximum number of tokens that
match the rule while not giving up any tokens to match the remaining rules.
2. Because <Field1> is possessive, there are no tokens available for <Field2>.
3. Because <Field1> is possessive, there are no tokens available for <Field3>. The input is not parsed.
38
Spectrum™ Technology Platform 9.0 SP2
Chapter 2: Parsing
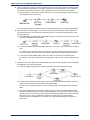
Zero or One Quantifier Example
Greedy
1. The Greedy behavior in <Field1> accepts no tokens or the maximum number of tokens that match
the rule, while giving up tokens only when necessary to match the remaining rules.
2. <Field2> can only accept the minimum number tokens that <Field1> is forced to give up.
3. <Field3> can only accept a single token that <Field1> is forced to give up.
Data Quality Guide
39
Culture-Specific Parsing
Reluctant
1. The reluctant behavior in <Field1> accepts the minimum number of tokens that match the rule
while giving up tokens only when necessary to match the remaining rules.
2. Because <Field2> is greedy, it accepts the maximum number of tokens given up by <Field1>, while
giving up tokens only when necessary to match the remaining rules.
3. <Field3> can only accept a single token that <Field2> is forced to give up.
Possessive
40
Spectrum™ Technology Platform 9.0 SP2
Chapter 2: Parsing
1. The possessive behavior in <Field1> accepts no tokens or the maximum number of tokens that
match the rule, while not giving up any tokens to match the remaining rules.
2. Because <Field1> is possessive, there is only one token available for <Field2>.
3. Because <Field1> is possessive, there are no tokens available for <Field3>. The input is not parsed.
• Min/Max Quantifier Example
Greedy
1. The Greedy behavior in the <Field1> rule accepts the maximum number of tokens that match the
rule, while giving up tokens only when necessary to match the remaining rules.
2. <Field2> can only accept the minimum number tokens that <Field1> is forced to give up.
3. <Field3> can only accept a single token that <Field1> is forced to give up.
Data Quality Guide
41
Culture-Specific Parsing
Reluctant
1. The reluctant behavior in <Field1> accepts the minimum number of tokens that match the rule
while giving up tokens only when necessary to match the remaining rules.
2. Because <Field2> is greedy, it accepts the maximum number of tokens given up by <Field1>, while
giving up tokens only when necessary to match the remaining rules.
3. <Field3> can only accept a single token that <Field2> is forced to give up.
42
Spectrum™ Technology Platform 9.0 SP2
Chapter 2: Parsing
Possessive
1. The possessive behavior in <Field1> accepts the maximum number of tokens that match the rule,
while not giving up any tokens to match the remaining rules.
2. Because <Field1> is possessive, there are two tokens available for <Field2>.
3. <Field3> can only accept a single token that <Field2> is forced to give up.
Data Quality Guide
43
Culture-Specific Parsing
Cultures
A culture is the primary concept for organizing culture-specific parsing grammars. You can use cultures
to create different parsing rules for different cultures and languages. Culture follows a hierarchy:
• Global Culture: The global culture is culture-independent and language agnostic. Use global culture
to create parsing grammar rules that span all cultures and languages.
• Language: A language is associated with a language, but not with a specific culture/region. For
example, English.
• Culture/Region: A culture/region is associated with a language and a country or region. For
example, English in the United Kingdom, or English in the United States.
In the culture hierarchy, the parent of a culture/region is a language and the parent of a language is the
global culture.
Culture/regions inherit the properties of the parent language. Languages inherit the properties of the
global culture. As such, you can define parsing grammars in a language for use in multiple countries
that share that language. Then, you can override the language grammar rules with specialized parsing
grammars for a particular country or region that shares the same language as the base language culture,
but has specific addressing, naming, or other country or regional differences.
You can also use culture inheritance to parse incoming records that have an assigned culture code, but
no defined grammar rule for that culture code. In this case, Open Parser looks for a language code that
has an assigned grammar rule. If it does not exist, Open Parser looks for an assigned grammar rule in
the global culture.
The Domain Editor uses a combination of a language code and a culture code to represent language
and culture/region, respectively.
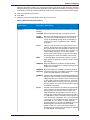
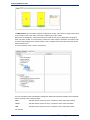
Defining a Culture's Grammar Rules
You can use a culture's grammar rules to substitute a portion of a the global culture's parsing grammar
with strings, commands, or expressions specific to the culture and/or language. By defining a grammar
rule, you can customize portions of the global culture parsing grammar based on the record's culture
and/or language. This is useful if you do not want to create an entirely separate parsing grammar for
44
Spectrum™ Technology Platform 9.0 SP2
Chapter 2: Parsing
each culture and instead use the global culture's grammar, customizing only specific portions of the
global culture grammar for each culture.
This topic describes how to create a grammar rule for a culture.
1. In Enterprise Designer, go to Tools > Open Parser Domain Editor.
2. Click the Cultures tab.
For a complete list of supported cultures, see Assigning a Parsing Culture to a Record on page
13.
3. Select the culture to which you want to add a grammar rule then click Properties.
4. Click the Grammar Rules tab. The information displayed includes the grammar rule names defined
for the selected culture, the associated source culture, the defined value of the grammar rule, and
the description.
5. Click Add.
6. Type a name for the grammar rule in the Name field.
7. Type a description of the grammar rule in the Description field.
8. Type the grammar rule in the Value field.
The grammar rule can be any valid variable, string, command, or grouped expression. For more
information, see Grammars on page 20.
9. Select Enable word wrap to display the value in the text box without scrolling.
10. Click OK.
The grammar rule value that you typed is validated. If the value contains grammar syntax errors, a
message displays a description of the errors encountered, the line and column where the error occurs,
and the command, grammar rule, or RegEx tag where the error occurs.
Example Grammar Rule
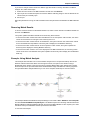
You have a grammar that parses Western names. The structure of the pattern maybe
the same for all cultures (<FirstName><MiddleName><LastName>) and many of the
rules might match the same pattern or table. However, you also have culture-specific
tables for last names, and you want to use the appropriate table based on the record's
culture code.
To accomplish this, you could define a grammar rule for each culture that replaces
the <LastName> element in the global culture with a reference to the culture-specific
table. For example, if you have a table of Dutch last names, you would create a
grammar rule for the Dutch (nl) culture as follows:
Name: LastName
Description: Dutch last names
Value: @Table("Dutch Last Names");
Defining Culture RegEx Tags
This topic describes how to define culture RegEx tags when defining a culture-specific parsing grammar.
1. In Enterprise Designer, go to Tools > Open Parser Domain Editor.
2. Click the Cultures tab. The Cultures tab displays a list of supported cultures. For a complete list of
supported cultures, see Assigning a Parsing Culture to a Record on page 13.
3. Select a culture from the list and then click Properties. The Culture Properties dialog box displays.
4. Click the RegEx Tags tab. The RegEx Tags tab displays. The information displayed includes the
RegEx tag names defined for the selected culture and the associated source culture, the value of
the RegEx tag, and the description. For information about predefined RegEx tags, see Defining
Culture RegEx Tags on page 45.
5. Click Add or Modify.
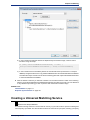
6. Type a name for the RegEx tag in the Name text box.
Data Quality Guide
45
Culture-Specific Parsing
If you type a name that already exists in the selected culture, a warning icon flashes. Type a different
name or close the dialog box, delete the existing RegEx tag, and then click Add again.
7. Type a description of the RegEx tag in the Description text box.
8. Type a value for the RegEx tag in the Value text box.
The value can be any valid regular expression but cannot match an empty string.
Domain Editor includes several predefined RegEx tags that you can use to define culture properties.
You can also use these RegEx tags for defining tokenization characters in your parsing grammar.
You can modify the predefined RegEx tags or copy them and create your own variants. You can also
use override properties to create specialized RegEx tags for specific languages.
• Letter: Any letter from any language. This RegEx tag includes overrides for several languages due
to differences in scripts used, for example, cyrillic scripts, asian-language scripts, and Thai script.
• Lower: A lowercase letter that has an uppercase variant.
• Number: Any numeric character in any script.
• Punctuation: Any punctuation character.
• Upper: An uppercase letter that has a lowercase variant.
• Whitespace: Any whitespace or invisible separator.
9. Click OK.
Importing and Exporting Cultures
In addition to creating cultures, you can also import cultures you've created elsewhere and export cultures
you create in the Domain Editor.
1. In Enterprise Designer, go to Tools > Open Parser Domain Editor.
2. Click the Cultures tab.
3. Click Import or Export.
4. Do one of the following:
• If you are importing a culture, navigate to and select a culture. Click Open. The imported culture
appears in the Domain Editor.
• If you are exporting a culture, navigate to and select the location where you would like to save the
exported culture. Click Save. The exported culture is saved and the Domain Editor returns.
Domains
Adding a Domain
A domain represents a type of data such as name, address, and phone number data. It consists of a
pattern that represents a sequence of one or more tokens in your input data that you commonly need
to parse and that you associate with one or more cultures.
This topic describes how to add a domain in Domain Editor when defining a culture-specific parsing
grammar. After you have created a new domain, it will be accessible in the Open Parser and Open Name
Parser stages. In the Open Parser Options dialog box, the new domain will be listed in the Domain
dropdown. From the Advanced tab of the Open Name Parser Options dialog box, double-click an existing
domain and the new domain will be listed.
1. In Enterprise Designer, go to Tools > Open Parser Domain Editor.
2. Click the Domains tab.
3. Click Add.
4. Type a domain name in the Name field.
5. Type a description of the domain name in the Description field.
6. If you want to create a new, empty domain, click OK. If you want to create a new domain based on
another domain, do the following:
46
Spectrum™ Technology Platform 9.0 SP2
Chapter 2: Parsing
a) Select Use another domain as a template if you want to create a new domain based on another
domain.
b) Select a domain from the list. When you click OK in the next step, the new domain will be created.
The new domain will contain all of the culture-specific parsing grammars defined in the domain
template that you selected.
c) Click OK.
Modifying a Domain
A domain represents a type of data such as name, address, and phone number data. It consists of a
pattern that represents a sequence of one or more tokens in your input data that you commonly need
to parse and that you associate with one or more cultures.
This topic describes how to modify a domain.
1. In Enterprise Designer, go to Tools > Open Parser Domain Editor.
2. Click the Domains tab.
3. Select a domain in the list and then click Modify. The Modify Domain dialog box displays.
4. Change the description information.
5. If you only want to modify the description of the domain, click OK. If you have made updates to the
template domain and now want to add those changes to the domain you are modifying, then continue
to the next step.
6. Select Use another domain as a template to inherit changes made to the domain template.
7. Select a domain pattern template from the list. When you click OK in the next step, the domain pattern
will be modified. The modified domain pattern will contain all of the culture-specific parsing grammars
defined in the domain pattern template that you selected. Any parsing grammar in the selected domain
pattern will be overwritten with the parsing grammar from the domain pattern template.
8. Click OK.
To see how this works, do the following:
1. Create a domain pattern named NameParsing and define parsing grammars for
Global Culture, en, and en-US.
2. Create a domain pattern named NameParsing2 and use NameParsing as a
domain pattern template. NameParsing2 is created as an exact copy and contains
parsing grammars for Global Culture, en, and en-US.
3. Modify the culture-specific parsing grammars for NameParsing by changing some
of the grammar rules in the Global Culture grammar and add en-CA as a new
culture.
4. Select NameParsing2 on the Domains tab, click Modify, and again use
NameParsing as the domain pattern template.
The results will be:
• The Global Culture parsing grammar will be updated (overwriting your changes if
any have been made).
• The cultures en and en-US will remain the same (unless they have been modified
in the target domain, in which case they would then revert back to the Name Parsing
version).
• A culture-specific grammar for en-CA will be added.
Removing a Domain
A domain represents a type of data such as name, address, and phone number data. It consists of a
pattern that represents a sequence of one or more tokens in your input data that you commonly need
to parse and that you associate with one or more cultures.
Data Quality Guide
47
Analyzing Parsing Results
This topic describes how to remove a domain.
1. In Enterprise Designer, go to Tools > Open Parser Domain Editor.
2. Click the Domains tab.
3. Select a domain in the list.
4. Click Remove.
If the domain is associated with one or more culture-specific parsing grammars, a message displays
asking you to confirm that you want to remove the domain. If no culture-specific parsing grammars
are associated with this domain, a message displays confirming that you want to remove the selected
domain.
5. Click Yes. The domain and any culture-specific parsing grammars associated with this domain are
removed.
Importing and Exporting Domains
In addition to creating domains, you can also import domains you've created elsewhere and export
domains you create in the Domain Editor.
1. Click the Domains tab. The Domains tab displays.
2. Click Import or Export.
3. Do one of the following:
• If you are importing a domain, navigate to and select a domain name. Click Open. The imported
domain appears in the Domain Editor.
• If you are exporting a domain, navigate to and select the location where you would like to save the
exported domain. Click Save. The exported domain is saved and the Domain Editor returns.
Analyzing Parsing Results
Tracing Final Parsing Results
The Open Parser Trace Details feature displays a graphical view of how the input field was parsed,
token-by-token, into the output field values. Trace displays matching results, non-matching results, and
interim results.
Final Parsing Results shows the parsing grammar tree and the resulting output. Use this view when you
want to see only the results of the matching process. This is the default view.
1. In Enterprise Designer, open the dataflow that contains the Open Parser stage whose parsing results
you want to trace.
2. Double-click the Open Parser stage on the canvas.
3. Click the Preview tab.
4. Enter sample data that you want to parse then click the Preview button.
5. In the Trace column, click the Click here... link to display the trace diagram.
The tree view of the parsing grammar shows one or more the following elements, depending on the
selected options:
• The <root> variable. The top node in the tree is the <root> variable.
• The expressions defined in the <root> variable. The second-level nodes are the expressions defined
in the <root> variable. The <root> expressions also define the names of the output fields.
• The variable definitions of the second-level nodes. The third-level nodes and each level below it
are the definitions of each of the <root> expressions. Expression definitions can be other variables,
aliases, or rule definitions.
48
Spectrum™ Technology Platform 9.0 SP2
Chapter 2: Parsing
• The values and tokens that are output. The bottom node in the tree shows the values assigned to
each sequential token in the parsing grammar.
• The parser score for relevant elements of the parsing grammar. Parser scores are determined
from the bottom of a root expression to the top. For example, if an expression pattern has a weight
of 80 and an ancestor rule has a weight of 75, the final score for the ancestor expression is the
product of the child scores and the ancestor scores, which in this example would be 60 percent.
• The space character displays in the Input data text box as a non-breaking space character (upward
facing bracket) so that you can better see space characters. Delimiters not used as tokens are
displayed as gray.
6. In the Information field, select Final parsing results.
Note: To step through the parsing events, see Stepping Through Parsing Events on page 49.
7. In the Level of detail list, select one of the options.
• Hide expressions without results. Shows those branches that lead to a matching or non-matching
result. Any root expression branch that does not lead to a match is shown as an ellipsis. If you
want to look at a branch that does not lead to a match, double-click on the ellipsis.
• Hide root expressions without results. Shows all branches of the root expressions containing
match or non-matching results. Any other root expressions are not displayed.
• Show all roots. Shows every root expression. If a root has no matching result, the display is
collapsed for that root expression using the ellipsis symbol.
• Show all expressions. Shows the root expressions and all branches. The root expressions are
no longer displayed as an ellipsis; instead, the rules for each expression in the branch are shown.
If you have a level-of-detail view selected that hides expressions without results and you select a
root expression that is not currently displayed, Trace Details changes the level-of-detail selection to
a list item that shows the minimum number of root expressions, while still displaying the root
expression.
8. Click Show scores to display parser scores for root expressions, variable expressions, and the
resulting matches and non-matches.
9. In the Zoom field, select the size of the tree view.
10. In the Root clause field, select one of the options to show that branch of the root expression tree.
When you click an expression branch in the trace diagram, the Root clause list updates to display
the selected clause. Double-click an ellipsis to display a collapsed expression.
11. Click OK when you are done. The level of detail, show scores, and zoom control settings are saved
when you click OK.
Stepping Through Parsing Events
The Open Parser Trace Details view allows you to view a diagram of event-by-event steps in the matching
process. Use this view when you are troubleshooting the matching process and want to see how each
token is evaluated, the parsing grammar tokenization, and the token-by-token matching results.
1. In Enterprise Designer, open the dataflow that contains the Open Parser stage whose parsing results
you want to trace.
2. Double-click the Open Parser stage on the canvas.
3. Click the Preview tab.
4. Enter sample data that you want to parse then click the Preview button.
5. In the Trace column, click the Click here... link to display the trace diagram.
The tree view of the parsing grammar shows one or more the following elements, depending on the
selected options:
• The <root> variable. The top node in the tree is the <root> variable.
• The expressions defined in the <root> variable. The second-level nodes are the expressions defined
in the <root> variable. The <root> expressions also define the names of the output fields.
Data Quality Guide
49
Analyzing Parsing Results
• The variable definitions of the second-level nodes. The third-level nodes and each level below it
are the definitions of each of the <root> expressions. Expression definitions can be other variables,
aliases, or rule definitions.
• The values and tokens that are output. The bottom node in the tree shows the values assigned to
each sequential token in the parsing grammar.
• The parser score for relevant elements of the parsing grammar. Parser scores are determined
from the bottom of a root expression to the top. For example, if an expression pattern has a weight
of 80 and an ancestor rule has a weight of 75, the final score for the ancestor expression is the
product of the child scores and the ancestor scores, which in this example would be 60 percent.
• The space character displays in the Input data text box as a non-breaking space character (upward
facing bracket) so that you can better see space characters. Delimiters not used as tokens are
displayed as gray.
6. Matches and non-matches are color coded in the trace diagram:
• Green boxes indicate matches that are part of the final successful result.
• Red boxes indicate non-matches.
• Yellow boxes indicate interim matches that will eventually be rolled back as the events are stepped
through. Interim matches display only in Step Through Parsing Events.
• Gray boxes indicate interim matches that have been rolled back to free up that token for another
expression. Interim matches display only in Step Through Parsing Events.
7. In the Information list, select Step through parsing events.
8. In the Level of detail list, select one of the options.
• Hide expressions without results. Shows those branches that lead to a matching or non-matching
result. Any root expression branch that does not lead to a match is shown as an ellipsis. If you
want to look at a branch that does not lead to a match, double-click on the ellipsis.
• Hide root expressions without results. Shows all branches of the root expressions containing
match or non-matching results. Any other root expressions are not displayed.
• Show all roots. Shows every root expression. If a root has no matching result, the display is
collapsed for that root expression using the ellipsis symbol.
• Show all expressions. Shows the root expressions and all branches. The root expressions are
no longer displayed as an ellipsis; instead, the rules for each expression in the branch are shown.
If you have a level-of-detail view selected that hides expressions without results and you select a
root expression that is not currently displayed, Trace Details changes the level-of-detail selection to
a list item that shows the minimum number of root expressions, while still displaying the root
expression.
9. Click Show scores to display parser scores for root expressions, variable expressions, and the
resulting matches and non-matches.
10. In the Zoom field, select the size of the tree view.
11. In the Root clause field, select one of the options to show that branch of the root expression tree.
When you click an expression branch in the trace diagram, the Root clause list updates to display
the selected clause. Double-click an ellipsis to display a collapsed expression.
12. The Automatically step to selected node check box is selected by default. When this is selected
and you click the Play button, the events execute from the beginning and stop on the first event that
occurs with the selected node or any of its children. To play all events without stopping, clear this
check box before clicking the Play button.
13. In the Play delay (seconds) field, specify a delay to control the speed of the play rate.
14. Click the Play button to start executing the parsing events.
15. Click OK when you are done.
50
Spectrum™ Technology Platform 9.0 SP2
Chapter 2: Parsing
Parsing Personal Names
If you have name data that is all in one field, you may want to parse the name into separate fields for
each part of the name, such as first name, last name, title of respect, and so on. These parsed name
elements can then be used by other automated operations such as name matching, name standardization,
or multi-record name consolidation.
1. If you have not already done so, load the following tables onto the Spectrum™ Technology Platform
server:
• Open Parser Base
• Open Parser Enhanced Names
Use the Data Normalization Module's database load utility to load these tables. For instructions on
loading tables, see the Installation Guide.
2. In Enterprise Designer, create a new dataflow.
3. Drag a source stage onto the canvas.
4. Double-click the source stage and configure it. See the Dataflow Designer's Guide for instructions
on configuring source stages.
5. Drag an Open Name Parser stage onto the canvas and connect it to the source stage.
For example, if you are using a Read from File stage, your dataflow would look like this:
6. Drag a sink stage onto the canvas and connect Open Name Parser to it.
For example, if you are using a Write to File sink, your dataflow might look like this:
7. Double-click the sink stage and configure it. See the Dataflow Designer's Guide for instructions on
configuring source stages.
You have created a dataflow that can parse personal names into component parts, placing each part of
the name in its own field.
Related Links
Open Name Parser on page 256
Dataflow Templates for Parsing
Parsing English Names
This dataflow template demonstrates how to take personal name data (for example "John P. Smith"),
parse it into first name, middle name, and last name parts, and add gender data.
Data Quality Guide
51
Dataflow Templates for Parsing
Business Scenario
You work for an insurance company that wants to send out personalized quotes based on gender to
prospective customers. Your input data include name data as full names and you want to parse the
name data into First, Middle, and Last name fields. You also want to determine the gender of the
individuals in your input data.
The following dataflow provides a solution to the business scenario:
This dataflow template is available in Enterprise Designer. Go to File > New > Dataflow > From template
and select Parse Personal Name.
This dataflow requires the following:
• The Universal Name Module
• The Open Parser base tables
• The Open Parser enhanced names tables
In this dataflow, data is read from a file and processed through the Open Name Parser stage. Open
Name Parser is part of the Universal Naming Module. For each name, the dataflow does the following:
Read from File
This stage identifies the file name, location, and layout of the file that contains the names you want to
parse. The file contains both male and female names.
Open Name Parser
Open Name Parser examines name fields and compares them to name data stored in the Spectrum™
Technology Platform name database files. Based on the comparison, it parses the name data into First,
Middle, and Last name fields.
Write to File
The template contains one Write to File stage. In addition to the input fields, the output file contains the
FirstName, MiddleName, LastName, EntityType, GenderCode, and GenderDeterminationSource fields.
Parsing Arabic Names
This template demonstrates how to parse westernized Arabic names into component parts. The parsing
rule separates each token in the Name field and copies each token to five fields: Kunya, Ism, Laqab,
Nasab, Nisba. These output fields represent the five parts of an Arabic name and are described in the
business scenario.
Business Scenario
You work for a bank that wants to better understand the Arabic naming system in an effort to improve
customer service with Arabic-speaking customers. You have had complaints from customers whose
billing information does not list the customer's name accurately. In an effort to improve customer intimacy,
the Marketing group you work in wants to better address Arabic-speaking customers through marketing
campaigns and telephone support.
In order to understand the Arabic naming system, you search for and find these resources on the internet
that explain the Arabic naming system:
52
Spectrum™ Technology Platform 9.0 SP2
Chapter 2: Parsing
• en.wikipedia.org/wiki/Arabic_names
• heraldry.sca.org/laurel/names/arabic-naming2.htm
Arabic names are based on a naming system that includes these name parts: Ism, Kunya, Nasab, Laqab,
and Nisba.
• The ism is the main name, or personal name, of an Arab person.
• Often, a kunya referring to the person's first-born son is used as a substitute for the ism.
• The nasab is a patronymic or series of patronymics. It indicates the person's heritage by the word ibn
or bin, which means son, and bint, which means daughter.
• The laqab is intended as a description of the person. For example, al-Rashid means the righteous or
the rightly-guided and al-Jamil means beautiful.
• The nisba describes a person's occupation, geographic home area, or descent (tribe, family, and so
on). It will follow a family through several generations. The nisba, among the components of the Arabic
name, perhaps most closely resembles the Western surname. For example, al-Filistin means the
Palestinian.
The following dataflow provides a solution to the business scenario:
This dataflow template is available in Enterprise Designer. Go to File > New > Dataflow > From template
and select ParseArabicNames. This dataflow requires the Data Normalization Module.
In this dataflow, data is read from a file and processed through the Open Parser stage. For each data
row in the input file, this dataflow will do the following:
Read from File
This stage identifies the file name, location, and layout of the file that contains the names you want to
parse. The file contains both male and female names.
Open Parser
This stage defines whether to use a culture-specific domain grammar created in the Domain Editor or
to define a domain-independent grammar. A culture-specific parsing grammar that you create in the
Domain Editor is a validated parsing grammar that is associated with a culture and a domain. A
domain-independent parsing grammar that you create in Open Parser is a validated parsing grammar
that is not associated with a culture and domain.
In this template, the parsing grammar is defined as a domain-independent grammar.
The Open Parser stage contains a parsing grammar that defines the following commands and expressions:
• %Tokenize is set to the space character (\s). This means that Open Parser will use the space
character to separate the input field into tokens. For example, Abu Mohammed al-Rahim ibn Salamah
contains five tokens: Abu, Mohammed, al-Rahim, ibn and Salamah.
• %InputField is set to parse input data from the Name field.
• %OutputFields is set to copy parsed data into five fields: Kunya, Ism, Laqab, Nasab, and Nisba.
• The <root> expression defines the pattern for Arabic names:
•
•
•
•
•
Zero or one occurrence of Kunya
Exactly one or two occurrences of Ism
Zero or one occurrence of Laqab
Zero or one occurrence of Nasab
Zero or more occurrences of Nisba
Data Quality Guide
53
Dataflow Templates for Parsing
The rule variables that define the domain must use the same names as the output fields defined in the
required OutputFields command.
The parsing grammar uses a combination of regular expressions and expression quantifiers to build a
pattern for Arabic names. The parsing grammar uses these special characters:
• The "?" character means that a regular expression can occur zero or one time.
• The "*" character means that a regular expression can occur zero or more times
• The ";" character means end of a rule.
Use the Commands tab to explore the meaning of the other special symbols you can use in parsing
grammars by hovering the mouse over the description.
By default, quantifiers are greedy. Greedy means that the expression accepts as many tokens as possible,
while still permitting a successful match. You can override this behavior by appending a '?' for reluctant
matching or '+' for possessive matching. Reluctant matching means that the expression accepts as few
tokens as possible, while still permitting a successful match. Possessive matching means that the
expression accepts as many tokens as possible, even if doing so prevents a match.
To test the parsing grammar, click the Preview tab. Type the names shown below in the Name field and
then click Preview.
You can also type other valid and invalid names to see how the input data is parsed.
You can use the Trace feature to see a graphical representation of either the final parsing results or to
step through the parsing events. Click the link in the Trace column to see the Trace Details for the data
row.
Write to File
The template contains one Write to File stage. In addition to the input field, the output file contains the
Kunya, Ism, Laqab, Nasab, and Nisba fields.
Parsing Chinese Names
This template demonstrates how to parse Chinese names into component parts. The parsing rule
separates each token in the Name field and copies each token to two fields: LastName and FirstName.
Business Scenario
You work for a financial service company that wants to explore if it is feasible to include the Chinese
characters for its Chinese-speaking customers on various correspondence.
In order to understand the Chinese naming system, you search for and find this resource on the internet,
which explains how Chinese names are formed:
en.wikipedia.org/wiki/Chinese_names
The following dataflow provides a solution to the business scenario:
54
Spectrum™ Technology Platform 9.0 SP2
Chapter 2: Parsing
This dataflow template is available in Enterprise Designer. Go to File > New > Dataflow > From template
and select ParseChineseNames. This dataflow requires the Data Normalization Module.
In this dataflow, data is read from a file and processed through the Open Parser stage. For each data
row in the input file, this data flow will do the following:
Read from File
This stage identifies the file name, location, and layout of the file that contains the names you want to
parse. The file contains both male and female names.
Open Parser
This stage defines whether to use a culture-specific domain grammar created in the Domain Editor or
to define a domain-independent grammar. A culture-specific parsing grammar that you create in the
Domain Editor is a validated parsing grammar that is associated with a culture and a domain. A
domain-independent parsing grammar that you create in Open Parser is a validated parsing grammar
that is not associated with a culture and domain.
In this template, the parsing grammar is defined as a domain-independent grammar.
The Open Parser stage contains a parsing grammar that defines the following commands and expressions:
• %Tokenize is set to None. When Tokenize is set to None, the parsing grammar rule must include
any spaces or other token separators within its rule definition.
• %InputField is set to parse input data from the Name field.
• %OutputFields is set to copy parsed data into two fields: LastName and FirstName.
The <root> expression defines the pattern for Chinese names:
• One occurrence of LastName
• One to three occurrences of FirstName
The rule variables that define the domain must use the same names as the output fields defined in the
required OutputFields command.
The CJKCharacter rule variable defines the character pattern for Chinese/ Japanese/Korean (CJK).
The character pattern is defined so as to only use characters that are letters.The rule is:
<CJKCharacter> = @RegEx("([\p{InCJKUnifiedIdeographs}&&\p{L}])");
• The regular expression \p{InX} is used to indicate a Unicode block for a certain culture, in which X
is the culture. In this instance the culture is CJKUnifiedIdeographs.
• In regular expressions, a character class is a set of characters that you want to match. For example,
[aeiou] is the character class containing only vowels. Character classes may appear within other
character classes, and may be composed by the union operator (implicit) and the intersection operator
(&&). The union operator denotes a class that contains every character that is in at least one of its
operand classes. The intersection operator denotes a class that contains every character that overlaps
the intersected Unicode blocks.
• The regular expression \p{L} is used to indicate the Unicode block that includes only letters.
To test the parsing grammar, click the Preview tab. Type the names shown below in the Name field and
then click Preview.
Data Quality Guide
55
Dataflow Templates for Parsing
You can also type other valid and invalid names to see how the input data is parsed.
You can use the Trace feature to see a graphical representation of either the final parsing results or to
step through the parsing events. Click the link in the Trace column to see the Trace Details for the data
row.
Write to File
The template contains one Write to File stage. In addition to the input field, the output file contains the
LastName, and FirstName fields. Select a match results in the Match Results List and then click Remove.
Parsing Spanish and German Names
This template demonstrates how to parse mixed-culture names, such as Spanish and German names,
into component parts. The parsing rule separates each token in the Name field and copies each token
to the fields defined in the Personal and Business Names parsing grammar. For more information about
this parsing grammar, select Tools > Open Parser Domain Editor and then select the Personal and
Business Names domain and either the German (de) or Spanish (es) cultures.
This template also applies gender codes to personal names in using table data contained in Table
Management. For more information about Table Management, select Tools > Table Management.
Business Scenario
You work for a pharmaceuticals company based in Brussels that has consolidated its Germany and
Spain operations. Your company wants to implement a mixed-culture database containing name data
and it is your job to analyze the variations in names between the two cultures.
The following dataflow provides a solution to the business scenario:
This dataflow template is available in Enterprise Designer. Go to File > New > Dataflow > From template
and select ParseSpanish&GermanNames. This dataflow requires the Data Normalization Module.
In this dataflow, data is read from a file and processed through the Open Parser stage. For each data
row in the input file, this data flow will do the following:
Read from File
This stage identifies the file name, location, and layout of the file that contains the names you want to
parse. The file contains both male and female names and includes CultureCode information for each
name. The CultureCode information designates the input names as either German (de) or Spanish (es).
56
Spectrum™ Technology Platform 9.0 SP2
Chapter 2: Parsing
Open Name Parser
Open Name Parser examines name fields and compares them to name data stored in the Spectrum™
Technology Platform name database files. Based on the comparison, it parses the name data into First,
Middle, and Last name fields.
Conditional Router
This stage routes the input so that personal names are routed to the Gender Codes stage and business
names are routed to the Business Names stage.
Gender Code
Double-click this stage on the canvas and then click Modify to display the table lookup rule options.
The Categorize option uses the Source value as a key and copies the corresponding value from the
table entry into the field selected in the Destination list. In this template, Complete field is selected and
Source is set to use the FirstName field. Table Lookup treats the entire field as one string and flags the
record if the string as a whole can be categorized.
The Destination is set to the GenderCode field and uses the lookup terms contained in the Gender
Codes table to perform the categorization of male and female names. If a term in the input data is not
found, Table Lookup assigns a value of U, which means unknown. To better understand how this works,
select Tools > Table Management and select the Gender Codes table.
Write to File
The template contains two Write to File stages, one for personal names and one for business names.
In addition to the input field, the personal names output file contains the Name, TitleOfRespect,
FirstName, MiddleName, LastName, PaternalLastName, MaternalLastName, MaturitySuffix,
GenderCode, CultureUsed, and ParserScore fields.
The business names output file contains the Name, FirmName, FirmSuffix, CulureUsed, and
ParserScore fields.
Parsing E-mail Addresses
This template demonstrates how to parse e-mail addresses into component parts. The parsing rule
separates each token in the Email field and copies each token to three fields: Local-Part, DomainName,
and DomainExtension. Local-Part represents the domain name part of the e-mail address, DomainName
represents the domain name of the e-mail address, and DomainExtension represents the domain
extension of the e-mail address. For example, in pb.com, "pb" is the domain name and "com" is the
domain extension.
The internet is a great source of public domain information that can aid you in your open parsing tasks.
In this example, e-mail formatting information was obtained from various internet resources and was
then imported into Table Management to create a table of domain values. The domain extension task
that you will perform in this template activity demonstrates the usefulness of this method.
This template also demonstrates how to effectively use table data that you load into Table Management
to perform table look-ups as part of your parsing tasks.
Business Scenario
You work for an insurance company that wants to do its first e-mail marketing campaign. Your database
contains e-mail addresses of your customers and you have been asked to find a way to make sure that
those e-mail addresses are in a valid SMTP format.
Before you create this dataflow, you will need to load a table of valid domain names extensions in Table
Management so that you can look up domain name extensions as part of the validation process.
The following dataflow provides a solution to the business scenario:
Data Quality Guide
57
Dataflow Templates for Parsing
This dataflow template is available in Enterprise Designer. Go to File > New > Dataflow > From template
and select ParseEmail. This dataflow requires the Data Normalization Module.
In this dataflow, data is read from a file and processed through the Open Parser stage. For each data
row in the input file, this dataflow will do the following:
Create a Domain Extension Table
The first task is to create an Open Parser table in Table Management that you can use to check if the
domain extensions in your e-mail addresses are valid.
1.
2.
3.
4.
5.
6.
7.
8.
From the Tools menu, select Table Management.
In the Type list, select Open Parser.
Click New.
In the Add User Defined Table dialog box, type EmailDomains in the Table Name field, make
sure that None is selected in the Copy from list, and then click OK.
With EmailDomains displayed in the Name list, click Import.
In the Import dialog box, click Browse and locate the source file for the table. The default location
is: <drive>:\Program Files\Pitney
Bowes\Spectrum\server\modules\coretemplates\data\ Email_Domains.txt. Table
Management displays a preview of the terms contained in the import file.
Click OK. Table Management imports the source files and displays a list of internet domain extensions.
Click Close. The EmailDomains table is created. Now create the dataflow using the ParseEmail
template.
Read from File
This stage identifies the file name, location, and layout of the file that contains the eÂmail addresses
you want to parse.
Open Parser
The Open Parser stage parsing grammar defines the following commands and expressions:
• %Tokenize is set to None. When Tokenize is set to None, the parsing grammar rule must include
any spaces or other token separators within its rule definition.
• %InputField is set to parse input data from the Email_Address field.
• %OutputFields is set to copy parsed data into three fields: Local-Part, DomainName, and
DomainExtension.
• The root expression defines the pattern of tokens being parsed:
<root> = <Local-Part>"@"<DomainName>"."<DomainExtension>;
The rule variables that define the domain must use the same names as the output fields defined in the
required OutputFields command.
• The remainder of the parsing grammar defines each of the rule variables as expressions.
<Local-Part> = (<alphanum> ".")* <alphanum> | (<alphanum> "_")* <alphanum>
;
<DomainName> = (<alphanum> ".")? <alphanum>;
58
Spectrum™ Technology Platform 9.0 SP2
Chapter 2: Parsing
<DomainExtension> = @Table("EmailDomains")* "."? @Table("EmailDomains");
<alphanum>=@RegEx("[A-Za-z0-9]+");
The <Local-Part> variable is defined as a string of text that contains the <alphanum> variable, the
period character, and another <alphanum> variable.
The <alphanum> variable definition is a regular expression that means any string of characters from A
to Z, a to a, and 0-9. The <alphanum> variable is used throughout this parsing grammar and is defined
once on the last line of the parsing grammar.
The parsing grammar uses a combination of regular expressions and literal characters to build a pattern
for e-mail addresses. Any characters in double quotes in this parsing grammar are literal characters, the
name of a table used for lookup, or a regular expression. The parsing grammar uses these special
characters:
•
•
•
•
The "+" character means that a regular expression can occur one or more times.
The "?" character means that a regular expression can occur zero or one time.
The "|" character means that the variable has an OR condition.
The ";" character means end of a rule.
Use the Commands tab to explore the meaning of the other special symbols you can use in parsing
grammars by hovering the mouse over the description.
To test the parsing grammar, click the Preview tab. Type the e-mail addresses shown below in the Email
Address field and then click Preview.
You can also type other e-mail addresses to see how the input data is parsed.
You can also use the Trace feature to see a graphical representation of either the final parsing results
or to step through the parsing events. Click the link in the Trace column to see the Trace Details for the
data row.
Trace Details shows a matching result. Compare the tokens matched for each expression in the parsing
grammar.
Data Quality Guide
59
Dataflow Templates for Parsing
You can also use Trace to view non-matching results. The following graphic shows a non- matching
result. Compare the tokens matched for each expression in the parsing grammar. The reason that this
input data (Abc.example.com) did not match is because it did not contain all of the required tokens to
match—there is no @ character separating the Local- Part token and the Domain tokens.
Write to File
The template contains one Write to File stage. In addition to the input field, the output file contains the
Local-Part, DomainName, DomainExtension, IsParsed, and ParserScore fields.
Parsing U.S. Phone Numbers
This template demonstrates how to parse U.S. phone numbers into component parts. The parsing rule
separates each token in the PhoneNumber field and copies each token to four fields: CountryCode,
AreaCode, Exchange, and Number.
60
Spectrum™ Technology Platform 9.0 SP2
Chapter 2: Parsing
Business Scenario
You work for a wireless provider and have been assigned a project to analyze incoming phone number
data for a growing region of your business.
The following dataflow provides a solution to the business scenario:
This dataflow template is available in Enterprise Designer. Go to File > New > Dataflow > From template
and select ParseUSPhoneNumbers. This dataflow requires the Data Normalization Module.
In this dataflow, data is read from a file and processed through the Open Parser stage. For each data
row in the input file, this data flow will do the following:
Read from File
This stage identifies the file name, location, and layout of the file that contains the phone numbers you
want to parse.
Open Parser
This stage defines whether to use a culture-specific domain grammar created in the Domain Editor or
to define a domain-independent grammar. A culture-specific parsing grammar that you create in the
Domain Editor is a validated parsing grammar that is associated with a culture and a domain. A
domain-independent parsing grammar that you create in Open Parser is a validated parsing grammar
that is not associated with a culture and domain.
In this template, the parsing grammar is defined as a domain-independent grammar.
The Open Parser stage contains a parsing grammar that defines the following commands and expressions:
• %Tokenize is set to None. When Tokenize is set to None, the parsing grammar rule must include
any spaces or other token separators within its rule definition.
• %InputField is set to parse input data from the PhoneNumber field.
• %OutputFields is set to separate parsed data into four fields: CountryCode, AreaCode, Exchange,
and Number.
• The <root> expression defines pattern of tokens being parsed and includes OR statements (|), such
that a valid phone number is:
• CountryCode, AreaCode, Exchange, and Number OR
• AreaCode, Exchange, and Number OR
• Exchange and Number
The parsing grammar uses a combination of regular expressions and literal characters to build a pattern
for phone numbers. Any characters in double quotes in this parsing grammar are literal characters or a
regular expression.
The plus character (+) used in this <root> command is defined as a literal character because it is
encapsulated in quotes. You can use single or double quotes to indicate a literal character. If the plus
character is used without quotes, it means that the expression it follows can occur one or more times.
The phone number domain rules are defined to match the following character patterns:
• Zero or one occurrence of a "+" character.
• The CountryCode rule, which is a single digit between 0-9.
• Zero or one occurrence of an open parentheses or a hyphen or a space character. Two of these
characters occurring in sequence results in a non-match, or in other words, an invalid phone number.
Data Quality Guide
61
Dataflow Templates for Parsing
• The AreaCode rule, which is a sequence of exactly three digits between 0-9.
• Zero or one occurrence of an open parentheses or a hyphen or a space character. Two of these
characters occurring in sequence results in a non-match, or in other words, an invalid phone number.
• The Exchange rule, which is a sequence of exactly three digits between 0-9.
• Zero or one occurrence of an open parentheses or a hyphen or a space character. Two of these
characters occurring in sequence results in a non-match, or in other words, an invalid phone number.
• The Number rule, which is a sequence of exactly four digits between 0-9.
The rule variables that define the domain must use the same names as the output fields defined in the
required OutputFields command.
Regular Expressions and Expression Quantifiers
The parsing grammar uses a combination of regular expressions and expression quantifiers to build a
pattern for U.S. phone numbers. The parsing grammar uses these special characters:
• The "?" character means that a regular expression can occur zero or one time.
• The (|) character indicates an OR condition.
• The ";" character means end of a rule.
Use the Commands tab to explore the meaning of the other special symbols you can use in parsing
grammars by hovering the mouse over the description.
Using the Preview Tab
To test the parsing grammar, click the Preview tab. Type the phone numbers shown below in the
PhoneNumber field and then click Preview.
You can also type other valid and invalid phone numbers to see how the input data is parsed.
You can also use the Trace feature to see a graphical representation of either the final parsing results
or to step through the parsing events. Click the link in the Trace column to see the Trace Details for the
data row.
Write to File
The template contains one Write to File stage. In addition to the input field, the output file contains the
CountryCode, AreaCode, Exchange, and Number fields.
62
Spectrum™ Technology Platform 9.0 SP2
Standardization
In this section:
• Standardizing Terms . . . . . . . . . . . . . . . . . . . . . . . . . . . . . .64
• Standardizing Personal Names . . . . . . . . . . . . . . . . . . . . .65
• Templates for Standardization . . . . . . . . . . . . . . . . . . . . . .66
3
Standardizing Terms
Standardizing Terms
Inconsistent use of terminology can be a data quality issue that causes difficulty in parsing, lookups, and
more. You can create a dataflow that finds terms in your data that are inconsistently used and standardize
them. For example, if your data includes the terms "Incorporated", "Inc.", and Inc" in business names,
you can create a dataflow to standardize on one form (for example, "Inc.").
Note: Before performing this procedure, your administrator must install the Data Normalization Module
database containing standardized terms that you want to apply to your data. Instructions for
installing databases can be found in the Installation Guide.
1. In Enterprise Designer, create a new dataflow.
2. Drag a source stage onto the canvas.
3. Double-click the source stage and configure it. See the Dataflow Designer's Guide for instructions
on configuring source stages.
4. Drag a Table Lookup stage onto the canvas and connect it to the source stage.
For example, if you were using a Read from File source stage, your dataflow would look like this:
5. Double-click the Table Lookup stage on the canvas.
6. To specify the options for Table Lookup you create a rule. You can create multiple rules then specify
the order in which you want to apply the rules. Click Add to create a rule.
7. In the Action field, leave the default option Standardize selected.
8. In the On field, leave Complete field selected if the whole field is the term you want to standardize.
Or, choose Individual terms within a field to standardize individual words in the field.
9. In the Source field, select the field you want to standardize.
10. In the Destination field, select the field that you want to contain the standardized term. If you specify
the same field as the source field, then the source field's value will be replaced with the standardized
term.
11. In the Table field, select the table that contains the standardized terms.
Note: If you do not see the table you need, contact your system administrator. The Data
Normalization Module database must be loaded.
12. In the When table entry not found, set Destination's value to field, select Source's value.
13. Click OK.
14. Define additional rules if you want to standardize values in more fields. When you are done defining
rules, click OK.
15. Drag a sink stage onto the canvas and connect it to Table Lookup.
For example, if you were using Write to File, your dataflow would look like this:
16. Double-click the sink stage and configure it.
For information on configuring sink stages, see the Dataflow Designer's Guide.
You now have a dataflow that standardizes terms.
64
Spectrum™ Technology Platform 9.0 SP2
Chapter 3: Standardization
Standardizing Personal Names
This procedure shows how to create a dataflow that takes personal name data (for example "John P.
Smith"), identifies common nicknames of the same name, and create a standard version of the name
that can then be used to consolidate redundant records.
Note: Before beginning, make sure that your input data has a field named "Name" that contains the
full name of the person.
1. If you have not already done so, load the following tables onto the Spectrum™ Technology Platform
server:
• Open Parser Base
• Open Parser Enhanced Names
Use the Data Normalization Module's database load utility to load these tables. For instructions on
loading tables, see the Installation Guide.
2. In Enterprise Designer, create a new dataflow.
3. Drag a source stage onto the canvas.
4. Double-click the source stage and configure it. See the Dataflow Designer's Guide for instructions
on configuring source stages.
5. Drag an Open Name Parser stage onto the canvas and connect it to the source stage.
For example, if you are using a Read from File stage, your dataflow would look like this:
6. Drag a Table Lookup stage onto the canvas and connect it to the Open Name Parser stage.
Your dataflow should now look like this:
7. Double-click the Table Lookup stage on the canvas.
8. In the Source field, select FirstName.
9. In the Destination field, select FirstName.
By specifying the same field as both the source and destination, the field will be updated with the
standardized version of the name.
10. In the Table field, select NickNames.xml.
11. Click OK.
12. Click OK again to close the Table Lookup Options window.
13. Drag a sink stage onto the canvas and connect it to the Table Lookup stage.
For example, if you were using a Write to File sink, your dataflow would now look like this:
Data Quality Guide
65
Templates for Standardization
14. Double-click the sink stage and configure it. See the Dataflow Designer's Guide for instructions on
configuring source stages.
You now have a dataflow that takes personal names and standardizes the first name, replacing nicknames
with the standard form of the name.
Templates for Standardization
Formalizing Personal Names
This dataflow template demonstrates how to take personal name data (for example "John P. Smith"),
identify common nicknames of the same name, and create a standard version of the name that can then
be used to consolidate redundant records. It also show how you can add Title of Respect data based
on Gender data.
Business Scenario
You work for a non-profit organization that wants to send out invitations for a gala event. Your input data
include name data as full names and you want to parse the name data into First, Middle, and Last name
fields and add a Title of Respect field to make your invitations more formal. You also want to replace
any nicknames in your name data to use a more formal variant of the name.
The following dataflow provides a solution to the business scenario:
This dataflow template is available in Enterprise Designer. Go to File > New > Dataflow > From template
and select StandardizePersonalNames. This dataflow requires the Data Normalization Module and
the Universal Name Module.
For each data row in the input file, this data flow will do the following:
Read from File
This stage identifies the file name, location, and layout of the file that contains the names you want to
parse. The file contains both male and female names.
Name Parser
In this template, the Name Parser stage is named Parse Personal Name. Parse Personal Name stage
examines name fields and compares them to name data stored in the Spectrum™ Technology Platform
name database files. Based on the comparison, it parses the name data into First, Middle, and Last
name fields, assigns an entity type, and a gender to each name. It also uses pattern recognition in
addition to the name data.
In this template the Parse Personal Name stage is configured as follows.
• Parse personal names is selected and Parse business names is cleared. When you select these
options, first names are evaluated for gender, order, and punctuation and no evaluation of business
names is performed.
• Gender Determination Source is set to default. For most cases, Default is the best setting for gender
determination because it covers a wide variety of names. However, if you are processing names from
a specific culture, select that culture. Selecting a specific culture helps ensure that the proper gender
66
Spectrum™ Technology Platform 9.0 SP2
Chapter 3: Standardization
is assigned to the names. For example, if you leave Default selected, then the name Jean will be
identified as a female name. However, if you select French, it will be identified as a male name.
• Order is set to natural. The name fields are ordered by Title, First Name, Middle Name, Last Name,
and Suffix.
• Retain periods is cleared. Any punctuation in the name data is not retained.
Transformer
In this template, the Transformer stage is named Assign Titles. Assign Titles stage uses a custom script
to search each row in the data stream output by the Parse Personal Name stage and assign a
TitleOfRespect value based on the GenderCode value.
The custom script is:
if (row.get('TitleOfRespect') == '')
{
if (row.get('GenderCode') == 'M')
row.set('TitleOfRespect', 'Mr')
if (row.get('GenderCode') == 'F')
row.set('TitleOfRespect', 'Ms')
Every time the Assign Titles stage encounters M in the GenderCode field it sets the value for
TitleOfRespect as Mr. Every time the Assign Titles stages encounters F in the GenderCode field it sets
the value of TitleOfRespect as Ms.
Standardization
In this template, the Standardization stage is named Standardize Nicknames. Standardize Nickname
stage looks up first names in the Nicknames.xml database and replaces any nicknames with the more
regular form of the name. For example, the name Tommy is replaced with Thomas.
Write to File
The template contains one Write to File stage. In addition to the input fields, the output file contains the
TitleOfRespect, FirstName, MiddleName, LastName, EntityType, GenderCode, and
GenderDeterminationSource fields.
Data Quality Guide
67
Matching
In this section:
•
•
•
•
•
•
•
•
•
•
•
•
Matching Terminology . . . . . . . . . . . . . . . . . . . . . . . . . . . .70
Techniques for Defining Match Keys . . . . . . . . . . . . . . . .71
Match Rules . . . . . . . . . . . . . . . . . . . . . . . . . . . . . . . . . . . . .73
Matching Records from a Single Source . . . . . . . . . . . . .82
Matching Records from One Source to Another Source .86
Matching Records Between and Within Sources . . . . . .89
Matching Records Against a Database . . . . . . . . . . . . . . .93
Matching Records Using Multiple Match Rules . . . . . . . .95
Creating a Universal Matching Service . . . . . . . . . . . . . . .97
Using an Express Match Key . . . . . . . . . . . . . . . . . . . . . .100
Analyzing Match Results . . . . . . . . . . . . . . . . . . . . . . . . .102
Dataflow Templates for Matching . . . . . . . . . . . . . . . . . .115
4
Matching Terminology
Matching Terminology
70
Average Score
The average match score of all duplicates. The possible values are 0-100,
with 0 indicating a poor match and 100 indicating an exact match.
Baseline
The selected match result that will be compared against another match result.
Candidate Group
Suspect and Candidate records grouped together by an ID assigned by
CandidateFinder. The suspect (the first record in the group) is a record read
from an Input source while its candidates are usually records found in a
database using a SQL query.
Candidate Records
All non-suspect records in a match group or candidate group.
Drop
A decrease in duplicates.
Detail Match Record
A single record that corresponds to a record processed by a match stage.
Each record provides information about whether the record was a Suspect,
Unique, or a Duplicate as well as information about its Match Group or
Candidate Group and output collection. Candidate records provide information
on why the input record matched or did not match to its suspect.
Duplicate Collections
A duplicate collection consists of a Suspect and its Duplicate records grouped
together by a CollectionNumber. Unique records always belong to
CollectionNumber 0.
Duplicate Records
A record that matches another record within a match group. Can be a suspect
or a candidate.
Express Matches
An express match is made when a suspect and candidate have an exact
match on the contents of a designated field, usually an ExpressMatchKey
provided by the Match Key Generator. If an Express Match is made no further
processing is done to determine if the suspect and candidate are duplicates.
Input Records
Order of the records in the matching stage before the matching sort is
performed.
Interflow Match
A matching stage that locates matches between similar data records between
two input record streams. The first record stream is a source for suspect
records and the second stream is a source for candidate records.
Intraflow Match
A matching stage that locates matches between similar data records within
a single input stream.
Lift
An increase in duplicates.
Match Groups
(Group By) Records grouped together either by a match key or a sliding
window.
Match Results
(or Resource Bundle) Logical grouping of files produced by a stage. This
data is saved for each run of a stage and stored to disk. Subsequent runs
will not overwrite or change the results from a previous run. In MAT, the
bundles are used to provide information about the summary and details
results, as well as settings information.
Match Results List
List of match results of a single type that MAT can analyze in the current
analysis session.
Match Results Type
Indicates the contents of the match results. MAT uses the match results type
to determine how to use the data.
Matcher Stage
A stage on the canvas that performs matching routines. The matcher stages
are Interflow Match, Intraflow Match, and Transactional Match
Spectrum™ Technology Platform 9.0 SP2
Chapter 4: Matching
Missed Match
A record that was previously a suspect or duplicate but is now unique.
New Match
A record that was previously unique but is now a suspect or duplicate.
Sliding Window
The sliding window matching method sequentially fills a predetermined buffer
size called a window with the corresponding amount of data rows. As each
row is added to the window it is compared to each item already contained in
the window.
Suspect Records
A driver record that is matched against candidates within a match group or
a candidate group.
Transactional Match
A matching stage that matches suspect records against candidate records
that are returned from Candidate Finder or by an external application.
Unique Records
A suspect or candidate record that does not match any other records in a
match group. If it is the only record in a match group a suspect is automatically
unique.
Techniques for Defining Match Keys
Effective and efficient matching requires the right balance between accuracy and performance. The most
accurate approach to matching would be to analyze each record against all other records, but this is not
practical because the number of records that would need to be processed would result in unacceptably
slow performance. A better approach is to limit the number of records involved in the matching process
to those that are most likely to match. You can do this by using match keys. A match key is a value
created for each record using an algorithm that you define. The algorithm takes values from the record
and uses it to produce a match key value, which is stored as a new field in the record.
For example, if the incoming record is:
First Name - Fred
Last Name - Mertz
Postal Code - 21114-1687
Gender Code - M
And you define a match key rule that generates a match key by combining data from the record like this:
Input Field
Start Position
Length
Postal Code
1
5
Postal Code
7
4
Last Name
1
5
First Name
1
5
Gender Code
1
1
Then the key would be:
211141687MertzFredM
Any records that have the same match key are placed into a match group. The matching process then
compares records in the group to each other to identify matches.
To create a match key, use a Match Key Generator stage if you are matching records using Interflow
Match or Intraflow Match. If you are matching records using Transactional Match, use the Candidate
Finder stage to create match groups.
Data Quality Guide
71
Techniques for Defining Match Keys
Note: The guidelines that follow can be applied to both Match Key Generator keys and Candidate
Finder queries. In Candidate Finder, these guidelines apply to how you define the SELECT
statement.
Match Group Size and Performance
The match key determines the size of the match group, and thus the performance of your dataflow. As
the size of the match group doubles, execution time doubles. For example, if you define a match key
that produces a group of 20 potentially-matching records, it will take twice as long to process as if you
modify the match key so that the match group contains only 10 potentially-matching records. The
disadvantage to "tightening" the match key rule to produce a smaller match group is that you run the
risk of excluding records that do match. "Loosening" the match key rules reduces the chance of a matching
record being excluded from the group, but increases group size. To find the right balance for your data
it is important that you test with a variety of match key rules using a data that is representative of the
data you intend to process in production.
Density
When designing a match key it is important to consider the density of the data. Density refers to the
degree to which the data can be distributed across match groups. Since performance is determined by
the number of comparisons the system has to perform, match keys that produce a small number of large
match groups will result is slower performance than match keys that produce a large number of small
match groups.
To illustrate this concept, consider a situation where you have a set of one million name and address
records that you want to match. You might define a match key as the first three bytes of the postal code
and the first letter of the last name. If the records are from all over the U.S., the match key would produce
a good number of match groups and is likely to have acceptable performance. But if all the records are
from New York, the postal codes would all begin with "100" and you would end up with, at most, only 26
match groups. This would produce large match groups containing, on average, approximately 38,000
records.
You can calculate the maximum number of comparisons performed for each match group by using the
following formula:
N * (N-1) / 2
Where N is the number of records in the match group.
So if you have 26 match groups containing 38,000 records each, the maximum number of comparisons
performed would be approximately 18.7 billion. Here is how this number is calculated:
First, determine the maximum number of comparisons per match group:
38,000 * (38,000-1) / 2 = 721,981,000
Then, multiply this amount by the number of match groups:
721,981,000 * 26 = 18,771,506,000
If there were instead 100 unique values for the first 3 bytes of the postal code you would have 2,600
match groups containing an average of 380 records. In this case the maximum number of comparisons
would be 187 million, which is 100 times fewer. So if the records are only from New York, you might
consider using the first four or even five bytes of the postal code for the match key in order to produce
more match groups and reduce the number of comparisons. You may miss a few matches but the tradeoff
would be greatly reduced execution time.
In reality, a match key like the one used in this example will not result in match groups of equal size
because of variations in the data. For example, there will be many more people whose last name starts
with "S" than with "X". Because of this, you should focus your efforts on reducing the size of the largest
match groups. A match group of 100,000 records is 10 times larger than a match group of 10,000 but it
will require 100 times more comparisons and will take 100 times as long. For example, say you are using
five bytes of postal code and six bytes of the AddressLine1 field for your match key. On the surface that
72
Spectrum™ Technology Platform 9.0 SP2
Chapter 4: Matching
seems like a fairly fine match key. The problem is with PO Box addresses. While most of the match
groups may be of an acceptable size, there would be a few very large match groups with keys like
10002PO BOX that contain a very large number of records. To break up the large match groups you
could modify your match key to include the first couple of digits of the PO box number.
Aligning the Match Key with the Match Rule
To achieve the most accurate results, you should design the match key to work well with the match rule
that you will use it with. This requires you to consider how the match rule is defined.
• The match key should include any fields that the match rule requires to be an exact match.
• The match key should use the same kind of algorithm as is used in the match rule. For example, if
you are designing a match key for use with a match rule that uses a phonetic algorithm, then the match
key should also use a phonetic algorithm.
• The match key should be built using data from all the fields that are used in the match rule.
• Consider how the match key will be affected if there is data missing from one or more of the fields
used for the match key. For example, say you use middle initial as part of the match key and you have
a record for John A. Smith and another for John Smith. You have configured the match rule to ignore
blank values in the middle initial field, so these two records would match according to your match rule.
However, since the match key uses the middle initial, the two records would end up in different match
groups and would not be compared to each other, thus defeating the intent of your match rule.
Match Rules
Each of the matching stages (Interflow Match, Intraflow Match, and Transactional Match) require you to
configure a match rule. A match rule defines the criteria that are used to determine if one record matches
another. It specifies the fields to compare, how to compare the fields, and a hierarchy of comparisons
for complex matching rules.
Creating a hierarchical set of comparisons allows you to form nested Boolean match rules. For example,
consider the following match rule:
Data Quality Guide
73
Match Rules
In this example, the match rule is attempting to match records based on a business name and address.
The first element of the match rule is the FirmName field. This element means that the value in the
FirmName field must match in order for records to match. The second element evaluates the address.
Note that it is prefaced with the logical operator "and" which means that both the FirmName and Address
must match in order for records to match. The Address portion of the match rule consists of child rules
that evaluate four types of addresses: street addresses, PO Box addresses, Rural Route/Highway
Contract (RRHC) addresses, and private mailbox addresses. The Street child looks at the dataflow fields
HouseNumber, LeadingDirectional, StreetName, StreetSuffix, TrailingDirectional, and ApartmentNumber.
If all these match, then the parent rule "Street" and its parent rule "Address" all evaluate to "true". If the
Street rule does not evaluate to true, the POBox field is evaluated, then RRHC, then PrivateMailbox. If
any of these three match then the parent Address element will match.
Building a Match Rule
Match rules are used in Interflow Match, Intraflow Match, and Transactional Match to define the criteria
that determine if one record matches another. Match rules specify the fields to compare, how to compare
the fields, and a hierarchy of comparisons for complex matching rules.
You can build match rules in Interflow Match, Intraflow Match, and Transactional Match. You can also
build match rules in the Enterprise Designer Match Rule Management tool. Building a rule in the Match
Rule Management tool makes the rule available to use in any dataflow, and also makes it available to
other users. Building a match rule in one of the matcher stages makes the rule available only for that
stage, unless you save the rule by clicking the Save button, which makes it available to other stages
and users.
1. Open Enterprise Designer.
2. Do one of the following:
• If you want to define a match rule in Interflow Match, Intraflow Match, or Transactional Match,
double-click the match stage for which you want to define a match rule. In the Load match rule
field, choose a predefined match rule as a starting point. If you want to start with a blank match
rule, click New.
74
Spectrum™ Technology Platform 9.0 SP2
Chapter 4: Matching
• If you want to define a match rule in the Match Rule Management tool, select Tools > Match Rule
Management. If you want to use an existing rule as a starting point for your rule, check the Copy
from box and select the rule to use as a starting point.
3. Specify the dataflow fields you want to use in the match rule as well as the match rule hierarchy.
a) Click Add Parent.
b) Type in a name for the parent. The name must be unique and it cannot be a field. The first parent
in the hierarchy is used as the match rule name in the Load match rule field. All custom match
rules that you create and predefined rules that you modify are saved with the word "Custom"
prepended to the name.
c) Click Add Child. A drop-down menu appears in the rule hierarchy. Select a field to add to the
parent.
Note: All children under a parent must use the same logical operator. If you want to use different
logical operators between fields you must first create intermediate parents.
d) Repeat to complete your matching hierarchy.
4. Define parent options. Parent options are displayed to the right of the rule hierarchy when a parent
node is selected.
a) Click Match when not true to change the logical operator for the parent from AND to AND NOT.
If you select this option, records will only match if they do not match the logic defined in this
parent.
Note: Checking the Match when not true option has the effect of negating the Matching
Method options. For more information, see Negative Match Conditions on page 80.
b) In the Matching Method field, specify how to determine if a parent is a match or a non-match.
One of the following:
All true
A parent is considered a match if all children are determined to match. This
method creates an "AND" connector between children.
Any true
A parent is considered a match if at least one child is determined to match.
This method creates an "OR" connector between children.
Based on
threshold
A parent is considered a match if the score of the parent is greater than or
equal to the parent's threshold. When you select this option, the Threshold
slider appears. Use this slider to specify a threshold. The scoring method
determines which logical connector to use. Thresholds at the parent cannot
be higher than the threshold of the children.
Note: The threshold set here can be overridden at runtime in the Dataflow
Options dialog box. Go to Edit > Dataflow Options and click Add.
Expand the stage, click Top level threshold, and enter the threshold
in the Default value field.
c) In the Missing Data field, specify how to score blank data in a field. One of the following:
Ignore blanks
Ignores the field if it contains blank data.
Count as 0
Scores the field as 0 if it contains blank data.
Count as 100
Scores the field as 100 if it contains blank data.
Compare Blanks
Pads a shorter value with blanks for comparisons.
d) In the Scoring method field, select the method used for determining the matching score. One
of the following:
Weighted Average
Uses the weight of each child to determine the average match
score.
Average
Uses the average score of each child to determine the score of a
parent.
Maximum
Uses the highest child score to determine the score of a parent.
Minimum
Uses the lowest child score to determine the score of a parent.
Data Quality Guide
75
Match Rules
The following table shows the logical relationship between matching methods and scoring methods
and how each combination changes the logic used during match processing.
Table 1: Matching Method-to-Scoring Method Matrix
Matching Method
Scoring Method
Any True
All True
Based on
Threshold
Weighted
Average
n/a
AND
AND
Average
n/a
AND
AND
Maximum
OR
n/a
OR
Minimum
OR
n/a
OR
Comments
Only available
when All True or
Based on
Threshold are
selected as the
Matching Method.
Only available
when Any True or
Based on
Threshold are
selected as the
Matching Method.
5. Define child options. Child options are displayed to the right of the rule hierarchy when a child is
selected.
a) Check the option Candidate field to map the child record field selected to a field in the input file.
b) Check the option Cross match against to match different fields to one another between two
records.
c) Click Match when not true to change the logical operator from AND to NOT. If you select this
option, the match rule will only evaluate to true if the records do not match the logic defined in
this child.
For example, if you want to identify individuals who are associated with multiple accounts, you
could create a match rule that matches on name but where the account number does not match.
You would use the Match when not true option for the child that matches the account number.
d) In the Missing Data field, specify how to score blank data in a field. One of the following:
Ignore blanks
Ignores the field if it contains blank data.
Count as 0
Scores the field as 0 if it contains blank data.
Count as 100
Scores the field as 100 if it contains blank data.
Compare Blanks
Pads a shorter value with blanks for comparisons.
e) In the Threshold field, specify the threshold that must be met at the individual field level in order
for that field to be determined a match.
f) In the Scoring method field, select the method used for determining the matching score. One
of the following:
Weighted Average
Uses the weight of each algorithm to determine the average match
score.
Average
Uses the average score of each algorithm to determine the match
score.
Maximum
Uses the highest algorithm score to determine the match score.
Minimum
Uses the lowest algorithm score to determine the match score.
g) Choose one or more algorithms to use to determine if the values in the field match. One of the
following.
76
Spectrum™ Technology Platform 9.0 SP2
Chapter 4: Matching
Acronym
Determines whether a business name matches its acronym. Example: Internal
Revenue Service and its acronym IRS would be considered a match and
return a match score of 100.
Character
Frequency
Determines the frequency of occurrence of each character in a string and
compares the overall frequencies between two strings.
Daitch-Mokotoff Phoenetic algorithm that allows greater accuracy in matching of Slavic and
Soundex
Yiddish surnames with similar pronunciation but differences in spelling. Coded
names are six digits long, and multiple possible encodings can be returned
for a single name. This option was developed to respond to limitations of
Soundex in the processing of Germanic or Slavic surnames.
Date
Compare date fields regardless of the date format in the input records. Click
Edit in the Options column to specify the following:
• Require Month: prevents a date that consists only of a year from matching
• Require Day: prevents a date that consists only of a month and year from
matching
• Match Transposed MM/DD: where month and day are provided in numeric
format, compares suspect month to candidate day and suspect day to
candidate month as well as the standard comparison of suspect month to
candidate month and suspect day to candidate day
• Prefer DD/MM/YYYY format over MM/DD/YYYY: contributes to date parsing
in cases where both month and day are provided in numeric format and
their identification can not be determined by context. For example, given
the numbers 5 and 13, the parser will automatically assign 5 to the month
and 13 to the day because there are only 12 months in a year. However,
given the numbers 5 and 12 (or any two numbers 12 and under), the parser
will assume whichever number is first to be the month. Checking this option
will ensure that the parser reads the first number as the day rather than the
month.
• Range Options—Overall: allows you to set the maximum number of days
between matching dates. For example, if you enter an overall range of 35
days and your candidate date is December 31st, 2000, a suspect date of
February 5, 2001 would be a match, but a suspect date of February 6 would
not. If you enter an overall range of 1 day and your candidate date is January
2000, a suspect date of 1999 would be a match (comparing December 31,
1999) but a suspect date of January 2001 would not.
• Range Options—Year: allows you to set the number of years between
matching dates, independent of month and day. For example, if you enter
a year range of 3 and your candidate date is January 31, 2000, a suspect
date of January 31, 2003, would be a match but a suspect date of February
2003 would not. Similarly, if your candidate date is 2000, a suspect date of
March 2003 would be a match because months are not in conflict and it's
within the three-year range.
• Range Options—Month: allows you to set the number of months between
matching dates, independent of year and day. For example, if you enter a
month range of 4 and your candidate date is January 1, 2000, a suspect
date of May 2000 is a match because there is no day conflict and it's within
the four-month range, but a suspect date of May 2, 2000, is not, because
the days conflict.
• Range Options—Day: allows you to set the number of days between
matching dates, independent of year and month. For example, if you enter
a day range of 5 and your candidate date is January 1, 2000, a suspect
date of January 2000 is a match because there is no day conflict but a
suspect date of December 27, 1999, is not, because the months conflict.
Double
Metaphone
Data Quality Guide
Determines the similarity between two strings based on a phonetic
representation of their characters. Double Metaphone is an improved version
of the Metaphone algorithm, and attempts to account for the many irregularities
found in different languages.
77
Match Rules
Edit Distance
Determines the similarity between two strings based on the number of
deletions, insertions, or substitutions required to transform one string into
another.
Euclidean
Distance
Provides a similarity measure between two strings using the vector space of
combined terms as the dimensions. It also determines the greatest common
divisor of two integers. It takes a pair of positive integers and forms a new pair
that consists of the smaller number and the difference between the larger and
smaller numbers. The process repeats until the numbers are equal. That
number then is the greatest common divisor of the original pair. For example,
21 is the greatest common divisor of 252 and 105: (252 = 12 × 21;
105 = 5 × 21); since 252 − 105 = (12 − 5) × 21 = 147, the GCD of 147 and
105 is also 21.
Exact Match
Determines if two strings are the same.
Initials
Used to match initials for parsed personal names.
Jaro-Winkler
Distance
Determines the similarity between two strings based on the number of
character replacements it takes to transform one string into another. This
option was developed for short strings, such as personal names.
Keyboard
Distance
Determines the similarity between two strings based on the number of
deletions, insertions, or substitutions required to transform one string to the
other, weighted by the position of the keys on the keyboard. Click Edit in the
Options column to specify the type of keyboard you are using: QWERTY
(U.S.), QWERTZ (Austria and Germany), or AZERTY (France).
Koeln
Indexes names by sound as they are pronounced in German. Allows names
with the same pronunciation to be encoded to the same representation so
that they can be matched, despite minor differences in spelling. The result is
always a sequence of numbers; special characters and white spaces are
ignored. This option was developed to respond to limitations of Soundex.
Kullback-Liebler Determines the similarity between two strings based on the differences
Distance
between the distribution of words in the two strings.
Metaphone
Determines the similarity between two English-language strings based on a
phonetic representation of their characters. This option was developed to
respond to limitations of Soundex.
Metaphone
(Spanish)
Determines the similarity between two strings based on a phonetic
representation of their characters. This option was developed to respond to
limitations of Soundex.
Metaphone 3
Improves upon the Metaphone and Double Metaphone algorithms with more
exact consonant and internal vowel settings that allow you to produce words
or names more or less closely matched to search terms on a phonetic basis.
Metaphone 3 increases the accuracy of phonetic encoding to 98%. This option
was developed to respond to limitations of Soundex.
Name Variant
Determines whether two names are variants of each other. The algorithm
returns a match score of 100 if two names are variations of each other, and
a match score of 0 if two names are not variations of each other. For example,
JOHN is a variation of JAKE and returns a match score of 100. JOHN is not
a variant of HENRY and returns a match score of 0. Click Edit in the Options
column to select Name Variant options. For more information, see Name
Variant Finder on page 254.
NGram
Distance
Calculates in text or speech the probability of the next term based on the
previous n terms, which can include phonemes, syllables, letters, words, or
base pairs and can consist of any combination of letters. This algorithm
includes an option to enter the size of the NGram; the default is 2.
Numeric String Compares address lines by separating the numerical attributes of an address
line from the characters. For example, in the string address 1234 Main Street
Apt 567, the numerical attributes of the string (1234567) are parsed and
handled differently from the remaining string value (Main Street Apt). The
algorithm first matches numeric data in the string with the numeric algorithm.
78
Spectrum™ Technology Platform 9.0 SP2
Chapter 4: Matching
If the numeric data match is 100, the alphabetic data is matched using Edit
distance and Character Frequency. The final match score is calculated as
follows:
(numericScore + (EditDistanceScore +
CharacterFrequencyScore) / 2) / 2
For example, the match score of these two addresses is 95.5, calculated as
follows:
123 Main St Apt 567
123 Maon St Apt 567
Numeric Score = 100
Edit Distance = 91
Character Frequency = 91
91 + 91 = 182
182/2 = 91
100 + 91 = 191
191/2 = 95.5
Nysiis
Phonetic code algorithm that matches an approximate pronunciation to an
exact spelling and indexes words that are pronounced similarly. Part of the New
York State Identification and Intelligence System. Say, for example, that you
are looking for someone's information in a database of people. You believe
that the person's name sounds like "John Smith", but it is in fact spelled "Jon
Smath". If you conducted a search looking for an exact match for "John Smith"
no results would be returned. However, if you index the database using the
NYSIIS algorithm and search using the NYSIIS algorithm again, the correct
match will be returned because both "John Smith" and "Jon Smath" are indexed
as "JANSNATH" by the algorithm. This option was developed to respond to
limitations of Soundex; it handles some multi-character n-grams and maintains
relative vowel positioning, whereas Soundex does not.
Note: This algorithm does not process non-alpha characters; records
containing them will fail during processing.
Phonix
Preprocesses name strings by applying more than 100 transformation rules
to single characters or sequences of several characters. 19 of those rules are
applied only if the character(s) are at the beginning of the string, while 12 of
the rules are applied only if they are at the middle of the string, and 28 of the
rules are applied only if they are at the end of the string. The transformed
name string is encoded into a code that is comprised by a starting letter
followed by three digits (removing zeros and duplicate numbers). This option
was developed to respond to limitations of Soundex; it is more complex and
therefore slower than Soundex.
Soundex
Determines the similarity between two strings based on a phonetic
representation of their characters.
SubString
Determines whether one string occurs within another.
Syllable
Alignment
Combines phonetic information with edit distance-based calculations. Converts
the strings to be compared into their corresponding sequences of syllables
and calculates the number of edits required to convert one sequence of
syllables to the other.
The following table describes the logical relationship between the number of algorithms you can
use based on the parent scoring method selected.
Data Quality Guide
79
Match Rules
Table 2: Matching Algorithm-to-Scoring Method Matrix
Algorithms
Scoring Method
Single
Multiple
Weighted Average
n/a
Yes
Average
n/a
Yes
Maximum
Yes
Yes
Minimum
n/a
Yes
6. If you are defining a rule in Interflow Match, Intraflow Match, or Transactional Match, and you want
to share the rule with other stages and/or users, click the Save button at the top of the window.
Related Links
Match Rules on page 73
Negative Match Conditions
Match conditions are statements that indicate which fields you want to match in order for two records to
be considered a match. However, in some situations you may want to define a condition that says that
two fields must not match in order for two records to be considered a match. This technique, known as
negation, reverses the logic of a condition within a match rule.
For example, say you have customer support records for a call center and you want to identify customers
who have contacted the call center but done so for multiple accounts. In other words, you want to identify
individuals who are associated with multiple accounts. In order to identify customers who have multiple
accounts, you would want to match records where the name matches but the account number does not
match. In this case you would use negation on a match condition for the account number.
To use negation, check the box Match when not true when defining your match rule. This option is
available to both parents (groups of conditions) and children (individual conditions) in the match rule.
The effect of this option is slightly different when used on a parent as opposed to a child. When used on
a parent, the Match when not true option effectively reverses the matching method option as follows:
• The All true matching method effectively becomes "any false". The match rule can only match records
if at least one of the children under the parent evaluates to false, thus making the parent evaluate to
false. Since the Match when not true option is enabled, this evaluation to false will result in a match.
• The Any true matching method effectively becomes "none true". The match rule can only match
records where none of the children evaluate to true because if any of the children evaluate to true, the
parent will be true, but with the Match when not true option enabled, this evaluation to true will not
result in a match. Only if none of the children are true, resulting in the parent evaluating to "not true",
can the rule find a match.
• The Based on threshold matching method effectively changes from matching records that are equal
to or greater than a specified threshold, to matching records that are less than the threshold. This is
because records with a threshold value less than the one specified will evaluate to false, and since
Match when not true is enabled, this will result in a match.
The Match when not true option is easier to understand when applied to child elements in a match rule.
It simply indicates that two records are considered a match if the algorithm does not indicate a match.
Testing a Match Rule
After defining a match rule you may want to test it to see its results. To do this, you can use Match Rule
Evaluation to examine the effects of a match rule on a small set of sample data.
1. Open the dataflow in Enterprise Designer.
80
Spectrum™ Technology Platform 9.0 SP2
Chapter 4: Matching
2. Double-click the stage containing the match rule you want to test.
Match rules are used in Interflow Match, Intraflow Match, and Transactional Match.
3. In the match rule hierarchy, select the node you want to test and click Evaluate.
4. On the Import tab, enter the test data (a suspect and up to 10 candidates). There are two ways to
enter test data.
• To type in the test data manually, type a suspect record under Suspect and up to ten candidates
under Candidate. After typing the records, you can click Export to save the records to a file which
you can import later instead of re-entering the data manually.
• To import test data from a file, click Import... and select the file containing the sample records.
Delimited files can be comma, pipe or tab delimited and should have a header record with header
fields that match the field names shown under Candidates. A sample header record for Household
input would be:
Name,AddressLine1,City,StateProvince
5. Evaluate the rule using one of these methods:
• Click Current Rule. This runs the rule defined on the Match Rule tab. Results are displayed for
one suspect and candidate pair at a time. To cycle through the results, click the arrow buttons.
Scores for fields and algorithms are displayed in a tree format similar to the match rule control.
The results can optionally be exported to an XML file.
Note: If you make changes to the match rule and want to apply the changes to the stage's match
rule, click Save.
• Click All Algorithms. This ignores the match rule and instead runs all algorithms against each
field for suspect and candidate pairs. Results are displayed for one suspect and candidate pair at
a time and can be cycled through using the arrow buttons.
To automatically update the results as you make changes to the match rule and/or input, select the
Auto update check box. When using this feature with the All Algorithms option, only changes to
the input will update the results.
The results shown under Scores are color coded as follows:
•
•
•
•
Green—The rule resulted in a match.
Red—The rule that did not result in a match.
Gray—The rule was ignored
Blue—The results for individual algorithms within the rule.
To export the evaluation results in XML format, click Export.
Related Links
Match Rules on page 73
Sharing a Match Rule
You can create match rules that can be shared between stages, between dataflows, and even between
users. By sharing a match rule, you can make it easier to develop dataflows by defining a match rule
once and then referencing in where needed. This also helps ensure that match rules that are intended
to perform the same function are consistent across dataflows.
• To share a match rule you built in Interflow Match, Intraflow Match, or Transactional Match, click the
Save button at the top of the stage's options window.
• If you build the rule in the Match Rules Management tool, the rule is automatically available to use in
dataflows by all users. To view the Match Rules Management tool, in Enterprise Designer select
Tools > Match Rules Management.
Related Links
Match Rules on page 73
Data Quality Guide
81
Matching Records from a Single Source
Viewing Shared Match Rules
In Enterprise Designer you can browse all the shared match rules available on your Spectrum™
Technology Platform system. These match rules can be used by Interflow Match, Intraflow Match, and
Transactional Match stages in a dataflow to perform matching.
To browse the match rules in the Match Rule Repository, follow this procedure.
1. Open Enterprise Designer.
2. Select Tools > Match Rules Management.
3. Select the rule you want to view and click View.
Related Links
Match Rules on page 73
Creating a Custom Match Rule as a JSON Object
Match rules can be configured and passed at runtime if they are exposed as dataflow options. This
enables you to share match rules across machines and override existing match rules with JSON-formatted
match rule strings. You can also set stage options when calling the job through a process flow or through
the job executor command-line tool.
You can find schemas for the match rule and match info field in the <Spectrum
Location>\server\modules\matcher\matchrule\schemas folder.
1. Save and expose the dataflow that contains the match rule.
2. Open the dataflow that uses the match rule.
3. Go to Edit > Dataflow Options.
4. In the Map dataflow options to stages table, click the matching stage that uses the match rule and
check the Custom Match Rule box.
5. Optional: Change the name of the match rule in the Option label field from "Custom Match Rule" to
the name you prefer.
6. Click OK twice.
Matching Records from a Single Source
This procedure describes how to use an Intraflow Match stage to identify groups of records within a
single data source (such as a file or database table) that are related to each other based on the matching
criteria you specify. The dataflow groups records into collections and writes the collections to an output
file.
1. In Enterprise Designer, create a new dataflow.
2. Drag a source stage onto the canvas.
3. Double-click the source stage and configure it. See the Dataflow Designer's Guide for instructions
on configuring source stages.
4. Drag a Match Key Generator stage onto the canvas and connect it to the source stage.
For example, if you are using a Read from File source stage, your dataflow would now look like this:
82
Spectrum™ Technology Platform 9.0 SP2
Chapter 4: Matching
Match Key Generator creates a non-unique key for each record, which can then be used by matching
stages to identify groups of potentially duplicate records. Match keys facilitate the matching process
by allowing you to group records by match key and then only comparing records within these groups.
5. Double-click Match Key Generator.
6. Click Add.
7. Define the rule to use to generate a match key for each record.
Table 3: Match Key Generator Options
Option Name
Description / Valid Values
Algorithm
Specifies the algorithm to use to generate the match key. One of the
following:
Consonant Returns specified fields with consonants removed.
Double
Returns a code based on a phonetic representation of
Metaphone their characters. Double Metaphone is an improved
version of the Metaphone algorithm, and attempts to
account for the many irregularities found in different
languages.
Koeln
Indexes names by sound, as they are pronounced in
German. Allows names with the same pronunciation to
be encoded to the same representation so that they can
be matched, despite minor differences in spelling. The
result is always a sequence of numbers; special
characters and white spaces are ignored. This option
was developed to respond to limitations of Soundex.
MD5
A message digest algorithm that produces a 128-bit
hash value. This algorithm is commonly used to check
data integrity.
Metaphone Returns a Metaphone coded key of selected fields.
Metaphone is an algorithm for coding words using their
English pronunciation.
Metaphone Returns a Metaphone coded key of selected fields for
(Spanish) the Spanish language. This metaphone algorithm codes
words using their Spanish pronunciation.
Metaphone Improves upon the Metaphone and Double Metaphone
3
algorithms with more exact consonant and internal vowel
settings that allow you to produce words or names more
or less closely matched to search terms on a phonetic
basis. Metaphone 3 increases the accuracy of phonetic
encoding to 98%. This option was developed to respond
to limitations of Soundex.
Nysiis
Data Quality Guide
Phonetic code algorithm that matches an approximate
pronunciation to an exact spelling and indexes words
that are pronounced similarly. Part of the New York
State Identification and Intelligence System. Say, for
example, that you are looking for someone's information
in a database of people. You believe that the person's
name sounds like "John Smith", but it is in fact spelled
"Jon Smyth". If you conducted a search looking for an
exact match for "John Smith" no results would be
returned. However, if you index the database using the
NYSIIS algorithm and search using the NYSIIS
algorithm again, the correct match will be returned
because both "John Smith" and "Jon Smyth" are indexed
as "JAN SNATH" by the algorithm.
83
Matching Records from a Single Source
Option Name
Description / Valid Values
Phonix
Preprocesses name strings by applying more than 100
transformation rules to single characters or to
sequences of several characters. 19 of those rules are
applied only if the character(s) are at the beginning of
the string, while 12 of the rules are applied only if they
are at the middle of the string, and 28 of the rules are
applied only if they are at the end of the string. The
transformed name string is encoded into a code that is
comprised by a starting letter followed by three digits
(removing zeros and duplicate numbers). This option
was developed to respond to limitations of Soundex; it
is more complex and therefore slower than Soundex.
Soundex
Returns a Soundex code of selected fields. Soundex
produces a fixed-length code based on the English
pronunciation of a word.
Substring Returns a specified portion of the selected field.
Field name
Specifies the field to which you want to apply the selected algorithm
to generate the match key. For example, if you select a field called
LastName and you choose the Soundex algorithm, the Soundex
algorithm would be applied to the data in the LastName field to
produce a match key.
Start position
Specifies the starting position within the specified field. Not all
algorithms allow you to specify a start position.
Length
Specifies the length of characters to include from the starting position.
Not all algorithms allow you to specify a length.
Remove noise characters
Removes all non-numeric and non-alpha characters such as hyphens,
white space, and other special characters from an input field.
Sort input
Sorts all characters in an input field or all terms in an input field in
alphabetical order.
Characters
Sorts the characters values from an input field
prior to creating a unique ID.
Terms
Sorts each term value from an input field prior to
creating a unique ID.
8. When you are done defining the rule click OK.
9. If you want to add additional match rules, click Add and add them, otherwise click OK when you are
done.
10. Drag an Intraflow Match stage onto the canvas and connect it to the Match Key Generator stage.
For example, if you are using a Read from File source stage, your dataflow would now look like this:
11. Double-click Intraflow Match.
12. In the Load match rule field, select one of the predefined match rules which you can either use as-is
or modify to suit your needs. If you want to create a new match rule without using one of the predefined
match rules as a starting point, click New. You can only have one custom rule in a dataflow.
Note: The Dataflow Options feature in Enterprise Designer enables the match rule to be exposed
for configuration at runtime.
84
Spectrum™ Technology Platform 9.0 SP2
Chapter 4: Matching
13. In the Group by field, select MatchKey.
This will place records that have the same match key into a group. The match rule is applied to
records within a group to see if there are duplicates. The match key for each record will be generated
by the Generate Match Key stage you configured earlier in this procedure.
14. For information about modifying the other options, see Building a Match Rule on page 74.
15. Click OK to save your Intraflow Match configuration and return to the dataflow canvas.
16. Drag a sink stage onto the canvas and connect it to the Generate Match key stage.
For example, if you were using a Write to File sink stage your dataflow would look like this:
17. Double-click the sink stage and configure it.
For information on configuring sink stages, see the Dataflow Designer's Guide.
You now have a dataflow that will match records from a single source.
Example of Matching Records in a Single Data Source
As a data steward for a credit card company, you want to analyze your customer
database and find out which addresses occur multiple times and under what names
so that you can minimize the number of duplicate credit card offers sent to the same
household.
This example demonstrates how to identify members of the same household by
comparing information within a single input file and creating an output file containing
one record per household.
The Read from File stage reads in data that contains both unique records for each
household and records that are potentially from the same household. The input file
contains names and addresses.
The Match Key Generator creates a match key which is a non-unique key shared by
like records that identify records as potential duplicates.
The Intraflow Match stage compares records that have the same match key and marks
each record as either a unique record or as one of multiple records for the same
household.
The Conditional Router sends records that are collections of records for each household
to the Filter stage, which filters out all but one of the records from each household,
and sends it on to the Stream Combiner stage. The Conditional Router stage also
sends unique records directly to Stream Combiner.
Finally, the Write to File stage creates an output file that contains one record for each
household.
Related Links
Match Key Generator on page 174
Intraflow Match on page 171
Data Quality Guide
85
Matching Records from One Source to Another Source
Matching Records from One Source to Another
Source
This procedure describes how to use an Interflow Match stage to identify records in one source that
match records in another source. The first source contains suspect records and the second source
contains candidate records. The dataflow only matches records from one source to records in another
source. It does not attempt to match records from within the same source. The dataflow groups records
into collections of matching records and writes these collections to an output file.
1. In Enterprise Designer, create a new dataflow.
2. Drag two source stages onto the canvas. Configure one of them to point to the source of the suspect
records and configure the other to point to the source of the candidate records.
See the Dataflow Designer's Guide for instructions on configuring source stages.
3. Drag a Match Key Generator stage onto the canvas and connect it to one of the source stages.
For example, if you are using a Read from File source stage, your dataflow would now look like this:
Match Key Generator creates a non-unique key for each record, which can then be used by matching
stages to identify groups of potentially duplicate records. Match keys facilitate the matching process
by allowing you to group records by match key and then only comparing records within these groups.
Note: You will add a second Match Key Generator stage later. For now you only need one on the
canvas.
4. Double-click the Match Key Generator stage.
5. Click Add.
6. Define the rule to use to generate a match key for each record.
Table 4: Match Key Generator Options
Option Name
Description / Valid Values
Algorithm
Specifies the algorithm to use to generate the match key. One of the
following:
Consonant Returns specified fields with consonants removed.
Double
Returns a code based on a phonetic representation of
Metaphone their characters. Double Metaphone is an improved
version of the Metaphone algorithm, and attempts to
account for the many irregularities found in different
languages.
Koeln
86
Indexes names by sound, as they are pronounced in
German. Allows names with the same pronunciation to
be encoded to the same representation so that they can
be matched, despite minor differences in spelling. The
result is always a sequence of numbers; special
Spectrum™ Technology Platform 9.0 SP2
Chapter 4: Matching
Option Name
Description / Valid Values
characters and white spaces are ignored. This option
was developed to respond to limitations of Soundex.
MD5
A message digest algorithm that produces a 128-bit
hash value. This algorithm is commonly used to check
data integrity.
Metaphone Returns a Metaphone coded key of selected fields.
Metaphone is an algorithm for coding words using their
English pronunciation.
Metaphone Returns a Metaphone coded key of selected fields for
(Spanish) the Spanish language. This metaphone algorithm codes
words using their Spanish pronunciation.
Metaphone Improves upon the Metaphone and Double Metaphone
3
algorithms with more exact consonant and internal vowel
settings that allow you to produce words or names more
or less closely matched to search terms on a phonetic
basis. Metaphone 3 increases the accuracy of phonetic
encoding to 98%. This option was developed to respond
to limitations of Soundex.
Nysiis
Phonetic code algorithm that matches an approximate
pronunciation to an exact spelling and indexes words
that are pronounced similarly. Part of the New York
State Identification and Intelligence System. Say, for
example, that you are looking for someone's information
in a database of people. You believe that the person's
name sounds like "John Smith", but it is in fact spelled
"Jon Smyth". If you conducted a search looking for an
exact match for "John Smith" no results would be
returned. However, if you index the database using the
NYSIIS algorithm and search using the NYSIIS
algorithm again, the correct match will be returned
because both "John Smith" and "Jon Smyth" are indexed
as "JAN SNATH" by the algorithm.
Phonix
Preprocesses name strings by applying more than 100
transformation rules to single characters or to
sequences of several characters. 19 of those rules are
applied only if the character(s) are at the beginning of
the string, while 12 of the rules are applied only if they
are at the middle of the string, and 28 of the rules are
applied only if they are at the end of the string. The
transformed name string is encoded into a code that is
comprised by a starting letter followed by three digits
(removing zeros and duplicate numbers). This option
was developed to respond to limitations of Soundex; it
is more complex and therefore slower than Soundex.
Soundex
Returns a Soundex code of selected fields. Soundex
produces a fixed-length code based on the English
pronunciation of a word.
Substring Returns a specified portion of the selected field.
Field name
Data Quality Guide
Specifies the field to which you want to apply the selected algorithm
to generate the match key. For example, if you select a field called
LastName and you choose the Soundex algorithm, the Soundex
algorithm would be applied to the data in the LastName field to
produce a match key.
87
Matching Records from One Source to Another Source
Option Name
Description / Valid Values
Start position
Specifies the starting position within the specified field. Not all
algorithms allow you to specify a start position.
Length
Specifies the length of characters to include from the starting position.
Not all algorithms allow you to specify a length.
Remove noise characters
Removes all non-numeric and non-alpha characters such as hyphens,
white space, and other special characters from an input field.
Sort input
Sorts all characters in an input field or all terms in an input field in
alphabetical order.
Characters
Sorts the characters values from an input field
prior to creating a unique ID.
Terms
Sorts each term value from an input field prior to
creating a unique ID.
7. When you are done defining the rule click OK.
8. Right-click the Match Key Generator stage on the canvas and select Copy Stage.
9. Right-click in an empty area of the canvas and select Paste.
10. Connect the copy of Match Key Generator to the other source stage.
For example, if you are using Read from File input stages your dataflow would now look like this:
The dataflow now contains two Match Key Generator stages that produce match keys for each source
using exactly the same rules. Having identically-configured Match Key Generator stages is essential
to the proper functioning of this dataflow.
11. Drag an Interflow Match stage onto the canvas and connect each of the Match Key Generator stages
to it.
For example, if you are using Read from File input stages your dataflow would now look like this:
12. Double-click the Interflow Match stage.
13. In the Load match rule field, select one of the predefined match rules which you can either use as-is
or modify to suit your needs. If you want to create a new match rule without using one of the predefined
match rules as a starting point, click New. You can only have one custom rule in a dataflow.
Note: The Dataflow Options feature in Enterprise Designer enables the match rule to be exposed
for configuration at runtime.
14. In the Group by field, select MatchKey.
88
Spectrum™ Technology Platform 9.0 SP2
Chapter 4: Matching
This will place records that have the same match key into a group. The match rule is applied to
records within a group to see if there are duplicates. The match key for each record will be generated
by the Generate Match Key stages you configured earlier in this procedure.
15. For information about modifying the other options, see Building a Match Rule on page 74.
16. Drag a sink stage onto the canvas and connect it to the Interflow Match stage.
For example, if you were using a Write to File sink stage, your dataflow would look like this:
17. Double-click the sink stage and configure it.
For information on configuring sink stages, see the Dataflow Designer's Guide.
You now have a dataflow that will match records from two data sources.
Example of Matching Records from Multiple Sources
As a direct mail company, you want to identify people who are on a do-not-mail list so
that you do not send direct mail to them. You have a list of recipients in one file, and
a list of people who do not wish to receive direct marketing mail in another file (a
suppression file).
The following dataflow provides a solution to this business scenario:
The Read from File stage reads data from your mailing list, and the Read from File 2
stage reads data from the suppression list. The two Match Key Generator stages are
identically configured so that they produce a match key which can be used by Interflow
Match to form groups of potential matches. Interflow Match identifies records in the
mailing list that are also in the suppression file and marks these records as duplicates.
Conditional Router sends unique records, meaning those records that were not found
in the suppression list, to Write to File to be written out to a file. The Conditional Router
stage sends all other records to Write to Null where they are discarded.
Related Links
Match Key Generator on page 174
Interflow Match on page 168
Match Key Generator on page 174
Interflow Match on page 168
Matching Records Between and Within Sources
This procedure describes how to use an Intraflow Match stage to identify records in one file that match
records in another file and in the same file. For example, you have two files (file A and file B) and you
Data Quality Guide
89
Matching Records Between and Within Sources
want to see if there are records in file A that match records in file B, but you also want to see if there are
records in file A that match other records in file A. You can accomplish this using a Stream Combiner
and an Intraflow Match stage.
1. In Enterprise Designer, create a new dataflow.
2. Drag a source stage onto the canvas.
3. Double-click the source stage and configure it. See the Dataflow Designer's Guide for instructions
on configuring source stages.
4. Drag a second source stage onto the canvas and configure it to read the second data source into
the dataflow.
5. Drag a Stream Combiner stage onto the canvas and connect the two source stages to it.
For example, if your dataflow had two Read from File stages it would look like this after adding the
Stream Combiner:
6. Drag a Match Key Generator stage onto the canvas and connect it to the Stream Combiner stage.
For example, your dataflow may now look like this:
Match Key Generator creates a non-unique key for each record, which can then be used by matching
stages to identify groups of potentially duplicate records. Match keys facilitate the matching process
by allowing you to group records by match key and then only comparing records within these groups.
7. Double-click Match Key Generator.
8. Click Add.
9. Define the rule to use to generate a match key for each record.
Table 5: Match Key Generator Options
Option Name
Description / Valid Values
Algorithm
Specifies the algorithm to use to generate the match key. One of the
following:
Consonant Returns specified fields with consonants removed.
Double
Returns a code based on a phonetic representation of
Metaphone their characters. Double Metaphone is an improved
version of the Metaphone algorithm, and attempts to
90
Spectrum™ Technology Platform 9.0 SP2
Chapter 4: Matching
Option Name
Description / Valid Values
account for the many irregularities found in different
languages.
Koeln
Indexes names by sound, as they are pronounced in
German. Allows names with the same pronunciation to
be encoded to the same representation so that they can
be matched, despite minor differences in spelling. The
result is always a sequence of numbers; special
characters and white spaces are ignored. This option
was developed to respond to limitations of Soundex.
MD5
A message digest algorithm that produces a 128-bit
hash value. This algorithm is commonly used to check
data integrity.
Metaphone Returns a Metaphone coded key of selected fields.
Metaphone is an algorithm for coding words using their
English pronunciation.
Metaphone Returns a Metaphone coded key of selected fields for
(Spanish) the Spanish language. This metaphone algorithm codes
words using their Spanish pronunciation.
Metaphone Improves upon the Metaphone and Double Metaphone
3
algorithms with more exact consonant and internal vowel
settings that allow you to produce words or names more
or less closely matched to search terms on a phonetic
basis. Metaphone 3 increases the accuracy of phonetic
encoding to 98%. This option was developed to respond
to limitations of Soundex.
Nysiis
Phonetic code algorithm that matches an approximate
pronunciation to an exact spelling and indexes words
that are pronounced similarly. Part of the New York
State Identification and Intelligence System. Say, for
example, that you are looking for someone's information
in a database of people. You believe that the person's
name sounds like "John Smith", but it is in fact spelled
"Jon Smyth". If you conducted a search looking for an
exact match for "John Smith" no results would be
returned. However, if you index the database using the
NYSIIS algorithm and search using the NYSIIS
algorithm again, the correct match will be returned
because both "John Smith" and "Jon Smyth" are indexed
as "JAN SNATH" by the algorithm.
Phonix
Preprocesses name strings by applying more than 100
transformation rules to single characters or to
sequences of several characters. 19 of those rules are
applied only if the character(s) are at the beginning of
the string, while 12 of the rules are applied only if they
are at the middle of the string, and 28 of the rules are
applied only if they are at the end of the string. The
transformed name string is encoded into a code that is
comprised by a starting letter followed by three digits
(removing zeros and duplicate numbers). This option
was developed to respond to limitations of Soundex; it
is more complex and therefore slower than Soundex.
Soundex
Returns a Soundex code of selected fields. Soundex
produces a fixed-length code based on the English
pronunciation of a word.
Substring Returns a specified portion of the selected field.
Data Quality Guide
91
Matching Records Between and Within Sources
Option Name
Description / Valid Values
Field name
Specifies the field to which you want to apply the selected algorithm
to generate the match key. For example, if you select a field called
LastName and you choose the Soundex algorithm, the Soundex
algorithm would be applied to the data in the LastName field to
produce a match key.
Start position
Specifies the starting position within the specified field. Not all
algorithms allow you to specify a start position.
Length
Specifies the length of characters to include from the starting position.
Not all algorithms allow you to specify a length.
Remove noise characters
Removes all non-numeric and non-alpha characters such as hyphens,
white space, and other special characters from an input field.
Sort input
Sorts all characters in an input field or all terms in an input field in
alphabetical order.
Characters
Sorts the characters values from an input field
prior to creating a unique ID.
Terms
Sorts each term value from an input field prior to
creating a unique ID.
10. When you are done defining the rule click OK.
11. If you want to add additional match rules, click Add and add them, otherwise click OK when you are
done.
12. Drag an Intraflow Match stage onto the canvas and connect it to the Match Key Generator stage.
For example, your dataflow may now look like this:
13. Double-click Intraflow Match.
14. In the Load match rule field, select one of the predefined match rules which you can either use as-is
or modify to suit your needs. If you want to create a new match rule without using one of the predefined
match rules as a starting point, click New. You can only have one custom rule in a dataflow.
Note: The Dataflow Options feature in Enterprise Designer enables the match rule to be exposed
for configuration at runtime.
15. In the Group by field, select MatchKey.
This will place records that have the same match key into a group. The match rule is applied to
records within a group to see if there are duplicates. The match key for each record will be generated
by the Generate Match Key stage you configured earlier in this procedure.
16. For information about modifying the other options, see Building a Match Rule on page 74.
17. Click OK to save your Intraflow Match configuration and return to the dataflow canvas.
18. Drag a sink stage onto the canvas and connect it to the Generate Match key stage.
92
Spectrum™ Technology Platform 9.0 SP2
Chapter 4: Matching
For example, if you were using a Write to File sink stage your dataflow would look like this:
19. Double-click the sink stage and configure it.
For information on configuring sink stages, see the Dataflow Designer's Guide.
Matching Records Against a Database
This procedure describes how to match records where the suspect records come from a source such
as a file or database, and the candidate records are in a database with other unrelated records. For each
input record, the dataflow queries the database for candidates for that record, then uses a Transactional
Match stage to match records. Finally, the dataflow writes the collections of matching records to an
output file.
Note: Transactional Match only matches suspect records to candidates. It does not attempt to match
suspect records to other suspect records as is done in Intraflow Match.
1. In Enterprise Designer, create a new dataflow.
2. Drag a source stage onto the canvas.
3. Double-click the source stage and configure it. See the Dataflow Designer's Guide for instructions
on configuring source stages.
4. Drag a Candidate Finder stage to the canvas and connect the source stage to it.
For example, if you were using the Read from File source stage, your dataflow would look like this:
Candidate Finder obtains the candidate records that will form the set of potential matches that
Transactional Match will evaluate later in the dataflow.
5. Double-click the Candidate Finder stage on the canvas.
6. In the Connection field, select the database you want to query to find candidate records. If the
database you want is not listed, open Management Console and define the database connection
there first.
7. In the SQL field, enter a SQL SELECT statement that finds records that are candidates based on the
value in one of the dataflow fields. To reference dataflow fields, use the format ${FieldName},
where FieldName is the name of the field you want to reference.
For example, if you wanted to find records in the database where the value in the LastName column
is the same as the dataflow records' Customer_LastName field, you would write a SQL statement
like this:
SELECT FirstName, LastName, Address, City, State, PostalCode
FROM Customer_Table
WHERE LastName = ${Customer_LastName};
Data Quality Guide
93
Matching Records Against a Database
8. On the Field Map tab, select which fields in the dataflow should contain the data from each database
column.
The Selected Fields column lists the database columns and theStage Fields lists the fields in the
dataflow.
9. Click OK.
10. Drag a Transactional Match stage onto the canvas and connect the Candidate Finder stage to it.
For example, if you are using a Read from File input stage your dataflow would now look like this:
Transactional Match matches suspect records against candidate records that are returned from the
Candidate Finder stage. Transactional Match uses matching rules to compare the suspect record to
all candidate records with the same candidate group number (assigned in Candidate Finder) to
identify duplicates.
11. Double-click the Transactional Match stage on the canvas.
12. In the Load match rule field, select one of the predefined match rules which you can either use as-is
or modify to suit your needs. If you want to create a new match rule without using one of the predefined
match rules as a starting point, click New. You can only have one custom rule in a dataflow.
Note: The Dataflow Options feature in Enterprise Designer enables the match rule to be exposed
for configuration at runtime.
13. For information about modifying the other options, see Building a Match Rule on page 74.
14. When you are done configuring the Transactional Match stage, click OK.
15. Drag a sink stage onto the canvas and connect it to the Transactional Match stage.
For example, if you were using a Write to File sink stage, your dataflow would look like this:
16. Double-click the sink stage and configure it.
For information on configuring sink stages, see the Dataflow Designer's Guide.
You now have a dataflow that will match records from two data sources.
Example of Matching Records Against a Database
As a sales executive for an online sales company you want to determine if an online
prospect is an existing customer or a new customer.
The following dataflow service provides a solution to the business scenario:
This dataflow is a service that evaluates prospect data sent to it by an API call or web
service call. It evaluates the data against customer data in a customer database to
determine if a prospect is a customer.
The Input stage is configured so that the dataflow accepts the following input fields:
AddressLine1, City, Name, PostalCode, and StateProvince. AddressLine1 and Name
are the fields that are key to the dataflow processing in this template.
94
Spectrum™ Technology Platform 9.0 SP2
Chapter 4: Matching
The Candidate Finder stage obtains the candidate records that will form the set of
potential matches that the Transactional Match stage will evaluate.
The Transactional Match stage matches suspect records against potential candidate
records that are returned from the Candidate Finder Stage. Transactional Match uses
matching rules to compare the suspect record to all candidate records with the same
candidate group number (assigned in Candidate Finder) to identify duplicates. In this
example, Transactional Match compares LastName and AddressLine1.
The Output stage returns the results of the dataflow through an API or web service
response.
Related Links
Candidate Finder on page 154
Transactional Match on page 177
Matching Records Using Multiple Match Rules
Download the sample dataflow
If you have records that you want to match and you want to use more than one matching operation, you
can create a dataflow that uses more than one match key then combines the results to effectively match
on multiple separate criteria. For example, say you want to create a dataflow that matches records where:
The name and address match
OR
The date of birth and government ID match
To perform matching using this logic, you create a dataflow that performs name and address matching
in one stage, and date of birth and government ID matching in another stage, then combine the matching
records into a single collection.
This topic provides a general procedure for setting up a dataflow where matching occurs over the course
of two matching stages. For purposes of illustration this procedure uses Intraflow Match stages. However,
you can use this technique with Interflow Match as well.
1. In Enterprise Designer, create a new dataflow.
2. Drag a source stage onto the canvas.
3. Double-click the source stage and configure it. See the Dataflow Designer's Guide for instructions
on configuring source stages.
4. Define the first matching pass. The results of this first matching pass will be collections of records
that match on your first set of matching criteria, for example records that match on name and address.
a) Drag a Match Key Generator and Intraflow Match stage to the canvas and connect them so you
have a dataflow that looks like this:
a) In the Match Key Generator stage, define the match key to use for the first matching pass.
For example, if you want the first matching pass to match on name and address, you may create
a match key based on the fields containing the last name and postal code.
b) In the Intraflow Match stage, define the match rules you want to perform the first matching pass.
For example, if you may configure this matching stage to match on name and address.
Data Quality Guide
95
Matching Records Using Multiple Match Rules
5. Save the collection numbers from the first matching pass to another field. This is necessary because
the CollectionNumber field will be overwritten during the second matching pass. It is necessary to
rename the CollectionNumber field in order to preserve the results of the first matching pass.
a) Drag a Transformer stage to the canvas and connect it to the Intraflow Match stage so that you
have a dataflow that looks like this:
b) Configure the Transformer stage to rename the field CollectionNumber to CollectionNumberPass1.
6. Define the second matching pass. The results of this second matching pass will be collections of
records that match on your second set of matching criteria, for example records that date of birth
and government ID.
a) Drag a Match Key Generator and Intraflow Match stage to the canvas and connect them so that
you have a dataflow that looks like this:
b) In the second Match Key Generator stage, define the match key to use for the second matching
pass.
For example, if you want the second matching pass to match date of birth and government ID,
you might create a match key based on the fields containing the birthday and government ID.
c) In the second Intraflow Match stage, define the match rule for the second matching pass.
For example, if you may configure this matching stage to match on date of birth and government
ID.
7. Determine if any of the duplicate records identified by the second matching pass were also identified
as duplicates in the first matching pass.
a) Create the dataflow snippet shown below following the second Intraflow Match stage:
b) Configure the Conditional Router stage so that records where the CollectionNumber field is not
equal to 0 are routed to the Duplicate Synchronization stage.
This will route the duplicates from the second matching pass to the Duplicate Synchronization
stage.
c) Configure the Duplicate Synchronization stage to group records by the CollectionNumer field
(this is the collection number from the second matching pass). Then within each collection, identify
whether any of the records in the collection were also identified as duplicates in the first matching
pass. If they were, copy the collection number from the first pass to a new field called
CollectionNumberConsolidated. To accomplish this, configure Duplicate Synchronization as
shown here:
96
Spectrum™ Technology Platform 9.0 SP2
Chapter 4: Matching
d) In the Transformer stage that follows the Duplicate Synchronization stage, create a custom
transform using this script:
if (data['CollectionNumberConsolidated'] == null) {
data['CollectionNumberConsolidated'] = data['CollectionNumber']
}
e) In the Transformer that immediately follows the Conditional Router (Transformer 2 in sample
dataflow) configure a transform to copy CollectionNumberPass1 to CollectionNumberConsolidated.
This takes the unique records from the second matching pass and copies CollectionNumberPass1
to CollectionNumberConsolidated.
8. After the Stream Combiner you will have collections of records that match in either of the matching
passes. The CollectionNumberConsolidated field indicates the matching records. You can add a sink
or any additional processing you wish to perform after the Stream Combiner stage.
Related Links
Intraflow Match on page 171
Duplicate Synchronization on page 161
Creating a Universal Matching Service
Download the Sample Dataflow
A universal matching service is a service that can use any of your match rules to perform matching and
can accept any input fields. The service takes a match rule name as an input option, allowing you specify
Data Quality Guide
97
Creating a Universal Matching Service
the match rule you want to use in the API call or web service request. The service does not have a
predefined input schema so you can include whatever fields are appropriate for the type of records you
want to match. By creating a universal matching service you can avoid having separate services for
each match rule, enabling you to add new match rules without having to add a service.
This procedure shows how to create a universal matching service and includes an example of a web
service request to the universal matching service.
1. In Enterprise Designer, create a new service dataflow.
2. Drag an Input stage, a Transactional Match stage, and an Output stage to the canvas and connect
them so that you have a dataflow that looks like this:
3. Double-click the Transactional Match stage.
4. In the Load match rule field, select any match rule. For example, you can select the default
Household match rule.
Even though you will specify the match rule in the service request, you have to configure the
Transactional Match stage with a default match rule in order for the dataflow to be valid. If you do
not select a match rule the dataflow will fail validation and you will not be able to expose it.
5. Click OK.
6. Double-click the Output stage.
7. Choose to expose the fields MatchRecordType and MatchScore.
8. Click OK.
Note: There is no need to expose any fields in the Input stage since input fields will be specified
as user-defined fields in the service request.
9. Click Edit > Dataflow Options.
10. Click Add.
11. Expand Transactional Match and check the box next to Match Rule.
This exposes the match rule option as a run-time option, making it possible to specify the match rule
in the service request.
12. Click OK then click OK again to close the Dataflow Options window.
13. Save and expose the dataflow.
You now have a universal match service that you can use to perform matching using any of the match
rules defined in the Match Rules Management tool in Enterprise Designer. When calling the service,
specify the match rule in the MatchRule option and specify the input fields as user-defined fields.
Example: Calling the Universal Matching Service
You have created a match rule named AddressAndBirthday in the Match Rules
Management tool. This match rule matches records using the fields Address and
Birthday. You want to use the universal matching service to perform matching using
this rule through a SOAP web service request.
To accomplish this, you would have a SOAP request that specifies
AddressAndBirthday in the MatchRule element and the record's fields in the
user_fields element.
<soapenv:Envelope
xmlns:soapenv="http://schemas.xmlsoap.org/soap/envelope/"
xmlns:univ="http://www.pb.com/spectrum/services/UniversalMatchingService">
<soapenv:Header/>
98
Spectrum™ Technology Platform 9.0 SP2
Chapter 4: Matching
<soapenv:Body>
<univ:UniversalMatchingServiceRequest>
<univ:options>
<univ:MatchRule>AddressAndBirthday</univ:MatchRule>
</univ:options>
<univ:Input>
<univ:Row>
<univ:user_fields>
<univ:user_field>
<univ:name>Name</univ:name>
<univ:value>Bob Smith</univ:value>
</univ:user_field>
<univ:user_field>
<univ:name>Address</univ:name>
<univ:value>4200 Parliament
Pl</univ:value>
</univ:user_field>
<univ:user_field>
<univ:name>Birthday</univ:name>
<univ:value>1973-6-15</univ:value>
</univ:user_field>
</univ:user_fields>
</univ:Row>
<univ:Row>
<univ:user_fields>
<univ:user_field>
<univ:name>Name</univ:name>
<univ:value>Robert M. Smith</univ:value>
</univ:user_field>
<univ:user_field>
<univ:name>Address</univ:name>
<univ:value>4200 Parliament
Pl</univ:value>
</univ:user_field>
<univ:user_field>
<univ:name>Birthday</univ:name>
<univ:value>1973-6-15</univ:value>
</univ:user_field>
</univ:user_fields>
</univ:Row>
<univ:Row>
<univ:user_fields>
<univ:user_field>
<univ:name>Name</univ:name>
<univ:value>Bob Smith</univ:value>
</univ:user_field>
<univ:user_field>
<univ:name>Address</univ:name>
<univ:value>424 Washington
Blvd</univ:value>
</univ:user_field>
<univ:user_field>
<univ:name>Birthday</univ:name>
<univ:value>1959-2-19</univ:value>
</univ:user_field>
</univ:user_fields>
</univ:Row>
</univ:Input>
</univ:UniversalMatchingServiceRequest>
</soapenv:Body>
</soapenv:Envelope>
This request would result in the following response:
<soap:Envelope
xmlns:soap="http://schemas.xmlsoap.org/soap/envelope/">
<soap:Body>
Data Quality Guide
99
Using an Express Match Key
<ns3:UniversalMatchingServiceResponse
xmlns:ns2="http://spectrum.pb.com/"
xmlns:ns3="http://www.pb.com/spectrum/services/UniversalMatchingService">
<ns3:Output>
<ns3:Row>
<ns3:MatchScore/>
<ns3:MatchRecordType>Suspect</ns3:MatchRecordType>
<ns3:user_fields>
<ns3:user_field>
<ns3:name>Name</ns3:name>
<ns3:value>Bob Smith</ns3:value>
</ns3:user_field>
<ns3:user_field>
<ns3:name>Birthday</ns3:name>
<ns3:value>1973-6-15</ns3:value>
</ns3:user_field>
<ns3:user_field>
<ns3:name>Address</ns3:name>
<ns3:value>4200 Parliament Pl</ns3:value>
</ns3:user_field>
</ns3:user_fields>
</ns3:Row>
<ns3:Row>
<ns3:MatchScore>100</ns3:MatchScore>
<ns3:MatchRecordType>Duplicate</ns3:MatchRecordType>
<ns3:user_fields>
<ns3:user_field>
<ns3:name>Name</ns3:name>
<ns3:value>Robert M. Smith</ns3:value>
</ns3:user_field>
<ns3:user_field>
<ns3:name>Birthday</ns3:name>
<ns3:value>1973-6-15</ns3:value>
</ns3:user_field>
<ns3:user_field>
<ns3:name>Address</ns3:name>
<ns3:value>4200 Parliament Pl</ns3:value>
</ns3:user_field>
</ns3:user_fields>
</ns3:Row>
</ns3:Output>
</ns3:UniversalMatchingServiceResponse>
</soap:Body>
</soap:Envelope>
Using an Express Match Key
Express key matching can be a useful tool for reducing the number of compares performed and thereby
improving execution speed in dataflows that use an Interflow Match or Intraflow Match stage. If two
records have an exact match on the express key, the candidate is considered a 100% match and no
further matching attempts are made. If two records do not match on an express key value, they are
compared using the rules-based method. However, a loose express key results in many false positive
matches.
1. Open your dataflow in Enterprise Designer.
2. Double-click the Match Key Generator stage.
100
Spectrum™ Technology Platform 9.0 SP2
Chapter 4: Matching
3. Check the box Generate express match key.
4. Click Add.
5. Complete the following fields:
Table 6: Match Key Generator Options
Option Name
Description / Valid Values
Algorithm
Specifies the algorithm to use to generate the match key. One of the
following:
Consonant Returns specified fields with consonants removed.
Double
Returns a code based on a phonetic representation of
Metaphone their characters. Double Metaphone is an improved
version of the Metaphone algorithm, and attempts to
account for the many irregularities found in different
languages.
Koeln
Indexes names by sound, as they are pronounced in
German. Allows names with the same pronunciation to
be encoded to the same representation so that they can
be matched, despite minor differences in spelling. The
result is always a sequence of numbers; special
characters and white spaces are ignored. This option
was developed to respond to limitations of Soundex.
MD5
A message digest algorithm that produces a 128-bit
hash value. This algorithm is commonly used to check
data integrity.
Metaphone Returns a Metaphone coded key of selected fields.
Metaphone is an algorithm for coding words using their
English pronunciation.
Metaphone Returns a Metaphone coded key of selected fields for
(Spanish) the Spanish language. This metaphone algorithm codes
words using their Spanish pronunciation.
Metaphone Improves upon the Metaphone and Double Metaphone
3
algorithms with more exact consonant and internal vowel
settings that allow you to produce words or names more
or less closely matched to search terms on a phonetic
basis. Metaphone 3 increases the accuracy of phonetic
encoding to 98%. This option was developed to respond
to limitations of Soundex.
Data Quality Guide
Nysiis
Phonetic code algorithm that matches an approximate
pronunciation to an exact spelling and indexes words
that are pronounced similarly. Part of the New York
State Identification and Intelligence System. Say, for
example, that you are looking for someone's information
in a database of people. You believe that the person's
name sounds like "John Smith", but it is in fact spelled
"Jon Smyth". If you conducted a search looking for an
exact match for "John Smith" no results would be
returned. However, if you index the database using the
NYSIIS algorithm and search using the NYSIIS
algorithm again, the correct match will be returned
because both "John Smith" and "Jon Smyth" are indexed
as "JAN SNATH" by the algorithm.
Phonix
Preprocesses name strings by applying more than 100
transformation rules to single characters or to
sequences of several characters. 19 of those rules are
applied only if the character(s) are at the beginning of
101
Analyzing Match Results
Option Name
Description / Valid Values
the string, while 12 of the rules are applied only if they
are at the middle of the string, and 28 of the rules are
applied only if they are at the end of the string. The
transformed name string is encoded into a code that is
comprised by a starting letter followed by three digits
(removing zeros and duplicate numbers). This option
was developed to respond to limitations of Soundex; it
is more complex and therefore slower than Soundex.
Soundex
Returns a Soundex code of selected fields. Soundex
produces a fixed-length code based on the English
pronunciation of a word.
Substring Returns a specified portion of the selected field.
Field name
Specifies the field to which you want to apply the selected algorithm
to generate the match key. For example, if you select a field called
LastName and you choose the Soundex algorithm, the Soundex
algorithm would be applied to the data in the LastName field to
produce a match key.
Start position
Specifies the starting position within the specified field. Not all
algorithms allow you to specify a start position.
Length
Specifies the length of characters to include from the starting position.
Not all algorithms allow you to specify a length.
Remove noise characters
Removes all non-numeric and non-alpha characters such as hyphens,
white space, and other special characters from an input field.
Sort input
Sorts all characters in an input field or all terms in an input field in
alphabetical order.
Characters
Sorts the characters values from an input field
prior to creating a unique ID.
Terms
Sorts each term value from an input field prior to
creating a unique ID.
6. Click OK.
7. If you want to specify an additional field and/or algorithm to use in generating an express match key,
click Add, otherwise click OK.
8. Double-click the Interflow Match or Intraflow Match stage on the canvas.
9. Select the option Express match on and choose the field ExpressMatchKey.
This field contains the express match key produced by Match Key Generator.
10. Click OK.
11. Save and run your dataflow.
To determine whether a candidate was matched using an express key, look at the value of the
ExpressKeyIdentified field, which is either Y for a match or N for no match. Note that suspect records
always have an ExpressKeyIdentified value of N.
Analyzing Match Results
The Match Analysis tool in Enterprise Designer displays the results of one or more matching stages of
the same type. The tool provides summary matching results for a dataflow and also allows you to view
102
Spectrum™ Technology Platform 9.0 SP2
Chapter 4: Matching
matching results on a record-by-record basis. You can use this information to troubleshoot or fine-tune
your match rules to produce the results you want.
The Match Analysis tool provides the following features:
• Match Summary Results: Displays summary record counts for a single match result or comparisons
between two match results.
• Lift/Drop charts: Uses bar charts to display an increase or decrease in matches..
• Match rules: Displays the match rules used for a single match result or the changes made to the match
rules when comparing two match results.
• Match Detail results: Displays record processing details for a single match result or the comparison
between two match results.
Viewing a Summary of Match Results
The Match Analysis tool can display summary information about the matching processes in a dataflow,
such as the number of duplicate records, the average match score, and so on. You can view the results
of a single job or you can compare results between multiple jobs.
1. In Enterprise Designer, open the dataflow you want to analyze.
2. For each Interflow Match, Intraflow Match, or Transactional match stage whose matching you want
to analyze, double-click the stage and select the Generate data for analysis check box.
Important: Enabling the Generate data for analysis option reduces performance. You should turn
this option off when you are finished using the Match Analysis tool.
3. Select Run > Run Current Flow
Note: For optimal results, use data that will produce 100,000 or fewer records. The more match
results, the slower the performance of the Match Analysis tool.
4. When the dataflow finishes running, select Tools > Match Analysis.
The Browse Match Results dialog box displays with a list of dataflows that have match results that
be viewed in the Match Analysis tool. If the job you want to analyze is not listed, open the dataflow
and make sure that the matching stage has the Generate data for analysis check box selected.
Tip: If there are a large number of dataflows and you want to filter the dataflows, select a filter option
from the Show only jobs where drop-down list.
5. Click the "+" icon next to the dataflow you want to view to expand it.
6. Under the dataflow there is one entry for each matcher stage in the dataflow. Select the stage whose
results you want to view and click Add.
The Match Analysis tool appears at the bottom of the Enterprise Designer window.
7. If you want to compare the matcher results side by side with the results from another matcher:
a)
b)
c)
d)
Click Add.
Select the matcher whose results you want to compare.
Click Add.
In the dataflow list, select the matcher you just added and click Comapare.
The Summary tab lists matching statistics for the job. Depending on the type of matching stage used
in the dataflow, you will see different information.
For Intraflow Match you will see the following summary information:
Input Records
The total number of records processed by the matcher stage.
Unique Records
A suspect or candidate record that does not match any other records in a
match group. If it is the only record in a match group a suspect is automatically
unique.
Data Quality Guide
103
Analyzing Match Results
Match Groups
(Group By) Records grouped together either by a match key or a sliding
window.
Duplicate Collections
A duplicate collection consists of a Suspect and its Duplicate records grouped
together by a CollectionNumber. Unique records always belong to
CollectionNumber 0.
Express Matches
An express match is made when a suspect and candidate have an exact
match on the contents of a designated field, usually an ExpressMatchKey
provided by the Match Key Generator. If an Express Match is made no further
processing is done to determine if the suspect and candidate are duplicates.
Average Score
The average match score of all duplicates. The possible values are 0-100,
with 0 indicating a poor match and 100 indicating an exact match.
For Interflow Match you will see the following summary information:
Duplicate Collections
A duplicate collection consists of a Suspect and its Duplicate records
grouped together by a CollectionNumber. Unique records always belong
to CollectionNumber 0.
Express Matches
An express match is made when a suspect and candidate have an exact
match on the contents of a designated field, usually an ExpressMatchKey
provided by the Match Key Generator. If an Express Match is made no
further processing is done to determine if the suspect and candidate are
duplicates.
Average Score
The average match score of all duplicates. The possible values are 0-100,
with 0 indicating a poor match and 100 indicating an exact match.
Input Suspects
The number of records in the input stream that the matcher tried to match
to other records
Suspects with Duplicates The number of input suspects that matched at least one candidate record.
Unique Suspects
The number of input suspects that did not match any candidate records.
Suspects with Candidates The number of input suspects that had at least one candidate record in
its match group and therefore had at least one match attempt.
Suspects without
Candidates
The number of input suspects that had no candidate records in its match
group and therefore had no match attempts.
For Transactional Match, you will see the following summary information:
Average Score
The average match score of all duplicates. The possible values are
0-100, with 0 indicating a poor match and 100 indicating an exact
match.
Input Suspects
The number of records in the input stream that the matcher tried to
match to other records
Suspects with Duplicates
The number of input suspects that matched at least one candidate
record.
Unique Suspects
The number of input suspects that did not match any candidate
records.
Suspects with Candidates
The number of input suspects that had at least one candidate record
in its match group and therefore had at least one match attempt.
Suspects without Candidates The number of input suspects that had no candidate records in its
match group and therefore had no match attempts.
104
Spectrum™ Technology Platform 9.0 SP2
Chapter 4: Matching
Intraflow Match
Interflow Match
Transactional Match
Input Records
X
Duplicate Records
X
Unique Records
X
Match Groups
X
Duplicate Collections
X
X
Express Matches
X
X
Average Score
X
X
X
Input Suspects
X
X
Suspects with Duplicates
X
X
Unique Suspects
X
X
Suspects with
Candidates
X
X
Suspects without
Candidates
X
X
The Lift/Drop tab of the Match Analysis tool displays duplicate and unique record counts in a bar chart
for the selected baseline and, optionally, comparison results. Lift is the increase in the number of duplicate
records. Drop is the decrease in the number of duplicate records. Unique records are shown in yellow
and duplicate records are shown in green.
If only a baseline job is selected, the chart will show the results for that one job:
If both a baseline and a comparison job are selected, a chart for the baseline and comparison jobs are
shown side by side:
Data Quality Guide
105
Analyzing Match Results
The Match Rules tab of the Match Analysis tool displays the match rules used for a single match result
or the changes made to the match rules when comparing two match results.
Match rules are displayed in a hierarchical structure similar to how they are displayed in the stage in
which they were created. The rule hierarchy contains two nodes: Options and Rules. The Options node
shows the stage settings for the selected match result. The Rules node shows the match rules for the
selected match result.
To view rule details, select a node in the hierarchy.
If you are comparing match rules between multiple jobs, differences between the baseline and comparison
match results are color coded as follows:
Blue
Indicates that the match rule in the comparison match result was modified.
Green
Indicates that the match rule in the comparison match result was added.
Red
Indicates that the match rule in the comparison match result was omitted.
For example:
106
Spectrum™ Technology Platform 9.0 SP2
Chapter 4: Matching
Viewing Record-Level Match Results
Detailed results displays a collection of details about match records for match results set.
To display detailed results:
1. In the Match Analysis tool, specify a baseline job and, optionally, a comparison job.
2. Click Details.
The baseline match results are displayed based on the selected view in the Show drop-down list.
The following table lists the columns displayed for each match stage type.
Table 7: Detailed Results Data Displayed
Detail-Related Results
Intraflow
Interflow
Transactional
Input Record Number
X
X
X
Match Group
X
X
Express Key
X
X
Express Key Driver Record
X
X
Collection Number
X
X
X
Match Record Type
X
X
X
Fields used by the rules
X
X
X
Overall (top-level) rule score
X
X
X
Candidate Group
Data Quality Guide
107
Analyzing Match Results
Detail-Related Results
Intraflow
Match ScoreSelect a match results in the Match
Results List and then click Remove.
Interflow
Transactional
X
X
For information about the match rate chart, see Match Rate Chart on page 109.
3. In the Analyze field, choose one of the follwing:
Baseline
Displays the match results from the baseline run.
Comparison
Displays the match results of the comparison run.
4. Select one of the following values from the show list and then click Refresh. If you are analyzing
baseline results, the options are:
• Suspects with Candidates: (All matchers) Displays suspect records and all candidate records that
attempted to match to each suspect.
• Suspects with Duplicates: (All matchers) Displays all suspect records and candidate records that
matched to each suspect.
• Suspects with Express Matches: (Interflow Match and Intraflow Match, when Express Match Key
is enabled) Displays suspect and candidate records that match based on the Express Match Key.
• Duplicate Collections: (Intraflow and Interflow) Displays all duplicate collections by collection
number.
• Match Groups: (Intraflow and Interflow) Displays records by match groups.
• Candidate Groups: (Transactional Match) Displays records by candidate groups.
• Unique Suspects: (Interflow and Transactional Match) Displays all suspect records that did not
match to any candidate records.
• Unique Records: (Intraflow) Displays all non-matched records.
• Suspects without Candidates: (Interflow and Transactional Match) Displays all suspects that
contained no candidates to match against.
• All Records: Displays all records processed by the matching stage.
If you are analyzing comparison results, the show options are:
• New Matches: (Intraflow) Displays all new matches and its related suspects. This view combines
the results of Suspects with New Duplicates and New Suspects into one view.
• New Matched Suspects: (Interflow and Transactional Match) Displays suspects that had no
duplicates in the baseline but have at least one duplicate in the comparison.
• New Unique Suspects: (Interflow and Transactional Match) Displays suspects that had duplicates
in the baseline but have none in the comparison.
• Missed Matches: (Intraflow) Displays all missed matches. This view combines the results of Suspects
with Missed Duplicates and Missed Suspects into one view.
• Suspects with New Duplicates: (All matchers) Displays records that are new duplicates for records
that were suspects in the baseline and remained suspects in the comparison.
• Suspects with Missed Duplicates: (All matchers) Displays records that are missed duplicates for
records that were suspects in the baseline and remained suspects in the comparison.
• New Suspects: (Intraflow) Displays records that are suspects in the comparison match result, but
were not Suspects in the baseline.
• Missed Suspects (Intraflow) Displays records that are not suspects in the comparison result, but
were suspects in the baseline.
5. Expand a suspect record to view its candidates.
6. Select a candidate record and click Details.
Note: This option is not available when Sliding Window is enabled in Intraflow Match stages.
The Record Details window shows field-level data as well as the record's match score for each
match rule. If you specified both a baseline and a comparison job run, you can see the record's
results for both baseline and comparison runs.
108
Spectrum™ Technology Platform 9.0 SP2
Chapter 4: Matching
• Baseline Input—Displays the field level data, from both the suspect and candidate, used in the
match.
• Baseline Match Details—Displays scoring information for each node in the match rules.
• Comparison Input—Displays the field level data, from both the suspect and candidate, used in the
match.
• Comparison Match Details—Displays scoring information for each node in the match rules. Green
text represents a match for a node in the rules. Red text represents a non-match for a node in the
rules.
Match Rate Chart
Match Rate charts graphically display match information in detail views.
For Intraflow matches, it displays one chart displaying overall matches:
• Baseline Matches: Total number of matches in the baseline result.
• Comparison Matches: Total number of matches in the comparison result.
• New Matches: A count of all records that were unique in the baseline result, but are a suspect or
duplicate in the comparison result.
• Missed Matches: A count of all records that were suspects or duplicates in the baseline result, but are
unique in the comparison result.
For Interflow and Transactional matches, it displays two charts:
•
•
•
•
Overall Match Rate
Baseline Matches: Total number of matches in the baseline result.
Comparison Matches: Total number of matches in the comparison result.
New Matches: A count of all records that were unique in the baseline result, but are a suspect or
duplicate in the comparison result.
Data Quality Guide
109
Analyzing Match Results
• Missed Matches: A count of all records that were suspects or duplicates in the baseline result, but are
unique in the comparison result.
• Suspect Match Rate
• Baseline Matches: A count of all Suspects that were not unique in the baseline.
• Comparison Matches: A count of all suspects that were not unique in the comparison.
• New Matches: A count of all suspects that were unique in the baseline, but are matches in the
comparison result.
• Missed Matches: A count of all suspects that were matches in the baseline, but are unique in the
comparison result.
Using Field Chooser
Click the Field Chooser icon
to display selected columns in the Match Analysis Results. Field Chooser
displays at the parent level and the child level. You can independently select display columns for parents
and children.
Filtering Records
Use the Display records in which check box to filter the detail match records displayed. You can filter
records based on several operators to compare user-provided values against data in one field of each
detail match record.
The operators you can choose are:
•
•
•
•
•
•
•
•
•
110
String-type fields (MatchGroup, MatchRecordType, any matching data)
contains
is between
is equal to
is not equal to
starts with
Numeric-type fields (CollectionNumber, InputRecordNumber, MatchScore)
is between
is equal to
Spectrum™ Technology Platform 9.0 SP2
Chapter 4: Matching
•
•
•
•
•
is not equal to
is greater than
is greater than or equal to
is less than
is less than or equal to
To filter records:
1. Select a baseline or comparison match result from the Match Analysis Results view and click Refresh.
2. Select the Display records in which check box.
3. Select a field from the Field list box.
4. Select an operator.
5. Type a value for the selected operator type. If you select is between, type a range of values.
6. When filtering on suspect views, you can filter on:
• Parents—Filter just on parents (Suspects), all children returned.
• Children—Filter out any children that do not fall in the filter range. Parent (Suspect) nodes returned.
• Parents and Children—Filter on parents (Suspects), then if any parents are returned, filter on its
children
7. Click Refresh. Records that fall in the range of the options and values are displayed. If no records
fall in the range of the selected options and values, a message displays that no records were returned.
Analyzing Match Rule Changes
You can use the Match Analysis tool in Enterprise Designer to view in detail the effect that a change in
a match rule has in the dataflow's match results. You can do this by running the dataflow, making changes,
re-running the dataflow, and then viewing the results in the Match Analysis tool. This procedure describes
how to do this.
Important: When comparing match results, the input data used for the baseline and comparison runs
must be identical. Using different input data can cause misleading results. Observe the
following to help ensure an accurate comparison:
• Use the same input files or tables
• Sort the data in the same way prior to the matching stage
• Use the same Candidate Finder queries when using Transactional Match
Data Quality Guide
111
Analyzing Match Results
1. In Enterprise Designer, open the dataflow you want to analyze.
2. For each Interflow Match, Intraflow Match, or Transactional match stage whose matching you want
to analyze, double-click the stage and select the Generate data for analysis check box.
Important: Enabling the Generate data for analysis option reduces performance. You should turn
this option off when you are finished using the Match Analysis tool.
3. Select Run > Run Current Flow
Note: For optimal results, use data that will produce 100,000 or fewer records. The more match
results, the slower the performance of the Match Analysis tool.
4. In the dataflow's matcher stage or stages, make the match rule changes you want then run the
dataflow again.
For example, if you want to test the effect of increasing the threshold value, change the threshold
value and run the dataflow again.
5. When the dataflow finishes running, select Tools > Match Analysis.
The Browse Match Results dialog box displays with a list of dataflows that have match results that
be viewed in the Match Analysis tool. If the job you want to analyze is not listed, open the dataflow
and make sure that the matching stage has the Generate data for analysis check box selected.
Tip: If there are a large number of dataflows and you want to filter the dataflows, select a filter option
from the Show only jobs where drop-down list.
6. On the left side of the Match Analysis pane, there is a list of the matcher stages, one per run. Select
the matcher stage in the run that you want to use as the baseline for comparison then click Baseline.
Then, select the run you want to compare the baseline to and click Compare.
You can now compare summary match results, such as the total number of duplicate records, as well
as detailed record-level information that shows how each record was evaluated against the match rules.
Example of Match Results Comparison
For example, say you run a job named HouseholdRelationshipsAnalysis. You want
to test the effect of a change to the Household Match 2 stage. Your first run the job
using the original settings, then you modify the match rules in the Household Match
2 stage and run the job again. In the Match Analysis tool, the run with a job ID of 10
is the run with the original settings, so you set it as the baseline. The run with a job ID
of 13 is run with the modified match rule. When you click Compare, you can see that
the modified match rule (job ID 13) produced one more duplicate record and one less
unique record than the original match rule.
Adding Match Results
If you run a job while the Match Analysis Tool is open and the Match Results List is empty, the match
results are automatically added to the list. After a match result has been added, the Match Analysis Tool
only adds match results of the same match type (Interflow Match, Intraflow Match, or Transactional
Match).
112
Spectrum™ Technology Platform 9.0 SP2
Chapter 4: Matching
If you want to analyze match results of a different type than what is currently selected in the Match
Analysis Tool, follow these steps.
1. Select all match results in the Match Results List and then click Remove.
2. Open a job from the Server Explorer that uses a different matching stage or click the tab above the
canvas if the job is already open.
3. Run the job.
When the job finishes running, the match results from the last job instance are added to the Match Results
List.
Removing Match Results
To remove a match results from the Match Results List, select a match results in the Match Results List
and then click Remove.
The system updates the Match Results list and Summary tab as follows:
• If the removed match results was neither the Baseline nor the Comparison match results, the match
results is removed and no changes to the Summary tab occur.
• If the removed match results was set as the Baseline, the system sets the next oldest match results
as the new Baseline and updates the Summary tab to display the new Baseline data only.
• If the removed match results was set as the Comparison match results, the system updates the
Summary tab to display the existing Baseline data only.
• If the removed match results is one of two displayed in the Match Results list, the remaining match
results is set as the new Baseline and system updates the Summary tab to display the new Baseline
data only.
Example: Using Match Analysis
This example demonstrates how to use the Match Analysis tool to compare the lift/drop rates of two
different matches. Before the data is sent through a matcher, it is split into two streams using a
Broadcaster. Each stream is then sent through an Intraflow Match stage. Each data stream includes
identical copies of the processed data. Each Intraflow Match stage uses different matching algorithm
and generates Match Analysis data that you can use to compare the lift/drop of various matches.
This example dataflow is available in Enterprise Designer. Go to File > New > Dataflow > From template
and select HouseholdRelationshipsAnalysis. This dataflow requires the following modules: Advanced
Matching Module, Data Normalization Module, and Universal Name Module. It also requires you to load
the Table Lookup core database and the Open Parser base tables.
To use view this example:
Data Quality Guide
113
Analyzing Match Results
1. Run the dataflow.
2. Select Tools > Match Analysis.
3. From Browse Match Results window, expand HouseholdRelationshipAnalysis, select Household
Match 1 and Household Match 2 from the Source list, and then click Add.
4. Select Household Match 1 in the Match Results List and click Compare. The Summary Results
display.
5. Click the Lift/Drop tab. The Lift/Drop chart displays.
This chart shows the differences between the duplicate and unique records generated for the different
match rules used.
6. Click the Match Rules tab. The match rules comparison displays.
From this tab you can see that the algorithm has been changed; Character Frequency is omitted and
Exact Match has been added.
7. Click Details.
8. Select Duplicate Collections from the show list and then click Refresh.
9. Expand each CollectionNumber to view the Suspect and Duplicate records for each duplicate
collection.
114
Spectrum™ Technology Platform 9.0 SP2
Chapter 4: Matching
10. Compare the collections in the Detail view to the output file created.
Dataflow Templates for Matching
Identifying Members of a Household
This dataflow template demonstrates how to identify members of the same household by comparing
information within a single input file and creating an output file of household collections.
Business Scenario
As data steward for a credit card company and you want to analyze your customer database and find
out which addresses occur multiple times and under what names so that you can minimize that number
of duplicate mailings and credit card offers sent to the same address.
The following dataflow provides a solution to the business scenario:
This dataflow template is available in Enterprise Designer. Go to File > New > Dataflow > From template
and select HouseholdRelationships. This dataflow requires the following modules: Advanced Matching
Module, Data Normalization Module, and Universal Name Module
For each record in the input file, this dataflow will do the following:
Data Quality Guide
115
Dataflow Templates for Matching
Read from File
This stage identifies the file name, location, and layout of the file that contains the names you want to
parse. The file contains both male and female names.
Open Name Parser
The Open Name Parser stage examines name fields and compares them to name data stored in the
Spectrum™ Technology Platform name database files. Based on the comparison, it parses the name
data into First, Middle, and Last name fields, assigns an entity type, and a gender to each name. It also
uses pattern recognition in addition to the name data.
Standardize Nicknames
In this template, the Table Lookup stage is named Standardize Nicknames. Standardize Nickname stage
looks up first names in the Nicknames.xml database and replaces any nicknames with the more regular
form of the nickname. For example, the name Tommy is replaced with Thomas.
Transformer
In this template, the Transformer stage is named Assign Titles. Assign Titles stage uses a custom script
to search each row in the data stream output by the Parse Personal Name stage and assign a
TitleOfRespect value based on the GenderCode value.
The custom script is:
if (row.get('TitleOfRespect') == '')
{
if (row.get('GenderCode') == 'M')
row.set('TitleOfRespect', 'Mr')
if (row.get('GenderCode') == 'F')
row.set('TitleOfRespect', 'Ms')
Every time the Assign Titles stage encounters M in the GenderCode field it sets the value for
TitleOfRespect as Mr. Every time the Assign Titles stages encounters F in the GenderCode field it sets
the value of TitleOfRespect as Ms.
Match Key Generator
The Match Key Generator processes user-defined rules that consist of algorithms and input source fields
to generate the match key field. A match key is a non-unique key shared by like records that identify
records as potential duplicates. The match key is used to facilitate the matching process by only comparing
records that contain the same match key. A match key is comprised of input fields. Each input field
specified has a selected algorithm that is performed on it. The result of each field is then concatenated
to create a single match key field.
In this template, two match key fields are defined: SubString (LastName (1:3)) and SubString (PostalCode
(1:5)).
For example, if the incoming address was:
FirstName - Fred
LastName - Mertz
PostalCode - 21114-1687
And the rules specified that:
116
Input Field
Start Position
Length
LastName
1
3
Spectrum™ Technology Platform 9.0 SP2
Chapter 4: Matching
Input Field
Start Position
Length
PostalCode
1
5
Then the key, based on the rules and the input data shown above, would be:
Mer21114
Household Match
In this dataflow template the Intraflow Match stage is named Household Match. This stage locates
matches between similar data records within a single input stream. Matched records can also be qualified
by using non-name/non-address information. The matching engine allows you to create hierarchical
rules based on any fields that have been defined or created in other stages.
A stream of records to be matched as well as settings that specify what fields should be compared, how
scores should be computed, and generally what constitutes a successful match.
In this template, you create a custom matching rule that compares LastName and AddressLine1. Select
the Generate data for analysis check box to generate data for the Interflow Summary Report.
Here are some guidelines to follow when creating your matching hierarchy:
• A parent node must be given a unique name. It can not be a field.
• The child field must be a Spectrum™ Technology Platform data type field, that is, one available through
one or more components.
• All children under a parent must use the same logical operators. To combine connectors you must
first create intermediate parent nodes.
• Thresholds at the parent node could be higher than the threshold of the children.
• Parent nodes do not have to have a threshold.
Write to File
The template contains one Write to File stage that creates a text file that shows the addresses as a
collection of households.
Intraflow Summary Report
The template contains the Intraflow Match Summary Report. After you run the job, expand Reports in
the Execution Details window, and then click IntraflowMatchSummary.
The Intraflow Match Summary Report lists the statistics for the records processed and shows a bar chart
that graphically illustrates the record count and overall matching score.
Determining if a Prospect is a Customer
This dataflow template demonstrates how to evaluate prospect data in an input file to customer data in
a customer database to determine if a prospect is a customer. This is a service dataflow, meaning that
the dataflow can be accessed via the API or web services.
Business Scenario
As a sales executive for an online sales company you want to determine if an online prospect is an
existing customer or a new customer.
The following dataflow service provides a solution to the business scenario:
Data Quality Guide
117
Dataflow Templates for Matching
This dataflow template is available in Enterprise Designer. Go to File > New > Dataflow > From template
and select ProspectMatching. This dataflow requires the Advanced Matching Module and Universal
Name Module.
For each record in the input file, this dataflow does the following:
Input
The selected input fields for this template are AddressLine1, City, Name, PostalCode, and StateProvince.
AddressLine1 and Name are the fields that are key to the dataflow processing in this template.
Name Parser
In this template, the Name Parser stage is named Parse Personal Name. Parse Personal Name stage
examines name fields and compares them to name data stored in the Spectrum™ Technology Platform
name database files. Based on the comparison, it parses the name data into First, Middle, and Last
name fields, assigns an entity type, and a gender to each name. It also uses pattern recognition in
addition to the name data.
In this template the Parse Personal Name stage is configured as follows.
• Parse personal names is selected and Parse business names is cleared. When you select these
options, first names are evaluated for gender, order, and punctuation and no evaluation of business
names is performed.
• Gender Determination Source is set to default. For most cases, Default is the best setting for gender
determination because it covers a wide variety of names. However, if you are processing names from
a specific culture, select that culture. Selecting a specific culture helps ensure that the proper gender
is assigned to the names. For example, if you leave Default selected, then the name Jean will be
identified as a female name. However, if you select French, it will be identified as a male name.
• Order is set to natural. The name fields are ordered by Title, First Name, Middle Name, Last Name,
and Suffix.
• Retain periods is cleared. Any punctuation in the name data is not retained.
Candidate Finder
The Candidate Finder stage is used in combination with the Transactional Match stage.
The Candidate Finder stage obtains the candidate records that will form the set of potential matches
that the Transactional Match stage will evaluate. In addition, depending on the format of your data,
Candidate Finder may need to parse the name or address of the suspect record, the candidate records,
or both.
As part of configuring Candidate Finder, you select the database connection through which the specified
query will be executed. You can select any connection configured in Management Console. To connect
to a database not listed, configure a connection to that database in Management Console, and then
close and reopen Candidate Finder to refresh the connection list.
To define the SQL query you can type any valid SQL select statement into the text box on the Candidate
Finder Options view. For example, assume you have a table in your database called Customer_Table
that has the following columns:
Customer_Table
Cust_Name
Cust_Address
118
Spectrum™ Technology Platform 9.0 SP2
Chapter 4: Matching
Cust_City
Cust_State
Cust_Zip
Note: You can type any valid SQL select, however, Select * is not valid in this control.
To retrieve all the rows from the database, you might construct a query similar to the following:
select Cust_Name, Cust_Address, Cust_City, Cust_State, Cust_Zip from
Customer_Table;
However, it is unlikely that you would want to match your transaction against all the rows in the
database.To return only relevant candidate records, you will want to add a WHERE clause using variable
substitution.Variable substitution refers to a special notation that you will use to cause the Candidate
Selection engine to replace the variable with the actual data from your suspect record.
To use variable substitution, enclose the field name in braces preceded by a dollar sign using the form
${FieldName}. For example, the following query will return only those records that have a value in
Cust_Zip that matches the value in PostalCode on the suspect record.
select Cust_Name, Cust_Address, Cust_City, Cust_State,Cust_Zip
from Customer_Table
where Cust_Zip = ${PostalCode};
Next you need to map database columns to stage fields if the column names in your database do not
match the Component Field names exactly. If they do match they will be automatically mapped to the
corresponding Stage Fields. You will need to use the Selected Fields (columns from the database) to
map to the Stage Fields (field names defined in the dataflow).
Again consider the Customer_Table from the above example:
Customer_Table
Cust_Name
Cust_Address
Cust_City
Cust_State
Cust_Zip
When you retrieve these records from the database, you need to map the column names to the field
names that will be used by the Transactional Match stage and other stages in your dataflow. For example,
Cust_Address might be mapped to AddressLine1, and Cust_Zip would be mapped to PostalCode.
1. Select the drop-down list under Selected Fields in the candidate Finder Options view. Then, select
the database column Cust_Zip.
2. Select the drop-down list under Stage Fields. Then, select the field to which you want to map.
For example, if you want to map Cust_Zip to Postal Code, first select Cust_Zip under Selected fields
and then select PostalCode on the corresponding Stage Field row.
In addition to mapping fields as described above, you can use special notation in your SQL query to
perform the mapping.To do this, you will enter the name of the Stage Field, enclosed in braces, after
the column name in your query.When you do this, the selected fields will be automatically mapped to
the corresponding stage fields.
Data Quality Guide
119
Dataflow Templates for Matching
An example of this using the query from the previous example follows:
select Cust_Name {Name}, Cust_Address {AddressLine1},
Cust_City {City}, Cust_State {StateProvince},
Cust_Zip {PostalCode}
from Customer
where Cust_Zip = ${PostalCode};
Transactional Match
The Transactional Match stage is used in combination with the Candidate Finder stage.
The Transactional Match stage allows you to match suspect records against potential candidate records
that are returned from the Candidate Finder Stage.
Transactional Match uses matching rules to compare the suspect record to all candidate records with
the same candidate group number (assigned in Candidate Finder) to identify duplicates. If the candidate
record is a duplicate, it is assigned a collection number, the match record type is labeled a Duplicate,
and the record is then written out. Any unmatched candidates in the group are assigned a collection
number of 0, labeled as Unique and then written out as well.
In this template, you create a custom matching rule that compares LastName and AddressLine1.
Here are some guidelines to follow when creating your matching hierarchy:
• A parent node must be given a unique name. It can not be a field.
• The child field must be a Spectrum™ Technology Platform data type field, that is, one available through
one or more stages.
• All children under a parent must use the same logical operators. To combine connectors you must
first create intermediate parent nodes.
• Thresholds at the parent node could be higher than the threshold of the children.
• Parent nodes do not have to have a threshold.
Output
As a service, this template sends all available fields to the output. You can limit the output based on your
needs.
120
Spectrum™ Technology Platform 9.0 SP2
Deduplication
In this section:
• Filtering Out Duplicate Records . . . . . . . . . . . . . . . . . . .122
• Creating a Best of Breed Record . . . . . . . . . . . . . . . . . . .124
5
Filtering Out Duplicate Records
Filtering Out Duplicate Records
The simplest way to remove duplicate records is to add a Filter stage to your dataflow after a matching
stage. The Filter stage removes records from collections of duplicate records based on the settings you
specify.
1. In Enterprise Designer, create a dataflow that identifies duplicate records through matching.
Matching is the first step in deduplication because you need to identify records that are similar, such
as records that have the same account number or name. See the following topics for instructions on
creating a dataflow that matches records.
Matching Records from a Single Source on page 82
Matching Records from One Source to Another Source on page 86
Matching Records Against a Database on page 93
Note: You only need to build the dataflow to the point where it reads data and performs matching
with an Interflow Match, Intraflow Match, or Transactional Match stage. Once you have created
a dataflow to this point, continue with the following steps.
2. Once you have defined a dataflow that reads data and matches records, drag a Filter stage to the
canvas and connect it to the stage that performs the matching (Interflow Match, Intraflow Match, or
Transactional Match).
For example, if your dataflow reads data from a file and performs matching with Intraflow Match, your
dataflow would look like this after adding a Filter stage:
3. Double-click the Filter stage on the canvas.
4. In the Group by field, select CollectionNumber.
5. Leave the option Limit number of returned duplicate records selected and the value set to 1.
These are the default settings.
6. Decide if you want to keep the first record in each collection, or if you want to define a rule to choose
which record from each collection to keep. If you want to keep the first record in each collection, skip
this step. If you want to define a rule, in the rule tree, select Rules then follow these steps:
a) Click Add Rule.
Records in each group are evaluated to see if they meet the rules you define here. If a record
meets the rule, it is the surviving record and the other records in the group are discarded.
b) Define a rule to identify the record from each group to retain.
Use the following options to define a rule:
Option
Description
Field name
Specifies the name of the dataflow field whose value you want to
evaluate to determine whether to filter the record.
Field Type
Specifies the type of data in the field. One of the following:
Operator
122
Non-Numeric
Choose this option if the field contains non-numeric
data (for example, string data).
Numeric
Choose this option if the field contains numeric data
(for example, double, float, and so on).
Specifies the type of comparison you want to use to evaluate the field.
One of the following:
Spectrum™ Technology Platform 9.0 SP2
Chapter 5: Deduplication
Option
Description
Contains
Determines if the field contains the value specified.
For example, "sailboat" contains the value "boat".
Equal
Determines if the field contains the exact value
specified.
Greater Than Determines if the field value is greater than the value
specified. This operation only works on numeric fields.
Greater Than Determines if the field value is greater than or equal
Or Equal To to the value specified. This operation only works on
numeric fields.
Highest
Compares the field's value for all the records group
and determines which record has the highest value in
the field. For example, if the fields in the group contain
values of 10, 20, 30, and 100, the record with the field
value 100 would be selected. This operation only
works on numeric fields. If multiple records are tied
for the longest value, one record is selected.
Is Empty
Determines if the field contains no value.
Is Not Empty Determines if the field contains any value.
Less Than
Determines if the field value is less than the value
specified. This operation only works on numeric fields.
Less Than Or Determines if the field value is less than or equal to
Equal To
the value specified. This operation only works on
numeric fields.
Value type
Longest
Compares the field's value for all the records group
and determines which record has the longest (in bytes)
value in the field. For example, if the group contains
the values "Mike" and "Michael", the record with the
value "Michael" would be selected. If multiple records
are tied for the longest value, one record is selected.
Lowest
Compares the field's value for all the records group
and determines which record has the lowest value in
the field. For example, if the fields in the group contain
values of 10, 20, 30, and 100, the record with the field
value 10 would be selected. This operation only works
on numeric fields. If multiple records are tied for the
longest value, one record is selected.
Most
Common
Determines if the field value contains the value that
occurs most frequently in this field among the records
in the group. If two or more values are most common,
no action is taken.
Not Equal
Determines if the field value is not the same as the
value specified.
Specifies the type of value you want to compare to the field's value.
One of the following:
Note: This option is not available if you select the operator Highest,
Lowest, or Longest.
Data Quality Guide
Field
Choose this option if you want to compare another
dataflow field's value to the field.
String
Choose this option if you want to compare the field to
a specific value.
123
Creating a Best of Breed Record
Option
Description
Value
Specifies the value to compare to the field's value. If you selected Field
in the Field type field, select a dataflow field. If you selected String in
the Value type field, type the value you want to use in the comparison.
Note: This option is not available if you select the operator Highest,
Lowest, or Longest.
c) Click OK.
You have now configured Filter with one rule. You can add additional rules if needed.
7. Click OK to close the Filter Options window.
8. Drag a sink stage onto the canvas and connect it to the Filter stage.
For example, if you were using a Write to File sink stage, your dataflow would look like this:
9. Double-click the sink stage and configure it.
For information on configuring sink stages, see the Dataflow Designer's Guide.
You now have a dataflow that identifies matching records and removes all but one record for each group
of duplicates, resulting in an output file that contains deduplicated data.
Related Links
Filter on page 164
Creating a Best of Breed Record
To eliminate duplicate records from your data, you may choose to merge data from groups of duplicate
records into a single "best of breed" record. This approach is useful when each duplicate record contains
data of the same type (for example, phone numbers or names) and you want to preserve the best data
from each record in the surviving record.
This procedure describes how create a dataflow that merges duplicate records into a best of breed
record.
1. In Enterprise Designer, create a dataflow that identifies duplicate records through matching.
Matching is the first step in deduplication because you need to identify records that are similar, such
as records that have the same account number or name. See the following topics for instructions on
creating a dataflow that matches records.
Matching Records from a Single Source on page 82
Matching Records from One Source to Another Source on page 86
Matching Records Against a Database on page 93
Note: You only need to build the dataflow to the point where it reads data and performs matching
with an Interflow Match, Intraflow Match, or Transactional Match stage. Once you have created
a dataflow to this point, continue with the following steps.
2. Once you have defined a dataflow that reads data and matches records, drag a Best of Breed stage
to the canvas and connect it to the stage that performs the matching (Interflow Match, Intraflow Match,
or Transactional Match).
124
Spectrum™ Technology Platform 9.0 SP2
Chapter 5: Deduplication
For example, if your dataflow reads data from a file and performs matching with Intraflow Match, your
dataflow would look like this after adding a Best of Breed stage:
3. Double-click the Best of Breed stage on the canvas.
4. In the Group by field, select CollectionNumber.
5. Under Best of Breed Settings, select Rules in the conditions tree.
6. Click Add Rule.
Records in each group are evaluated to see if they meet the rules you define here. If a record matches
a rule, its data may be copied to the best of breed record, depending on how you configure the actions
associated with the rule. You will define actions later.
7. Define a rule that a duplicate record must meet in order for a its data to be copied to the best of breed
record.
Use the following options to define a rule:
Option
Description
Field name
Specifies the name of the dataflow field whose value you want to evaluate
to determine if the condition is met and the associated actions should be
taken.
Field Type
Specifies the type of data in the field. One of the following:
Operator
Non-Numeric
Choose this option if the field contains non-numeric
data (for example, string data).
Numeric
Choose this option if the field contains numeric data
(for example, double, float, and so on).
Specifies the type of comparison you want to use to evaluate the field.
One of the following:
Contains
Determines if the field contains the value specified. For
example, "sailboat" contains the value "boat".
Equal
Determines if the field contains the exact value specified.
Greater Than
Determines if the field value is greater than the value
specified. This operation only works on numeric fields.
Greater Than
Or Equal To
Determines if the field value is greater than or equal to
the value specified. This operation only works on
numeric fields.
Highest
Compares the field's value for all the records group and
determines which record has the highest value in the
field. For example, if the fields in the group contain
values of 10, 20, 30, and 100, the record with the field
value 100 would be selected. This operation only works
on numeric fields. If multiple records are tied for the
longest value, one record is selected.
Is Empty
Determines if the field contains no value.
Is Not Empty
Determines if the field contains any value.
Less Than
Determines if the field value is less than the value
specified. This operation only works on numeric fields.
Less Than Or Determines if the field value is less than or equal to the
Equal To
value specified. This operation only works on numeric
fields.
Data Quality Guide
125
Creating a Best of Breed Record
Option
Value type
Description
Longest
Compares the field's value for all the records group and
determines which record has the longest (in bytes) value
in the field. For example, if the group contains the values
"Mike" and "Michael", the record with the value "Michael"
would be selected. If multiple records are tied for the
longest value, one record is selected.
Lowest
Compares the field's value for all the records group and
determines which record has the lowest value in the
field. For example, if the fields in the group contain
values of 10, 20, 30, and 100, the record with the field
value 10 would be selected. This operation only works
on numeric fields. If multiple records are tied for the
longest value, one record is selected.
Most
Common
Determines if the field value contains the value that
occurs most frequently in this field among the records
in the group. If two or more values are most common,
no action is taken.
Not Equal
Determines if the field value is not the same as the value
specified.
Specifies the type of value you want to compare to the field's value. One
of the following:
Note: This option is not available if you select the operator Highest,
Lowest, or Longest.
Value
Field
Choose this option if you want to compare another
dataflow field's value to the field.
String
Choose this option if you want to compare the field to a
specific value.
Specifies the value to compare to the field's value. If you selected Field in
the Field type field, select a dataflow field. If you selected String in the
Value type field, type the value you want to use in the comparison.
Note: This option is not available if you select the operator Highest,
Lowest, or Longest.
8. Click OK.
9. Click the Actions node in the tree.
10. Click Add Action.
11. Specify the data to copy to the best of breed record if the record meets the criteria you defined in the
rule.
Option
Description
Source type
Specifies the type of data to copy to the best of breed record. One of the
following.
Source data
126
Field
Choose this option if you want to copy a value from a field
to the best of breed record.
String
Choose this option if you want to copy a constant value
to the best of breed record.
Specifies the data to copy to the best of breed record. If the source type
is Field, select the field whose value you want to copy to the destination
field. If the source type is String, specify a constant value to copy to the
destination field.
Spectrum™ Technology Platform 9.0 SP2
Chapter 5: Deduplication
Option
Description
Destination
Specifies the field in the best of breed record to which you want to copy
the data specified in the Source data field.
Accumulate source data If the data in the Source data field is numeric data, you can enable this
option to combine the source data for all duplicate records and put the
total value in the best of breed record.
For example, if there were three duplicate records in the group and they
contained these values in the Deposits field:
100.00
20.00
5.00
Then all three values would be combined and the total value, 125.00,
would be put in the best of breed record's Deposits field.
12. Click OK.
You have now configured Best of Breed with one rule and one action. You can add additional rules
and actions if needed.
13. Click OK to close the Best of Breed Options window.
14. Drag a sink stage onto the canvas and connect it to the Best of Breed stage.
For example, if you were using a Write to File sink stage, your dataflow would look like this:
15. Double-click the sink stage and configure it.
For information on configuring sink stages, see the Dataflow Designer's Guide.
You now have a dataflow that identifies matching records and merges records within a collection into a
single best of breed record.
Related Links
Best of Breed on page 148
Data Quality Guide
127
Exception Records
In this section:
• Designing a Dataflow to Handle Exceptions . . . . . . . . .130
• Designing a Dataflow for Real-Time Revalidation . . . . .131
6
Designing a Dataflow to Handle Exceptions
Designing a Dataflow to Handle Exceptions
If you have licensed the Business Steward Module, you can include an exception management process
in your dataflows. The basic building blocks of an exception management process are:
• An initial dataflow that performs a data quality process, such as record deduplication, address validation,
or geocoding.
• An Exception Monitor stage that identifies records that could not be processed.
• A Write Exceptions stage that takes the exception records identified by the Exception Monitor stage
and writes them to the exception repository for manual review.
• The Business Steward Portal, a browser-based tool, which allows you to review and edit exception
records. Once edited, the records are marked as "Approved", which makes the records available to
be reprocessed.
• An exception reprocessing job that uses the Read Exceptions stage to read approved records from
the exception repository into the job. The job then attempts to reprocess the corrected records, typically
using the same logic as the original dataflow. The Exception Monitor stage once again checks for
exceptions. The Write Exceptions stage then sends exceptions back to the exception repository for
additional review.
Here is an example scenario that helps illustrate a basic exception management implementation:
In this example, there are two dataflows: the initial dataflow, which evaluates the input records' postal
code data, and the exception reprocessing job, which takes the edited exceptions and verifies that the
records now contain valid postal code data.
In both dataflows there is an Exception Monitor stage. This stage contains the conditions you want to
use to determine if a record should be routed for manual review. These conditions consist of one or more
expressions, such as PostalCode is empty, which means any record not containing a postal code
would be considered an exception and would be routed to the Write Exceptions stage and written to the
exception repository. For more information, see Exception Monitor on page 181.
Any records that the Exception Monitor identifies as exceptions are routed to an exception repository
using the Write Exceptions stage. Data stewards review the exceptions in the repository using the
Business Steward Portal, a browser-based tool for viewing and modifying exception records. Using our
example, the data steward could use the Exception Editor in the Business Steward Portal to manually
add postal codes to the exception records and mark them as "Approved".
130
Spectrum™ Technology Platform 9.0 SP2
Chapter 6: Exception Records
Once a record is marked as "Approved" in the Business Steward Portal, the record is available to be
read back into a Spectrum™ Technology Platform dataflow. This is accomplished by using a Read
Exceptions stage. If any records still result in an exception they are once again written to the exception
repository for review by a data steward.
To determine the best approach for your situation, consider these questions:
• How do you want to identify exception records? The Exception Monitor stage can evaluate any
field's value or any combination of fields to determine if a record is an exception. You should analyze
the results you are currently getting with your dataflow to determine how you want to identify exceptions.
You may want to identify records in the middle range of the data quality continuum, and not those that
were clearly validated or clearly failed.
• Do you want edited and approved exception records re-processed using the same logic as was
used in the original dataflow? If so you may want to use a subflow to create reusable business logic.
For example, the subflow could be used in an initial dataflow that performs address validation and in
an exception reprocessing job that re-processes the corrected records to verify the corrections. You
can then use different source and sink stages between the two. The initial dataflow might contain a
Read from DB stage that takes data from your customer database for processing. The exception
reprocessing job would contain a Read Exceptions stage that takes the edited and approved exception
records from the exception repository.
• Do you want to reprocess corrected and approved exceptions on a predefined schedule? If so
you can schedule your reprocessing job using Scheduling in the Management Console.
Designing a Dataflow for Real-Time Revalidation
If you are using exception management in your dataflow, you can use the revalidation feature to rerun
exception records through the validation process after they have been corrected in the Business Steward
Portal. This enables you to determine if the change you made causes the record to process successfully
in a real-time manner; you don't need to wait until the Read Exceptions batch job runs again to see the
result.
The basic building blocks of a revalidation environment are:
• A job or a service that reuses or contains an exposed subflow. It must also contain an input source,
the subflow stage that processes the input, a Write Exceptions stage, and an output sink for successfully
processed records.
• An exposed subflow containing an Exception Monitor stage that points to a revalidation service and
is configured for revalidation, including designating whether revalidated records should be reprocessed
or approved.
• An exposed service that also reuses or contains the exposed subflow. It processes records that were
edited, saved, and sent for revalidation in the Business Steward Portal.
Here is an example scenario that helps illustrate a revalidation implementation:
Data Quality Guide
131
Designing a Dataflow for Real-Time Revalidation
In this example, there are three dataflows: a job, a subflow, and a service. The job runs input data through
the subflow. The subflow contains an Exception Monitor stage, which determines if a record should be
routed for manual review. Continuing with our example, that means any records with no data in the
PostalCode field would be considered an exception and would be routed to the Write Exceptions stage;
these exceptions are what appears in the Business Steward Portal. Records with anything else in that
field would be routed to the Write to File stage.
The exception revalidation service that you designated when configuring the Exception Monitor stage
is called when you edit one or more exception records in the Business Steward Portal Exception Editor
and click Revalidate and Save. Like the job, the service contains the exception monitor subflow that
uses the same business logic to reprocess the record(s). If the records fail one or more conditions set
in the Exception Monitor stage, the exceptions will be updated in the repository. If the records pass the
conditions set in the Exception Monitor stage, one of two actions will occur, depending on the selection
made in the "Action after revalidation" field:
• Reprocess records—Records will be deleted from the repository and reprocessed.
• Approve records—Records will be marked as approved and sent back to the repository.
Follow these steps to create and use a real-time revalidation scenario:
1. Open or create a job or service dataflow that contains an Exception Monitor stage, an input source
(such as a Read from File or Input stage), an output sink (such as a Write to File or Output stage),
and a Write Exceptions stage.
2. Convert the Exception Monitor stage to a subflow and map the input and output fields to match those
in the initial dataflow. Be sure to include the ExceptionMetadata field for the input source as well as
the output stage that populates the Write Exceptions stage in the job. Expose the subflow so it can
be used by the job and service.
3. Create a service that contains an Input stage, the subflow you created in step 2, an Output stage,
and an output sink (such as a Write to File or Write to DB stage). Map the input and output fields to
match those in the initial dataflow; be sure to include the ExceptionMetadata field for the Input stage
as well as the Output stage. Expose the service so it can be used by the subflow.
4. Return to the subflow and open the Configuration tab of the Exception Monitor stage. Select the
revalidation service you created in step 3 and specify which action to take after revalidation. Save
and expose the subflow again.
5. Return to the service, where a message will appear, notifying you of changes to the subflow and
saying that the service will be refreshed. Click OK, then save and expose the service again.
6. Return to the initial job or service, where a message will appear, notifying you of changes to the
subflow and saying that the dataflow will be refreshed. Click OK, then save the dataflow.
7. Run the job.
132
Spectrum™ Technology Platform 9.0 SP2
Chapter 6: Exception Records
Note: Even if you have run the initial job or service before, you must run it again after creating the
revalidation scenario to populate the repository with records that are eligible for revalidation.
You can identify whether records in the Exception Editor are eligible for revalidation because
the "Revalidate & Save" button will be active for those records.
Data Quality Guide
133
Lookup Tables
In this section:
•
•
•
•
•
•
•
•
•
•
Introduction to Lookup Tables . . . . . . . . . . . . . . . . . . . .136
Data Normalization Module Tables . . . . . . . . . . . . . . . . .136
Universal Name Module Tables . . . . . . . . . . . . . . . . . . . .140
Viewing the Contents of a Lookup Table . . . . . . . . . . . .141
Adding a Term to a Lookup Table . . . . . . . . . . . . . . . . . .142
Removing a Term from a Lookup Table . . . . . . . . . . . . .142
Modifying the Standardized Form of a Term . . . . . . . . .142
Reverting Table Customizations . . . . . . . . . . . . . . . . . . .143
Creating a Lookup Table . . . . . . . . . . . . . . . . . . . . . . . . .143
Importing Data . . . . . . . . . . . . . . . . . . . . . . . . . . . . . . . . . .143
7
Introduction to Lookup Tables
Introduction to Lookup Tables
A lookup table is a table of key/value pairs used by Spectrum™ Technology Platform stages to standardize
data by performing token replacement. To modify the contents of the lookup tables used in Advanced
Transformer, Open Parser, and Table Lookup, use the Table Management tool in Enterprise Designer.
Data Normalization Module Tables
Advanced Transformer Tables
Advanced Transformer uses the following tables to identify terms. Use Table Management to create
new tables or to modify existing ones. For more information, see Introduction to Lookup Tables on
page 136.
•
•
•
•
•
•
•
•
•
•
•
•
•
•
•
•
•
•
•
•
•
•
•
•
•
•
•
•
•
•
•
•
136
Aeronautical Abbreviations
All Acronyms Initialism
Business Names Abbreviations
Canadian Territory Abbreviations
Computing/IT Abbreviations
Delimiters
German Companies
Fortune 1000
Geographic Directional Abbreviations
Global Sentry Noise Terms
Global Sentry Sanctioned Countries
Government Agencies Abbreviations
IATA Airline Designator
IATA Airline Designator Country
Legal Abbreviations
Medical Abbreviations
Medical Organizations Acronyms
Military Abbreviations
Nicknames
Secondary Unit Abbreviations
Secondary Unit Reverse
Singapore Abbreviations
Spanish Abbreviations
Spanish Directional Abbreviations
Spanish Street Suffix Abbreviations
State Name Abbreviations
State Name Reverse
Street Suffix Abbreviations
Street Suffix Reverse
Subsidiary to Parent
U.S. Army Acronyms
U.S. Navy Acronyms
Spectrum™ Technology Platform 9.0 SP2
Chapter 7: Lookup Tables
Open Parser Tables
Open Parser uses the following tables to identify terms. Use Table Management to create new tables
or to modify existing ones. For more information, see Introduction to Lookup Tables on page 136.
Base Tables
Base tables are provided with the Data Normalization Module installation package.
•
•
•
•
•
•
•
•
•
•
•
•
•
•
•
•
Account Descriptions
Companies
Company Conjunctions
Company Prepositions
Company Suffixes
Company Terms
Conjunctions
Family Name Prefixes
Family Names
General Suffixes
German Companies
Given Names
Maturity Suffixes
Spanish Given Names
Spanish Family Names
Titles
Core Name Tables
Core Names tables are not provided with the Data Normalization Module installation package and thus
require an additional license. For more information, contact your account executive.
Core Names tables must be loaded using the Data Normalization Module database load utility. For
instructions, see the Spectrum™ Technology Platform Installation Guide.
• Enhanced Family Names
• Enhanced Given Names
Company Name Tables
Company Names tables are not provided with the Data Normalization Module installation package and
thus require an additional license. For more information, contact your account executive.
Company Names tables must be loaded using the Data Normalization Module database load utility. For
instructions, see the Spectrum™ Technology Platform Installation Guide.
• Companies - Americas
• Companies - Asia Pacific
• Companies - EMEA
• Company Articles
• Company Conjunctions
Arabic Plus Pack Tables
Arabic Plus Pack tables are not provided with the Data Normalization Module installation package and
thus require an additional license. For more information, contact your account executive.
Data Quality Guide
137
Data Normalization Module Tables
Arabic Plus Pack tables must be loaded using the Data Normalization Module database load utility. For
instructions, see the Spectrum™ Technology Platform Installation Guide.
•
•
•
•
Arabic Family Names (Arabic)
Arabic Family Names (Romanized)
Arabic Given Names (Arabic)
Arabic Given Names (Romanized)
Asian Plus Pack Tables
Asian Plus Pack tables are not provided with the Data Normalization Module installation package and
thu require an additional license. For more information, contact your account executive.
Asian Plus Pack tables must be loaded using the Data Normalization Module database load utility. For
instructions, see the Spectrum™ Technology Platform Installation Guide.
•
•
•
•
•
•
•
•
•
•
•
•
•
•
Chinese Family Names (Native)
Chinese Family Names (Romanized)
Chinese Given Names (Native)
Chinese Given Names (Romanized)
Korean Family Names (Native)
Korean Family Names (Romanized)
Korean Given Names (Native)
Korean Given Names (Romanized)
Japanese Family Names (Kana)
Japanese Family Names (Kanji)
Japanese Family Names (Romanized)
Japanese Given Names (Kana)
Japanese Given Names (Kanji)
Japanese Given Names (Romanized)
Table Lookup Tables
Table Lookup uses the following tables to identify terms. Use Table Management to create new tables
or to modify existing ones. For more information, see Introduction to Lookup Tables on page 136.
Base Tables
Base tables are provided with the Data Normalization Module installation package.
•
•
•
•
•
•
•
•
•
•
•
•
•
•
•
138
Aeronautical Abbreviations
All Acronyms Initialism
Business Names Abbreviations
Canadian Territory Abbreviations
Computing/IT Abbreviations
EU Acronyms
Fortune 1000
French Abbreviations
French Arrondissement to Department Number
French Commune to Postal Code
French Department to Region
French Department Number to Department
Gender Codes
Geographic Directional Abbreviations
German Acronyms
Spectrum™ Technology Platform 9.0 SP2
Chapter 7: Lookup Tables
•
•
•
•
•
•
•
•
•
•
•
•
•
•
•
•
•
•
•
•
•
•
•
•
•
•
•
•
•
•
•
German City to State Code
German Area Code to City
German District to State Code
German State Abbreviations
Global Sentry Sanctioned Countries
Government Agencies Abbreviations
IATA Airline Designator
IATA Airline Designator Country
Legal Abbreviations
Medical Abbreviations
Medical Organizations Acronyms
Military Abbreviations
Nicknames
Secondary Unit Abbreviations
Secondary Unit Reverse
Singapore Abbreviations
Spanish Abbreviations
Spanish Directional Abbreviations
Spanish Street Suffix Abbreviations
State Name Abbreviations
State Name Reverse
Street Suffix Abbreviations
Street Suffix Reverse
Subsidiary to Parent
U.K. Town to Postcode Area
U.K. Dialing Code Prefixes
U.K. Dialing Codes to Town
U.K. Postcode Area to Town
U.S. Army Acronyms
U.S. Navy Acronyms
ZREPLACE (Used by the SAP Module for French address validation)
Core Names
Core Names tables require an additional license. For more information, contact your account executive.
Core Names tables must be loaded using the Data Normalization Module database load utility. For
instructions, see the Spectrum™ Technology Platform Installation Guide.
• Enhanced Family Names Ethnicity
• Enhanced Gender Codes
• Enhanced Given Names Ethnicity
Arabic Plus Pack
Arabic Plus Pack tables require an additional license. For more information, contact your account
executive.
Arabic Plus Pack tables must be loaded using the Data Normalization Module database load utility. For
instructions, see the Spectrum™ Technology Platform Installation Guide.
•
•
•
•
Arabic Family Names Ethnicity (Arabic)
Arabic Family Names Ethnicity (Romanized)
Arabic Gender Codes (Arabic)
Arabic Gender Codes (Romanized)
Data Quality Guide
139
Universal Name Module Tables
• Arabic Given Names Ethnicity (Arabic)
• Arabic Given Names Ethnicity (Romanized)
Asian Plus Pack
Asian Plus Pack tables require an additional license. For more information, contact your account executive.
Asian Plus Pack tables must be loaded using the Data Normalization Module database load utility. For
instructions, see the Spectrum™ Technology Platform Installation Guide.
•
•
•
•
•
•
•
CJK Family Names Ethnicity (Native)
CJK Family Names Ethnicity (Romanized)
CJK Given Names Ethnicity (Native)
CJK Given Names Ethnicity (Romanized)
Japanese Gender Codes (Kana)
Japanese Gender Codes (Kanji)
Japanese Gender Codes (Romanized)
Universal Name Module Tables
Name Variant Finder Tables
The Name Variant Finder stage uses the following tables. Each table requires a separate license.
• Arabic Plus Pack: g1-cdq-cjki-arabic-<date>.jar
• Asian Plus Pack - Chinese: g1-cdq-cjki-chinese-<date>.jar
• Asian Plus Pack - Japanese: g1-cdq-cjki-japanese-<date>.jar
• Asian Plus Pack - Korean: g1-cdq-cjki-korean-<date>.jar
• Core Names Database: g1-cdq-nomino-base-<date>.jar
Open Name Parser Tables
Open Name Parser uses the following tables to identify terms. Use Table Management to create new
tables or to modify existing ones. For more information, see Introduction to Lookup Tables on page
136.
Base Tables
Base tables are provided with the Universal Name Module installation package.
•
•
•
•
•
•
•
•
•
•
•
140
Account Descriptions
Company Conjunctions
Conjunctions
Family Name Prefixes
Family Names
General Suffixes
Given Names
Maturity Suffixes
Spanish Given Names
Spanish Family Names
Titles
Spectrum™ Technology Platform 9.0 SP2
Chapter 7: Lookup Tables
Core Name Tables
Core name tables are not provided with the Universal Name Module installation package and thus require
an additional license.
• Enhanced Family Names
• Enhanced Given Names
Company Name Tables
The following company name tables are provided with the Universal Name Module installation package.
•
•
•
•
•
•
•
•
Account Descriptions
Companies
Company Articles
Company Conjunctions
Company Prepositions
Company Suffixes
Company Terms
Conjunctions
The following company name tables are not provided with the Universal Name Module installation
package and thus require an additional license.
• Companies - Americas
• Companies - Asia Pacific
• Companies - EMEA
Asian Plus Pack Tables
Asian Plus Pack tables are not provided with the Universal Name Module installation package and thus
require an additional license.
•
•
•
•
•
•
•
Japanese Family Names (Kana)
Japanese Family Names (Kanji)
Japanese Family Names (Romanized)
Japanese Given Names (Kana)
Japanese Given Names (Kanji)
Japanese Given Names (Romanized)
Japanese Titles
Viewing the Contents of a Lookup Table
You can view the contents of a lookup table by using the Table Management in Enterprise Designer.
1. In Enterprise Designer, select Tools > Table Management.
2. In the Type field, select the stage whose lookup table you want to view.
3. In the Name field, select the table you want to view.
4. You can use the following options to change how the table is displayed:
Option
Description
Find a specific term
In the Starts with field, type the term you want to find
then click Refresh.
Page through the table
Click the forward and back icons to the right of the
Refresh button.
Change the number of terms displayed Change the value in the Items per page field.
per page
Data Quality Guide
141
Adding a Term to a Lookup Table
Option
Description
View all the lookup terms for each
standardized term in a Table Lookup
table
In the View by field select Standardized Term
(Grouping). This option is only available for Table
Lookup tables
Adding a Term to a Lookup Table
If you find that your data has terms that are not included in the lookup table and you want to add the
term to a lookup table, follow this procedure.
1. In Enterprise Designer, select Tools > Table Management.
2. In the Type field, select the stage whose lookup table you want to modify.
3. In the Name field, select the table to which you want to add a term.
4. Click Add.
5. In the Lookup Term field, type the term that exists in your data. This is the lookup key that will be
used.
6. For Table Lookup tables, in the Standardized Term field enter the term you want to be the
replacement for the loookup term in your dataflow.
For example, if you want to change the term PB to Pitney Bowes, you would enter PB as the lookup
term, and Pitney Bowes as the standardized term.
7. For Table Lookup tables, select the Override existing term check box if this term already exists in
the table and you want to replace it with the value you typed in step 5.
8. Click Add.
Removing a Term from a Lookup Table
To remove a term from a lookup table:
1. In Enterprise Designer, select Tools > Table Management.
2. Select the term and click Remove.
3. Click Yes to remove the table term.
Modifying the Standardized Form of a Term
For tables used by Table Lookup to standardize terms, you can change the standardized form of a term.
For example, if you have a table where you have the lookup terms PB and PB Software, and the
standardized term is Pitney Bowes, and you want to change the standardized form to Pitney Bowes Inc,
you could do this by following this procedure.
1. In Enterprise Designer, select Tools > Table Management.
2. In the Type field, select Table Lookup.
3. In the Name field select the table you want to modify.
4. Select the term you want to modify and click Modify.
Tip: If there are multiple lookup terms for a standardized term, you can easily modify all lookup
terms to use the new standardized term by selecting View by Standardized Term (Grouping)
in the View by field, selecting the group, and clicking Modify.
142
Spectrum™ Technology Platform 9.0 SP2
Chapter 7: Lookup Tables
5. Type a new value in the Standardized Term field.
6. Click OK.
Reverting Table Customizations
If you make modifications to a table you can revert the table to its original state. To revert table
customizations:
1. In Enterprise Designer, select Tools > Table Management.
2. Select the table you want to revert.
3. Click Revert.
The Revert window displays. It lists all of the added, removed, and modified terms.
4. Select the Revert check box for each table entry you want to revert. You can also click Select All
or Deselect All to select or clear all of the Revert check boxes.
5. Click OK.
Creating a Lookup Table
The Advanced Matching Module, Data Normalization Module, and Universal Name Module come with
a variety of tables that can be used for a wide range of term replacement or standardization processes.
However, if these tables do not meet your needs, you can create your own table of lookup terms to use
with Advanced Transformer, Open Parser, or Table Lookup. To create a table, follow this procedure.
1. In Enterprise Designer, select Tools > Table Management.
2. In the Type field, select the stage for which you want to create a lookup table.
3. Click New. The Add Table dialog box displays.
4. In the Table name field, enter a name for the new table.
5. If you want a new, blank table of the selected type, leave Copy from set to None. If you want the
new table to be populated from an existing table, select a table name from the Copy from list.
6. Click OK.
For information about adding table items to your new table, see Adding a Term to a Lookup Table on
page 142.
Importing Data
Importing Data Into a Lookup Table
You can import data from a file into a lookup table for use with Advanced Transformer, Open Parser, or
Table Lookup. In order to be able to import data from a file into a lookup table, the file must meet these
requirements:
• Must be UTF-8 encoded.
• Must be a delimited file. Supported delimiter characters are comma (,), semicolon (;), pipe (|), and tab
(\t).
• Fields with embedded delimiters must be start and end with double quotes, for example "1,a","2,b","3,c".
Data Quality Guide
143
Importing Data
• A literal quote in a field starting and ending with double quote must have two quotes, for example "2""
feet".
To import data from a file into a lookup table:
1. In Enterprise Designer, select Tools > Table Management.
2. Select the table into which you want to import the data. Or, create a new table. For instructions on
creating a table, see Creating a Lookup Table on page 143.
3. Click Import.
4. Click Browse and select the file that contains the data you want to import.
5. Click Open. A preview of the data in the imported file displays in Preview File.
6. You can select columns from a user-defined table and map to that in the existing table. For example,
assume there are two columns in the user-defined table that you want to import. It has column1 and
column2. The column list would show column1 and column2. You could select the column2 to map
to a lookup term and select the column1 to map to a standardized term.
7. Select Import only new terms to import only new records from the user-defined table or Overwrite
existing terms to import all records of the selected columns.
8. Click OK.
Using Advanced Import
The Advanced Import function allows you to selectively import data into lookup tables used by Advanced
Transformer, Table Lookup, and Open Parser. Use Advanced Import to:
• Extract terms from a selected column in a delimited, user-defined file.
• Extract single-word terms (tokens) from a selected column in a delimited user-defined file. When you
extract tokens, you can identify the number of times that the terms occurs for a given column in the
file and create groupings for related terms and add them to the table.
The file that contains the data you want to import must meet these requirements:
• Must be UTF-8 encoded.
• Must be a delimited file. Supported delimiter characters are comma (,), semicolon (;), pipe (|), and tab
(\t).
• Fields with embedded delimiters must be start and end with double quotes, for example "1,a","2,b","3,c".
• A literal quote in a field starting and ending with double quote must have two quotes, for example "2""
feet".
1. In Enterprise Designer, select Tools > Table Management.
2. Select the table into which you want to import data.
3. Click Adv Import.
4. Click Browse and select the file that you want to import.
5. Click Open.
6. Select a table column from the Column list. The sample data shows the frequency of occurrence for
each term listed in the user-defined table. Frequency is only displayed for terms that are not yet in
the existing table.
7. To view terms as single words, select Separate into single-word terms.
8. For Advanced Transformer and Open Parser tables:
a) Select a term from the list on the left.
b) Click the right arrow to add the term to the list on the right. Click the left arrow to delete a selected
term from the table list.
c) Click OK to save the changes to the table.
9. For Table Lookup tables:
a) Click
to add a table grouping.
b) Click New.
c) Type a new term and then click Add. Continue adding terms until finished and then click Close.
144
Spectrum™ Technology Platform 9.0 SP2
Chapter 7: Lookup Tables
d) Select a term from the list and then click Add. Continue adding terms until finished and then click
Close. The new terms are added to the terms list on the right.
e) Select a term on the left and then click the right arrow to add the term to the selected grouping.
Click the left arrow to delete a term from one of the groupings.
f) To modify a term, select it from the list on the right and then click
.
g) To delete a term, select it from the list on the right and then click
h) Click OK to save the changes to the table.
.
Data Quality Guide
145
Stages Reference
In this section:
•
•
•
•
Advanced Matching Module . . . . . . . . . . . . . . . . . . . . . .148
Business Steward Module . . . . . . . . . . . . . . . . . . . . . . . .181
Data Normalization Module . . . . . . . . . . . . . . . . . . . . . . .226
Universal Name Module . . . . . . . . . . . . . . . . . . . . . . . . . .238
8
Advanced Matching Module
Advanced Matching Module
Advanced Matching Module
The Advanced Matching Module matches records between and/or within any number of input files. You
can also use the Advanced Matching Module to match on a variety of fields including name, address,
name and address, or non-name/address fields, such as social security number or date of birth.
Best of Breed
Best of Breed consolidates duplicate records by selecting the best data in a duplicate record collection
and creating a new consolidated record using the best data. This "super" record is known as the best
of breed record. You define the rules to use in selecting records to process. When processing completes,
the best of breed record is retained by the system.
Related Links
Creating a Best of Breed Record on page 124
Options
The following table lists the options for Best of Breed.
148
Option Name
Description / Valid Values
Group by
Specifies the field to use to create groups of records to merge into a
single best of breed record, creating one best of breed record from each
group. In cases where you have used a matching stage earlier in the
dataflow, you should select the CollectionNumber field to use the
collections created by the matching stage as the groups. However, if
you want to group records by some other field, choose the field here.
For example, if you want to merge all records that have the same value
in the AccountNumber field into one best of breed record, you would
select AccountNumber.
Sort
If you specify a field in the Group by field, check this box to sort the
records by the value in the field you chose. This option is enabled by
default.
Advanced
Click this button to specify sort performance options. By default, the sort
performance options specified in Management Console, which are the
default performance options for your system, are in effect. If you want
to override your system's default performance options, check the
Override sort performance options box then specify the values you
want in these fields:
In memory record
limit
Specifies the maximum number of data rows a
sorter will hold in memory before it starts paging
to disk. Be careful in environments where there
are jobs running concurrently because
increasing the In memory record limit setting
increases the likelihood of running out of
memory.
Maximum number
of temporary files
to use
Specifies the maximum number of temporary
files that may be used by a sort process.
Spectrum™ Technology Platform 9.0 SP2
Chapter 8: Stages Reference
Option Name
Description / Valid Values
Enable
compression
Specifies that temporary files are compressed
when they are written to disk.
Note: The optimal sort performance settings depends on your server's
hardware configuration. Nevertheless, the following equation
generally produces good sort performance:
(InMemoryRecordLimit × MaxNumberOfTempFiles
÷ 2) >= TotalNumberOfRecords
Keep original records
Select this option to retain all records in the collection along with the
best of breed record. Clear the option if you want only the best of breed
record.
Use first record
Select this option if you want Best of Breed to automatically select the
first record in the collection as the template record. The template record
is the record upon which the best of breed record is based.
Define template record
Select this option to define rules for selecting the template record. For
more information, see Defining Template Record Rules on page 149.
Defining Template Record Rules
In Best of Breed processing, the template record is the record in a collection that is used to create the
best of breed record. The template record is used as the starting point for constructing the best of breed
record and is modified based on the best of breed settings you define. The Best of Breed stage can
select the template record automatically, or you can define rules for selecting the template record. This
topic describes how to define rules for selecting the template record.
Template rules are written by specifying the field name, an operator, a value type, and a value. Here is
an example of template record options:
Field Name: MatchScore
Field Type: Numeric
Operator: Equal
Value Type: String
Value: 100
This template rule selects the record in the collection where the Match Score is equal to the value of
100.
The following procedure describes how to define a template record rule in the Best of Breed stage.
1. In the Best of Breed stage, under Template Record Settings, select the option Define template
record.
2. In the tree, click Rules.
3. Click Add Rule.
4. Complete the following fields.
Option
Description
Field name
Specifies the name of the dataflow field whose value you want to evaluate
to determine if the record should be the template record.
Field Type
Specifies the type of data in the field. One of the following:
Non-Numeric
Data Quality Guide
Choose this option if the field contains non-numeric
data (for example, string data).
149
Advanced Matching Module
Option
Description
Numeric
Operator
Choose this option if the field contains numeric data
(for example, double, float, and so on).
Specifies the type of comparison you want to use to evaluate the field.
One of the following:
Contains
Determines if the field contains the value specified. For
example, "sailboat" contains the value "boat".
Equal
Determines if the field contains the exact value specified.
Greater Than
Determines if the field value is greater than the value
specified. This operation only works on numeric fields.
Greater Than
Or Equal To
Determines if the field value is greater than or equal to
the value specified. This operation only works on
numeric fields.
Highest
Compares the field's value for all the records group and
determines which record has the highest value in the
field. For example, if the fields in the group contain
values of 10, 20, 30, and 100, the record with the field
value 100 would be selected. This operation only works
on numeric fields. If multiple records are tied for the
longest value, one record is selected.
Is Empty
Determines if the field contains no value.
Is Not Empty
Determines if the field contains any value.
Less Than
Determines if the field value is less than the value
specified. This operation only works on numeric fields.
Less Than Or Determines if the field value is less than or equal to the
Equal To
value specified. This operation only works on numeric
fields.
Value type
Longest
Compares the field's value for all the records group and
determines which record has the longest (in bytes) value
in the field. For example, if the group contains the values
"Mike" and "Michael", the record with the value "Michael"
would be selected. If multiple records are tied for the
longest value, one record is selected.
Lowest
Compares the field's value for all the records group and
determines which record has the lowest value in the
field. For example, if the fields in the group contain
values of 10, 20, 30, and 100, the record with the field
value 10 would be selected. This operation only works
on numeric fields. If multiple records are tied for the
longest value, one record is selected.
Most
Common
Determines if the field value contains the value that
occurs most frequently in this field among the records
in the group. If two or more values are most common,
no action is taken.
Not Equal
Determines if the field value is not the same as the value
specified.
Specifies the type of value you want to compare to the field's value. One
of the following:
Note: This option is not available if you select the operator Highest,
Lowest, or Longest.
150
Spectrum™ Technology Platform 9.0 SP2
Chapter 8: Stages Reference
Option
Value
Description
Field
Choose this option if you want to compare another
dataflow field's value to the field.
String
Choose this option if you want to compare the field to a
specific value.
Specifies the value to compare to the field's value. If you selected Field in
the Field type field, select a dataflow field. If you selected String in the
Value type field, type the value you want to use in the comparison.
Note: This option is not available if you select the operator Highest,
Lowest, or Longest.
5. Click OK.
6. If you want to specify additional rules, click Add Rule.
If you add additional rules, you will have to select a logical operator to use between each rule. Choose
And if you want the new rule and the previous rule to both pass in order for it to be selected as the
template record. Select Or if you want either the previous rule or the new rule to pass in order for
the record to be selected as the template record.
You have now configured rules to use to select the template record. Configure the best of breed settings
to complete the configuration of the Best of Breed stage.
Defining Best of Breed Rules and Actions
Best of Breed rules and actions work together to determine which fields from duplicate records in a
collection to copy to the Best of Breed record. Rules test values in a record and if the record passes the
rules, the data is copied from the record to the template record. Actions define which data to copy, and
which field in the template record should receive the data. After all the rules and actions are executed,
the template record will be the best of breed record.
Rules and actions can be grouped together into conditions, and you can have multiple conditions. This
allows you
1. In the Best of Breed stage, under Best of Breed Settings, click the Rules node in the tree.
2. Click Add Rule.
3. Complete the following fields:
Option
Description
Field name
Specifies the name of the dataflow field whose value you want to evaluate
to determine if the condition is met and the associated actions should be
taken.
Field Type
Specifies the type of data in the field. One of the following:
Operator
Data Quality Guide
Non-Numeric
Choose this option if the field contains non-numeric
data (for example, string data).
Numeric
Choose this option if the field contains numeric data
(for example, double, float, and so on).
Specifies the type of comparison you want to use to evaluate the field.
One of the following:
Contains
Determines if the field contains the value specified. For
example, "sailboat" contains the value "boat".
Equal
Determines if the field contains the exact value specified.
Greater Than
Determines if the field value is greater than the value
specified. This operation only works on numeric fields.
151
Advanced Matching Module
Option
Description
Greater Than
Or Equal To
Determines if the field value is greater than or equal to
the value specified. This operation only works on
numeric fields.
Highest
Compares the field's value for all the records group and
determines which record has the highest value in the
field. For example, if the fields in the group contain
values of 10, 20, 30, and 100, the record with the field
value 100 would be selected. This operation only works
on numeric fields. If multiple records are tied for the
longest value, one record is selected.
Is Empty
Determines if the field contains no value.
Is Not Empty
Determines if the field contains any value.
Less Than
Determines if the field value is less than the value
specified. This operation only works on numeric fields.
Less Than Or Determines if the field value is less than or equal to the
Equal To
value specified. This operation only works on numeric
fields.
Value type
Longest
Compares the field's value for all the records group and
determines which record has the longest (in bytes) value
in the field. For example, if the group contains the values
"Mike" and "Michael", the record with the value "Michael"
would be selected. If multiple records are tied for the
longest value, one record is selected.
Lowest
Compares the field's value for all the records group and
determines which record has the lowest value in the
field. For example, if the fields in the group contain
values of 10, 20, 30, and 100, the record with the field
value 10 would be selected. This operation only works
on numeric fields. If multiple records are tied for the
longest value, one record is selected.
Most
Common
Determines if the field value contains the value that
occurs most frequently in this field among the records
in the group. If two or more values are most common,
no action is taken.
Not Equal
Determines if the field value is not the same as the value
specified.
Specifies the type of value you want to compare to the field's value. One
of the following:
Note: This option is not available if you select the operator Highest,
Lowest, or Longest.
Value
Field
Choose this option if you want to compare another
dataflow field's value to the field.
String
Choose this option if you want to compare the field to a
specific value.
Specifies the value to compare to the field's value. If you selected Field in
the Field type field, select a dataflow field. If you selected String in the
Value type field, type the value you want to use in the comparison.
Note: This option is not available if you select the operator Highest,
Lowest, or Longest.
152
Spectrum™ Technology Platform 9.0 SP2
Chapter 8: Stages Reference
4. Click OK.
5. If you want to specify additional rules for this condition, click Add Rule.
If you add additional rules, you will have to select a logical operator to use between each rule. Choose
And if you want the new rule and the previous rule to both pass in order for the condition to be met
and the associated actions taken. Select Or if you want either the previous rule or the new rule to
pass in order for the condition to be met.
6. Click the Actions node in the tree.
7. Click Add Action.
8. Complete the following fields.
Option
Description
Source type
Specifies the type of data to copy to the best of breed record. One of the
following.
Field
Choose this option if you want to copy a value from a field
to the best of breed record.
String
Choose this option if you want to copy a constant value
to the best of breed record.
Source data
Specifies the data to copy to the best of breed record. If the source type
is Field, select the field whose value you want to copy to the destination
field. If the source type is String, specify a constant value to copy to the
destination field.
Destination
Specifies the field in the best of breed record to which you want to copy
the data specified in the Source data field.
Accumulate source data If the data in the Source data field is numeric data, you can enable this
option to combine the source data for all duplicate records and put the
total value in the best of breed record.
For example, if there were three duplicate records in the group and they
contained these values in the Deposits field:
100.00
20.00
5.00
Then all three values would be combined and the total value, 125.00,
would be put in the best of breed record's Deposits field.
9. Click OK.
10. If you want to specify additional actions to take for this condition, click Add Action and repeat the
above steps.
11. To add another condition, click the root condition in the tree then click Add Condition.
Example Best of Breed Rule and Action
This Best of Breed rule selects the record where the Match Score is equal to the value
of 100. The Account Number data that corresponds to the selected field is then copied
to the AccountNumber field on the Best of Breed record.
Rule
Field Name: MatchScore
Field Type: Numeric
Operator: Equal
Value Type: String
Value: 100
Action
Data Quality Guide
153
Advanced Matching Module
Source Type: Field
Source Data: AccountNumber
Destination: AccountNumber
Output
Table 8: Best of Breed Output
Field Name
Format
CollectionRecordType String
Description / Valid Values
Identifies the template and Best of Breed records in a collection of
duplicate records. The possible values are:
Primary
The record is the selected template record in a
collection.
Secondary
The record is not the selected template record in
a collection.
BestOfBreed
The record is the newly created best of breed
record in the collection.
Candidate Finder
Candidate Finder obtains the candidate records that will form the set of potential matches. Database
searches work in conjunction with Transactional Match, and Search Index searches work independently
from Transactional Match. Depending on the format of your data, Candidate Finder may also need to
parse the name or address of the suspect record, the candidate records, or both.
Candidate Finder also enables full-text index searches and helps in defining both simple and complex
search criteria against characters and text using various search types (Any Word Starts With, Contains,
Contains All, Contains Any, Contains None, Fuzzy, Pattern, Proximity, Range, Wildcard) and conditions
(All True, Any True, None True).
Related Links
Matching Records Against a Database on page 93
Database Options
The Candidate Finder dialog enables you to define SQL statements that retrieve potential match
candidates from a database, as well as map the columns that you select from the database to the field
names that are defined in your dataflow.
Table 9: Candidate Finder Database Options
154
Option Name
Description / Valid Values
Finder type
Select Database.
Connection
Select the database that contains the candidate records. You can select
any connection configured in Management Console. To connect to a
database not listed, configure a connection to that database in
Management Console, then close and reopen Candidate Finder to
refresh the connection list.
Spectrum™ Technology Platform 9.0 SP2
Chapter 8: Stages Reference
Option Name
Description / Valid Values
Note: The Dataflow Options feature in Enterprise Designer enables
the connection name to be exposed for configuration at runtime.
SQL statement
Type a SQL statement in the text box as described in Defining the SQL
Query on page 155
Field Map tab
Choose field mapping settings as described in Mapping Database
Columns to Stage Fields on page 156.
Preview tab
Click this tab to enter a sample match key to test your SQL SELECT
statement or your index query.
Defining the SQL Query
You can type any valid SQL select statement into the text box on the Candidate Finder Options dialog.
Note: Select * is not valid.
For example, assume you have a table in your database called Customer_Table that has the following
columns:
•
•
•
•
•
•
Customer_Table
Cust_Name
Cust_Address
Cust_City
Cust_State
Cust_Zip
To retrieve all the rows from the database, you might construct a query similar to the following:
SELECT Cust_Name, Cust_Address, Cust_City, Cust_State, Cust_Zip from
Customer_Table;
You will rarely want to match your transaction against all the rows in the database. To return only relevant
candidate records, add a WHERE clause using variable substitution. Variable substitution refers to a
special notation that you will use to cause the Candidate Selection engine to replace the variable with
the actual data from your suspect record.
To use variable substitution, enclose the field name in braces preceded by a dollar sign using the form
${FieldName}. For example, the following query will return only those records that have a value in
Cust_Zip that matches the value in PostalCode on the suspect record.
SELECT Cust_Name, Cust_Address, Cust_City, Cust_State,Cust_Zip
FROM Customer_Table
WHERE Cust_Zip = ${PostalCode};
For SQL 2000, the data type needs to be identical to the data type for Candidate Finder. The JDBC
driver sets the Candidate Finder input variable (Ex: ${MatchKey}) that is used in the WHERE clause to a
data type of nVarChar(4000). If the data in the database is set to a data type of VarChar, SQL Server
will ignore the index on the database. If the index is ignored, then performance will be degraded. Therefore,
use the following query for SQL 2000:
SELECT Cust_Name, Cust_Address, Cust_City, Cust_State,Cust_Zip
FROM Customer_Table
WHERE Cust_Zip = CAST(${PostalCode} AS VARCHAR(255));
Data Quality Guide
155
Advanced Matching Module
Mapping Database Columns to Stage Fields
If the column names in your database match the Component Field names exactly, they are automatically
mapped to the corresponding Stage Fields. If they are not named exactly the same, you will need to use
the Selected Fields (columns from the database) to map to the Stage Fields (field names defined in the
dataflow).
For example, consider a table named Customer_Table with the following columns:
•
•
•
•
•
Cust_Name
Cust_Address
Cust_City
Cust_State
Cust_Zip
When you retrieve these records from the database, you need to map the column names to the field
names that are used by Transactional Match and other components in your dataflow. For example,
Cust_Address might be mapped to AddressLine1, and Cust_Zip would be mapped to PostalCode.
1. Select the drop-down list under Selected Fields in the Candidate Finder Options dialog. Then,
select the database column Cust_Zip.
2. Select the drop-down list under Stage Fields. Then, select the field to which you want to map.
For example, if you want to map Cust_Zip to Postal Code, first select Cust_Zip under Selected fields
and then select PostalCode on the corresponding Stage Field row.
Alternate Method for Mapping Fields
You can use special notation in your SQL query to perform the mapping. To do this, enclose the field
name you want to map to in braces after the column name in your query. When you do this, the selected
fields are automatically mapped to the corresponding stage fields.
For example,
select Cust_Name {Name}, Cust_Address {AddressLine1},
Cust_City {City}, Cust_State {StateProvince},
Cust_Zip {PostalCode}
from Customer
where Cust_Zip = ${PostalCode};
Search Index Options
The Candidate Finder dialog enables you to define search indexes and build matching rules that retrieve
potential match candidates.
Table 10: Candidate Finder Options
156
Option Name
Description / Valid Values
Finder type
Select Search Index.
Name
Select the appropriate index that was created using the Write to Search
Index stage under the Advanced Matching deployed stages in Enterprise
Designer.
Maximum results
Enter the maximum number of responses you want the index search to
return. The default is 10.
Add Parent button
Access Parent Options.
Parent options—Name
Enter a name for the parent.
Spectrum™ Technology Platform 9.0 SP2
Chapter 8: Stages Reference
Option Name
Description / Valid Values
Parent options—Searching
method
Specify how to determine if a parent is a match or a non-match. One of
the following:
All true—A parent is considered a match if all children are determined
to match. This method creates an "AND" connector between children.
Any true—A parent is considered a match if at least one child is
determined to match. This method creates an "OR" connector between
children.
None true—A parent is considered a match if none of the children is
determined to match. This method creates a "NOT" connector between
children.
Add Child button
Access Child Options.
Child options—Index field
Select the field on which you want to create a search index.
Child options—Search type
Specifies the searching/matching criteria that determines whether the
input data is searched/matched with the indexed data. All searches are
case insensitive.
Any Word/Phrase Starts With Determines whether the text contained in the search index field begins
with the text that is contained in the input field.
For example, text in the input field “tech” would be considered a match
for search index fields containing “Technical”, “Technology”,
“Technologies”, “Technician” or even "National University of Technical
Sciences". Likewise, a phrase in the input field “DEF Sof” would be
considered a match for search index fields containing “ABC DEF
Software”, “DEF Software”, and “DEF Software India” but it would not
be a match for search index fields containing “Software DEF” or “DEF
ABC Software”.
Contains
Determines whether the search index field contains the data from the
input field. This search type considers the sequence of words in the
input field while searching the search index field. For example, input
field data “Pitney” and “Pitney Bowes” would be contained in a search
index field of “Pitney Bowes Software Inc.”
Contains All
Determines whether all alphanumeric words from the input field are
contained in the search index field. This search type does not consider
the sequence of words in the input field while searching the search index
field.
Contains Any
Determines whether any of the alphanumeric words from the input field
is contained in the search index field.
Contains None
Determines whether none of the alphanumeric words from the input
field is contained in the search index field.
Fuzzy
Determines the similarity between two alphanumeric words based on
the number of deletions, insertions, or substitutions required to transform
one word into another.
Use the Maximum edits parameter to set a limit on the number of edits
allowed to be considered a successful match:
• 0—Allows for no deletions, insertions, or substitutions. The input field
data and the search index field data must be identical.
Data Quality Guide
157
Advanced Matching Module
Option Name
Description / Valid Values
• 1—Allows for no more than one deletion, insertion, or substitution.
For example, an input field containing "Barton" will match a search
index field containing "Carton".
• 2—Allows for no more than two deletions, insertions, or substitutions.
For example, an input field containing "Barton" will match a search
index field containing "Martin".
The Fuzzy search type is used for single-word searches only. Click
Ignore extra words to have Candidate Finder consider only the first
word in the field when comparing the input field to the index field. For
example, if the index field says "Pitney" and the input field says "Pitney
Bowes", they would not be considered a match because of "Bowes".
However, if you check this box, "Bowes" would be ignored and with
"Pitney" being the first word, the two words would be considered a match.
Pattern
Determines whether the text pattern of the input field matches the text
pattern of the search criteria. You can further refine the text pattern in
the Pattern string field. For example, if the input field contains “nlm”
and the pattern defined is “a*b?c” then it will match the following words
“Neelam”, “nelam”, “neelum”, “nilam”, and so on.
The Pattern search type is used for single-word searches only. Click
Ignore extra words to have Candidate Finder consider only the first
word in the field when comparing the input field to the index field.
Proximity
Determines whether words in the input fields are within a certain distance
of each other.
• Define the input First input field and Second input field you want
to search for in the index.
• Use the Distance parameter to determine the maximum allowed
distance between the words specified in the First field and Second
field in order to be considered a match.
For example, you could successfully use this search type to look for
First field "Spectrum" and Second field "Pitney" within ten words of each
other in a search index field containing the sentence “Spectrum
Technology Platform is a product of Pitney Bowes Software Inc.”
The Proximity search type is used for single-word searches only. Click
Ignore extra words to have Candidate Finder consider only the first
word in the field when comparing the input field to the index field.
Range
Performs an inclusive searches for terms within a range, which is
specified using a Lower bound field (starting term) and an Upper bound
field (ending term). All alphanumeric words are arranged
lexicographically in the search index field.
• Use the Lower bound field parameter to select the field to be used
as the starting term.
• Use the Upper bound field parameter to select the field to be used
as the ending term.
For example, if you searched postal codes from 20001 (defined in the
Lower bound field) to 20009 (defined in the Upper bound field), the
search would return all addresses with postal codes within that range.
158
Spectrum™ Technology Platform 9.0 SP2
Chapter 8: Stages Reference
Option Name
Description / Valid Values
The Range search type is used for single-word searches only. Click
Ignore extra words to have Candidate Finder consider only the first
word in the field when comparing the input field to the index field.
Wildcard
Searches using single or multiple Wildcard characters:
Select the Position in your input file where you are inserting the wildcard
character.
The Wildcard search type is used for single-word searches only. Click
Ignore extra words to have Candidate Finder consider only the first
word in the field when comparing the input field to the index field.
Child options—Relevance
factor
Control the relevance of a child field by entering a number up to 100
here. The higher the boost factor, the more relevant the field will be. For
example, if you want results from the Firm Name field to be more relevant
than the results from other fields, select "Firm Name" from the Index
field name and enter "5" here.
Note: Numbers entered here must be positive but can be less than
"1"; for instance, ".05" would be valid.
Output Fields tab
Check the Include box to select which stored fields should be included
in the output.
Note: If the input field is from an earlier stage in the dataflow and it
has the same name as the store field name from the search
index, the values from the input field will overwrite the values
in the output field.
The screen below shows an example of the completed Candidate Finder Options stage using an index
search :
•
•
•
•
•
•
A Parent type named "State Match"
A Child type named "StateProvince", based on the Index field name
A Fuzzy search type with Maximum edits of 2, which allows up to two edits in a successful match
An input field of "StateProvince" used to match against the "StateProvince" index field
A boost of 2.0 to increase the relevance of the state data
A field map showing that we are including InputKeyValue, AddressLine1, and AddressLine2, but not
FirmName or City.
Data Quality Guide
159
Advanced Matching Module
Configuring the Search Index Name at Runtime
The search index name can be configured at runtime if it is exposed as a dataflow option. This enables
you to run your dataflow while using a different index name.
1. Save and expose the dataflow that creates the search index.
2. Open the dataflow that uses the search index.
3. Go to Edit > Dataflow Options
4. In the Map dataflow options to stages table, click the stage that uses the search index and check
the SearchIndexName box.
5. Change the name of the index in the Option label field.
6. Click OK
Output
Table 11: Candidate Finder Outputs
160
Field Name
Format
Description / Valid Values
CandidateGroup
String
This field identifies a grouping of a suspect record and its
candidates. Each suspect record is given a CandidateGroup
number. The candidates for that suspect are given the same
CandidateGroup number. For example, if John Smith is a
suspect record and its candidate records are John Smith and
Jon Smth, then all three records would have the same
CandidateGroup value.
Spectrum™ Technology Platform 9.0 SP2
Chapter 8: Stages Reference
Field Name
Format
Description / Valid Values
TransactionRecordType
String
One of the following:
Suspect
A suspect record is used as input to a
query.
Candidate
A candidate record is a result returned
from a query.
Duplicate Synchronization
Duplicate Synchronization determines which fields from a collection of records to copy to the corresponding
fields of all records in the collection. You can specify the rules that records must satisfy in order to copy
the field data to the other records in the collection. When processing has been completed, all records in
the collection are retained.
Options
The following table lists the options for the Duplicate Synchronization stage.
Option Name
Description / Valid Values
Group by
Specifies the field to use to create groups of records to synchronize. In
cases where you have used a matching stage earlier in the dataflow,
such as Interflow Match, Intraflow Match, or Transactional Match, you
should select the CollectionNumber field to use the collections created
by the matching stage as the groups. However, if you want to group
records by some other field, choose the field here. For example, if you
want to synchronize records that have the same value in the
AccountNumber field, you would select AccountNumber.
Sort
If you specify a field in the Group by field, check this box to sort the
records by the value in the field you chose. This option is enabled by
default.
Advanced
Click this button to specify sort performance options. By default, the sort
performance options specified in Management Console, which are the
default performance options for your system, are in effect. If you want
to override your system's default performance options, check the
Override sort performance options box then specify the values you
want in these fields:
Data Quality Guide
In memory record
limit
Specifies the maximum number of data rows a
sorter will hold in memory before it starts paging
to disk. Be careful in environments where there
are jobs running concurrently because
increasing the In memory record limit setting
increases the likelihood of running out of
memory.
Maximum number
of temporary files
to use
Specifies the maximum number of temporary
files that may be used by a sort process.
Enable
compression
Specifies that temporary files are compressed
when they are written to disk.
161
Advanced Matching Module
Option Name
Description / Valid Values
Note: The optimal sort performance settings depends on your server's
hardware configuration. Nevertheless, the following equation
generally produces good sort performance:
(InMemoryRecordLimit × MaxNumberOfTempFiles
÷ 2) >= TotalNumberOfRecords
Rules
Duplicate Synchronization rules determine which records should have their data copied to all other
records in the collection.
To add a rule, select Rules in the rule hierarchy and click Add Rule
If you specify multiple rules, you will have to select a logical operator to use between each rule. Choose
And if you want the new rule and the previous rule to both pass in order for the condition to be met.
Select Or if you want either the previous rule or the new rule to pass in order for the condition to be met.
Option
Description
Field name
Specifies the name of the dataflow field whose value you want to evaluate
to determine whether to filter the record.
Field Type
Specifies the type of data in the field. One of the following:
Operator
162
Non-Numeric
Choose this option if the field contains non-numeric
data (for example, string data).
Numeric
Choose this option if the field contains numeric data
(for example, double, float, and so on).
Specifies the type of comparison you want to use to evaluate the field. One
of the following:
Contains
Determines if the field contains the value specified. For
example, "sailboat" contains the value "boat".
Equal
Determines if the field contains the exact value specified.
Greater Than
Determines if the field value is greater than the value
specified. This operation only works on numeric fields.
Greater Than
Or Equal To
Determines if the field value is greater than or equal to the
value specified. This operation only works on numeric
fields.
Highest
Compares the field's value for all the records group and
determines which record has the highest value in the field.
For example, if the fields in the group contain values of
10, 20, 30, and 100, the record with the field value 100
would be selected. This operation only works on numeric
fields. If multiple records are tied for the longest value, one
record is selected.
Is Empty
Determines if the field contains no value.
Is Not Empty
Determines if the field contains any value.
Less Than
Determines if the field value is less than the value
specified. This operation only works on numeric fields.
Spectrum™ Technology Platform 9.0 SP2
Chapter 8: Stages Reference
Option
Description
Less Than Or
Equal To
Determines if the field value is less than or equal to the
value specified. This operation only works on numeric
fields.
Longest
Compares the field's value for all the records group and
determines which record has the longest (in bytes) value
in the field. For example, if the group contains the values
"Mike" and "Michael", the record with the value "Michael"
would be selected. If multiple records are tied for the
longest value, one record is selected.
Lowest
Compares the field's value for all the records group and
determines which record has the lowest value in the field.
For example, if the fields in the group contain values of
10, 20, 30, and 100, the record with the field value 10
would be selected. This operation only works on numeric
fields. If multiple records are tied for the longest value, one
record is selected.
Most Common Determines if the field value contains the value that occurs
most frequently in this field among the records in the group.
If two or more values are most common, no action is taken.
Not Equal
Value type
Determines if the field value is not the same as the value
specified.
Specifies the type of value you want to compare to the field's value. One of
the following:
Note: This option is not available if you select the operator Highest, Lowest,
or Longest.
Value
Field
Choose this option if you want to compare another dataflow
field's value to the field.
String
Choose this option if you want to compare the field to a
specific value.
Specifies the value to compare to the field's value. If you selected Field in
the Field type field, select a dataflow field. If you selected String in the Value
type field, type the value you want to use in the comparison.
Note: This option is not available if you select the operator Highest, Lowest,
or Longest.
Actions
Actions determine which field to copy to other records in the group. To add an action, select Actions in
the Duplicate Synchronization condition tree then click the Add Action. Use the following options to
define the action.
Option
Description
Source type
Specifies the type of data to copy to other records in the group. One of the
following.
Field
Data Quality Guide
Choose this option if you want to copy a value from a field
to the other records in the group.
163
Advanced Matching Module
Option
Description
String
Choose this option if you want to copy a constant value to
the other records in the group.
Source data
Specifies the data to copy to the other records in the group. If the source type
is Field, select the field whose value you want to copy to the other records
in the group. If the source type is String, specify a constant value to copy to
the other records in the group.
Destination
Specifies the field in the other records to which you want to copy the data
specified in the Source data field. For example, if you want to copy the data
to the AccountBalance field in all the other records in the group, you would
specify AccountBalance.
Example of a Duplicate Synchronization Rule and Action
This Duplicate Synchronization rule and action selects the record where the match
score is 100 and copies the account number AccountNumber field in all the other
records in the group.
Rule
Field Name: MatchScore
Field Type: Numeric
Operator: Equal
Value Type: String
Value: 100
Action
Source Type: Field
Source Data: AccountNumber
Destination: NewAccountNumber
Filter
The Filter stage retains or removes records from a group of records based on the rules you specify.
Related Links
Filtering Out Duplicate Records on page 122
Options
The following table lists the options for the Filter stage.
164
Option Name
Description / Valid Values
Group by
Specifies the field to use to create groups of records to filter. The Filter
stage will retain one or more records from each group, depending on
how you configure the stage. In cases where you have used a matching
stage earlier in the dataflow, such as Interflow Match, Intraflow Match,
or Transactional Match, you should select the CollectionNumber field
to use the collections created by the matching stage as the groups.
However, if you want to group records by some other field, choose the
field here. For example, if you want to filter out all but one record from
Spectrum™ Technology Platform 9.0 SP2
Chapter 8: Stages Reference
Option Name
Description / Valid Values
records that have the same value in the AccountNumber field, you would
select AccountNumber.
Sort
If you specify a field in the Group by field, check this box to sort the
records by the value in the field you chose. This option is enabled by
default.
Advanced
Click this button to specify sort performance options. By default, the sort
performance options specified in Management Console, which are the
default performance options for your system, are in effect. If you want
to override your system's default performance options, check the
Override sort performance options box then specify the values you
want in these fields:
In memory record
limit
Specifies the maximum number of data rows a
sorter will hold in memory before it starts paging
to disk. Be careful in environments where there
are jobs running concurrently because
increasing the In memory record limit setting
increases the likelihood of running out of
memory.
Maximum number
of temporary files
to use
Specifies the maximum number of temporary
files that may be used by a sort process.
Enable
compression
Specifies that temporary files are compressed
when they are written to disk.
Note: The optimal sort performance settings depends on your server's
hardware configuration. Nevertheless, the following equation
generally produces good sort performance:
(InMemoryRecordLimit × MaxNumberOfTempFiles
÷ 2) >= TotalNumberOfRecords
Limit number of returned
duplicate records
Specifies the maximum number of records that are returned from each
group. If you set this option to 1, you can define filter rules to determine
which record in each group should be returned. If no rules are defined,
the first record in each collection is returned and the rest are discarded.
In this mode, the filter rules define which record will be retained.
For example, if you define a rule where the record with the highest match
score in a group is retained, and you set this option to 1, then the record
with the highest match score in each group will survive and the other
records in the group will be discarded.
If you set this option to a value higher than one, you cannot specify filter
rules.
Note: In the event no records in the collection meet the defined rule
criteria, then no records from the group are returned.
Remove duplicates from
collection
Data Quality Guide
Specifies to use filter rules to determine which records are removed
from the collection. The remaining records in the collection are retained.
When this option is selected, you must define a rule.
165
Advanced Matching Module
Option Name
Description / Valid Values
Note: If a group contains only one record, the filter rules are ignored
and the record is retained.
Rule Options
Filter rules determine which records in a group to retain or remove. If you select the option Limit number
of returned duplicate records then the rules determine which records survive the filter. If you select
the option Remove duplicates from collection then the rules determine which records are removed
from the dataflow.
To add a rule, select Rules in the rule hierarchy and click Add Rule
If you specify multiple rules, you will have to select a logical operator to use between each rule. Choose
And if you want the new rule and the previous rule to both pass in order for the condition to be met.
Select Or if you want either the previous rule or the new rule to pass in order for the condition to be met.
Note: You can only have one condition in a Filter stage. When you select Condition in the rule hierarchy,
the buttons are grayed out.
Option
Description
Field name
Specifies the name of the dataflow field whose value you want to evaluate
to determine whether to filter the record.
Field Type
Specifies the type of data in the field. One of the following:
Operator
166
Non-Numeric
Choose this option if the field contains non-numeric
data (for example, string data).
Numeric
Choose this option if the field contains numeric data
(for example, double, float, and so on).
Specifies the type of comparison you want to use to evaluate the field. One
of the following:
Contains
Determines if the field contains the value specified. For
example, "sailboat" contains the value "boat".
Equal
Determines if the field contains the exact value specified.
Greater Than
Determines if the field value is greater than the value
specified. This operation only works on numeric fields.
Greater Than
Or Equal To
Determines if the field value is greater than or equal to the
value specified. This operation only works on numeric
fields.
Highest
Compares the field's value for all the records group and
determines which record has the highest value in the field.
For example, if the fields in the group contain values of
10, 20, 30, and 100, the record with the field value 100
would be selected. This operation only works on numeric
fields. If multiple records are tied for the longest value, one
record is selected.
Is Empty
Determines if the field contains no value.
Is Not Empty
Determines if the field contains any value.
Spectrum™ Technology Platform 9.0 SP2
Chapter 8: Stages Reference
Option
Description
Less Than
Determines if the field value is less than the value
specified. This operation only works on numeric fields.
Less Than Or
Equal To
Determines if the field value is less than or equal to the
value specified. This operation only works on numeric
fields.
Longest
Compares the field's value for all the records group and
determines which record has the longest (in bytes) value
in the field. For example, if the group contains the values
"Mike" and "Michael", the record with the value "Michael"
would be selected. If multiple records are tied for the
longest value, one record is selected.
Lowest
Compares the field's value for all the records group and
determines which record has the lowest value in the field.
For example, if the fields in the group contain values of
10, 20, 30, and 100, the record with the field value 10
would be selected. This operation only works on numeric
fields. If multiple records are tied for the longest value, one
record is selected.
Most Common Determines if the field value contains the value that occurs
most frequently in this field among the records in the group.
If two or more values are most common, no action is taken.
Not Equal
Value type
Determines if the field value is not the same as the value
specified.
Specifies the type of value you want to compare to the field's value. One of
the following:
Note: This option is not available if you select the operator Highest, Lowest,
or Longest.
Value
Field
Choose this option if you want to compare another dataflow
field's value to the field.
String
Choose this option if you want to compare the field to a
specific value.
Specifies the value to compare to the field's value. If you selected Field in
the Field type field, select a dataflow field. If you selected String in the Value
type field, type the value you want to use in the comparison.
Note: This option is not available if you select the operator Highest, Lowest,
or Longest.
Example of a Filter Rule
This rule retains the record in each group with the highest value in the MatchScore
field. Note that Value and Value Type options do not apply when the Operator is
highest or lowest.
Field Name = MatchScore
Field Type = Numeric
Operator = Highest
This rule retains the record where the value in the AccountNumber is "12345".
Data Quality Guide
167
Advanced Matching Module
Field Name = AccountNumber
Field Type = Numeric
Operator = Equals
Value Type = String
Value = 12345
Interflow Match
Interflow Match locates matches between similar data records across two input record streams. The first
record stream is a source for suspect records and the second stream is a source for candidate records.
Using match group criteria (for example a match key), Interflow Match identifies a group of records that
are potentially duplicates of a particular suspect record.
Each candidate is separately matched to the Suspect and is scored according to your match rules. If
the candidate is a duplicate, it is assigned a collection number, the match record type is labeled a
duplicate, and written out; unmatched unique candidates may be written out at the user's option. When
Interflow Match has exhausted all candidate records in the current match group, the matched suspect
record is assigned a collection number that corresponds to its duplicate record. Or, if no matches where
identified, the suspect is assigned a collection number of 0 and is labeled a unique record.
Note: Interflow Match only matches suspect records to candidate records. It does not attempt to match
suspect records to other suspect records as is done in Intraflow Match.
The matching process for a particular suspect may terminate before matching all possible candidates if
you have set a limiter on duplicates and the limit has been exceeded for the current suspect.
The type of matching (Intraflow or Interflow) determines how express key match results translate to
Candidate Match Scores. In Interflow matching, a successful Express Key match always confers a 100
MatchScore onto the Candidate. On the other hand, in Intraflow matching, the score a Candidate gains
as a result of an Express Key match depends on whether the record to which that Candidate matched
was a match of some other Suspect—Express Key duplicates of a Suspect will always have MatchScores
of 100, whereas Express Key duplicates of another Candidate (which was a duplicate of a Suspect) will
inherit the MatchScore (not necessarily 100) of that Candidate
Related Links
Matching Records from One Source to Another Source on page 86
Matching Records from One Source to Another Source on page 86
Options
1. In the Load match rule field, select one of the predefined match rules which you can either use as-is
or modify to suit your needs. If you want to create a new match rule without using one of the predefined
match rules as a starting point, click New. You can only have one custom rule in a dataflow.
Note: The Dataflow Options feature in Enterprise Designer enables the match rule to be exposed
for configuration at runtime.
2. Click Group By to select a field to use for grouping records in the match queue. Intraflow Match only
attempts to match records against other records in the same match queue.
3. Select the Sort box to perform a pre-match sort of your input based on the field selected in the Group
By field.
4. Click Advanced to specify additional sort performance options.
168
In memory record limit
Specifies the maximum number of data rows a sorter will hold in
memory before it starts paging to disk. Be careful in environments
where there are jobs running concurrently because increasing the
In memory record limit setting increases the likelihood of running
out of memory.
Maximum number of
temporary files to use
Specifies the maximum number of temporary files that may be used
by a sort process.
Spectrum™ Technology Platform 9.0 SP2
Chapter 8: Stages Reference
Enable compression
Specifies that temporary files are compressed when they are written
to disk.
Note: The optimal sort performance settings depends on your server's hardware configuration.
Nevertheless, the following equation generally produces good sort performance:
(InMemoryRecordLimit × MaxNumberOfTempFiles ÷ 2) >=
TotalNumberOfRecords
5. Click Express Match On to perform an initial comparison of express key values to determine whether
two records are considered a match.
Express Key matching can be a useful tool for reducing the number of compares performed and
thereby improving execution speed. A loose express key results in many false positive matches. You
can generate an express key as part of generating a match key through MatchKeyGenerator. See
Match Key Generator on page 174 for more information.
If two records have an exact match on the express key, the candidate is considered a 100% duplicate.
If two records do not match on an express key value, they are compared using the rules-based
method.
To determine whether a candidate was matched using an express key, look at the value of the
ExpressKeyIdentified field, which is either Y for a match or N for no match. Note that suspect records
always have an ExpressKeyIdentified value of N.
6. In the Initial Collection Number text box, specify the starting number to assign to the collection
number field for duplicate records.
The collection number identifies each duplicate record in a match queue. Unique records are assigned
a collection number of 0. Each duplicate record is assigned a collection number starting with the
value specified in the Initial Collection Number text box.
7. Select one of the following:
Option
Description
Compare suspect to
all candidates
This option matches the suspect to all candidates in the same match group
(group by option) even if a duplicate is already found within the match
group. For example:
Suspect - John Smith
Candidate - Bill Jones
Candidate - John Smith
Candidate - John Smith
In the example, the suspect John Smith would be compared to both John
smith candidates.
Check the Return Unique Candidates box to return records within a
match group from the candidate port that have been identified as unique
records.
Stop comparing
suspect against
candidates after
finding n duplicates
This option matches the suspect to all candidates in the same match group
(group by option) but stops comparing when the user defined number of
duplicates have been identified. For example, if you chose to stop
comparing candidates after finding one duplicate and you had this data:
Suspect - John Smith
Candidate - Bill Jones
Candidate - John Smith
Candidate - John Smith
In the example, the suspect record John Smith would stop comparing
within the match group when the first John Smith candidate is identified
as a duplicate.
8. Click Generate Data for Analysis to generate match results. For more information, see Analyzing
Match Results on page 102.
Data Quality Guide
169
Advanced Matching Module
9. Assign collection number 0 to unique records, checked by default, will assign zeroes as collection
numbers to unique records. Uncheck this option to generate collection numbers other than zero for
unique records. The unique record collection numbers will be in sequence with any other collection
numbers. For example, if your matching dataflow finds five records and the first three records are
unique, the collection numbers would be assigned as shown in the first group below. If your matching
dataflow finds five records and the last two are unique, the collection numbers would be assigned
as shown in the second group below.
Option
Description
Collection Number
Record Type
1
Unique
2
Unique
3
Unique
4
Duplicate/Suspect
4
Duplicate/Suspect
Collection Number
Record Type
1
Duplicate/Suspect
1
Duplicate/Suspect
2
Unique
3
Unique
4
Unique
If you leave this box checked, any unique records found in your dataflow will be assigned a collection
number of zero by default.
10. If you are creating a new custom matching rule, see Building a Match Rule on page 74 for more
information.
11. Click Evaluate to evaluate how a suspect record scored against candidate records. For more
information, see Interflow Match on page 168.
Output
Table 12: Interflow Match Output Fields
170
Field Name
Description / Valid Values
CollectionNumber
Identifies a collection of duplicate records. The possible values are 1 or
greater.
ExpressMatchIdentified
Indicates whether the match was obtained using the express match key.
The possible values are Yes or No.
InterflowSourceType
The possible values are input_port_0 or input_port_1
MatchRecordType
Identifies the type of match record in a collection. The possible values
are:
suspect
The original input record that was flagged as
possibly having duplicate records.
duplicate
A record that is a duplicate of the input record.
unique
A record that has no duplicates.
Spectrum™ Technology Platform 9.0 SP2
Chapter 8: Stages Reference
Field Name
Description / Valid Values
MatchScore
Identifies the overall score between two records. The possible values
are 0-100, with 0 indicating a poor match and 100 indicating an exact
match.
Note: The Validate Address and Advanced Matching Module stages both use the MatchScore field.
The MatchScore field value in the output of a dataflow is determined by the last stage to modify
the value before it is sent to an output stage. If you have a dataflow that contains Validate Address
and Advanced Matching Module stages and you want to see the MatchScore field output for
each stage, use a Transformer stage to copy the MatchScore value to another field. For example,
Validate Address produces an output field called MatchScore and then a Transformer stage
copies the MatchScore field from Validate Address to a field called AddressMatchScore. When
the matcher stage runs it populates the MatchScore field with the value from the matcher and
passes through the AddressMatchScore value from Validate Address.
Intraflow Match
Intraflow Match locates matches between similar data records within a single input stream. You can
create hierarchical rules based on any fields that have been defined or created in other stages of the
dataflow.
Related Links
Matching Records from a Single Source on page 82
Options
1. In the Load match rule field, select one of the predefined match rules which you can either use as-is
or modify to suit your needs. If you want to create a new match rule without using one of the predefined
match rules as a starting point, click New. You can only have one custom rule in a dataflow.
Note: The Dataflow Options feature in Enterprise Designer enables the match rule to be exposed
for configuration at runtime.
2. Click Group By to select a field to use for grouping records in the match queue. Intraflow Match only
attempts to match records against other records in the same match queue.
3. Select the Sort box to perform a pre-match sort of your input based on the field selected in the Group
By field.
4. Click Advanced to specify additional sort performance options.
In memory record limit
Specifies the maximum number of data rows a sorter will hold in
memory before it starts paging to disk. Be careful in environments
where there are jobs running concurrently because increasing the
In memory record limit setting increases the likelihood of running
out of memory.
Maximum number of
temporary files to use
Specifies the maximum number of temporary files that may be used
by a sort process.
Enable compression
Specifies that temporary files are compressed when they are written
to disk.
Note: The optimal sort performance settings depends on your server's hardware configuration.
Nevertheless, the following equation generally produces good sort performance:
(InMemoryRecordLimit × MaxNumberOfTempFiles ÷ 2) >=
TotalNumberOfRecords
Data Quality Guide
171
Advanced Matching Module
5. Click Express Match On to perform an initial comparison of express key values to determine whether
two records are considered a match.
You can generate an express key as part of generating a match key through MatchKeyGenerator.
See Match Key Generator on page 174 for more information.
6. In the Initial Collection Number text box, specify the starting number to assign to the collection
number field for duplicate records.
The collection number identifies each duplicate record in a match queue. Unique records are assigned
a collection number of 0. Each duplicate record is assigned a collection number starting with the
value specified in the Initial Collection Number text box.
7. Click Sliding Window to enable this matching method. For more information about Sliding Window,
see Sliding Window Matching Method on page 173
8. Click Generate Data for Analysis to generate match results. For more information, see Analyzing
Match Results on page 102.
9. Assign collection number 0 to unique records, checked by default, will assign zeroes as collection
numbers to unique records. Uncheck this option to generate collection numbers other than zero for
unique records. The unique record collection numbers will be in sequence with any other collection
numbers. For example, if your matching dataflow finds five records and the first three records are
unique, the collection numbers would be assigned as shown in the first group below. If your matching
dataflow finds five records and the last two are unique, the collection numbers would be assigned
as shown in the second group below.
Option
Description
Collection Number
Record Type
1
Unique
2
Unique
3
Unique
4
Duplicate/Suspect
4
Duplicate/Suspect
Collection Number
Record Type
1
Duplicate/Suspect
1
Duplicate/Suspect
2
Unique
3
Unique
4
Unique
If you leave this box checked, any unique records found in your dataflow will be assigned a collection
number of zero by default.
10. For information about modifying the other options, see Building a Match Rule on page 74.
11. Click Evaluate to evaluate how a suspect record scored against candidate records. For more
information, see Interflow Match on page 168.
Default Matching Method
Using group by (match group) set by the user, the matcher identifies groups of records that might
potentially be duplicates of one another. The matcher then proceeds through each record in the group;
if the record matches an existing Suspect, the record is considered a Duplicate of that suspect, assigned
a Score, CollectionNumber, and MatchRecordType (Duplicate), and eliminated from the match. If, on
the other hand, the record matches no existing Suspect within the match group, the record becomes a
new Suspect, in that it is added to the current Match group so that it can be matched against by
subsequent records. When the matcher has exhausted all records in the current Match group, it eliminates
all Suspects from the match, labeling the Match Record type as Unique and assigning a collection number
of 0. Those Suspects with a least one duplicate will retain a Match Record Type of Suspect and is
172
Spectrum™ Technology Platform 9.0 SP2
Chapter 8: Stages Reference
assigned the same collection number as its matched duplicate record. Finally, when all records within
a match group have been written to the output. A new match group is compared.
Note: The Default Matching Method will only compare records that are within the same match group.
The type of matching (Intraflow or Interflow) determines how express key match results translate to
Candidate Match Scores. In Interflow matching, a successful Express Key match always confers a 100
MatchScore onto the Candidate. On the other hand, in Intraflow matching, the score a Candidate gains
as a result of an Express Key match depends on whether the record to which that Candidate matched
was a match of some other Suspect—Express Key duplicates of a Suspect will always have MatchScores
of 100, whereas Express Key duplicates of another Candidate (which was a duplicate of a Suspect) will
inherit the MatchScore (not necessarily 100) of that Candidate
Sliding Window Matching Method
The sliding window algorithm is an algorithm which sequentially fills a pre determined buffer size called
a window with the corresponding amount of data rows. As each row is added to the window it's compared
to each item already contained in the window. If a match with an item is determined then both the driver
record (the new item to add to the window) and the candidates (items already in the window) is given
the same group ID. This comparison is continued until the driver record has been compared to all items
contained within the window.
As new drivers are added the window will eventually reach its predetermined capacity. At this point the
window will slide, hence the term Sliding Window. Sliding simply means that the window buffer will
remove and write the oldest item in the window as it adds the newest driver record to the window.
Output
Table 13: Intraflow Match Output
Field Name
Description / Valid Values
CollectionNumber
Identifies a collection of duplicate records. The possible values are 1 or
greater.
ExpressMatchIdentified
Indicates whether the match was obtained using the express match key.
Possible values are Yes or No.
MatchRecordType
Identifies the type of match record in a collection. The possible values
are:
MatchScore
suspect
A record that other records are compared to in order
to determine if they are duplicates of each other.
Each collection has one and only one suspect record.
duplicate
A record that is a duplicate of the suspect record.
unique
A record that has no duplicates.
Identifies the overall score between two records. The possible values
are 0-100, with 0 indicating a poor match and 100 indicating an exact
match.
Note: The Validate Address and Advanced Matching Module stages both use the MatchScore field.
The MatchScore field value in the output of a dataflow is determined by the last stage to modify
the value before it is sent to an output stage. If you have a dataflow that contains Validate Address
and Advanced Matching Module stages and you want to see the MatchScore field output for
each stage, use a Transformer stage to copy the MatchScore value to another field. For example,
Validate Address produces an output field called MatchScore and then a Transformer stage
copies the MatchScore field from Validate Address to a field called AddressMatchScore. When
Data Quality Guide
173
Advanced Matching Module
the matcher stage runs it populates the MatchScore field with the value from the matcher and
passes through the AddressMatchScore value from Validate Address.
Match Key Generator
Match Key Generator creates a non-unique key for each record, which can then be used by matching
stages to identify groups of potentially duplicate records. Match keys facilitate the matching process by
allowing you to group records by match key and then only comparing records within these groups.
The match key is created using rules you define and is comprised of input fields. Each input field specified
has a selected algorithm that is performed on it. The result of each algorithm is then concatenated to
create a single match key field.
In addition to creating match keys, you can also create express match keys to be used later in the
dataflow by an Intraflow Match stage or an Interflow Match stage.
You can create multiple match keys and express match keys.
For example, if the incoming record is:
First Name - Fred
Last Name - Mertz
Postal Code - 21114-1687
Gender Code - M
And you define a match key rule that generates a match key by combining data from the record like this:
Input Field
Start Position
Length
Postal Code
1
5
Postal Code
7
4
Last Name
1
5
First Name
1
5
Gender Code
1
1
Then the key would be:
211141687MertzFredM
Related Links
Matching Records from a Single Source on page 82
Matching Records from One Source to Another Source on page 86
Matching Records from One Source to Another Source on page 86
Input
The input is any field in the source data.
Options
To define Match Key Generator options click the Add button. The Match Key Field dialog displays.
Note: The Dataflow Options feature in Enterprise Designer enables Match Key Generator to be exposed
for configuration at runtime.
174
Spectrum™ Technology Platform 9.0 SP2
Chapter 8: Stages Reference
Table 14: Match Key Generator Options
Option Name
Description / Valid Values
Algorithm
Specifies the algorithm to use to generate the match key. One of the
following:
Consonant Returns specified fields with consonants removed.
Double
Returns a code based on a phonetic representation of
Metaphone their characters. Double Metaphone is an improved version
of the Metaphone algorithm, and attempts to account for
the many irregularities found in different languages.
Koeln
Indexes names by sound, as they are pronounced in
German. Allows names with the same pronunciation to be
encoded to the same representation so that they can be
matched, despite minor differences in spelling. The result
is always a sequence of numbers; special characters and
white spaces are ignored. This option was developed to
respond to limitations of Soundex.
MD5
A message digest algorithm that produces a 128-bit hash
value. This algorithm is commonly used to check data
integrity.
Metaphone Returns a Metaphone coded key of selected fields.
Metaphone is an algorithm for coding words using their
English pronunciation.
Metaphone Returns a Metaphone coded key of selected fields for the
(Spanish) Spanish language. This metaphone algorithm codes words
using their Spanish pronunciation.
Metaphone Improves upon the Metaphone and Double Metaphone
3
algorithms with more exact consonant and internal vowel
settings that allow you to produce words or names more
or less closely matched to search terms on a phonetic
basis. Metaphone 3 increases the accuracy of phonetic
encoding to 98%. This option was developed to respond
to limitations of Soundex.
Data Quality Guide
Nysiis
Phonetic code algorithm that matches an approximate
pronunciation to an exact spelling and indexes words that
are pronounced similarly. Part of the New York State
Identification and Intelligence System. Say, for example,
that you are looking for someone's information in a
database of people. You believe that the person's name
sounds like "John Smith", but it is in fact spelled "Jon
Smyth". If you conducted a search looking for an exact
match for "John Smith" no results would be returned.
However, if you index the database using the NYSIIS
algorithm and search using the NYSIIS algorithm again,
the correct match will be returned because both "John
Smith" and "Jon Smyth" are indexed as "JAN SNATH" by
the algorithm.
Phonix
Preprocesses name strings by applying more than 100
transformation rules to single characters or to sequences
of several characters. 19 of those rules are applied only
if the character(s) are at the beginning of the string, while
175
Advanced Matching Module
Option Name
Description / Valid Values
12 of the rules are applied only if they are at the middle
of the string, and 28 of the rules are applied only if they
are at the end of the string. The transformed name string
is encoded into a code that is comprised by a starting letter
followed by three digits (removing zeros and duplicate
numbers). This option was developed to respond to
limitations of Soundex; it is more complex and therefore
slower than Soundex.
Soundex
Returns a Soundex code of selected fields. Soundex
produces a fixed-length code based on the English
pronunciation of a word.
Substring Returns a specified portion of the selected field.
Field name
Specifies the field to which you want to apply the selected algorithm to
generate the match key. For example, if you select a field called
LastName and you choose the Soundex algorithm, the Soundex
algorithm would be applied to the data in the LastName field to produce
a match key.
Start position
Specifies the starting position within the specified field. Not all algorithms
allow you to specify a start position.
Length
Specifies the length of characters to include from the starting position.
Not all algorithms allow you to specify a length.
Remove noise characters
Removes all non-numeric and non-alpha characters such as hyphens,
white space, and other special characters from an input field.
Sort input
Sorts all characters in an input field or all terms in an input field in
alphabetical order.
Characters
Sorts the characters values from an input field prior
to creating a unique ID.
Terms
Sorts each term value from an input field prior to
creating a unique ID.
If you add multiple match key generation algorithms, you can use the Move Up and Move Down buttons
to change the order in which the algorithms are applied.
Generating an Express Match Key
Enable the Generate Express Match Key option and click Add to define an express match key to be
used later in the dataflow by an Intraflow Match stage or an Interflow Match stage.
If the Generate Express Match Key option is enabled and the Express match key on option is selected
in a downstream Interflow Match stage or Intraflow Match stage, the match attempt is first made using
the express match key created here. If two records' express match keys match, then the record is
considered a match and no further processing is attempted. If the records' express match keys do not
match, then the match rules defined in Interflow Match or Intraflow Match are used to determine if the
records match.
176
Spectrum™ Technology Platform 9.0 SP2
Chapter 8: Stages Reference
Output
Table 15: Match Key Generator Output
Field Name
Description / Valid Values
ExpressMatchKey
A value indicating the match level. If the express match key is a match,
the score is 100. If the express match key does not match, then a score
of 0 is returned.
MatchKey
The key generated to identify records.
Transactional Match
Transactional Match matches suspect records against candidate records that are returned from the
Candidate Finder stage. Transactional Match uses matching rules to compare the suspect record to all
candidate records with the same candidate group number (assigned in Candidate Finder) to identify
duplicates. If the candidate record is a duplicate, it is assigned a collection number, the match record
type is labeled a Duplicate, and the record is then written out. Any unmatched candidates in the group
are assigned a collection number of 0, labeled as Unique and then written out as well.
Note: Transactional Match only matches suspect records to candidates. It does not attempt to match
suspect records to other suspect records as is done in Intraflow Match.
Transactional Match is used in combination with Candidate Finder. For more information about Candidate
Finder, see Candidate Finder on page 154.
Related Links
Matching Records Against a Database on page 93
Options
1. In the Load match rule field, select one of the predefined match rules which you can either use as-is
or modify to suit your needs. If you want to create a new match rule without using one of the predefined
match rules as a starting point, click New. You can only have one custom rule in a dataflow.
Note: The Dataflow Options feature in Enterprise Designer enables the match rule to be exposed
for configuration at runtime.
2. Select Return unique candidates if you want unique candidate records to be included in the output
from the stage.
3. Select Generate data for analysis if you want to use the Match Analysis tool to analyze the results
of the dataflow. For more information, see Analyzing Match Results on page 102.
4. For information about modifying the other options, see Building a Match Rule on page 74.
5. Click Evaluate to evaluate how a suspect record scored against candidate records. For more
information, see Interflow Match on page 168.
Output
Table 16: Transactional Match Output
Field Name
Description / Valid Values
HasDuplicates
Identifies whether the record is a duplicate of another
record. One of the following:
Data Quality Guide
177
Advanced Matching Module
Field Name
MatchRecordType
Description / Valid Values
Y
The record is a suspect record and has
duplicates.
N
The record is a suspect record and has no
duplicates.
D
The record is a candidate record and is a
duplicate of the suspect record.
U
The record is a candidate record but is not a
duplicate of the suspect record.
Identifies the type of match record in a collection. The
possible values are:
Suspect
The original input record that was
flagged as possibly having duplicate
records.
Duplicate
A record that is a duplicate of the input
record.
Unique
A record that has no duplicates.
MatchScore
Identifies the overall score between two records. The
possible values are 0-100, with 0 indicating a poor match
and 100 indicating an exact match.
MatchInfo.MatchRuleNodeName.IsMatch
This field identifies the match state for each node in the
rule hierarchy. MatchRuleNodeName is a variable in the
field name that is replaced by the hierarchical node
names in your match rules.Each node in the rule
hierarchy produces this field.
The possible values are True (there were one or more
matches) or False (there were no matches).
MatchInfo.MatchRuleNodeName.Score
This field identifies the match score for each node in the
rule hierarchy. MatchRuleNodeName is a variable in the
field name that is replaced by the hierarchical node
names in your match rules. Each node in the rule
hierarchy produces this field.
The possible values are 0-100, with 0 indicating a poor
match and 100 indicating an exact match.
Note: The Validate Address and Advanced Matching Module stages both use the MatchScore field.
The MatchScore field value in the output of a dataflow is determined by the last stage to modify
the value before it is sent to an output stage. If you have a dataflow that contains Validate Address
and Advanced Matching Module stages and you want to see the MatchScore field output for
each stage, use a Transformer stage to copy the MatchScore value to another field. For example,
Validate Address produces an output field called MatchScore and then a Transformer stage
copies the MatchScore field from Validate Address to a field called AddressMatchScore. When
the matcher stage runs it populates the MatchScore field with the value from the matcher and
passes through the AddressMatchScore value from Validate Address.
178
Spectrum™ Technology Platform 9.0 SP2
Chapter 8: Stages Reference
Write to Search Index
Write to Search Index enables you to create a full-text index based on the data coming in to the stage.
Having this data in a dedicated search index results in quicker response time when you conduct searches
against the index from other Spectrum™ Technology Platform stages. Full-text-search indexes are
preferable to relational databases when you have a great deal of free-form text data that needs to be
searched or categorized or if you support a high volume of interactive, text-based queries.
Write to Search Index uses an analyzer to break input text into small indexing elements called tokens.
It then extracts search index terms from those tokens. The type of analyzer used—the manner in which
input text is broken into tokens—determines how you will then be able to search for that text. Some
analyzers simply separate the tokens with whitespace, while others are somewhat more sophisticated
and remove articles such as "a" or "the."
Search indexes support the near real time feature, allowing indexes to be updated almost immediately,
without the need to close and rebuild the stage using the search index.
General Options
1. In Enterprise Designer, double-click the Write to Search Index stage on the canvas.
2. Enter a Name for the index.
3. Select a Write mode. When you regenerate an index, you have options related to how the new data
should affect the existing data.
• Append—New data will be added to the existing data and the existing data will remain in tact.
• Overwrite—New data will overwrite the existing data and the existing data will no longer be in the
index.
• Update or Append—New data will overwrite existing data, and any new data that did not previously
exist will be added to the index.
• Key Column—If you select the Update or Append option, select the field on which...
4. Check the Batch commit box if you want to specify the number of records to commit in a batch while
creating the search index. Then enter that number in the Batch size field.
5. Select an Analyzer to build:
• Standard—Provides a grammar-based tokenizer that contains a superset of the Whitespace and
Stop Word analyzers. Understands English punctuation for breaking down words, knows words to
ignore (via the Stop Word Analyzer), and performs technically case-insensitive searching by
conducting lowercase comparisons. For example, the string “Pitney Bowes Software” would be
returned as three tokens: “Pitney”, “Bowes”, and “Software”.
• Whitespace—Separates tokens with whitespace. Somewhat of a subset of the Standard Analyzer
in that it understands word breaks in English text based on spaces and line breaks.
• Stop Word—Removes articles such as "the," "and," and "a" to shrink the index size and increase
performance.
• Keyword—Creates a single token from a stream of data. For example, the string “Pitney Bowes
Software” would be returned as just one token “Pitney Bowes Software”.
• Russian—Supports Russian-language indexes and type-ahead services. Also supports many stop
words and removes articles such as "and," "I," and "you" to shrink the index size and increase
performance.
• German—Supports German-language indexes and type-ahead services. Also supports many stop
words and removes articles such as "the" "and," and "a" to shrink the index size and increase
performance.
• Danish—Supports Danish-language indexes and type-ahead services. Also supports many stop
words and removes articles such as "at" "and," and "a" to shrink the index size and increase
performance.
• Dutch—Supports Dutch-language indexes and type-ahead services. Also supports many stop
words and removes articles such as "the" "and," and "a" to shrink the index size and increase
performance.
• Finnish—Supports Finnish-language indexes and type-ahead services. Also supports many stop
words and removes articles such as "is" "and," and "of" to shrink the index size and increase
performance.
Data Quality Guide
179
Advanced Matching Module
• French—Supports French-language indexes and type-ahead services. Also supports many stop
words and removes articles such as "the" "and," and "a" to shrink the index size and increase
performance.
• Hungarian—Supports Hungarian-language indexes and type-ahead services. Also supports many
stop words and removes articles such as "the" "and," and "a" to shrink the index size and increase
performance.
• Italian—Supports Italian-language indexes and type-ahead services. Also supports many stop
words and removes articles such as "the" "and," and "a" to shrink the index size and increase
performance.
• Norwegian—Supports Norwegian-language indexes and type-ahead services. Also supports many
stop words and removes articles such as "the" "and," and "a" to shrink the index size and increase
performance.
• Portuguese—Supports Portuguese-language indexes and type-ahead services. Also supports
many stop words and removes articles such as "the" "and," and "a" to shrink the index size and
increase performance.
• Spanish—Supports Spanish-language indexes and type-ahead services. Also supports many stop
words and removes articles such as "the" "and," and "a" to shrink the index size and increase
performance.
• Swedish—Supports Swedish-language indexes and type-ahead services. Also supports many
stop words and removes articles such as "the" "and," and "a" to shrink the index size and increase
performance.
• Hindi—Supports Hindi-language indexes and type-ahead services. Also supports many stop words
and removes articles such as "by" "and," and "a" to shrink the index size and increase performance.
6. Click Regenerate to add or update fields from your input source. You can change the field name by
typing the new name directly in the Fields column. Note that you cannot change the Stage Fields
name or the field Type.
7. Select the field(s) whose data you want to store. For example, using an input file of addresses, you
could index just the Postal Code field but choose to store the remaining fields (such as Address Line
1, City, State) so the entire address is returned when a match is found using the index search.
8. Select the field(s) whose data you want to be added to the index for a search query.
9. If necessary, change the analyzer for any field that should use something other than what you selected
in the Analyzer field.
10. Click OK.
The screen below shows an example of the completed Write to Search Index Options stage:
•
•
•
•
A name of "SearchIndex"
The use of the Standard analyzer
A list of fields that are in the input file
A list of fields that will be stored along with the index data. In our case only AddressLine2 will not be
stored.
• A list of fields that will comprise the index
• The use of the Keyword analyzer for the PostalCode field
180
Spectrum™ Technology Platform 9.0 SP2
Chapter 8: Stages Reference
Search Index Management
The Search Index Management tool enables you to delete one or more search indexes.
1. Select Tools > Search Index Management.
2. Select the search index(es) you want to delete.
3. Click Delete.
4. Click Close.
You can also delete a search index by using the Administration Utility. The command is index delete
--n IndexName, where "IndexName" is the name of the index you want to delete.
Business Steward Module
Business Steward Module Introduction
The Business Steward Module is a set of features that allow you to identify and resolve exception records.
Exception records are records that Spectrum™ Technology Platform could not confidently process and
that require manual review by a data steward. Some examples of exceptions are:
•
•
•
•
Address verification failures
Geocoding failures
Low-confidence matches
Merge/consolidation decisions
The Business Steward Module provides a browser-based tool for manually reviewing exception records.
Once exception records are manually corrected and approved, they can be reincorporated into your
Spectrum™ Technology Platform data quality process.
Related Links
Adding or Modifying Conditions and Expressions on page 182
Removing a Condition or Expression on page 185
Exception Monitor
The Exception Monitor stage evaluates records against a set of conditions to determine if the record
requires manual review by a data steward. Exception Monitor enables you to route records that Spectrum™
Technology Platform could not successfully process to a manual review tool (the Business Steward
Portal).
Some examples of exceptions are:
•
•
•
•
Address verification failures
Geocoding failures
Low-confidence matches
Merge/consolidation decisions
In addition to setting conditions that determine if records require manual review, you can also configure
Exception Monitor to send a notification to one or more email addresses when those conditions have
been met a certain number of times.
For more information on exception processing, see Business Steward Module Introduction on page
181.
Related Links
Adding or Modifying Conditions and Expressions on page 182
Data Quality Guide
181
Business Steward Module
Removing a Condition or Expression on page 185
Input
Exception Monitor takes any record as input.
Note: Exception Monitor cannot monitor fields that contain complex data such as lists or geometry
objects.
Options
Conditions Tab
Table 17: Exception Monitor Options
Option Name
Description
Stop evaluating when a Specifies whether to continue evaluating a record against the remaining
condition is met
conditions once a condition is met. Enabling this option may improve
performance because it potentially reduces the number of evaluations that
the system has to perform. However, if not all conditions are evaluated you
will lose some degree of completeness in the exception reports shown in the
Business Steward Portal. For example, if you define three conditions (Address
Completeness, Name Confidence, and Geocode Confidence) and a record
meets the criteria defined in Address Completeness, and you enable this
option, the record would not be evaluated against Name Confidence and
Geocode Confidence. If the record also qualifies as an exception because it
matches the Name Confidence condition, this information would not be
captured. Instead the record would be reported as having only an Address
Completeness problem, instead of both an Address Completeness and Name
Confidence problem.
Adding or Modifying Conditions and Expressions
A condition defines the criteria used to determine if a record is an "exception" and needs to be routed
for manual review. Typically this means that you want to define conditions that can consistently identify
records that either failed automated processing earlier in the dataflow or that have a low degree of
confidence and therefore should be reviewed manually.
The Exception Monitor stage enables you to create predefined conditions and custom conditions using
the Add Condition dialog box. Predefined conditions are available to all dataflows, while custom conditions
are available only to the dataflows for which they were created. The configuration process is almost
identical for both types; however, to create a predefined condition you must save the condition by
completing the fields and clicking Save, shown in the red box below.
182
Spectrum™ Technology Platform 9.0 SP2
Chapter 8: Stages Reference
After you have saved a custom condition, the Predefined conditions field changes to show the name
of the condition rather than "<custom condition>".
After you have created predefined or custom conditions, they will appear on the Conditions tab of the
Exception Monitor Options dialog box. As shown in the following image, the icon next to the name of the
condition identifies it as either a predefined condition or a custom condition. A dual-document icon
designates a predefined condition, and a single document icon designates a custom condition.
1. In the Conditions tab of the Exception Monitor Options window, click Add to create a new condition,
or Modify to edit an existing condition. Complete these fields:
• Predefined Conditions—Select a predefined condition or retain "<custom condition>" in the
dropdown to create a new condition.
• Name—A name for the condition. The name can be anything you like. Since the condition name
is displayed in the Business Steward Portal, you should use a descriptive name. For example,
"MatchScore<80" or "FailedDPV". If you try to give a new condition a name that is identical to an
existing condition but with other characters appended to the end (for example, "FailedDPV" and
"FailedDPV2"), you will be asked whether you want to overwrite the existing condition as soon as
you type the last character that matches its name (using our example, "V"). Say "Yes" to the prompt,
finish naming the condition, and when you press OK or Save, both conditions will be visible on the
Exception Monitor Options dialog box. The new condition will not overwrite the existing condition
unless the name is 100% identical.
• Assign to—Select a user to whom the exception records meeting this condition should be assigned.
If you do not make a selection in this field, the excepion records will automatically be assigned to
the user who ran the job.
• Data domain—(Optional) Specifies the kind of data being evaluated by the condition. This is used
solely for reporting purposes in the Business Steward Portal to show which types of exceptions
occur in your data. For example, if the condition evaluates the success or failure of address
validation, the data domain could be "Address"; if the condition evaluates the success or failure of
a geocoding operation, the data domain could be "Spatial", and so forth. You can specify your own
data domain or select one of the predefined domains:
• Uncategorized—Choose this option if you do not want to categorize this condition.
• Name—The condition checks personal name data, such as a first name or last name.
• Address—The condition checks address data, such as a complete mailing address or a postal
code.
• Phone—The condition checks phone number data.
• Date—The condition checks date data.
• Email—The condition checks email data.
• SSN—The condition checks U.S. Social Security Number data.
• Account—The condition checks a business or organization name associated with a sales account.
• Product—The condition checks data about materials, parts, merchandise, and so forth.
• Asset—The condition checks data about the property of a company, such as physical property,
real estate, human resources, or other assets.
• Financial—The condition checks data related to currency, securities, and so forth.
• Spatial—The condition checks point, polygon, or line data which represents a defined geographic
feature, such as flood plains, coastal lines, houses, sales territories, and so forth.
Data Quality Guide
183
Business Steward Module
• Data quality metric —(Optional) Specifies the metric that this condition measures. This is used
solely for reporting purposes in the Business Steward Portal to show which types of exceptions
occur in your data. For example, if the condition is designed to evaluate the record's completeness
(meaning, for example, that all addresses contain postal codes) then you could specify
"Completeness" as the data quality metric. You can specify your own metric or select one of the
predefined metrics:
• Uncategorized—Choose this option if you do not want to categorize this condition.
• Completeness—The condition measures whether data is missing essential attributes. For example,
an address that is missing the postal code, or an account that is missing a contact name.
• Accuracy—The condition measures whether the data could be verified against a trusted source.
For example, if an address could not be verified using data from the postal authority, it could be
considered to be an exception because it is not accurate.
• Uniqueness—The condition measures whether there is duplicate data. If the dataflow could not
consolidate duplicate data, the records could be considered to be an exception.
• Interpretability—The condition measures whether data is correctly parsed into a data structure
that can be interpreted by another system. For example, social security numbers should contain
only numeric data. If the data contains letters, such as xxx-xx-xxxx, the data could be considered
to have interpretability problems.
• Consistency—The condition measures whether the data is consistent between multiple systems.
For example if your customer data system uses gender codes of M and F, but the data you are
processing has gender codes of 0 and 1, the data could be considered to have consistency
problems.
• Recency—The condition measures whether the data is up to date. For example, if an individual
moves but the address you have in your system contains the person's old address, the data
could be considered to have a recency problem.
2. You must add at least one expression to the condition. An expression is a logical statement that
checks the value of a field. To add an expression, click Add. To modify an existing expression, click
Modify. Complete these fields:
• Expression created with Expression Builder—Select this option to create a basic expression.
• Custom expression—Select this option to write an expression using Groovy scripting. If you need
to use more complex logic, such as nested evaluations, use a custom expression. For more
information, see Using Custom Expressions in Exception Monitor on page 185.
• If other expressions are already defined for this condition, you can select an operator in the Logical
operator field. One of the following:
• And—This expression must be true in addition to the preceding expression being true in order
for the condition to be true.
• Or—If this expression is true the condition is true even if the preceding expression is not true.
• If you chose to create an expression with expression builder the following fields are available:
• Field name—Select the field that you want this expression to evaluate. The list of available fields
is populated based on the stages upstream from the Exception Monitor stage.
• Operator—Select the operator you want to use in the evaluation.
• Value—Specify the value you want the expression to check for using the operator chosen in the
Operator field.
3. Click Add to add the expression. Click Close when you are done adding expressions.
4. Use the Move Up and Move Down buttons to change the order in which expressions are evaluated.
5. Click the Notification tab if you want Exception Monitor to send a message to one or more email
addresses when this condition is met a specific number of times. That email will include a link to the
failed records in the Exception Editor of the Business Steward Portal, where you can manually enter
the correct data. If you do not wish to set up notifications, skip ahead to step 11. To stop receiving
notifications at a particular email address, remove that address from the list of recipients in the Send
notification to line of the Notification tab on the Modify Condition dialog box.
Note: Notifications must be set up in the Management Console before you can successfully use a
notification from within Exception Monitor. See the Administration Guide for information on
configuring notifications.
184
Spectrum™ Technology Platform 9.0 SP2
Chapter 8: Stages Reference
6. Enter the email address(es) to which the notification should be sent. Separate multiple addresses
with commas, spaces, or semicolons.
7. Designate the point at which you want a notification to be sent. You can have it sent upon the first
occurrence of the condition, or you can have it sent when the condition has been met a specific
number of times. The maximum value is 1,000,000 occurrences.
8. Check the Send reminder after box if you want reminder messages sent to the designated email
address(es) after the initial email.
9. Enter the number of days after the initial email that you want the reminder email to be sent.
10. Click Remind daily if you want reminder messages sent every day following the first reminder email.
11. If you want to save this condition for reuse as a predefined condition, click Save. If you modify an
existing condition and click Save, you will be asked if you want to overwrite the existing condition;
note that if you overwrite a predefined condition, those changes will take effect for all dataflows that
use the condition.
12. When finished working with expressions, click OK.
13. Add or modify additional conditions as needed.
14. Use the Move Up and Move Down buttons to change the order in which conditions are evaluated.
The order of the conditions is important only if you have enabled the option Stop evaluating when
a condition is met. For information about this option, see Configuration Tab on page 186.
15. When finished, click OK.
Related Links
Business Steward Module Introduction on page 181
Exception Monitor on page 181
Removing a Condition or Expression
• To remove a condition, open Exception Monitor, select the condition you want to remove, then click
Remove. Note that when you remove a condition, all expressions in the condition are removed.
• To remove an expression, open the condition that contains the expression, select the expression, then
click Remove.
Related Links
Business Steward Module Introduction on page 181
Exception Monitor on page 181
Using Custom Expressions in Exception Monitor
Groovy scripting allows you to write custom expressions to control how Exception Monitor handles
records. If you are not familiar with Groovy scripting, see this website for complete information on Groovy:
groovy.codehaus.org
The expression must evaluate to a boolean value (true or false) which indicates whether the record is
an exception or not. Exception records are routed to the exception port.
Note: Functions are not supported in Exception Monitor Groovy scripts.
Checking a Field for a Single Value
This example evaluates to true if the Status field has 'F' in it. This would have to be
an exact match, so 'f' would not evaluate to true.
return data['Status'] == 'F';
Checking a Field for Multiple Values
This example evaluates to true if the Status field has 'F' or 'f' in it.
boolean returnValue = false;
if (data['Status'] == 'F' || data['Status'] == 'f')
Data Quality Guide
185
Business Steward Module
{
returnValue = true;
}
return returnValue;
Evaluating Field Length
This example evaluates to true if the PostalCode field has more than 5 characters.
return data['PostalCode'].length() > 5;
Checking for a Character Within a Field Value
This example evaluates to true if the PostalCode field has a dash in it.
boolean returnValue = false;
if (data['PostalCode'].indexOf('-') != -1)
{
returnValue = true;
}
return returnValue;
Common Mistakes
The following illustrate common mistakes when using scripting.
The following is incorrect because PostalCode (the column name) must be in single or double quotes
return data[PostalCode];
The following is incorrect because no column is specified
return data[];
Configuration Tab
Table 18: Exception Monitor Options
186
Option Name
Description
Disable exception
monitor
Turns Exception Monitor on or off. If you disable Exception Monitor, records
will simply pass through the stage and no action will be taken. This is similar
in effect to removing Exception Monitor from the dataflow.
Stop job after reaching
exception limit
Specifies whether to halt job execution when the specified number of records
meet the exception conditions.
Maximum number of
exception records
If Stop job after reaching exception limit is selected, use this field to specify
the maximum number of exception records to allow before halting job
execution. For example, if you specify 100, the job will stop once the 101st
exception record is encountered.
Report only (do not
create exceptions)
Enables you to track records that meet exception conditions and reports
those statistics on the Data Quality Performance page in the Business Steward
Portal, but does not create exceptions for those records.
Spectrum™ Technology Platform 9.0 SP2
Chapter 8: Stages Reference
Option Name
Description
Return all records in
exception's group
Specifies whether to return all records belonging to an exception record's
group instead of just the exception record. For example, a match group (based
on a MatchKey) contains four records. One is the Suspect record, one is a
duplicate that scored 90, and two are unique records that scored 80 and 83.
If you have a condition that says that any record with a MatchScore between
80 and 89 is an exception, by default just the records with a match score of
80 and 83 would be sent to the exception port. However, if you enable this
option, all four records would be sent to the exception port.
Enable this option if you want data stewards to be able to compare the
exception record to the other records in the group. By comparing all the
records in the group, data stewards may be able to make more informed
decisions about what to do with an exception record. For example, in a
matching situation a data steward could see all candidates to determine if
the exception is a duplicate of the others.
Group by
If you select Return all records in exception's group choose the field by
which to group the records.
Revalidation service
Select the service you want to run when you revalidate records from this
dataflow.
Action after revalidation Specifies whether you want to reprocess records or approve records that
have been revalidated.
Match exception records Uses match fields to match input records against exception records in the
using match field
repository. Enable this option if your input contains records that previously
generated exceptions but are now corrected in the input.
The input records will be evaluated against the condition(s) and then matched
against the existing exception records in the repository. If an input record
passes the condition(s) and matches an exception record, that exception
record will be removed from the repository. If an input record does not pass
the condition(s) and matches an exception record, that exception record will
be updated and retained in the repository. Additionally, if duplicates exist in
the repository, only one matched exception per dataflow will be updated; all
others for that dataflow will be deleted.
Match fields
Provides a list of all input fields used to build a key to match an exception
record in the repository. You must define at least one match field if you
checked the Match exception records using match fields box.
Output
Exception Monitor returns records in two ports. One port contains records that do not meet any of the
conditions defined in the Exception Monitor stage. The other port, the exception port, contains all records
that match one or more exception conditions. The exception port may also include non-exception records
if you enable the option Return all records in exception's group. Exception Monitor does not add or
modify fields within a record.
Read Exceptions
Read Exceptions is a stage that reads records from the exception repository as input to a dataflow. (For
more information on the exception repository, see Business Steward Module Introduction on page
181.)
Note: Once a record is read into a dataflow by Read Exceptions, it is deleted from the repository.
Data Quality Guide
187
Business Steward Module
Input
Read Exceptions reads in data from an exception repository. It does not take input from another stage
in a dataflow.
Note: Only records marked as "approved" in the Business Steward Portal are read into the dataflow.
Options
The Read Exceptions stage has the following options.
General Tab
The options on the General tab specify which exception records you want to read into the dataflow.
The Filter options allow you to select a subset of records from the exception repository using these
criteria:
• User: The user who ran the dataflow that generated the exceptions you want to read into the dataflow.
• Dataflow name: The name of the dataflow that generated the exceptions you want to read into the
dataflow.
• Stage label: The Exception Monitor stage's label as shown in the dataflow in Enterprise Designer.
This criteria is useful if the dataflow that generated the exceptions contains multiple Exception Monitor
stages and you only want to read in the exceptions from one of those Exception Monitor stages.
• From date: The date and time of the oldest records that you want to read into the dataflow. The date
of an exception record is the date it was last modified.
• To date: The date and time of the newest records that you want to read into the dataflow. The date
of an exception record is the date it was last modified.
The Fields listing shows the fields that will be read into the dataflow. By default all fields are included,
but you can exclude fields by clearing the check box in the Include column.
The Preview listing shows the records that meet the criteria you specified under Filter.
Note: The preview displays only records that have been marked "Approved" in the Business Steward
Portal and meet the filter criteria.
Sort Tab
Use the Sort tab to sort the input records based on field values.
• Add: Adds a field to sort on.
• Field Name column: Shows the name of the field to sort on. You can select a field by clicking the
drop-down button.
• Order column: specifies whether to sort in ascending or descending order.
• Up and Down: Changes the order of the sort. Records are sorted first by the field at the top of the list,
then by the second, and so on.
• Remove: Removes a sort field.
Runtime Tab
• Starting record: Specify the position in the repository of the first record you want to read into the
dataflow. For example, if you want to skip the first 99 records in the repository, you would specify 100.
The 100th record would be the first one read into the repository if it matches the criteria specified on
the General tab. A record's position is determined by the order of the records in the Business Steward
Portal.
• All records: Select this option if you want to read in all records that match the search criteria specified
on the General tab.
188
Spectrum™ Technology Platform 9.0 SP2
Chapter 8: Stages Reference
• Max records: Select this option if you want to limit the number of records read in to the dataflow. For
example, if you only want to read in the first 1,000 records that match the selection criteria, select this
option and specify 1000.
Output
The Read Exceptions stage returns records from the exception repository that have been approved and
that match the selection criteria specified in the Read Exception options. In addition to the records' fields,
Read Exceptions returns these fields which describe the last modifications made to the record in the
Business Steward Portal.
Table 19: Read Exceptions Output
Field Name
Description
Exception.Comment
Any comments entered by the person who resolved
the exception. For example, comments might
describe the modifications that the business
steward made to the record.
Exception.LastModifiedBy
The last user to modify the record in the Business
Steward Portal
Exception.LastModifiedMilliseconds
The time that the record was last modified in the
Business Steward Portal. The time is expressed in
milliseconds since January 1, 1970 0:00 GMT. This
is the standard way of calculating time in the Java
programming language. You can use this value to
perform date comparisons, or to create a transform
to convert this value to whatever date format you
want.
Exception.LastModifiedString
The time that the record was last modified in the
Business Steward Portal. This field provides a more
understandable representation of the date than the
Exception.LastModifiedMilliseconds field. The time
is expressed in this format:
Thu Feb 17 13:34:32 CST 2011
Write Exceptions
Write Exceptions is a stage that takes records that the Exception Monitor stage has identified as exceptions
and writes them to the exception repository. Once in the exception repository, the records can be reviewed
and edited using the Business Steward Portal.
Input
The Write Exceptions stage takes records from the exception port on the Exception Monitor stage and
then writes them to the exception repository. The Write Exceptions stage should be placed downstream
of the Exception Monitor stage's exception port. The exception port is the bottom output port on the
Exception Monitor stage:
Data Quality Guide
189
Business Steward Module
Options
The Write Exceptions stage enables you to select which fields' data should be returned to the exceptions
repository. The fields that appear depend upon the stages that occur upstream in the dataflow. If, for
instance, you have a Validate Address stage in the dataflow, you would see such fields as AddressLine1,
AddressLine2, City, PostalCode, and so on in the Write Exceptions stage. By default, all of those fields
are selected; uncheck the boxes for any fields you do not want returned to the exceptions repository.
You can also designate which of the selected fields should be editable once they are passed to the
exceptions repository. By default, the Allow editing column is checked for all fields coming in to the
Write Exceptions stage. Uncheck the box for any field you wish to be returned to the exceptions repository
in a read-only state.
Output
Write Exceptions does not return any output in the dataflow. It writes exception records to the exception
repository.
Business Steward Portal Introduction
What is the Business Steward Portal?
The Business Steward Portal is a tool for reviewing records that failed automated processing or that
were not processed with a sufficient level of confidence. Use the Business Steward Portal to manually
enter the correct data in a record. For example, if a customer record fails an address validation process,
you could do the research necessary to determine the customer's address, then modify the record so
that it contains the correct address. The modified record could then be reprocessed by Spectrum™
Technology Platform, sent to another data validation or enrichment process, or written to a database,
depending on your configuration.
The Business Steward Portal also provides summary charts that provide insight into the kinds of data
that are triggering exception processing, including the data domain (name, addresses, spatial, and so
on) as well as the data quality metric that the data is failing (completeness, accuracy, recency, and so
on).
In addition, the Business Steward Portal Manage Exception page enables you to review and manage
exception record activity, including reassigning records from one user to another. Also, the Business
Steward Portal Data Quality Performance page provides trend and key performance indicator information.
For more information on exception processing, see Business Steward Module Introduction on page
181.
190
Spectrum™ Technology Platform 9.0 SP2
Chapter 8: Stages Reference
Accessing the Business Steward Portal
To open the Business Steward Portal, go to Start > All Programs > Pitney Bowes > Spectrum
Technology Platform > Server > Welcome Page and select Spectrum Data Quality, then Business
Steward Portal, and then click Open the Business Steward Portal.
Alternatively, you could follow these steps:
1. Open a web browser and go to http://<servername>:<port>/bsm-portal.
For example,
http://myserver:8080/bsm-portal
Contact your Spectrum™ Technology Platform administrator if you do not know the server name and
port.
2. Log in to the Spectrum™ Technology Platform. Contact your Spectrum™ Technology Platform
administrator if you have trouble logging in.
Note: Refreshing the Business Steward Portal window using the browser refresh button in Internet
Explorer 10 and 11 can sometimes cause the application to become nonresponsive. There are
three ways to prevent this issue:
• Use Google Chrome.
• Enter the actual host name in the Business Steward Portal browser address (for example,
"http://CH016PA:8080/bsm-portal" versus "http://localhost:8080/bsm-portal").
• Add the host's domain name to the IE Compatability View list by clicking Tools > Compatability
View Settings and adding the name to the list of websites.
The Business Steward Portal Menu
The Business Steward Portal menu consists of four options and access to the help system, as shown
below:
•
•
•
•
Dashboard—View graphic representations of the type of exceptions found in your records.
Editor—Review and edit exception records for reprocessing.
Manage—View status information for and assign/maintain exception records.
Performance—View statistical information and configure key performance indicators for exception
records.
• Settings—Designate the maximum number of records you want to appear per page and whether you
want to use Internet-based help or local help. We recommend you use Internet-based help to ensure
you are accessing the latest information.
• Help icon—Access the Business Steward Portal help system.
Exception Counts
Viewing Exception Counts
The Exception Dashboard contains charts that summarize the types of exceptions that have been found
in your data. You can view a breakdown of exceptions by data domain and data quality metric, as well
as by the users and dataflows that have produced exceptions.
1. Open a web browser and go to http://<servername>:<port>/bsm-portal.
For example,
http://myserver:8080/bsm-portal
Data Quality Guide
191
Business Steward Module
Contact your Spectrum™ Technology Platform administrator if you do not know the server name and
port.
2. Log in using a Spectrum™ Technology Platform user account that has administrative privileges.
Contact your Spectrum™ Technology Platform administrator if you have trouble logging in.
Note: Only user accounts with administrative privileges can log in.
There are four charts displayed:
• Quality Metric—Shows the proportion of exceptions that fall into each data quality metric category.
• Data Domain—Shows the kind of data that is causing exceptions.
• Status—Shows the amount of progress you have made with exception records that are assigned
to you as well as the progress with exception records system wide.
• Dataflow—Shows the names of the dataflows that have produced exceptions.
You can drill down into each category in the charts by clicking on the portion of the chart that you
want to expand. For example, in the Data Domain chart, you can click a domain, such as "Name",
to see a list of dataflow names that contain exceptions based on Name data. You can then click a
dataflow to view those name exceptions in the Exception Editor.
3. To switch between pie chart format and bar chart format, click the appropriate button:
You can also switch individual charts by right-clicking in the chart:
192
Spectrum™ Technology Platform 9.0 SP2
Chapter 8: Stages Reference
4. To remove a category from a chart, clear the category's check box in the legend:
Exception Editor
The Exception Editor provides a means for you to perform a manual review of exception records. The
goal of a manual review is to determine which data is incorrect and then manually correct it, since
Spectrum™ Technology Platform was unable to correct it as part of an automated dataflow process.
The Exceptions pane displays the exception records; you can view all exception records or a subset of
exception records by applying filters via the Filter tab. You can also use features on the Search tab to
locate information that helps you correct records and rerun them successfully.
Note: The panes in the Exception Editor can be docked, floating, or tabbed. You can also pin, unpin,
and resize the panes to adjust their size and position.
You may see one or more of the following icons next to your records in the Exceptions pane:
Status Icons
The record has not been edited.
The record has been modified but the changes have not been saved. To
save the changes, click the Save button.
The record has been modified and the changes have been saved.
Data Quality Guide
193
Business Steward Module
Type Icons
The exception record is a single record and not part of a group. For example, an
address validation failure for a single record.
The exception record is a member of a group of records. This means that the
exception is the result of a failed match attempt, such as in a deduplication
dataflow. For instructions on resolving this kind of exception, see Resolving
Duplicate Records on page 200.
The record is a member of a group that contains exception records but is not itself
an exception record.
Comments Icon
Indicates that there are comments written for this record. Click the
icon to read the comments.
You can view additional details about a record by highlighting it and clicking the Details tab at the bottom
of the window:
The Detail tab shows the following information:
194
Job ID
A numeric identifier assigned to a job by the system. Each time a job runs it is
assigned a new job ID.
Dataflow Name
The user-defined name given to the dataflow.
Stage Label
The user-defined name given to the Exception Monitor stage in the dataflow.
This information is particularly useful in cases where a dataflow contains multiple
Exception Monitor stages. If the person who created the dataflow gave each
Exception Monitor stage a meaningful label you can identify which Exception
Monitor produced the exception record. The default label is "Exception Monitor".
User
The user who ran the dataflow.
Exception Time
The date and time when the Exception Monitor identified the record as an
exception.
Group By
If the dataflow was configured to return all records in the exception records group,
this shows the field by which the records are grouped. This only applies to
dataflows that perform matching, such as dataflows that identify duplicate records
or dataflows that group records into households.
Condition Name
The name of the condition that identified the record as an exception. Condition
names are defined by the person who set up the dataflow.
Data Domain
The kind of data that resulted in an exception. Examples of data domains include
Name, Address, and Phone Number. This information helps you identify which
fields in the record require editing.
Spectrum™ Technology Platform 9.0 SP2
Chapter 8: Stages Reference
Quality Metric
The quality measurement that the record failed. Examples of quality metrics
include Accuracy, Completeness, and Uniqueness. This information helps you
determine why the record was identified as an exception.
If you want to view the edit history of the record, click the History tab at the bottom of the window.
The History tab shows the following information:
Version
The revision number of the change.
Last changed by
The user who made the change.
Assigned to
The user to whom the exception record is currently assigned.
When
The date and time that the change was saved.
Comments
The comments (if any) that were entered by the person who made
the change.
Filtering the Exception Records View
Filtering allows you to display only those records that you are interested in. By default, the Business
Steward Portal only displays records from one Spectrum™ Technology Platform dataflow at a time. You
can further filter the record list to show just those records you are interested in editing.
To filter the list of records:
1. If the filtering options are not visible, click the Filter tab:
2. Use the filter options to display the records you want to edit.
Note: You can only view records for one dataflow at a time. The Dataflow name field at the top of
the window shows the dataflow that produced the records currently displayed.
User
Data Quality Guide
The user ID of the person to whom the exceptions are assigned.
195
Business Steward Module
Data Domain
The category of data that resulted in an exception. For example, address
data or name data.
Quality Metrics
The measurement of data quality that resulted in the exception. For example,
completeness or accuracy.
Dataflow Name
The name of the dataflow that resulted in exceptions. You can only view
exceptions for one dataflow at a time.
Job ID
The numeric job number of the job that resulted in exceptions.
Stage Label
The label of the Exception Monitor stage that routed the record to the
Business Steward Portal. This is the label that is displayed in the dataflow
in Enterprise Designer. By default, the label is "Exception Monitor" but the
dataflow designer may have given the stage a more meaningful name,
especially if there are multiple Exception Monitor stages in a dataflow.
Approval status
The approval status indicates whether a data steward has edited the record
and marked it as approved. When a record is approved, it is ready to be
reprocessed by Spectrum™ Technology Platform.
From date/To date
The date (and optionally time) that the dataflow ran. To enter time, type the
time after the date.
3. To filter based on values in a fields:
a) Click the add field filter icon:
b) In the Field Name column, select the field you want to filter on.
c) In the Operation column, select one of the following:
196
is equal to
Looks for records that have exactly the value you specify. This can be a
numeric value or a text value. For example, you can search for records
with a MatchScore value of exactly 82, or records with a LastName value
of "Smith".
is not equal to
Looks for records that have any value other than the one you specify. This
can be a numeric value or a text value. For example, you can search for
records with any MatchScore value except 100, or records with any
LastName except "Smith".
is greater than
Looks for records that have a numeric value that is greater than the value
you specify.
is greater than or
equal to
Looks for records that have a numeric value that is greater than or equal
to the value you specify. For example, if you specify 50, you would see
records with a value of 50 or greater in the selected field.
is less than
Looks for records that have a numeric value that is less than the value you
specify.
is less than or
equal to
Looks for records that have a numeric value that is less than or equal to
the value you specify. For example, if you specify 50, you would see records
with a value of 50 or less in the selected field.
contains
Looks for records that contain the value you specify in any position within
the selected field. For example, if you filter for "South" in the AddressLine1
field, you would see records with "12 South Ave.", "9889 Southport St.",
"600 South Shore Dr.", and "4089 5th St. South".
Spectrum™ Technology Platform 9.0 SP2
Chapter 8: Stages Reference
starts with
Looks for records that start with a particular value in the selected field. For
example, if you filter for "Van" in the LastName field you would see records
with "Van Buren", Vandenburg", or "Van Dyck".
ends with
Looks for records that end with a particular value in the selected field. For
example, if you filter for records that end with "burg" in the City field, you
would see records with "Gettysburg", "Fredricksburg", and "Blacksburg".
d) In the Field Value column, enter the value to use as the filtering criteria.
Note: The search value is case-sensitive. This means that searching for SMITH will return only
records with "SMITH" in all upper case, but not "smith" or "Smith".
e) To filter on more than one field, add multiple filters by clicking the add field filter icon:
. For
example, if you want all records with a LastName value of "SMITH" and a State value of "NY"
you could use two filters, one for the LastName field and one for the State field.
f) Click Refresh.
This example would return all records with a value of "FL" in the StateProvince field:
This example would return all records that do not have a PostalCode value of 60510:
This example would return all records with a StateProvince of "NY" with all postal codes except
14226.
Customizing the Exceptions Grid View
There are several ways you can customize the Exceptions grid. You can select which fields appear,
change the order in which they appear, or freeze fields and alter how they scroll by clicking the Configure
View button and making changes accordingly.
These changes are made in real time and will be visible in the Exceptions grid behind the Configure
View dialog box. Note that these changes are saved on the server based on the user name and dataflow
name; therefore, when you open the dataflow at a later time the configuration will still be applied. Similarly,
changes you make here also affect what's shown when you edit exception records using the Quick Edit
function.
Hiding Fields from View
If you don't want to view every field in an exception record, click Configure View and deselect the fields
you want to hide. The list shown will be in the same order as what you see in the Exceptions grid.
Changing Field Order
Data Quality Guide
197
Business Steward Module
You can also customize the view by changing the order in which fields are shown. Click Configure View
and use the up and down arrows on the right side of the screen to put the fields in the desired order.
Note: The first field is always frozen and cannot be moved to a lower position; likewise, no other field
can be placed before it.
Freezing Fields
If you want certain fields to stay in view while scrolling through other fields, use the freeze function. This
causes a set number of fields, counting from the left-most field, to stay in place as you scroll. You will
see the horizontal scroll bar adjust depending on how many fields are frozen. Click Configure View and
enter a number in the Frozen column count field.
Note: The default for this field is "1", so the first field will always be frozen.
Note that this feature counts hidden columns. Therefore, if you have chosen to hide a field and that field
falls within the "frozen zone," it will still be included in the count. For example, if you enter "3" in the
Frozen column count field and have chosen to hide the second field, those first three fields will be frozen
but only fields 1 and 3 will appear in the Exceptions grid.
The first image below shows the Exceptions grid with the records and fields as they were formatted upon
input and the default first column frozen, indicated by the location of the scroll bar. The second image
shows how an entry of "2" in the Frozen column count field freezes the Approved and Status columns
and allows the Type and Comments fields to be scrolled past, with the AddressLine1 field being the next
column shown and the scroll bar having shifted.
Editing Exception Records
The purpose of editing an exception record is to correct the record so that it can be processed successfully.
Editing an exception record may involve using other Spectrum Technology Platform services or consulting
external resources such as maps, the Internet, or other information systems in your company. The goal
of a manual review is to determine which data is incorrect and manually correct it, since Spectrum™
Technology Platform was unable to correct it as part of an automated dataflow process.
After reviewing records, you can edit them directly in the Exceptions grid, or you can use the Quick Edit
function. The Exceptions grid enables you to edit one record at a time; alternatively, you can edit single
or multiple records at one time with the Quick Edit function.
Note that read-only fields cannot be edited. If you want to make a read-only field editable, you would
need to delete all exception records for that dataflow and job ID and run the dataflow again after
configuring the fields accordingly in the Write Exceptions stage. This would produce new exception
198
Spectrum™ Technology Platform 9.0 SP2
Chapter 8: Stages Reference
records with editable fields. Also, you cannot edit a record with invalid data. For example, you cannot
edit a numeric-only field to contain non-numeric characters. If you enter invalid data and click Done, the
problematic field will be outlined in a red box and an error message will display at the bottom of the Edit
Exceptions screen. The field will not update with invalid data.
To edit records directly in the Exceptions pane, click the field you want to edit and type the new value
for the field. Right-click the field to access cut, copy, and paste options. Click Save when you are finished
editing records.
To edit records using the Quick Edit function, follow the steps below. When you edit a record using the
Quick Edit method, the data is immediately synchronized with the list of records shown in the Exception
Editor. To make the Quick Edit process as efficient as possible, the Edit Exceptions window does not
contain a Cancel or a Save button. Instead, if you determine an edit is incorrect, you must click Done
and then use the Revert function to undo a change to a record.
1. Highlight the record(s) you want to edit and click Quick Edit... The Edit Exceptions window will
open containing all fields for the selected record(s).
2. Change the field values accordingly. Read-only fields will be grayed out. If you selected multiple
records to edit, fields whose values are not the same for all records will show "Multiple values" in the
text box. You are able to edit these fields, but be aware that changes you make here will apply to all
selected records, even though previously the values for those fields varied. Likewise, if you clear the
data for a field when editing multiple records, it will be cleared for all selected records.
3. You can add comments about your changes in the Comments column. Comments are visible to
other users and can be used to help keep track of the changes made to the record.
4. If you selected just one record to edit, you can use the navigation buttons at the top of the screen to
go to previous or next records; you can also use these buttons to go directly to the first or last record.
These navigation buttons are not available when editing multiple records. When you have completed
editing the record(s), click Done to return to the Exceptions grid.
5. When you are confident that you have made the necessary changes to make the record(s) valid, you
need to approve the record(s). If you are approving one or more records that are not part of a duplicate
records group, check the box in the Approved column and click Done. All changes from all modified
records are saved to the exception repository. This will mark the record as ready to be processed
by Spectrum™ Technology Platform.
If you are approving records that are part of a duplicate records group, you must click Remove
Duplicates and approve the records on the Duplicate Resolution screen; you cannot approve records
using the Approve boxes on the Exceptions window. When you approve a record in the group, all
records in that group will become approved. Click Save and Close. All changes from the record
group are saved to the exception repository.
Note: If a record is part of a group, the Remove Duplicates button will be activated; otherwise it
will be grayed out.
Data Quality Guide
199
Business Steward Module
6. If you need to undo a change you made, select the record(s) you want to undo and click Revert.
Resolving Duplicate Records
Duplicate resolution exceptions occur when Spectrum™ Technology Platform cannot confidently determine
whether a record is a duplicate of another. There are two ways to resolve duplicate records.
One approach is to group duplicate records together into collections. When you approve the records
they can then be processed through a consolidation process to eliminate the duplicate records in each
collection from your data.
Another approach is to edit the records so that they are more likely to be recognized as duplicates, for
example correcting the spelling of a street name. When you approve the records, Spectrum™ Technology
Platform reprocesses the records through a matching and consolidation process. If you corrected the
records successfully, Spectrum™ Technology Platform will be able to identify the record as a duplicate.
Related Links
Making a Record a Duplicate of Another on page 200
Creating a New Group of Duplicate Records on page 201
Making a Record Unique on page 202
Fields Automatically Adjusted During Duplicate Resolution on page 202
Making a Record a Duplicate of Another
Duplicate records are shown as groups of records in the Business Steward Portal. You can make a
record a duplicate of another by moving it into the same group as the duplicate record.
To make a record a duplicate:
1. In the Business Steward Portal, click the Editor tab.
2. Set the filtering options to display the records you want to work with. For information on filtering
options, see Filtering the Exception Records View on page 195
3. Select the record you want to work on then click Resolve Duplicates.
The Duplicate Resolution view shows duplicate records. The records are grouped into collections
or candidate groups that contain these match record types:
suspect
A record that other records are compared to in order to determine if they
are duplicates of each other. Each collection has one and only one suspect
record.
duplicate
A record that is a duplicate of the suspect record.
unique
A record that has no duplicates.
You can determine a record's type by looking at the MatchRecordType column.
4. If necessary, correct individual records as needed. For more information, see Editing Exception
Records on page 198.
5. In the CollectionNumber or CandidateGroup field, enter the number of the group that you want to
move the record into. The record is made a duplicate of the other records in the group.
200
Spectrum™ Technology Platform 9.0 SP2
Chapter 8: Stages Reference
In some cases you cannot move a record with a MatchRecordType value of "suspect" into another
collection of duplicates.
Note: Records are grouped by either the CollectionNumber field or the CandidateGroup field
depending the type of matching logic used in the dataflow that produced the exceptions.
Contact your Spectrum™ Technology Platform administrator if you would like additional
information about matching.
6. When you are done modifying records, check the Approved box. This signals that the record is ready
to be re-processed by Spectrum™ Technology Platform.
7. To save your changes, click Save.
Related Links
Resolving Duplicate Records on page 200
Fields Automatically Adjusted During Duplicate Resolution on page 202
Creating a New Group of Duplicate Records
In some situations you can create a new group of records that you want to make duplicates of each
other. In other situations you cannot create new groups. Your ability to create new groups is determined
by the type of Spectrum™ Technology Platform processing that generated the exception records.
1. In the Business Steward Portal, click the Editor tab.
2. Set the filtering options to display the records you want to work with. For information on filtering
options, see Filtering the Exception Records View on page 195
3. Select the record you want to work on then click Resolve Duplicates.
The Duplicate Resolution view shows duplicate records. The records are grouped into collections
or candidate groups that contain these match record types:
suspect
A record that other records are compared to in order to determine if they
are duplicates of each other. Each collection has one and only one suspect
record.
duplicate
A record that is a duplicate of the suspect record.
unique
A record that has no duplicates.
You can determine a record's type by looking at the MatchRecordType column.
4. If necessary, correct individual records as needed. For more information, see Editing Exception
Records on page 198.
5. Select a record that you want to put in the new collection then click New Collection. The new collection
is automatically given a unique collection number, and the record you selected becomes a suspect
record.
Note: If you do not see the New Collection button, you cannot create a new collection for the
records you are working with. You can only create new collections if the dataflow that produced
the exceptions contained and Interlfow Match or an Intraflow Match stage, but not if it contained
a Transactional Match stage. Contact your Spectrum™ Technology Platform administrator if
you would like additional information about these matching stages.
6. Place additional records in the collection by entering the new collection's number in the record's
CollectionNumber field.
7. When you are done modifying records, check the Approved box. This signals that the record is ready
to be re-processed by Spectrum™ Technology Platform.
8. To save your changes, click Save.
Related Links
Resolving Duplicate Records on page 200
Fields Automatically Adjusted During Duplicate Resolution on page 202
Data Quality Guide
201
Business Steward Module
Making a Record Unique
To change a record from a duplicate to a unique:
1. In the Business Steward Portal, click the Editor tab.
2. Set the filtering options to display the records you want to work with. For information on filtering
options, see Filtering the Exception Records View on page 195
3. Select the record you want to work on then click Resolve Duplicates.
The Duplicate Resolution view shows duplicate records. The records are grouped into collections
or candidate groups that contain these match record types:
suspect
A record that other records are compared to in order to determine if they
are duplicates of each other. Each collection has one and only one suspect
record.
duplicate
A record that is a duplicate of the suspect record.
unique
A record that has no duplicates.
You can determine a record's type by looking at the MatchRecordType column.
4. In the MatchRecordType field, enter "Unique".
5. When you are done modifying records, check the Approved box. This signals that the record is ready
to be re-processed by Spectrum™ Technology Platform.
6. To save your changes, click Save.
Related Links
Resolving Duplicate Records on page 200
Fields Automatically Adjusted During Duplicate Resolution on page 202
Fields Automatically Adjusted During Duplicate Resolution
When you modify records in the Business Steward Portal's duplicate resolution view, some fields are
automatically adjusted to reflect the record's new disposition.
Table 20: Records Processed by Interflow or Intraflow Match
Action
Values Automatically Applied to Fields
Moving a record from one collection to
another
If you move a record into a collection of duplicates:
• MatchRecordType: Duplicate
• MatchScore: 100
• HasDuplicates: D (This field is only present if the dataflow
contained an Interflow Match stage.)
If you move a duplicate record into the collection of
unique records (collection 0):
• MatchRecordType: Unique
• MatchScore: No change
• HasDuplicates: U (This field is only present if the dataflow
contained an Interflow Match stage.)
If you move a suspect record into the collection of unique
records (collection 0):
• MatchRecordType: Unique
• MatchScore: 0
• HasDuplicates: N (This field is only present if the dataflow
contained an Interflow Match stage.)
202
Spectrum™ Technology Platform 9.0 SP2
Chapter 8: Stages Reference
Action
Values Automatically Applied to Fields
Creating a new collection
• MatchRecordType: Suspect
• MatchScore: No value
• HasDuplicates: Y (This field is only present if the dataflow
contained an Interflow Match stage.)
Note: If the record came from a dataflow that contained an
Interflow Match stage only records with a value of
"input_port_0" in the InterflowSourceType field can
be a suspect record.
Table 21: Records Processed by Transactional Match
Action
Values Automatically Applied to Fields
Change MatchRecordType to Duplicate • HasDuplicates: D
• MatchScore: 100
Change MatchRecordType to Unique
• HasDuplicates: U
• MatchScore: unchanged
Change HasDuplicates to D
• MatchRecordType: Duplicate
• MatchScore: 100
Change HasDuplicates to U
• MatchRecordType: Unique
• MatchScore: unchanged
Change HasDuplicates to Y
• MatchRecordType: Suspect
• MatchScore: blank
Change HasDuplicates to N
• MatchRecordType: Suspect
• MatchScore: blank
Related Links
Resolving Duplicate Records on page 200
Making a Record a Duplicate of Another on page 200
Creating a New Group of Duplicate Records on page 201
Making a Record Unique on page 202
Using Search Tools
The Business Steward Portal Exception Editor provides search tools to assist you in looking up information
that may help you edit exception records and rerun them successfully. The tools include the services
you have licensed in Spectrum™ Technology Platform as well as premium services that can be used for
various functions, such as phone number lookups or business information lookups. While the Spectrum™
Technology Platform services can be used immediately in the Exception Editor, premium services must
first be configured as external web services in Management Console.
Using Spectrum Service Search Tools
Pitney Bowes Software service search tools include all services for which you are licensed, such as
ValidateAddress, GetPostalCodes, and so on. You can use these services within the Exception Editor
to look up and validate exception data that you are attempting to correct.
1. In the Business Steward Portal, click the record containing data you want to look up.
2. Below the records table, click the Search Tools tab:
Data Quality Guide
203
Business Steward Module
3. In the Tool field, select the service you want to use, such as ValidateAddress or
GetCandidateAddresses.
4. If the record contains fields used in that service, the values for those fields will appear in the Value
column on the Input tab. If these fields do not exist, double-click the cell in the Input Source column
and select the field in your data that contains this information. You will then see the Value column
populate with the data from the exception record for that field. For example, you may be using
ValidateAddress and your exception record may not include an AddressLine1 field. However, it may
include an Address1 field instead, in which case you would select "Address1" from the Input Source
column and the data for that field would populate in the Value column.
Note: The Business Steward Portal remembers the maps you create from input source fields to
service fields as long as you are mapping exception records with the same field names. For
instance, if your input source file has a field named "Address1" and you map it to
"AddressLine1", it will remember this map as long as you are working with files that contain
"Address1". When you begin to map exception records with different field names (such as
"Addr1"), the Exception Editor will remember those new maps and discard the previous map
memory.
5. Click the Options tab to view service options that were set in Management Console. If you don't
know the purpose of a particular option, click that option to see its description.
Note: If the service you are using requires a database, you must have configured the database
resource in Management Console, and you must enter the name of database in the appropriate
field on the Options tab. For example, if you are reviewing U.S. records using Validate Address,
you must enter the name of the database in the US Database field under Options.
6. Sometimes changing the setting of an option will result in an exception record processing successfully.
To determine if changing an option will fix an exception record, change the setting for that option and
click Search. The updated record will appear with a status code indicating the success of the record.
204
Spectrum™ Technology Platform 9.0 SP2
Chapter 8: Stages Reference
7. If you want to reprocess the updated record, click the Approved check box for that record and then
click Saved.
Configuring Premium Service Search Tools
Premium service search tools require access to external web services hosted by Pitney Bowes Software.
To configure the search tools you need to obtain a user ID and password for the premium services. To
request a user ID and password, send an email containing your Pitney Bowes Software account name
and contact information to [email protected]. Additional charges may apply, such as a
pay-per-use fee for Experian Truvue. For more information, contact your account executive.
These search tools use web services to perform lookups of various sorts. Before you can use these
search tools you must set them up as external web services on your Spectrum™ Technology Platform
server.
Note: This procedure must be performed by a Spectrum™ Technology Platform administrator.
1. Open the Management Console.
2. Expand the Resources node, then click External Web Services.
3. Click Add.
4. In the Name field, enter the appropriate name:
Search Tool
Name
Company Lookup
CompanyLookupService
Experian Truvue
ExperianTruvueService
Interactive Address Search
AddressDoctorFastCompletionService
Note: If you have the Universal Addressing
Module stage Validate Address Global
installed, you can use it for the Interactive
Address Search tool instead of an
external web service. To use your
Validate Address Global service, open
the Validate Address Global service in
the Management console, go to the
Process tab, and in the Processing
mode field select FastCompletion.
Phone Lookup
PhoneAppendService
Reverse Phone Lookup
ReversePhoneAppendService
5. In the External service type field, select SOAP.
6. In the Timeout (seconds) field, enter 10.
7. Check the boxes Expose as service and SOAP. Clear the REST check box.
8. In the URL field, enter the appropriate URL:
Search Tool URL
Company
Lookup
http://spectrum.pbondemand.com:8080/soap/CompanyLookupService?wsdl
Data Quality Guide
205
Business Steward Module
Search Tool URL
Experian
Truvue
http://spectrum.pbondemand.com:8080/soap/ExperianTruvueService?wsdl
Interactive
Address
Search
http://spectrum.pbondemand.com:8080/soap/AddressFastCompletionService?wsdl
Phone
Lookup
http://spectrum.pbondemand.com:8080/services/PhoneAppend?wsdl
Reverse
Phone
Lookup
http://spectrum.pbondemand.com:8080/services/ReversePhoneAppend?wsdl
Note: If you have the Universal Addressing Module stage Validate Address Global
installed, you can use it for the Interactive Address Search tool instead of
an external web service. To use your Validate Address Global service, open
the Validate Address Global service in the Management console, go to the
Process tab, and in the Processing mode field select FastCompletion.
9. The Operation field is automatically populated with the correct value. If you do not see a value in
this field, click Refresh after entering the URL.
10. In the User name and Password fields, enter your OnDemand credentials. To request a user name
and password, contact [email protected].
11. Click the Request tab and do the following:
Search Tool
Configuration
Company Lookup
Check the Allow Null check box so that all the
check boxes in the column are checked.
Experian Truvue
No changes needed.
Interactive Address Search
No changes needed.
Phone Lookup
• For the account_id field, enter your
OnDemand user name in the Default Value
column.
• For the account_password field, enter your
OnDemand password in the Default Value
column.
• Clear the check box in the Expose column for
these two fields.
Reverse Phone Lookup
• For the account_id field, enter your
OnDemand user name in the Default Value
column.
• For the account_password field, enter your
OnDemand password in the Default Value
column.
• Clear the check box in the Expose column for
these two fields.
12. Click OK.
Using Bing Maps
The Bing Maps search tool displays the location of an address on a map and provides controls that allow
you to zoom and pan the map. In addition, you can click on the map to obtain addresses.
206
Spectrum™ Technology Platform 9.0 SP2
Chapter 8: Stages Reference
1. In the Business Steward Portal, click the record you want to research.
2. Below the records table, click the Search Tools tab:
3. In the Tools field, select Bing Maps.
4. Select the fields you want to use in your search. For example, if you want to search for the address
on a map, you might choose AddressLine1 and City. If you want to view the city on a map, you could
select just City and StateProvince. The values for the selected fields are placed in the search box:
5. Click Search. The results are displayed:
Data Quality Guide
207
Business Steward Module
6. To obtain the address of other buildings, click the map. Switching to the Aerial view may be helpful
when finding buildings.
Using Company Lookup
If you know the company's name and the state in which it is located, you can validate the company name,
address, phone number, and other information about the company.
1. In the Business Steward Portal, click the record for which you want to find company information.
2. Below the records table, click the Search Tools tab:
3. In the Tools field, select Company lookup.
4. If the record contains fields named FirmName, AddressLine1, City, StateProvince, and PostalCode,
the values for these fields are automatically used for the search. If these fields do not exist, double-click
the cell in the Input Source column and select the field that contains this data.
5. In the Country field, enter the two-character ISO country code. For a list of ISO codes, see Country
ISO Codes and Module Support on page 274.
6. Click Search.
The lookup tool provides the following information:
DUNS
208
The D&B D-U-N-S Number is a unique nine-digit identification sequence, which
provides unique identifiers of single business entities, while linking corporate
family structures together. D&B links the D&B D-U-N-S Numbers of parents,
subsidiaries, headquarters and branches on more than 62 million corporate
family members around the world. Used by the world's most influential
standards-setting organizations, it is recognized, recommended and/or required
by more than 50 global, industry and trade associations, including the United
Nations, the U.S. Federal Government, the Australian Government and the
European Commission.
Spectrum™ Technology Platform 9.0 SP2
Chapter 8: Stages Reference
FirmName
The primary business name. This will not represent tradestyle or Doing Business
As names nor will it reflect the exact official registered business name. The
registered name is captured within public records depending upon availability
and local filing requirements.
AddressLine1
The first address line for the business.
City
Name of the city where the business is located, generally in the local language.
StateProvince
The name of the state or province where the business is located.
PostalCode
The postal code of the business.
CountryCode
The two-character ISO country code. For a list of ISO codes, see Country ISO
Codes and Module Support on page 274.
CountryName
The name of the country in English where the company is located.
Phone
Telephone number for the business. In the U.S., these are direct dialing
telephone numbers with area code and no punctuation. In other countries, the
number is provided as entered in the local database, which may include
punctuation.
TradeStyle
An additional name used by a business for advertising and/or buying purposes.
SubjectDetails
Indicates the organizational structure of the establishment. One of the following:
BranchDivision
The establishment is a branch or division that reports
to a headquarters.
ParentHeadquarters The establishment is a parent company or headquarters.
Parent is a corporation that owns more than 50 % of
another corporation's capital stock. The parent company
can also be a subsidiary of another corporation. If the
parent also has branches, then it is a headquarters as
well as being a parent company. A headquarters is a
business establishment that has branches or divisions
reporting to it, and is financially responsible for those
branches or divisions. If the headquarters has more than
50% of capital stock owned by another corporation, it
also will be a subsidiary. If it owns more than 50% of
capital stock of another corporation, then it is also a
parent.
SingleLocation
The establishment does not report to a headquarters.
ConfidenceCode A two-digit code used to group similar quality matches. Many MatchGrades
relate to one ConfidenceCode.
BestMatchFlag
Indicates which record is the best match for the input based on the match grade
and confidence code.
MatchGradeString Six or eleven letters that indicate how alike or different the elements are,
compared to your data. Each element is given one of the following values:
• A: The element returned is the same as the input.
• B: The element returned is similar to the input.
• F: The element returned is different than the input. It is important to note that
while F does represent difference in the input data to the reference data, upon
visual review it could be determined to be a "good" match even though an F
was assigned.
• Z: The element was missing from the input.
Each position in the match grade string represents a field in the record, as
follows:
•
•
•
•
Data Quality Guide
Position 1: Company name
Position 2: Building number
Position 3: Street name
Position 4: City name
209
Business Steward Module
• Position 5: In the U.S., this is the state. In Canada, this is the province. In
Japan, this is the prefecture, in other countries, this is the country.
• Position 6: The P.O. box.
• Position 7: The telephone number.
1
• Position 8: The postal code.
1
• Position 9: Business density.
• Position 10: Uniqueness, which indicates the number of similar company
names in the same state (U.S.), province (Canada) or country (other
1
countries).
• Position 11: The industry that the company is in, as determined by the
1
Standard Industrial Classification (SIC).
MDPProfile
A code that describes how well the business you searched for matched to a
known business. For more information, see MDP Profile on page 210.
Status
A numeric code that represents the result of the query. One of the following:
•
•
•
•
•
•
•
•
•
•
•
Null: If the Status field is empty, the call was successful.
0: Error. Call failed.
7: No candidates - no match was found.
8: Invalid partner ID.
9: Invalid and/or missing customer ID.
10: Contract has expired.
11: Exceeded maximum number of transactions.
12: Trial has expired.
13: Invalid country code.
14: Missing account ID.
15: A data restriction is in force.
StatusDescription A verbose description of the result of the lookup.
MDP Profile
The MDP Profile is a 28-character code. The first 14 numbers describe how well the business you
searched for matched to a known business. The final 14 numbers currently have no meaning but may
be used in a future release.
Table 22: MDP Profile - Digits 1-2 (Name)
1
210
Code
Description
00-xx-xx-xx-xx-xx-xx
Matched to the primary business name.
01-xx-xx-xx-xx-xx-xx
Matched to the registered business name.
02-xx-xx-xx-xx-xx-xx
Matched to a tradestyle, a secondary name, or additional name used
by the business. A tradestyle is a name by which the business is known
other than the formal, official name of the business. For example, D&B
is a tradestyle of Dun & Bradstreet.
03-xx-xx-xx-xx-xx-xx
Matched to the CEO name or other primary contact.
04-xx-xx-xx-xx-xx-xx
Matched to an additional executive name.
05-xx-xx-xx-xx-xx-xx
Matched to the former business name.
This field is only available in the Canada, U.S., U.K., Benelux countries, Spain, Portugal, Andorra, Italy,
and San Marino.
Spectrum™ Technology Platform 9.0 SP2
Chapter 8: Stages Reference
Code
Description
06-xx-xx-xx-xx-xx-xx
Matched to the former tradestyle name, which is an additional name
used by the business other than the formal, official name of the business.
For example D&B is a tradestyle of Dun & Bradstreet.
07-xx-xx-xx-xx-xx-xx
Matched to the former CEO name or other primary contact.
08-xx-xx-xx-xx-xx-xx
Matched to a former executive name.
09-xx-xx-xx-xx-xx-xx
Matched to a short name or abbreviated name for the business
10-xx-xx-xx-xx-xx-xx
Matched to a registered acronym, which is a word made from the first
letters of syllables of other words, e.g. NATO is an acronym of North
Atlantic Treaty Organization. An acronym is usually pronounced as a
word in its own right, as distinct from initialisms, which are pronounced
as separate letters, e.g., BBC, CIA, FBI. Initialisms are tradestyles.
11-xx-xx-xx-xx-xx-xx
Matched to a brand name, which is the name of a particular brand or
product which is owned by the subject. Examples might include: Coke,
Snickers, and Big Mac.
12-xx-xx-xx-xx-xx-xx
Matched to the search name, which is manually entered by operators
to facilitate the finding of the company. Sometimes it could be the
previous name, other times it is just an acronym, part of name, or an
abbreviation of a name or extended name
13-xx-xx-xx-xx-xx-xx
Matched to a trademark name, which is a name, word, or symbol,
especially (in full registered trademark) one that is officially registered
and protected by law, used to represent a company or individual or
product. Trademarks often include the symbol ®, signifying that the mark
has been registered. Trademarks tend to include precise formatting like
the Coke or Ford logos, or the hyphenated D-U-N-S Number trademark.
14-xx-xx-xx-xx-xx-xx
Matched to marketing name, which is a name assigned to the business
for marketing purposes. Usually this name is not officially used by the
business.
15-xx-xx-xx-xx-xx-xx
Matched to "known by" name, which is any other name by which the
entity is known, which cannot be categorized by one of the other name
types either because the name category is not covered by an existing
type, or because the precise name type cannot be identified.
16-xx-xx-xx-xx-xx-xx
Matched to stock exchange ticker name.
17-xx-xx-xx-xx-xx-xx
Matched to headquarters name.
18-xx-xx-xx-xx-xx-xx
Matched to registered tradestyle name, which is the name which the
business uses and by which it is known other than the formal, official
name of the business. For example, D&B is a tradestyle of Dun &
Bradstreet. This would not include names by which a business may be
generally known but which the business itself does not use or promote.
This code is only used for tradestyles which have been registered.
19-xx-xx-xx-xx-xx-xx
Matched to the alternative language name, which is any of the names
of the entity in a language other than the primary language of the entity.
The primary language of the business is decided by the local country
and is used in countries that have multiple languages.
Data Quality Guide
211
Business Steward Module
212
Code
Description
20-xx-xx-xx-xx-xx-xx
The inquiry national ID number matched completely to the candidate
national ID number. The national ID number is a business identification
number used in some countries for business registration and tax
collection. Examples include CRO numbers in the U.K. and the French
Siren numbers.
21-xx-xx-xx-xx-xx-xx
The inquiry national ID number matched only in part to the candidate
national ID number. The national ID number is a business identification
number used in some countries for business registration and tax
collection. Examples include CRO numbers in the U.K. and the French
Siren numbers.
30-xx-xx-xx-xx-xx-xx
Matched to the primary business name, but the legal designator
(business type) of the candidate does not match the inquiry business
type.
31-xx-xx-xx-xx-xx-xx
Matched to the registered business name, but the legal designator
(business type) of the candidate does not match the inquiry business
type.
32-xx-xx-xx-xx-xx-xx
Matched to the current tradestyle, secondary or additional name used
by the business, but the legal designator (business type) of the candidate
does not match the inquiry business type. A tradestyle is the name which
the business uses and by which it is known other than the formal, official
name of the business. For example D&B is a tradestyle of Dun &
Bradstreet.
33-xx-xx-xx-xx-xx-xx
Matched to the former business name, but the legal designator (business
type) of the candidate does not match the inquiry business type.
34-xx-xx-xx-xx-xx-xx
Matched to the former tradestyle name, but the legal designator
(business type) of the candidate does not match the inquiry business
type. A tradestyle is the name which the business uses and by which it
is known other than the formal, official name of the business. For
example D&B is a tradestyle of Dun & Bradstreet.
35-xx-xx-xx-xx-xx-xx
Matched to a short name or abbreviated name for the business, but the
legal designator (business type) of the candidate does not match the
inquiry business type.
36-xx-xx-xx-xx-xx-xx
Matched to a registered acronym, but the legal designator (business
type) of the candidate does not match the inquiry business type. An
acronym is a word made from the first letters of syllables of other words,
e.g., NATO is an acronym of North Atlantic Treaty Organization. An
acronym is usually pronounced as a word in its own right, as distinct
from initialisms, which are pronounced as separate letters, e.g. BBC,
CIA, FBI. Initialisms are tradestyles.
37-xx-xx-xx-xx-xx-xx
Matched to a brand name, but the legal designator (business type) of
the candidate does not match the inquiry business type. A brand name
is the name of a particular brand or product which is owned by the
subject. Examples might include: Coke, Snickers, and Big Mac.
38-xx-xx-xx-xx-xx-xx
Matched to the Search Name, but the legal designator (business type)
of the candidate does not match the inquiry business type. A Search
Name is manually entered by operators to facilitate the finding of the
company. Sometimes it could be the previous name, other times it is
Spectrum™ Technology Platform 9.0 SP2
Chapter 8: Stages Reference
Code
Description
just an acronym, part of name, or an abbreviation of name or extended
name.
39-xx-xx-xx-xx-xx-xx
Matched to a trademark name, but the legal designator (business type)
of the candidate does not match the inquiry business type. A trademark
name is a name, word, or symbol, especially (in full registered trademark)
one that is officially registered and protected by law, used to represent
a company or individual or product. Trademarks often include the symbol
®, signifying that the mark has been registered. Trademarks tend to
include precise formatting like the Coke or Ford logos, or the hyphenated
D-U-N-S number trademark.
40-xx-xx-xx-xx-xx-xx
Matched to marketing name, but the legal designator (business type)
of the candidate does not match the inquiry business type. The marketing
name is a name assigned to the business for marketing purposes.
Usually this name is not officially used by the business.
41-xx-xx-xx-xx-xx-xx
Matched to "known by" name, but the legal designator (business type)
of the candidate does not match the inquiry business type. The "known
by" name is any other name by which the subject is known which cannot
be categorized by one of the other name types, either because the name
category is not covered by an existing type, or because the precise
name type cannot be identified.
42-xx-xx-xx-xx-xx-xx
Matched to headquarters name, but the legal designator (business type)
of the candidate does not match the inquiry business type.
43-xx-xx-xx-xx-xx-xx
Matched to registered tradestyle name, but the legal designator
(business type) of the candidate does not match the inquiry business
type. A registered tradestyle name is the name which the business uses
and by which it is known other than the formal, official name of the
business. For example D&B is a tradestyle of Dun & Bradstreet. This
would not include names by which a business may be generally known
but which the business itself does not use or promote. This code is only
used for tradestyles which have been registered.
44-xx-xx-xx-xx-xx-xx
Matched to the alternative language name, but the legal designator
(business type) of the candidate does not match the inquiry business
type. The alternative language name is any of the names of the entity
in a language other than the entity's primary language, but the legal
designator (business type) of the candidate does not match the inquiry
business type. The primary language of the business is decided by the
local country and is used in countries that have multiple languages.
97-xx-xx-xx-xx-xx-xx
There is no designation for type of name matched. This is applicable
only for the business name component.
Table 23: MDP Profile - Digits 3 to 10 (Physical Address)
Code
Description
xx-00-00-00-00-xx-xx
Matched to current physical address.
xx-01-01-01-01-xx-xx
Matched to registered address, which is based on European public
registry sources that carry only a registered address.
Data Quality Guide
213
Business Steward Module
Code
Description
xx-02-02-02-02-xx-xx
Matched to a former physical address.
xx-03-03-03-03-xx-xx
Matched to an additional address.
Table 24: MDP Profile - Digits 11 to 12 (Mail Address)
Code
Description
xx-xx-xx-xx-xx-00-xx
Matched to the current mail address (PO Box).
xx-xx-xx-xx-xx-02-xx
Matched to a former mail address (PO Box).
xx-xx-xx-xx-xx-03-xx
Matched to an additional mail address (PO Box).
Table 25: MDP Profile - Digits 13 to 14 (Phone)
Code
Description
xx-xx-xx-xx-xx-xx-00
Matched to the current phone number.
xx-xx-xx-xx-xx-xx-02
Matched to a former phone number.
Table 26: MDP Profile - Other Codes
98-98-98-98-98-98-98
Identifies when the matched record lacked a particular element. This is
applicable for all components.
99-99-99-99-99-99-99
Identifies when the inquiry record lacked a particular element. This is
applicable for all components.
-96-96-96-96-96-
Identifies when the inquiry record provided an address element which
could not be verified or standardized. This is applicable for the following
inquiry components: Street Number, Street Name, PO box, City, State
and ZIP Code
Using Experian Truvue
If you know the name and address of an individual you can look up that person's last three addresses
using the Experian Truvue search tool.
1. In the Business Steward Portal, click the record for the individual you want to look up.
2. Below the records table, click the Search Tools tab:
214
Spectrum™ Technology Platform 9.0 SP2
Chapter 8: Stages Reference
3. In the Tools field, select Experian Truvue.
4. If the record contains fields named FirstName, LastName, MiddleName, AddressLine, City,
StateProvince, PostalCode, PhoneNumber, and DateOfBirth, the values for these fields are
automatically used for the search. If these fields do not exist, double-click the cell in the Input Source
column and select the field in your data that contains this information.
Note: To perform a search you must have at least a name, address, and either a city and state or
a postal code.
The phone number can consist of seven or ten digits and may contain hyphens, parentheses or
periods.
The date of birth must be in the format MMDDYYYY. For example, 07041976 means July 4, 1976.
5. Click Search.
The lookup tool provides the following information:
Name Fields
Description
FirstName
The first name of the individual. If multiple first names are listed, then there
are alternative first names used by the individual. For example, if the first name
is Matthew, a variant first name might be Matt.
MiddleName
The individual's middle name or initial. If there are multiple middle names,
there are variant middle names, such as both a middle initial and a full middle
name.
Data Quality Guide
215
Business Steward Module
Name Fields
Description
LastName
The surname of the individual. If there are multiple last names, then the
individual has variant last names, such as a maiden name.
Address Fields
Description
IsCurrent
Indicates if the address is the person's current address or a previous
address. One of the following:
Y
Yes, the address is the current address.
N
No, the address is not the current address. It is a previous
address.
HouseNumber
The house or building number. For example, House number, for example:
123 E Main St.
LeadingDirectional
Street directional that precedes the street name. For example, N State
St.
StreetName
The name of the street, excluding directionals and suffixes. For example,
if the address is on N State St., the street name is State.
StreetSuffix
The street type. For example, Ave., St., or Blvd.
TrailingDirectional
A directional that appears after the street. For example, First St. NW.
ApartmentLabel
For buildings that contain multiple addresses, such as apartment
buildings, the type of unit, such as Apt. or Ste.
ApartmentNumber
For buildings that contain multiple address, such as apartment buildings,
the unit number.
City
The name of the municipality in which the address is located.
StateProvince
The postal abbreviation for the state or province in which the address is
located.
PostalCode
The postal code for the address, such as a ZIP Code for U.S. addresses.
Additional Fields
Description
AuthenticationCode
This code represents if a consumer with a Truvue ID has been
reported by one or more reliable Experian data sources The possible
authentication codes are:
NameVerification
NameVerificationDescription
216
Y
Authenticated
N
Not authenticated
Describes how well the input name matched the data in Truvue.
Possible codes are:
N1
Input name is an exact match to the Truvue best name
N2
Input name is a similar match to the Truvue best name
N4
Input name is an exact match to a Truvue name
variation.
N7
Input name does not match to the Truvue best or
variation names
A description of the NameVerification code. See NameVerification
above.
Spectrum™ Technology Platform 9.0 SP2
Chapter 8: Stages Reference
Additional Fields
Description
DateOfBirth
The date of birth as entered in your search, in the format
MMDDYYYY. For example, 07041976 means July 4, 1976.
DOBVerification
Indicates how well the date of birth you entered in your search
matches the Truvue date of birth. One of the following:
B1
Input date of birth is an exact match to Truvue date of
birth.
B2
Input date of birth is a similar match to Truvue date of
birth.
B7
Input date of birth does not match to the Truvue date
of birth.
B8
Date of birth is not available.
DOBVerificationDescription
A description of the code in the DOBVerification field.
AddressVerification
Describes how well the input address matched the data in Truvue.
Possible codes are:
C1
Input current address is an exact match to the Truvue
best address
C2
Input current address is a similar match to Truvue best
address
C4
Input current address is an exact match to a Truvue
historical address
C7
Input current address does not match to the Truvue
best or historical address
AddressVerificationDescription A description of the AddressVerification code. See the descriptions
above under AddressVerification.
PhoneNumber
The individual's current phone number.
PhoneVerification
Descrbes how well the input phone number matched the data in
Truvue. Possible codes are:
Data Quality Guide
T1
Input telephone number is an exact match to the Truvue
best telephone number
T2
Input telephone number is a similar match to the Truvue
best telephone number
T3
Input telephone number is a variation match to the
Truvue best telephone number
T4
Input telephone number is an exact match to a Truvue
historical telephone number
T5
Input telephone number is a similar match to a Truvue
historical telephone number
T6
Input telephone number is a variation match to a Truvue
historical telephone number
T7
Input telephone does not match to the Truvue best or
historical telephone number
T8
Telephone number not available on the Truvue ID
217
Business Steward Module
Additional Fields
Description
TE
Input telephone number is invalid and does not qualify
for verification
PhoneVerificationDescription A description of the code in the PhoneVerification field. See
PhoneVerification above.
ARFVersion
The version of the Experian Automated Response Format (ARF)
used by the search tool. For example, "08" means ARF version 8.
Preamble
A code that represents the general location of the input address.
ReportDate
The date the Truvue response was delivered, in the format is
MMDDYYYY. For example, 07102011 is July 10, 2011. The date
reflects the current date in the Central time zone in the U.S.
ReportTime
The time the Truvue reported was delivered, in the format HHMMSS.
For example, 022345 is 2:23:54 AM; 16:30:10 is 4:30:10 PM. The
time reflects the current time in the Central time zone in the U.S.
ErrorCode
If there was a problem with the search, a code that describes the
error.
ErrorDescription
If there was an problem with the search, a brief description of the
error.
Using Interactive Address Search
The Interactive Address Search tool allows you to find an address by entering a partial address. When
you enter part of an address, such as a city and street name, the search tool finds addresses that could
be the one you are looking for. For example, the following shows an address without a postal code. The
Interactive Address Search tool finds addresses that are similar:
1. In the Business Steward Portal, click the record for the individual you want to look up.
2. Below the records table, click the Search Tools tab:
218
Spectrum™ Technology Platform 9.0 SP2
Chapter 8: Stages Reference
3. In the Tool field, select Interactive Address Search.
4. If the record contains fields named AddressLine1, City, StateProvince, PostalCode, and Country,
the values for these fields are automatically used for the search. If these fields do not exist, double-click
the cell in the Input Source column and select the field in your data that contains this information.
Note: To perform a search you must enter the country.
5. Click Search.
The lookup tool provides the following information:
AddressLine1
The first line of the address, typically containing the building number and
street name.
City
The official city name.
SateProvince
The postal abbreviation for the state or province.
PostalCode
The postal code for the address. In the U.S., this is the ZIP Code.
Country
The name of the country.
Confidence
The level of confidence assigned to the address being returned. Range
is from zero (0) to 100; zero indicates failure, 100 indicates a very high
level of confidence that the match results are correct.
Data Quality Guide
219
Business Steward Module
Status
StatusDescription
Indicates the success or failure of the match. One of the following:
null
Success
F
Failure
A description of any errors that occurred.
Looking Up Phone Numbers
You can find the phone number for an address using the phone lookup tool in the Business Steward
Portal. The phone lookup tool works for residential and commercial addresses.
1. In the Business Steward Portal, click the record for which you want to find a phone number.
2. Below the records table, click the Search Tools tab:
3. In the Tools field, select Phone lookup.
4. If the record contains fields named AddressLine1, City, StateProvince, and PostalCode, the values
for these fields are automatically used for the search. If these fields do not exist, double-click the cell
in the Input Source column and select the field that contains this data.
5. Click Search.
The lookup tool provides the following information:
220
Spectrum™ Technology Platform 9.0 SP2
Chapter 8: Stages Reference
PhoneNumber The phone number for the address, without any puncuation. For example,
3019180955.
PhoneType
A numeric code that indicates the type of phone service associated with the phone
number. The phone types are:
•
•
•
•
•
•
•
•
•
•
•
•
•
•
•
•
•
•
•
•
•
•
•
•
•
•
•
•
•
•
•
•
•
•
•
•
•
•
0 POTS (Plain Old Telephone Service)
1 Mobile (Improved Mobile Telephone Service - IMTS)
2 Fully Dedicated Paging
3 Packet Switching
4 Fully Dedicated Cellular
5 Test Code
6 Maritime
7 Air to Ground
8 800 Service
9 900 Service
10 Called Party Pays
11 Information Provider Services
13 Directory Assistance
14 Special Calling Cards
15 Official Exchange Carrier Service
16 Originating Only
17 Billing Only
18 800 Data Base
30 Broadband
50 Shared between 3 or more (POTS, Cellular, Paging, Mobile)
51 Shared between POTS and Mobile
52 Shared between POTS and Paging
54 Shared between POTS and Cellular
55 Special Billing Option - Cellular
56 Special Billing Option - Paging
57 Special Billing Option Mobile
58 Special Billing Option shared between 2 or more - (Cellular, Paging, Mobile)
60 Service Provider Request SELECTIVE Local Exchange Company IntraLATA
Special Billing Option -Cellular
61 Service Provider Request SELECTIVE Local Exchange Company IntraLATA
Special Billing Option -Paging
62 Service Provider Request SELECTIVE Local Exchange Company IntraLATA
Special Billing Option -Mobile
63 Combination of 60, 61, 62
64 Personal Communication Services
65 Misc. Service (non-500, PCS, etc.)
66 Shared between POTS and Misc. Service
67 Special Billing Option - PCS / Misc. Service
68 Service Provider Request SELECTIVE Local Exchange Company IntraLATA
Special Billing Option -PCS/Misc.
88 Toll Station - Ring Down
99 Undetermined type
PhoneStatus Indicates the status of the service provided to the phone number. One of the
following:
•
•
•
•
Data Quality Guide
Connected
Delisted
Published
Unknown
221
Business Steward Module
Finding the Address of a Phone Number
You can find the address for a given phone number using the Reverse Phone Lookup tool in the Business
Steward Portal. This tool can be used to find the address of individuals and businesses.
1. In the Business Steward Portal, click the record you want to research.
2. Below the records table, click the Search Tools tab:
3. In the Tools field, select Reverse phone lookup.
4. If no field is selected in the InputSource column, select the field that contains the phone number.
5. Click Search.
Manage Exceptions
The Business Steward Portal Manage Exceptions page enables a user with administrative rights to
review and manage exception record activity for all assignees. It also provides the ability to reassign
exception records from one user to another. In addition, you can delete exception records from the
system based on dataflow name and job ID.
Reviewing Exception Record Activity
The Status section of the Manage Exceptions page shows exception record activity by assignee. It
provides the number of exception records assigned to each user as well as how many of those records
have been approved.
The default view is to show activity for all assignees. You can sort in ascending or descending order by
clicking the Assignee column. Alternatively, you can view the activity for one assignee at a time by typing
that user's name in the Filter row. The list will dynamically auto-populate with users whose names match
the letters you type.
Assigning Exception Records
The Assignment section of the Manage Exceptions page enables you to reassign exception records
from one user to another.
222
Spectrum™ Technology Platform 9.0 SP2
Chapter 8: Stages Reference
1. Make a selection in the User field.
2. To reassign all exception records belonging to a user, skip to Step 4. To reassign a portion of a user's
exception records, complete one or more of these fields:
•
•
•
•
•
•
•
•
Data domain—The kind of data assigned in the Exception Monitor.
Quality metrics—The kind of metric assigned in the Exception Monitor.
Dataflow name—The name of the dataflow producing the exception records.
Job ID—The ID assigned to the job containing the exception records.
Stage label—The name of the stage producing the exception records.
Approval status—Whether or not the exception records have been approved.
From date—The start date in a range of dates in which the exception records were created.
To date—The end date in a range of dates in which the exception records were created.
3. After making selections in the User and Dataflow name fields (at minimum), you can further refine
the filter.
a) Click the add field filter icon:
b) In the Field Name column, select the field you want to filter on.
c) In the Operation column, select one of the following:
is equal to
Looks for records that have exactly the value you specify. This can be a
numeric value or a text value. For example, you can search for records
with a MatchScore value of exactly 82, or records with a LastName value
of "Smith".
is not equal to
Looks for records that have any value other than the one you specify. This
can be a numeric value or a text value. For example, you can search for
records with any MatchScore value except 100, or records with any
LastName except "Smith".
is greater than
Looks for records that have a numeric value that is greater than the value
you specify.
is greater than or
equal to
Looks for records that have a numeric value that is greater than or equal
to the value you specify. For example, if you specify 50, you would see
records with a value of 50 or greater in the selected field.
is less than
Looks for records that have a numeric value that is less than the value you
specify.
is less than or
equal to
Looks for records that have a numeric value that is less than or equal to
the value you specify. For example, if you specify 50, you would see records
with a value of 50 or less in the selected field.
contains
Looks for records that contain the value you specify in any position within
the selected field. For example, if you filter for "South" in the AddressLine1
field, you would see records with "12 South Ave.", "9889 Southport St.",
"600 South Shore Dr.", and "4089 5th St. South".
starts with
Looks for records that start with a particular value in the selected field. For
example, if you filter for "Van" in the LastName field you would see records
with "Van Buren", Vandenburg", or "Van Dyck".
ends with
Looks for records that end with a particular value in the selected field. For
example, if you filter for records that end with "burg" in the City field, you
would see records with "Gettysburg", "Fredricksburg", and "Blacksburg".
d) In the Field Value column, enter the value to use as the filtering criteria.
Data Quality Guide
223
Business Steward Module
Note: The search value is case-sensitive. This means that searching for SMITH will return only
records with "SMITH" in all upper case, but not "smith" or "Smith".
e) To filter on more than one field, add multiple filters by clicking the add field filter icon:
. For
example, if you want all records with a LastName value of "SMITH" and a State value of "NY"
you could use two filters, one for the LastName field and one for the State field.
This example would return all records with a value of "FL" in the StateProvince field:
This example would return all records that do not have a PostalCode value of 60510:
This example would return all records with a StateProvince of "NY" with all postal codes except
14226.
4. Click Reassign.
5. Select another user in the Reassign dropdown.
6. Click Confirm.
Deleting Exception Records
The Maintenance section of the Manage Exceptions page enables you to delete exception records from
the system. You must make selections from both the Dataflow name and Job ID fields before clicking
Remove. However, you can select "All" from the Job ID field to remove exception records from every
job run by the selected dataflow.
Data Quality Performance
The Business Steward Portal Performance page provides information on trends within your exception
records. It also enables you to identify key performance indicators (KPI) and send notifications when
certain conditions have been met.
Identifying Trends
The Trends section of the Data Quality Performance page depicts the following statistical information
about your dataflows:
• Total number of records processed
• Total number of exception records
• Percentage of records that were processed successfully
224
Spectrum™ Technology Platform 9.0 SP2
Chapter 8: Stages Reference
• Percentage of successful records and exception records
• The trend of your data in 30-day intervals
This information can be broken down by dataflow name or stage label within a dataflow. You can sort
metrics and domains on any of the columns. The values that appear here are determined by the settings
you selected in the Exceptions Monitor stage of your dataflows.
1. Select a Dataflow name if you want to view information for a specific dataflow. Otherwise, you will
see data for all dataflows.
2. Select a Stage label if you want to see the data domains that apply to that metric. Note that you
must select a single dataflow if you want to also filter the results based on a stage.
3. Select a duration for the Scale to specify how far back you want the data to go. The default is 1
month, but you can also select from 1 week, 3 months, 6 months, or 1 year. The month scales work
in 30-day increments, regardless of how many days are in a particular month. For example, if today
were June 1st, and you wanted to look at data from May 1st, you would need to select the 3 month
duration because the 1 month duration would take you to May 2nd (since that is 30 days prior to
June 1st).
4. Expand the appropriate data quality metric if you want to filter results by data domain. The image
below shows an expanded Accuracy metric. If you click anywhere within the metrics or domains, the
chart on the right side of the screen will update dynamically to graphically display that data as well.
Configuring Key Performance Indicators
The KPI Configuation section of the Data Quality Performance page enables you to designate key
performance indicators (KPIs) for your data and assign notifications for when those KPIs meet certain
conditions.
1. Click Add KPI.
2. Enter a Name for the key performance indicator. This name must be unique on your Spectrum™
Technology Platform server.
3. Select a data quality Metric for the key performance indicator; if you do not make a selection, this
key performance indicator will be tied to all metrics.
Data Quality Guide
225
Data Normalization Module
4. Select a Dataflow name for the key performance indicator; if you do not make a selection, this key
performance indicator will be tied to all Business Steward Module dataflows.
5. Select a Stage label for the key performance indicator; if you do not make a selection, this key
performance indicator will be tied to all Business Steward Module stages in your dataflows.
6. Select a data Domain for the key performance indicator; if you do not make a selection, this key
performance indicator will be tied to all domains. Note that selecting a Domain here will cause the
Condition field to be disabled.
7. Select a Condition for the key performance indicator. If you do not make a selection, this key
performance indicator will default to "All". Note that to select a condition, you must first have selected
"All" in the Domain field. Once a Condition has been selected, the Domain field will become disabled.
8. Select a KPI period to designate the intervals for which you want the Business Steward Module to
monitor your data and send notifications. For example, if you select "1" and "Monthly", a KPI notification
will be sent when the percentage of exceptions has increased per the threshold or variance over a
month-to-month period of time.
9. Provide a percentage for either a Threshold or a Variance. Threshold values represent the percentage
of failures at which you want the notifications to be sent. Its value must be 1 or greater. Variance
values represent the increased percentage of failures in exception records since the last time period.
10. Enter the email addresses for the Recipients who should be notified when these conditions are met.
When possible, this field will auto-complete as you enter email addresses. You do not need to separate
addresses with commas, semicolons, or any other punctuation.
11. Enter the Subject you want the notification email to use.
12. Enter the Message you want the notification to relay when these conditions are met.
13. Click OK. The new KPI will appear among any other existing KPIs. You can sort KPIs on any of the
columns containing data.
You can modify and remove KPIs by selecting a KPI and clicking either Modify... or Remove.
Data Normalization Module
Data Normalization Module
The Data Normalization Module examines terms in a record and determines if the term is in the preferred
form.
• Advanced Transformer—This stage scans and splits strings of data into multiple fields, placing the
extracted and non extracted data into an existing filed or a new field.
• Open Parser—This stage parses your input data from many cultures of the world using a simple, but
powerful parsing grammar. Using this grammar, you can define a sequence of expressions that
represent domain patterns for parsing your input data. Open Parser also collects statistical data and
scores the parsing matches to help you determine the effectiveness of your parsing grammars.
• Table Lookup—This stage evaluates a term and compares it to a previously validated form of that
term. If the term is not in the proper form, then the standard version replaces the term. Table Lookup
includes changing full words to abbreviations, changing abbreviations to full words, changing nick
names to full names or misspellings to corrected spellings.
• Transliterator—Transliterator converts a string between Latin and other scripts.
226
Spectrum™ Technology Platform 9.0 SP2
Chapter 8: Stages Reference
Advanced Transformer
The Advanced Transformer stage scans and splits strings of data into multiple fields using tables or
regular expressions. It extracts a specific term or a specified number of words to the right or left of a
term. Extracted and non-extracted data can be placed into an existing field or a new field.
For example, want to extract the suite information from this address field and place it in a separate field.
2300 BIRCH RD STE 100
To accomplish this, you could create an Advanced Transformer that extracts the term STE and all words
to the right of the term STE, leaving the field as:
2300 BIRCH RD
Input
Advanced Transformer uses any defined input field in the data flow.
Options
To specify the options for Advanced Transformer you create a rule. You can create multiple rules then
specify the order in which you want to apply the rules. To create a rule:
1. Double-click on the instance of Advanced Transformer on the canvas. The Advanced Transformer
Options dialog displays.
2. Select the number of runtime instances. Use the Runtime Instances option to configure a dataflow
to run multiple, parallel instances of a stage to potentially increase performance.
3. Click the Add button. The Advanced Transformer Rule Options dialog displays.
Note: If you add multiple transformer rules, you can use the Move Up and Move Down buttons to
change the order in which the rules are applied.
4. Select the type of transform action you wish to perform. The options are listed in Table 27: Advanced
Transformer Options on page 227.
5. Click OK.
Table 27: Advanced Transformer Options
Option
Description
Source
Specifies the source input field to evaluate for scan and split.
Extract using
Select Table Data or Regular Expressions.
Select Table Data if you want to scan and split using the XML tables
located in <Drive>:\Program Files\Pitney
Bowes\Spectrum\server\modules\advancedtransformer\data. See
Table Data Options below for more information about each option.
Select Regular Expressions if you want to scan and split using regular
expressions. Regular expressions provide many additional options for
splitting data. You can use the pre-packaged regular expressions by
selecting one from the list or you can construct your own using RegEx
syntax.
For example, you could split data when the first numeric value is found,
as in "John Smith 123 Main St." where "John Smith" would go in one
field an "123 Main St." would go in another. See Regular Expression
options below for more information about each option.
Data Quality Guide
227
Data Normalization Module
Option
Description
Table Data Options
Non-extracted Data
Specifies the output field that you want to contain the transformed data.
If you want to replace the original value specify the same field in the
Destination field as you did in the Source drop-down box.
You may also type in a new field name in the Destination field. If you
type in a new field name, that field name will be available in stages in
your dataflow that are downstream of Advanced Transformer.
Extracted Data
Specifies the output field where you want to put the extracted data.
You may type in a new field name in the Extracted Data field. If you type
in a new field name, that field name will be available in stages in your
dataflow that are downstream of Advanced Transformer.
Tokenization Characters
Specifies any special characters that you want to tokenize. Tokenization
is the process of separating terms. For example, if you have a field with
the data "Smith, John" you would want to tokenize the comma. This
would result in terms:
• Smith
• ,
• John
Now that the terms are separated, the data can be split by scanning
and extracting on the comma so that "Smith" and "John" are cleanly
identified as the data to standardize.
Table
Specifies the table that contains the terms on which to base the splitting
of the field. For a list of tables, see Advanced Transformer Tables on
page 136. For information about creating or modifying tables, see
Introduction to Lookup Tables on page 136.
Lookup multiple word terms
Select this check box to enable multiple word searches within a given
string. For example:
Input String = "Cedar Rapids 52401" Business Rule = Identify "Cedar
Rapids" in string based on a table that contains the entry; Cedar Rapids
= US Output = Identifies presence of "Cedar Rapids" and places the
terms into a new field, for example City.
For multiple word searches, the search stops at the first occurrence of
a match.
Note: Selecting this option may adversely affect performance.
Extract
Specifies the type of extraction to perform. One of the following:
Extract term
Extracts the term identified by the selected
table.
Extract N words to Extracts words to the right of the term. You
the right of the term specify the number of words to extract. For
example, if you want to extract the two words
to the right of the identified term, specify 2.
Extract N words to
the left of the term
228
Extracts words to the left of the term. You
specify the number of words to extract. For
Spectrum™ Technology Platform 9.0 SP2
Chapter 8: Stages Reference
Option
Description
example, if you want to extract the two words
to the left of the identified term, specify 2.
If you choose to extract words to the right or left of the term, you can
specify if you want to include the term itself in the destination data or
the extracted data. For example, if you have this field:
2300 BIRCH RD STE 100
and you want to extract "STE 100" and place it in the field specified in
extracted data, you would choose to include the term in the extracted
data field, thus including the abbreviation "STE" and the word "100".
If you select neither Destination nor Extracted data, the term will not be
included and is discarded.
Regular Expressions Options
Regular ExpressionsSelect a Select a pre-packaged regular expressions from the list or construct
match results in the Match
your own in the text box. Advanced Transformer supports standard
Results List and then click
RegEx syntax.
Remove.
The Java 2 Platform contains a package called java.util.regex, enabling
the use of regular expressions. For more information, go to:
java.sun.com/docs/books/tutorial/essential/regex/index.html.
Ellipsis Button
Click this button to add or remove a new regular expression.
Populate GroupSelect a
match results in the Match
Results List and then click
Remove.
After you have selected a predefined or typed a new Regex expression,
click Populate Group to extract any Regex groups and place the
complete expression, as well as any Regex groups found, into the
Groups list.
Groups
This column shows the regular expressions for the selected Regular
Expressions group.
For example, if you select the Date Regex expression, the following
expression displays in the text box:
(1[012]{1,2}|0?[1-9])[-/.]([12][0-9]|3[01]{1,2}|0?[1-9])[-/.](([0-9]{4})). This
Regex expression has three parts to it and the whole expression and
each of the parts can be sent to a different output field. The entire
expression is looked for in the source field and if a match is found in the
source field, then the associated parts are moved to the assigned output
field. If the source field is "On 12/14/2006" and you apply the Date
expression to it, and assign the entire date (i.e. "12/14/2006) to be placed
in the DATE field, the "12" to be placed in MONTH field, the "14" to be
placed in the DAY field and "2006" to be placed in YEAR field. It will
look for the date and if it finds it will move the appropriate information
to the appropriate output field.
Source Field: "On 12/14/2006" DATE: "12/14/2006" MONTH: "12" DAY:
"14" YEAR: "2006"
Output Field
Pull-down menu to select an output field.
Output
Advanced Transformer does not create any new output fields. Only the fields you define are written to
the output.
Data Quality Guide
229
Data Normalization Module
Open Parser
Open Parser parses your input data from many cultures of the world using a simple but powerful parsing
grammar. Using this grammar, you can define a sequence of expressions that represent domain patterns
for parsing your input data. Open Parser also collects statistical data and scores the parsing matches
to help you determine the effectiveness of your parsing grammars.
Use Open Parser to:
• Parse input data using domain-specific and culture-specific parsing grammars that you define in Domain
Editor.
• Parse input data using domain-independent parsing grammars that you define in Open Parser using
the same simple but powerful parsing grammar available in Domain Editor.
• Preview parsing grammars to test how sample input data parses before running the job using the
target input data file.
• Trace parsing grammar results to view how tokens matched or did not match the expressions you
defined and to better understand the matching process.
Input
Open Parser accepts the input field that you define in your parser grammar. For more information, see
InputField Command on page 23.
If you are performing culture-specific parsing, you can optionally include a CultureCode field in the input
data to use a specific culture's parsing grammar for a record. If you omit the CultureCode field, or if it is
empty, then each culture listed in the Open Parser stage is applied, in the order specified. The result
from the culture with the highest parser score, or the first culture to have a score of 100, is returned. For
more information about the CultureCode field, see Assigning a Parsing Culture to a Record on page
13.
Options
The following tables list the options for the Open Parser stage.
Rules Tab
Option
Description
Use culture-specific domain
grammar
Specifies to use a language and domain specific parsing grammar which
has already been defined in the Open Parser Domain Editor tool in
Enterprise Designer. For more information about defining domains, see
Defining a Culture-Specific Parsing Grammar on page 12.
If you choose this option you will also see these options:
230
Domain
Specifies the parsing grammar to use.
Cultures
Specifies the language or culture of the data you want
to parse. Click the Add button to add a culture. You can
change the order in which Open Parser attempts to parse
the data with each culture by using the Move Up and
Move Down buttons. For more information about
cultures, see Defining a Culture-Specific Parsing
Grammar on page 12.
Return
multiple
Enable this option to have Open Parser return records
for each culture that successfully parses the input. If you
do not check this box, Open Parser will return the results
Spectrum™ Technology Platform 9.0 SP2
Chapter 8: Stages Reference
Option
Description
parsed
records
Define domain-independent
grammar
for the first record that achieves a parser score of 100,
regardless of culture. If all cultures run without hitting a
record that has parser score of 100, Open Parser will
return the record with the score closest to 100. If multiple
cultures return records with the same high score under
100, the order set in Step 4 will determine which culture's
record is returned.
Choose this option if you want to define a parsing grammar that should
be applied without consideration of the input data's language or domain.
If you choose this option, the grammar editor will appear and you can
define the parsing grammar directly in the Open Parser stage rather
than using the Open Parser Domain Editor tool in Enterprise Designer.
Preview Tab
Creating a working parsing grammar is an iterative process. Preview is useful in testing out variations
on your input to make sure that the parsing grammar produces the expected results.
Type test values in the input field and then click Preview.
The parsed output fields display in the Results grid. For information about the output fields, see Output
on page 232. For information about trace, see Tracing Final Parsing Results on page 48. If your results
are not what you expected, click the Rules tab and continue editing the parsing grammar and testing
input data until it produces the expected results.
Data Quality Guide
231
Data Normalization Module
Output
Table 28: Open Parser Output
Field Name
Description / Valid Values
<Input Field>
The original input field defined in the parsing grammar.
<Output Fields...>
The output fields defined in the parsing grammar.
CultureCode
The culture codes contained in the input data. For a complete list of
supported culture codes, see Assigning a Parsing Culture to a Record
on page 13.
CultureUsedtoParseSelect a The culture code value used to parse each output record. This value is
match results in the Match
based on matches to a culture-specific parsing grammar.
Results List and then click
Remove.
IsParsed
Indicates if an output record was parsed. Values are Yes or No.
ParserScoreSelect a match
results in the Match Results
List and then click Remove.
Indicates the total average score. The value of ParserScore will be
between 0 and 100, as defined in the parsing grammar. 0 is returned
when no matches are returned.
For more information, see Scoring Command on page 27.
Trace
Click this control to see a graphical view of how each token in the parsing
grammar was parsed to an output field for the selected row in the Results
grid.
Table Lookup
The Table Lookup stage standardizes terms against a previously validated form of that term and applies
the standard version. This evaluation is done by searching a table for the term to standardize.
For example:
First Name
Last Name
Source Input:
Bill
Smith
Standardized Output:
William
Smith
There are three types of action you can perform: standardize, identify, and categorize.
If the term is found when performing the standardize action, Table Lookup replaces either the entire field
or individual terms within the field with the standardized term, even if the field contains multiple words.
Table Lookup can include changing full words to abbreviations, changing abbreviations to full words,
changing nicknames to full names or misspellings to corrected spellings.
If the term is found when performing the identify action, Table Lookup flags the record as containing a
term that can be standardized, but performs no action.
If the term is found when performing the categorize action, Table Lookup uses the source value as a
key and copies the corresponding value from the table entry into the selected field. If none of the source
terms match, Categorize uses the default value specified.
232
Spectrum™ Technology Platform 9.0 SP2
Chapter 8: Stages Reference
Input
Table 29: Table Lookup Input Fields
Field Name
Description / Valid Values
Source
Specifies the source input field to evaluate for scan and split.
StandardizationTable
One of the tables listed in Table Lookup Tables on page 138.
Options
To specify the options for Table Lookup you create a rule. You can create multiple rules then specify
the order in which you want to apply the rules. To create a rule, open the Table Lookup stage and click
Add then complete the following fields.
Note: If you add multiple Table Lookup rules, you can use the Move Up and Move Down buttons to
change the order in which the rules are applied.
Option
Description
Action
Specifies the type of action to take on the source field. One of the
following:
Standardize Changes the data in a field to match the standardized
term found in the lookup table. If the field contains multiple
terms, only the terms that are found in the lookup table
are replaced with the standardized term. The other data
in the field is not changed.
Identify
Flags the record as containing a term that can be
standardized, but performs no action on the data in the
field. The output field StandardizedTermIdentified is
added to the record with a value of Yes if the field can be
standardized and No if it cannot.
Categorize Uses the Source value as a key and copies the
corresponding value from the table into the field selected
in the Destination list. This creates a new field in your
data that can be used to categorize records.
On
Specifies whether to use the entire field as the lookup term or to search
the lookup table for each term in the field. One of the following:
Complete Treats the entire field as one term, resulting in the following:
field
• If you selected the action Standardize, Table Lookup
treats the entire field as one string and attempts to
standardize the field using the string as a whole. For
example, "International Business Machines" would be
changed to "IBM".
• If you selected the action Identify, Table Lookup treats
the entire field as one string and flags the record if the
string as a whole can be standardized.
• If you selected the action Categorize, Table Lookup treats
the entire field as one string and flags the record if the
string as a whole can be categorized.
Data Quality Guide
233
Data Normalization Module
Option
Description
Individual Treats each word in the field as its own term, resulting in
terms
the following:
within
• If you selected the action Standardize, Table Lookup
field
parses the field and attempts to standardize the individual
terms within the field. For example, "Bill Mike Smith"
would be changed to "William Michael Smith".
• If you selected the action Identify, Table Lookup parses
the field and flags the record if any single term within the
field can be standardized.
• If you selected the action Categorize, Unlike
Standardize, Categorize does not copy the source term
if there isn't a table match. If none of the source terms
match, Categorize uses the default value specified.
Unlike Standardize, Categorize only returns that table
value and nothing from Source. If none of the source
terms match, Categorize uses the default value specified.
Source
Specifies the field you want to containing the term you want to look up.
Destination
Specifies the field to which the terms returned by the table lookup should
be written.
If you want to replace the value, specify the same field in the Destination
field as you did in the Source field. You can also create a new field by
typing the name of the field you want to create.
The Destination field is not available if you select the action Identify.
Table
Specifies the table you want to use to find terms that match the data in
your dataflow.
For a list of tables that you can edit, see Table Lookup Tables on page
138. For information about creating or modifying tables, see Introduction
to Lookup Tables on page 136.
Lookup multiple word terms
Enables multiple word searches within a given string. For example:
Input String: "Major General John Smith"
Business Rule: Identify "Major General" in a string based on a table that
contains the entry
Output: Replace "Major General" with "Maj. Gen."
For multiple word searches, the search stops at the first occurrence of
a match.
This option is disabled when On is set to Complete field.
Note: Selecting this option may adversely affect performance.
When table entry not found,
set Destination's value to
234
Specifies the value to put in the destination field if a matching term
cannot be found in the lookup table. One of the following:
Source's value
Put the value from the source field into the
destination field.
Other
Put a specific value into the destination field.
Spectrum™ Technology Platform 9.0 SP2
Chapter 8: Stages Reference
Output
Table 30: Table Lookup Outputs
Field Name
Description / Valid Values
StandardizedTermIdentified
Indicates whether or not the field contains a term that can be
standardized. Only output if you select Complete field or Individual
terms in field options.
Yes
The record contains a term that can be standardized.
No
The record does not contain a term that can be
standardized.
Transliterator
Transliterator converts a string between Latin and other scripts. For example:
Source
Transliteration
kyanpasu
Αλφαβητικός Κατάλογος
Alphabētikós Katálogos
биологическом
biologichyeskom
It is important to note that transliteration is not translation. Rather, transliteration is the conversion of
letters from one script to another without translating the underlying words.
Note: Standard transliteration methods often do not follow the pronunciation rules of any particular
language in the target script.
The Transliterator stage supports the following scripts. In general, the Transliterator stage follows the
UNGEGN Working Group on Romanization Systems guidelines. For more information, see
www.eki.ee/wgrs.
Arabic
The script used by several Asian and African languages, including Arabic, Persian,
and Urdu.
Cyrillic
The script used by Eastern European and Asian languages, including Slavic languages
such as Russian. The Transliterator stage generally follows ISO 9 for the base Cyrillic
set.
Greek
The script used by the Greek language.
Half width/Full The Transliterator stage can convert between narrow half-width scripts and wider
width
full-width scripts. For example, this is half-width:
. This is full-width:
.
Hangul
Data Quality Guide
The script used by the Korean language. The Transliterator stage follows the Korean
Ministry of Culture & Tourism Transliteration regulations. For more information, see
the website of The National Institute of the Korean Language.
235
Data Normalization Module
Katakana
One of several scripts that can be used to write Japanese. The Transliterator stage
uses a slight variant of the Hepburn system. With Hepburn system, both ZI (
) and
DI (
) are represented by "ji" and both ZU (
) and DU (
) are represented by
"zu". This is amended slightly for reversibility by using "dji" for DI and "dzu" for DU.
The Katakana transliteration is reversible. Hiragana-Katakana transliteration is not
completely reversible since there are several Katakana letters that do not have
corresponding Hiragana equivalents. Also, the length mark is not used with Hiragana.
The Hiragana-Latin transliteration is also not reversible since internally it is a
combination of Katakana-Hiragana and Hiragana-Latin.
Latin
The script used by most languages of Europe, such as English.
Transliterator is part of the Data Normalization Module. For a listing of other stages, see Data
Normalization Module on page 226.
Transliteration Concepts
There are a number of generally desirable qualities for script transliterations. A good transliteration should
be:
•
•
•
•
Complete
Predictable
Pronounceable
Unambiguous
These qualities are rarely satisfied simultaneously, so the Transliterator stage attempts to balance these
requirements.
Complete
Every well-formed sequence of characters in the source script should transliterate to a sequence of
characters from the target script.
Predictable
The letters themselves (without any knowledge of the languages written in that script) should be sufficient
for the transliteration, based on a relatively small number of rules. This allows the transliteration to be
performed mechanically.
Pronounceable
Transliteration is not as useful if the process simply maps the characters without any regard to their
pronunciation. Simply mapping "αβγδεζηθ..."
to "abcdefgh..." would yield strings that might
be complete and unambiguous, but cannot be pronounced.
Standard transliteration methods often do not follow the pronunciation rules of any particular language
in the target script. For example, the Japanese Hepburn system uses a "j" that has the English phonetic
value (as opposed to French, German, or Spanish), but uses vowels that do not have the standard
English sounds. A transliteration method might also require some special knowledge to have the correct
pronunciation. For example, in the Japanese kunrei-siki system, "tu" is pronounced as "tsu". This is
similar to situations where there are different languages within the same script. For example, knowing
that the word Gewalt comes from German allows a knowledgeable reader to pronounce the "w" as a "v".
In some cases, transliteration may be heavily influenced by tradition. For example, the modern Greek
letter beta (β ) sounds like a "v", but a transform may continue to use a b (as in biology). In that case,
the user would need to know that a "b" in the transliterated word corresponded to beta (β ) and is to be
pronounced as a "v" in modern Greek. Letters may also be transliterated differently according to their
context to make the pronunciation more predictable. For example, since the Greek sequence GAMMA
GAMMA (γγ ) is pronounced as "ng", the first GAMMA can be transcribed as an "n".
236
Spectrum™ Technology Platform 9.0 SP2
Chapter 8: Stages Reference
Note: In general, in order to produce predictable results when transliterating Latin script to other scripts,
English text will not produce phonetic results. This is because the pronunciation of English cannot
be predicted easily from the letters in a word. For example, grove, move, and love all end with
"ove", but are pronounced very differently.
Unambiguous
It should always be possible to recover the text in the source script from the transliteration in the target
script. For example, it should be possible to go from Elláda back to the original Ελλάδα
. However,
in transliteration multiple characters can produce ambiguities. For example, the Greek character PSI
(ψ ) maps to ps, but ps could also result from the sequence PI, SIGMA (πσ
) since PI (π ) maps
to p and SIGMA (σ ) maps to s.
To handle the problem of ambiguity, Transliterator uses an apostrophe to disambiguate character
sequences. Using this procedure, the Greek character PI SIGMA (πσ
) maps to p's. In Japanese,
whenever an ambiguous sequence in the target script does not result from a single letter, the transform
uses an apostrophe to disambiguate it. For example, it uses this procedure to distinguish between
man'ichi and manichi.
Note: Some characters in a target script are not normally found outside of certain contexts. For example,
the small Japanese "ya" character, as in "kya" (
), is not normally found in isolation. To
handle such characters, Transliterator uses a tilde. For example, the input "~ya" would produce
an isolated small "ya". When transliterating to Greek, the input "a~s" would produce a non-final
Greek sigma (ασ
) at the end of a word. Likewise, the input "~sa" would produce a final sigma
in a non-final position (ςα ).
For the general script transforms, a common technique for reversibility is to use extra accents to distinguish
between letters that may not be otherwise distinguished. For example, the following shows Greek text
that is mapped to fully reversible Latin:
Input
columnNameField Name
Description
Any string field
The Transliterator stage can transliterate any string
field. You can specify which fields to transliterate
in the Transliterator stage options.
TransliteratorID
Overrides the default transliteration specified in the
Transliterator stage options. Use this field if you
want to specify a different transliteration for each
record.
One of the following:
Data Quality Guide
Arabic-Latin
From Arabic to Latin.
Cyrillic-Latin
From Cyrillic to Latin.
Greek-Latin
From Greek to Latin.
Hangul-Latin
From Hangul to Latin.
Katakana-Latin
From Katakana to Latin.
Latin-Arabic
From Latin to Arabic.
Latin-Cyrillic
From Latin to Cyrillic.
Latin-Greek
From Latin to Greek.
237
Universal Name Module
columnNameField Name
Description
Latin-Hangul
From Latin to Hangul.
Latin-Katakana
From Latin to Katakana.
Fullwidth-Halfwidth From full width to half
width.
Halfwidth-Fullwidth From half width to full
width.
Options
Table 31: Transliterator Options
Option
Description/Valid Values
From
The script used by the fields that you want to transliterate. For a description
of the supported scripts, see Transliterator on page 235.
Note: The Transliterator stage does not support transliteration between all
scripts. The From and To fields automatically reflect the valid values
based on your selection.
To
The script that you want to convert the field into. For a description of the
supported scripts, see Transliterator on page 235.
Note: The Transliterator stage does not support transliteration between all
scripts. The From and To fields automatically reflect the valid values
based on your selection.
Swap button
Click the swap button to exchange the languages in the From and To fields.
Fields to transliterate
Specifies the fields that you want to transliterate.
Output
The Transliterator stage transliterates the fields you specify. It does not produce any other output.
Universal Name Module
Universal Name Module
To perform the most accurate standardization you may need to break up strings of data into multiple
fields. Spectrum™ Technology Platform provides advanced parsing features that enable you to parse
personal names, company names, and many other terms and abbreviations. In addition, you can create
your own list of custom terms to use as the basis of scan/extract operations.
238
Spectrum™ Technology Platform 9.0 SP2
Chapter 8: Stages Reference
Name Parser (DEPRECATED)
Attention: The Name Parser stage is deprecated and may not be supported in future releases. Use
Open Name Parser for parsing names.
Name Parser breaks down personal and business names and other terms in the name data field into
their component parts. The parsing process includes an explanation of the function, form and syntactical
relationship of each part to the whole. These parsed name elements are then subsequently available to
other automated operations such as name matching, name standardization or multi-record name
consolidation.
Name parsing does the following:
• Determines the entity type of a name in order to describe the function which the name performs. Name
entity types are divided into two major groupings: Personal names and business names with subgroups
within these major groupings.
• Determines the form of a name in order to understand which syntax the parser should follow for parsing.
Personal names usually take on a natural (signature) order or a reverse order. Business names are
usually ordered hierarchically.
• Determines and labels the component parts of a name so that the syntactical relationship of each
name part to the entire name is identified. The personal name syntax includes prefixes, first, middle
and last name parts, suffixes and account description terms among other personal name parts. The
business name syntax includes the primary text, insignificant terms, prepositions, objects of the
preposition and suffix terms among other business name parts.
• Determines the gender of the name. The gender is determined based on cultural assumptions which
you specify. For example, Jean is a male name in France but a female name in the U.S. If you know
the names you are processing are from France, you could specify French as the gender determination
culture. The Name Parser uses data from the First Name and Compound First Names tables to
determine gender. If a name is not found in either table and a title is present in the name, the parser
checks the Title table to determine gender. Otherwise, the gender is marked as unknown.
Note: If a field on your input record already contains one of the supported cultures, you can pre-define
the GenderDeterminationSource field in your input to override the Gender Determination Source
in the GUI.
• Assigns a parsing score which indicates the degree of confidence which the parser has that its parsing
is correct.
Input
Attention: The Name Parser stage is deprecated and may not be supported in future releases. Use
Open Name Parser for parsing names.
Table 32: Name Parser Input
Field Name
Description / Valid Values
GenderDeterminationSource The culture of the name data to use to determine gender. Default uses
cross-cultural rules. For example, Jean is commonly a female name
and Default identifies it as such, but it is identified as a male name if
you select French. The options are listed below along with example
countries for each culture. Note that the list of countries under each
culture is not exhaustive.
Data Quality Guide
SLAVIC
Bosnia, Poland, Albania.
ARMENIAN
Armenia.
DEFAULT
Bulgaria, Cayman Islands, Ireland,
U.S., U.K.
239
Universal Name Module
Field Name
Description / Valid Values
FRENCH
France.
SCANDINAVIAN
Denmark, Finland, Iceland, Norway,
Sweden.
GERMANIC
Austria, Germany, Luxembourg,
Switzerland, The Netherlands.
GREEK
Greece.
HUNGARIAN
Hungary.
ITALIAN
Italy.
PORTUGUESE
Portugal.
ROMANIA
Romania.
HISPANIC
Spain.
ARABIC
Tunisia.
GenderDeterminationSource is also used by Name Variant Finder to
limit the returned name variations based on culture. For more
information, see Name Variant Finder on page 254.
Name
The name you want to parse. This field is required.
Options
Attention: The Name Parser stage is deprecated and may not be supported in future releases. Use
Open Name Parser for parsing names.
To specify the Name Parser options, double-click the instance of Name Parser on the canvas. The Name
Parser Options dialog displays.
Table 33: Name Parser Options
240
Option
Description
Parse personal names
Check this box to parse personal names.
Separate conjoined names
into multiple recordsSelect a
match results in the Match
Results List and then click
Remove.
Click this box to separate names containing more than one individual
into multiple records, for example, Bill & Sally Smith.
Gender Determination
SourceSelect a match results
in the Match Results List and
then click Remove.
Determines how the Name Parser assigns a gender to the name. For
most cases, Default is the best setting because it covers a wide variety
of names. If you are processing names from a specific culture, select
that culture. Selecting a specific culture helps ensure that the proper
gender is assigned to the names. For example, if you leave Default
selected, then the name Jean is identified as a female name. If you
select French, it is identified as a male name.
When a conjoined record results in two separate name records, a Parser
Record ID output field is generated. Each pair of separate name records
are identified with the same Parser Record ID.
Spectrum™ Technology Platform 9.0 SP2
Chapter 8: Stages Reference
Option
Description
Note: If you select a culture but the name is not found in that culture,
gender is determined using the Default culture, which includes
data from a variety of cultures.
Order
Specifies how the name fields are ordered in your input records. One
of the following:
Natural
The name fields are ordered by Title, First Name,
Middle Name, Last Name, and Suffix.
Reverse
The name fields are ordered by Last Name first.
Mixed
The name fields are ordered using a combination of
natural and reverse.
Retain Periods
Retains punctuation in the parsed personal name field.
Parse Business Names
Check this box to parse business names.
Retain Periods
Check this box to return punctuation to the parsed business name field.
User-Defined Table
Click any of the User-Defined Tables to add values to existing values
in the various parser tables. This capability enables you to customize
tables for your unique business environment. Click Configure to select
an XML file that contains the values that you want to add. For more
information about user-defined tables, see Modifying Name Parser
User-Defined Tables on page 241.
Modifying Name Parser User-Defined Tables
Attention: The Name Parser stage is deprecated and may not be supported in future releases. Use
Open Name Parser for parsing names.
You can add, modify, and delete values in the Name Parser tables to customize them for your unique
business environment.
Name Parser's user-defined tables are XML files located by default in the <Drive>:\Program
Files\Pitney Bowes\Spectrum\server\modules\parser\data folder. Spectrum™ Technology
Platform includes the following user-defined tables:
•
•
•
•
•
•
•
•
•
•
•
•
UserAccountDescriptions.xml on page 242
UserCompanyPrepositions.xml on page 242
UserCompanySuffixes.xml on page 243
UserCompanyTerms.xml on page 243
UserCompoundFirstNames.xml on page 244
UserConjunctions.xml on page 245
UserFirstNames.xml on page 245
UserGeneralSuffixes.xml on page 246
UserLastNamePrefixes.xml on page 247
UserLastNames.xml on page 248
UserMaturitySuffixes.xml on page 249
UserTitles.xml on page 249
Data Quality Guide
241
Universal Name Module
UserAccountDescriptions.xml
Table 34: UserAccountDescriptions.xml Columns
Column Name
Description / Valid Values
LookupValue
A lookup term commonly found in an Account Description. Any
single-word text. Case insensitive.
Example entry:
<table-data>
<deleted-entries delimiter-character="|">
<deleted-entry-group>
<![CDATA[
LookupValue
ART
AND
]]>
</deleted-entry-group>
</deleted-entries>
<added-entries delimiter-character="|">
<![CDATA[
LookupValue
A/C
ACCOUNT
EXP
]]>
</added-entries>
</table-data>
UserCompanyPrepositions.xml
Table 35: UserCompanyPrepositions.xml Columns
Column Name
Description / Valid Values
LookupValue
Any preposition (for example, "of" or "on") commonly found in company
names. Any single-word text. Case insensitive.
Example entry:
<table-data>
<deleted-entries delimiter-character="|">
<deleted-entry-group>
<![CDATA[
LookupValue
AROUND
NEAR
]]>
</deleted-entry-group>
</deleted-entries>
<added-entries delimiter-character="|">
<![CDATA[
LookupValue
ABOUT
AFTER
ACROSS
242
Spectrum™ Technology Platform 9.0 SP2
Chapter 8: Stages Reference
]]>
</added-entries>
</table-data>
UserCompanySuffixes.xml
Table 36: UserCompanySuffixes.xml Columns
Column Name
Description / Valid Values
LookupValue
Any suffix commonly found in company names. Examples include "Inc."
and "Co." Any single-word text. Case insensitive.
Example entry:
<table-data>
<deleted-entries delimiter-character="|">
<deleted-entry-group>
<![CDATA[
LookupValue
SANDY
CLUE
]]>
</deleted-entry-group>
</deleted-entries>
<added-entries delimiter-character="|">
<![CDATA[
LookupValue
LTD
LLC
CO
INC
]]>
</added-entries>
</table-data>
UserCompanyTerms.xml
Table 37: UserCompanyTerms.xml Columns
Column Name
Description / Valid Values
LookupValue
Any term commonly found in a company name. Any single-word text.
Case insensitive.
Example entry:
<table-data>
<deleted-entries delimiter-character="|">
<deleted-entry-group>
<![CDATA[
LookupValue
MARY
BLUE
]]>
</deleted-entry-group>
Data Quality Guide
243
Universal Name Module
</deleted-entries>
<added-entries delimiter-character="|">
<![CDATA[
LookupValue
ARC
ARCADE
ASSEMBLY
ARIZONA
]]>
</added-entries>
</table-data>
UserCompoundFirstNames.xml
This table contains user-defined compound first names. Compound names are names that consist of
two words.
Table 38: UserCompoundFirstNames.xml Columns
Column Name
Description / Valid Values
FirstName
The compound first name. Maximum of two words. Case insensitive.
Culture
The culture in which this FirstName/Gender combination applies. You
may use any of the values that are valid in the
GenderDeterminationSource input field. For more information, see Input
on page 239.
Gender
The gender most commonly associated with this FirstName/Culture
combination. One of the following:
Frequency
M
The name is a male name.
F
The name is a female name.
A
Ambiguous. The name can be either male or female.
U
Unknown. The gender of this name is not known. Unknown
is assumed if this field is left blank.
Not used in this release. You may leave this column blank.
Example entry:
<table-data>
<deleted-entries delimiter-character="|">
<deleted-entry-group>
<![CDATA[
FirstName
ANN MARIE
BILLY JOE
]]>
</deleted-entry-group>
<deleted-entry-group>
<![CDATA[
FirstName|Frequency
KAREN SUE|0.126
BILLY JOE|0.421
]]>
</deleted-entry-group>
<deleted-entry-group>
<![CDATA[
244
Spectrum™ Technology Platform 9.0 SP2
Chapter 8: Stages Reference
FirstName|Gender|Culture
JEAN ANN|M|DEFAULT
JEAN CLUADE|F|FRENCH
]]>
</deleted-entry-group>
</deleted-entries>
<added-entries delimiter-character="|">
<![CDATA[
FirstName|Gender|Culture
JOHN Henry|M|DEFAULT
A'SHA A'MAR|F|ARABIC
BILLY JO|A|DEFAULT
]]>
</added-entries>
</table-data>
UserConjunctions.xml
This table contains a list of user-defined conjunctions, such as "and", "or", or "&".
Table 39: UserConjunctions.xml Columns
Column Name
Description / Valid Values
LookupValue
Any conjunction. Must be a single word. Case insensitive.
Example entries:
<table-data>
<deleted-entries delimiter-character="|">
<deleted-entry-group>
<![CDATA[
LookupValue
FIND
CARE
%
]]>
</deleted-entry-group>
</deleted-entries>
<added-entries delimiter-character="|">
<![CDATA[
LookupValue
&
AND
OR
]]>
</added-entries>
</table-data>
UserFirstNames.xml
Table 40: UserFirstNames.xml Columns
Column Name
Description / Valid Values
FirstName
The first name described by this table row. Case insensitive.
Gender
The gender most commonly associated with this FirstName/Culture
combination. One of the following:
Data Quality Guide
245
Universal Name Module
Column Name
Culture
Description / Valid Values
M
The name is a male name.
F
The name is a female name.
A
Ambiguous. The name can be either male or female.
U
Unknown. The gender of this name is not known. Unknown
is assumed if this field is left blank.
The culture in which this FirstName/Gender combination applies. You
may use any of the values that are valid in the
GenderDeterminationSource input field. For more information, see Input
on page 239.
Example entry:
<table-data>
<deleted-entries delimiter-character="|">
<deleted-entry-group>
<![CDATA[
FirstName
AADEL
AADIL
]]>
</deleted-entry-group>
<deleted-entry-group>
<![CDATA[
FirstName
A'SACE
A'BOCKETT
]]>
</deleted-entry-group>
<deleted-entry-group>
<![CDATA[
FirstName|Gender|Culture
ALII|M|DEFAULT
AISHA|F|ARABIC
]]>
</deleted-entry-group>
<deleted-entry-group>
<![CDATA[
FirstName|Gender
JOHE|M
]]>
</deleted-entry-group>
</deleted-entries>
<added-entries delimiter-character="|">
<![CDATA[
FirstName|Gender|Culture
JOHE|M|DEFAULT
A'SHAN|F|ARABIC
]]>
</added-entries>
</table-data>
UserGeneralSuffixes.xml
This table contains a list of user-defined suffixes used in personal names that are not maturity suffixes,
such as "MD" or "PhD".
246
Spectrum™ Technology Platform 9.0 SP2
Chapter 8: Stages Reference
Table 41: UserGeneralSuffixes.xml Columns
Column Name
Description / Valid Values
LookupValue
Any suffix that is frequently applied to personal names and is not a
maturity suffix. Must be a single word. Case insensitive.
Example entry:
<table-data>
<deleted-entries delimiter-character="|">
<deleted-entry-group>
<![CDATA[
LookupValue
AND
WILL
TUNA
]]>
</deleted-entry-group>
</deleted-entries>
<added-entries delimiter-character="|">
<![CDATA[
LookupValue
ACCOUNTANT
ATTORNEY
ANALYST
ASSISTANT
]]>
</added-entries>
</table-data>
UserLastNamePrefixes.xml
This table contains a list of user-defined prefixes that occur in a person's last name such as "Van", "De",
or "La".
Table 42: UserLastNamePrefixes.xml Columns
Column Name
Description / Valid Values
LookupValue
Any prefix that occurs as part of an individual's last name. Any
single-word text. Case insensitive.
Example entry:
<table-data>
<deleted-entries delimiter-character="|">
<deleted-entry-group>
<![CDATA[
LookupValue
DO
RUN
ANIMAL
]]>
</deleted-entry-group>
</deleted-entries>
<added-entries delimiter-character="|">
<![CDATA[
LookupValue
Data Quality Guide
247
Universal Name Module
D'
DA
DEN
DEL
]]>
</added-entries>
</table-data>
UserLastNames.xml
Table 43: UserLastNames.xml Columns
Column Name
Description / Valid Values
LastName
The last name described by this table row. Case insensitive.
Gender
The gender most commonly associated with this FirstName/Culture
combination. One of the following:
Culture
M
The name is a male name.
F
The name is a female name.
A
Ambiguous. The name can be either male or female.
U
Unknown. The gender of this name is not known. Unknown
is assumed if this field is left blank.
The culture in which this FirstName/Gender combination applies. You
may use any of the values that are valid in the
GenderDeterminationSource input field. For more information, see Input
on page 239.
Example entry:
<table-data>
<deleted-entries delimiter-character="|">
<deleted-entry-group>
<![CDATA[
LastName
Rusod
AADIL
]]>
</deleted-entry-group>
<deleted-entry-group>
<![CDATA[
LastName
KAASEEY
JOIEN
]]>
</deleted-entry-group>
</deleted-entries>
<added-entries delimiter-character="|">
<![CDATA[
LastName|Culture|Gender
SMITH|ENGLISH|A
WILSON|ENGLISH|A
JONES|ENGLISH|A
]]>
</added-entries>
</table-data>
248
Spectrum™ Technology Platform 9.0 SP2
Chapter 8: Stages Reference
UserMaturitySuffixes.xml
This table contains user-defined generational suffixes used in a person's name, such as "Jr." or "Sr.".
Table 44: UserMaturitySuffixes.xml Columns
Column Name
Description / Valid Values
LookupValue
A generational suffix used in personal names. Any single-word text.
Case insensitive.
Example entry:
<table-data>
<deleted-entries delimiter-character="|">
<deleted-entry-group>
<![CDATA[
LookupValue
I
V
18
VI
]]>
</deleted-entry-group>
</deleted-entries>
<added-entries delimiter-character="|">
<![CDATA[
LookupValue
I
II
III
]]>
</added-entries>
</table-data>
UserTitles.xml
This table contains user-defined titles used in a person's name, such as "Mr." or "Ms."
Table 45: UserTitles.xml Columns
Column Name
Description / Valid Values
LookupValue
A title used in personal names. Any single-word text. Case insensitive.
Gender
The gender most commonly associated with this title. One of the
following:
Data Quality Guide
M
The name is a male name.
F
The name is a female name.
A
Ambiguous. The name can be either male or female.
U
Unknown. The gender of this name is not known. Unknown
is assumed if this field is left blank.
249
Universal Name Module
Example entry:
<table-data>
<deleted-entries delimiter-character="|">
<deleted-entry-group>
<![CDATA[
LookupValue
Belt
Friend
Thursday
Red
]]>
</deleted-entry-group>
</deleted-entries>
<added-entries delimiter-character="|">
<![CDATA[
LookupValue|Gender
Mrs|F
Mr|M
Most|F
]]>
</added-entries>
</table-data>
Sample User-Defined Table
The figure below shows a sample UserFirstNames.xml table and the syntax to use when modifying
user-defined tables.
<table-data>
<deleted-entries delimiter-character="|">
<deleted-entry-group>
<![CDATA[
FirstName
AADEL
AADIL
]]>
</deleted-entry-group>
<deleted-entry-group>
<![CDATA[
FirstName|Frequency
A'SACE|0.126
A'BECKETT|0.421
]]>
</deleted-entry-group>
<deleted-entry-group>
<![CDATA[
FirstName|Gender|Culture|VariantGroup
ALI|M|DEFAULT|GROUP88
AISHA|F|ARABIC|GROUP43
]]>
</deleted-entry-group>
<deleted-entry-group>
<![CDATA[
FirstName|Gender
JOHN|M
]]>
</deleted-entry-group>
</deleted-entries>
<added-entries delimiter-character="|">
<![CDATA[
FirstName|Gender|Culture
JOHN|M|DEFAULT
A'SHA|F|ARABIC
JAMES|M|DEFAULT
]]>
250
Spectrum™ Technology Platform 9.0 SP2
Chapter 8: Stages Reference
</added-entries>
</table-data>
Output
Attention: The Name Parser stage is deprecated and may not be supported in future releases. Use
Open Name Parser for parsing names.
Table 46: Name Parser Output
Field Name
Format
Description / Valid Values
AccountDescription
String
An account description that is part of the name. For example,
in "Mary Jones Account # 12345", the account description is
"Account#12345".
EntityType
String
Indicates the type of name. One of the following:
Firm
The name is a company name.
Personal
The name is an individual person's name.
Fields Related to Names of Companies
FirmModifier.1.Object
String
The first object of a preposition occurring in firm name. For
example, in the firm name "Pratt & Whitney Division of United
Technologies", the first object of a preposition is "United
Technologies".
FirmModifier.1.Preposition
String
The first preposition occurring in firm name. For example, in
the firm name "Pratt & Whitney Division of United
Technologies", "of" would be the first preposition.
FirmModifier.2.Object
String
The second object of a preposition occurring in firm name.
For example, in the firm name "Church of Our Lady of
Lourdes", the second object of a preposition is the second
"Lourdes".
FirmModifier.2.Preposition
String
The second preposition occurring in firm name. For example,
in the firm name "Church of Our Lady of Lourdes", the second
preposition is the second "of".
FirmName
String
The name of a company. For example, "Pitney Bowes, Inc."
FirmPrimary
String
The base part of a company's name. For example, "Pitney
Bowes".
FirmSuffix
String
The corporate suffix. For example, "Co." and "Inc."
FirstName
String
The first name of a person.
FirstNameVariantGroup
String
A numeric ID that indicates the group of similar names to
which first name belongs. For example, Muhammad,
Mohammed, and Mehmet all belong to the same Name
Variant Group. The actual group ID is assigned when the
add-on data is loaded.
Fields Related to Names of
Individual People
Data Quality Guide
251
Universal Name Module
Field Name
Format
Description / Valid Values
This field is only populated if you have purchased the Name
Variant Group feature.
GenderCode
String
A person's gender as determined by analyzing the first name.
One of the following:
A
Ambiguous. The name is both a male and a female
name. For example, Pat.
F
Female. The name is a female name.
M
Male. The name is a male name.
U
Unknown. The name could not be found in the
gender table.
GenderDeterminationSource String
The culture used to determine a name's gender. If the name
could not be found in the gender table, this field is blank.
GeneralSuffix
String
A person's general/professional suffix. For example, MD or
PhD.
LastName
String
The last name of a person.
MaturitySuffix
String
A person's maturity/generational suffix. For example, Jr. or
Sr.
MiddleName
String
The middle name of a person.
NameScore
String
Score representing quality of the parsing operation, from 0
to 100. 0 indicates poor quality and 100 indicates high quality.
ParserRecordID
String
A unique ID assigned to each input record.
TitleOfRespect
String
A person's title, such as Mr., Mrs., Dr., or Rev.
String
The first name of the second person in a conjoined name. An
example of a conjoined name is "John and Jane Smith".
PersonalName.2.FirstNameVariantGroup String
A numeric ID that indicates the group of similar names to
which first name of the second person in a conjoined name
belongs. For example, Muhammad, Mohammed, and Mehmet
all belong to the same Name Variant Group. The actual group
ID is assigned when the add-on data is loaded.
Fields Related to Conjoined
Names
PersonalName.2.FirstName
This field is only populated if you have purchased the Name
Variant Group feature.
PersonalName.2.GenderCode String
252
The gender of the second person in a conjoined name as
determined by Name Parser analyzing the first name. An
example of a conjoined name is "John and Jane Smith". One
of the following:
A
Ambiguous. The name is both a male and a female
name. For example, Pat.
F
Female. The name is a female name.
M
Male. The name is a male name.
Spectrum™ Technology Platform 9.0 SP2
Chapter 8: Stages Reference
Field Name
Format
Description / Valid Values
U
Unknown. The name could not be found in the
gender table.
PersonalName.2.GenderDeterminationSource String
The culture used to determine the gender of the second
person in a conjoined name. An example of a conjoined name
is "John and Jane Smith".
PersonalName.2.GeneralSuffix String
The general/professional suffix of the second person in a
conjoined name. An example of a conjoined name is "John
and Jane Smith". Examples of general suffixes are MD and
PhD.
PersonalName.2.LastName
The last name of the second person in a conjoined name. An
example of a conjoined name is "John and Jane Smith".
String
PersonalName.2.MaturitySuffix String
The maturity/generational suffix of the second person in a
conjoined name. An example of a conjoined name is "John
and Jane Smith". Examples of maturity suffixes are Jr. and
Sr.
PersonalName.2.MiddleName String
The middle name of the second person in a conjoined name.
An example of a conjoined name is "John and Jane Smith".
PersonalName.2.TitleOfRespect String
The title of respect for the second name in a conjoined name.
For example, "Mr. and Mrs. Smith" is a conjoined name.
Examples of titles of respect are Mr., Mrs., and Dr.
PersonalName.3.FirstName
The first name of the third person in a conjoined name. For
example, "Mr. & Mrs. John Smith & Dr. Mary Jones" is a
conjoined name.
String
PersonalName.3.FirstNameVariantGroup String
A numeric ID that indicates the group of similar names to
which first name of the second person in a conjoined name
belongs. For example, Muhammad, Mohammed, and Mehmet
all belong to the same Name Variant Group. The actual group
ID is assigned when the add-on data is loaded.
This field is only populated if you have purchased the Name
Variant Group feature.
PersonalName.3.GenderCode String
PersonalName.3.GenderDeterminationSource String
Data Quality Guide
The gender of the third person in a conjoined name as
determined by Name Parser analyzing the first name. An
example of a conjoined name is "Mr. & Mrs. John Smith &
Adam Jones". One of the following:
A
Ambiguous. The name is both a male and a female
name. For example, Pat.
F
Female. The name is a female name.
M
Male. The name is a male name.
U
Unknown. The name could not be found in the
gender table.
The culture used to determine the gender of the third person
in a conjoined name. "Mr. & Mrs. John Smith & Adam Jones".
253
Universal Name Module
Field Name
Format
Description / Valid Values
PersonalName.3.GeneralSuffix String
The general/professional suffix of the third person in a
conjoined name. An example of a conjoined name is "Mr. &
Mrs. John Smith & Adam Jones PhD." Examples of general
suffixes are MD and PhD.
PersonalName.3.LastName
String
The last name for the third person in a conjoined name. For
example, "Mr. & Mrs. John Smith & Dr. Mary Jones" is a
conjoined name.
PersonalName.3.MaturitySuffix String
The maturity/generational suffix of the third person in a
conjoined name. An example of a conjoined name is "Mr. &
Mrs. John Smith & Adam Jones Sr." Examples of maturity
suffixes are Jr. and Sr.
PersonalName.3.MiddleName String
The middle name for the third person in a conjoined name.
For example, "Mr. & Mrs. John Smith & Dr. Mary Jones" is a
conjoined name.
PersonalName.3.TitleOfRespect String
The title of respect for the third name in a conjoined name.
For example, "Mr. & Mrs. John Smith & Dr. Mary Jones" is a
conjoined name. Examples of titles of respect are Mr., Mrs.,
and Dr.
Name Variant Finder
Name Variant Finder works in either first name or last name mode to query a database to return alternative
versions of a name. For example, "John" and "Jon" are variants for the name "Johnathan". Name Variant
Finder requires add-on dictionaries that can be installed using Universal Name Module, Data Normalization
Module, and Advanced Matching Modules database load utility. Contact your sales representative for
information on how to obtain these optional culture-specific dictionaries.
Input
Table 47: Name Variant Finder Input Fields
Field Name
Description / Valid Values
FirstName
The name for which you want to find variants, if the name is a given
name.
LastName
The name for which you want to find variants, if the name is a surname.
GenderCode
The gender of the name in the FirstName field. One of the following:
Note: Gender codes only apply to first names, not last names.
Ethnicity
254
M
The name is a male name.
F
The name is a female name.
A
Ambiguous. The name can be either male or female.
U
Unknown. The gender of this name is not known.
The culture most commonly associated with the name in the FirstName
or LastName field. You can use the Name Parser or Open Parser stages
to populate this field if you do not know the ethnicity for a name.
Spectrum™ Technology Platform 9.0 SP2
Chapter 8: Stages Reference
Field Name
Description / Valid Values
Note: This field was formerly named GenderDeterminationSource.
Options
Table 48: Name Variant Finder Options
Option
Description
First Name
Finds name variations based on first name.
Last Name
Finds name variations based on last name.
Gender Code
Returns the name variations only for the gender specified in the record's
GenderCode field. For information about the GenderCode field, see
Input on page 254.
Ethnicity
Returns name variations only for the culture specified in the record's
Ethnicity field. For information about the Ethnicity field, see Input on
page 254.
Romanized
Returns the English romanized version of the name. A romanized name
is one that has been converted from a non-Latin script to the Latin script.
For example, Achin is the Romanized version of the Korean name
.
Native
Returns the name in the native script of the name's culture. For example,
a Korean name would be returned in Hangul.
Kana
If you select Native, you can choose to return Japanese names in Kana
by selecting this option. Kana is comprised of hiragana and katakana
scripts.
Note: You must have licensed the Asian Plus Pack database to look
up Japanese name variants. For more information, contact your
sales executive.
Kanji
If you select Native, you can choose to return Japanese names in Kanji
by selecting this option. Kanji is one of the scripts used in the Japanese
language.
Note: You must have licensed the Asian Plus Pack database to look
up Japanese name variants. For more information, contact your
sales executive.
Output
Table 49: Name Variant Finder Outputs
Field Name
Format
Description / Valid Values
CandidateGroup
String
Identifies a grouping of an input name and its name variations.
Each input name is given a CandidateGroup number. The
Data Quality Guide
255
Universal Name Module
Field Name
Format
Description / Valid Values
variations for that input name are given the same
CandidateGroup number.
Ethnicity
String
The culture of a name determined by the Core Name and
add-on dictionaries.
Note: This field was formerly named
GenderDeterminationSource.
FirstName
String
The given name of a person.
GenderCode
String
The gender of a name determined by the Core Name and
add-on dictionaries. One of the following:
M
The name is a male name.
F
The name is a female name.
A
Ambiguous. The name can be either male or
female.
U
Unknown. The gender of this name is not known.
LastName
String
The surname name of a person.
TransactionalRecordType
String
Specifies how the name was used in the matching process.
One of the following:
Suspect
A suspect record is used as input to a
query.
Candidate
A candidate record is a result returned
from a query.
Open Name Parser
Open Name Parser breaks down personal and business names and other terms in the name data field
into their component parts. These parsed name elements are then subsequently available to other
automated operations such as name matching, name standardization, or multi-record name consolidation.
Open Name Parser does the following:
• Determines the type of a name in order to describe the function that the name performs. Name entity
types are divided into two major groups: personal names and business names. Within each of these
major groups are subgroups.
• Determines the form of a name in order to understand which syntax the parser should follow for parsing.
Personal names usually take on a natural (signature) order or a reverse order. Business names are
usually ordered hierarchically.
• Determines and labels the component parts of a name so that the syntactical relationship of each
name part to the entire name is identified. The personal name syntax includes prefixes, first, middle,
and last name parts, suffixes, and account description terms, among other personal name parts. The
business name syntax includes the firm name and suffix terms.
• Parses conjoined personal and business names and either retains them as one record or splits them
into multiple records. Examples of conjoined names include "Mr. and Mrs. John Smith" and "Baltimore
Gas & Electric dba Constellation Energy".
• Parses output as records or as a list.
• Enables you to use the Open Parser Domain Editor to create new domains that can be used in the
Open Name Parser Advanced Options.
• Assigns a parsing score that reflects the degree of confidence that the parsing is correct.
256
Spectrum™ Technology Platform 9.0 SP2
Chapter 8: Stages Reference
Resource URL
JSON endpoint:
http://server:port/rest/OpenNameParser/results.json
XML endpoint:
http://server:port/rest/OpenNameParser/results.xml
http://server:port/soap/OpenNameParser
Example with JSON Response
The following example requests a JSON response:
http://myserver:8080/rest/OpenNameParser/results.json?
Data.Name=John+Williams+Smith
The JSON returned by this request would be:
{"output_port": [{
"Name": "John Williams Smith",
"CultureCodeUsedToParse": "",
"FirstName": "John",
"LastName": "Smith",
"MiddleName": "Williams",
"Names": [],
"IsParsed": true,
"IsPersonal": true,
"IsConjoined": false,
"IsReverseOrder": false,
"IsFirm": false,
"NameScore": 100,
"user_fields": []
}]}
Example with XML Response
The following example requests an XML response:
http://myserver:8080/rest/OpenNameParser/results.xml?
Data.Name=John+Williams+Smith
The XML returned by this request would be:
<ns2:xml.OpenNameParserResponse
xmlns:ns2="http://www.pb.com/spectrum/services/OpenNameParser">
<ns2:output_port>
<ns2:Result>
<ns2:Name>John Williams Smith</ns2:Name>
<ns2:CultureCodeUsedToParse/>
<ns2:FirstName>John</ns2:FirstName>
<ns2:LastName>Smith</ns2:LastName>
<ns2:MiddleName>Williams</ns2:MiddleName>
<ns2:Names/>
<ns2:IsParsed>true</ns2:IsParsed>
<ns2:IsPersonal>true</ns2:IsPersonal>
<ns2:IsConjoined>false</ns2:IsConjoined>
<ns2:IsReverseOrder>false</ns2:IsReverseOrder>
<ns2:IsFirm>false</ns2:IsFirm>
<ns2:NameScore>100</ns2:NameScore>
<ns2:user_fields/>
</ns2:Result>
Data Quality Guide
257
Universal Name Module
</ns2:output_port>
</ns2:xml.OpenNameParserResponse>
Example
The following shows a SOAP request:
<soapenv:Envelope xmlns:soapenv="http://schemas.xmlsoap.org/soap/envelope/"
xmlns:open="http://www.pb.com/spectrum/services/OpenNameParser"
xmlns:spec="http://spectrum.pb.com/">
<soapenv:Header/>
<soapenv:Body>
<open:OpenNameParserRequest>
<open:input_port>
<open:Input>
<open:Name>John Williams Smith</open:Name>
</open:Input>
</open:input_port>
</open:OpenNameParserRequest>
</soapenv:Body>
</soapenv:Envelope>
This would be the response:
<soap:Envelope xmlns:soap="http://schemas.xmlsoap.org/soap/envelope/">
<soap:Body>
<ns3:OpenNameParserResponse xmlns:ns2="http://spectrum.pb.com/"
xmlns:ns3="http://www.pb.com/spectrum/services/OpenNameParser">
<ns3:output_port>
<ns3:Result>
<ns3:Name>John Williams Smith</ns3:Name>
<ns3:CultureCodeUsedToParse/>
<ns3:FirstName>John</ns3:FirstName>
<ns3:LastName>Smith</ns3:LastName>
<ns3:MiddleName>Williams</ns3:MiddleName>
<ns3:Names/>
<ns3:IsParsed>true</ns3:IsParsed>
<ns3:IsPersonal>true</ns3:IsPersonal>
<ns3:IsConjoined>false</ns3:IsConjoined>
<ns3:IsReverseOrder>false</ns3:IsReverseOrder>
<ns3:IsFirm>false</ns3:IsFirm>
<ns3:NameScore>100</ns3:NameScore>
<ns3:user_fields/>
</ns3:Result>
</ns3:output_port>
</ns3:OpenNameParserResponse>
</soap:Body>
</soap:Envelope>
Related Links
Parsing Personal Names on page 51
InputParameters for Input Data
Table 50: Open Name Parser Input
Field Name
Description
columnName
Parameter
CultureCode
Data.CultureCode
258
The culture of the input name data. The options are listed below.
Null (empty)
Global culture (default).
Spectrum™ Technology Platform 9.0 SP2
Chapter 8: Stages Reference
Field Name
Description
columnName
Parameter
de
German.
es
Spanish.
ja
Japanese.
Note: If you added your own domain using the Open Parser Domain
Editor, the cultures and culture codes for that domain are also
valid.
Name
The name you want to parse. This field is required.
Data.Name
Options
Parsing OptionsParameters for Parsing Options
The following table lists the options that control the parsing of names.
Table 51: Open Name Parser Parsing Options
Option Name
Description
optionName
Parameter
Parse personal names
ParseNaturalOrderPersonalNames
Option.ParseNaturalOrderPersonalNames
ParseReverseOrderPersonalNames
Option.ParseReverseOrderPersonalNames
Specifies whether to parse personal names.
Natural
The name fields are ordered by Title,
First Name, Middle Name, Last
Name, and Suffix.
Reverse
The name fields are ordered by Last
Name first.
Both
The name fields are ordered using a
combination of natural and reverse.
Specifies whether to parse names where the is in
the order Title, First Name, Middle Name, Last
Name, and Suffix.
true
Parse personal names that are in
natural order.
false
Do not parse names that are in
natural order.
Specifies whether to parse names where the last
name is specified first.
true
Data Quality Guide
Parse personal names that are in
reverse order.
259
Universal Name Module
Option Name
Description
optionName
Parameter
false
Conjoined names
Do not parse names that are in
reverse order.
Specifies whether to parse conjoined names.
ParseConjoinedNames
true
Parse conjoined names.
Option.ParseConjoinedNames
false
Do not parse conjoined names.
Split conjoined names into multiple records
SplitConjoinedNames
Option.SplitConjoinedNames
Parse business names
Specifies whether to separate names containing
more than one individual into multiple records, for
example, Bill & Sally Smith.
Use a Unique ID Generator stage to create an ID
for each of the split records.
true
Split conjoined names.
false
Do not split conjoined names.
Specifies whether to parse business names.
ParseBusinessNames
true
Parse business names.
Option.ParseBusinessNames
false
Do not parse business names.
Output results as list
OutputAsList
Option.OutputAsList
Shortcut threshold
ShortcutThreshold
Option.ShortcutThreshold
Specifies whether to return the parsed name
elements in a list form.
true
Return the parsed elements in a list
form.
false
Do not return the parsed elements in
a list form.
Specifies how to balance performance versus
quality. A faster performance will result in lower
quality output; likewise, higher quality will result in
slower performance. When this threshold is met,
no other processing will be performed on the
record.
Specify a value from 0 to 100. The default is 100.
Cultures OptionsParameters for Culture Options
The following table lists the options that control name cultures.
260
Spectrum™ Technology Platform 9.0 SP2
Chapter 8: Stages Reference
Table 52: Open Name Parser Cultures Options
Option Name
Description
optionName
Parameter
Cultures
DefaultCulture
Option.DefaultCulture
Specifies which culture(s) you want to include in
the parsing grammar. Global Culture is the default
selection.
Note: If you added your own domain using the
Open Parser Domain Editor, the cultures
and culture codes for that domain will
appear here as well.
Click the Up and Down buttons to set the order in
which you want the cultures to run.
Specify cultures by specifying the two-character
culture code in a comma-separated list in priority
order. For example, to attempt to parse the name
using the Spanish culture first then Japanese, you
would specify:
es,ja,,
Advanced OptionsParameters for Advanced Options
The following table lists the advanced options for name parsing.
Table 53: Open Name Parser Advanced Options
Option
Description
Advanced Options
Use the Domain drop-down to select the
appropriate domain for each Name.
Click the Up and Down buttons to set the order in
which you want the parsers to run. Results will be
returned for the first domain that scores higher than
the number set in the Shortcut threshold field. If
no domain reaches that threshold, results for the
domain with the highest score are returned. If
multiple domains reach the threshold at the same
time, priority goes to the domain that was run first
(determined by the order set here) and its results
will be returned.
Note: If you added your own domain using the
Open Parser Domain Editor, that domain
will appear here as well.
NaturalOrderPersonalNamesDomain
Option.NaturalOrderPersonalNamesDomain
Data Quality Guide
Specifies the domain to use when parsing natural
order personal names. The valid values are the
domain names defined in the Open Parser Domain
Editor too in Enterprise Designer.
261
Universal Name Module
Option
Description
NaturalOrderPersonalNamesPriority
Specify a number between 1 and 5 that indicates
the priority of the natural order personal names
domain relative to the other domains that you are
using. This determines the order in which you want
the parsers to run.
Option.NaturalOrderPersonalNamesPriority
Results will be returned for the first domain that
scores higher than the number set in the shortcut
threshold option. If no domain reaches that
threshold, results for the domain with the highest
score are returned. If multiple domains reach the
threshold at the same time, priority goes to the
domain that was run first (determined by the order
set here) and its results will be returned.
ReverseOrderPersonalNamesDomain
Option.ReverseOrderPersonalNamesDomain
ReverseOrderPersonalNamesPriority
Option.ReverseOrderPersonalNamesPriority
Specifies the domain to use when parsing reverse
order personal names. The valid values are the
domain names defined in the Open Parser Domain
Editor too in Enterprise Designer.
Specify a number between 1 and 5 that indicates
the priority of the reverse order personal names
domain relative to the other domains that you are
using. This determines the order in which you want
the parsers to run.
Results will be returned for the first domain that
scores higher than the number set in the shortcut
threshold option. If no domain reaches that
threshold, results for the domain with the highest
score are returned. If multiple domains reach the
threshold at the same time, priority goes to the
domain that was run first (determined by the order
set here) and its results will be returned.
NaturalOrderConjoinedPersonalNamesDomain
Specifies the domain to use when parsing natural
order conjoined personal names. The valid values
Option.NaturalOrderConjoinedPersonalNamesDomain
are the domain names defined in the Open Parser
Domain Editor too in Enterprise Designer.
NaturalOrderConjoinedPersonalNamesPriority
Specify a number between 1 and 5 that indicates
the priority of the natural order conjoined personal
Option.NaturalOrderConjoinedPersonalNamesPriority
names domain relative to the other domains that
you are using. This determines the order in which
you want the parsers to run.
Results will be returned for the first domain that
scores higher than the number set in the shortcut
threshold option. If no domain reaches that
threshold, results for the domain with the highest
score are returned. If multiple domains reach the
threshold at the same time, priority goes to the
domain that was run first (determined by the order
set here) and its results will be returned.
ReverseOrderConjoinedPersonalNamesDomain
Option.ReverseOrderConjoinedPersonalNamesDomain
262
Specifies the domain to use when parsing reverse
order conjoined personal names. The valid values
Spectrum™ Technology Platform 9.0 SP2
Chapter 8: Stages Reference
Option
Description
are the domain names defined in the Open Parser
Domain Editor too in Enterprise Designer.
ReverseOrderConjoinedPersonalNamesPriority
Specify a number between 1 and 5 that indicates
the priority of the reverse order conjoined personal
Option.ReverseOrderConjoinedPersonalNamesPriority
names domain relative to the other domains that
you are using. This determines the order in which
you want the parsers to run.
Results will be returned for the first domain that
scores higher than the number set in the shortcut
threshold option. If no domain reaches that
threshold, results for the domain with the highest
score are returned. If multiple domains reach the
threshold at the same time, priority goes to the
domain that was run first (determined by the order
set here) and its results will be returned.
BusinessNamesDomain
Specifies the domain to use when parsing business
names. The valid values are the domain names
defined in the Open Parser Domain Editor too in
Enterprise Designer.
Option.BusinessNamesDomain
BusinessNamesPriority
Specify a number between 1 and 5 that indicates
the priority of the business names domain relative
to the other domains that you are using. This
determines the order in which you want the parsers
to run.
Option.BusinessNamesPriority
Results will be returned for the first domain that
scores higher than the number set in the shortcut
threshold option. If no domain reaches that
threshold, results for the domain with the highest
score are returned. If multiple domains reach the
threshold at the same time, priority goes to the
domain that was run first (determined by the order
set here) and its results will be returned.
Request
InputParameters for Input Data
Table 54: Open Name Parser Input
Field Name
Description
columnName
Parameter
CultureCode
Data.CultureCode
Data Quality Guide
The culture of the input name data. The options are listed below.
Null (empty)
Global culture (default).
de
German.
es
Spanish.
263
Universal Name Module
Field Name
Description
columnName
Parameter
ja
Japanese.
Note: If you added your own domain using the Open Parser Domain
Editor, the cultures and culture codes for that domain are also
valid.
Name
The name you want to parse. This field is required.
Data.Name
Options
Parsing OptionsParameters for Parsing Options
The following table lists the options that control the parsing of names.
Table 55: Open Name Parser Parsing Options
Option Name
Description
optionName
Parameter
Parse personal names
ParseNaturalOrderPersonalNames
Option.ParseNaturalOrderPersonalNames
ParseReverseOrderPersonalNames
Option.ParseReverseOrderPersonalNames
Conjoined names
ParseConjoinedNames
264
Specifies whether to parse personal names.
Natural
The name fields are ordered by Title,
First Name, Middle Name, Last
Name, and Suffix.
Reverse
The name fields are ordered by Last
Name first.
Both
The name fields are ordered using a
combination of natural and reverse.
Specifies whether to parse names where the is in
the order Title, First Name, Middle Name, Last
Name, and Suffix.
true
Parse personal names that are in
natural order.
false
Do not parse names that are in
natural order.
Specifies whether to parse names where the last
name is specified first.
true
Parse personal names that are in
reverse order.
false
Do not parse names that are in
reverse order.
Specifies whether to parse conjoined names.
true
Parse conjoined names.
Spectrum™ Technology Platform 9.0 SP2
Chapter 8: Stages Reference
Option Name
Description
optionName
Parameter
Option.ParseConjoinedNames
Split conjoined names into multiple records
SplitConjoinedNames
Option.SplitConjoinedNames
Parse business names
false
Do not parse conjoined names.
Specifies whether to separate names containing
more than one individual into multiple records, for
example, Bill & Sally Smith.
Use a Unique ID Generator stage to create an ID
for each of the split records.
true
Split conjoined names.
false
Do not split conjoined names.
Specifies whether to parse business names.
ParseBusinessNames
true
Parse business names.
Option.ParseBusinessNames
false
Do not parse business names.
Output results as list
OutputAsList
Option.OutputAsList
Shortcut threshold
ShortcutThreshold
Option.ShortcutThreshold
Specifies whether to return the parsed name
elements in a list form.
true
Return the parsed elements in a list
form.
false
Do not return the parsed elements in
a list form.
Specifies how to balance performance versus
quality. A faster performance will result in lower
quality output; likewise, higher quality will result in
slower performance. When this threshold is met,
no other processing will be performed on the
record.
Specify a value from 0 to 100. The default is 100.
Cultures OptionsParameters for Culture Options
The following table lists the options that control name cultures.
Table 56: Open Name Parser Cultures Options
Option Name
Description
optionName
Parameter
Cultures
DefaultCulture
Option.DefaultCulture
Data Quality Guide
Specifies which culture(s) you want to include in
the parsing grammar. Global Culture is the default
selection.
Note: If you added your own domain using the
Open Parser Domain Editor, the cultures
and culture codes for that domain will
appear here as well.
265
Universal Name Module
Option Name
Description
optionName
Parameter
Click the Up and Down buttons to set the order in
which you want the cultures to run.
Specify cultures by specifying the two-character
culture code in a comma-separated list in priority
order. For example, to attempt to parse the name
using the Spanish culture first then Japanese, you
would specify:
es,ja,,
Advanced OptionsParameters for Advanced Options
The following table lists the advanced options for name parsing.
Table 57: Open Name Parser Advanced Options
Option
Description
Advanced Options
Use the Domain drop-down to select the
appropriate domain for each Name.
Click the Up and Down buttons to set the order in
which you want the parsers to run. Results will be
returned for the first domain that scores higher than
the number set in the Shortcut threshold field. If
no domain reaches that threshold, results for the
domain with the highest score are returned. If
multiple domains reach the threshold at the same
time, priority goes to the domain that was run first
(determined by the order set here) and its results
will be returned.
Note: If you added your own domain using the
Open Parser Domain Editor, that domain
will appear here as well.
NaturalOrderPersonalNamesDomain
Option.NaturalOrderPersonalNamesDomain
NaturalOrderPersonalNamesPriority
Option.NaturalOrderPersonalNamesPriority
Specifies the domain to use when parsing natural
order personal names. The valid values are the
domain names defined in the Open Parser Domain
Editor too in Enterprise Designer.
Specify a number between 1 and 5 that indicates
the priority of the natural order personal names
domain relative to the other domains that you are
using. This determines the order in which you want
the parsers to run.
Results will be returned for the first domain that
scores higher than the number set in the shortcut
threshold option. If no domain reaches that
threshold, results for the domain with the highest
score are returned. If multiple domains reach the
266
Spectrum™ Technology Platform 9.0 SP2
Chapter 8: Stages Reference
Option
Description
threshold at the same time, priority goes to the
domain that was run first (determined by the order
set here) and its results will be returned.
ReverseOrderPersonalNamesDomain
Option.ReverseOrderPersonalNamesDomain
ReverseOrderPersonalNamesPriority
Option.ReverseOrderPersonalNamesPriority
Specifies the domain to use when parsing reverse
order personal names. The valid values are the
domain names defined in the Open Parser Domain
Editor too in Enterprise Designer.
Specify a number between 1 and 5 that indicates
the priority of the reverse order personal names
domain relative to the other domains that you are
using. This determines the order in which you want
the parsers to run.
Results will be returned for the first domain that
scores higher than the number set in the shortcut
threshold option. If no domain reaches that
threshold, results for the domain with the highest
score are returned. If multiple domains reach the
threshold at the same time, priority goes to the
domain that was run first (determined by the order
set here) and its results will be returned.
NaturalOrderConjoinedPersonalNamesDomain
Specifies the domain to use when parsing natural
order conjoined personal names. The valid values
Option.NaturalOrderConjoinedPersonalNamesDomain
are the domain names defined in the Open Parser
Domain Editor too in Enterprise Designer.
NaturalOrderConjoinedPersonalNamesPriority
Specify a number between 1 and 5 that indicates
the priority of the natural order conjoined personal
Option.NaturalOrderConjoinedPersonalNamesPriority
names domain relative to the other domains that
you are using. This determines the order in which
you want the parsers to run.
Results will be returned for the first domain that
scores higher than the number set in the shortcut
threshold option. If no domain reaches that
threshold, results for the domain with the highest
score are returned. If multiple domains reach the
threshold at the same time, priority goes to the
domain that was run first (determined by the order
set here) and its results will be returned.
ReverseOrderConjoinedPersonalNamesDomain
Specifies the domain to use when parsing reverse
order conjoined personal names. The valid values
Option.ReverseOrderConjoinedPersonalNamesDomain
are the domain names defined in the Open Parser
Domain Editor too in Enterprise Designer.
ReverseOrderConjoinedPersonalNamesPriority
Specify a number between 1 and 5 that indicates
the priority of the reverse order conjoined personal
Option.ReverseOrderConjoinedPersonalNamesPriority
names domain relative to the other domains that
you are using. This determines the order in which
you want the parsers to run.
Results will be returned for the first domain that
scores higher than the number set in the shortcut
threshold option. If no domain reaches that
Data Quality Guide
267
Universal Name Module
Option
Description
threshold, results for the domain with the highest
score are returned. If multiple domains reach the
threshold at the same time, priority goes to the
domain that was run first (determined by the order
set here) and its results will be returned.
BusinessNamesDomain
Specifies the domain to use when parsing business
names. The valid values are the domain names
defined in the Open Parser Domain Editor too in
Enterprise Designer.
Option.BusinessNamesDomain
BusinessNamesPriority
Specify a number between 1 and 5 that indicates
the priority of the business names domain relative
to the other domains that you are using. This
determines the order in which you want the parsers
to run.
Option.BusinessNamesPriority
Results will be returned for the first domain that
scores higher than the number set in the shortcut
threshold option. If no domain reaches that
threshold, results for the domain with the highest
score are returned. If multiple domains reach the
threshold at the same time, priority goes to the
domain that was run first (determined by the order
set here) and its results will be returned.
OutputResponse
Table 58: Open Name Parser Output
Field Name
Format
Description
AccountDescription
String
An account description that is part of the name. For example,
in "Mary Jones Account # 12345", the account description is
"Account#12345".
Names
String
A hierarchical field that contains a list of parsed elements.
This field is returned when you check the Output results as
list box under Parsing Options.
columnName
Response Element
Fields Related to Names of Companies
FirmConjunction
String
Indicates that the name of a firm contains a conjunction such
as "d/b/a" (doing business as), "o/a" (operating as), and "t/a"
(trading as).
FirmName
String
The name of a company. For example, "Pitney Bowes".
FirmSuffix
String
The corporate suffix. For example, "Co." and "Inc."
IsFirm
String
Indicates that the name is a firm rather than an individual.
Fields Related to Names of
Individual People
268
Spectrum™ Technology Platform 9.0 SP2
Chapter 8: Stages Reference
Field Name
Format
Description
Conjunction
String
Indicates that the name contains a conjunction such as "and",
"or", or "&".
CultureCode
String
The culture codes contained in the input data.
CultureCodeUsedToParse
String
Identifies the culture-specific grammar that was used to parse
the data.
columnName
Response Element
Null (empty)
Global culture (default).
de
German.
es
Spanish.
ja
Japanese.
Note: If you added your own domain using the Open Parser
Domain Editor, the cultures and culture codes for
that domain will appear in this field as well.
FirstName
String
The first name of a person.
GeneralSuffix
String
A person's general/professional suffix. For example, MD or
PhD.
IsParsed
String
Indicates whether an output record was parsed. Values are
true or false.
IsPersonal
String
Indicates whether the name is an individual rather than a firm.
Values are true or false.
IsReverseOrder
String
Indicates whether the input name is in reverse order. Values
are true or false.
LastName
String
The last name of a person. Includes the paternal last name.
LeadingData
String
Non-name information that appears before a name.
MaturitySuffix
String
A person's maturity/generational suffix. For example, Jr. or
Sr.
MiddleName
String
The middle name of a person.
Name.
String
The personal or firm name that was provided in the input.
NameScore
String
Indicates the average score of known and unknown tokens
for each name. The value of NameScore will be between 0
and 100, as defined in the parsing grammar. 0 is returned
when no matches are returned.
SecondaryLastName
String
In Spanish parsing grammar, the surname of a person's
mother.
TitleOfRespect
String
Information that appears before a name, such as "Mr.", "Mrs.",
or "Dr."
TrailingData
String
Non-name information that appears after a name.
String
Indicates that a second, conjoined name contains a
conjunction such as "and", "or", or "&".
Fields Related to Conjoined
Names
Conjunction2
Data Quality Guide
269
Universal Name Module
Field Name
Format
Description
Conjunction3
String
Indicates that a third, conjoined name contains a conjunction
such as "and", "or", or "&".
FirmName2
String
The name of a second, conjoined company. For example,
Baltimore Gas & Electric dba Constellation Energy.
FirmSuffix2
String
The suffix of a second, conjoined company.
FirstName2
String
The first name of a second, conjoined name.
FirstName3
String
The first name of a third, conjoined name.
GeneralSuffix2
String
The general/professional suffix for a second, conjoined name.
For example, MD or PhD.
GeneralSuffix3
String
The general/professional suffix for a third, conjoined name.
For example, MD or PhD.
IsConjoined
String
Indicates that the input name is conjoined. An example of a
conjoined name is "John and Jane Smith".
LastName2
String
The last name of a second, conjoined name.
LastName3
String
The last name of a third, conjoined name.
MaturitySuffix2
String
The maturity/generational suffix for a second, conjoined name.
For example, Jr. or Sr.
MaturitySuffix3
String
The maturity/generational suffix for a third, conjoined name.
For example, Jr. or Sr.
MiddleName2
String
The middle name of a second, conjoined name.
MiddleName3
String
The middle name of a third, conjoined name.
TitleOfRespect2
String
Information that appears before a second, conjoined name,
such as "Mr.", "Mrs.", or "Dr."
TitleOfRespect3
String
Information that appears before a third, conjoined name, such
as "Mr.", "Mrs.", or "Dr."
columnName
Response Element
Open Name Parser Summary Report
The Open Name Parser Summary Report lists summary statistics about the job, such as the total number
of input records and the total number of records that contained no name data, as well as several parsing
statistics. For instructions on how to use reports, see the Spectrum™ Technology Platform Dataflow
Designer's Guide.
General Results
• Total number of input records—The number of records in the input file.
• Total number of records that contained no name data—The number of records in the input file that
did not contain name data to be parsed.
• Total number of names parsed out—The number of names in the input file that were parsed.
• Total Records—The total number of records processed.
• Lowest name parsing score—The lowest parsing score given to any name in the input file.
• Highest name parsing score—The highest parsing score given to any name in the input file.
270
Spectrum™ Technology Platform 9.0 SP2
Chapter 8: Stages Reference
• Average name parsing score—The average parsing score given among all parsed names in the
input file.
Personal Name Parsing Results
• Number of personal name records written—The number of personal names in the input file.
• Number of names parsed from conjoined names—The number of parsed names from records that
contained conjoined names. For example, if your input file had five records with two conjoined names
and seven records with three conjoined names, this value for this field would be 31, as expressed in
this equation: (5 x 2) + (7 x 3).
• Records with 2 conjoined names—The number of input records containing two conjoined names.
• Records with 3 conjoined names—The number of input records containing three conjoined names.
• Number of names with title of respect present—The number of parsed names containing a title of
respect.
• Number of names with maturity suffix present—The number of parsed names containing a maturity
suffix.
• Number of names with general suffix present— The number of parsed names containing a general
suffix.
• Number of names that contained account descriptions—The number of parsed names containing
an account description.
• Total Reverse Order Names—The number of parsed names in the reverse order, resulting in the
output field isReversed as "True".
Business Name Parsing Results
• Number of business name records written—The number of business names in the input file.
• Number of names with firm suffix present—The number of parsed names containing a firm suffix.
• Number of names that contained account descriptions—The number of input records containing
an account description.
• Total DBA Records—The number of input records containing Doing Business As (DBA) conjunctions,
resulting in both output fields isPersonal and isFirm as "True".
Data Quality Guide
271
ISO Country Codes and
Module Support
In this section:
• Country ISO Codes and Module Support . . . . . . . . . . . .274
9
Country ISO Codes and Module Support
Country ISO Codes and Module Support
The following table lists the ISO codes for each country as well as the modules that support addressing,
geocoding, and routing for each country.
Note that the Enterprise Geocoding Module includes databases for Africa (30 countries), Middle East (8
countries) and Latin America (20 countries). These databases cover the smaller countries in those
regions that do not have their own country-specific geocoding databases. The Supported Modules column
indicates which countries are covered by these Africa, Middle East, and Latin America databases.
Also, the Geocode Address World database provides geographic and limited postal geocoding (but not
street-level geocoding) for all countries.
2
274
ISO Country Name
ISO 3116-1
Alpha-2
ISO 3116-1
Alpha-3
Supported Modules
Afghanistan
AF
AFG
Address Now Module
Universal Addressing Module
Aland Islands
AX
ALA
Address Now Module
Universal Addressing Module
Albania
AL
ALB
Address Now Module
Universal Addressing Module
Algeria
DZ
DZA
Address Now Module
Universal Addressing Module
American Samoa
AS
ASM
Address Now Module
Universal Addressing Module
Andorra
AD
AND
Address Now Module
2
Enterprise Geocoding Module
Universal Addressing Module
GeoComplete Module
Angola
AO
AGO
Address Now Module
Enterprise Geocoding Module (Africa)
Universal Addressing Module
Anguilla
AI
AIA
Address Now Module
Universal Addressing Module
Antarctica
AQ
ATA
Address Now Module
Universal Addressing Module
Antigua And Barbuda
AG
ATG
Address Now Module
Universal Addressing Module
Argentina
AR
ARG
Address Now Module
Enterprise Geocoding Module
Universal Addressing Module
Andorra is covered by the Spain geocoder
Spectrum™ Technology Platform 9.0 SP2
Chapter 9: ISO Country Codes and Module Support
ISO Country Name
ISO 3116-1
Alpha-2
ISO 3116-1
Alpha-3
Supported Modules
Armenia
AM
ARM
Address Now Module
Universal Addressing Module
Aruba
AW
ABW
Address Now Module
Enterprise Geocoding Module (Latin
America)
Universal Addressing Module
Australia
AU
AUS
Address Now Module
Enterprise Geocoding Module
Enterprise Routing Module
Universal Addressing Module
Austria
AT
AUT
Address Now Module
Enterprise Geocoding Module
Enterprise Routing Module
Universal Addressing Module
GeoComplete Module
Azerbaijan
AZ
AZE
Address Now Module
Universal Addressing Module
Bahamas
BS
BHS
Address Now Module
Enterprise Geocoding Module
Universal Addressing Module
Bahrain
BH
BHR
Address Now Module
Enterprise Geocoding Module (Middle
East)
Universal Addressing Module
Bangladesh
BD
BGD
Address Now Module
Universal Addressing Module
Barbados
BB
BRB
Address Now Module
Enterprise Geocoding Module (Latin
America)
Universal Addressing Module
Belarus
BY
BLR
Address Now Module
Universal Addressing Module
Belgium
BE
BEL
Address Now Module
Enterprise Geocoding Module
Enterprise Routing Module
Universal Addressing Module
GeoComplete Module
Belize
BZ
BLZ
Address Now Module
Enterprise Geocoding Module (Latin
America)
Universal Addressing Module
Data Quality Guide
275
Country ISO Codes and Module Support
276
ISO Country Name
ISO 3116-1
Alpha-2
ISO 3116-1
Alpha-3
Supported Modules
Benin
BJ
BEN
Address Now Module
Enterprise Geocoding Module (Africa)
Universal Addressing Module
Bermuda
BM
BMU
Address Now Module
Universal Addressing Module
Bhutan
BT
BTN
Address Now Module
Universal Addressing Module
Bolivia, Plurinational State Of BO
BOL
Address Now Module
Enterprise Geocoding Module (Latin
America)
Universal Addressing Module
Bonaire, Saint Eustatius And BQ
Saba
BES
Address Now Module
Universal Addressing Module
Bosnia And Herzegovina
BA
BIH
Address Now Module
Universal Addressing Module
Botswana
BW
BWA
Address Now Module
Enterprise Geocoding Module (Africa)
Universal Addressing Module
Bouvet Island
BV
BVT
Address Now Module
Universal Addressing Module
Brazil
BR
BRA
Address Now Module
Enterprise Geocoding Module
Enterprise Routing Module
Universal Addressing Module
GeoComplete Module
British Indian Ocean Territory IO
IOT
Address Now Module
Universal Addressing Module
Brunei Darussalam
BN
BRN
Address Now Module
Universal Addressing Module
Bulgaria
BG
BGR
Address Now Module
Universal Addressing Module
Burkina Faso
BF
BFA
Address Now Module
Enterprise Geocoding Module (Africa)
Universal Addressing Module
Burundi
BI
BDI
Address Now Module
Enterprise Geocoding Module (Africa)
Universal Addressing Module
Cambodia
KH
KHM
Address Now Module
Universal Addressing Module
Spectrum™ Technology Platform 9.0 SP2
Chapter 9: ISO Country Codes and Module Support
ISO Country Name
ISO 3116-1
Alpha-2
ISO 3116-1
Alpha-3
Supported Modules
Cameroon
CM
CMR
Address Now Module
Enterprise Geocoding Module (Africa)
Universal Addressing Module
Canada
CA
CAN
Address Now Module
Enterprise Geocoding Module
Enterprise Routing Module
Universal Addressing Module
GeoComplete Module
Cape Verde
CV
CPV
Address Now Module
Universal Addressing Module
Cayman Islands
KY
CYM
Address Now Module
Universal Addressing Module
Central African Republic
CF
CAF
Address Now Module
Universal Addressing Module
Chad
TD
TCD
Address Now Module
Universal Addressing Module
Chile
CL
CHL
Address Now Module
Enterprise Geocoding Module
Universal Addressing Module
GeoComplete Module
China
CN
CHN
Address Now Module
Enterprise Geocoding Module
Universal Addressing Module
Christmas Island
CX
CXR
Address Now Module
Universal Addressing Module
Cocos (Keeling) Islands
CC
CCK
Address Now Module
Universal Addressing Module
Colombia
CO
COL
Address Now Module
Universal Addressing Module
Comoros
KM
COM
Address Now Module
Universal Addressing Module
Congo
CG
COG
Address Now Module
Enterprise Geocoding Module (Africa)
Universal Addressing Module
Congo, The Democratic
Republic Of The
CD
COD
Address Now Module
Enterprise Geocoding Module (Africa)
Universal Addressing Module
Cook Islands
CK
COK
Address Now Module
Universal Addressing Module
Data Quality Guide
277
Country ISO Codes and Module Support
278
ISO Country Name
ISO 3116-1
Alpha-2
ISO 3116-1
Alpha-3
Supported Modules
Costa Rica
CR
CRI
Address Now Module
Enterprise Geocoding Module (Latin
America)
Universal Addressing Module
Côte d'Ivoire
CI
CIV
Address Now Module
Universal Addressing Module
Croatia
HR
HRV
Address Now Module
Enterprise Geocoding Module
Enterprise Routing Module
Universal Addressing Module
Cuba
CU
CUB
Address Now Module
Enterprise Geocoding Module (Latin
America)
Universal Addressing Module
Curacao
CW
CUW
Address Now Module
Universal Addressing Module
Cyprus
CY
CYP
Address Now Module
Universal Addressing Module
Czech Republic
CZ
CZE
Address Now Module
Enterprise Geocoding Module
Universal Addressing Module
GeoComplete Module
Denmark
DK
DNK
Address Now Module
Enterprise Geocoding Module
Enterprise Routing Module
Universal Addressing Module
GeoComplete Module
Djibouti
DJ
DJI
Address Now Module
Universal Addressing Module
Dominica
DM
DMA
Address Now Module
Universal Addressing Module
Dominican Republic
DO
DOM
Address Now Module
Enterprise Geocoding Module (Latin
America)
Universal Addressing Module
Ecuador
EC
ECU
Address Now Module
Enterprise Geocoding Module (Latin
America)
Universal Addressing Module
Egypt
EG
EGY
Address Now Module
Enterprise Geocoding Module (Middle
East)
Universal Addressing Module
Spectrum™ Technology Platform 9.0 SP2
Chapter 9: ISO Country Codes and Module Support
3
ISO Country Name
ISO 3116-1
Alpha-2
ISO 3116-1
Alpha-3
Supported Modules
El Salvador
SV
SLV
Address Now Module
Enterprise Geocoding Module (Latin
America)
Universal Addressing Module
Equatorial Guinea
GQ
GNQ
Address Now Module
Universal Addressing Module
Eritrea
ER
ERI
Address Now Module
Universal Addressing Module
Estonia
EE
EST
Address Now Module
Enterprise Geocoding Module
Enterprise Routing Module
Universal Addressing Module
Ethiopia
ET
ETH
Address Now Module
Universal Addressing Module
Falkland Islands (Malvinas)
FK
FLK
Address Now Module
Universal Addressing Module
Faroe Islands
FO
FRO
Address Now Module
Universal Addressing Module
Fiji
FJ
FJI
Address Now Module
Universal Addressing Module
Finland
FI
FIN
Address Now Module
Enterprise Geocoding Module
Enterprise Routing Module
Universal Addressing Module
GeoComplete Module
France
FR
FRA
Address Now Module
Enterprise Geocoding Module
Enterprise Routing Module
Universal Addressing Module
GeoComplete Module
French Guiana
GF
GUF
Address Now Module
3
Enterprise Geocoding Module
Universal Addressing Module
French Polynesia
PF
PYF
Address Now Module
Universal Addressing Module
French Southern Territories
TF
ATF
Address Now Module
Universal Addressing Module
Gabon
GA
GAB
Address Now Module
Enterprise Geocoding Module (Africa)
Universal Addressing Module
French Guiana is covered by the France geocoder
Data Quality Guide
279
Country ISO Codes and Module Support
4
5
280
ISO Country Name
ISO 3116-1
Alpha-2
ISO 3116-1
Alpha-3
Supported Modules
Gambia
GM
GMB
Address Now Module
Universal Addressing Module
Georgia
GE
GEO
Address Now Module
Universal Addressing Module
Germany
DE
DEU
Address Now Module
Enterprise Geocoding Module
Enterprise Routing Module
Universal Addressing Module
GeoComplete Module
Ghana
GH
GHA
Address Now Module
Enterprise Geocoding Module (Africa)
Universal Addressing Module
Gibraltar
GI
GIB
Address Now Module
4
Enterprise Geocoding Module Universal
Addressing Module
Greece
GR
GRC
Address Now Module
Enterprise Geocoding Module
Universal Addressing Module
Greenland
GL
GRL
Address Now Module
Universal Addressing Module
Grenada
GD
GRD
Address Now Module
Universal Addressing Module
Guadeloupe
GP
GLP
Address Now Module
5
Enterprise Geocoding Module
Universal Addressing Module
Guam
GU
GUM
Address Now Module
Universal Addressing Module
Guatemala
GT
GTM
Address Now Module
Enterprise Geocoding Module (Latin
America)
Universal Addressing Module
Guernsey
GG
GGY
Address Now Module
Universal Addressing Module
Guinea
GN
GIN
Address Now Module
Universal Addressing Module
Guinea-Bissau
GW
GNB
Address Now Module
Universal Addressing Module
Gibraltar is covered by the Spain geocoder
Guadeloupe is covered by the France geocode
Spectrum™ Technology Platform 9.0 SP2
Chapter 9: ISO Country Codes and Module Support
6
ISO Country Name
ISO 3116-1
Alpha-2
ISO 3116-1
Alpha-3
Supported Modules
Guyana
GY
GUY
Address Now Module
Enterprise Geocoding Module (Latin
America)
Universal Addressing Module
Haiti
HT
HTI
Address Now Module
Universal Addressing Module
Heard Island and McDonald
Islands
HM
HMD
Address Now Module
Universal Addressing Module
Holy See (Vatican City State) VA
VAT
Address Now Module
6
Enterprise Geocoding Module
Universal Addressing Module
Honduras
HN
HND
Address Now Module
Enterprise Geocoding Module (Latin
America)
Universal Addressing Module
Hong Kong
HK
HKG
Address Now Module
Enterprise Geocoding Module
Universal Addressing Module
Hungary
HU
HUN
Address Now Module
Enterprise Geocoding Module
Enterprise Routing Module
Universal Addressing Module
GeoComplete Module
Iceland
IS
ISL
Address Now Module
Universal Addressing Module
India
IN
IND
Address Now Module
Enterprise Geocoding Module
Universal Addressing Module
Indonesia
ID
IDN
Address Now Module
Enterprise Geocoding Module
Universal Addressing Module
Iran, Islamic Republic Of
IR
IRN
Address Now Module
Universal Addressing Module
Iraq
IQ
IRQ
Address Now Module
Universal Addressing Module
Ireland
IE
IRL
Address Now Module
Enterprise Geocoding Module
Enterprise Routing Module
Universal Addressing Module
GeoComplete Module
The Vatican is covered by the Italy geocoder
Data Quality Guide
281
Country ISO Codes and Module Support
282
ISO Country Name
ISO 3116-1
Alpha-2
ISO 3116-1
Alpha-3
Supported Modules
Isle Of Man
IM
IMN
Address Now Module
Universal Addressing Module
Israel
IL
ISR
Address Now Module
Universal Addressing Module
Italy
IT
ITA
Address Now Module
Enterprise Geocoding Module
Enterprise Routing Module
Universal Addressing Module
GeoComplete Module
Jamaica
JM
JAM
Address Now Module
Enterprise Geocoding Module (Latin
America)
Universal Addressing Module
Japan
JP
JPN
Address Now Module
Enterprise Geocoding Module
Enterprise Routing Module
Universal Addressing Module
GeoComplete Module
Jersey
JE
JEY
Address Now Module
Universal Addressing Module
Jordan
JO
JOR
Address Now Module
Universal Addressing Module
Kazakhstan
KZ
KAZ
Address Now Module
Universal Addressing Module
Kenya
KE
KEN
Address Now Module
Enterprise Geocoding Module (Africa)
Universal Addressing Module
Kiribati
KI
KIR
Address Now Module
Universal Addressing Module
Korea, Democratic People's
Republic Of
KP
PRK
Address Now Module
Universal Addressing Module
Korea, Republic Of
KR
KOR
Address Now Module
Universal Addressing Module
Kosovo
KS
KOS
Address Now Module
Universal Addressing Module
GeoComplete Module
Kuwait
KW
KWT
Address Now Module
Enterprise Geocoding Module (Middle
East)
Universal Addressing Module
Spectrum™ Technology Platform 9.0 SP2
Chapter 9: ISO Country Codes and Module Support
7
8
ISO Country Name
ISO 3116-1
Alpha-2
ISO 3116-1
Alpha-3
Supported Modules
Kyrgyzstan
KG
KGZ
Address Now Module
Universal Addressing Module
Lao People's Democratic
Republic
LA
LAO
Address Now Module
Universal Addressing Module
Latvia
LV
LVA
Address Now Module
Enterprise Geocoding Module
Enterprise Routing Module
Universal Addressing Module
Lebanon
LB
LBN
Address Now Module
Enterprise Geocoding Module (Middle
East)
Universal Addressing Module
Lesotho
LS
LSO
Address Now Module
Enterprise Geocoding Module (Africa)
Universal Addressing Module
Liberia
LR
LBR
Address Now Module
Universal Addressing Module
Libyan Arab Jamahiriya
LY
LBY
Address Now Module
Universal Addressing Module
Liechtenstein
LI
LIE
Address Now Module
7
Enterprise Geocoding Module
Enterprise Routing Module
Universal Addressing Module
GeoComplete Module
Lithuania
LT
LTU
Address Now Module
Enterprise Geocoding Module
Enterprise Routing Module
Universal Addressing Module
Luxembourg
LU
LUX
Address Now Module
8
Enterprise Geocoding Module
Enterprise Routing Module
Universal Addressing Module
GeoComplete Module
Macao
MO
MAC
Address Now Module
Enterprise Geocoding Module
Universal Addressing Module
Macedonia, Former Yugoslav MK
Republic Of
MKD
Address Now Module
Universal Addressing Module
Madagascar
MDG
Address Now Module
Universal Addressing Module
MG
Liechtenstein is covered by the Switzerland geocoder
Luxembourg is covered by the Belgium geocoder
Data Quality Guide
283
Country ISO Codes and Module Support
9
10
284
ISO Country Name
ISO 3116-1
Alpha-2
ISO 3116-1
Alpha-3
Supported Modules
Malawi
MW
MWI
Address Now Module
Enterprise Geocoding Module (Africa)
Universal Addressing Module
Malaysia
MY
MYS
Address Now Module
Enterprise Geocoding Module
Enterprise Routing Module
Universal Addressing Module
Maldives
MV
MDV
Address Now Module
Universal Addressing Module
Mali
ML
MLI
Address Now Module
Enterprise Geocoding Module (Africa)
Universal Addressing Module
Malta
ML
MLT
Address Now Module
Universal Addressing Module
Marshall Islands
MH
MHL
Address Now Module
Universal Addressing Module
Martinique
MQ
MTQ
Address Now Module
Enterprise Geocoding Module
Guadeloupe is covered by the France
geocode Universal Addressing Module
Mauritania
MR
MRT
Address Now Module
Enterprise Geocoding Module (Africa)
Universal Addressing Module
Mauritius
MU
MUS
Address Now Module
Enterprise Geocoding Module (Africa)
Universal Addressing Module
Mayotte
YT
MYT
Address Now Module
Enterprise Geocoding Module Universal
Addressing Module
Mexico
MX
MEX
Address Now Module
Enterprise Geocoding Module
Universal Addressing Module
Micronesia, Federated States FM
Of
FSM
Address Now Module
Universal Addressing Module
Moldova, Republic Of
MDA
Address Now Module
Universal Addressing Module
MD
Martinique is covered by the France geocoder.
Mayotte is covered by the France geocoder.
Spectrum™ Technology Platform 9.0 SP2
Chapter 9: ISO Country Codes and Module Support
11
ISO Country Name
ISO 3116-1
Alpha-2
ISO 3116-1
Alpha-3
Supported Modules
Monaco
MC
MCO
Address Now Module
Enterprise Geocoding Module
11
Universal Addressing Module
Mongolia
MN
MNG
Address Now Module
Universal Addressing Module
Montenegro
ME
MNE
Address Now Module
Universal Addressing Module
Montserrat
MS
MSR
Address Now Module
Universal Addressing Module
Morocco
MA
MAR
Address Now Module
Enterprise Geocoding Module (Africa)
Universal Addressing Module
Mozambique
MZ
MOZ
Address Now Module
Enterprise Geocoding Module (Africa)
Universal Addressing Module
Myanmar
MM
MMR
Address Now Module
Universal Addressing Module
Namibia
NA
NAM
Address Now Module
Enterprise Geocoding Module (Africa)
Universal Addressing Module
Nauru
NR
NRU
Address Now Module
Universal Addressing Module
Nepal
NP
NPL
Address Now Module
Universal Addressing Module
Netherlands
NL
NLD
Address Now Module
Enterprise Geocoding Module
Enterprise Routing Module
Universal Addressing Module
GeoComplete Module
New Caledonia
NC
NCL
Address Now Module
Universal Addressing Module
New Zealand
NZ
NZL
Address Now Module
Enterprise Geocoding Module
Enterprise Routing Module
Universal Addressing Module
Nicaragua
NI
NIC
Address Now Module
Enterprise Geocoding Module (Latin
America)
Universal Addressing Module
Monaco is covered by the France geocoder
Data Quality Guide
285
Country ISO Codes and Module Support
286
ISO Country Name
ISO 3116-1
Alpha-2
ISO 3116-1
Alpha-3
Supported Modules
Niger
NE
NER
Address Now Module
Enterprise Geocoding Module (Africa)
Universal Addressing Module
Nigeria
NG
NGA
Address Now Module
Enterprise Geocoding Module (Africa)
Universal Addressing Module
Niue
NU
NIU
Address Now Module
Universal Addressing Module
Norfolk Island
NF
NFK
Address Now Module
Universal Addressing Module
Northern Mariana Islands
MP
MNP
Address Now Module
Universal Addressing Module
Norway
NO
NOR
Address Now Module
Enterprise Geocoding Module
Enterprise Routing Module
Universal Addressing Module
GeoComplete Module
Oman
OM
OMN
Address Now Module
Enterprise Geocoding Module (Middle
East)
Universal Addressing Module
Pakistan
PK
PAK
Address Now Module
Universal Addressing Module
Palau
PW
PLW
Address Now Module
Universal Addressing Module
Palestinian Territory,
Occupied
PS
PSE
Address Now Module
Universal Addressing Module
Panama
PA
PAN
Address Now Module
Enterprise Geocoding Module (Latin
America)
Universal Addressing Module
Papua New Guinea
PG
PNG
Address Now Module
Universal Addressing Module
Paraguay
PY
PRY
Address Now Module
Enterprise Geocoding Module (Latin
America)
Universal Addressing Module
Peru
PE
PER
Address Now Module
Enterprise Geocoding Module (Latin
America)
Universal Addressing Module
Spectrum™ Technology Platform 9.0 SP2
Chapter 9: ISO Country Codes and Module Support
ISO Country Name
ISO 3116-1
Alpha-2
ISO 3116-1
Alpha-3
Supported Modules
Philippines
PH
PHL
Address Now Module
Enterprise Geocoding Module
Universal Addressing Module
Pitcairn
PN
PCN
Address Now Module
Universal Addressing Module
Poland
PL
POL
Address Now Module
Enterprise Geocoding Module
Enterprise Routing Module
Universal Addressing Module
GeoComplete Module
Portugal
PT
PRT
Address Now Module
Enterprise Geocoding Module
Enterprise Routing Module
Universal Addressing Module
GeoComplete Module
Puerto Rico
PR
PRI
Address Now Module
Universal Addressing Module
Qatar
QA
QAT
Address Now Module
Enterprise Geocoding Module (Middle
East)
Universal Addressing Module
Reunion
RE
REU
Address Now Module
Enterprise Geocoding Module
12
Universal Addressing Module
Romania
RO
ROU
Address Now Module
Universal Addressing Module
Enterprise Routing Module
12
Russian Federation
RU
RUS
Address Now Module
Enterprise Geocoding Module
Enterprise Routing Module
Universal Addressing Module
GeoComplete Module
Rwanda
RW
RWA
Address Now Module
Enterprise Geocoding Module (Africa)
Universal Addressing Module
Saint Barthelemy
BL
BLM
Address Now Module
Universal Addressing Module
Saint Helena, Ascension &
Tristan Da Cunha
SH
SHE
Address Now Module
Universal Addressing Module
Reunion is covered by the France geocoder
Data Quality Guide
287
Country ISO Codes and Module Support
13
288
ISO Country Name
ISO 3116-1
Alpha-2
ISO 3116-1
Alpha-3
Supported Modules
Saint Kitts and Nevis
KN
KNA
Address Now Module
Enterprise Geocoding Module (Latin
America)
Universal Addressing Module
Saint Lucia
LC
LCA
Address Now Module
Universal Addressing Module
Saint Martin (French Part)
MF
MAF
Address Now Module
Universal Addressing Module
Saint Pierre and Miquelon
PM
SPM
Address Now Module
Universal Addressing Module
Saint Vincent And The
Grenadines
VC
VCT
Address Now Module
Universal Addressing Module
Samoa
WS
WSM
Address Now Module
Universal Addressing Module
San Marino
SM
SMR
Address Now Module
13
Enterprise Geocoding Module
Universal Addressing Module
Sao Tome And Principe
ST
STP
Address Now Module
Universal Addressing Module
Saudi Arabia
SA
SAU
Address Now Module
Enterprise Geocoding Module (Middle
East)
Universal Addressing Module
Senegal
SN
SEN
Address Now Module
Enterprise Geocoding Module (Africa)
Universal Addressing Module
Serbia
RS
SRB
Address Now Module
Universal Addressing Module
Seychelles
SC
SYC
Address Now Module
Universal Addressing Module
Sierra Leone
SL
SLE
Address Now Module
Universal Addressing Module
Singapore
SG
SGP
Address Now Module
Enterprise Geocoding Module
Enterprise Routing Module
Universal Addressing Module
GeoComplete Module
Sint Maarten (Dutch Part)
SX
SXM
Universal Addressing Module
San Marino is covered by the Italy geocoder
Spectrum™ Technology Platform 9.0 SP2
Chapter 9: ISO Country Codes and Module Support
ISO Country Name
ISO 3116-1
Alpha-2
ISO 3116-1
Alpha-3
Supported Modules
Slovakia
SK
SVK
Address Now Module
Enterprise Geocoding Module
Enterprise Routing Module
Universal Addressing Module
GeoComplete Module
Slovenia
SI
SVN
Address Now Module
Enterprise Geocoding Module
Enterprise Routing Module
Universal Addressing Module
GeoComplete Module
Solomon Islands
SB
SLB
Address Now Module
Universal Addressing Module
Somalia
SO
SOM
Address Now Module
Universal Addressing Module
South Africa
ZA
ZAF
Address Now Module
Enterprise Geocoding Module
Universal Addressing Module
GeoComplete Module
South Georgia And The South GS
Sandwich Islands
SGS
Address Now Module
Enterprise Geocoding Module
Universal Addressing Module
South Sudan
SS
SSD
Address Now Module
Universal Addressing Module
Spain
ES
ESP
Address Now Module
Enterprise Geocoding Module
Enterprise Routing Module
Universal Addressing Module
GeoComplete Module
Sri Lanka
LK
LKA
Address Now Module
Universal Addressing Module
Sudan
SD
SDN
Address Now Module
Universal Addressing Module
Suriname
SR
SUR
Address Now Module
Enterprise Geocoding Module (Latin
America)
Universal Addressing Module
Svalbard And Jan Mayen
SJ
SJM
Address Now Module
Universal Addressing Module
Swaziland
SZ
SWZ
Address Now Module
Enterprise Geocoding Module (Africa)
Universal Addressing Module
Data Quality Guide
289
Country ISO Codes and Module Support
290
ISO Country Name
ISO 3116-1
Alpha-2
ISO 3116-1
Alpha-3
Supported Modules
Sweden
SE
SWE
Address Now Module
Enterprise Geocoding Module
Enterprise Routing Module
Universal Addressing Module
GeoComplete Module
Switzerland
CH
CHE
Address Now Module
Enterprise Geocoding Module
Enterprise Routing Module
Universal Addressing Module
GeoComplete Module
Syrian Arab Republic
SY
SYR
Address Now Module
Universal Addressing Module
Taiwan, Province of China
TW
TWN
Address Now Module
Universal Addressing Module
Tajikistan
TJ
TJK
Address Now Module
Universal Addressing Module
Tanzania, United Republic Of TZ
TZA
Address Now Module
Enterprise Geocoding Module (Africa)
Universal Addressing Module
Thailand
TH
THA
Address Now Module
Enterprise Geocoding Module
Enterprise Routing Module
Universal Addressing Module
Timor-Leste
TL
TLS
Address Now Module
Universal Addressing Module
Togo
TG
TGO
Address Now Module
Enterprise Geocoding Module (Africa)
Universal Addressing Module
Tokelau
TK
TKL
Address Now Module
Universal Addressing Module
Tonga
TO
TON
Address Now Module
Universal Addressing Module
Trinidad and Tobago
TT
TTO
Address Now Module
Enterprise Geocoding Module (Latin
America)
Universal Addressing Module
Tunisia
TN
TUN
Address Now Module
Enterprise Geocoding Module (Africa)
Universal Addressing Module
Turkey
TR
TUR
Address Now Module
Enterprise Geocoding Module
Enterprise Routing Module
Spectrum™ Technology Platform 9.0 SP2
Chapter 9: ISO Country Codes and Module Support
ISO Country Name
ISO 3116-1
Alpha-2
ISO 3116-1
Alpha-3
Supported Modules
Universal Addressing Module
GeoComplete Module
Turkmenistan
TM
TKM
Address Now Module
Universal Addressing Module
Turks And Caicos Islands
TC
TCA
Address Now Module
Universal Addressing Module
Tuvalu
TV
TUV
Address Now Module
Universal Addressing Module
Uganda
UG
UGA
Address Now Module
Enterprise Geocoding Module (Africa)
Universal Addressing Module
Ukraine
UA
UKR
Address Now Module
Enterprise Geocoding Module
Universal Addressing Module
United Arab Emirates
AE
ARE
Address Now Module
Enterprise Geocoding Module (Middle
East)
Universal Addressing Module
United Kingdom
GB
GBR
Address Now Module
Enterprise Geocoding Module
Enterprise Routing Module
Universal Addressing Module
GeoComplete Module
United States
US
USA
Address Now Module
Enterprise Geocoding Module
Enterprise Routing Module
Universal Addressing Module
GeoComplete Module
United States Minor Outlying UM
Islands
UMI
Address Now Module
Universal Addressing Module
Uruguay
UY
URY
Address Now Module
Enterprise Geocoding Module
Universal Addressing Module
Uzbekistan
UZ
UZB
Address Now Module
Universal Addressing Module
Vanuatu
VU
VUT
Address Now Module
Universal Addressing Module
Venezuela, Bolivarian
Republic Of
VE
VEN
Address Now Module
Enterprise Geocoding Module
Universal Addressing Module
Data Quality Guide
291
Country ISO Codes and Module Support
292
ISO Country Name
ISO 3116-1
Alpha-2
ISO 3116-1
Alpha-3
Supported Modules
Viet Nam
VN
VNM
Address Now Module
Universal Addressing Module
Virgin Islands, British
VG
VGB
Address Now Module
Universal Addressing Module
Virgin Islands, U.S.
VI
VIR
Address Now Module
Universal Addressing Module
Wallis and Futuna
WF
WLF
Address Now Module
Universal Addressing Module
Western Sahara
EH
ESH
Address Now Module
Universal Addressing Module
Yemen
YE
YEM
Address Now Module
Universal Addressing Module
Zambia
ZM
ZMB
Address Now Module
Enterprise Geocoding Module (Africa)
Universal Addressing Module
Zimbabwe
ZW
ZWE
Address Now Module
Enterprise Geocoding Module (Africa)
Universal Addressing Module
Spectrum™ Technology Platform 9.0 SP2
Notices
©
2014 Pitney Bowes Software Inc. All rights reserved. MapInfo and Group 1 Software are trademarks
of Pitney Bowes Software Inc. All other marks and trademarks are property of their respective holders.
®
USPS Notices
®
Pitney Bowes Inc. holds a non-exclusive license to publish and sell ZIP + 4 databases on optical and
magnetic media. The following trademarks are owned by the United States Postal Service: CASS, CASS
Link
Link
Certified, DPV, eLOT, FASTforward, First-Class Mail, Intelligent Mail, LACS , NCOA , PAVE,
Link
PLANET Code, Postal Service, POSTNET, Post Office, RDI, Suite
, United States Postal Service,
Standard Mail, United States Post Office, USPS, ZIP Code, and ZIP + 4. This list is not exhaustive of
the trademarks belonging to the Postal Service.
Link®
®
Pitney Bowes Inc. is a non-exclusive licensee of USPS for NCOA
processing.
Prices for Pitney Bowes Software's products, options, and services are not established, controlled, or
™
approved by USPS® or United States Government. When utilizing RDI data to determine parcel-shipping
®
costs, the business decision on which parcel delivery company to use is not made by the USPS or
United States Government.
Data Provider and Related Notices
Data Products contained on this media and used within Pitney Bowes Software applications are protected
by various trademarks and by one or more of the following copyrights:
©
Copyright United States Postal Service. All rights reserved.
©
2014 TomTom. All rights reserved. TomTom and the TomTom logo are registered trademarks of
TomTom N.V.
©
Copyright NAVTEQ. All rights reserved
Data © 2014 NAVTEQ North America, LLC
Fuente: INEGI (Instituto Nacional de Estadística y Geografía)
Based upon electronic data © National Land Survey Sweden.
©
Copyright United States Census Bureau
©
Copyright Nova Marketing Group, Inc.
Portions of this program are © Copyright 1993-2007 by Nova Marketing Group Inc. All Rights Reserved
©
Copyright Second Decimal, LLC
©
Copyright Canada Post Corporation
This CD-ROM contains data from a compilation in which Canada Post Corporation is the copyright owner.
©
2007 Claritas, Inc.
The Geocode Address World data set contains data licensed from the GeoNames Project
(www.geonames.org) provided under the Creative Commons Attribution License ("Attribution License")
located at http://creativecommons.org/licenses/by/3.0/legalcode. Your use of the GeoNames data
(described in the Spectrum™ Technology Platform User Manual) is governed by the terms of the Attribution
License, and any conflict between your agreement with Pitney Bowes Software, Inc. and the Attribution
License will be resolved in favor of the Attribution License solely as it relates to your use of the GeoNames
data.
ICU Notices
Copyright © 1995-2011 International Business Machines Corporation and others.
All rights reserved.
Permission is hereby granted, free of charge, to any person obtaining a copy of this software and
associated documentation files (the "Software"), to deal in the Software without restriction, including
without limitation the rights to use, copy, modify, merge, publish, distribute, and/or sell copies of the
294
Spectrum™ Technology Platform 9.0 SP2
Copyright
Software, and to permit persons to whom the Software is furnished to do so, provided that the above
copyright notice(s) and this permission notice appear in all copies of the Software and that both the
above copyright notice(s) and this permission notice appear in supporting documentation.
THE SOFTWARE IS PROVIDED "AS IS", WITHOUT WARRANTY OF ANY KIND, EXPRESS OR
IMPLIED, INCLUDING BUT NOT LIMITED TO THE WARRANTIES OF MERCHANTABILITY, FITNESS
FOR A PARTICULAR PURPOSE AND NONINFRINGEMENT OF THIRD PARTY RIGHTS. IN NO
EVENT SHALL THE COPYRIGHT HOLDER OR HOLDERS INCLUDED IN THIS NOTICE BE LIABLE
FOR ANY CLAIM, OR ANY SPECIAL INDIRECT OR CONSEQUENTIAL DAMAGES, OR ANY DAMAGES
WHATSOEVER RESULTING FROM LOSS OF USE, DATA OR PROFITS, WHETHER IN AN ACTION
OF CONTRACT, NEGLIGENCE OR OTHER TORTIOUS ACTION, ARISING OUT OF OR IN
CONNECTION WITH THE USE OR PERFORMANCE OF THIS SOFTWARE.
Except as contained in this notice, the name of a copyright holder shall not be used in advertising or
otherwise to promote the sale, use or other dealings in this Software without prior written authorization
of the copyright holder.
Data Quality Guide
295