1
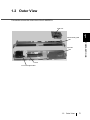
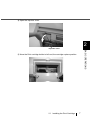
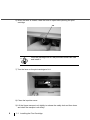
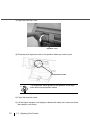
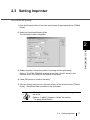
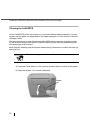
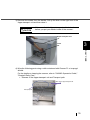
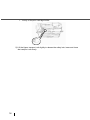
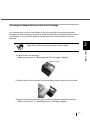
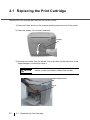
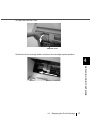
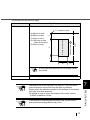
P3PC-E377-01XA
fi-486PRFR Imprinter
Operator’s Guide
Operator’s Guide
English
Japanese
fi-486PRFR Imprinter
Operator’s Guide
Operator’s Guide
English
INTRODUCTION
Thank you for purchasing the fi-486PRFR Imprinter.
The fi-486PRFR is the fi-4860C image scanner option.
The fi-486PRFR and the fi-486PRRE can be installed in the fi-4860C image
scanner together.However, they cannot be used at a time.Either fi-486PRRE or
fi-486PRFR can be used during scanning.
ATTENTION
The fi-486PRFR installation should be done by a trained service engineer.
fi-486PRFR
The fi-486PRFR prints on the front side of documents.
Printing is done prior to scanning a document and the printed
characters are scanned and included in the scanned image.
About this manual
The contents of this manual are as follows.
1. PREPARATIONS
This chapter explains the contents of the imprinter package and the
part names.
2. BASIC OPERATIONS
This chapter describes how to use the imprinters.
3. DAILY CARE
This chapter describes how to clean the imprinter and the related area
of the scanner.
4. REPLACING PRINT CARTRIDGE
This chapter explains how to replace the Print cartridge and reset the
Ink remain counter.
5. PRECAUTION
This chapter explains important details for ensuring the correct use of
the products.
i
6. ERROR MESSAGES
This chapter explains the error messages and the recovery process.
7. SPECIFICATIONS
This chapter describes the specifications of the fi-486PRFR imprinter
option.
This manual provides necessary information to make the best use of the
fi-486PRFR.
August, 2002
ii
■ Revisions
FCC declaration
This equipment has been tested and found to comply with the limits for a Class A
digital device, pursuant to Part 15 of the FCC Rules. These limits are designed to
provide reasonable protection against harmful interference when the equipment is
operated in a commercial environment. This equipment generates, uses, and can
radiate radio frequency energy and, if not installed and used in accordance with the
instruction manual, may cause harmful interference to radio communications.
Operation of this equipment in a residential area is likely to cause harmful
interference in which case the user will be required to correct the interference at his
own expense.
CAUTION
ATTENTION
Changes or modifications not expressly
approved by the party responsible for compliance could void the user’s authority to operate
the equipment.
•
The use of a shielded interface cable is
required to comply with the Class A limits
of Part 15 of FCC rules. The length of the
SCSI interface cable must be 1.5 meters
(5 feet) or less.
•
The length of the AC cable must be 3
meters (10 feet) or less.
Canadian DOC Regulations
This digital apparatus does not exceed the Class A limit for radio noise emissions
from digital apparatus set out in the Radio interference Regulations of the Canadian
Department of Communications.
Le pésent appareil numérique n’ément pas de bruits radioélectriques dépassant les
limites applicables aux appareils numériques de la classe A prescridtes dans le
Réglesment sur le brouillage radioélectrique dicté par le ministere des
Communications du Canada.
Cet appareil numérique de la classe A est conformme à la norme NMB-003 du
Canada.
iii
International ENERGY STAR® Program
As an ENERGY STAR® Partner, PFU LIMITED has determined
that this product meets the ENERGY STAR® guidelines for energy
efficiency.
The International ENERGY STAR® Office Equipment Program is
an international program that promotes energy saving through the penetration of
energy efficient computers and other office equipment. The program backs the
development and dissemination of products with functions that effectively reduce
energy consumption. It is an open system in which business proprietors can
participate voluntarily. The targeted products are office equipment such as
computers, monitors, printers, facsimiles, copiers, scanners, and multifunction
devices. Their standards and logos (
nations.
) are uniform among participating
Use in High-safety Applications
This product has been designed and manufactured on the assumption that it will be
used in office, personal, domestic, regular industrial, and general-purpose
applications. It has not been designed and manufactured for use in applications
(simply called "high-safety applications" from here on) that directly involve serious
danger to life and health when an extremely high degree of safety is required, for
example, in the control of nuclear reactions at nuclear power facilities, automatic
flight control of aircraft, air traffic control, operation control in mass-transport
systems, medical equipment for sustaining life, and missile firing control in weapons
systems, and when provisionally the safety in question is not ensured. The user
should use this product without adopting measures for ensuring safety in such highsafety applications. PFU LIMITED assumes no liability whatsoever for damages
arising from use of this product by the user in high-safety applications, and for any
claims or compensation for damages by the user or a third party.
All Rights Reserved, Copyright© PFU LIMITED 2002.
iv
■ Preface
Safety Precautions
This manual describes important details for ensuring the safe and correct use of
this product. Thoroughly read this manual before you start to use this product. In
particular, be sure to read and fully understand the Safety Precautions described in
this manual before you use this product.
Also, store this manual in a safe place so that it can be easily referred to during use
of this product.
Warning Indications Used In This Manual
This manual uses the following indications to ensure safe and correct use of this
product, and to prevent possible danger and injury to the operator and other
persons.
CAUTION
WARNING
This indication alerts operators to an operation that, if not
strictly observed, may result in severe injury or death.
This indication alerts operators to an operation that, if not
strictly observed, may result in safety hazards to personnel
or damage to equipment.
v
Symbols Used In This Manual
This manual uses the following symbols in explanations in addition to warning
indications.
ATTENTION
This symbol alerts operators to particularly important information.
Be sure to read this information.
This symbol alerts operators to helpful advice regarding operation.
HINT
A TRIANGLE symbol indicates that special care and attention is
required.
The drawing inside the triangle shows the specific caution.
A CIRCLE with a diagonal line inside shows action which users
are not allowed to do.The drawing inside or under the circle shows
the specific action that is not allowed.
R
vi
Outline characters on a colored background shows instructions
users should follow. It may include the drawing which shows the
sepecific instruction.
■ Safety Precautions
WARNING
The following describes important warnings described in this manual.
Do not install in locations subject to oil smoke, steam, humidity, and
dust.
Do not install the scanner in locations subject to oil smoke, steam,
humidity, and dust. Doing so might cause fire or electric shock.
Do not use the scanner if you smell strange odor.
If you sense heat coming from devices or detect other malfunctions
such as smoke, strange smells or strange noises, immediately press
down the power button to turn off the scanner and then disconnect
its power plug.
Make sure that the smoke has disappeared, and then contact the
agent where you bought the scanner.
vii
Do not allow liquids to get inside the scanner.
Do not insert or drop foreign metal objects in to the scanner.
Do not scan wet document or document with paper clips.
Do not splash or allow the scanner to get wet.
If foreign objects (water, small metal objects, liquids, etc.) get inside
the scanner, immediately press down the power button to turn off the
scanner and disconnect the power plug from the power outlet.
Then contact the agent where you bought the scanner or Maintenance Service Center.
Pay particular attention to this warning in households where there
are small children.
viii
CAUTION
The following describes important cautions described in this manual.
Protect the scanner from static electricity.
Install the scanner away from strong magnetic fields and other
sources of noise. Also, protect the scanner from static electricity as
this might cause the scanner to malfunction.
Do not use aerosol sprays near the scanner.
Do not use aerosol sprays, for example, to clean the scanner. Air
sprayed from aerosol sprays causes dirt and dust to enter the
scanner, resulting scanner failure and malfunction.
Do not install the scanner in the direct sunlight.
Do not install the scanner in the direct sunlight or near heating
apparatus. Doing so might cause heat to build up inside the scanner,
causing fire or scanner trouble. Install the scanner in a wellventilated location.
ix
■ Fujitsu Group Offices
Please send your comments on this manual or on Fujitsu products to the following
addresses:
x
FUJITSU COMPUTER PRODUCTS OF
AMERICA, INC.
2904 Orchard Parkway, San Jose, CA
95134-2009, U.S.A.
Phone: (1-800)591-5924;
(1-408)432-6333
Technical Assistance Center:
(1-800)626-4686
Fax: (1-408)894-1709
Website: http://www.fcpa.com/
E-mail: [email protected]
FUJITSU CANADA, INC.
2800 Matheson Boulevard East,
Mississauga, Ontario L4W 4X5, Canada
Phone: (1-905)602-5454
Fax: (1-905)602-5457
Website: http://www.fujitsu.ca/
E-mail: [email protected]
(For Sales Questions)
[email protected]
(For technical questions)
FUJITSU EUROPE LTD.
Hayes Park Central, Hayes End Road,
Hayes Middlesex UB4 8FE, U.K.
Phone: (44-208)573-4444
Fax: (44-208)573-2643
Website: http://www.fujitsueurope.com/
E-mail: [email protected]
FUJITSU DEUTSCHLAND GMBH.
Frankfurter Ring 211, 80807 München
40, Germany
Phone: (49-89)323-78-0
Fax: (49-89)323-78-100
Website: http://de.fujitsu.com/
E-mail: [email protected]
FUJITSU ITALIA S.p.A.
Via Nazario Sauro, 38
20099 Sesto San Giovanni (Milan), Italy
Phone: (39-02)26294-1
Fax: (39-02)26294-201
Website: http://www.fujitsu-europe.com/
FUJITSU ICL ESPAÑA, S.A.
Camino Cerro de los Gamos, 1 28224,
Pozuelo de Alarcon, Madrid, Spain
Phone: (34-91)784-9000
Fax: (34-91)784-9379
Website: http://www.fujitsu-europe.com/
E-mail: [email protected]
FUJITSU AUSTRALIA LTD.
Fujitsu House 2 Julius Avenue
North Ryde, N.S.W 2113 Australia
Phone: (61-2)9776-4555
Fax: (61-2)9776-4019
Website: http://au.fujitsu.com/
FUJITSU ASIA PTE.LTD.
20 Science Park Road, #03-01, Tele
Teck Park Singapore Science Park II,
Singapore 117674
Phone: (65)777-6577
Fax: (65)771-5499
Website: http://sg.fujitsu.com/
E-mail: [email protected]
FUJITSU TAIWAN LTD.
19th Fl., No39, Sec.1,Chung-hwa Rd.,
Taipei, Taiwan R.O.C.
Phone: (886-2)2311-2255
Fax: (886-2)2311-2277
Website: http://fw.fujitsu.com/
FUJITSU HONG KONG LTD.
10/F., Lincoln House, 979 King's Road,
Taikoo Place, Island East, Hong Kong
Phone: (852)2827-5780
Fax: (852)2827-4724
Website: http://hk.fujitsu.com/
E-mail: [email protected]
FUJITSU SYSTEMS BUSINESS
(THAILAND) LTD.
12th Fl., Olympia Thai Tower, 444
Rachadapisek Road, Samsennok,
Huay kwang, Bangkok 10320, Thailand
Phone: (662)512-6066
Fax: (662)512-6068
Website: http://th.fujitsu.com/
FUJITSU KOREA LTD.
5-11 Fl., Coryo Finance Center Building,
Youido-Dong 23-6, Young DungPo-gu,
Seoul, Korea, 150-010
Phone: (82-2)3787-6159
Fax: (82-2)3787-6164
Website: http://kr.fujitsu.com/
E-mail: [email protected]
FUJITSU MALAYSIA SDN.BHD.
7th FL., Wisma Damansara, Jalan
Semantan 50490 Kuala Lumpur,
MALAYSIA
Phone: (60-3)254-3644
Fax: (60-3)253-3940
Website: http://my.fujitsu.com/
FUJITSU PHILIPPINES, INC
2nd Fl., United Life Building, Pasay
Road, Legaspi Village Makati,
Metro Manila, Philippines
Phone: (63-2)812-4002
Fax: (63-2)817-7576
Imaging Products Division,
PFU LIMITED
Solid Square East Tower, 580 Horikawacho, Saiwai-ku, Kawasaki-shi,
Kanagawa 212-8563, Japan
Phone: (81-44)540-4658
Fax: (81-44)540-4639
Website: http://
imagescanner.fujitsu.com/
E-mail: [email protected]
PFU LIMITED
(Corporate headquarters)
Nu 98-2 Unoke, Unoke-machi,
kahoku-gun, Ishikawa 929-1192, Japan
Phone: (81-76)283-1212
Fax: (81-76)283-4689
Screen Examples In This Manual
The screen examples in this manual are subject to change without notice in the
interest of product improvement.
xi
If the actual displayed screen differs from the screen examples in this manual,
operate by following the actual displayed screen referring to the User's Manual of
the scanner application you are using.
Furthermore, the screenshots in this manual are for the FUJITSU TWAIN32
scanner driver and the Image Capturing Software Utilities "ScandAll 21" for
Microsoft® Windows®.
xii
CONTENTS
1 PREPARATIONS ........................................... 1
Checking the Contents of the Imprinter Package ..............................2
Outer View .........................................................................................3
2 BASIC OPERATIONS ................................... 5
Installing the Print Cartridge ..............................................................6
Adjusting Print Position ......................................................................9
Setting Imprinter ..............................................................................11
3 DAILY CARE ............................................... 13
4 REPLACING PRINT CARTRIDGE .............. 19
Replacing the Print Cartridge ..........................................................20
Reset the remaining ink counter of imprinter ...................................23
5 PRECAUTION ............................................. 25
6 ERROR MESSAGES ................................... 27
7 SPECIFICATIONS ....................................... 29
xiii
xiv
1
PREPARATIONS
This chapter explains how to prepare the imprinter, fi-486PRFR for
use.
1.1 Checking the Contents of the Imprinter Package ..............2
1.2 Outer View..............................................................................3
1
1.1 Checking the Contents of the
Imprinter Package
Please confirm that all of the following parts are included in the package. If any parts are
missing or defective, contact the FUJITSU Scanner dealer where you purchased the
product.
Handle the imprinter and the accessories with care.
Imprinter and Accessories
o Imprinter
o Print Cartridge
o Operator's Guide
o Installation screws
(Qty 2)
o Positioning seal
o PCB unit
o Glass sheet guide
o Operation instruction
label
2
1.1Checking the Contents of the Imprinter Package
1.2 Outer View
This section shows the outer view of the fi-486PRFR.
PCB unit
1
Glass sheet guide
PREPARATIONS
Imprinter
Lever
Print cartridge holder
1.2Outer View
3
4
1.2Outer View
2
BASIC OPERATIONS
This chapter describes the installation of the Print cartridge, the
adjustment of print position, and the setup of the imprinter.
2.1 Installing the Print Cartridge ................................................6
2.2 Adjusting Print Position........................................................9
2.3 Setting Imprinter.................................................................. 11
5
2.1 Installing the Print Cartridge
Installation of the Print cartridge is explained in the following.
1) Press the Power button on the scanner operator panel and turn off the power.
2) Open the Hopper if it is closed (retracted).
Hopper
3) Remove documents from the stacker. Pull up the lever on the right front of the
Upper transport unit and then raise it.
CAUTION
Make sure that the Upper transport unit is locked
before you put your hands inside of the scanner.
Upper transport unit
Lever
6
2.1Installing the Print Cartridge
4) Open the imprinter cover.
2
Imprinter cover
BASIC OPERATIONS
5) Move the Print cartridge holder to left-end, the cartridge replace position.
2.1Installing the Print Cartridge
7
6) When the lever is closed, rotate the lever to open before placing the print
cartridge.
Tab
HINT
Insert the cartridge with its Tab positioned toward left side
and install it.
7) Turn the lever on the print cartridge to fix it.
8) Close the imprinter cover.
9) Lift the Upper transport unit slightly to release the safety lock and then lower
and close the transport unit slowly.
8
2.1Installing the Print Cartridge
2.2 Adjusting Print Position
Adjust the print position.
1) Open the Hopper if it is closed (retracted).
Hopper
2
CAUTION
Make sure that the Upper transport unit is locked
before you put your hands inside of the scanner.
Upper transport unit
Lever
2.2Adjusting Print Position
9
BASIC OPERATIONS
2) Remove documents from the stacker. Pull up the lever on the right front of the
Upper transport unit and then raise it.
3) Open the imprinter cover.
Imprinter cover
4) Place the print alignment mark to the position where you want to print.
Print position sticker
HINT
The characters will be printed to the position of the alignment allow of print position sticker.
5) Close the imprinter cover.
6) Lift the Upper transport unit slightly to release the safety lock, lower and close
the transport unit slowly.
10
2.2Adjusting Print Position
2.3 Setting Imprinter
You must do the following:
1) Click the [Option] button is from the main screen of the scanner driver [TWAIN
Driver].
2) Select the [Imprinter(Endosor)] tab.
The following screen is displayed.
2
BASIC OPERATIONS
3) Enable Imprinter. Setup the position of printing and the print string.
Refer to "FUJITSU TWAIN32 scanner driver User’s Guide" stored in the
scanner driver (CD-ROM) for the details of the setup.
4) Press [OK] button to confirm the setup.
5) Click the [Scan] button is from the main screen of the scanner driver [TWAIN
Driver] , the defined data is printed on the document.
HINT
When you want to setup the imprinter without using a scanner driver.
Refer to “fi-4860C Operator’s Guide”,the section
” 7.3 Setup Mode Details”
2.3Setting Imprinter
11
12
2.3Setting Imprinter
3
DAILY CARE
This chapter explains how to clean the fi-486PRFR, the fi-486PRRE,
and nozzle surface of the Print cartridge.
CAUTION
When you do the cleaning, turn off the
scanner power, and unplug the power
cord from the outlet.
If cleaning is done with power turned on,
it may cause electric shock or imprinter
failure.
13
Clean the fi-486PRFR and the nozzle surface of the Print cartridge.
Cleaning the fi-486PRFR
As the fi-486PRFR prints the number on a document before reading operation, ink can
spatter over the glass and paper path of the Upper transport unit, and vicinity of the print
cartridge holder.
We recommend you to clean the scanner after 5000 sheets scanning to avoid smudge
on the scanned image.Note that the required cleaning cycle may very depending upon
document type to be scanned.
More frequent cleaning may be required when printing a document on which ink does not
easily get dry.
ATTENTION
For the cleaning, use lint-free cloth and wipe the parts gently.
1) Press the Power button on the scanner operator panel and turn off the power.
2) Open the Hopper if it is closed (retracted).
Hopper
14
3) Remove documents from the stacker. Pull up the lever on the right front of the
Upper transport unit and then raise it.
CAUTION
Make sure that the Upper transport unit is locked
before you put your hands inside of the scanner .
Upper transport unit
3
Lever
DAILY CARE
4) Wipe the following parts using a cloth moistened with Cleaner F1 or isopropyl
alcohol.
For the details on cleaning the scanner, refer to "fi-4860C Operator's Guide,"
"Chapter3 Daily Care."
•
Glasses of the Upper transport unit and Transport path
Glass of the Upper transport unit
Transport path
15
•
Vicinity of the print cartridge holder
5) Lift the Upper transport unit slightly to release the safety lock, lower and close
the transport unit slowly.
16
Cleaning the Nozzle Surface of the Print Cartridge
Ink or stains stuck to the nozzle surface of the print cartridge or leaving the imprinter
unused for a while cause poor printing of characters because of blocked emission holes
in the nozzle. If your imprinter has this trouble, clean the nozzle surface of the print
cartridge.
ATTENTION
3
For the cleaning, use dry lint-free cloth and wipe the parts gently.
Wipe off dirt and stain gently from the nozzle surface.
DAILY CARE
1) Remove the Print cartridge.
Refer to the section "4.1 Replacing the Print Cartridge" (page20).
Nozzle surface
2) Gently wipe off dirt and stain from the Nozzle surface using dry lint-free cloth.
3) Make sure that dirt and stain are all removed and then install the cartridge.
Refer to the section "2.1 Installing the Print Cartridge" (page6).
17
18
4
REPLACING PRINT
CARTRIDGE
This chapter explains how to replace the Print cartridge and reset the
Ink remain counter.
CAUTION
Make sure that you turn off the scanner
power and unplug the power cable from
the outlet.
If the cartridge replacement is done with
power turned on, it may cause electric
shock or imprinter failure.
4.1 Replacing the Print Cartridge.............................................20
4.2 Reset the remaining ink counter of imprinter...................23
19
4.1 Replacing the Print Cartridge
Replace the Print cartridge and reset the Ink remain counter.
1) Press the Power button on the scanner operator panel and turn off the power.
2) Open the Hopper if it is closed (retracted).
Hopper
3) Remove documents from the stacker. Pull up the lever on the right front of the
Upper transport unit and then raise it.
CAUTION
Make sure that the Upper transport unit is locked
before you put your hands inside of the scanner.
Upper transport unit
Lever
20
4.1Replacing the Print Cartridge
4) Open the imprinter cover.
Imprinter cover
5) Move the Print cartridge holder to left-end, the cartridge replace position.
4
REPLACING PRINT CARTRIDGE
4.1Replacing the Print Cartridge
21
6) Turn the blue lever toward right and open the cartridge holder.
Lever
7) Take out the Print cartridge from the holder and put the new one.
HINT
Insert the cartridge with its Tab positioned toward left
side and install it.
8) Move the lever leftward to fix the cartridge.
Tab
9) Close the imprinter cover.
10) Lift the Upper transport unit slightly to release the safety lock, lower and
close the transport unit slowly.
22
4.1Replacing the Print Cartridge
4.2 Reset the remaining ink counter of
imprinter
If the following message comes up, prepare the new Print cartridge.
If no further printing is impossible, replace the Print cartridge and reset the Ink Remain
Counter.
If the Print cartridge is replaced before Print cartridge error occurs, be sure to reset the
Ink remain counter.
P
N
l
o
e
w
a
s
R
e
e
a
a
d
i
n
n
e
g
w
!
x
I
x
n
x
k
x
[XXXX] is the scanned sheet counter value.
HINT
1) Press
(Next button) or
<Screen26>.
(Previous button) and let LCD display
4
<Screen26>
2
6
I
n
k
g g g g c c
(
x
R
x
e
x
s
x
e
)
t
/
N
o
REPLACING PRINT CARTRIDGE
!
=
Approximate remaining ink amount is shown as below:
-
Amount of remaining ink is high.
-
The amount of remaining ink is low or empty.
In [XXXX], [Pre] or [Post] is displayed.
HINT
4.2Reset the remaining ink counter of imprinter
23
2) At <Screen26>, to choose to reset the ink remain counter, press
arrow button) and select [Reset].
Press
(Left
(Enter button). Then <Screen26-1> is displayed.
<Screen26-1>
!
2
6
-
1
Not to reset, select [No] and press
R
e
s
N
e
o
To cancel the reset, select [No] and press
2
6
N
e
o
s
w
I
n
(Right arrow button)
(Enter button).
(Enter button) and reset the counter (
!
=
Y
(Enter button).
3) At <Screen26-1>, to actually reset the counter, press
and select [yes].
4) Press
t
/
k
g g g g g g
(
J J J J J ).
x
R
x
e
x
s
x
e
)
t
/
N
o
In [XXXX], [Pre] or [Post] is displayed.
HINT
5) Press
screen.
24
(Eixt button) at the end and the LCD display goes back to [Ready]
4.2Reset the remaining ink counter of imprinter
5
PRECAUTION
This chapter explains the important details for ensuring the correct
use of the products.
25
1. When installing and replacing the Print cartridge, be careful not to insert
the cartridge incorrectly.
2. When printing near the edge of paper, note that printing may go across the
edge depending on the setting position of the imprinter.
3. Be careful not to touch the contacts or the nozzle on the bottom of the print
cartridge. Poor printing or loose contact may occur
4. Do not move the imprinter during printing. Printing may be out of order.
5. Do not shock the imprinter or the print cartridge. Poor printing may occur.
6. We recommend you to remove the print cartridge from the scanner while
you do not use it for a long time.
Even when the Imprinter is not used, ink is consumed by such as turning
the scanner power on.
26
6
ERROR MESSAGES
This chapter explains the error messages and the recovery process.
If the following error messages are displayed on the LCD, the
Imprinter is malfunctioning.
Recover the Imprinter following the procedures described.
If the error messages are different from the following or the ones
described in "fi-4860C Operator's Guide", "Appendix 3 MESSAGES
OF OPERATOR PANEL", or if you can not fix the problem, contact
the FUJITSU Scanner dealer where you purchased the scanner, or
an authorized FUJITSU Scanner Service Provider.
27
N
o
I
n
k
C
a
r
t
r
i
d
g
e
Possible causes are as follows.
•Loose contact of the signal electrodes of the print cartridge.
Reinsert the print cartridge in place.
•Print cartridge is not installed correctly.
Reinsert the Print cartridge in place.
In [XXXX], [Pre] or [Post] is displayed.
HINT
I
m
p
r
i
n
t
e
r
A
l
a
r
m
Possible causes are as follows.
•Loose contact of the signal electrodes of the print cartridge.
Reinsert the print cartridge in place.
•The program memory is out of order.
Turn of the power,and then turn on again.
•The print cartridge is does not work.
Please change the print cartridge.
In [XXXX], [Pre] or [Post] is displayed.
HINT
28
7
SPECIFICATIONS
This chapter describes the specifications of the fi-486PRFR imprinter
option.
29
Specification
(Continued from the following page)
Item
Specification
Printing Method
Thermal inkjet printing
Printed Characters
Alphabet Letters
: A to Z, a to z
Numeric Characters : 0, 1 to 9
Symbols
:!"$#%&'()*+,-./:;<=>?@[¥]
^_‘{|}¯
Maximum printable
characters per line
Maximum 40 column
Character Size
Height 2.91 mm to width 2.82 mm
Character Pitch
Approximately 3.53mm
Document quality
requirements
Documents allowed for fi-4860C
For the details ofr the document quality requirements, refer to
"fi-4860C Operator's Guide," "Chapter 6 ADF DOCUMENT
SPECIFICATIONS."
ATTENTION
30
Document paper having glossy surface such as
thermal paper, thermal transfer paper, coated
paper, and art paper take longer time for the ink to
dry and may cause poor print quality.
The cleaning cycle is also shortened.
(Continued from the previous page)
Item
Printing Area
Specification
Printable area is shown as below.
D
B
A
Center
Feeding direction
A=40mm or more
E
B=99mm or less
C=5mm or more
D=140.5mm or less
(Max.40 columm)
E=5mm or more
Printing area (front side)
Reference point
C
ATTENTION
Consumable
ATTENTION
Print Cartridge
The product life of this imprinter is 5 years or 7,200,000 sheet
scans whichever comes first from the date of purchase.
Please check the abrasion counter for the number of documents
that have ever been scanned.
For details on how to check the scanner life counter, refer to
“fi-4860C Installation Guide."
If the scanner is used beyond the product life, failures and/or
scan performance degradation may occur.
31
7
SPECIFICATIONS
ATTENTION
A document with less than 80 mm length cannot
be printed.
Purchasing consumables
Contact FUJITSU Scanner dealer where you purchased the imprinter.
32
fi-486PRFR Operator's Guide
P3PC-E377-01XA
Date of issuance: August, 2002
Issuance responsibility: PFU LIMITED
Printed in Japan
• Copying of the contents of this manual in whole or in part and copying of the scanner
application is forbidden under the copyright law.
• The contents of this manual are subject to change without notice.
• PFU LIMITED assumes no liability for incidental or consequential damages arising from the
use of this manual, and any claims by a third party.
• Repair parts for this product are retained for five years from discontinuation of production.