1
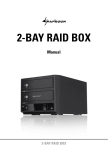
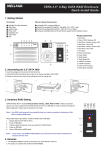
FANTEC SQ-X2RU3e 2x 3.5" SATA HDD USB3.0 eSATA User Manual Important: All data will be deleted if you change the Raid Mode. Backup the HDD(s) before switching the RAID mode. 1. Package Contents - 1x Manual 1x 2 bay hard drive enclosure 2x HDD bays 2x screws 1x USB 3.0 cable 1x eSATA cable 1x Power Supply 2. Technical Details - eSATA and USB 3.0 connection (downwards compatible with USB 2.0 and USB 1.1) Auto Power Saving will sleep/wakeup the drives with the PC Reduce 25% power consumption with Green Power Design Reduce 33% of HDD Temperature with 80 mm Cooling FAN and smart ventilation design. Up to 5Gbps transfer speed with USB3.0 connection. SATA-II interface and HDD supports SATA – I, II, III 2 HDDs are operated distinctively, Plug & Play, and Hot swappable Each HDD capacity supports up to 4TB in GPT format, W7/Vista Windows XP can’t support 4TB HDD Notice: 1. Please read the manual carefully before you begin installing and using this product. 2. This product operates between 0oC to 40oC with a relative humidity between 0% to 80%. Be sure the unit is operating in a well ventilated environment. 3. Do not block any holes of the ventilation on the product in order to retain the best heat dissipation efficiency possible. 4. Do not place any liquids or chemical hazards near the product. 5. This product operates using a 12V/DC @3A output, 100V~240V/AC input power adapter. Do not use any other types of AC/DC rating’s adapter which differs to the mentioned specifications. Doing so will severe damage the product. 6. The power adapter should be well ventilated and not be covered by any object. 7. HDDs must be well secured and fixed to the HDD-tray before sliding the HDD-tray into the Multi-HDD frame. 1 3. About the Device Hardware Overview Power DC input Receptor for the provided Power Adapter - 12V DC, 100-240V AC, 50-60Hz PC connection interface USB 3.0 eSATA Connect USB 3.0 Cable to computer Connect eSATA Cable to computer Note: When connecting eSATA and USB3.0 to the PC at the same time, the PC will recognize eSATA. FAN Speed Control Control wheel Turn the wheel to control the fan speed 2 Front / Back View Power LED HDD1 LED HDD2 LED Tray lock HDD Tray Power on/off switch Power jack (DC12V) eSATA Raid reset USB3.0 FAN Speed control 3 RAID Switch 4. Hardware Installation Guide Step1: Push the Locker switch to the left side to unlock the HDD tray. Step2: Take out the HDD trays. 4 Step3: Gluing the rubber pad to the middle at inner side of HDD tray if your HDD is a little shorter. Step4: Install the HDD into the tray and insert one screw on each side. Make sure screws are firmly tightened, holding the tray and HDD together. 5 Step5: Slide the HDD tray into the case. Step6: Push the switch to the right side to lock the HDD tray. 6 5. Raid Settings You can configure the FANTEC SQ-X2RU3e to use any of the following Storage Policies to map the appliance's physical hard drives to virtual drives that are visible to the host computer. The virtual drives are called volumes in the GUI. The host operating system treats each volume as if it were a single physical drive. This virtualization allows you to overcome restrictions that are imposed by physical hard drives, such as speed, storage capacity or data storage reliability Important: Back up HDD(s) before adjusting RAID switch. 1. Power on the case. 2. Check and make sure both HDDs are installed and both HDD LEDs light up. 3. Connect the case to PC via either USB or eSATA cable. Make sure HDD LED light up. 4. Select HDD Mode from below table by adjusting “Raid Switch”, which is located at the back of the case. RAID-Mode-Settings 5. Pin and hold “RAID Reset” for 3~5 seconds. Then HDD mode will change according to the selection. 6. Format HDDs before they are ready to use. Note: Refer to Hard Drive Formatting Guide in the below session for detailed instructions. 7 JBOD MODE(Single): The normal Mode (Just a Bunch of Disks) storage policy enables each hard drive to be seen separately as one drive. JBOD storage policy is for a standalone (non-cascaded) Storage Processor or the top-level node of a cascaded configuration, but not for subordinate nodes. In a JBOD configuration, each physical drive is directly exposed. Volume B Volume A Volume A Volume B FANTEC SQ-X2RU3e Port 0 Port 1 FANTEC SQ-X2RU3e Port 0 Port 1 Drive A Drive A Drive B Equal hard drives Unequal hard drives 8 Drive B BIG MODE (Spanning): The BIG storage policy concatenates a series of physical hard drives as a single large volume; resulting in a seamless expansion of virtual volumes beyond the physical limitations of singularly connected hard drives. BIG storage policy delivers maximum storage space without a single large capacity and costly hard drive. Hard drive A and B are concatenated into a single virtual volume in the Figure below with a storage capacity that is equal to the sum of each of the physical hard drives A and B. Drive A 250GB BIG 500GB BIG 1000GB FANTEC SQ-X2RU3e Port 0 Port 1 FANTEC SQ-X2RU3e Port 0 Port 1 + Drive A 250GB Drive A 250GB Equal hard drives + Unequal hard drives 9 Drive A 750GB RAID 0 (Striping): The RAID0 storage policy distributes access across all hard disks, also called striping. RAID0 presents the best data speed but no data redundancy. RAID0 storage policy accelerates hard disk operating speed by using many disks in parallel. Hard drive data segments are written to different disks simultaneously which increases performance while sacrificing data redundancy. To implement the RAID0 storage policy, the device creates a single virtual volume that is striped across both hard drives, with a storage capacity that is equal to the sum of both hard disk drives. RAID0 500GB RAID0 500GB FANTEC SQ-X2RU3e Port 0 Port 1 FANTEC SQ-X2RU3e Port 0 Port 1 Drive A 250GB Drive B 250GB Drive A 250GB Equal hard drives Unequal hard drives 10 Drive B 750GB RAID 1 (Mirroring): The RAID1 storage policy stores all data in duplicate on separate drives to protect against data loss due to drive failure. One drive mirrors the other at all times. Every write operation goes to both drives. RAID1 provides the highest level of data protection for critical data that you cannot afford to lose if a hard drive fails, but halves the amount of storage capacity because all data must be stored twice. The resulting storage capacity of the virtual RAID1 volume will be equivalent to the size of one hard drive (if both drives are the same) or the smaller of the two drives (if they are different). If one drive fails, the RAID1 volume is still usable, but it is in a vulnerable state because its mirrored hard drive is inaccessible. When the offline drive comes back online, the appliance begins a rebuild process immediately to restore data redundancy. Although the volume remains available during the rebuild process, the volume is susceptible to data loss through damage to the remaining drive until redundancy is restored at the end of the rebuild and verification process. Host access takes precedence over the rebuild process. If you continue to use the SAFE volume during the rebuild, the rebuild process will take a longer time to complete, and the host data transfer performance will also be affected. RAID1 250GB RAID1 250GB FANTEC SQ-X2RU3e Port 0 Port 1 FANTEC SQ-X2RU3e Port 0 Port 1 Drive A 250GB Drive A 250GB Drive B 250GB Drive B 750GB Equal hard drives Unequal hard drives 11 6. HDD Formatting Guide STEP1: Right-click on “My Computer” icon and select ”Manage” column. STEP2: Select “Disk Management” and you will see your External HDD showed “Unallocated”. Example:250GB & 750GB hard drives. JBOD MODE (Single) Disk 1: 232.88GB Disk 2: 698.63GB 12 Big MODE Disk 1: Capacity = 232.88+698.63 => 931.52 RAID 0 MODE Disk 1: Capacity = 232.88 x 2 > 465.77 (GB) 13 RAID 1 MODE Disk 1: Capacity = 232.88 = 232.88 (GB) STEP3: Right-click the circled block and select “Initialize Disk” 14 STEP4: Press “OK” button to initialize the hard drive. STEP5: Right-click on the “Unallocated” block and select “New Partition”. 15 STEP6: The “New Partition Wizard” will appear. Please follow the instruction of the wizard to complete. STEP7: When partitioning is completed, the external HDD will be recognized as a “New Volume”. 16 STEP8: Double-click “My Computer”. You will see the new volume appears on your PC. Initialize a Disk If the HDD is new you have to initialization the device. View the box to the left of the “Unallocated” box.You most likely would see the “Not Initialized” message displayed. The Hard Disk Drive must be set to “Online” before partitioning and formatting the Hard Disk Drive. 17 1. Right-click the “Not Initialized” area, a disk’s initialization menu will appear as below. Select “Initialize Disk” and follow the steps of the HDD Formatting Guide wizard to complete disk initialization. Note: Windows Vista and 7 will ask what kind of disk type you want to make, “MBR” or “GPT”. Please Activate MBR if the total volume is less than 2TB. If the total volume is more than 2TB please activate GPT. 18 7. Note About HDD Mode Reset the device is necessary every time HDD Mode changes. Press Raid Reset button only when the device is powered on & connected to a running PC. Make sure to back up all files before HDD mode changes since such practice requires HDD reformatting. procedure how to change the HDD a. Install both HDDs to the case b. Connect the case and PC and have both devices powered on. (USB connection is proposed.) c. Adjust RAID switch correctly. d. Push and hold Raid reset button for 3-5 seconds to observe rapid blinking of both HDD LEDs. HDD mode adjustment is complete when LED rapid blinking stops. e. Initialize and format the HDD(s). When using two HDDs of unequal capacity, users may experience capacity reduction under RAID0 and RAID1 configuration. Therefore, it is recommended that HDDs of equal capacity are used to utilize the application. About HDD Capacity Support Installing HDD(s) over 2TB is possible. However, make sure to run this device under Vista® and Win7® OS and activate GPT mode when formatting this device to have it work correctly. About Power synchronization feature This case detects PC power status and turn on & off itself automatically. When PC power off and/or hibernates, HDD(s) spin down and all LEDs and Fan off, except that Power LED remains constantly on until main power is shut down. In some OS, when system reaches sleep mode, only monitor and peripheral are turned off while motherboard is powered on. In this case, HDD and LED will be still on. 19 About USB & eSATA Connectivity The equipped USB3.0 port is downward compatible with USB2.0 eSATA host(PC) needs to support Port Multiplier function in order to have Normal Mode(Single) to connect 2 HDDs correctly. If eSATA host(PC) doesn’t support hot swappable plug and play function, Please try following procedure: a. Connect eSATA cable when case and PC are powered off. b. Power on case first and observe HDD Link LED(s) are light on c. Power PC on This practice procedure is every time reconnection necessary. Connecting USB & eSATA simultaneously is impossible. eSATA connection will be prioritized. About Fan This case is equipped with manual fan speed control for faster/slower fan. However, in order for efficient heat dissipation, it is strongly recommended that max speed (adjusting to the right-most, +) is set at all time. Fan synchronizes along with power synchronization function. After the case reaches sleep mode, the fan stops within 2 mins. 20