1
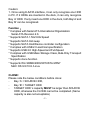
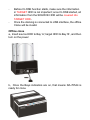
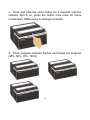
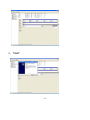
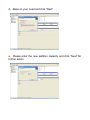
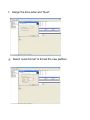
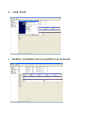
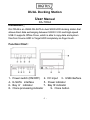
DUAL Docking Station
User Manual
DA-70544
Introduction:
DA-70544 is an USB2.0/E-SATA to dual SATA HDD docking station that
allows direct data exchanging between SATA II 3.0G and High-speed
USB. It supports Offline Clone, which is able to copy data and system
files from Source HDD to Target HDD completely via finger touch.
Function Chart:
1、Power switch (ON/OFF) 2、DC input 3、USB interface
4、E-SATA interface
5、Power indicator
6、Bay ‘A’ indicator
7、Bay ‘B’ indicator
8、Clone processing indicator
9、Clone button
-1-
Caution:
1. Once using E-SATA interface, it can only recognize one HDD
in PC. If 2 HDDs are inserted in the dock, it can only recognize
Bay ‘A’ HDD. If only insert one HDD in the dock, both Bay’A’ and
Bay ’B’ can be recognized.
Function:
* Complies with Serial ATA International Organization:
Serial ATA Revision 2.6
* Supports SATA 1.5G/3.0G Speed
* Supports SATA Hot swap
* Supports SATA Host/Device controller configuration
* Complies with USB 2.0 electrical specification
* Supports USB 2.0 High-Speed and Full-Speed
* Complies with USB Mass Storage Class, Bulk-Only Transport
Specification
* Supports clone function
* Supports Win 98/ME/2000/XP/VISTA /WIN7
MAC OS 9.X/10.X /Linux
CLONE:
Please note the below conditions before clone:
Bay ‘A’ = SOURCE HDD,
Bay ’B’ = TARGET HDD
TARGET HDD ‘s capacity MUST be larger than SOURCE
HDD, otherwise the CLONE cannot be completed. (Same
capacity is also not acceptable)
-2-
-
-
Before CLONE function starts, make sure the information
in TARGET HDD is not important; once CLONE started, all
information from the SOURCE HDD will be covered into
TARGET HDD..
Once the docking is connected to USB interface, the offline
Clone will be invalid.
Offline clone
a、Insert source HDD to Bay ‘A’; target HDD to Bay ‘B’, and then
turn on the power
b、Once the Bays indicators are on, that means DA-70544 is
ready for clone.
-3-
c、Press and hold the clone button for 3 seconds until the
indicator light is on, press the button once more for Clone
confirmation. Offline clone is starting to process.
d、Clone progress indicator flashes and shows the progress
(25%, 50%, 75%, 100%).
-4-
e、Once clone is finished, all progress indicators will light up.
f、Turn off power and take out the HDD carefully
HDD Partition
a、Open Disk management and select the unallocated area
b、Right click 〝New partition〞for further action
-5-
c、“Next”
-6-
d、Base on your need and click “Next”
e、Please enter the new partition capacity and click “Next” for
further action
-7-
f、Assign the drive letter and “Next”
g、Select “quick format” to format the new partition
-8-
h、Click “finish”
i、Partition completed, the new partition can be found.
-9-