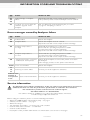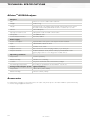
1
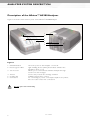
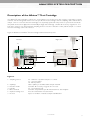
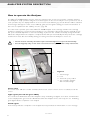
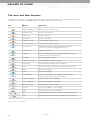
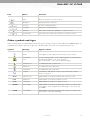
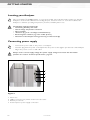
Afinion™ AS100 Analyzer
User Manual
POINT OF CARE CENTER
1115461 2008-03
09-38555
1115175
09-38555
Dear Customer,
Congratulations on the purchase of your Afinion™ AS100 Analyzer.
Upon arrival of your Afinion™ AS100 Analyzer we recommend that the serial number along with the software version be recorded in the table provided below.The additional rows in the table are to be utilized if a
software upgrade is performed on your AS100 Analyzer.The recorded information will be of great value if
and when a question is reported, or the desire to add a new Afinion™ test to your Analyzer arises.
Serial number
(see label on the underside of the Analyzer or on
the transport container)
NOTE! The Analyzer must be turned off when the
label on the underside is read.
Software records
Date
Software version*
Afinion™ tests available
Upon receipt
1. SW upgrade
2. SW upgrade
3. SW upgrade
4. SW upgrade
5. SW upgrade
* See display when you switch on the Analyzer (see “Automatic start-up procedure”, page 13).
Notes
Technical Support
Call 1-877-4-Afinion or 1-877-423-4646. E-mail: [email protected]
09-38555
1
AfinionTM AS100 Analyzer System
Intended use
The Afinion™ AS100 Analyzer System consists of the Afinion™ AS100 Analyzer and the
Afinion™ Test Cartridges.The Afinion™ Analyzer System is designed for point-of-care testing and is for
in vitro diagnostic use only.
CLIA Statements
Waived Afinion™ tests
This User Manual is valid for the Afinion™ tests waived under the Clinical Laboratory Improvement
Amendment of 1988 (CLIA`88). A CLIA Certificate is needed to perform testing in a waived setting.
If the laboratory modifies the Afinion™ test or Afinion™ AS100 Analyzer instructions, the test no longer
meets the requirements for waived categorization. A modified test is
considered to be highly complex and is subject to all applicable CLIA requirements.
Conformity to the IVD directive
The Afinion™ AS100 Analyzer meets all provisions in the European directive 98/79/EC on In Vitro Diagnostic
Medical Devices and is CE marked accordingly.
Safety standards
The Afinion™ AS100 Analyzer is tested and conforms to the safety standards IEC/EN 61010-1, IEC/EN
61010-2-081 and IEC/EN 61010-2-101, and to the EMC standard IEC/EN 61326.
Axis-Shield PoC AS
P.O. Box 6863 Rodeløkka
NO-0504 Oslo, Norway
ISO 9001 and ISO 13485 certified company
2
09-38555
TABLE OF CONTENTS
INTRODUCTION
Intended use of the Afinion™ AS100 Analyzer System
5
About this User Manual
5
Examining the package contents
5
ANALYZER SYSTEM DESCRIPTION
Description of the Afinion™ AS100 Analyzer
6
Description of the Afinion™ Test Cartridge
7
How to operate the Analyzer
8
How the Afinion™ AS100 Analyzer System works
9
Internal process control
9
Calibration
9
GALLERY OF ICONS
The icons and their function
10
Other symbols and signs
11
GETTING STARTED
Locating your Analyzer
12
Connecting power supply
12
Connecting additional equipment
13
How to switch ON the Analyzer
13
Automatic start-up procedure
13
Setting the configuration
14
How to switch OFF the Analyzer
18
QUALITY CONTROL
Why quality control testing?
19
Choosing control material
19
Handling and testing controls
19
Frequency of control testing
19
TESTING PROCEDURES
Operating precautions
20
Using the operator ID function
21
Using the patient ID function
22
Using the control ID function
23
Preparing for an Afinion™ analysis
24
Collecting a specimen with the Test Cartridge
25
Analyzing a patient sample
26
Analyzing a control
27
Viewing result records
28
Table continues on next page.
09-38555
3
TABLE OF CONTENTS
INFORMATION CODES AND TROUBLESHOOTING
When an information code appears
Information messages caused by assay specific limitations
29
Error messages caused by sample or Test Cartridge failure
30
Error messages caused by Analyzer failure
31
Service information
31
MAINTENANCE AND WARRANTY
Cleaning and maintenance
32
Disposal of the Analyzer
33
Software upgrade
33
Warranty
33
TECHNICAL SPECIFICATIONS
Afinion™ AS100 Analyzer
34
Accessories
34
SYMBOLS AND ABBREVIATIONS
4
29
35
09-38555
INTRODUCTION
Intended use of the Afinion™ AS100 Analyzer System
Afinion™ AS100 Analyzer System, consisting of the Afinion™ AS100 Analyzer and the Afinion™ Test
Cartridges, is for in vitro diagnostic use only.
Afinion™ AS100 is a compact multi-assay analyzer for point-of-care testing. It is designed to analyze the
Afinion™ Test Cartridges.The Afinion™ Analyzer System is easy to use, rapid and gives reliable and accurate
results.
About this User Manual
This User Manual will guide you through installation, operation and maintenance of your Afinion™ AS100
Analyzer.The User Manual also explains how the Analyzer works, describes the quality assurance system and
assists you in troubleshooting.
For analyzing patient samples or controls, please also read the test specific information given in the Package
Inserts found in the Afinion™ test kits.The Quick Guides highlight the main steps of the test procedures and
contains information on proper quality control routines.
It is recommended that you become familiar with the user instructions before you start operating the
Afinion™ AS100 Analyzer.
Some of the information in this User Manual is accompanied with a symbol that points you to the following
particulars:
Operator's handling
Warnings and precautions
References to the Package Inserts and Quick Guides for the specific Afinion™ tests and control kits
Examining the package contents
When unpacking, check the contents against the list below and examine the components for signs of
shipping damage.
The Afinion™ AS100 package unit includes:
•
•
•
•
•
•
Afinion™ AS100 Analyzer
Power cable
Power cord adapter, 24 volt power supply
Quick Guides for the available Afinion™ tests
User Manual
Installation video (CD-Rom)
If the package unit is found incomplete, please report missing items or shipping damage to your supplier. It is
recommended to keep the shipping box in case of later transportation of the Analyzer.
09-38555
5
ANALYZER SYSTEM DESCRIPTION
Description of the Afinion™ AS100 Analyzer
Figure 1 shows the main exterior parts of the Afinion™ AS100 Analyzer.
1
2
3
4
5
6
Figure 1
1 ON/OFF button:
2 Red and green LEDs:
3 Touch screen:
4 The lid:
5 Cooling ribs:
6 Connectors:
Turns the power to the Analyzer on and off.
Light emitting diodes (LEDs) that indicate whether the
Analyzer is busy or not.
Allows you to communicate with the Analyzer through
touch icons and messages.
Covers and protects the cartridge chamber.
Facilitate temperature control.
For connecting to power cord adapter. Options for printer,
barcode reader and/or PC connections.
Do not open the lid manually.
6
09-38555
ANALYZER SYSTEM DESCRIPTION
Description of the Afinion™ Test Cartridge
The Afinion™ Test Cartridge is unique for each analyte to be measured, as the reagent composition, reagent
volumes and the integrated devices are test specific.The Test Cartridge and the sampling device labels have a
unique color for each test.The Test Cartridges are separately packed in foil pouches to protect the chemicals
and plastic devices from light, dirt and humidity. A single Test Cartridge contains all necessary reagents for one
test and is ready to use. An integrated sampling device is used for collection of the patient sample or control.
The Test Cartridge cannot be re-used.
Figure 2 illustrates an Afinion™ Test Cartridge with its functional parts:
Left side
Right side
1b
1a
2
4
5
7
6
3
Figure 2
1 Sampling device:
2
3
4
5
6
7
Capillary:
Reaction wells:
Handle:
Barcode label:
Optical reading area:
ID area:
For collection of patient sample or control.
1a - closed position
1b - lifted position
Glass capillary to be filled with sample material.
Contains all necessary reagents for one test.
For correct finger grip.
Contains assay and lot specific information for the Analyzer.
Area for transmission measurement.
Space for written or labeled sample identification.
09-38555
7
ANALYZER SYSTEM DESCRIPTION
How to operate the Analyzer
The Afinion™ AS100 Analyzer has two main user interfaces, the touch screen and the cartridge chamber.
The Analyzer is easily operated using the icons that appear on the screen. Only the icons you need to use at
each operative step are displayed. When an icon is touched, it will turn grey and its function will be activated.
Text messages that appear on the screen will help guide you through the testing procedure.The functions of
the icons are explained in the “Gallery of icons”, page 10.
The other main operative part of the Afinion™ AS100 Analyzer is the cartridge chamber.The cartridge
chamber is designed to receive the Test Cartridge in one orientation only.The lid must be manually closed,
but opens automatically. When a new Test Cartridge is placed in the chamber, manually closing the lid will
initiate the analysis. When the analysis is complete the lid will open automatically.The lid protects the cartridge
chamber from dust, dirt and humidity during processing and when the Analyzer is not in use.
• The lid must be manually closed, but opens automatically. Do not open the lid manually.
• Use the fingertips only on the touch screen. Do not use pens or other sharp instruments.
3
1
2
4
Figure 3
1
2
3
4
Text message
Icons
The lid in open position
The cartridge chamber
with a Test Cartridge
Screen saver
The screen saver will turn on after 3 minutes, if the touch screen is not in use.To re-activate, touch the
screen.
Light signals (the red and green LEDs)
The red diode is illuminated when the Analyzer is busy. A flashing red light is seen when an information
code is displayed.The green diode is illuminated when the Analyzer is free and ready for use. A flashing
green light indicates completion of an analysis.
Sound signals
A short beep indicates completion of an analysis.Two beeps indicate an information or error message.
8
09-38555
ANALYZER SYSTEM DESCRIPTION
How the Afinion™ AS100 Analyzer System works
The Afinion™ AS100 Analyzer System uses different chemical and mechanical assay methods combined with
advanced, computerized processing and measuring technology.
A Test Cartridge with patient sample or control is placed in the cartridge chamber of the Analyzer. By manually
closing the lid, the Test Cartridge is transported into the analysis compartment of the Analyzer. Test and lot
specific information is obtained from the barcode label, which then initiates the processing of the Test
Cartridge.The sample and reagents are automatically transferred between the wells. A monochrome solid-state
camera monitors the entire process. When the assay is completed, light-emitting diodes (LEDs) illuminate the
final reaction area, which can be either a colored membrane or a reaction well.The camera detects the
reflected or transmitted light, which is converted to a test result and displayed on the touch screen. When
the user accepts the result, the lid covering the cartridge chamber opens automatically and the used Test
Cartridge can be removed and discarded.The Analyzer is then ready for the next run.
Internal process control
The Analyzer self-test
A self-test is performed during start-up of the Analyzer to ensure that the instrument is operating according
to established specifications.The self-test validates:
•
•
•
•
Hardware and software integrity
Test Cartridge transport system
Liquid transport system
Camera vision system
If the self-test fails at any point the red LED will start flashing and an information code will be displayed on
the touch screen (see “Information codes and troubleshooting”, page 29). If the Analyzer is unable to use the
display, only the red LED will be flashing.
When the Analyzer is switched on for a longer period, it will automatically restart once a day to ensure that
a self-test is done regularly.This procedure will not interrupt any Test Cartridge measurements.
The fail-safe mechanisms
Fail-safe mechanisms are included to secure safe processing.The integrated camera inspects the test cartridges
initially before the process starts. If defects are detected (e.g. broken capillary, the cartridge is used past its
expiration date), the Test Cartridge is rejected and an information code is displayed. During processing vital
functions and components (e.g. pumps, heater) are supervised. When problems are detected by the built-in
safety mechanism, the process will be aborted and an information code will be displayed.
Calibration
The Afinion™ AS100 Analyzer has been manufactured to deliver reliable and accurate results. During
manufacturing, the Analyzers are calibrated against a reference system.This procedure has been established
to ensure that all Analyzers operate within identical tolerance limits.
Test specific calibration data are established for each lot of test cartridges and then stored in the barcode label.
When the Test Cartridge enters the Analyzer, the integrated camera reads the barcode.The calibration data
for the actual lot are transferred to the instrument and used for calculating results. Calibration by the operator
is thus not required.
09-38555
9
GALLERY OF ICONS
The icons and their function
Touching an icon on the screen will activate the function of this icon. All the icons that may appear during
operation of the Afinion™ AS100 Analyzer are explained below by their function.
Icon
Name
Function
Patient sample mode
Select patient sample mode.
Control mode
Select control mode.
Patient ID
Enter patient ID.
Control ID
Enter control ID.
Patient records
View patient result records.
Control records
View control result records.
Main menu
Enter main menu (operator ID, patient records,
control records and configuration menu).
Operator ID
Enter operator ID.
Settings
Enter configuration menu (language, patient ID on/off,
date/time and screen/beeper).
Language
Enter language selection.
Patient ID on/off
Enable/disable patient ID function.
Date/Time
Enter date/time settings (date and time).
Exit
Exit current menu and return to previous screen view.
Date
Enter date setting.
Time
Enter time setting.
Screen/Beeper
Enter screen and beeper settings (screen contrast,
screen adjustment and beeper volume).
Screen contrast
Enter screen contrast setting.
Screen alignment
Enter screen alignment function.
Beeper volume
Enter beeper volume setting.
Accept
Accept (a setting or a test result).
Print
Print result on connected printer.
ON
Disable patient ID function (turns OFF when touched).
OFF
Enable patient ID function (turns ON when touched).
Table continued on next page.
10
09-38555
GALLERY OF ICONS
Icon
Name
Function
Enter
Enter and return to previous view.
Backspace
Delete previous character.
Increase
Increase contrast/volume.
Decrease
Decrease contrast/volume.
Scroll up
View next result in the patient or control records.
Scroll down
View previous result in the patient or control records.
Other symbols and signs
Other symbols, signs and abbreviations that may appear during operation of the Afinion™ AS100 Analyzer are
explained below.These symbols or signs are only informative and cannot be activated like the icons.
Symbol
Meaning
Appears when?
Wait!
Hour-glass icon that appears in the start-up procedure.
Information
code
Icon used along with a code number [#] that corresponds to
specific information or an error message
(see “Information codes and troubleshooting”).
Operator ID
Icon illustrates the operator ID.
Patient ID
Icon illustrates the patient ID.
Control ID
Icon illustrates the control ID.
Control
The letter C will appear on the screen when the control
mode is selected.
O-ID
Operator ID
Abbreviation used in the patient and control records.
P-ID
Patient ID
Abbreviation used in the patient records.
C-ID
Control ID
Abbreviation used in the control records.
RUN#
Run number
Abbreviation used in the patient and control records for the
run number of the analysis.This numbering is reset each day
at 24:00h.
LOT#
Lot number
Abbreviation used in the patient and control records for the
lot number of the Test Cartridge.
[#]
09-38555
11
GETTING STARTED
Locating your Analyzer
Place your Afinion™ AS100 Analyzer on a dry, clean, stable and horizontal surface. Make sure that the
Analyzer is located with sufficient surrounding airspace, at least 5 inches on each side. Acclimate the
Analyzer to ambient operating temperature (15-32°C, 59-89°F) before use.
The Analyzer might be impaired by:
• Condensing humidity and water
• Heat and large temperature variations
• Direct sunlight
• Vibrations (e.g. from centrifuges and dishwashers)
• Electromagnetic radiation (e.g. from mobile phones)
• Movement of the Analyzer during processing of a Test Cartridge
Connecting power supply
- Connect the power cable to the power cord adapter.
- Insert the plug from the power cord adapter into the power socket (Figure 4) in the back of the Analyzer.
- Plug in the power cord to a wall outlet.
Always use the correct supply voltage.The power supply voltage must match the information
quoted in the section “Technical specifications”, page 34.
1
2
3
4
Figure 4
1
2
3
4
12
Not in use
USB-A connectors for printer and/or barcode reader
RS-232 port for PC
Power input for power supply connection
09-38555
GETTING STARTED
Connecting additional equipment
Optional accessories, not provided with your Afinion™ AS100 Analyzer are:
• External barcode reader – for reading barcoded sample or operator identification.
• Printer – for optional print out of test results.
• PC – for data transfer to HIS or LIS systems.
For additional information regarding the recommended barcode reader, printer, and PC connection please
call 1-877-4-Afinion (1-877-423-4646) or email [email protected]. See figure 4 for correct
connection of the external equipment.
Connecting the equipment should be done while the Analyzer is switched off.
How to switch ON the Analyzer
Switch on the Analyzer by pressing the ON/OFF button (Figure 1).
An automatic start-up procedure will be initiated. Please wait.
Do not open the lid manually.
Automatic start-up procedure
Start-up menu
1
2
3
The automatic start-up procedure will be initiated shortly after the Analyzer has been switched on.The
Analyzer's software version (X.XX) will appear in the upper left corner of the screen and a self-test will run
for approximately 4 minutes.The red light on the top of the Analyzer will turn on, indicating that the Analyzer
is busy. The Analyzer is ready for use when the start-up menu is displayed and the green indicator light turns on.
If the Analyzer fails during the start-up procedure, an information code will appear referring to a message
given in the “Information codes and troubleshooting”, page 29.
09-38555
13
GETTING STARTED
Setting the configuration
Before using your Afinion™ AS100 Analyzer you should set the configuration according to your needs.
To enter the configuration menu, do the following:
Entering configuration menu
Start-up menu
Main menu
1
Touch
main menu.
to enter
Configuration menu
2
3
Touch
to enter
configuration menu.
Select an item for configuration
(see following pages).
The following items can be set from the configuration menu:
• Language
• Patient ID on/off
• Date and time
• Screen contrast, screen alignment and beeper volume
To set these items, please comply with the following instructions.
Choosing language
The default setting by the manufacturer is English. Other languages are available.
Configuration menu
14
1
2
3
Touch
to enter
language selection.
Touch the arrow in the window
to view other languages.
Scroll down until you find the
preferred language.
Touch
to accept
and return to the configuration
menu.
09-38555
GETTING STARTED
Disabling or enabling patient ID function
The patient identification (ID) function can be enabled or disabled.The patient ID function is enabled as a
default setting by the manufacturer. When the patient ID function is enabled (ON), the patient ID must be
entered for each Test Cartridge to be analyzed.
If the patient ID function is disabled (OFF), a run number will automatically replace the patient ID and be
displayed in the upper left corner of the screen.This numbering is reset every 24hrs; each day at 00:00h.
Disabling the patient ID function:
Configuration menu
1
2
3
Touch
to enter
patient ID on/off option.
Touch
to
disable the patient ID
function.
Touch
to accept
and return to the configuration
menu.
1
2
3
Touch
to enter
patient ID on/off option.
Touch
to
enable the patient ID function.
Touch
to accept
and return to the configuration
menu.
Enabling the patient ID function:
Configuration menu
09-38555
15
GETTING STARTED
Setting date
The correct date should always be set because the date and time for the analysis are stored and displayed in
the patient and control records.The date format is YYYY:MM:DD, where YYYY is the year, MM is the month
(01 to 12), and DD is the day (01 to 31).
Configuration menu
1
2
3
Touch
to enter
date/time settings.
Touch
date setting.
to enter
Enter today's date.
Touch
to confirm
and return to previous view.
Setting time
The correct time should always be set because the date and time for the analysis are stored and displayed in
the patient and control records.The time format is hh:mm, where hh is the hour from 00 to 23 and mm is
minutes from 00 to 59.
Configuration menu
16
1
2
3
Touch
to enter
date/time settings.
Touch
time setting.
to enter
09-38555
Enter time.
Touch
to confirm and
return to previous view.
GETTING STARTED
Adjusting screen contrast
The screen contrast can be adjusted.
Configuration menu
1
2
3
Touch
to enter
screen/beeper settings.
Touch
to enter
screen contrast setting.
Adjust screen contrast by
touching
or
Touch
to accept
and return to previous view.
Aligning screen
The screen must be realigned if the buttons do not respond accurately when touched. It is not necessary to
align screen as a part of the initial configuration.
Configuration menu
1
2
3
Touch
to enter
screen/beeper settings.
Touch
to enter
screen alignment function.
Tap the cross-hair object (+)
in the upper left corner using
a blunt pencil to be precise.
Repeat for the object appearing in the lower right corner
and in the center of the screen.
The previous screen view will
automatically return.
17
09-38555
GETTING STARTED
Adjusting beeper volume
One beep means that the test is completed and result displayed.Two beeps means that an information
or error code is displayed.The beeper volume can be adjusted. If adjusted to a minimum, no beep will
be heard.
Configuration menu
1
2
3
Touch
to enter
screen/beeper settings.
Touch
to enter
beeper volume setting.
Adjust beeper volume by
touching
or
Touch
to accept
and return to previous view.
How to switch OFF the Analyzer
Switch off the Analyzer by pressing the ON/OFF button (Figure 1).
The Analyzer should be switched off after the end of a working day.
Please note:
• When the power is turned off, a closing down procedure is initiated.The cartridge carriage will move
to a safe position and the display will be active a few seconds until the Analyzer shuts down.
The Analyzer can be switched off, or the power supply disconnected, without loss of stored results.
• The Analyzer can only be switched off when the cartridge chamber is empty and the lid is closed. If the
ON/OFF button is pressed and the lid is open, the message “Close lid” will appear on the screen.
18
09-38555
QUALITY CONTROL
Why quality control testing?
Quality control testing should be done to confirm that your Afinion™ AS100 Analyzer System is working
properly and providing reliable results. Only when controls are used routinely and the values are within the
acceptable ranges can accurate results for patient samples be assured.
Choosing control material
Controls recommended by Axis-Shield should be used for quality control of your the Afinion™ AS100
Analyzer System.These control kits contain control materials with established acceptable ranges for the
Afinion™ AS100 Analyzer System.
Handling and testing controls
Consult the Package Insert that comes with each control kit for detailed instructions on handling
and storage of the control material.
To run a control, follow the procedure in the section “Testing procedures”, page 20-28.
The measured value should be within the acceptable range stated on the control vial label or in the control
package insert. If the control results are within the acceptable ranges, patient samples may be tested and
results reported.
If
-
the result obtained for a control is outside the acceptable limits, make sure that:
The control vial has not passed its expiry date.
The control vial has not passed its open vial expiry date.
The control vial and Afinion™ Test Cartridges have been stored according to recommendations.
There is no evidence of bacterial or fungal contamination of the control vial.
Correct any procedural error and re-test the control material. If no procedural errors are detected, it is
recommended to examine the laboratory’s quality control record to investigate the frequency of control
failures. Ensure that there is no trend in out-of-range quality control results. Re-test the control material
using a new control vial.
Patient results must be declared invalid when controls do not perform as expected. Contact your
customer service representative (1-877-4-Afinion or 1-877-423-4646) for advice before analyzing
patient samples.
Frequency of control testing
Controls should be analyzed:
- With each new shipment of Afinion™ test kits.
- With each new lot of Afinion™ test kits.
- Users with a low frequency of testing should analyze controls at least every 30 days.
- When training new operators in correct use of the Afinion™ AS100 Analyzer.
- Anytime an unexpected test result is obtained.
- After software upgrade of the Afinion™ AS100 Analyzer.
The controls should always be analyzed if an unexpected test result is obtained (see the Afinion™ test
Package Insert, section Test result reporting). If local, state and/or federal regulations require more frequent
testing of control materials, then quality control should be performed in compliance with these regulations.
Each laboratory site can benefit from establishing a quality control plan.The laboratory director should
determine whether additional testing is appropriate for their laboratory.
09-38555
19
TESTING PROCEDURES
Operating precautions
When operating the Analyzer:
• Use your fingertip to operate the touch screen. Do not use pens or other objects that may
scratch or damage the screen. Exception: If the screen alignment function is required, you will
need to use a blunt pencil.
• The lid opens automatically, but must be closed manually. Do not try to open the lid manually.
• The lid protects the cartridge chamber from dust, dirt and humidity. Empty the cartridge
chamber and keep the lid closed when the Analyzer is not in use.
• If an information code appears on the screen during the analysis, please consult the
“Information codes and troubleshooting” section, page 29.
• Do not move the Analyzer when a Test Cartridge is being processed.
• Do not turn the Analyzer upside down when a Test Cartridge is being processed.
When handling the Test Cartridge:
• Do not use Test Cartridges after the expiration date, or if the Test Cartridges have not been
stored in accordance with the recommendations.
• Do not use the Test Cartridge if the foil pouch, the desiccant bag or the Test Cartridge itself
is damaged.
• The Test Cartridges must reach recommended operating temperature before use.
• Do not open the foil pouch until just before use. Once opened, the Test Cartridge has limited
stability.
• Handle and dispose the Test Cartridges and sample collection equipment as potential biohazardous materials. Use personal protective equipment.
• Do not re-use any part of the Test Cartridge.
Consult the Package Insert that comes with each Afinion™ test kit for assay specific information.
20
09-38555
TESTING PROCEDURES
Using the operator ID function
Entering operator ID (optional)
If required the operator's identification (ID) can be entered before processing an Afinion™ Test Cartridge.
Both letters and numbers can be entered (maximum 16 characters).The operator ID will be stored and
displayed in the lower left corner of the screen.The entered operator ID will be memorized and displayed
in the patient and control records.The entered operator ID remains in use by the Analyzer until this ID is
deleted, a new ID is entered or the Analyzer is switched off.
Start-up menu
Main menu
1
Touch
main menu.
to enter the
2
3
Touch
to enter the
operator ID option.
Enter operator ID by numbers
and/or touch
to enter
letters.
Touch
to confirm and
return to previous view.
If a barcode reader is connected to the Analyzer, then this can be used to scan a bar-coded operator ID.
09-38555
21
TESTING PROCEDURES
Using the patient ID function
The patient ID function is ON as a default setting. As long as this function is enabled, the patient ID must be
entered for each patient sample to be analyzed.The patient ID function can be disabled (see “Setting the
configuration”, page 14).
Entering patient ID
It is recommended to enter the patient ID during processing of the Test Cartridge in the Analyzer. Entering
the patient ID will not interrupt the processing. It is also possible to enter the patient ID before the processing. Both letters and numbers can be entered (maximum 16 characters).The patient ID will be stored in
the memory and displayed along with the other specific data for this run (see “Viewing result records”,
page 28).
To enter the patient ID during processing, do the following:
1
2
3
Touch
to enter
the patient ID option.
Enter patient ID by numbers
and/or touch
to enter
letters.
Touch
to confirm and
return to previous view.
The entered patient ID will
appear on the screen.
The patient ID icon will remain
in view to allow corrections to
be made.
If a barcode reader is connected to the Analyzer, then this can be used to scan a bar-coded patient ID.
22
09-38555
TESTING PROCEDURES
Using the control ID function
In quality control testing, a suitable control ID must always be entered.The lot number of the control material
is recommended as a suitable control ID.The control ID function cannot be disabled.
Entering control ID
It is recommended to enter the control ID during processing of the Test Cartridge in the Analyzer. Entering
the control ID will not interrupt the processing. It is also possible to enter the control ID before processing.
Both letters and numbers can be entered (maximum 16 characters).The control ID will be stored in the
memory and displayed along with the other specific data for this run (see “Viewing result records”, page 28).
To enter the control ID during processing, do the following:
1
2
3
Touch
to enter the
control ID option.
Enter control ID by numbers
and/or press
to enter
letters.
Touch
to confirm and
return to previous view.
The entered control ID will
appear on the screen.
The control ID icon will remain
in view to allow corrections to
be made.
09-38555
23
TESTING PROCEDURES
Preparing for an AfinionTM analysis
-
Allow the Afinion™ Test Cartridges to reach recommended operating temperature before use.
Switch on your Afinion™ Analyzer so it is ready for the day's first analysis.
Enter operator ID (optional). See procedure on page 21.
The patient ID or control ID can be entered before or during processing of the Test Cartridge in
the Analyzer. See procedures on page 22 and 23.
Consult the Afinion™ test Package Insert or Quick Guide for assay specific information.
Handle
Tear strip
ID area
XX-NN
24
3
1
2
Open the foil pouch.
Grip the handle and remove
the Test Cartridge from the
pouch.
Discard the desiccant bag and
foil pouch in suitable waste
containers.
Inspect the Cartridge.
Do not use the Test Cartridge
if it is damaged or if loose
desiccant particles are found
on the Test Cartridge.
Mark the Test Cartridge with
the patient or control ID.
Use the ID area on the opposite
side of the Test Cartridge.
An ID label can also be used.
Once opened, the Test Cartridge
has limited stability.
Use the handle to avoid
touching the optical reading area.
Do not write on the barcode
label or allow it to become wet,
dirty or scratched.
If an ID label is used, this must
fit into the ID area.
Optical reading area
09-38555
TESTING PROCEDURES
Collecting a specimen with the Test Cartridge
• The patient sample material and control material to be used is specific for each Afinion™ test.
• The length of the capillary in the sampling device, and thereby the sample volume, might also vary
for the different Afinion™ tests.
• The time from filling the capillary until analyzing the Test Cartridge should be as short as
possible.
• Do not use the Test Cartridge if dropped on the bench or floor after the sample has been
collected.
Consult the Afinion™ test Package Insert or Quick Guide for assay specific information.
Examples:
Collecting capillary blood
Collecting control
material
1
2
3
Remove the sampling device
from the Test Cartridge.
Fill the capillary; hold the
sampling device close to
horizontal and bring the tip
of the capillary into contact
with the surface of the sample.
Make sure that the capillary fills
completely. It is not possible
to overfill.
Do not wipe off the capillary.
Immediately and carefully
replace the sampling device
into the Test Cartridge.
Use the handle to keep the
Test Cartridge steady against
the table and pull the sampling
device straight up.
Avoid air bubbles and excess
sample on the outside of the
capillary.
The time from filling the capillary
until analyzing the Test Cartridge
should be as short as possible.
09-38555
25
TESTING PROCEDURES
Analyzing a patient sample
1
2
3
Touch
to enter
patient sample mode.
The lid opens automatically.
Insert the Test Cartridge with
the barcode label facing left.
Close the lid manually.
The Analyzer will start
processing the Test Cartridge.
If the lid is left open from
previous run and “Insert
Cartridge” is displayed, this
step is omitted and you can
start with step 2.
Be sure that the Test Cartridge
is correctly placed in the
cartridge chamber.
The processing time depends
on the test in use.
4
5
6
Record the result, then
touch
to accept.
If a printer is connected,
touch
to print the
result.
Remove the used Test
Cartridge from the cartridge
chamber and discard it in a
suitable waste container.
Insert a new Test Cartridge
or close the lid manually.
The lid opens automatically.
The result will be saved in the
patient records.
Keep the lid closed to protect the
cartridge chamber when the
Analyzer is not in use.
Touch
patient ID.
Touch
and enter
to confirm.
Entering the patient ID will not
interrupt the processing.
See detailed procedure on
page 22.
Consult the Afinion™ test Package Insert or Quick Guide for assay specific information.
26
09-38555
TESTING PROCEDURES
Analyzing a control
1
2
3
Touch
to enter
control mode.
The lid opens automatically.
Insert the Test Cartridge with
the barcode label facing left.
Close the lid manually.
The Analyzer will start
processing the Cartridge.
If the lid is left open from
previous run and “Insert
Cartridge” is displayed,
touch
then proceed
with step 2.
A “C” in the upper left corner
indicates that the Analyzer is in
the control mode.
The processing time depends
on the test in use.
4
5
6
Record the result, then
touch
to accept.
If a printer is connected,
touch
to print the
result.
Remove the used Test
Cartridge from the cartridge
chamber and discard it in a
suitable waste container.
Insert a new Test Cartridge
or close the lid manually.
The lid opens automatically.
The result will be saved in the
control records.
Keep the lid closed to protect
the cartridge chamber when the
Analyzer is not in use.
Touch
control ID.
Touch
and enter
to confirm.
Entering the control ID will not
interrupt the processing.
See detailed procedure on
page 23.
Consult the Afinion™ test Package Insert for control and assay specific information.
09-38555
27
TESTING PROCEDURES
Viewing result records
The patient and control results are stored in the memory of the Afinion™ AS100 Analyzer.The last 500
patient results and the last 500 control results are saved in separate records. When exceeding the capacity
of 500 results, the oldest result will be deleted.
The following parameters are listed for each run: Date and time, run number, patient ID/control ID, operator
ID, lot numbers of Test Cartridge and Test Result.
If a printer is connected, the test results can be printed one by one.
Viewing patient results
Start-up menu
Main menu
1
Touch
main menu.
to enter
2
3
Touch
to enter
patient records.
The last patient result is
displayed.
To view more results touch
or
If a printer is connected,
touch
to print the
result.
Viewing control results
Start-up menu
Main menu
1
Touch
main menu.
28
to enter
2
3
Touch
to enter
control records.
The last control result is
displayed.
To view more results touch
or
If a printer is connected,
touch
to print the
result.
09-38555
INFORMATION CODES AND TROUBLESHOOTING
When an information code appears
Information codes that might appear during use of the Afinion™ AS100 Analyzer refer to specific information
or error messages.The code numbers, the possible causes and actions to take are listed below.
If the Analyzer detects a problem during processing of a Test Cartridge, the test will automatically be aborted
and the Test Cartridge will be safely moved to the cartridge chamber. Proceed as follows:
1
2
3
Record the code number (#)
and touch
to accept.
The lid opens automatically.
Remove the Test Cartridge.
If the Test Cartridge is not
ejected, restart the Analyzer.
Look up the possible cause
from the table below, and take
actions to solve the problem.
If the problem persists, contact
your local Afinion™ supplier
(see “Service information”
page 31).
Do not re-use the Test
Cartridge.
Do not re-use a Test Cartridge that has been rejected by the Analyzer. Collect a new sample and
repeat the test with a new Test Cartridge.
Information messages caused by assay specific limitations
[#]
Cause
Action to take
103
Hemoglobin too low
Consult the Afinion™ HbA1c Package Insert,
section Test result reporting.
104
Hemoglobin too high
Consult the Afinion™ HbA1c Package Insert,
section Test result reporting.
105
HbA1c too low
Consult the Afinion™ HbA1c Package Insert,
section Test result reporting.
106
HbA1c to high
Consult the Afinion™ HbA1c Package Insert,
section Test result reporting.
107
Creatine too high
Consult the Afinion™ ACR Package Insert
108
Blood in urine
Consult the Afinion™ ACR Package Insert
29
09-38555
INFORMATION CODES AND TROUBLESHOOTING
Error messages caused by sample or Test Cartridge failure
30
[#]
Cause
Action to take
201
Insufficient sample volume:
- Empty capillary
- Air bubble in capillary
- Capillary incompletely filled
Repeat the test with a new sample and Test Cartridge.
Ensure that the capillary is completely filled with no air bubbles.
202
Excess sample on the sampling
device exterior
Repeat the test with a new sample and Test Cartridge.
Ensure that only the tip of the capillary is in contact with
the sample.
203
Wrong sample material
Repeat the test with a new sample and Test Cartridge.
Ensure that proper sample material is used (see Package
Insert for the Afinion™ test in use, section Specimen collection
and storage).
204
Coagulated sample
Repeat the test with a new sample and Test Cartridge.
The time from filling the capillary until analyzing the Test
Cartridge should be as short as possible.
Hemolysed blood sample
(Afinion™ HbA1c)
Consult the Afinion™ HbA1c Package Insert.
Repeat the test with a new sample and Test Cartridge.
Test Cartridge or Analyzer
failure
Repeat the test with a new sample and Test Cartridge.
If the problem persists, restart the Analyzer and run controls.
205
Capillary cracked or damaged
Repeat the test with a new sample and Test Cartridge.
Inspect the sampling device before use and handle with care.
206
Barcode label not readable
(dirty or damaged)
Repeat the test with a new sample and Test Cartridge.
If the problem persists, restart the Analyzer and run controls.
207
No sampling device inserted
Repeat the test with a new sample and Test Cartridge.
Used sampling device belongs
to another Afinion™ test
Repeat the test with a new sample and Test Cartridge. Ensure
that the sampling device and Test Cartridge have the same label
color.
Label on sampling device not
readable (dirty or damaged)
Repeat the test with a new sample and Test Cartridge. Ensure
that the label is clean.
208
Test Cartridge previously used
Repeat the test with a new sample and Test Cartridge.
209
Test Cartridge has passed
expiration date
Check expiration date on the Cartridge pouch or box.
Repeat the test using a new sample and a new Test Cartridge
from another lot.
The date in the Analyzer is
incorrectly set
Check the date in the Analyzer to make sure it is set correctly.
Repeat the test with a new sample and Test Cartridge.
210
Test Cartridge temperature
too low
Repeat the test with a new sample and a new Test Cartridge
within recommended operating temperature range
(see Package Insert for the Afinion™ test in use).
211
Test Cartridge temperature
too high
Repeat the test with a new sample and a new
Test Cartridge within recommended operating temperature
range (see Package Insert for the Afinion™ test in use, section
Test procedure).
212
Test Cartridge not recognized
by the Analyzer
The software version required for this test is not installed.
Contact your local supplier for assistance.
09-38555
INFORMATION CODES AND TROUBLESHOOTING
[#]
Cause
Action to take
213
214
215
Test Cartridge or Analyzer
failure
Repeat the test with a new sample and Test Cartridge.
If the problem persists, restart the Analyzer and run controls.
216
Controls are not run after the
software upgrade of the
Analyzer
Run one Afinion™ Control following the procedure
on page 27 “Analyzing a control”.
Error messages caused by Analyzer failure
[#]
Cause
Action to take
301
Self-test failed
Restart the Analyzer.
302
Analyzer failure
Restart the Analyzer and run controls.
Repeat the test with a new sample and Test Cartridge.
303
Analyzer temperature is
too high
Wait until the Analyzer has cooled down.
Ensure that the operating temperature is within
recommended range (15-32ºC, 59-89ºF).
Repeat the test with a new sample and Test Cartridge.
304
Analyzer temperature is
too low
Ensure that the operating temperature is within
recommended range (15-32ºC, 59-89ºF).
Repeat the test with a new sample and Test Cartridge.
305
- Printer improperly connected
- Malfunction of the printer
Switch off the Analyzer, reconnect the printer and restart
the Analyzer.
If the message persists, see the printer User Manual.
Touch screen failure
Restart the Analyzer.
Start-up procedure failed
Contact your local supplier for assistance.
ERROR
27
28
29
Self-test error.
Analyzer in
Severe instrument failure
non-operative
mode
Contact your local supplier for assistance.
Service information
The laboratory must notify the manufacturer of this test system of any performance, perceived or
validated, that does not meet the performance specifications as outlined in the instructions.
The manufacturer provides a toll free line for technical support.
Call 1-877-4-Afinion or 1-877-423-4646.
The toll free number is available for use only in the United States of America.
E-mail: [email protected]
Before asking for assistance, please record the following information:
• Afinion™ AS100 Analyzer serial number (SN) – see page 1
• Software version number – see page 1
• Afinion™ test type
• Test Cartridge lot number – see foil pouch or kit container
• Control name and lot number – see vial label
• Control results obtained
• Description of the problem with reference to information codes and error messages
31
09-38555
MAINTENANCE AND WARRANTY
Cleaning and maintenance
No maintenance of the AfinionTM AS100 Analyzer is required other than cleaning the exterior and cartridge chamber.
Cleaning the exterior
Cleaning the exterior of the AfinionTM AS100 Analyzer should be performed whenever necessary. Most spills
and stains can be removed with water or a mild detergent.
- Switch off the Analyzer. Unplug the power supply when the shut down procedure is completed.
- Clean the outside of the Analyzer and the touch display with a clean, lint-free and non-abrasive
cloth dampened in water or a mild detergent.
- To disinfect the exterior of the instrument, first remove as much as possible of the spilled material
with a cloth dampened in the disinfectant (2% glutaraldehyde or 0.5% sodium hypochlorite).The
surface of the Analyzer should be exposed to the disinfectant for at least 10 minutes.1
- Allow the Analyzer to air dry.
- Plug in the power supply and switch on the Analyzer.
• The Analyzer must be switched off and unplugged before cleaning.
• Do not use any cleaning liquid or equipment other than those recommended above.
• Do not immerse the Analyzer in water or other liquids.
Cleaning the cartridge chamber
The AfinionTM AS100 Analyzer Cleaning Kit (
chamber.
1115269) should always be used for cleaning the cartridge
The cartridge chamber should be cleaned immediately if materials or liquids are spilled in the cartridge chamber.
For regular maintenance (removal of dust particles etc.), the cartridge chamber should be cleaned every 30 days.
- Touch
to open the lid.
- Unplug the power supply.
- Wet a Cleaning Swab with 3 drops of water or a disinfectant (2% glutaraldehyde or 0.5% sodium
hypochlorite). Do not soak.
- Carefully remove spills and particles from the cartridge chamber using the moistened swab.
- To disinfect the cartridge chamber, the surface of the chamber should be exposed to the disinfectant
for at least 10 minutes.1
- Wipe off any residual liquid from the cartridge chamber using a new, dry Cleaning Swab.
- Close the lid.
- Plug in the power supply and switch on the Analyzer.
• The Analyzer must be unplugged before cleaning.
• Do not use any cleaning liquid or equipment other than those recommended above.
• Do not allow liquid to drip off the Cleaning Swab into the Analyzer. If liquid drips into
the Analyzer, optics can be destroyed.
• Do not immerse the Analyzer in water or other liquids.
Clinical and Laboratory Standards Institute (CLSI) Guideline M29-A3: ”Protection of Laboratory Workers
From Occupationally Acquired Infections; Approved Guideline - Third Edition”. ISBN 1-56-238-567-4
1
32
09-38555
MAINTENANCE AND WARRANTY
Disposal of the Analyzer
For correct disposal according to the Directive 2002/96/EC (WEEE), contact your local
Afinion™ supplier.
Software upgrade
Consult the Afinion™ AS100 Analyzer SW Upgrade Package Insert.
Warranty
Axis-Shield warrants solely to the Buyer that the Afinion™ AS100 Analyzer will be free from defects
in materials and workmanship, when given normal, proper and intended usage, and will perform in
accordance with Axis-Shield’s specifications for a period of twelve months from the date of delivery.
At its expense, Axis-Shield agrees to repair, or at Axis-Shield’s option, replace with a new or reconditioned unit, any Afinion™ AS100 Analyzer which is under warranty and not performing substantially
in accordance with applicable product specifications, provided that the Buyer has given Axis-Shield
notification of such warranty claim within the warranty period. If Axis-Shield is unable after reasonable efforts to repair or replace the Afinion™ AS100 Analyzer not performing substantially in accordance with applicable product specifications, the Buyer’s sole remedy shall be the refund of an
amount not to exceed the actual purchase price paid by the Buyer for the Afinion™ AS100 Analyzer.
All repairs will be done during normal working hours. All replaced parts shall become Axis-Shield’s
property. Axis-Shield may require the Buyer to ship the Afinion™ AS100 Analyzer to Axis-Shield or
elsewhere at Axis-Shield’s expense, for warranty service to be performed.
Notwithstanding the foregoing, Axis-Shield shall have no obligation to make repairs, replacements or
corrections which result, in whole or in part, from (i) an act of God or other unforeseen catastrophe,
(ii) any error, omission or negligence of the Buyer, (iii) improper or unauthorized use of the Afinion™
AS100 Analyzer, (iv) operating errors or the disregard of warnings and precautions described in this
Afinion™ AS100 Analyzer User Manual; (v) repairs performed to the Afinion™ AS100 Analyzer by
any person other than an authorized Axis-Shield service representative; (vi) use of the Afinion™
AS100 Analyzer in a manner for which it was not designed, (vii) causes external to the Afinion™
AS100 Analyzer such as, but not limited to, power failure or electric power surges, or (viii) use of the
Afinion™ AS100 Analyzer in combination with equipment, components or software not supplied by
Axis-Shield.
EXCEPT AS STATED IN THIS SECTION OF THE USER MANUAL, AXIS-SHIELD DISCLAIMS ALL
WARRANTIES, WHETHER EXPRESS OR IMPLIED, WRITTEN OR ORAL, WITH RESPECT TO THE
AFINION™ AS100 ANALYZER, INCLUDING ANY WARRANTY OF MERCHANTABILITY OR
FITNESS FOR A PARTICULAR PURPOSE. AXIS-SHIELD’S MAXIMUM LIABILITY ARISING OUT
OF THE SALE OF THE AFINION™ AS100 ANALYZER OR ITS USE, WHETHER BASED UPON
WARRANTY, CONTRACT,TORT OR OTHERWISE, SHALL NOT EXCEED THE ACTUAL
PURCHASE PRICE PAID BY THE BUYER FOR THE AFINION™ AS100 ANALYZER. IN NO
EVENT SHALL AXIS-SHIELD BE LIABLE FOR SPECIAL, INCIDENTAL OR CONSEQUENTIAL
DAMAGES, INCLUDING, BUT NOT LIMITED TO, LOSS OF PROFITS, LOSS OF DATA OR LOSS
OF USE DAMAGES, ARISING HEREUNDER OR FROM THE SALE OF THE AFINION™ AS100
ANALYZER. THIS WARRANTY MAY NOT BE TRANSFERRED BY THE BUYER.
The acknowledgement of claims shall be reported to your Axis-Shield Technical Care Specialist at
1-877-4-Afinion or 1-877-423-4646 or by E-mail to [email protected]
33
09-38555
TECHNICAL SPECIFICATIONS
AfinionTM AS100 Analyzer
Analyzer
Size
12.6 x 6.7 x 6.7 in. / 320 x 170 x 170 mm
Weight
11 lbs. / 5 kg
Display
Standard LCD color display with back light and integrated touch panel.
Resolution: 240 x 320 pixels.Visible area: 2.3 x 3.0 in. / 58 x 77 mm.
Camera
640 x 480 pixels
Capacity of result records
500 patient results and 500 control results
SW update
via USB flash drive
Communication interface
RS 232C, USB 1.1
Power supply
Power cord adapter
Separate AC to DC power cord adapter. Double insulated.
Input
100-240 VAC, 50/60 Hz, 42 W
Output
24 VDC ± 5%, 1.75A
Output connector
0.2 x 0.1 in. / 5.5 x 2.5 mm plug. Positive (+) on inner pin.
Adapter standards
IEC/EN-60950/UL 1950 (USA and Europe). EN-60601/UL 2601
(Japan). Approved for in vitro diagnostic medical devices.
Operating conditions
Temperature
15-32ºC (59-89ºF)
Relative humidity
10-90%, non-condensing
Location
Dry, clean, horizontal surface. Avoid direct sunlight.
Test Cartridge temperature
According to specifications for the AfinionTM test in use.
Storage and transport (in the original container)
Temperature
-40 to 70ºC (-40 to 158ºF)
Relative humidity
10-93% at 40ºC (104ºF)
Accessories
For information regarding recommended barcode reader and printer please call 1-877-4-Afinion (1-877-423-4646)
or email [email protected].
34
09-38555
SYMBOLS AND ABBREVIATIONS
The following symbols and abbreviations are used in the product labeling and instructions for the Afinion™
AS100 Analyzer System.
Symbol/Abbreviation
Explanation
Conformity to the European directive 98/79/EC on in vitro diagnostic
medical devices
In Vitro Diagnostic Medical Device
Catalog number
Lot number
Serial number
Test Cartridge
CONTROL C I
Control C I
CONTROL C II
Control C II
CLEANING KIT
Cleaning kit
Waste Electrical and Electronical Equipment (WEEE)
Contents are sufficient for one test
Contents are sufficient for 15 tests
Expiration date (year-month)
Storage temperature limitations
Manufacturer
Operator's handling
Warnings and precautions
Biological risk
Consult the Afinion™ user instructions
CLIA
Clinical Laboratory Improvement Amendment of 1988
LED
Light Emitting Diode
PC
Personal Computer
ID
Identification
HIS
Hospital Information System
LIS
Laboratory Information System
LCD
Liquid Crystal Display
AC
Alternating Current
DC
Direct Current
35
09-38555
www.signatur.no
1115384 2007-03
Axis-Shield PoC USA
10 Commerce Way
Norton, MA 02766
USA
Axis-Shield PoC AS
P.O. Box 6863 Rodeløkka
NO-0504 Oslo, Norway
ISO 9001 and ISO 13485 certified company
09-38555