1
SDK User Manual v1
By Martin Fleurent
Table of Contents
1.
Introduction ...................................................................................................................................... 4
Conventions Used in this Manual ............................................................................................... 4
2.
Installation ......................................................................................................................................... 6
PC ........................................................................................................................................................... 6
MAC ....................................................................................................................................................... 9
3.
SDK basics ....................................................................................................................................... 11
A Module is made of parts ......................................................................................................... 11
Module functionalities ................................................................................................................ 12
Query system ........................................................................................................................................... 13
Event System ............................................................................................................................................ 14
Real-time Audio and Data process................................................................................................... 15
Chunk System .......................................................................................................................................... 15
Settings Panel ........................................................................................................................................... 16
Graphic Canvas ........................................................................................................................................ 16
Contextual Menu ..................................................................................................................................... 17
Automation Recording ......................................................................................................................... 17
Randomize ................................................................................................................................................ 18
Mouse events............................................................................................................................................ 18
Multi touch events.................................................................................................................................. 18
LAN Remote .............................................................................................................................................. 18
Utilities functions ......................................................................................................................... 19
4.
Understanding SDK examples .................................................................................................. 20
Audio Volume example ............................................................................................................... 20
The query system ................................................................................................................................... 20
Processing audio buffers ..................................................................................................................... 21
Data Multiply example ................................................................................................................ 22
Event System ............................................................................................................................................ 22
Draw Box example ....................................................................................................................... 23
Graphic interface .................................................................................................................................... 23
Sensomusic SDK User Manual v1.0
Mouse events............................................................................................................................................ 23
Randomize ................................................................................................................................................ 25
Contextual menu ..................................................................................................................................... 25
Midi Transpose example ............................................................................................................ 25
Processing midi messages .................................................................................................................. 25
Simple Pad example..................................................................................................................... 26
Settings Panel ........................................................................................................................................... 26
Automation Recording ......................................................................................................................... 27
LAN Remote .............................................................................................................................................. 29
Chunk system ........................................................................................................................................... 29
5.
Usine rules for user modules.................................................................................................... 31
Multi-platform ............................................................................................................................... 31
Usine workflow integration ...................................................................................................... 31
Translation ..................................................................................................................................... 31
Parameters Min/Max, Precision, Scale, Symbol................................................................. 32
6.
Development info’s, tips & tricks ............................................................................................ 33
Parameters or Settings ............................................................................................................... 33
How to update parameters in sync with time..................................................................... 33
7.
Conclusion ....................................................................................................................................... 34
Sensomusic SDK User Manual v1.0
1. Introduction
The power of Usine comes from the generic way you can customize your live setup and your
interface to create exactly the environment you want. The core of this power is the module
concept, which let you patch and organize your data flow in any direction with a generic
approach.
To optimize or extend your patches, you can use the script language to make your own
modules. It’s more CPU friendly than patching and easy because completely integrated in
Usine.
But, the SDK is the ultimate tool to extend Usine. You can construct your own user module in
C++ to create any new module you can imagine.
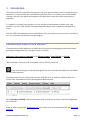
Conventions Used in this Manual
This manual provides indicators to guide the user when performing procedures and when
pointing out important key concepts, terms, or actions.
Indicates a key-term or concept such a Mouse events, Visual Studio, or Xcode.
Italics indicate a location path to navigate such as Library/Audio FX.
Icons such as the gear to the left help guide the user to locate the similar icon available
on the Usine Interface.
Screenshots such as the one below is used to help the user to perform similar action or to
locate some informations in the Developpment Environment.
Menu [Product->Build] indicates the menu path to perform an action in the Developpment
Environment.
Links to Web content like Sensomusic site or to other part of the document like the Draw Box
example.
Sensomusic SDK User Manual v1.0
Page | 4
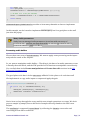
Code reference like a functionName or variables in a paragraph.
Code snippets are formatted as follow
// example of code snippet
void onGetModuleInfo (MasterInfo* pMasterInfo, ModuleInfo* pModuleInfo);
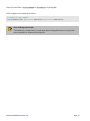
Note and important info
This indicates a related note, or sub-topic that is being discussed; or to provide
some extended or advanced description.
Sensomusic SDK User Manual v1.0
Page | 5
2. Installation
Usine is multi-platform (MAC/PC), so is the SDK. We have made our best to follow the ‘Write
once, compile anywhere’ philosophy.
The SDK is provided as a zipped folder, unzip it where you want and it’s ready to use:
The bin folder is where ends up all compiled binaries.
The examples folder provides 5 simple User Modules, they are made to learn the basics and
we’ll see them in details in this manual. They are also a good starting point for your own
modules as they cover usual needs in term of modules types.
The libs folder is for dependencies in case a module needs an external library.
The modules folder contains more than 20 complex modules and distributed with Usine,
like Matrix and devices. They are good examples of how far you can go and to acquire deep
understanding of the SDK .
The SDK folder contains files with declarations and the module wrapper.
In order to compile a module, you’ll need a compiler, we provide project for Visual Studio on
PC and Xcode on Mac.
Let’s start by opening the project of an example module to check if all is correctly installed.
PC
You only need to have Visual Studio installed to make a user module.
If needed, download and install it (version 2012 or later).
We’ll now open the AudioVolumeExample module project and compile it to verify that all is
ok.
Sensomusic SDK User Manual v1.0
Page | 6
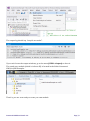
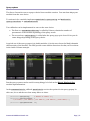
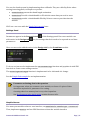
A [DOUBLE CLICK] on the AUdioVolumeExample.sln should open the project in Visual
Studio
Now, go to the menu [BUILD->Build Solution] to start the compilation.
Sensomusic SDK User Manual v1.0
Page | 7
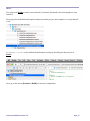
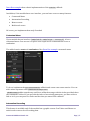
The output log should say “compile succeeded”.
If you can’t locate the output windows, go to the menu [VIEW->Output] to show it.
The result user module (which is in fact a dll) is located in the folder Sensomusic
SDK\bin\SDK Examples
That’s it; you are now ready to create you own module.
Sensomusic SDK User Manual v1.0
Page | 8
MAC
You only need Xcode to make a user module, if needed, download it from the AppStore and
install it.
Now open the AudioVolumeExample.xcodeproj module project and compile it to verify that all
is ok.
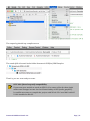
A [DOUBLE CLICK] on the AUdioVolumeExample.xcodeproj should open the project in
Xcode
Now, go to the menu [Product->Build] to start the compilation.
Sensomusic SDK User Manual v1.0
Page | 9
The output log should say compile success
The result dylib is located in the folder Sensomusic SDK\bin\SDK Examples
That’s it; you are now ready to create.
OS X 10.6 (Snow Leopard) compatibility
If you want your module to work on OSX 10.6, be aware of the fact that Apple
made some changes in some low level functionality of OSX (audio, graphics).
It could be necessary to compile the project with XCode 3.2.6 on a MAC with OS
X 10.6 installed as the OS.
Sensomusic SDK User Manual v1.0
Page | 10
3. SDK basics
This is an overview of what a User module is made of. We begin to speak about code without
going too deeply. If you want further info on a function, the API Reference Documentation
describes exactly what each function does.
T construct a module, the SDK offer you a simple but powerful approach:
-
Two global functions, one to instantiate and the second to destroy your module.
-
A UserModuleBase class to derive from, providing complete communication with Usine
and all the necessary stuff to customize your module behavior. In addition, this base class
provides many utility functions to help you integrate your data in the module.
So, your module is contained in one class, derived from the UserModuleBase class.
By implementing and customizing certain part of this base class, you can construct the
module you want.
A Module is made of parts
It’s a brunch of callbacks used by Usine to communicate with your module.
Some are mandatory and you must implement them in your module. Let see them.
// needed by usine to obtain your module characteristics
void onGetModuleInfo (MasterInfo* pMasterInfo, ModuleInfo* pModuleInfo);
// needed by usine to obtain parameters characteristics of your module
void onGetParamInfo (int ParamIndex, TParamInfo* pParamInfo);
// needed by usine to assign handles to your module parameters
void onSetEventAddress (int ParamIndex, UsineEventPtr pEvent);
// needed by usine to inform your module about parameters actions
void onCallBack (UsineMessage *Message);
Some are needed depending on the info’s you put in the pModuleInfo structure.
Let’s take an example, you want your module to have a GUI, you activate this feature by
choosing pModuleInfo->ModuleType = mtControl in onGetModuleInfo. Now, your modules
has a graphic canvas, it’s up to you to draw the module GUI, so you have to implement the
onPaint callback
// needed by Usine to draw the module canvas if it is of type mtControl
void onPaint ();
We use some functions provided by the SDK here, like sdkDrawLine or sdkFillText to
populate the canvas.
In addition, you can receive mouse events of this canvas, by implementing those callbacks
Sensomusic SDK User Manual v1.0
Page | 11
// optional, if the module has a canvas (ModuleType = mtControl)
// those callbacks let you know about mouse events on it
void onMouseMove (TShiftState Shift, float X, float Y);
void onMouseDown (TMouseButton MouseButton, TShiftState Shift, float X,float Y);
void onMouseUp (TMouseButton MouseButton, TShiftState Shift, float X,float Y);
Some of those callbacks are not connected to special features, they just let you do things
when something specific happen.
// Usine call it when the Usine Size change
void onBlocSizeChange (int BlocSize);
// Usine call it when the SampleRate change
void onSampleRateChange (double SampleRate);
They are optional and you implement them only if you need them, like adjusting a DSP
algorithm to the sample rate.
So, to resume, by filling the ModuleInfo structure in onGetModuleInfo and implementing
some callbacks, you decide what your module can do and choose by all the functionalities
offered by the SDK.
Module functionalities
Modules are deeply integrated in Usine. It means lots of features in order to comply with
ergonomic and modularity of Usine workflow.
Those features are organized by themes as follow
Query System.
Event System.
Real-time Audio and Data process.
Chunk System.
Settings Panel.
Graphic Canvas.
Contextual Menu.
Automation Recording.
Preset and Randomize.
Mouse Events.
Multi-touch Events.
LAN Remote.
Most of the time, you only need some of them to do the job but you’ll have to take care about
which are necessary for a good Usine integration (Contextual Menu, Settings, chunk…).
Sensomusic SDK User Manual v1.0
Page | 12
Query system
The Query System let you to popup a choice list at module creation. You can then adapt your
module from the user choice.
To activate it for a module, implement ModuleInfo->QueryString and ModuleInfo>QueryListValues in onGetModuleInfo.
Two callbacks can be implemented to react to the user choice.
The first on, onGetNumberOfParams, is called by Usine to obtain the number of
parameters of the module depending of the query result.
The second one, onAfterQuery, is called after the query pop-up is closed. It let you do
some things depending of the query choice.
A typical use of the query system is in Audio modules, it let the user chose the Multi-channels
characteristic of the module. The SDK provide some utilities functions for that, we’ll see them
in the Audio Volume example.
But the query system can be used for many things, let’s look at the Matrix Display & Set
module implementation.
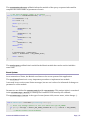
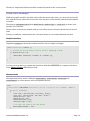
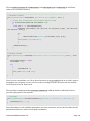
In the onGetModuleInfo callback, pModuleInfo receive the options for the query popup. In
this case, it’s to ask the user how many faders to show.
pModuleInfo->QueryString
= "Number of faders \?";
pModuleInfo->QueryListValues =
"\"no fader\",\"16 faders\",\"32 faders\",\"64 faders\",\"128 faders\"";
pModuleInfo->QueryDefaultIdx
Sensomusic SDK User Manual v1.0
= 1;
Page | 13
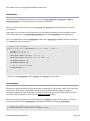
The onGetNumberOfParams callback inform the module of the query response index and let
compute the total number of parameters from it.
// Get total parameters number of the module
int TMatrixModule::onGetNumberOfParams( int queryIndex)
{
int NumOfFaders = 0;
int result = 0;
switch (queryIndex)
{
case 1:
NumOfFaders =
break;
case 2:
NumOfFaders =
break;
case 3:
NumOfFaders =
break;
case 4:
NumOfFaders =
break;
default:
break;
}
16;
32;
64;
128;
m_numOfOptFaders = NumOfFaders;
result = NumOfFaders + OPT_FADERS_SHIFT;
return result;
}
The onAfterQuery callback isn’t needed in the Matrix module but can be used to initialize
some stuff.
Event System
As an extension of Usine, the Module can listen to the event system of the application.
The onCallBack function is a very important procedure to implement in a module.
It not only let us receive some Usine messages, but we use it also to be informed of change on
parameters of the module.
Parameters are defined in onGetParamInfo with a ParamIndex. This unique index is contained
in the UsineMessage::wParam to identify the Parameter concerned by the callback.
The UsineMessage::lParam is the type of event (mouse click, mouse move, value change…).
void DrawBoxExample::onCallBack (UsineMessage *Message)
{
// filter only message specific to this user module and type MS_CHANGE
if (Message->message == NOTIFY_MSG_USINE_CALLBACK && Message->lParam == MSG_CHANGE)
{
// WParam contains the Param Number
Sensomusic SDK User Manual v1.0
Page | 14
switch (Message->wParam)
{
// Erase trajectory button input
case 0:
eraseBox();
break;
// randomize button input
case 1:
onRandomize();
break;
}
}
}
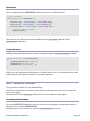
Real-time Audio and Data process
Activated by default, if you don’t need it, you can deactivate it with ModuleInfo>DontProcess = TRUE in onGetModuleInfo.
If activated, the onProcess function is called by Usine in sync with the audio engine. It’s
where you can do some real-time calculations.
In the onProcess function is executed, each audio parameter contains an array of audio
samples dimensioned to the BlockSize of the Usine engine.
You can easily take inputs audio block, make an operation and copy the result on the outputs.
The Audio Volume example shows a simple event operation.
Be careful
The onProcess is called from the audio thread at each audio tick of the audio
engine, so every BlocSize samples.
Keep it optimized and avoid any memory allocation here, pre allocate them at
initialization time.
Chunk System
A chunk is a memory block used to store some binary data. Usine store chunks in patch and
workspace files and use them to store/restore presets.
In a module, parameters are automatically stored except if TParamInfo::DontSave is set to
TRUE.
Parameters are automatically stored in presets if TParamInfo::IsStoredInPreset is set to
TRUE.
But sometime, you need to store internal values or extra data and you use the chunk for this.
Sensomusic SDK User Manual v1.0
Page | 15
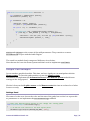
You use the chunk system by implementing three callbacks. They are called by Usine when
storing/restoring patch, workspace or presets.
onGetChunkLen return the chunk length estimation.
onGetChunk Provide a chunk handle to fill with the extra data you need to store.
onSetChunk provide a chunk handle filled by Usine to restore your data into the
module.
We’ll see a use case with the Simple Pad example later.
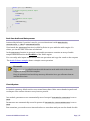
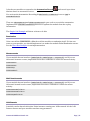
Settings Panel
Parameters appear in the Properties tab
add entries in the Design tab
parameters.
of the Settings panel. But a user module can
too, for settings that don’t need to be exposed as real time
Here we can see the added entries in the Design tab for the Granulator module.
To do so, we just need to implement the onCreateSettings function and populate it with SDK
functions to create some settings entries.
The onSettingsHasChanged function is implemented to be informed of a change.
See the Simple Pad example for an implementation.
Parameter or Setting, that is the question
It’s important, when you construct your module, to choose if a piece of data
should be exposed as a parameter or a setting.
A setting takes less memory but is very slow in patches.
See Development infos, tips & tricks section for more info.
Graphic Canvas
You want your module to have a user interface, set pModuleInfo->ModuleType = mtControl.
Then, implement onPaint and use SDK functions to draw the module interface.
Sensomusic SDK User Manual v1.0
Page | 16
Draw Box example show a basic implementation of the onPaint callback.
In addition, if the module has a user interface, you can have access to many features:
Contextual Menu
Automation Recording
Mouse events
Multi touch event
Of course, you implement them only if needed.
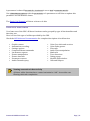
Contextual Menu
If your module has an interface (pModuleInfo->ModuleType = mtControl), it has a
contextual menu. You can use it to place some rapid access commands like reset or
randomize.
The added entries reset and randomize of the Draw Box example contextual menu.
To do so, implement the onCreateCommands callback and create some menu entries. You can
add a menu separator with sdkAddCommandSeparator.
sdkAddCommand add a named entry and fire a callback message with the index provided when
the command is clicked. If you provide the index of an existing parameter, you have a direct
link to it. Or you can put a free index and do what you want in the callback.
Automation Recording
This feature is available only if the module has a graphic canvas. You’ll also need Mouse or
multi touch events to feed recording data.
Sensomusic SDK User Manual v1.0
Page | 17
It let the user module to respond to the Automation Record
distinct data’s in automation curves.
and record up to three
You activate the Automation Recording if ModuleInfo::CanRecord is set to TRUE in
onGetModuleInfo.
Then use sdkStopRecord and sdkProcessRecord in your code to record the automation.
Implement the onSetRecordedValue function to update the module from the replay
information.
The Simple Pad Example will show us how to do this.
Randomize
Usine can call the onRandomize callback to tell the module to randomize itself. If it has any
sense to your module, you should implement it to make the module Global Randomize aware.
See the Draw Box Example for an implementation.
Mouse events
If your module has an interface (pModuleInfo->ModuleType = mtControl) and if you are
interested in mouse events, implement those three callbacks to collect the mouse activity.
onMouseMove
onMouseDown
onMouseUp
onMouseWheel
Multi touch events
If your module has an interface (pModuleInfo->ModuleType = mtControl) and if you are
interested in multi touch events, implement those three callbacks to collect the mouse
activity.
onMouseMoveMultiProc
onMouseDownMultiProc
onMouseUpMultiProc
LAN Remote
A module can be shared with other Usine instance running on a LAN network. It’s the LAN
Remote feature and your module can share any parameter.
Sensomusic SDK User Manual v1.0
Page | 18
A parameter is shared if ParamInfo::IsShared is set to TRUE in onGetParamInfo.
Use sdkNeedRemoteUpdate with the paramIndex of a parameter to tell Usine to update this
parameter on LAN Remote clients.
The Simple Pad Example will show us how to do this.
Utilities functions
It’s a huge part of the SDK. All those functions can be grouped by type of functionalities and
data they use.
Here is a list of the type of utilities provided by the SDK.
Check the API Reference Documentation for complete description of each function.
Graphic canvas.
Automation recording.
Settings options.
Contextual Menu commands.
Lan Remote request.
Events manipulation.
Events data utils.
Parameters setters.
Audio Channels query
Usine Core infos and services.
Usine Paths getters.
Files utils.
Audio Files manipulation.
Math utils
Trace functions.
Dialog popup.
Module child window.
Utils and Helpers.
Naming convention is here to help
All these utility functions have a name beginning by “sdk”. It provides easy
filtering with code complexion.
Sensomusic SDK User Manual v1.0
Page | 19
4. Understanding SDK examples
Five module examples are provided to show some of the features of the SDK and the way to
use them. The best way to read this part is in front of the sources, opened in your IDE.
Studying those examples are a good way to learn how the SDK work, and how to make good
modules.
It’s also a perfect base to start with and extends them if you don’t feel to start from scratch.
At start, don’t start from scratch
Starting from an existing project exempt you from having to fully configure it.
Let’s go exploring them and learn how to code our own modules.
Audio Volume example
It’s a simple audio gain module with a query system to set the number of channels at creation.
It also shows how to process audio buffers.
It’s a good base for any audio processing module that needs to implement the multi channel
query.
The query system
Using the query system to choose how many audio channels a module has to deal with is a
common case, the SDK provides some helpers and this module show how to use them.
We activate the query system in onGetModuleInfo by filling the appropriate members of the
pModuleInfo structure.
// query for multi-channels
if (pMasterInfo != nullptr)
{
pModuleInfo->QueryString
= sdkGetAudioQueryTitle();
pModuleInfo->QueryListValues = sdkGetAudioQueryChannelList();
pModuleInfo->QueryDefaultIdx = 1;
}
We have to implement onGetNumberOfParams to tell Usine the total numbers of parameters
the module has, based on the user choice.
// Get total parameters number of the module
int AudioVolumeExample::onGetNumberOfParams (int queryIndex)
{
Sensomusic SDK User Manual v1.0
Page | 20
int result = 0;
this->queryIndex = queryIndex;
numOfAudiotInsOuts = sdkGetAudioQueryToNbChannels (queryIndex);
// we want 1 in 1 out per channels
result = (numOfAudiotInsOuts * 2) + numOfParamAfterAudiotInOut;
return result;
}
sdkGetAudioQueryToNbChannels provides us how many channels we have to implement.
In this example, we don’t need to implement onAfterQuery but it’s a good place to do stuff
just after the popup.
Many Audio parameters
Study how we manage Audio parameters in and out with two array of
UsineEventPtr and how we map them with ParamIndex in onGetParamInfo,
onSetEventAddress and onCallBack.
Processing audio buffers
We now have two array of UsineEventPtr. We want to apply some processing on the inputs
and push the result on the outputs.
So, we want to manipulate audio buffers… The thing is, the data of an audio parameter event
is literally the audio block, and the SDK provide lots of function to manipulate event directly.
You can find them in the Events manipulation and Events data utils sections in the API
Reference Documentation.
The good place to do that is in the onProcess callback. It’s the place to do real time stuff.
We implement it to copy audio inputs to output and apply the gain.
void AudioVolumeExample::onProcess ()
{
for (int i = 0; i < numOfAudiotInsOuts; i++)
{
sdkCopyEvt (audioInputs[i], audioOutputs[i]);
sdkMultEvt1 (coeffGain, audioOutputs[i]);
}
}
Notice how we loop through the arrays and do some simple operations on events. We don’t
process sample by sample, but on the block of samples directly, thanks to the SDK event
helpers.
The coeffGain is computed in onCallBack by collecting the fdrGain event value and
converting it from dB to coefficient.
Sensomusic SDK User Manual v1.0
Page | 21
void AudioVolumeExample::onCallBack (UsineMessage *Message)
{
// filter only message specific to this user module
if (Message->message == NOTIFY_MSG_USINE_CALLBACK)
{
// Message->wParam is equal to ParamIndex
if ( (Message->wParam >= (numOfAudiotInsOuts*2))
&& (Message->lParam == MSG_CHANGE)
)
{
coeffGain = sdkDbToCoeff (sdkGetEvtData (fdrGain))
* (1.0f - sdkGetEvtData (switchMute));
}
}
}
Data Multiply example
Minimal math module, two data inputs A and B and one output equal to A*B.
It’s an interesting module because it’s totally event based, all the stuff is made in the
onCallBack callback.
Event System
The module has three parameters, they are defined in the onGetParamInfo function
// dtfInputA
case 0:
pParamInfo->ParamType
pParamInfo->Caption
pParamInfo->IsInput
pParamInfo->IsOutput
pParamInfo->CallBackType
=
=
=
=
=
ptDataField;
"A";
TRUE;
FALSE;
ctImmediate;
break;
Notice how we set the callback type to ctImmediate on the two inputs. Like that, we have
immediate response in onCallBack when a parameters change.
See how we compute the output value directly in callbacks of the inputs.
if (Message->message == NOTIFY_MSG_USINE_CALLBACK)
{
int paramIndex = (int)Message->wParam;
if ((paramIndex == 0 || paramIndex == 1) && (Message->lParam == MSG_CHANGE))
{
sdkMultEvt3 (dtfInputA, dtfInputB, dftOutput);
}
}
Sensomusic SDK User Manual v1.0
Page | 22
We have a simple and efficient module completely based on the event system.
Draw Box example
With this graphic module, we draw a box with the mouse, after that, we can zoom in/out the
box with the mouse wheel. We look at the user interface of the module and the functionalities
around it.
Choosing in onGetModuleInfo that pModuleInfo->ModuleType = mtControl activate your
module user interface.
We now have to draw the module, and we can collect mouse actions to draw the box in realtime.
Finally, we add two commands in the contextual menu to reset and randomize the box.
Graphic interface
Implement onPaint to draw the module interface, here a simple rectangle.
void DrawBoxExample::onPaint ()
{
// we check the box top value to see if there is something to draw
if (boxCoords.top >= 0)
{
sdkFillRect (boxCoords, colorBox, 0, colorBox, 0);
}
}
See how we keep this very simple and just draw with the boxCoords we compute elsewhere,
in the Mouse events callbacks precisely.
Mouse events
We implement three mouse callbacks onMouseMove, onMouseDown, onMouseUp and
onMouseWheel to collect mouse info’s and update the box.
void
DrawBoxExample::onMouseDown (TMouseButton Button, TShiftState Shift, float X, float Y)
{
if (Button == mbLeft)
{
float left = std::min(1.0f, std::max(X, 0.0f));
float top = std::min(1.0f, std::max(Y, 0.0f)) ;
boxCoords.left = left;
boxCoords.top = top;
boxCoords.bottom = top;
boxCoords.right = left;
// we store the state of the left button
mouseLeftButtonDown = TRUE;
}
Sensomusic SDK User Manual v1.0
Page | 23
}
At mouse down, we limit the mouse input to 0:1 (the size of the graphic canvas).
We use the mouse coordinates to initialize our box. We store the left button state and the last
mouse move.
void DrawBoxExample::onMouseMove (TShiftState Shift, float X, float Y)
{
// we only want to draw when the left mouse button is down
if (mouseLeftButtonDown)
{
updateBox (std::min(1.0f, std::max(X, 0.0f)), std::min(1.0f, std::max(Y, 0.0f)));
}
// collecte mouse pos in case of zoom
lastMousePos.x = X;
lastMousePos.y = Y;
}
We update the bottom right corner of the box with the new mouse coordinates while left
button is down.
Here we just store the state of the left button.
void DrawBoxExample::onMouseUp (TMouseButton Button, TShiftState Shift, float X, float Y)
{
mouseLeftButtonDown = FALSE;
}
With the mouse wheel, we apply the zoom to the box.
void DrawBoxExample::onMouseWheel (TShiftState Shift, int WheelDelta)
{
WheelDelta > 0 ? boxScale = 1.1f : boxScale = 0.9f;
// apply the scale
boxCoords.left
=
boxCoords.top
=
boxCoords.bottom =
boxCoords.right =
(boxCoords.left - lastMousePos.x) * boxScale + lastMousePos.x;
(boxCoords.top - lastMousePos.y) * boxScale + lastMousePos.y;
(boxCoords.bottom - lastMousePos.y) * boxScale + lastMousePos.y;
(boxCoords.right - lastMousePos.x) * boxScale + lastMousePos.x;
// limit to canvas
boxCoords.left
=
boxCoords.top
=
boxCoords.bottom =
boxCoords.right =
bounds
std::min(1.0f,
std::min(1.0f,
std::min(1.0f,
std::min(1.0f,
std::max(boxCoords.left, 0.0f));
std::max(boxCoords.top, 0.0f));
std::max(boxCoords.bottom, 0.0f));
std::max(boxCoords.right, 0.0f));
}
We use the lastMousePos collected in onMouseMove to center the zoom under the mouse position.
Sensomusic SDK User Manual v1.0
Page | 24
Randomize
Here we implement the onRandomize callback to produce a randomized box.
// usine randomize
void DrawBoxExample::onRandomize ()
{
boxCoords.left = (float)(rand() / (float)(RAND_MAX));
boxCoords.right = (float)(rand() / (float)(RAND_MAX));
boxCoords.top = (float)(rand() / (float)(RAND_MAX));
boxCoords.bottom = (float)(rand() / (float)(RAND_MAX));
// Ask to repaint the module
sdkRepaintPanel();
}
Note that we also call this function internally from the onCallback callback for the
btnRandomize parameter.
Contextual menu
Adding contextual commands is as simple as implementing the onCreateCommands callback
void DrawBoxExample::onCreateCommands()
{
sdkAddCommandSeparator("cmd_edit");
sdkAddCommand("cmd_reset", 0);
sdkAddCommand("cmd_randomize", 1);
}
Inside, we add commands and link them to a callback index. Here, it corresponds to the same
actions that the two inputs parameters reset and randomize.
Midi Transpose example
It’s a good base module for some Midi hacking.
We have an input fader to tweak the pitch and two midi parameters, one for the input and
one for the output.
We do the midi stuff in onProcess callback to be in sync with the audio engine.
Processing midi messages
We use the onProcess callback to copy the in to the out and apply a transposition based on
the pitch collected with sdkGetEvtData.
Midi parameter event contain one or more UsineMidiCode in an array.
Sensomusic SDK User Manual v1.0
Page | 25
void MidiTransposeExampleExample::onProcess ()
{
int sizeMidiIn = sdkGetEvtSize (midiIn);
sdkSetEvtSize (midiOut, 0);
if (sizeMidiIn > 0)
{
sdkCopyEvt (midiIn, midiOut);
int pitch = (int)sdkGetEvtData (fdrPitch);
for (int i = 0; i < sizeMidiIn; i++)
{
UsineMidiCode code = sdkGetEvtArrayMidi (midiOut, i);
if (code.Msg == MIDI_NOTEON || code.Msg == MIDI_NOTEOFF)
{
code.Data1 = std::min (127, std::max (0, (int)code.Data1 + pitch));
sdkSetEvtArrayMidi (midiOut, i, code);
}
}
}
}
midiIn and midiOut are the events of the midi parameters. They contain on or more
UsineMidicode in sync with the Audio Engine.
The result is a module that’s transposes Midi notes in real-time.
Note that we don’t use the Event System and don’t need to implement onCallBack.
Simple Pad example
Let see another graphical module. This time, we have 4 pads we can manipulate with the
Mouse events. To store the pads position, we use the chunk system.
In addition, we implement the Automation Record, LAN Remote system and add some
settings in the design panel.
We don’t focus on the Graphic canvas or the Mouse events this time as we have lot of other
feature to study.
Settings Panel
We want to let the user choose the color and the size of the pads, but we don’t to expose this
as parameters so we implement the onCreateSettings callback.
// create user defined layout options in the 'design tab' setting panel
void SimplePadExample::onCreateSettings()
{
// we had our user section in the edit layout panel
sdkAddSettingLineCaption(DESIGN_TAB_NAME, "pad");
Sensomusic SDK User Manual v1.0
Page | 26
sdkAddSettingLineColor( DESIGN_TAB_NAME, &colorPad, "color" );
sdkAddSettingLineInteger( DESIGN_TAB_NAME, &sizePad, "size", 1, 30,
scLinear, "px", 20);
}
Here is the result in Usine interface.
Note how entries appear in the order they are implemented and how we organize our setting
by regrouping them under an explicit caption.
We also implement the onSettingsHasChanged just to be sure the Graphic Canvas is
updated immediately when a setting change.
// Callback which indicate that the user has changed someting in the layout
// You'll probably need to redreaw
void SimplePadExample::onSettingsHasChanged()
{
// Ask to repaint the module
sdkRepaintPanel();
}
We don’t have anything else to do here because the colorPad and sizePad variable are
directly used in the onPaint callback when we draw the Canvas content.
Automation Recording
To use the Automation Recording feature, we have to activate it in the onGetModuleInfo
callback. This let Usine to be informed to check our module when the record button is
pressed.
pModuleInfo->CanRecord = TRUE;
As for now, the recording is limited to three float data numbers and we have to store at least
two numbers per pad (x and y coordinate). So we are limited to one pad for the recording, but
if we use the third slot to store the pad index, we can record any of the four pad.
Sensomusic SDK User Manual v1.0
Page | 27
We use sdkProcessRecord in onMouseMove and sdkStopRecord in onMouseUp to tell Usine
when to record data if needed.
//----------------------------------------------------------------------------// MouseMove callback
void SimplePadExample::onMouseMove (TShiftState Shift, float X, float Y)
{
// we only want to draw when the left mouse button is down
if (mouseLeftButtonDown && selectedPad >= 0)
{
float posX = X + selectedPadOffsetX;
float posY = Y + selectedPadOffsetY;
updatePad (selectedPad, std::min(1.0f, std::max(posX, 0.0f)), std::min(1.0f,
std::max(posY, 0.0f)));
try
{
sdkProcessRecord((TPrecision)selectedPad, posX, posY);
}
catch (std::exception& /*e*/)
{
}
sdkRepaintPanel();
}
}
//----------------------------------------------------------------------------// MouseUp callback
void SimplePadExample::onMouseUp (TMouseButton Button, TShiftState Shift, float X, float
Y)
{
mouseLeftButtonDown = FALSE;
selectedPad = -1;
try
{
sdkStopRecord ();
}
catch (std::exception& /*e*/)
{
}
}
Note how we encapsulate our call to those functions in a try/catch block as we don’t want to
propagate any exception. In case of errors, the recording won’t be effective but our module
won’t report errors at Usine level.
We now have to implement the onSetRecordedValue callback which is called by Usine to
provide replay data to the module.
// recording
void SimplePadExample::onSetRecordedValue (TPrecision X, TPrecision Y, TPrecision Z)
{
updatePad((int)X, Y, Z);
}
Note that names for the callback parameters are just convention, we use the first data for the
pad index and the two other for the pad coordinates.
Sensomusic SDK User Manual v1.0
Page | 28
We update the according pad coordinates and voila!
LAN Remote
This feature is enabled at parameter level by setting pParamInfo->IsShared to TRUE in
onGetParamInfo for each parameters we want to be shared.
Here we want to share the two arrays arrPosX and arrPosY that represent the four pad
coordinates.
After that, we just have to tell Usine when we want those parameters to be updated on the
LAN. We do this by using sdkNeedRemoteUpdate with the paramIndex of the parameter.
Here it’s implemented in the updatePad method and onSetChunk callback as they are where
we update the pad coordinates.
// update a pad coordinates
void SimplePadExample::updatePad(int padIndex, float x, float y)
{
posTab[padIndex].x = x;
posTab[padIndex].y = y;
sdkSetEvtArrayData (arrPosX, padIndex, x);
sdkSetEvtArrayData (arrPosY, padIndex, 1.0f - y);
sdkNeedRemoteUpdate (1);
sdkNeedRemoteUpdate (2);
// Ask to repaint the module
sdkRepaintPanel();
}
1 and 2 are the paramIndex of the arrPosX and arrPosY array events.
Chunk system
We have no input parameters reflecting pads coordinates so Usine won’t take care of storing
them for us. If we want our module to restore pads position when loading a patch or a
workspace and if we want to be able to recall presets of pads positions, the module need to
store the pads coordinates. We’ll use the Chunk system for this.
We already have the data stored internally in the posTab variable. We just have to copy the
content into the chunk in onGetChunk and update it from the chunk in onSetChunk.
// compute the lentgh of the chunk string
int SimplePadExample::onGetChunkLen (LongBool Preset)
{
Sensomusic SDK User Manual v1.0
Page | 29
// compute the chunk string lentgh to save points coords of pads
int ChunkLen = sizeof(TPointF) * PAD_OBJ_MAX;
return ChunkLen;
}
// store module datas in the chunk string
void SimplePadExample::onGetChunk (void* chunk, LongBool Preset)
{
// copy points coords array into the chunk
memcpy(chunk, &(posTab), sizeof(TPointF) * PAD_OBJ_MAX);
}
// restore module datas from the chunk string
void SimplePadExample::onSetChunk (const void* chunk, int sizeInBytes, LongBool Preset)
{
// copy points coords array from the chunk
memcpy(&(posTab), chunk, sizeof(TPointF) * PAD_OBJ_MAX);
for (int i = 0; i < PAD_OBJ_MAX; i++)
{
sdkSetEvtArrayData (arrPosX, i, posTab[i].x);
sdkSetEvtArrayData (arrPosY, i, 1.0f - posTab[i].y);
sdkNeedRemoteUpdate (1);
sdkNeedRemoteUpdate (2);
}
sdkRepaintPanel();
}
In this case, there is no difference if we are storing for preset or for patch/workspace.
Sensomusic SDK User Manual v1.0
Page | 30
5. Usine rules for user modules
Making module with the SDK is one thing, making good modules, reusable and sharable with
other is another.
In this chapter we’ll see an overview of subject to help you in that way.
Multi-platform
Due to the Multi-platform nature of Usine and so the SDK, it’s very important to develop your
module with that in mind.
The module output binary produced by the compilation is a Dynamic library. Usine use
special name extension to identify the module target platform.
Here is the naming convention;
PC
MAC
Can be compiled for x86 or x64 targets
Name extension for x86 target .usr- osx32
Name extension for x86 target .usr-win32
Future implementation :
Name extension for x64 target .usr-win64
Name extension for x64 target .usr- osx64
The SDK itself is platform agnostic but the way you code and the dependencies you use in
your module can make the task extremely complex.
Try to use, as much as possible the STL library as it is well integrated in most IDE.
At some point, you may need some external library to do the job. Here you have to think
about multi-platform and choose carefully your dependencies.
Usine workflow integration
A module can integrate lots of features. Some can be added alone and some are interdependent.
As a template, try to mimic modules of the Usine distribution in term of ergonomics and
feature integration.
For example, if your module has a canvas, it has also a contextual menu and you should/can
populate it with quick access actions that are not on the canvas like reset or randomize.
Translation
Make your module with multiple languages is important to help adoption.
Sensomusic SDK User Manual v1.0
Page | 31
The default language in Usine is English, and your module should implement it.
By convention in Usine, only the Contextual menu is translated, it means that parameters and
settings captions, in the patch and settings panels stay in English.
Usine do the job for you and try to translate Contextual Menu captions when needed, but you
have to prepare stuff to make it clean.
You can check in the Usine Distrib\Resources\Lang folder to see already existing expression
handle and use it in priority.
If you need to add some handle, put it in your module and Usine will build them automatically
in the languages files, thus, ready to be translated.
Parameters Min/Max, Precision, Scale, Symbol
The default Min/Max is between 0 and 1 and should be prioritized until it makes sense to use
another one.
A good example, the HSLA Color module
The Hue parameter is between 0 and 12 because there are 12 convenient
combinations of primary colors on the Hue wheel (one each 30 degrees).
The Luminance parameter is between 0 and 2 because at 0 you have a black, at
2 you have a white and at 1 you have the plain color.
A Parameter scale can be one of three types, Linear, Logarithmic and Exponential.
Symbols for parameters are pure visual helpers and have no computing implication. But
Usine use some convention and your module should follow them.
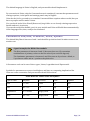
Usine Rules for Values Scale and Symbol
Type of value
Min/Max
Precision
Scale
Symbol
Pixel
0 -> 100
X.XXX
log
pix
Gain
-80 -> 12
X.X
exp
dB
Frequencies
50 -> 20000
integer/float
log
Hz
Pitch
-48 -> 48
integer/float
linear
halftone
Sensomusic SDK User Manual v1.0
Page | 32
6. Development info’s, tips & tricks
This chapter covers various subjects with info’s to help you with common cases you’ll
encounter during module development.
Parameters or Settings
Parameters are clearly implemented with real time in mind. They contain the data your
module has to process or deal with.
Settings are more for UI settings or behavior setup. Even if they can be connected (they are
accessible in extended mode of the module), they are not made to be heavily manipulated at
real time like parameters.
How to update parameters in sync with time
Parameters
They are containers for some pieces of data.
There is no assumption of the use you make of this data, for logic, for audio... It's just
numbers.
The onCallback callback
Is called when a parameter data change, it's the "event flow" of Usine and is
completely time independent.
Generally, we use this procedure to directly respond to a parameter change, but we
can also just collect info to be processed somewhere, has we don't have time reference
here.
The onProcess callback
Is called in sync with audio blocks, it's the "streaming flow" of Usine and precisely
timed.
The granularity depends of the buffersize, samplerate of the audio driver and the
buffersize of usine.
It's where we naturally process audio blocs but it's also where you can do other thing
in sync with the time.
It's literally the "time slice" of the Usine engine.
Consequences
Using sdkSetEvtValue on the same parameter in a while or a for loop is irrelevant.
The best way to do some parameters change in sync with time, or an ordered
sequence of parameter changes, is to do it in the onProcess callback.
Sensomusic SDK User Manual v1.0
Page | 33
7. Conclusion
This document gives you a good overview of the SDK architecture and how to produce simple
modules. As you’ll practice and go deeper, you’ll see that possibilities are endless.
We do our best to open the power of Usine through the SDK, and with this tool, you can easly
customize Usine to suit your need.
It’s up to you now to amaze us with your creation.
If you have any feedback, tell us on the SDK section of the Sensomusic forums.
Happy coding
Martin Fleurent & the Sensomusic Team
Sensomusic SDK User Manual v1.0
Page | 34