1
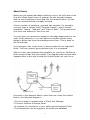
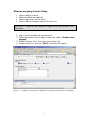
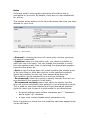
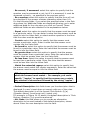
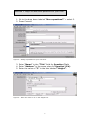
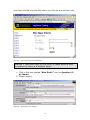
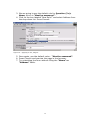
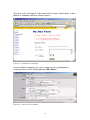
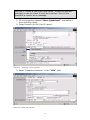
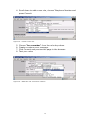
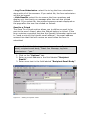
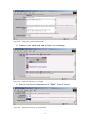
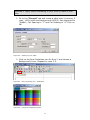
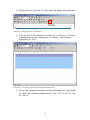
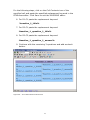
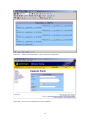
MySource Workshop
Workshop 2:
Creating on line forms
Monday 12th September 2005
Presented by:
Dan Petty MBCS
UWA Web Office
About Forms
Before we get started and begin defining a form, we will have a look
at a few things about forms in general, as well as what happens
when a user completes a form and hits the Submit button, so that
you can understand the concepts involved.
A form consists of questions, grouped into sections. For example,
you may have a section titled “Personal Details”, which has the
questions: “Name”, “Address” and “Date of Birth”. The questions for
your form are defined on the Form tab.
You can have your questions appear on the page sequentially in the
order of the sections, or you can define a complex format using
tables to define the layout and background colour. This is done on
the Format tab.
You can apply rules to the form, to ensure users fill out important
fields. The form doesn’t get submitted until it is completed.
After the user has answered the questions on your form, MySource
does several things with the results. The diagram below shows what
happens after a user has clicked the Submit button on your form:
As shown in the diagram above, when the user clicks the Submit
button, the following happens:
•
•
•
•
The form page is updated with a Thank You Message
The user receives a Receipt Email
A member (or members) of your staff receive Recipient Email
The submission can be logged to the MySource database
2
What we are going to learn Today
How to define a form.
What the different tabs do.
How to add rules to the form.
How to add a complex layout to the form.
Exercise 1: Create a new MySource page using the Custom Form
Template.
1. Log in to the MySource training site.
2. Enter the name of your page in the box under “Create new
pages?”
3. Select Custom Form from the drop down list.
4. Press Commit or use the “Alt S” shortcut (IE users).
Figure 1 – Creating a new page in MySource using the Custom Form Template.
3
When we click on the Contents tab, then on the form tab we see the
following screen:
Figure 2 – Form Tab Options.
This page is used to build the contents of your form and the
questions it contains. It has three main sections:
• Form – Details
• Form – Sections
• Form – Rules
We will now go through each of these sections in detail.
Details
This section defines the general details for your form:
• Form Title: enter a title in this field and tick the Show box to
print the title at the top of your form.
• Form Alignment: this option determines the alignment of the
form on the page: left, right or centre.
4
• Question Column Width: this optional field allows you to set the
width of the question column. The width can be expressed in pixels
(numerals with no suffix) or as a percentage (%).
• Answer Column Width: this optional field allows you to set the
width of the answer column. The width can be expressed in pixels
(numerals with no suffix) or as a percentage (%).
• Section Index: select the format in which your sections will be
auto-numbered, e.g. I, II, III or 1, 2, 3 or A, B, C. If the show?
tickbox is unchecked, your sections will not have any numbering or
markings.
• Question Index: this is the same as the Section Index, but is for
questions within sections. As with the Section Index above, if the
show? tickbox is unchecked, your questions will not have any
numberings or markings.
• Submit Button Text: this option allows you to change the text
that appears on the form’s Submit button. If left blank, the default
text is "Submit".
• Reset Button Text: this option allows you to change the text
that appears on the Reset button. If left blank, no Reset button will
appear on the form.
Sections
For any form to function properly, you must have at least one
Section, and at least one Question. A Section can contain as many
Questions as you like, and you can create as many Sections as you
like (e.g. Section A – Personal Details, Section B – Interests, etc).
Each Section of your form can appear on a page of its own. If a
form has more than one page, it is called a paginated form. You can
set a form to be paginated on the Options tab, and this is described
later in this chapter. For each section in your form, the following
fields appear:
• Section Title: this is where you enter the name for the section
(e.g. "Personal Details" or "Work History"). If you do not wish to
split your form up into multiple sections, leave this field blank.
• Section Note: you can add additional information relating to the
section here (e.g. "Please list only qualifications for courses or
certificates that have been completed.") The Section Note appears
underneath the Section Title on your form, however you may still
have a Section Note if you have left the Section Title blank.
• Section Order: this is a number field, which is used to set out
the order in which the user will view the sections of the form. For
example, if you created the section "Qualifications" before "Personal
Details" but would like "Personal Details" to be listed on the page
before "Qualifications", you can change the section order of
"Personal Details" to 1, and "Qualifications" to 2.
5
• More Questions?: this is where you add questions to your form.
Select the number of questions that you wish to add to the section
from the drop down list. Select the type of field to be used for the
question in the next drop down list, which can be changed later.
After you click on Commit, extra fields will be created in this
section, based on the number and type of the questions that you
requested.
The types of question fields that can be created are as follows:
- Text Box: this question type is a box in which the user can enter
any details they want. A text box can be single or multiple rows,
and can be limited to a set amount of characters.
- Dropdown/List Box: this question type is used when you want
the user to select one of the options that you have specified from a
drop down list.
- Tick-box list: this question type is used when you want the user
to select more than one option from a list of options. Users can see
all options on the page and can select the tick-box next to their
choice. Tick-boxes can have a default setting of ticked or un-ticked.
- Date/Time: this question type contains the option to include date
and time fields (in the form of drop down or text box fields). This
will be explained in more detail later.
- Email address: this question type is a text box that can be used
for email addresses. The validity of an email address entered is
automatically verified - only alpha-numeric characters and "." are
acceptable and it must contain the "@" character.
- Country: this question type is a pull-down list containing a preexisting list of country names.
- Login/Username: this question type is a text entry field that can
be used for login or user names. The validity of a login name
entered is automatically verified - only alphanumeric characters are
acceptable.
- Password: this question type is a text entry field that allows
users to enter passwords and displays this to the user as "*****".
- Hidden Field: this field type is used for passing information
between forms, and is an advanced HTML concept requiring
knowledge of scripting. We will not go into any more detail here.
MySource User Manual You will be presented with different editing
options depending on the type of question you select. However,
there are several fields that are common to all question types.
6
Rules
Rules are used to stop people submitting information that is
incomplete or incorrect. By default, there are no rules established
for a form.
This section at the bottom of the Form tab shows the rules you have
defined for your form.
Figure 3 – Form rules.
• Remove?: checking this box will remove the rule the next time
the page is committed.
• Question: when you first add a rule, you select a question to
which the rule is to apply. You can change the question to which
this rule applies at any time, by selecting the appropriate question
from this drop down list.
• Rule: in the first drop down list, select whether the answer given
in the form Must or Must Not conform to the specified condition.
Select the condition for the rule from second drop down list.
The condition can be selected from one of the following:
- Be answered: select this option to specify that the form will not
be submitted if this question is left blank.
- Be answered correctly: select this option to specify that the
form will not be submitted if this question is not answered correctly.
This is used for the Email Address and Login/Username question
types for which the format of a valid answer is pre-determined:
An email address must contain characters and “.” characters
and a single "@" character
a login must contain alphanumeric characters only.
Note: A question to which this rule condition has been applied must
not be left blank.
7
- Be correct, if answered: select this option to specify that the
question may be answered or not, but if it is answered, it must be
answered correctly – as specified in the previous option.
- Be a number: select this option to specify that the form will not
be submitted if the answer contains characters other than 0-9.
For the following fields, if you select the specified value in the Rule
drop down list, additional fields are displayed allowing you to enter
additional data for the rule when you click on Commit. These
additional fields are also detailed in the explanations below:
- Equal: select this option to specify that the answer must be equal
to a particular value. You can enter a value that the answer must be
equal to into the Value field, or select another question in the form
that the value must be equal to.
- Contain: select this option to specify that the answer must
contain a particular value. Enter a value that the answer must
contain into the Value field.
- Be found in: select this option to specify that the answer must be
found in a particular value. Enter the value that the answer must be
found in into the Value field.
- Be greater than: select this option to specify that the answer
must be greater than a particular value. Enter the value that the
answer must be greater than into the Value field.
- Be less than: select this option to specify that the answer must
be less than a particular value. Enter the value that the answer
must be less than into the Value field.
- Match the extended regexp: select this option to specify that
the answer must match this regular expression. Enter the value that
the answer must be equal to into the Value field.
TIP: A regular expression allows you to define a pattern
which the answer must match – for example, you could
specify “*apples” to specify that the answer may contain
any number of characters followed by the string “apples”.
• Default Description: this field shows you the description that is
displayed if a user’s input does not comply with any of the rules.
The default description is of the format: Rule Broken: Q (a)
(Question Name) (must/must not) (match rule).
For example, in Figure 14-13 above, the default description is “Rule
Broken: Question (I-a) must be answered”.
• Alt. Desc: this field allows you to provide an alternative
description to be used instead of the default description, shown
above. Enter the new description into the field.
8
Exercise 2. Begin to add some questions to your form.
1. Go to the drop down labeled “More questions?” – select 3.
2. Press Commit.
Figure 4 - Adding 3 questions to your new form.
3. Enter “Name” in the “Title” field for Question (I-a).
4. Enter “Address” in the same place for Question (I-b).
5. Enter the value of “3” in the box labeled “Height”.
Figure 5 – Enter the value of “3” in the Height box.
9
6. Select “Dropdown/List Box” for Question (I-c).
7. Enter “State or Territory” in the “Title” field for Question
(I-c).
8. Press Commit.
Figure 6 – Choosing Dropdown/List box.
9. Enter a list of states and territories in the box labeled
“Options” for Question (I-c). Press Commit.
Figure 7 – Entering the states and territories.
10
Your form should look like this when you click on the preview icon.
Figure 8 – Your new page in the browser.
Exercise 3. Add some rules to your form, to make sure the user
completes the Name and Address fields.
1. Click in the box labeled “New Rule?” next to Question (Ia): Name.
2. Press Commit.
Figure 9 – Applying a rule, stage 1.
11
3. We are going to use the default rule for Question (I-a):
Name, which is “Must be answered”.
4. Click on the box labeled “New Rule?” and select Address from
the drop down list. Press Commit.
Figure 10 – Applying a rule, stage 2.
5. Once again, use the default value - “Must be answered”.
6. Press Commit and preview the page in the browser.
7. Try submitting the form without filling the “Name” or
“Address” fields.
12
The form will now object if the user fails to enter information in the
Name or Address fields as shown below:
Figure 11 – Default error messages.
You are able to supply your own, custom error messages by
entering them in the fields labeled “Alt. Desc.”
Figure 12 – Custom error messages.
13
Exercise 4. Create a new input field called “Telephone Number”
and apply a rule to it that it must be a number. Give all the
questions a custom error message.
1. Go to the section labeled “More Questions?” and select 1
from the drop down.
2. Press Commit (or Alt S for IE users).
Figure 13 – Selecting 1 more question.
3. Enter “Telephone Number” in the “title” field.
Figure 14 – Enter the new title.
14
4. Scroll down to add a new rule, choose Telephone Number and
press Commit.
Figure 15 – Create a new rule.
5.
6.
7.
8.
Choose “be a number” from the rule drop down.
Create a custom error message.
Click Commit and preview the page in the browser.
Test your rules.
Figure 16 – Make the rule “must be a number.”
15
Adding Options
In the previous section we discussed how to use the Form tab of the
Contents: Custom Form tab to define the questions for your form,
and the rules to be applied to the answers. In this section we
describe the Options tab which allows you to define some of the
options for your form, such as whether it should be broken down
into pages, and who should be emailed with the answers.
The options are divided into the following sections, each of which is
explained below:
• Recipient Emails: enter the addresses of people to be emailed
when the user clicks Submit on your form. Enter each email address
on a new line.
• Recipient Email Body: enter the body of the email to be sent in
addition to the answers from the form fields.
• Send Recipient Email as HTML: select Yes to send the email as
HTML, and No to send it as plain text.
• Main Body Copy: enter the body copy to be displayed at the top
of your form page.
• Thank You Message: enter the copy to be displayed as a thank
you message after the user has clicked on Submit.
TIP: If Hide Results is set to Yes, only the thank you
message is shown after Submit is clicked. If Hide Results
is set to No, the thank you message is shown at the top of
the page as well as the form answers.
• Paginate: select Yes to show the different sections you have
defined on a separate page. If you select No, your sections will be
displayed on a single page with a scrollbar if necessary.
• Back Button Text: this option allows you to over-write the
default text of “Back” for the Back button. The Back button only
appears if the form is paginated, i.e. if it runs over more than one
page. Pagination is set on the Options tab and is described later in
this chapter.
• Receipt Email: select Yes in this drop down list to send an email
to the user with a copy of the answers, after the Submit button is
clicked. If you select No, an email will not be sent.
• Receipt Email Body: enter the body of the email to be sent in
addition to the answers to the form questions.
16
• Log Form Submission: select Yes to log the form submission
along with all of the answers. If you select No, the form submission
will not be logged.
• Hide Results: select Yes to remove the form questions and
display only the thank you message after the user has clicked
Submit. If you select No, the entered answers remain displayed on
the page after the user has clicked on Submit.
Send to a Friend
The Send To a Friend section allows you to define an email to be
sent to the user’s friend, when the Submit button is clicked. If the
form contains a question that has the Special Information option set
to “send a note to this friend’s email address”, the email address
entered into that field will receive an email when the form is
submitted.
Exercise 5. Add the following options to your form: Recipient
email, recipient email body, Thank You Message, log form
submissions – “yes.”
1. Click on the “Options” tab.
2. Enter an email address in the field labeled “Recipient
Emails”.
3. Enter some text in the field labeled “Recipient Email Body”.
Figure 17 – Adding a recipient email.
17
Figure 18 – Adding the recipient email body.
4. Create a new table and add a thank you message.
Figure 19 – Adding a “Thank you” message.
5. Set the Log Form Submissions to “Yes”. Press Commit.
Figure 20 – Setting the form to log submissions.
18
Formatting your form
The Format tab allows you to define the layout of your form. You
can define a complex table structure, just as you do for the body
copy of a standard page, and then use keyword replacements to
reference all of the elements of your form (i.e.: questions, section
titles, etc) using the WYSIWYG editor.
TIP: You do not have to use the format tab when creating
a form. Whilst you can achieve greater control of the
layout of your form, it can take you considerably longer
to set up the form.
The Format tab is shown in the diagram below:
Figure 21 – The Format tab.
19
This section shows the keywords you can use in the body copy of
your form, to reference the elements of your form that you defined
on the Form and Options tab covered previously.
TIP: A set of keywords will be available for each section and
question that you have created – that is, you can use the
following keywords for Section X, Question Y:
%section_1_index%
%section_1_title%
%section_1_note%
%section_1_question_1_index%
%section_1_question_1_title%
%section_1_question_1_note%
%section_1_question_1_answer%
As an example, let’s consider our form that contains one section
with four questions:
•
•
•
•
Name
Address
State
Telephone Number
To reference the text for your first question (Name), you can use
the keyword replacement:
%section_1_question_1_title%
To reference the text box where people type in their answer, you
use the keyword replacement:
%section_1_question_1_answer%
You can reference the other fields in a similar manner.
20
Exercise 6. Apply some formatting to your form to make it look
nice.
1. Go to the “Format” tab and create a table with 2 columns, 5
rows, 100% width and background 000000. Set Alignment to
“Middle”, Cell Spacing to “1” and Cell Padding to “4” Click on
OK.
Figure 22 – Setting up your table.
2. Click on the Row Properties icon for Row 2, and choose a
Background Colour. Repeat for rows 3-5.
Figure 23 – Row properties icon - HTMLArea.
Figure 24 – Choose a background colour.
21
3. Merge the two top cells into one cell that spans both columns.
Figure 24 – Merge Cells icon - HTMLArea.
4. Click on the Cell Properties icon for row-1, column-1, Choose
a background colour, Alignment to “Centre”, and Vertical
Alignment to “Top”.
Figure 25 – Your table, ready for the keyword replacements.
5. In the Cell Properties window for the following cells, set Width
to “25%” and Vertical Alignment to “Top”: R2-C1; R3-C1; R4C1; R5-C1.
22
For the following steps, click on the Cell Contents icon of the
specified cell and paste the specified replacement keyword in the
HTMLArea editor. Click Save to exit the WYSIWYG editor.
6. For R1-C1 paste the replacement keyword
%section_1_title%
7. For R2-C1 paste the replacement keyword
%section_1_question_1_title%
8. For R2-C2 paste the replacement keyword
%section_1_question_1_answer%
9. Continue with the remaining 3 questions and add a submit
button.
Figure 26 – Your table should look like this.
23
Figure 27 – Adding a submit button, using a keyword replacement.
Figure 28 – Your nicely formatted form in the browser..
24
For more help visit the Web Office MySource Help
Page located at:
http://www.weboffice.uwa.edu.au/help/mysource
25


![110_022_CWT_Compact_InstMaint[Icon]](http://vs1.manualzilla.com/store/data/006013284_1-4f7fdcae5c6c12a2f521c9690c1b7c83-150x150.png)