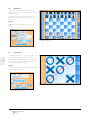
1
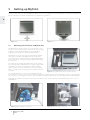
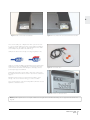
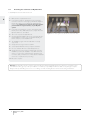
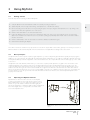
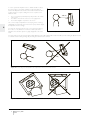
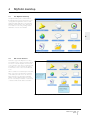
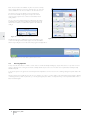
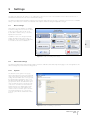
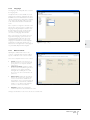
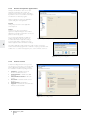
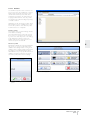
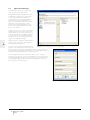
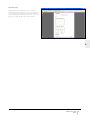
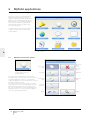
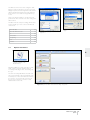
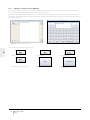
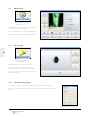
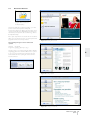
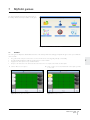
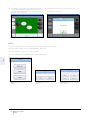
USER MANUAL:
MyTobii
Version 2.4
Content
1 Introduction
3
3
3
3
1.1
1.2
1.3
About MyTobii
Support
Warranty
2 Setting up MyTobii
4
4
4
5
2.1
2.2
2.3
Mounting MyTobii D10
Installing the software on MyTobii D10
Mounting and installation of MyTobii P10
3 Using MyTobii
3.1
3.2
3.3
3.4
3.5
3.6
3.7
3.8
3.9
3.10
3.11
3.12
Getting started
Basic principles
Adjusting the MyTobii monitor
License control
The MyTobii desktop
Off screen buttons
Pausing MyTobii
Settings
Advanced Settings
Application Manager
Calibration
Profiles
7
7
7
7
9
xx
xx
xx
xx
xx
xx
xx
xx
4. MyTobii applications
xx
xx
xx
xx
xx
xx
xx
xx
xx
xx
xx
xx
xx
xx
4.1
4.2
4.3
4.4
4.5
4.6
4.7
4.8
4.9
4.10
4.11
4.12
4.13
Windows and mouse control
MyTobii, Write
MyTobii E-mail
Internet Browser Settings
Internet Browser
Chat
Call for Help
Document Browser
Gobblet
Minesweeper
Eye Chess
Tic-Tac-Toe
Lines
5 Technical specification
xx
6 Accessories
xx
7 Iinstalling third party products
xx
8 Technical safety
xx
9 Emission of near infrared light
xx
9.1
9.2
Thermal hazard to the retina of the eye
Near-infrared thermal hazards to the lens
xx
xx
1
Introduction
1
1.1
About MyTobii
The MyTobii eye control system allows a user to interact directly with objects on a computer screen simply by looking at them. MyTobii is based
on Tobii Technology’s unique eye tracking technology, which keeps track of the user’s gaze as well as the location of objects on the screen and
estimates what actions the user intends to initiate based on the eye movements. Within the specially designed MyTobii environment and in eyeenabled third party software, this technology completely removes the need for the cumbersome technique of controlling the mouse cursor. For
tasks requiring access to the standard Windows environment mouse control by the eyes is available at any time through MyTobii.
1.2 Support
If you need any type of support please contact your local dealer. Having access to your MyTobii system and an internet connection when you call,
will greatly speed up the support process.
1.3 Warranty
This is a CE marked medical device. Please read the user manual carefully before using the unit. You will find out how to setup the hardware in
the first pages of the user manual. The warranty is only valid if the unit is used according to the user manual and the warranty seal is not broken.
Manual rev 2 | XXX
MyTobii
3
2
Setting up MyTobii
The two hardware options for running the MyTobii software are seen here. The MyTobii P10 is a unit with built in computer and the MyTobii D10
has to be attached to an external computer. Please see chapter 8 for specifications.
2
Figure 1: P10
2.1
Figure 2: D10
Mounting and installation of MyTobii P10
The MyTobii P10 should be mounted on a monitor arm. The monitor
arm can be ordered optionally. The monitor arm and tools for mounting
it will then be delivered with the MyTobii. For recommendations
regarding monitor arms please contact your MyTobii retailer.
Mounting holes for monitor arms of the Vesa and Daessy standards
can be found on the back of the MyTobii P10. The monitor arms
ordered from Tobii come with screws and mounting plates that fit into
these mounting holes. A separate mounting manual is delivered with
the monitor arm.
The mounting holes and plate allow different placements of the arm.
There are a big variety of standard arms for mounting on tables, walls,
wheelchairs, or above a bed or wheelchair, etc. Ask your MyTobii
retailer for advice. The monitor arm has to be mounted on a steady
table or on a stand made for mounting electronic equipment such as
a computer.
Figure 3: Casing with MyTobii P10 and an optional monitor arm
The only cable that has to be connected to the MyTobii P10 is the
power cable. The connector next to the power connector is intended for a switch if used. There is an additional connector for one extra switch.
The connectors from left to right are for: power cable, two switches and network cable. Only use the power supply delivered with the MyTobii!
All programs are installed at delivery. The product number for Windows can be found on the back of the MyTobii P10 if there is a need to reinstall Windows.
Figure 4: Daessy mounting for monitor arms
4
Manual rev 1 | XXX
MyTobii
Figure 5: VESA mounting for monitor arms
2
Figure 6: USB connectors and Tobii serial label
Figure 7: Power, switch, LAN connectors and Windows license label
There are two USB ports on MyTobii P10. These ports can be used
to connect external USB devices. Only connect USB devices that are
USB-IF approved to the USB ports of the MyTobii P10. These USB
devices always carry the USB or the USB 2 logo.
USB ports are intended for directly connecting a keyboard, mouse,
USB memory sticks and WiFi to the MyTobii P10. Devices that require
additional power such as CD-ROM drives, external hard drives, and
environmental control units should always be externally powered or
powered by an approved USB hub.
Figure 8: The standard switch
A label with serial number and production date can be found next to
the USB ports. This information is useful in case Tobii is contacted for
support.
MyTobii P10 has a touch screen. This makes it possible to point
directly on the screen instead of using eye control or a switch.
There are three buttons on the back of MyTobii P10, which are used to
adjust the contrast and volume.
Figure 9: Controls for contrast and volume
Note! MyTobii is optimized for a color depth of 32bit. To check, right click on the Windows desktop, choose properties and click the settings tab.
Manual rev 2 | XXX
MyTobii
5
2.2
Installing the software on MyTobii D10
To install MyTobii, follow the instructions below:
2
1. Make sure the computer is turned off.
2. Connect all four cables to the MyTobii monitor. Viewing the
rear of the monitor from left to right you will find the inputs for
the following cables: power, USB, Firewire IEEE1394 and
monitor cables. Make sure to only use the power adapter
provided with the original delivery of your MyTobii
system.
3. Connect the power adaptor to a power outlet and the USB,
Firewire, and monitor (VGA) cables to the computer where the
MyTobii software is to be installed.
4. Turn on the computer and start Windows.
Figure 1: From left to right: Power, USB, Firewire and monitor cables
5. Insert the MyTobii installation CD into the computer’s CD drive.
If the installation procedure does not start automatically, run
the file, Setup.exe, on the installation CD.
6. The installation program will now install all the necessary
components
7. Accept the license agreements for dot NET.
8. Select “MyTobii hardware” when prompted for hardware.
9. Choose to start the TET Server automatically at reboot.
10. Accept the license agreements for directX. At the end of the
installation procedure, the installation of dot NET framework
version 1.1 service pack 1 will be launched. This takes a few
moments to start, so wait about one minute after the installation
seems to be completed before proceeding.
11. Reboot the computer.
Warning! If the MyTobii product is mounted in such a way that it can fall and potentially harm the user, this is done solely at the user’s
own risk. Tobii Technology or any of its representatives do not take any responsibility and will not be liable for any damages or injuries
arising from the product falling onto someone or something, even if the mounting has been carried out according to instructions.
6
Manual rev 1 | XXX
MyTobii
3
Using MyTobii
3.1
Getting started
Follow the steps below to quickly get started with MyTobii.
1. Setup the MyTobii monitor and install the software if neccassary according to Chapter 2.
2. Start the MyTobii environment by double clicking on the MyTobii icon on the Windows desktop.
3. Go into the settings menu. This can be done by accessing the system menu by looking below the MyTobii screen or by clicking on the
system menu in the bottom right hand corner of the screen.
4. Click the Track Status button to show the track status meter.
5. Position the MyTobii monitor in front of the user so that the two white dots on the screen representing the user’s eyes in the track
status meter are stable in the middle. The user’s nose should be pointing perpendicularly at the middle of the screen and the distance
should be 60 cm/2 ft.
6. Click the Calibrate button. Click Yes and let the user follow the calibration dot with his/her gaze.
7. Click back and start using the MyTobii.
There will now be discrete feedback on any objects the user looks at. The objects will be selected when gazed upon for a short period of time or
blinked at. Read more about how the MyTobii environment works and how to adjust different settings in the sections below.
3.2
Basic principles
The MyTobii environment is a special computer program adapted to eye control as the primary input. It includes specially developed programs
suitable for eye control and is also integrated with other third party software, which has been eye enabled in collaboration with Tobii Technology
and its partners. With a special add-on application, a user also has full access to the complete Windows environment through eye control of the
mouse cursor.
The MyTobii monitor is the hardware, which makes eye control of the computer possible. Apart from a regular monitor element and control
circuitry, the MyTobii monitor contains several sensors and infrared illuminators positioned behind black windows around the screen. The
components behind these windows all need a free line of sight to the user’s face and eyes. In many cases, when the MyTobii system seems
unable to detect the user’s gaze, the reason for this is that the line of sight from the windows is obscured. Reasons for this can be stickers
placed over the windows, half-closed eyes or droopy eye-lids partially covering the eyes or that the monitor is positioned too low, in which case
nose and cheekbones cover the eyes from the view of the windows below the screen. Therefore, it is crucial to adjust the MyTobii monitor
properly in front of the user.
3.3
Adjusting the MyTobii monitor
MyTobii allows for extensive head motion and once the MyTobii
monitor is properly placed in front of the user the system needs no
further adjustments. In order to be tracked properly the user needs
at least one eye in the trackbox , which is a box with roughly the
dimensions 30x15x20 cm / 12x6x8 in (width x height x depth) placed
60 cm/2 ft straight out from a point just above the middle of the
screen of the MyTobii monitor.
90°
15 cm
30
cm
~60 cm
20 cm
Figure 10: The trackbox measures 30x20x15 cm at 60 cm from the
screen
Manual rev 2 | XXX
MyTobii
7
3
In order to position the MyTobii monitor so that the trackbox is where
the user’s head is, a general rule is that the angles and distances
between the MyTobii monitor and the user’s head should be the same
as they would be for a person sitting in front of a computer screen.
Make sure that:
•
•
•
~60 cm
The nose points perpendicularly at a point just above the middle
of the screen
The distance from the face to the screen is roughly 60 cm
The head is straight in comparison to the screen
90.0°
Two common setups of MyTobii are for users lying in bed or leaning
substantially in a wheelchair. In such cases it is very important to adjust
the MyTobii monitor accordingly.
3
For users who are lying down, the most common problem is placing
the monitor too low, similar to how a TV set would be placed. The
MyTobii monitor should be placed very high, straight above the user’s
head.
Figure 11: Ideal position of MyTobii in front of user
For users leaning to the side it is important to tilt the MyTobii monitor. Although MyTobii tolerates head tilt up to 40°, rotating the MyTobii monitor
to match the user’s head angle will greatly increasing the allowed head movement.
Figure 12: For users lying down, the MyTobii monitor is placed above the face, not over the stomach
Figure 13: For users leaning sideways the MyTobii monitor needs to be tilted sideways
8
Manual rev 1 | XXX
MyTobii
4
MyTobii desktop
4.1
The MyTobii desktop
The MyTobii desktop is the central location in
the MyTobii environment. It can include icons for
opening different applications such as e-mail,
writing, third party applications or the standard
Windows environment. From here, different off
screen buttons for accessing settings and the
Start/Pause menu are also available.
4
Figure 16: The MyTobii desktop
4.2
Off-screen buttons
Around the edges of the MyTobii screen there
are activation areas or Off-screen buttons, which
are used to control the MyTobii environment. A
common function of the off-screen buttons is the
presentation of control menus like the system
menu and the mouse control menu in Windows
mode.
Off-screen buttons are activated by a short dwell,
blink, or the click of the switch. Once activated
on the visible part of the screen, an off-screen
button works like any other button in MyTobii
with the exception that it is hidden from view if
the user looks away from it. Gaze on it and dwell
or click the switch and the button is activated.
Off-screen button
Only accessable in
webbrowser and
Windows Control
Off-screen button
System menu always
accessable
Figure 17: Standard off-screen button locations
Manual rev 2 | XXX
MyTobii
9
Most off-screen buttons are available only when needed. For example,
when working in Windows, a menu from which the user can get mouse
clicks is available from an off-screen button to the left of the screen.
The system menu is chosen with the off-screen button under
the screen. It is available in all programs except for the window
environment. The system menu consists of a Pause button and a
Settings button.
The eye control can be started and stopped with Pause. All settings
for MyTobii can be made under Settings. The System Menu pop up
window can be disabled or enabled under System in the Advanced
Settings.
4
Figure 18: The System Menu can be found below the screen
The MyTobii Tools menu containing the system menu and the mouse
control menu will appear in the bottom right corner at a click with the
switch or by touching the screen. This works in all programs and applications.
Figure 19: Menu for mouse control
Figure 22: MyTobii Tools menu with the system and mouse menu
4.3
Pausing MyTobii
In many cases the user want to look at the content of the screen without actually activating any objects. This can become a problem for users
relying on dwell time since looking around would constantly activate objects on the screen. For this reason a pause button is always readily
available in MyTobii.
To access the system menu, gaze in the area directly under the MyTobii screen. An off screen menu containing settings and a pause button will
appear.
Once the system menu is visible, the user can choose to turn the eye control on or off by clicking on the Pause button, using dwell time, blinking
or switching. It is also possible to pause the eye control by pressing the pause button on a keyboard. All eye control is paused until the Pause
button is activated again.
10
Manual rev 1 | XXX
MyTobii
5
Settings
The settings are divided into two parts; one eye-enabled user section and one mouse controlled advanced section intended for the use of
assistants and technicians. The user section is called basic settings.
The advanced settings and the application manager seen in the basic settings window can only be controlled by a mouse and are not available
with eye control. These two menus are described later in the chapters, Advanced settings and Application manager.
5.1
Basic settings
Track status meter and calibration are available
in the basic settings. The user can choose which
profile to use. Input method can also be set
to dwell, blink or switch for all eye control and
MyTobii can be shut down.
A calibration can be done directly under basic
settings, but further settings and creation of
profiles has to be done in advanced settings. For
more details see the section, Calibration.
5
Figure 25: The start view in settings, basic settings
5.2
Advanced settings
The advanced settings include different settings tabs for interaction, calibration, track status, keyboard, language, mouse and applications. The
different settings are presented in the following sections.
5.2.1
System
The dwell time for the System menu pop up
window, which appears in all programs in MyTobii,
can be changed under System in the Advanced
settings. The track status can be set to pop up at
the start and partner applications can be set to
autostart when MyTobii starts. The system menu
pop up window can also be disabled. This option
can be useful if the system menu appears often
on the screen even if the user did not intend to
activate it. Please notice that all settings in the
system menu have to be made with a mouse
or via the touch screen if this option is checked
since it will deactivate the eye control for the
menu. The option will also deactivate the Pause
function.
Figure 26: Dwell time and disabling of System menu
Manual rev 2 | XXX
MyTobii
11
5.2.2
Interaction
The menu for interaction settings is where
the eye control type is defined. Activation can
be done either through the click of a switch
connected by “dwell time” or by blink. In order
to use the option switch, a switch has to be
connected to the MyTobii. A switch can be
connected directly to the P10 or via a Joystick
cable to the D10. Using dwell time, a click is
initiated when the gaze is kept on a particular
object or area for longer than a specified time.
When blink click is chosen, buttons are activated
when the user is looking at them and blink for
the set period of time. Different parts of the
environment can be set to dwell, blink or switch
independently and dwell times can be adjusted.
The dot shown on all objects looked at in
MyTobii is called a feedback dot. It can be set
to look either like a shrinking dot or a growing
circle segment. The color of the dot can also be
changed.
5
The optimum setting is different for different
users and for different programs.
Figure 27: The start view in settings, basic settings
Some users may find it easier to use blink
click to control the MyTobii. The duration of the
blink that will invoke a click can be set under
Interaction.
Figure 28: The start view in settings, basic settings
12
Manual rev 1 | XXX
MyTobii
5.2.3
Calibration
Calibrating MyTobii for each user is necessary
in order to teach the system the characteristics
of each user’s eyes. The settings for this can be
found under the Calibration tab in the advanced
settings. This tab includes settings for size, speed
and color of calibration dots as well as tools for
inspecting and managing calibrations. Read more
about how to calibrate properly in the section,
Calibration.
Before starting a calibration, make sure that
the monitor is adjusted properly as described in
section 2, setting up the MyTobii.
To a large extent, calibrating MyTobii is an
automated process. By clicking the Calibrate
button either in the eye controlled basic settings
or under the calibration tab in the advanced
settings, a calibration consisting of a pulsating
circle moving over the screen is started. During
calibration the user follows the circle across the
screen focusing on the black dot in the middle of
the circle.
Figure 29: Calibration settings
Stepwise calibration
If the checkbox “Keyboard step-through” is
checked, the calibration dot will move to a location on screen and wait there
for a key press before taking a calibration and moving on to the next location.
Note that the actual calibration is taken after the key is pressed and it is
therefore important that the user keeps their gaze on the calibration dot until it
starts to move again.
Calibration alternatives
It is possible to select different ways of calibrating the MyTobii. You can select
to use a dot, image or video as calibration point. The image alternative will work
the same way as the dot calibration method. If you wish to use a video as a
calibration point, you will be able to select a primary and a secondary video. It
is advised that you use the “keyboard step-through” when calibrating using a
video as a calibration point.
5
ACTION:.
KEY:
Abort calibration
Esc
Show primary stimulus
Right arrow
Show secondary stimulus
Up arrow
Hide calibration stimulus
Left arrow
Collect data
Any other key
Improving calibration
After the calibration sequence, a plot
representing the quality of the calibration
is displayed under, Calibration, in advanced
settings. For each calibration point, MyTobii
takes several samples and creates a model of
the user’s eyes from these. The red and green
lines in the calibration plot show how still the
user kept his/her gaze at a calibration point. The
more concentrated the green and red lines are in
the circles in the plot, the better the calibration.
To recalibrate, mark the points that need to be
recalibrated, click the Improve button and a new
calibration sequence for the selected points will
begin. A new calibration for all points will start if
the Calibrate button is clicked.
Calibration for user with vision in one eye
Users with vision in one eye can also use
MyTobii. When it comes to calibration there are
two different cases:
Figure 40: Poor calibration, a
recalibration is recommended
Figure 41: Perfect calibration
•
Users for which two eyes appear in the Track status but where they are only using one eye; because of blindness on one eye,
because they have one dominant/leading eye due to strabismus, crossed eyes, etc. These users can use the calibration for one eye. Which
eye to use is chosen under, Active eye in the Calibration settings under Advanced Settings.
•
Users that only have one physical eye, or with only one eye appearing in the track status, can usually use the default settings, which is
calibration for both eyes. In this case, MyTobii will normally detect that only one eye is visible to the system. Chose Both under Active eye in
the Calibration settings.
The eye the user has vision in is chosen under Active eye. The result can be seen in the calibration plots.
Manual rev 2 | XXX
MyTobii
13
Calibration area
It is also possible to set the calibration area. Drag the corners to match
the area you want to calibrate.
Figure 43: Calibration area
5.2.4
5
Track status
In MyTobii there is a special tool to assist in the adjustment of the
MyTobii monitor in relation to the user in order to place the user’s eyes
in the trackbox. The Track status meter, which can be accessed from
the settings menu, or by pressing the Home key on a keyboard, shows
where the user’s eyes are in the trackbox. Make sure to spend time in
front of the track status meter in order to understand what happens
when a user moves from side to side, back and forth, up and down or
tilts his/her head in relation to the MyTobii monitor. This will greatly
simplify adjusting the system to a user. Once the two white dots
representing the user’s eyes in the trackbox are steady in the Track
status meter, the MyTobii monitor is adjusted properly to the user.
A track status sound can be used together with the track status
window to check how well a MyTobii user is positioned in front of the
screen. The two dots symbolizing the eyes should be as close to the
center of the track status window as possible. The closer the user is to
the appropriate position the faster the beeping. Press the button with
the sound icon at the top of the window to activate the sound. Press
the Distance button at the top of the window to toggle the distance
meter on and off.
5.2.5
Figure 15: The track status meter shows the user’s eyes in the
trackbox
Keyboard settings
The on-screen keyboard in MyTobii can be
changed by selecting a file that defines the
keyboard layout. A number of different keyboards
are shipped with the MyTobii software and these
are found in a list under keyboard settings. It is
also possible to change the speed for typing in
this view. This is done by changing the dwell time.
For most languages there are two different
layout options; one to have the keyboard set up
as a standard keyboard (Qwerty), or to have the
letters in alphabetic order (Abc). If the checkbox,
Use audio feedback is checked, a beep will
sound when a button is pressed on the onscreen keyboard in MyTobii.
Figure 30: The English keyboard is used
14
Manual rev 1 | XXX
MyTobii
5.2.6
Language
The language to use in MyTobii can be set under
the Language tab.
The MyTobii environment is available in several
languages. The language of MyTobii is the same
that Windows uses for standards and formats, for
example, default currency, date and time displays,
etc. To change the language setting, go to the
Control Panel, which is found under the Start
menu.
If the computer is configured to show the control
panel is set to category view, choose Date, Time,
Language and Regional Options and then click
the link Change the format of numbers, dates
and times. Under the tab Regional options,
choose the local language and click OK.
If the control panel is set to Classic view, open
Regional and Language options and choose
the Regional Options tab. Under the section
“Standards and Formats”, choose the local
language and click OK. The next time MyTobii
is started the local language will be used on
buttons and in messages. If the local language is
not yet available, MyTobii will use English.
5.2.7
Figure 31: Language settings
5
Mouse control
Adjusting the characteristics of the mouse
control is of great importance and the settings
depend on what the mouse control is used for.
There are several parameters for mouse control:
•
•
•
•
Speed regulates the responsiveness of
the mouse cursor to eye movement. High
speed gives a more responsive but also
jerkier cursor.
Fixation sensitivity regulates how still
the user needs to keep his/her gaze when
triggering a mouse click by dwell time.
The higher the sensitivity, the more still
the eyes need to be for a dwell click to be
performed.
Mouse menu regulates the dwell time it
takes for the mouse menu to appear. The
mouse menu can also be disabled here.
This setting is only recommended at try-out
situations since users will have a hard time
pausing or come back from the Windows
Control once this menu is disabled.
Figure 32: Settings for mouse control
Magnifier regulates the magnification
level under the mouse cursor in Windows control.
Click type and dwell time for the mouse can also be set in this view.
Manual rev 2 | XXX
MyTobii
15
5.2.8
Internal and partner applications
Click type and dwell time can be set for each
application in MyTobii, both for Tobii’s own
programs and for partner programs. This makes
it possible for the user to use different click types
and dwell time for different programs.
All these settings are made in the Application
specific settings for each application.
Internal
Settings are presented for each application
under Chapter 6.
Partner
Programs from other vendors that are
approved for MyTobii will appear under Partner
Applications. Click type and dwell time can be set
just as for all other programs.
5
For some third party applications, additional
settings might have to be made. These can
be found under Partner Application Settings
accessed via the button, Settings, under each
Partner Application tab in the Advanced Settings.
Figure 33: Application specific settings
The Partner application Settings makes it possible to add a command for
features such as start up page. Please contact the company you purchased the
software from or contact Tobii support if you do not know what to enter here.
Figure 36: Adding your own programs
5.2.9
License control
In advanced settings under licenses, you enter
your license key or keys. Here, you can also start
a trial of MyTobii. The trial will run for 30 days
from activation. The different packages include:
•
•
•
•
•
•
Standard – Text Editor, Document
Browser and Windows Control
Communication – Web Browser, Mail
and Chat
Windows Mouse Control – Windows
Control
Document – Text Editor and Document
Browser
Entertainment – Media Player
Upgrade – Text Editor, Document Browser,
Windows Control and Mail
Figure 14: License settings display
16
Manual rev 1 | XXX
MyTobii
5.2.10 Profiles
Several different profiles can be created for one
person. They can be used at different occasions.
Settings such as click type and delay for auto
click can differ between profiles. This can be
useful if the user wants to use different speed
for typing at different times of the day or if the
user wants to have different settings depending
on health conditions.
Calibrations are also saved in the profiles, which
takes away the need to recalibrate before each
use. It is also possible to have different profiles
for different users on one MyTobii.
Create a profile
A new profile can be created in Manage Profiles
under Advanced Settings.
The profile will be based on the profile used at
the moment or on a profile chosen in a list. It is
a good choice to base the profile on an existing
profile that has the settings closest to the
settings desired for the new profile. Choose a
name for the profile and click OK.
Choose a profile
MyTobii automatically saves the latest calibration.
One can choose to use a profile with a saved
calibration and settings instead of doing a new
calibration and/or changing settings. This makes
it possible for users that are having problems
with calibrations to open up a profile where their
calibration is saved. A profile is chosen under,
Select user profile, in the menu for settings.
Figure 44: Creating a new profile
5
Figure 46: Selecting a profile
Figure 45: Choosing from a list of
profiles
Manual rev 2 | XXX
MyTobii
17
5.3
Application Manager
In the application manager the desktop setup
can be changed and programs added.
All applications available in MyTobii are shown in
the application manager. The programs shown
on the desktop in MyTobii are listed on the
right hand side in the view, under Applications
on the desktop. Programs available but not
placed on the desktop are listed under Available
applications on the left hand side. To add a
program to the desktop highlight it and click
the arrow pointing towards the list of programs
placed on the desktop.
Programs can also be removed from the desktop
by pressing the arrow in the other direction. All
programs that a user is not using can be placed
on the left hand side under available applications.
They will not be shown on the MyTobii desktop
but can be added to the desktop at any time by
going into the application manager.
5
Programs that are not MyTobii or MyTobii Partner
programs can be added under New Application
in the Application Manager view.
Figure 37: Choose what applications to have on the desktop
The name of the program file that should be run
and where it is located has to be filled in. This will
allow you to add new programs to the MyTobii desktop. However, Tobii cannot
promise that the program will work well with eye control. Only MyTobii approved
software added as partner applications are tested by Tobii.
The menu Application Properties makes it possible to control or change
properties for a program. The choice, delete application, is also found in the top
menu in the application manager. The program has to be on the left hand side
of the Application Manager window and has to be highlighted in order to be
able to change or delete the program.
Figure 38: Adding your own programs
18
Manual rev 1 | XXX
MyTobii
5.4
Gaze evaluator
This is a program to assist you in a ”try out situation”.
It can help in testing the user’s ability to use eye control and in setting
up the system in the best possible way for the user. This is done by
finding out where on the screen the user can see and also in setting
the calibration area, calibrate and finally find out the most suitable grid
size.
To run either the Gaze Analyzer or the Grid size test a keyboard is
required. If you entered the Gaze Analyzer or the Grid size test without
a keyboard you can get out from here by right clicking on the screen
(push a while on the screen and release).
Profiles
In the profile list you can choose between existing profiles or you can
create a new profile by clicking the “New”-button.
Gaze Analyzer
Find out where on the screen the user can see!
If there are difficulties in knowing where on the screen a user can
see and it is hard to get a calibration this will assist you in getting
information about that.
5
This is done by recording the user’s gaze when looking at the screen
so that you can reach a conclusion about where on the screen the
user can see. Based on this you can set the calibration area and
calibrate.
Figure 47: Gaze Evaluator
Figure 48: Gaze Analyser
Manual rev 2 | XXX
MyTobii
19
There are two ways to show stimulus to record in the Gaze Analyzer: by Smooth Pursuit or by Fixation.
Smooth Pursuit
Here a stimulus, a point, is moving over the screen in eight different
tracks, one track at a time.
1. Start the recording:
Select Smooth Pursuit and the other settings you want. Push Start
recording. You will now see a white screen and you have to choose
the track that you want to record, this is done by toggle one of the
keys 1-8. You will see the track on the screen in black if no recording
has been done before for the selected profile. If recordings have been
made before, the recording is shown in color and will be lost if a new
recording is made, and the new recording will be saved for this profile.
Push the R button and the recording will start.
2. Replay the result of the recording:
Select the track you want to replay by toggling one of the numbers
1-8 and then press P. The stimulus track will show in yellow and the
filtered gaze track appears in red. If you toggle U, the unfiltered gaze
will show in purple.
Figure 49: All tracks
3. Result/Set calibration area:
5
It is possible to select all the recordings or just e few to get a picture
of how the user can look at the screen. Just choose the track number
you want to show by toggle 1-8. When you have a view that you are
satisfied with, you can set the calibration area over this area (the area
that the user can see). If you push X, a screenshot is taken that will
be shown in the information PDF for the profile. You can save one
screenshot per recording type and profile.
4. Calibration:
Here, the calibration is done. The calibration stimuli will be shown in
the calibration area. The calibration starts when you press the button.
Afterwards a gaze plot will be shown with the calibration result.
20
Manual rev 1 | XXX
MyTobii
Figure 50: What the result could look like
Yellow line - stimulus/point track. Red line - the persons gaze track
ACTION:.
KEY:
End test
Esc
Start recording
R
Stop recordin/playback
S
Start playback
P
Toggle stimulus position
1,2 ... 8
Toggle all positions
A
Toggle filtered playback
F
Toggle unfiltered playback
U
Toggle gaze tail
T
Save screenshot
X
Fixation
Here, a stimulus that is three dots placed in the corner of an imagined
triangle, each of the dots shrink and grow one at a time in order to
make the user focus on one place and then move the focus. The
stimulus can be shown in five different positions, one at a time.
1. Start the recording:
Select Fixation and the other settings you want. Push Start recording.
You will now see a white screen and you have to choose the position
that you want to show the stimuli in for recording, this is done by
toggle one of the keys 1-5. You will see the track on the screen in
black if no recording has been done before for the selected profile.
If recordings have been made before, the recording is shown in color
and will be lost if a new recording is made, and the new recording will
be saved for this profile. Push the R button and the recording will start.
2. Replay the result of the recording:
Figure 51: All poistions
Select the track you want to replay by toggling one of the numbers
1-5 and then push P. The stimulus track will show in yellow and the
filtered gaze track appears in red. If you toggle U, the unfiltered gaze
will show in purple.
3. Result/Set calibration area:
5
It is possible to select all the recordings or just a few to get a picture
of how the user can look at the screen. Just choose the track number
you want to show by toggle 1-8. When you have a view that you are
satisfied with, you can set the calibration area over this area (the area
that the user can see). If you push X, a screenshot is taken that will
be shown in the information PDF for the profile. You can save one
screenshot per recording type and profile.
4. Calibration:
Here, the calibration is done. The calibration stimuli will be shown in
the calibration area. The calibration starts when you press the button.
Afterwards a gaze plot will be shown with the calibration result.
Figure 52: What the result could look like
Yellow line - stimulus/point track. Red line - the persons gaze track
ACTION:.
KEY:
End test
Esc
Start recording
R
Stop recordin/playback
S
Start playback
P
Toggle stimulus position
1,2 ... 5
Toggle all positions
A
Toggle filtered playback
F
Toggle unfiltered playback
U
Toggle gaze tail
T
Save screenshot
X
Manual rev 2 | XXX
MyTobii
21
Grid size test
When you have a calibration you can find out the
most suitable grid size for the user. The result
from this can be used to adjust grids in different
communication programs.
The pictures on the screen can help you in
giving instructions to the person looking at the
grids and through that get help in seeing if the
user understands the instructions. The grids are
shown in the chosen calibration area for the
profile.
To use it, first you choose between three different
categories of pictures in the grids; “Animals”,
“Fruits and vegetables” and “Colors”.
5
Then push “Run test” and the first page with
grids will be shown. You navigate through the
different pages with the left and right arrow key.
In the first page there are two grids and when
you step forward it will be 4, 6, 9, 12, 20, 30, 42
and 80 grids. Except on the first two pages there
are some empty grids to make a more “calm”
view without pictures all over. To get confirmation
that the user has looked at a grid, you will hear a
“pling” sound.
Figure 53: grid size test
If you want to confirm a grid size press the “Esc”
key and you will come back to the “Grid size test”
start page. On this page the chosen grid size is shown. If you now push “Save and close” the grid size will be saved in the settings for the current
profile and will be shown in the information PDF for the user.
Figure 54: 2x1 grid
Figure 55: 2x2 grid
Figure 56: 2x3 grid
Figure 57: 8x10 grid
22
Manual rev 1 | XXX
MyTobii
Show info paper
By clicking this button, a PDF file is created and opens
with information about the profile name, screenshots of the
recordings and selected grid size. By default, the PDF file is
saved in the application folder but you can move it or save it
anywhere you want. The information is also printable.
Figure 58: A PDF file with information collected from the gaze evaluation
5
Manual rev 2 | XXX
MyTobii
23
6
MyTobii applications
There are several eye-controlled applications
available for the MyTobii environment. The
programs always included with the MyTobii are
Windows Control, Text Editor, Mail, Document
Browser and five games. All these applications
are presented here. Other programs can be
added and a list of partner programs can be
found at: www. tobii.com.
To get information on these programs please
contact your retailer or the vendor for that
specific software.
Figure 59: Select the Windows Control icon on the MyTobii desktop to start the Windows
mouse control
6
6.1
Windows and mouse control
Figure 63: The icon for the
program, Windows Control, on
the MyTobii desktop
No mouse
click
The mouse
cursor
moves,
no mouse
clicks
Left click
Right click
Eye control of the regular Windows environment is
accomplished by eye control of the mouse cursor. When
Double left
selecting the Windows Controll icon on the MyTobii
click
desktop, the MyTobii environment is hidden from view and
the Windows desktop is shown.
The mouse cursor is now controlled by the eyes. Clicks
Scroll up
can be gotten from a menu accessed with an off-screen
and down
button located to the left of the screen. When a click
type is chosen, this will be used repeatedly until the “No
click” button is chosen In order to return to the MyTobii
environment, press the “Back” button.
Back
Drag and
drop
Magnify
Figure 60: Controlling a mouse in windows
24
Manual rev 1 | XXX
MyTobii
The Windows environment can be enlarged so that
buttons, menus and other items are easier to click. In
Display Properties, under the Appearance tab, click the
Advanced button. By changing sizes of the different
items, these become easier to manage with the eye
mouse.
Click on the Advanced button to get the view in the
picture below, where size and color can be changed for
different items.
The table shows an example of settings, which can be
used to simplify eye mouse control of the Windows
environment.
Active Title Bar
30
Active Title Window border
10
Icon
50
Icon Font size
12
Icon Spacing
70
Menu
30
Scroll bar
20
6.2
Figure 61: Display properties,
Appearance
Figure 62: Windows items can be made
larger
MyTobii Text Editor
6
Figure 63: The icon for the
program, Text Editor, on the
MyTobii desktop
MyTobii Text Editor, is a simple text editor to write
small or large documents. It features all tools
necessary to write large bodies of text using only
the eyes.
The main view of MyTobii Write shows a list of all
saved documents. By looking at a particular entry
in the list, it is moved to the middle of the list and
becomes the one selected. This document can
then be opened, deleted or sent as an e-mail
with the buttons on the left.
Figure 64: MyTobii Text Editor offers basic text editing of large texts
Manual rev 2 | XXX
MyTobii
25
6.2.1
Writing or editing a text in MyTobii
By choosing the “Create new” button in the text editor, a blank document is presented on screen. The “Edit” button brings up the MyTobii on
screen keyboard. The Back button will close the text editor and show the desktop.
Text can be written by choosing the different letters on the MyTobii keyboard. Note that the text field at the top is scrollable with the eyes. The
Space button will create a blank between letters and Backspace will delete letters. Press the Insert Text button to exit the edit view and go back
to the start view in Write.
Figure 65: The start view in the text editor
Figure 66: The MyTobii on-screen keyboard
There are different menus in the keyboard view:
6
Capitals
Lower-case letters
Numbers and signs
Navigation menu jump to jump in the text
Tools to edit the text
Exit the keyboard view/
Go back to start view
26
Manual rev 1 | XXX
MyTobii
6.2.2
Editing Text in Write
Rough positioning of the cursor is done by gazing at a word and
dwelling or pressing the switch. The cursor is then positioned at the
beginning of that word. To move the cursor character by character,
gaze on the same word again and dwell or click the switch. A set of
navigator arrows are now visible. Look at an arrow to move the cursor
slowly in that direction. The speed of the navigator and how quickly it
appears depends on dwell time settings for the text editor. This can be
changed for the text editor under applications in Advanced settings.
The MyTobii on screen keyboard has controls for moving the cursor in
the text. In the navigation view below, there are buttons for moving the
cursor in all directions, both stepwise and in larger jumps. The view is
reached when pressing the Nav button. To get back to the view with
letters press ABC or abc depending on whether capitals are used or
not.
Figure 67: The navigator arrows position the curser between
By switching to the Tools view of the onscreen keyboard, simple
individual characters
editing of the text can be performed. In the Tools view there are
buttons for undoing and redoing changes and for cutting, copying or
pasting text. In order to select text for copying or cutting, place the cursor at the beginning of the text to cut or copy, press the Select button and
move the cursor to the end of the text to select.
6
Figure 68: The navigation keys on the keyboard offers easy cursor
positioning
4.2.3
Figure 69: More advanced editing is done in the tools view of the
onscreen keyboard
If a document is accidentally deleted
Documents can be accidentally deleted from
MyTobii Write. However they are not completely
deleted from the computer but saved in a special
Trash folder named Deleted Items. This can be
found under Tobii in the Windows start menu. Go
into the Application data folder.
Figure 70: Getting deleted documents
Manual rev 2 | XXX
MyTobii
27
6.3
MyTobii e-mail
Figure 63: The icon for the
program, Windows Control, on
the MyTobii desktop
MyTobii E-mail offers the basic ability of using
e-mail to stay in contact with friends and family.
The e-mail settings can be found on the E-mail
tab in advanced settings and need to be filled out
correctly to use MyTobii E-mail.
Figure 71: The Inbox is the main view of the MyTobii Email
Writing a new e-mail
It is easy to write an E-mail with MyTobii.
6
•
•
•
•
•
•
•
Open MyTobii Email, which will bring up the
Inbox.
Choose Write Mail. This will bring up a
blank e-mail
Choose the Subject button and write the
subject of the e-mail
Choose the Body button and write the mail
Choose the To button which will open the
address book
Select the recipients and go back to the
main mail view
Choose Send to send the E-mail
Figure 72: When writing mail, complete the fields, To, Subject and Body
28
Manual rev 1 | XXX
MyTobii
Receiving e-mail
The inbox shows a list of all mail in the inbox.
Once activated, the list scrolls up and down. The
entry under the lighter shade is the selected one.
To select another item simply look at it and it will
move to the middle of the list.
Once an e-mail has been selected it can be
opened or deleted with the buttons to the left.
Figure 73: The inbox
Attachements
Attachments can be added to E-mails sent
from MyTobii Mail. This is done by pressing the
Attachments button in the Compose Mail view.
6
Under Add attachment, attachments can be
either added or removed.
To add a new attachment, select Add, which
will bring up the Open File view. All files found
in the “My Documents” folder can be sent
as attachments. Choose the file to attach by
highlighting it and click the Add Attachment
button. The file will now be attached. Choose
Back to go back to the add attachment start
view, which now will show your attached file.
To add more files repeat the steps above.
If you wish to delete a file, highlitght it and select
Remove.
When you are done click, Finished, to go back to
edit or send the E-mail.
Figure 74: Adding attachment
Figure 75: Selecting a file to add
Figure 76: Selecting a file to add
Manual rev 2 | XXX
MyTobii
29
Attachments to E-mails received in MyTobii Mail
can be viewed by selecting the Attachment
button shown in the Read Email view.
The following types of files can be sent as
attachments and be viewed via the attachment
view in MyTobii: txt, rtf, pdf, jpg/jpeg, gif, bmp,
ico, png.
Figure 77: Opening files received with
incoming E-mail
Figure 78: Receiving attachments
The address book
When composing an e-mail, selecting the To button opens
the address book.
6
By selecting a contact in the list by bringing it to the
middle of the list and selecting, Add selected, this contact
is added to the list of recipients. Remove last removes the
last contact in the list of recipients.
The address book is edited with the New contact and
Edit contact buttons. Both these allow for editing the first
name, last name and e-mail of a new or existing user. Edit
contact also offers the possibility for deleting a contact.
Figure 79: Editing recipients is always done from the address book
Figure 80: Each contact has a first name, a surname, and an e-mail address
30
Manual rev 1 | XXX
MyTobii
Drafts
All unfinished e-mails, which have not been sent, are saved in a Drafts folder.
If there are e-mails in the Drafts folder when selecting Write Mail in the inbox,
MyTobii asks if it should go to the Drafts folder or write a new message.
Figure 81: Write a new E-mail or open a draft
If an E-mail is accidentally deleted
E-mails can be accidentally deleted from both
the inbox and from the drafts folder. They can
be found under Tobii, MyTobii in the Windows
start menu. Go into the Application data folder.
Deleted Items can be found in the folder, E-mail,
located in the Application data folder.
6.3.1
Figure 82: Finding deleted E-mails
E-mail settings
Click type and dwell time for the E-mail program can be set in the start view for
Mail just as for any other application in MyTobii.
The MyTobii e-mail program has a special tab in the advanced settings for
specifying the information needed to send and receive e-mails. The tab is
accessed by clicking on the Settings button for Mail. The information to be
filled in can be obtained from the e-mail service provider. Note that many
e-mail services do not require a password. After filling in the proper details it
is recommended that you verify both SMTP and POP settings to ensure that
emails can be sent and recieved.
6
Figure 34: Settings for sending and receiving E-mail
Manual rev 2 | XXX
MyTobii
31
6.4
Internet Browser
Toggle control
Read mode
Link map
Magnify
Keyboard
Home
Favorites
Figure 63: The icon for the
program, Web Browser, on the
MyTobii desktop
Go to
Page up
The Internet browser allows the user to browse the web as
with any other internet browser, the difference being that this
one is designed for eye control.
Page down
Back
Map of the controls in the web browser:
Left toolbar:
Toggle controls – this changes the appearance of the toolbar
Home – this takes you to your start page, defined in the
advanced settings for the web browser
Favorites – this button lets you manage your favorite web
pages.
Go to – this button lets you enter a specific address for a
web page.
Page up – page up
Page down – page down
Back – Will ask you if you wish to close the web browser
6
Left toolbar “toggle controls” activated:
Toggle controls – this changes the functionality of the toolbar
Forward – lets you go forward in pages you are currently
browsing
Backward – lets you go backwards in pages you are currently
browsing
Refresh – refreshes the current page in the web browser
Scroll left – scrolls left in a webpage
Scroll right – scrolls right in a webpage
Back – will ask you if you wish to close the web browser
Figure 84: Web Browser with Link Map activated
Toggle control
Read mode
Link map
Magnify
Keyboard
Forward
Backward
Refresh
Scroll left
Scroll right
Back
Figure 85: Web Browser with Toggle Controls activated
Top toolbar:
Toggle controls – this changes the appearance of the toolbar
Read mode – read mode lets you scroll vertically and horizontally using only your eyes
Link Map – dwell on a hyperlink and it will magnify into a colored balloon
Magnify – lets you decide the size of the page you are currently browsing. There are three modes: normal, larger and largest.
Keyboard – brings up the normal MyTobii keyboard for entering text in search engines and forms on the Internet. Place the cursor by focusing
where you want it to be.
6.4.1
Internet Browser Settings
The Internet browser settings are found under advanced settings. Here, you
can set start page for the Internet browser.
Figure 83: Web Browser Settings
32
Manual rev 1 | XXX
MyTobii
6.5
Chat
Figure 63: The icon for the
program, Chat, on the MyTobii
desktop
In the chat application, use the button, Sign in, to sign into
the account that has been set in the advanced settings.
Manage your contacts with the Contacts button.
Figure 86: The Chat application
6.5.1
Chat settings
The chat settings are found under advanced settings. Here you enter your account details. The
chat application supports the MSN, ICQ and AIM protocols. It is only possible to be signed in to
one account at the time.
6
Figure 87: Chat settings
Manual rev 2 | XXX
MyTobii
33
6.6
Media Player
Figure 63: The icon for the
program, Media Player, on the
MyTobii desktop
The Media Player gives you the option to control music
and videos stored on your computer.
Music is found in My Documents and My MyTobii Music.
Movis is found in My Documents and My MyTobii Movis.
Figure 88: Web Browser Settings
6.7
Call for Help
6
Figure 63: The icon for the
program, Windows Control, on
the MyTobii desktop
This application allows the user to call for help.
The settings for call for help can be found under
advanced settings. Go to internal, under applications.
Here, you can set the sound and volume of the alarm or
use the default sound.
Figure 89: Call For Help application
6.7.1
Calling for help setting
The settings for Call for help are found in advanced settings under internal applications.
Here you can set the sound and volume of the alarm or choose the default sound and preset
volumes.
Figure 90: Call For Help Settings
34
Manual rev 1 | XXX
MyTobii
6.8
Document Browser
Figure 63: The icon for the
program, Windows Control, on
the MyTobii desktop
The Document Browser makes it possible to open and
preview documents and pictures in MyTobii.
Documents located in the “My Documents” folder can be
opened up in the Browser. Highlight the file that is to be
viewed and press Open File. Choose Back to go back to
the MyTobii desktop.
If the option, Open File is selected, the Document Viewer
will be opened. The files can be zoomed and panned and
pages turned if the file format permits it.
Figure 91: Browsing all documents
The following file types can be viewed and
opened:
Text files: txt, rtf, pdf
Image files: jpg/jpeg, gif, bmp, ico, png
The files can be zoomed by pressing the button with the
magnifying glass. There are three different zoom options
to choose from: Normal, Larger and Largest. Normal
is the default size when opening the document in the
Document Viewer.
6
Figure 93: Zooming a document
Figure 92: Viewing a picture
Figure 94: Zooming of a document
Manual rev 2 | XXX
MyTobii
35
To scroll the document, use the arrow buttons next to the document. To scroll sideways or just a small ways up or down, use the eyes to scroll.
Simply look at the document and move the gaze up and down or to the side you want to scroll towards.
The pictures below illustrate this gaze scrolling. The blue areas will not appear on the screen, they are illustrations on how the document is
scrolled.
Figure 95: Left a right scrolling
6
6.9
Figure 96: Scrolling up and down in a document
Games
MyTobii comes with a few preinstalled games. The games are presented in chapter 7.
Figure 63: The icon for the
program, Windows Control, on
the MyTobii desktop
36
Manual rev 1 | XXX
MyTobii
7
MyTobii games
The games in MyTobii are found in the games folder on
the desktop. Below is a brief presentation of each game.
Figure 97: The icon for Gobblet on the desktop
7.1
Gobblet
One of the games in MyTobii is called Gobblet. It is found on the desktop, which is the start page in MyTobii. The game can be opened with auto
click or a switch.
•
•
•
•
The goal is to have four pieces of the same color in a row. This can be done diagonally, vertically or horizontally.
The players with the black and white pieces take turns to move the marbles.
Larger pieces can be placed on top of smaller marbles.
One piece can either be moved out from the side of the field or from one square on the field to another square.
1. Click on “Move” to move a piece
Figure 98: Start the game, click on Move
7
2. Click on a piece to move it, and then click on the square you want
to move it to.
Figure 99: Select a pice to move
Manual rev 2 | XXX
MyTobii
37
3.
The first player moves a white piece. If One player has been
selected under settings, the computer will move the black piece.
Player two will repeat step 1 and 2 to move a black piece in case
the game is set for two players.
4. Repeate steps 1 to 3 until someone has four pieces in a row.
Figure 100: Placing pieces on the field
Click Exit to end the game.
Figure 101: The game when someone has won
Settings
The number of players and the level of the game can be changed by clicking on the menu button.
The menu consists of settings for mode and difficulty. Exit by clicking, close.
The number of players can be set to one or two under Mode.
There are four difficulty levels in Gobblet: Easy, Normal, Hard and Nightmare.
7
Figure 102: The menu for game
settings
38
Manual rev 1 | XXX
MyTobii
Figure 103: There can be one or two
players
Figure 104: Different levels of difficulty
can be selected
7.2
Minesweeper
Click on the icon with the magnifying glass. Having this icon marked
makes it possible to choose a blue square on the field.
Figure 105: The start view for Minesweeper
Flags can be placed on the squares where you think the mines are
located. Flags can be placed there by clicking on the icon marked in
the picture below, and then by clicking on the square where the flag
is to be placed.
A number will appear when clicking on a blue square, this number
stands for the number of mines placed around the square. To be able
to look on the game field without clicking on squares, unmark the
magnifying glass. All icons can be marked and unmarked by clicking
on them.
Figure 106: Revealing squares without mines
Flags can be removed from the field by clicking on the other icon with
a flag on it according to the picture below followed by a click on the
flag that is to be removed.
7
Figure 107: Placing flags on mines
The number on the icon with a flag and a number indicates the
number of flags left to put out on the field. The number on this icon at
the start of the game indicates the total number of mines on the field.
Figure 109: The top icon shows how many flags there are left to
palce
Figure 108: Removing flags from the field.
To win the game, all flags have to be placed on the field and all other
squares clicked on to reveal a number. The game will be over if a
square with a mine is clicked on with the magnifying glass marked. To
start a new game or to exit the game after the game is over, click on
the window where it says GAME OVER!
Figure 110: The game is over
Manual rev 2 | XXX
MyTobii
39
7.3
EyeChess
EyeChess is a chess game adapted to eye control on
MyTobii. The icon in the form of a crown can be found on
the MyTobii desktop.
Start the game by pressing the Start button. To move a
figure, click on the figure and then on the square you
want to move it to.
Settings
Difficulty levels and other settings can be set under
Options.
Figure 111: EyeChess
Figure 112: Settings for EyeChess
7.4
Tic-Tac-Toe
To win the game, Tic-Tac-Toe, you have to get three of a
kind in a row: horizontally, vertically or diagonally.
7
Press New Game to start playing. Look at the square
where a marker is to be placed. The markers are a ring or
a cross. Take turns with the computer.
Settings
Settings for the game are made under Options. Difficulty
Level and marker can be selected.
Figure 113: Tic-Tac-Toe
Figure 114: Settings for Tic-Tac-Toe
40
Manual rev 1 | XXX
MyTobii
7.5
Lines
To start a game in Lines, select New Game. A couple of
pieces in different colors will appear on the game board.
Pick a piece to move by clicking on it, then move it by
looking or clicking on the square you want to move it to.
The goal is to get the highest score. Scores are given
every time there are five pieces of the same color in a
row: horizontally, vertically, diagonally or in a cross. The
Score is shown in the top left hand corner. If a piece is
moved to the wrong square, the button Undo can be
used. To finish the game and go back to the MyTobii
desktop, select Exit.
Settings
Game settings such as board size can be changed under
Options.
Figure 115: Starting a new game of Lines
Figure 116: Settings for Lines
7
Manual rev 2 | XXX
MyTobii
41
8
8
Technical specification
MyTobii D10
Description
Display
17 in TFT 1280x1024 pixels
Operating system
Windows XP
Computer requirement
According to Tobii Specifications
Dimensions
415 x 470 x 170 mm
Weight
9 kg
Monitor arm mount
Industry standard VESA mount
Working distance
50-70 cm /20-27 in
Freedom of head-movement
30x15x20 cm/12x6x8in (w x h x d)
Top head-motion speed
10 cm/s or 4 in/s
Gaze data rate
40 data points /s
Accuracy of gaze estimation
0.5° (~0.5cm)
Max head movement compensation error
~1.0°
Max long-term deterioration of accuracy
~1.0°
MyTobii P10
Description
Display
15 in TFT 1024x768 pixels with touch panel
Operating System
Windows XP
Computer
Intergrated
Internet
LAN or WLAN
Speaker
Integrated
Dimensions
360 x 365 x 110
Weight
5,3 kg
Monitor arm mount
Vesa and Daessy
Working distance
50 - 65 cm/ 20-26 in
Freedom of head-movement
30 x 15 x 20 cm (w x h x d)
Top head-motion speed
15 cm/s or 6 in/s
Gaze data rate
40 data points/s
Accuracy of gaze estimation
0.5° (~0.5cm)
Max head movement compensation error
~1.0°
Max long-term deterioration of accuracy
~1.0°
42
Manual rev 1 | XXX
MyTobii
9
Accessories
MyTobii P10/D10
Description
Monitor arm
Different monitor arms are available for both P10 and D10 to use for desk
mounting, mounting on wheel chair or above a bed.
Case for MyTobii
Different cases for the P10 and D10 are available. With or without wheels.
IR communication built-in
IR module to be used for environmental control. Has to be installed by Tobii.
Battery Pack for P10
Batteries to be used with the P10 when used on a wheelchair.
CD player
CD player with USB connection to P10
WLAN Dongle
Wireless Internet Dongle, USB connection
Bluetooth Dongle
Bluetooth, USB connection
Switch Buttons
Different switches for P10 and D10
Joystick Cable
For using external switches with D10
9
Manual rev 2 | XXX
MyTobii
43
10 Installing third party products
Tobii Technology is continuously working with partners to help eye-enable their software. Third party products should be installed automatically
on MyTobii. Icons for all programs can be added to and deleted from the desktop in the Application manager. See more details on this under the
section, application manager and partner applications, under advanced settings.
8
44
Manual rev 1 | XXX
MyTobii
11 Technical safety
The MyTobii hardware and software is in accordance with the Medical Devices Directive, 93/42/EEC, by fulfilling the requirements of LVFS
2003:11.
The MyTobii hardware and software has been designed to comply with the relevant sections of EN 12182:1999, Technical aids for disabled
persons – General requirements and test methods.
The MyTobii hardware and software is in accordance with the following standards.
EMC Emission
EN 60601-1-2
EN 55022, Class B
FCC part 15, Class B
EMC Immunity
EN 60601-1-2
EN 55024
• EN 61000-4-2 ESD
• EN 61000-4-3 RF field
• EN 61000-4-4 EFT/burst
• EN 61000-4-5 Surge
• EN 61000-4-8 Power frequency magnetic field
• EN 61000-4-11 Voltage dips/interruptions
Electrical Safety
EN 60950
EN 60601-1
NIR radiation
EN 60825-1
Laser Notice No. 50 (issued by the FDA)
Attention: When the MyTobii hardware is connected to a standard PC, the system will meet the electrical safety requirements of EN
60950.
For the system to meet the electrical safety requirements of EN 60601-1 an insulating transformer must be used between the PC and the
AC power outlet. If the PC is connected to a network, the connection should be made through an unshielded UTP CAT 5 cable. Alternatively, a
medical PC, which already meets 60601-1 can be used.
9
Manual rev 2 | XXX
MyTobii
45
12 Emission of near infrared light
9.1
Thermal hazard to the retina of the eye
The MyTobii P10 and the MyTobii D10 contain illuminators that emit light in the near infrared (NIR) spectra. The light emission levels have been
tested at ETL SEMKO in Stockholm according to the European laser safety standard IEC/EN 60825-1/A1-A2 and the US standard Laser
Notice no. 50. These standards regulate the safety of products containing illuminators emitting light in the near infrared spectra.
The standards contain test procedures to verify that the emitted light will cause no thermal injury to the retina of the eye of a person being
exposed to the light.
The MyTobii P10 and the MyTobii D10 have been verified, also under fault condition, to never get close to the emission limits set by these
standards. The tests have shown that the MyTobii products comply with the standards for products intended for use in long-time exposure
situations. The products are classified as Class 1 LED products.
Under regular operation of a MyTobii product, the user is exposed to less than 0.1 % (1/1000) of the accepted long-time exposure according to
IEC/EN 60825-1/A1-A2 and Laser Notice No.50.
9.2
Near-infrared thermal hazards to the lens
Research has been carried out, which indicates that long-time exposure to near infrared (NIR) light may accelerate the ageing of the lens of
the eye, and thereby cause lenticular cataracts. The near-infrared thermal hazards to the lens is not taken into account in the applicable safety
standards, which only regulate the emission limits based on the potential harm to the retina of the eye.
One of the most relevant publications on the subject is “Evaluation of optical radiation hazards” by Sliney, D.H. and Freasier, B.C. (1973). This
study shows that glass and steel workers exposed to infrared irradiances as low as 0.04-0.08 Wcm-2 daily for 10-15 years develop lenticular
cataracts. A MyTobii user is exposed to irradiances at 0.0002 Wcm-2.
Let us compare the amount of light that the glass and steel workers are exposed to and the amount of light that a MyTobii user is exposed to.
Assume that the glass and steel workers in the study are exposed to infrared light six hours a day, 5 days a week, for 10 years and that the light
intensity is 0.04 Wcm-2. This amount of light seems to be a likely minimum amount of light that one of the glass and steel workers in the study
may have been exposed to.
For a person that uses a MyTobii product eight hours a day, 7 days a week, it would take more than 1000 years to get exposed to the same
minimum amount of light as the glass and steel workers were exposed to in this study.
10
46
Manual rev 1 | XXX
MyTobii
Tobii Technology AB
Tobii Technology Inc.
Tobii Technology GmbH
Karlsrovägen 2D
182 53 Danderyd
Sweden
PHONE +46 8 663 69 90
FAX
+46 8 30 14 00
E-MAIL [email protected]
510 N, Washington St, Suite 200
Falls Church, VA 22046
USA
PHONE +1 888 898 6244
FAX
+1 419 715 7750
E-MAIL [email protected]
Niedenau 45
60325 Frankfurt am Main
Germany
PHONE +49 69 24 75 03 40
FAX
+49 69 24 75 03 429
E-MAIL [email protected]
Tobii Technology Norge
c/o Viking Software AS
Strømgaten 4
5015 Bergen
Norway
PHONE +47 55 55 10 60
FAX
+47 55 55 10 61
E-MAIL [email protected]
www.tobii.com