1
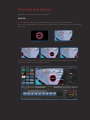
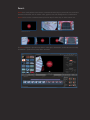
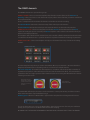
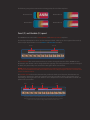
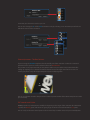
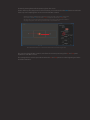
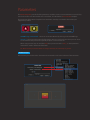
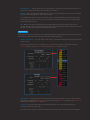
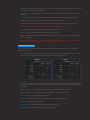
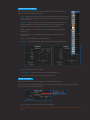
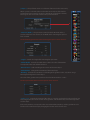
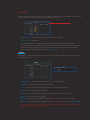
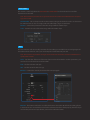
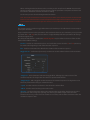
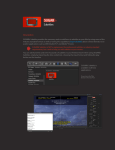
SUGAR fx ANIMO Description SUGARfx ANIMO is a tool to create dynamic animations in a fast, effective and easy way without the use of key frames and right in the Final Cut Pro X editing timeline. ANIMO includes a set of 2 master templates (Animate and Reveal), 4 Preset loader templates (Animate and Reveal) and 6 motion blur styles. All of these templates provide a wide range of possibilities to add animation to a video layer, text banners or combination of those elements. ANIMO can be found in the Titles browser, or under the ANIMO categories in the Themes browser. ANIMO was developed as title elements that can be placed on top of a section in the timeline to animate logos, text or video clips in and out of the screen. Animate and Reveal ANIMO comes ready to do two types of animations. Animate : Animate takes care of moving the animated element on top of the video layer underneath. You can use a custom video clip, a text message, a graphic element, color backgrounds or a combination of elements. The Animate element Video clip in the timeline The Animate template is placed on top of the video clip in the timeline, and the Presets are readily available for a quick and easy setup of the animation. Reveal : Reveal does exactly what its name means, it animates the video clip on your timeline to reveal other elements underneath, such as another video, graphics, text, color backgrounds or a combination. Reveal can be used as a custom transition placed on top of 2 video clips, or other creative uses. The Reveal element Video clips in the timeline The Reveal template is placed on top of the 2 video clips in the timeline, and the Presets are readily available for a quick and easy setup of the animation. The ANIMO elements. The ANIMO elements are separated in 3 groups: ANIMO | SUGARfx : These are 2 master templates that allow the creation of Presets for Animation or Revealing, or they can also be used in the timeline if you prefer to have all of their parameters available in the inspector window. There is a template for the animation of elements and another one for the revealing. The Animate Master animates the element on top of the video layer in the timeline. The Reveal Master animates the video layer and reveals whatever is underneath in the timeline. ANIMO | Preset Loader : These are 4 templates, two for the Animate and another two for the Reveal, capable of loading the presets created by the Master templates and use them in the timeline when you want to use minimal parameters. The templates offer a fixed build-in and build-out, and a variable or flexible duration when their duration is stretched in the timeline. This is a perfect solution for any kind of animation and timing requirements. ANIMO | Motion Blur : These are 6 templates to help you add motion blur to any element in the editing timeline. Use these templates only when you need to have Motion Blur in your animation. ( Be aware that these templates add motion blur to everything under it, so it has to be used with caution). Blur levels and quality : The numbers in the templates ( 8, 16 and 24 ) refer to the quality or number of repetitions from previous and next frames in order to create the motion blur effect,. The 720 number in parenthesis refers to a higher aperture of the motion blur, hence increasing the effect when the element is moving across the screen. Motion Blur animation helps blend or soften the quick movement of the animation by creating a blur effect. Same animation without Motion Blur. The Motion Blur effect helps the viewer see the animation in a more pleasant way, and there are times when some animations may benefit from using it. Rendering Time : Whenever a Motion Blur is applied to the template the rendering time will increase. To save rendering time you can use the Motion Blur 8, but if the movement is fast and you need better quality, you may need to use the Motion Blur 24 for better sampling. BE AWARE THAT THE HIGHER THE NUMBER OF MOTION BLUR, THE MORE TIME IT TAKES TO RENDER. The following images demonstrate the rendering quality of each of the templates. No motion blur Motion Blur 16 Motion Blur 8 Motion Blur 24 Fixed ( F ) and Variable ( V ) speed. The ANIMO Presets come with a Fixed Speed (F) and Variable Speed (V) templates. The fixed speed template has the in and out animations fixed, and they can be recognized because they have a couple of parameters to use the Build In and Build Out animation. Build-in Build-out The Fixed Speed refers to the situation when you need to change the duration of the ANIMO Preset in the timeline. The duration can be changed but the beginning and ending animations remain unchanged (or fixed); only the middle part is stretched or changed to fit the new duration. NOTICE : When changing the duration of a Fixed Speed preset, avoid using the 2 second duration because the Preset may display a black frame in the middle of the animation. If that occurs, simply change the duration to one frame earlier (1:29) or one frame later (2:01). The Variable Speed refers to the elements that, just like the Fixed Speed elements, their duration can be changed in the timeline, but their beginning and ending animations will also change their speed depending on the length of the new duration. –These templates do not have the Build-in and build-out options in the parameters. Begin End Begin End This graphic shows the same element duplicated in the timeline and one of them has been changed in its duration. The animation for the longer element takes more time to complete, therefore the overall speed of the Begin and End animations will be slower. How does it work? The idea is very simple. You have the option to Animate or Reveal when using ANIMO, so before you start using the ANIMO templates, answer the following questions: 1.- Do you want to animate elements on top of your video clip, or do you want to animate the video on the timeline to reveal other elements underneath? The answer will tell you what to use, the Animate or the Reveal templates. 2.- Do you want to use and load the built-in Presets or do you want to create (Master) your own setups to save them as custom presets? The answer determines what element category to use: the Preset Loader with minimal parameters, or the Master template with all parameters available. 3.- Would you like to add Motion Blur? Is rendering time and quality important? The answer determines if you need to use a Motion Blur template, and when the higher the number of the template is, the higher the quality and so the rendering time will be proportionately higher. Go ahead and select the ANIMO element of your choice and drop it on top of the area in the timeline where you want to create your animation. Quick Start Tutorials When you select a Preset Loader you can have access to a quick tutorial by clicking on the SUGARfx logo Help, or follow this basic procedure to use the ANIMO elements in your timeline. First : Browse the general Presets. From the pull-down menu see if there is anything that sounds similar to your desired animation. You can select a Preset and see how it animates in the timeline, and then select another one until you find something that you like. Note: Some presets are better suited for the Reveal (Green color label) rather than the Animate template (Red color label), so you have to select and see if it actually feels right depending on the Preset Loader that you have selected. Second : What do you want to animate? Go to the Animation Style section and choose from the menu the element(s) that you want to use for the animation. The Text animation refers to the animation of a Text layer as a whole, and not the animation of the text characters. Third : Select the animation behavior. The behavior changes the timing of the animation and how it behaves when landing or departing. Try several of them and try to see their subtle differences. Fourth : Tweak the appearance of the element. Scroll down in the parameters’ list and change the masking options, the text, font, color palette, etc. before you go any further. Customize your element as much as you can. You can also change the In and the Out animations easily by selecting a new animation preset for these individual sections of the animation. Other adjustments : The Rest Position If you are using the Animate template, then the middle part of the animation is where the animated element needs to pause or rest for a moment, this is the Rest Position. This position is very important and you may want to make sure you set this rest position first before setting up anything else, so that the animated element lands in the right section of the screen, not covering any faces or any other important parts of your underlying video. You can use the OSC control or the parameters in the inspector window of the Master template to set this up numerically. OSC controls and Guides ANIMO provides 3 specific points to modify the beginning or the origin of the animation (the Animation in point), the Resting point, and where it is going to go out of the screen (the Animation out point). You can easily see the OSC control points in the screen if they are within view, and you can modify their location by moving them with the pointer right on the screen. If some of these points happen to be off-screen, then you need to click on the Edit button to enable the “bird’s-eye-view” helpful guides on the screen and the OSC controls. The Edit view displays a thumbnail representation of your work area, with a couple of blue rectangles that represent the in and the out locations, and the orange rectangle that represents the resting location. The shape of the color rectangles indicate the maximum area of an image or video that can be animated. – Any image, background , text or video larger than that will be cropped to fit this area. Move the Timeline indicator to see the how the animation moves over time, using this view. This view also shows the OSC controls, and allows the accurate positioning of the in and out points anywhere in and off the screen. The rectangular blue color shapes indicate where the in and out points are at the beginning and at the end of the animation. Parameters The Master Templates provide all of the parameters needed to create a custom animation or reveal. They can also be used to save Presets that can be saved later, or loaded when a Preset Loader template. The parameters of the Master Templates have similarities, but they are related to the task they are supposed to perform. SUGARfx Logo / User Manual : Get access to the User Manual by clicking on the SUGARfx logo. [ Presets ] : This menu will contain all of the built-in Presets as well as the ones that you save. There are also buttons that provide the capability to Open or Save new Presets. When saving Presets, keep in mind that only those parameters with a dot [ • ] in their parameter name will be saved in the Preset information. TIP : Make sure that you name the Presets according to what they do or what they are good for. Animation Style Here is where you can choose the elements to be animated as well as the behavior of the animation. Animate Using… : A drop-down menu to select the type of element(s) to be animated. There are 9 elements or combinations that can be used for the animation. Behavior : Refers to the type of animation curve of the animated element, or how it moves from the in point to the resting position, and to the end point. Try out different behaviors on your animation and try to spot the differences between them. Some are linear, others have an ease-in or ease-out animation, and others may bounce a couple of times before the animation stops. Edit : Button to enable the thumbnail representation of the animated elements in the Canvas window. Use this button when positioning the initial and ending positions of the animation, and use the OSC control points to make your adjustments visually. Rest Position The Rest position refers to the place in the animation where the animated element comes in and lands or pauses for just a few moments before doing its final animation going out. [ Rest ] / [ Start & End ] : This pull-down menu contains a collection of Presets related only to the data in this section. The Preset thumbnails are color coded. The Red color presets are better suited when using the Animate template, and the Green color for when the Reveal template is used. Reveal does not have a Rest Rotation option. • Rest Position : The exact position where the animated element(s) will be on screen. This is the first stop when coming from the Animation In point when using the Animate template, or the Start & End position when using the Reveal template. • Rest Scale : This parameter takes the animated element(s) and scales it, potentially losing resolution if the scale is too large. For better quality results it is recommended that you change the size or the scale of the animated element(s) in their own parameters, and use this scale as the quick or the last resource if the size that you want cannot be achieved otherwise. • Rest Rotation : Sets the resting rotation of the animated element(s) –Not available for the Reveal template. Display PP : Displays a red circle in the Preview window that indicates the Pivot Point location. The Pivot Point is the point of reference that will be used for animation. The Pivot Point offset becomes more obvious when a rotation change is part of the animation. Note : The Pivot Point is shown in the thumbnails as the point where the lines are crossing. • Pivot X : Offsets the Pivot Point location in the horizontal or X axis. • Pivot Y : Offsets the Pivot Point location in the vertical or Y axis. (When using the X or Y offset of the Pivot Point, the Edit guides may also show a slight offset in the in and out positions). TIP : Use the Pivot Point offset to create advanced and unique type of animations. Some Presets with the name “Jump” or “Swing” in their description may be using offset values in these parameters. Animation In / Reveal In These parameters control the accurate placement of the animated element(s) in the in point of the animation sequence. [ In ] : This pull-down menu is a collection of Presets for this section only. Use this to save or recall setups that can be used in combination with other setups in other sections. • Position : Sets the exact position for the in point of the animation. These are the numerical values that correspond to the in position of the OSC displayed in the Canvas window when the Edit button is enabled. When using the Animate template this is the starting point of the initial animation. When using the Reveal template this is the starting point of the final animation. • Scale : Sets the scale of the animated element. • Rotation : Controls the rotation and perspective of the animated element. • Depth : Sets the position in Z space. • X ( Horizontal ) : Sets the orientation along the horizontal axis. • Y ( Vertical ) : Sets the orientation along the vertical axis. Animation Out / Reveal Out These parameters control the accurate placement of the animated element(s) in the out point of the animation sequence. [ Out ] : This pull-down menu is a collection of Presets for this section only. Use this to save or recall setups that can be used in combination with other setups in other sections. • Position : Sets the exact position for the out point of the animation. These are the numerical values that correspond to the out position of the OSC displayed in the Canvas window when the Edit button is enabled. When using the Animate template this is the destination point of the final animation. When using the Reveal template this is the destination point of the initial animation. • Scale : Sets the scale of the animated element. • Rotation : Controls the rotation and perspective of the animated element. • Depth : Sets the position in Z space. • X ( Horizontal ) : Sets the orientation along the horizontal axis. • Y ( Vertical ) : Sets the orientation along the vertical axis. Background / Matte This section handles the style of the Background and Matte being used. There are three styles of gradients/mattes, one is the Circular and the other 2 are Rectangular with a variation on the direction of the gradient. Style : Select the style of background/matte to be used. Note : Notice that this parameter does not get saved in the Presets and must be selected when a specific preset is loaded. [ Shapes ] : This pull-down menu is a collection of Presets for this section only. When a preset is selected, make sure that the correct style and the default palette have been previously selected, so that when you make the selection, the image on the screen looks similar to the preset thumbnail. • Diameter [ Width ] : This parameter controls both the Diameter when a Circular matte has been selected, or the Width when a Rectangular style has been selected. Use the following parameters when a Rectangular Style has been selected : • Height : Controls the height of the Rectangular style matte. • Outline Width : Controls the width of the outline. The color of the Outline corresponds to the Color Palette number 4. • Round Corners : Adds rounding to the corners of the matte shape. • Mask Rotation : Changes the orientation of the matte shape. • Blending : Controls the smoothness or blending of the gradient colors, only when using a Rectangular background / matte shape. The color of the gradient corresponds to the Color Palette numbers 1 and 2. Use these parameter when a Circular Style has been selected : • Circle ( 1 - 4 ) : Controls the location of the colors in a circular gradient. Each value goes from 0 to 100, being 0 (zero) the center location of the gradient, and 100 all the way out to the edge of the circular shape. Each Circle (number) corresponds to the same Color Palette (number), and the gradient or color bands can be controlled easily by changing the location value of each circle. Color Palettes The Color Palettes form part of the Background / Matte section, however this part of the section also has its own set of Presets, where you can load, create and save your own. [ Color Palettes ] : The full collection of color palette presets available. • Color ( 1-4 ) : The color wells. Keep in mind that when using the Rectangular background/matte style, the Color 1 and 2 correspond to the inside gradient, and Color 4 for the Outline, while the Circular style background/ matte uses all of the 4 color palettes, and their position in the circle can be controlled easily by adjusting the value of the location of each Circle ( Circle 1-4 ). Shadow The shadow is an optional section that only appears on screen when the Matte size is smaller than the full size of the screen. Shadow Presets : Collection of most common shadow and glow effects. • Amount : Controls the opacity of the shadow effect. • Color : The Color of the shadow (Use light colors to simulate a glow instead). • Blur : Blurring or softening of the shadow. • Distance : Controls the distance of the shadow depending on the direction angle. Angle : The direction of the drop shadow. Reveal Mask : Enables the type of mask used for the video clip when it is being revealed. Rounding : The amount of rounding affecting the Rectangular and Square selected in Reveal Mask. Note : Notice that the Angle, Reveal Mask and Rounding parameters do not get saved in the Presets and must be modified when a corresponding preset is loaded. Custom Video This section is useful only when the Same Video or Custom Video has been selected as one of the elements to be animated. Note : Notice that these parameters do not get saved in the Presets and must be modified when the corresponding preset is loaded. Custom Video : This is a drop zone where the Custom video gets loaded to be used as an element to be animated. You can also use images with embedded alpha, logos or animations. Position : Controls the placement of the video image within the Matte shape. Scale : Controls the scale of the video image within the Matte shape. Text The most common and most useful parameters for Text editing are available here to avoid going to the Text editor in Final Cut Pro X, unless you need complete customization of your title. Note : Notice that the text parameter do not get saved in the Presets and must be selected and modified when a specific preset is loaded. Color : Sets the color of the Face of the text. If you need to add an Outline or other parameters, you need to do so in the Final Cut Pro X Text editor. Font : The font selection and style. Size : Sets the size of the text message. Baseline : Controls the vertical placement of the text paragraph. Edit Text : This button enables the use of the Final Cut Pro Text editor. By default, the editing of text in Final Cut Pro X is not enabled in order for the other OSC handles to work properly, therefore if you need to edit your text and style further, you need to enable this button. When enabling the Edit Text button, make sure that you click away from the ANIMO element in the timeline and then come back to select it. This way, all of the parameters and options of the Final Cut Pro X built-in Text Editor should be available for editing. Do the same process when disabling the Edit Text button. Note : Final Cut Pro X sometimes does not display these parameters in the template parameters’ list when the Edit button has been used several times or when the template has been duplicated in the timeline, however they are all still available in the Text tab of the application and they can be modified when the Edit Text button is enabled. Effects This section provides a random wiggle effect that may be dialed-up to be added to the current setup to spice up the animation. Keep in mind that because these parameters add a random behavior to your animation, you may need to re-position the in and out points, because there is a high probability that those parameters will change from their original setup. Also, when the Edit button is enabled, the thumbnail guides may be offset also because of the random nature of these Effects’ settings. Dissolve : Enables an automatic dissolve in and out for those times when the in and out points may be visible at the beginning or end of the animation sequence. Blur : Enables an automatic blur effect for the duration of the animation sequence. Wiggle Presets : A collection of previously saved Presets to add random behavior to the animation. • Wiggle XY : Adds a horizontal and vertical wiggle effect, affecting the position values of the animated sequence. The higher the value the more prominent the effect is. • Wiggle Angle : Adds a wiggled random rotation to the animated sequence. The higher the value the more prominent the change in rotation becomes. • Speed : Use this control to accelerate or slow down the random effect. • Offset : Use this control to change the random value. (fx) Delay : Use this to determine when in the animation the wiggle effect should start. The value goes from 0 to 100, 0 being the beginning and 100 being the whole length of the animation, therefore when using a value of 0 means that there is no delay and the effect should start when the animation sequence starts. Technical Support Our Technical support team is available to answer your questions via e-mail and should respond as soon as possible. ([email protected]) Help The Help file (or the PDF version of this User Manual) is available when you open the FxFactory application and press on the Help button under the icon of the theme element. Support Please visit our web site (http://www.sugarfx.tv) for possible answers to your technical support issues, or visit our YouTube channel at (http://www.youtube.com/sugarfxtv) where you may also find a tutorial that will help you find the answer to your question. Known Issues (1) Potential disappearance of the Text parameters from the plug-in interface. The Text can still be edited simply by enabling the Edit Text parameter and going to the Text tab and adjusting them in there. –We believe this is Final Cut Pro X misbehaving and it rarely occurs. (2) The UI in the plug-in does not respond when the Edit button is enabled, but it seems to happen only when several copies of the same instance in the timeline have been duplicated. To solve this problem, simply drop a fresh ANIMO element in the timeline again and it will behave as expected. –This is an intermittent phenomenon, and again we believe this is caused by the publishing engine between Motion and FCPX. There are no more issues that we are aware of, at the time of release of this product.