1
SIgiteX
Fr&me
User Manual
1. Power Voltage
I I
0V AC or 220V AC
Ardio output format
. Digial SPDIF output fo@t
.
Analog ouQut
1.
RAW
2.
PCM
by
fo,mt by
l.
2Ch
Dom-mix output
2. Support memory format
. SD (MMC) | size24r!mx32lmx2.lm
MS: MS Cdd sire
.
(50m
x
, refer
follows:
2l.5mx 2.8m) rcfo as follows::
USB: supportUSB 1.1,US82.0
3. Key of remote control explanatiotr
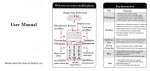
Direction for use
d
4. System setup
Select( Setup )utrder
min
menu to enter into setting mode.Further more , under other
function,when select Ell fI lll key to enter into setting mode as well.The below
pictue is the begiming ofsetting mode, the following will explain each function.
:l
t
10
ar4l
i15l
SETUPmode
6 follows:
5.1 Pholo Sefling
5.1.1Itrtenal Time
Refer to the above
pictue:
This option Ne to set up the inteilal time ofplaying pictures, include 5 seconds, l0 seconds,
15 seconds. 30 secotrds. 1 minutes.3 minutes
for selection.
(l) power or/power off
03)
(2)
backgroud music
offsound
00 set up key
(3) photo
(15) voice incrcase
(4) audio
(16) voice decrease
(5)
video
(17) quick backoff
(6) pause
(1
(7)
retm
8) quick advance
to main menu
(19) pictwe, music page up
(8) move cwsor up
(9) move cumor
(10)
dbm
move cusor left or rotate
(lD move cursor
(a select
(20) picture,music page down
pictre
right or rotate picture
and enter
This option use to set up cyclic displayirg pictue mode.
5.1.4.2 Mtrsic
5.13slioiirjgoa
Select
This opdon use to s.'t Bp whethe. lo show picture full screco or fit screent.
5.1.4Slide Mode
This option use to set up the mode ofslideshow pictue.
on",when enter in"photo" it cm mts into file mnagemetrt mode md auto
play,if select " of", you need to press "entfi" after mh into music file
5.1.5Brcwse
Select
" music" mder
sefup meDu aDd enter
inb music sefup mode, select"
mmagment,
5.1.43 Movie
"
brcwse" enter into photo mode, include file mnagement md browse
mode.
Select
" movie" undu setup menu, if select " on",it
'' otr', ii enters into movi€ file lrmagement.
entere into
aub play
movie: it select
file mrnrgement mode:
5.2Display Setup
5.2.1 Brightness
This option use to set up the brightness ofshowing picture, include nomal,
bright md soft for choose.
Browse mode:
5.2.2 Contrast
This option use to set up the conhast from -4 to 4, include 9 gade, the nmber is
Itrge, the cotrtrast is high.
5.1.4Auto Pl.y
5.1.4.1 Photo
Select " photo" udd setup menu md mter into photo setup mode, select "
on",when enter in " photo" it cm €trtd into" slide show mode, if sel€d"
otr", it will enter into fil€ @gem@t or brcwse mode. Refq to the pictue
below.
5.2.3 TFT Brightness
This option cm adjust TFT brightness, ftom -'1 - 0
nuber is lage,the brightness is strong.
-7,total l5
grades,the
5.2.4 TFT Contrast
This option can adjust TFT conhast ,from -7
is lmge,the brightness is high.
-
0
,'
7
total 15 grades,the nmber
5-2.5 TFT Saturation
This option can adjust TFT Saturattiotr, from -7
oumber is loge.rhe satuation is high.
5.3.2 Encoditrg
There
de two choice of encoditrg westem euopea ed Central euopean.
533
- 0-
7,
total 15 grades,the
5.3Custom Setup
osD Language
This option use to setup OSD logauge, include
English,French,Gemm,Italian,Spanish, Portuguese,Dutch and Polish for choose
Repeat mode
Select this option, us$
ca
enter rcpeat mode @d catr setup off, one folder
md
Off: Offthe rep@t function.
One: Repear the playing file.
Folder: Repeat the playing folded file
All: Repeat all the file io memory
5.3.1
5J.4Merlir----USB MODEruSB
S{)[JRCE
This option for user to setup the play mediaThere de two types, play the
media from my photo Aame u USB.
.*s$ ii*i;l a
l,'3trH8
IflffiIIE
,ffr*x*,
7. Music
key, it tests whet]rcr digibl photo ftme
min menu, select [Music] ,then press E
comected to memory (USB stick, memory cards). If digiul photo ftme not comect to memory it
Under
5J.5 Defiult
all the setting
retm
to orignal system setting.
retum to main menu afuomaticly.
Digital
phoao
ftme
comected to memory and select the ce(ain memory,
mmagement" to manage files, refer to {ollowing
it ente into " media
picue.
Under [Photo) mode, sysbm suppot media playitrg, fomat is MP2,MP3/WMA.If ser select
autoplay is on, it enttrs into autoplay music mdcr music mode.
Exit
Exit setup node, return to
5.4
main menu.
6. Photo
Unaler
min
menu, select (Photo
key. il Ests wherher digital photo tuame comected
),pres @
Ifdigital photo frame not connect to m€mory it reM to
to memory (USB stick, memory cards).
mitr
menu atuomticly.
Digital phob ftame connected to memory md
mode.If user selected
"file mode",
select the ceMiD
please refer
b dom picture.
) mode, sysh support picMs
memory it ents into user'selected
to up pictue. If usq
"
browse
8. Photo+Music
Under maitr menu, select ( Photo+Music),then press
comected to memory (JSB stick, memory cards).
mode",pleasercfer
Under I Photo
selected
play, the
fomt
is JPG
retum to main menu atuomaticly.
E
key, it tests whether digital photo frame
Ifdigital photo ftame not connect to memory it
Digibl photo frame connected to memory md select the cetain
"
file management" to IlHage playing, refer to following picture. Under
(Photo+Music) mode, sysbm suppofrs playing photos with backsoud music, the fomal h
JPG,MP2MP3^ilMA. If user select [Photo+Music] autoplay is or, it enter into autoplay photo with
memory,
it enters itrto
background music after
enterinto [Photo+Music)
i
mode.
I,iham
-dhtHE
Km&31
'*iwi.l&&**is
I
7. Music
Under mah menu,
select (Music) ,then
press
[.!
comected to memory (USB stick, memory cards).
ken it tests whether disitat phoro frame
Ifdigilal photo fiame not comect to memory, ir
l.Calendar
Select ICalendar) under main menu, then
press
[I
key enter into calendar mode
remm io main menu atuomaticlf
Digiul photo frame connected to memory and sclect the cefrain memory, it enters into " media
managemena'lo marage files, refer to followitrg picture.
Under [Photo) mode, system suppoil media playing, fomat is MP2,MP3,AMMA.]f user select
autoplay is on, it enters into autoplay music under music mode.
10.1 Display
This option provide [calenda) show function,the date is system cunenl setled
date.User can use
9. Photo+Music
Under main menu, select I Photo+Music ),then press
connected to menory (USB slick, memory cards).
E
k.y, it
to browse different months and use
! [
tests whether digital photo frame
Ifdigital photo frame not connect to memory, ir
return io main menu atuomaiicly. Digital photo fiame comected to memory and sel€ct the cenain
it enters into " file nanagement" to manage playing, refer to following picture. Under
(Photo+Musicl modc, syst.m suppofrs playing photos wilh backsound music. the lbmdt b
JPG.NIP2MP3Nry{A. If user select (Photo+Music) autoplay is on, it enter into autophy photo with
*xt*lwi:xm:M.&$*xx*s
memory,
::t:,::fitl::.!:.':,i!i::,,:,ti.,rrrtr..::.'
:xr..r&:1,r.*.:
:-xr..:*,::x,:.
.rr
. . r'
backgound music afier enter into (Photo+
10.Movie
Under main menu, select (N'lovie) ,then
press
I
comected to memory (USB stick, memory cards).
key, it tests whether digital photo ftm1e
Ifdigital photo frame not comect 10 memory it
relum to main menu atuomaiicly Digital phoio ftaDc connccted to memory and select the cefrain
memory, it enters into " file management" to mmage playing, refer to followitrg picirre. Under
(Movie) nodc, system suppofls playing video, lhe fomat is DATA4PG|TOB/AVL If user select
( Iv'loive ) autoplay is on, it enter into autoplay pholo wilh background music afler enter ilxo ( Movie )
mode.
10.2 Set Date
This option for user to setup the date
! !
to browse different
Se1€ct
(Analog clock)
Select
(ClockdCalendar) ,Dress
11.3
shows as follows
Fla! kev,it
shows as follows
Exit
Exit clock setting return to
main menu,
l3.Alarm
Select
(
Alm)
12.1 Enable
mder min menu,pre.. {q.q[] k"y to enter ioto
alm
setting mode.
10.3 Exit
Exi
t
t calendrr
sel t
ing return lo miin
2.Clock
Select (Clockl
pr"st
under main menu' rhen
menu
l-]
k"y tn cnter into timc setrng
11.1 DisPlaY
(clock)
select showrng
This option for user to
clock) .select (clock) 'press[jke):it
'
(clock&calendar)
shows as follows
'
[analog
User
cm select IEnable] on or off to make alam setting enable or not able.
14.Auto-Power
Select (Auto-Power)under
off setting
main
nenu,pr"rr
lfrt.tk"y
to enter the auto power
mode.
13,1 Power on Enable
User can choose
power
on emble or not able by select (On) or
(Off)
12.2 Set Time
User can set the time of
alm,rcfer
alm,whetr sglect (Enable) on can
to the following imge,press my key to exit
set the time
of
alam setting mode.
13.2 Power
offEnable
User cm choose power
offemble or not able by select (On) or (Off)
13.3 Set Time
User cm set the time of the auto power
off, (power off) md (powu on) ae
optional to setup the time.
12.3
Exit
Exit
alarm setting return to main menu.
t4
l5
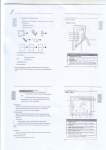
14.3 Delete
In this function, ale :se: :storage device. The use: _':lF
:e-::: s::e;: saler pictures in the
-::-:::_
::
i::s:_ press EiTER or 0K, then
enter into delete mde. a: :::s ::!E. +
i::r cm be used to
choose
picture the user ril!
:: of,. rhe picrure
can be
*
tc ie-e:e. ::::: lILl
deleted, or the user c&::-:asa
13.4
pictures.
Exit
Exit off setting teturn to
main select
The user
_aE-er- al-'
ca prass <- +
whose order wanted
to
be
iel to chmse pictures
r:a.gei €rcep! -delele' option.
l5.Edit
After (editI is
edit
mode.
choosed
in the nain
menu,
press
ENTER
or 0K to enter into
In this node, the user can choose "copy" , " delete" or
14.1 Copy
In this function, the user
as screen saver
then press
pictures.
ENTER
The
can copy
pictures in the storage device
user can press
or 0K, the pictures
show
f ] tey to
red
choose picture,
outline border moans they were
choosed. llthe userwantto @ncel the choice, press ENTER or OK anothertime, then the
choice is cancelled. After finish the choice, the user
+
+
€n
press
key, jump to "keep" option, press ENTER or OK, the picture that ch@sed
16
to delete all of
L7
the


![LS5105 Document No 4 [PDF 493KB]](http://vs1.manualzilla.com/store/data/005800437_1-91570bc2ebb104ae0a2a4b7bb76bd213-150x150.png)