1
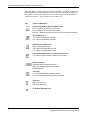
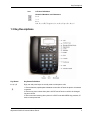
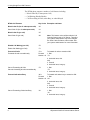
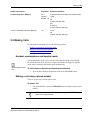
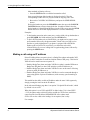
Objectworld Unified Communications Server®
Grandstream BudgeTone‐200 SIP Phone User Guide
© 2001-2009 Objectworld Communications Corp.
All rights reserved. Published February 18, 2009
Objectworld, Objectworld Unified Communications Server, Objectworld UC Server, Objectworld UC Client, Objectworld
Connect, Objectworld Connect PLUS, IT Telephony, and the IT Telephony Company are either trademarks or registered
trademarks of Objectworld Communications Corp. in the United States and/or other countries.
All other trademarks or registered trademarks are property of their respective owners.
Part No. UCS-1011-000-v4.4
Table of Contents
1 Grandstream BudgeTone-200 SIP Phone Overview . . . . . . . . . . . . . . . . 1
Overview . . . . . . . . . . . . . . . . . . . . . . . . . . . . . . . . . . . . . . . . . . . . . . . . . . . . . . . . . . . . . . . . . 1
Display Features . . . . . . . . . . . . . . . . . . . . . . . . . . . . . . . . . . . . . . . . . . . . . . . . . . . . . . . . . . . 1
Key Descriptions . . . . . . . . . . . . . . . . . . . . . . . . . . . . . . . . . . . . . . . . . . . . . . . . . . . . . . . . . . . 3
2 Using BudgeTone-200 Features . . . . . . . . . . . . . . . . . . . . . . . . . . . . . . . . 5
Using the BT200 Call Feature Access Codes . . . . . . . . . . . . . . . . . . . . . . . . . . . . . . . . . . . . . 5
Making Calls . . . . . . . . . . . . . . . . . . . . . . . . . . . . . . . . . . . . . . . . . . . . . . . . . . . . . . . . . . . . . . 7
Answering Calls . . . . . . . . . . . . . . . . . . . . . . . . . . . . . . . . . . . . . . . . . . . . . . . . . . . . . . . . . . 10
Holding and Resuming Calls . . . . . . . . . . . . . . . . . . . . . . . . . . . . . . . . . . . . . . . . . . . . . . . . . 11
Muting and Unmuting Calls . . . . . . . . . . . . . . . . . . . . . . . . . . . . . . . . . . . . . . . . . . . . . . . . . . 11
Conferencing . . . . . . . . . . . . . . . . . . . . . . . . . . . . . . . . . . . . . . . . . . . . . . . . . . . . . . . . . . . . . 12
Transferring Calls . . . . . . . . . . . . . . . . . . . . . . . . . . . . . . . . . . . . . . . . . . . . . . . . . . . . . . . . . 12
Ending Calls . . . . . . . . . . . . . . . . . . . . . . . . . . . . . . . . . . . . . . . . . . . . . . . . . . . . . . . . . . . . . 13
Redialing . . . . . . . . . . . . . . . . . . . . . . . . . . . . . . . . . . . . . . . . . . . . . . . . . . . . . . . . . . . . . . . . 14
Forwarding Calls . . . . . . . . . . . . . . . . . . . . . . . . . . . . . . . . . . . . . . . . . . . . . . . . . . . . . . . . . . 14
Changing the Volume . . . . . . . . . . . . . . . . . . . . . . . . . . . . . . . . . . . . . . . . . . . . . . . . . . . . . . 15
Selecting a Ring Tone . . . . . . . . . . . . . . . . . . . . . . . . . . . . . . . . . . . . . . . . . . . . . . . . . . . . . . 15
Accessing Call Lists . . . . . . . . . . . . . . . . . . . . . . . . . . . . . . . . . . . . . . . . . . . . . . . . . . . . . . . 16
Accessing Voice Mail . . . . . . . . . . . . . . . . . . . . . . . . . . . . . . . . . . . . . . . . . . . . . . . . . . . . . . 16
3 Using UC Server Features . . . . . . . . . . . . . . . . . . . . . . . . . . . . . . . . . . . . 17
Using the UC Server Call Feature Access Codes . . . . . . . . . . . . . . . . . . . . . . . . . . . . . . . . .
Parking Calls and Picking up Parked Calls . . . . . . . . . . . . . . . . . . . . . . . . . . . . . . . . . . . . . .
Picking up Calls Ringing at Another Extension . . . . . . . . . . . . . . . . . . . . . . . . . . . . . . . . . . .
Using the UC Server Conference Bridge . . . . . . . . . . . . . . . . . . . . . . . . . . . . . . . . . . . . . . .
Queuing Calls . . . . . . . . . . . . . . . . . . . . . . . . . . . . . . . . . . . . . . . . . . . . . . . . . . . . . . . . . . . .
Paging . . . . . . . . . . . . . . . . . . . . . . . . . . . . . . . . . . . . . . . . . . . . . . . . . . . . . . . . . . . . . . . . . .
17
20
21
22
23
25
1
Grandstream BudgeTone-200 SIP Phone
Overview
This document is designed to outline the features and functions of the Grandstream
BudgeTone-200 SIP in relation to the Objectworld Unified Communications
Server™. This chapter covers the following topics:
• Overview
• Display Features
• Key Descriptions
1.1 Overview
This document is not intended to replace the Grandstream BudgeTone-200 SIP
Phone User Manual. For more detailed information about the product, particularly
its operation in the absence of UC Server, please refer to the Grandstream User
Manual.
NOTE: For information on using your telephone mailbox see the Quick
Reference Card available on the Objectworld web site at
www.objectworld.com/support/documentation.
1.2 Display Features
The BT-200 phone has a numeric LCD of 64 mm x 24 mm size with backlight. This
model has a small, red LED status reminder. Here is the display when all segments
illuminate:
Objectworld Unified Communications Server
1
1 Grandstream BudgeTone-200 SIP Phone Overview
When the phone is in the normal idle state, the backlight is off. When a call occurs,
the backlight turns on automatically to bring to the user’s attention. In addition, if
Voice Mail is configured and there is a voice mail message waiting, the blinks to
remind users there is a voice mail in the Voice Mail server.
Icon
LCD Icon Definitions
Connectivity Status / SIP Proxy/Server Icon
Off – IP address of SIP server is not found
On – IP address of SIP server are located
Blinking – Ethernet link failure or the phone is not registered properly
Phone Status Icon
Off – When the handset is on-hook
On – When the handset is off-hook
Speakerphone Status Icon
Flash – When phone rings
Off – When the speakerphone is off
On – When the speakerphone is on
Handset and Speakerphone / Headset Volume Icon
0-7 scales to adjust handset / speakerphone volume
Real–time Clock
Synchronized to Internet time server
Time zone configurable via web browser
AM/PM indicator
Call Logs
01-10 for CALLED history (dialed number)
01-10 for CALLERS history (Incoming caller ID)
Time Icon
AM for the morning
PM for the afternoon
IP Address Separator Icon
2
Objectworld Unified Communications Server
Key Descriptions
Icon
LCD Icon Definitions
Numerical Numbers and Characters:
0-9
*=+
#=+
A, b, C, c, d, E, F, G, g, H, h, I, L, n, O, o, P, q, r, S, t, U, u, Y
1.3 Key Descriptions
Key Button
Key Button Definitions
0 - 9, *, #
Digit, star and pound keys are usually used to make phone calls
1. Reduce handset, speakerphone/headset volume after off hook the phone via handset
or speaker
2. Reduce ring tone volume when phone in IDLE and off hook to confirm the changed
ring tone volume
3. Next menu item browsing when phone is in IDLE mode after MENU key pressed, off
hook to interrupt and exit
Objectworld Unified Communications Server
3
1 Grandstream BudgeTone-200 SIP Phone Overview
Key Button
Key Button Definitions
1. Increase handset, speakerphone/headset volume after off hook the phone via
handset or speaker
2. Increase ring tone volume when phone in IDLE and off hook to confirm the changed
ring tone volume
3. Previous menu item browsing when phone is in IDLE mode after MENU key pressed,
off hook to interrupt and exit
MENU
Enter keypad MENU mode when phone is in IDLE mode.
It is also the ENTER key once entering MENU
CALLED
After off hook, press to display the dialed numbers. When number displayed, pressing
the SEND key can make call using that displayed number.
CALLERS
After off hook, press to display the incoming Caller IDs. When number displayed,
pressing the SEND key can make call using that displayed number.
MESSAGE
Enter to retrieve voice mails from Voice Mail Portal or Server
HOLD
Temporarily hold the active call
TRANSFER
Transfer the active call to another party
CONFERENCE
Establish 3-way conferencing call
FLASH
Flash event to switch between two lines
MUTE/DEL
Mute an active call; or Delete a key entry
Also used to ‘REJECT’ incoming call.
SEND
/(RE)DIAL
Dial a new number entered or Redial the number last dialed. After entering the phone
number, pressing this key forces a call to go out immediately before timeout.
SPEAKER
Enter hands-free mode using the speakerphone
4
Objectworld Unified Communications Server
2
Using BudgeTone-200 Features
This chapter outlines the features that are available on the Grandstream BudgeTone200 SIP telephone. UC Server supports all the telephone features that are outlined in
this chapter, unless otherwise noted. For more information on the BT200 keys see:
UC Server supports the following main features of the Grandstream BudgeTone-200
SIP listed below, unless otherwise noted.
•
•
•
•
•
•
•
•
•
•
•
•
•
•
Using the BT200 Call Feature Access Codes
Making Calls
Answering Calls
Holding and Resuming Calls
Muting and Unmuting Calls
Conferencing
Transferring Calls
Ending Calls
Redialing
Forwarding Calls
Changing the Volume
Selecting a Ring Tone
Accessing Call Lists
Accessing Voice Mail
2.1 Using the BT200 Call Feature Access Codes
To access various call features, key press sequences are provided by the BudgeTone200 phone.
NOTE: The Grandstream feature access codes listed below are
disabled by default, due to a conflict with one of the UC Server feature
access codes. Therefore, the codes below will only work if the system
administrator has enabled the Grandstream feature access codes.
Objectworld Unified Communications Server
5
2 Using BudgeTone-200 Features
The BT200 phone supports a number of call features including:
• Block Caller ID (or Anonymous Call)
• Call Waiting (Disable/Enable)
• Call Forwarding all Calls, when Busy, or when Delayed
BT200 Call Features
Key Codes Examples and Notes
Block Caller ID (for all subsequent calls)
*30
Send Caller ID (for all subsequent calls)
*31
Block Caller ID (per call)
*67
Send Caller ID (per call)
*82
Disable Call Waiting (per Call)
*70
Enable Call Waiting (per Call)
*71
Forward all Calls
Forwards all calls unconditionally.
*72 +
To forward all calls to extension 300:
Forward
1. Dial:
Number + # *72
2. At the dial tone, dial:
300
3. Press #
4. At the dial tone, hang up.
Cancel Forwarding all Calls
Cancels forwarding all calls unconditionally.
*73
Forward Calls when Busy
*90 +
To forward calls when busy to extension 300:
Forward
1. Dial:
Number + # *90
2. At the dial tone, dial:
300
3. Press #
4. At the dial tone, hang up.
Cancel Forwarding Calls when Busy
*91
6
Note: This feature code conflicts with the Call
Queuing feature code of UC Server. Therefore,
your system administrator may have changed
the Send Caller ID feature code number. See
your system administrator for more information.
1. Dial:
*73
2. At the dial tone, hang up.
1. Dial:
*91
2. At the dial tone, hang up.
Objectworld Unified Communications Server
Making Calls
BT200 Call Features
Key Codes Examples and Notes
Forward Calls when Delayed
*92 +
To forward calls when delayed to extension 300:
Forward
1. Dial:
Number + # *92
2. At the dial tone, dial:
300
3. Press #
4. At the dial tone, hang up.
Cancel Forwarding Calls when Delayed
*93
1. Dial:
*93
2. At the dial tone, hang up.
2.2 Making Calls
For information on making calls, see the following sections:
• Handset, speakerphone and headset mode
• Making a call using a phone number
• Making a call using an IP address
Handset, speakerphone and headset mode
The regular Handset mode can be switched with either the Speaker mode (Hand
free) or the Headset mode, however, whenever the Headset is plugged in, Speaker
mode will be switched to the Headset mode automatically.
Speakerphone status
icon
To switch between Handset and Speakerphone/Headset
• Press the Hook Flash in the Handset cradle or the SPEAKER button.
Making a call using a phone number
There are several ways to make phone calls:
To make a call
• Pick up the handset or press the SPEAKER button, and then enter the phone
number.
TIP: If you make a mistake dialing a number, press MUTE/DEL to
delete the last digit entered.
Objectworld Unified Communications Server
7
2 Using BudgeTone-200 Features
Other methods of placing calls are:
• Press the SEND button to redial the last number called.
Once pressed, the last dialed number is displayed on the LCD as the
corresponding DTMF tones are played out and an outgoing call is sent.
• Browse the CALLED/CALLER history and press the SEND/REDIAL
button.
Pick up the handset or press the SPEAKER button, then press the CALLED/
CALLERS button to browse through the last 10 numbers dialed. Once the
desired number is identified and displayed on the LCD screen, press the SEND
button and a new call to that displayed number is sent out immediately.
Examples:
• To dial another extension on the same proxy, such as 1008, pick up the handset or
press SPEAKER, dial 1008 and then press the SEND button.
• To dial a PSTN number such as 6266667890, you might need to enter in some
prefix number followed by the phone number. Check with your VoIP service
provider to get the information. If you phone is assigned with a PSTN-like
number such as 6265556789, most likely you follow the rule to dial
16266667890 as if you were calling from a regular analog phone, followed by
pressing the SEND button.
Making a call using an IP address
Direct IP calling allows two parties, that is, a BudgeTone phone and another VoIP
device, to talk to each other in an ad hoc fashion without a SIP proxy. This kind of
VoIP call can be made between two parties if:
• Both the BudgeTone phone and other VoIP Device (that is, another IP Phone or
BudgeTone SIP phone or other VoIP unit) have public IP addresses, or
• Both the BudgeTone phone and other VoIP Device are on the same LAN using
private or public IP addresses, or
• Both the BudgeTone phone and other VoIP Device can be connected through a
router using public or private IP addresses (with necessary port forwarding or
DMZ).
This model has the ability to dial an IP address under the same LAN segment by
simply pressing the last octet in the IP address.
In the Advanced Settings page there is an option "Use Quick IP-call mode", which
by default it is set to NO.
When this option is set to YES, and #XXX is dialed, where X is 0-9 and XXX
<=255, the phone makes a direct IP call to aaa.bbb.ccc.XXX where aaa.bbb.ccc
comes from the local IP address REGARDLESS of the subnet mask.
#XX or #X are also valid so the leading 0 is not required, but is okay.
For example:
8
Objectworld Unified Communications Server
Making Calls
192.168.0.2 calling 192.168.0.3 just dial #3 follow by SEND or #
192.168.0.2 calling 192.168.0.23 just dial #23 follow by SEND or #
192.168.0.2 calling 192.168.0.123 just dial #123 follow by SEND or #
192.168.0.2 dial #3 and #03 and #003 has same effect --> call 192.168.0.3
NOTE: If you have a SIP Server configured, Direct IP to IP calls will
work. However, if you are using STUN, Direct IP to IP calls will also
use STUN. Alternatively, follow the instructions below to make a direct
IP to IP call.
To make a direct IP to IP call
1 With the phone off hook, press the MENU key.
2 Enter a 12-digit target IP address to make the call.
3 If the port is not the default 5060, then destination ports can be specified by
using “*4” (encoding for “:”) followed by the port number.
Examples:
• If the target IP address is 192.168.0.10, the dialing convention is
MENU_key 192 168 000 010
followed by pressing the SEND key or wait for seconds in the No Key Entry
Timeout.
• If the target IP address/port is 192.168.1.20:5062, then the dialing convention
would be:
MENU_key 192168001020*45062
followed by pressing the SEND key wait for seconds in the No Key Entry
Timeout.
Quick IP Call Mode
The BT200 also supports Quick IP call mode. This enables the phone to make direct
IP-calls, using only the last few digits (last octet) of the target phone’s IP-number.
This is possible only if both phones are in under the same LAN/VPN. This simulates
a PBX function using the CMSA/CD without a SIP server. Controlled static IP usage
is recommended.
To enable Quick IP calls, the phone has to be setup first, through the web-setup
function.
Objectworld Unified Communications Server
9
2 Using BudgeTone-200 Features
To set up the phone to make Quick IP calls
1 Access the web-setup function.
2 In the Advanced Settings page, set the Use Quick IP-call mode to YES. When
#xxx is dialed, where x is 0-9 and xxx <=255, a direct IP call to
aaa.bbb.ccc.XXX is completed. “aaa.bbb.ccc” is from the local IP address
regardless of the subnet mask. The numbers #xx or #x are also valid. The
leading 0 is not required, but is okay.
For example:
192.168.0.2 calling 192.168.0.3 -- dial #3 follow by SEND or #
192.168.0.2 calling 192.168.0.23 -- dial #23 follow by SEND or #
192.168.0.2 calling 192.168.0.123 -- dial #123 follow by SEND or #
192.168.0.2: dial #3 and #03 and #003 results in the same call -- call 192.168.0.3
NOTE: If you have a SIP Server configured, a Direct IP to IP still
works. If you are using STUN, the Direct IP to IP call also uses STUN.
Configure the Use Random Port to NO when completing Direct IP
calls.
2.3 Answering Calls
NOTE: To forward an incoming call directly to voice mail, press MUTE/
DEL to reject the call and forward it to voice mail.
To answer a call
• Pick up the handset to answer the call normally.
TIP: Alternatively, press the SPEAKER button to answer a call in
either speakerphone or headset mode.
Using call waiting to answer a call
If call waiting is enabled, then while you are on a call, you will hear a stutter tone if
there is another incoming call.
To answer an incoming call while on another call
1 Press the FLASH button to put the current caller on hold and switch to the other
call.
2 Press the FLASH button again to toggle between two active calls.
10
Objectworld Unified Communications Server
Holding and Resuming Calls
2.4 Holding and Resuming Calls
To place a call on hold
• While on a call, press the Hold button to put the remote end on hold.
To resume a call on hold
• Press the Hold button again to release the previous Hold state and resume
the call.
To park a call at a selected park number
1 Press the FLASH button.
NOTE: If your phone has more than one identity assigned to it, then
Transfer the call instead of putting it on hold.
2 Dial *99.
3 Enter the number that you want to use as the park number.
The hold position is used by the person who answers the parked call. For
example, if you enter 1234, then the call is parked at 1234, and can be picked
up at 1234.
4 Press DIAL.
The call is removed from the hold position, and put in the park position.
To answer a parked call
1 Typically, a company announcement informs you that a call is on hold for you.
2 Dial *98.
The system prompts you for the park hold position.
3 Dial the number of the park hold position.
The system disconnects the current call and presents a new call.
4 Answer the new call to speak to the parked caller.
NOTE: If nobody answers the parked call, the call rings the extension
that originally put the call on system park.
2.5 Muting and Unmuting Calls
You can mute an active call so that the other party cannot hear you.
Objectworld Unified Communications Server
11
2 Using BudgeTone-200 Features
To mute a call
1 Press MUTE/DEL to mute a call.
2 Press MUTE/DEL again to resume the conversation.
NOTE: When dialing a number, pressing MUTE/DEL deletes the last
digit entered. When receiving an incoming call, pressing MUTE/DEL
rejects the call and forwards it to voice mail.
2.6 Conferencing
The BudgeTone 200 phone supports a 3-way conference. Follow the instructions
below if you are on a call with one party, and you wish to bring a second party into
the call as a conference call.
To initiate a conference call
1 Press the CONFERENCE button.
This puts the first party on hold and gets a dial tone.
2 Dial the number for the second party, and then press SEND to make the call.
3 If the second party answers the call, then press the CONFERENCE button to
bring both parties into the conference.
4 If the second party does not answer the call, then press FLASH to resume the
call with the first party.
NOTE: During the conference, if either party drops the call, then the
remaining two parties can continue talking. However, if the conference
initiator hangs up, then all calls are terminated.
NOTE: For information on the UC Server conference bridge see
“Using the UC Server Conference Bridge” on page 22.
2.7 Transferring Calls
Two transfer operations are supported, blind and attended transfers.
Blind Transfer
Transfers an active call to a third party without announcing
the call.
Attended Transfer Transfers an active call to a third party with an
announcement.
12
Objectworld Unified Communications Server
Ending Calls
To transfer a call blindly
1 Press the TRANSFER button.
If the other voice channel is available (that is, there is no other active
conversation besides the current one), you will hear a dial tone.
2 Dial the third party’s phone number then press SEND.
NOTE: The Enable Call Feature has to be configured to Yes in the
Web configuration page in order to make this feature work.
You can hold on to the phone and wait for one of the three following behaviors:
• A quick confirmation tone (temporarily using the call waiting indication tone)
followed by a dial tone. This indicates the transfer was successful. You can hang
up or make another call.
• A quick busy tone followed by a restored call (on supported platforms only). This
means the transfer failed due to the failed response sent from the server, and the
phone will try to recover the call. The busy tone indicates to the transferrer that
the transfer has failed.
• Busy tone keeps playing. This means the phone has failed to receive the final
response and has timed out. This does not indicate the transfer has been
successful, nor does it indicate the transfer has failed.
To make an attended transfer
1 Press the FLASH button.
You will hear a dial tone.
2 Dial the third party’s phone number then press the SEND button.
3 If the call is answered, speak to the recipient, and then press TRANSFER to
complete the transfer and hang up.
4 If the call is not answered, press the FLASH button to resume the original call.
NOTE: When an attended transfer fails, if you hang up, the BudgeTone
phone rings you back again to remind you that the caller is still on the
call. Pick up the phone to restore conversation with the caller.
2.8 Ending Calls
To end a call
• To end a call, hang up the phone.
Phone status icon
The phone status icon on the display will be off, when the handset is on-hook.
Objectworld Unified Communications Server
13
2 Using BudgeTone-200 Features
To end a call on speakerphone
• Press the SPEAKER button.
2.9 Redialing
To redial the last number dialed
• Press the SEND button.
2.10 Forwarding Calls
NOTE: The Grandstream call feature codes are disabled by default.
Only if the call feature codes have been enabled by your system
administrator will the call forwarding features work as per the
instructions below. If the Grandstream call feature codes are enabled,
then you can forward all calls, or forward only those calls when busy or
delayed.
To forward all calls
1 Dial *72.
2 At the dial tone dial the number that you want to forward your calls to.
3 Press #.
4 At the dial tone hang up.
To cancel forwarding all calls
1 Dial *73.
2 At the dial tone hang up.
To forward calls when busy
1 Dial *90.
2 At the dial tone dial that the number that you want to forward your calls to.
3 Press #.
4 At the dial tone hang up.
To cancel forwarding calls when busy
1 Dial *91.
2 At the dial tone hang up.
14
Objectworld Unified Communications Server
Changing the Volume
To forward calls when delayed
1 Dial *92.
2 At the dial tone dial the number that you want to forward your calls to.
3 Press #.
4 At the dial tone hang up.
To cancel forwarding calls when delayed
1 Dial *93.
2 At the dial tone hang up.
To forward an incoming call directly to voice mail
• When receiving an incoming call, press MUTE/DEL to reject the call and
forward it to voice mail.
2.11 Changing the Volume
Use the arrow keys to adjust the volume.
To change the ring tone volume when the phone is idle
Handset and
Speakerphone/Headset
• Press the arrow keys up or down to adjust the ring tone volume from 0 (off)
volume icon
to 7 (maximum).
To adjust the handset, speakerphone, and headset volume when on a
call
• Press the arrow keys up or down.
On the phone display the volume icon shows a 0-7 volume scale.
2.12 Selecting a Ring Tone
Different ring tone options are available from the BT200 phone menu. You may
want to select a different ring tone to distinguish between your phone and a coworker’s phone when ringing.
To select a ring tone
1 Press the MENU button.
2 Press the arrow keys to select option 10 ring 0.
3 Press MENU to hear the selected ring tone.
4 Press the arrow keys to select a ring tone.
Objectworld Unified Communications Server
15
2 Using BudgeTone-200 Features
5 Press MENU to confirm the selection.
2.13 Accessing Call Lists
You can view a list of numbers previously dialed. You can also view a list of callers.
To view a list of dialed numbers
1 Take the phone off hook.
2 Press CALLED to display the dialed numbers.
3 To call a displayed dialed number, press SEND.
To view a list of callers
1 Take the phone off hook.
2 Press CALLERS to display a list of incoming Caller IDs.
3 To call a displayed number, press SEND.
2.14 Accessing Voice Mail
To access voice mail
• When BudgeTone-200 is on-hook, press the MESSAGE button to retrieve
voice mails.
The MWI (Message Waiting Indicator) LED flashes in red when the voice mail
server sends the message waiting information to BudgeTone-200.
16
Objectworld Unified Communications Server
3
Using UC Server Features
This chapter outlines the phone features that are available with UC Server. The UC
Server call feature access codes are summarized in the following section:
• Using the UC Server Call Feature Access Codes
UC Server supports the following features listed below.
•
•
•
•
•
Parking Calls and Picking up Parked Calls
Picking up Calls Ringing at Another Extension
Using the UC Server Conference Bridge
Queuing Calls
Paging
3.1 Using the UC Server Call Feature Access Codes
To access various call features, key press sequences are provided by UC Server.
NOTE: Some features may be unavailable depending on the particular
system configuration. See your system administrator for more
information.
UC Server Call Features
Key Codes
Examples and Notes
Transferring Calls
*86 + extension To transfer to extension 300’s voice mail,
Transfer a call to another user’s voice mail
dial:
Allows you to transfer a current call to
*86300
another user’s voice mail/PA/PBA service.
This features is useful when the intended
recipient is away from their desk or out of the
office.
Note: The extension dialed must be at least
3 digits long.
Objectworld Unified Communications Server
17
3 Using UC Server Features
UC Server Call Features
Key Codes
Examples and Notes
Transfer a call to a call queue
Use this feature to transfer a caller to a
preconfigured departmental call queue.
If no agents logged into the queue are
available to take the call, the caller is put on
hold until an agent is available.
*80 + queue#
To enter queue 500, dial:
*80500
To transfer a caller to queue 500:
1. Press Transfer
2. Dial *80500
3. Press Send
Queuing Calls
Log into a call queue
Allows you to start receiving calls for the
specified queue.
*81 + queue#
To login as an agent to receive calls directed
to queue 500, dial:
*81500
Log out of a call queue
Allows you to stop receiving calls for the
specified queue.
*82 + queue#
To logout as an agent to no longer receive
calls for queue 500, dial:
*82500 Note: If you are using a Grandstream
phone, then this feature code may conflict
with the Caller ID feature code of
Grandstream, if your system administrator
has enabled the Grandstream feature
access codes. If this is the case, then your
system administrator may have changed the
Log out of a call queue feature code number.
See your system administrator for more
information.
Temporarily Stop Accepting Queued Calls
Temporarily makes yourself unavailable for
accepting queued calls, while not resetting
the longest idle agent status.
*83 + <1 - 9>
Dial:
*83
Press a number from 1 to 9 to indicate your
reason for being unavailable.
Reset agent status to available
Make yourself available again to accept
queued calls
*83 + 0
Dial:
*83
Press “0” at the prompt.
Check agent status in a call queue
Check your agent status to verify whether
you’re currently logged into a call queue,
temporarily unavailable, or currently logged
out of a call queue.
*84 + queue#
To check your agent status in a call queue
with queue number 500, dial:
*84500
18
Objectworld Unified Communications Server
Using the UC Server Call Feature Access Codes
UC Server Call Features
Key Codes
Examples and Notes
Picking up Other Calls
Picking up Calls Ringing at Another
Extension
Ringing call pickup allows you to pickup a
call that is ringing at a different extension.
*78 + extension To pickup a call that is ringing at extension
300, dial:
*78300
*27 + extension To pickup a call that is currently connected to
Pickup a connected call
extension 300, dial:
Connected call pickup allows you to pickup a
*27300
call that is currently connected to a different
extension.
Using the UC Server Conference Bridge
Conference Server
Note: The bridge number must be 4 digits
long.
7050 + bridge# To automatically connect to the conference
server bridge number 1234, dial:
70501234
Conference Server - Prompt Caller
This feature is used for external callers to
connect to a conference bridge.
7050
To connect to the conference server, dial:
7050
You will then be prompted to enter a bridge
number.
Parking Calls and Picking up Parked Calls
*99 + park#
Park a call using a specific park number
Allows you to park a call so that you can
pickup the call using a different phone. This
feature is useful if you need to switch phones
while on a call.
To park a currently connected call at park
number 1234:
1. Put the current call on hold.
2. Establish a new call.
3. Dial *991234
The call is automatically parked at 1234.
Park a call at a park number selected by UC *99
Server
This feature is the same as above, except
that the call is parked at a number chosen by
UC Server instead of you choosing the
number to park the call.
This is useful if you are uncertain whether
another call has already been parked at a
particular number.
To park a currently connected call:
1. Put the current call on hold.
2. Establish a new call.
3. Dial *99.
The system will tell you what number the call
is parked at.
Pickup a parked call
Enables a user to pick up a parked call
To pickup a call parked at 1234, dial:
*981234
Objectworld Unified Communications Server
*98 + park#
19
3 Using UC Server Features
UC Server Call Features
Key Codes
Paging
Examples and Notes
Contact your system administrator for
instructions on sending recorded pages.
Sending a Live Page
You can send a live page.
*72
To send a live page
1. Dial *72 (or *PA)
2. After you hear the tone, begin speaking.
3. When you are finished with the page, hang
up or use the end call function on your
phone.
3.2 Parking Calls and Picking up Parked Calls
You can park an active call, and then have the parked call picked up on another
phone. This feature is useful if you want to change phones during a call.
NOTE: Call park/pickup is a feature that must be enabled by your
system administrator for use on your phone.
There are two methods of parking calls. In one method, UC Server selects the next
available park number. Alternatively, you can select your own park number. Having
UC Server select the park number is useful if you are uncertain whether a call is
already parked at a particular number.
If more than one identity (for example, more than one extension number) is assigned
to your phone, then transfer the call rather than putting the active call on hold.
NOTE: If a person whose call has been parked then puts the call on
hold, the person retrieving the parked call will hear dead air or silence
until the other party resumes the call.
To park a call at the next available park number
1 Put the current call on hold.
NOTE: If your phone has more than one identity assigned to it, then
Transfer the call instead of putting it on hold.
2 Dial *99.
3 Note the hold position that plays over the telephone.
The hold position is used by the person who answers the parked call. UC Server
selects the park number for the caller starting at 1, or the next available higher
number.
20
Objectworld Unified Communications Server
Picking up Calls Ringing at Another Extension
4 Press DIAL.
The call is removed from the hold position, and put in the system park position.
To park a call at a selected park number
1 Put the current call on hold.
NOTE: If your phone has more than one identity assigned to it, then
Transfer the call instead of putting it on hold.
2 Dial *99.
3 Enter the number that you want to use as the park number.
The hold position is used by the person who answers the parked call. For
example, if you enter 1234, then the call is parked at 1234, and can be picked
up at 1234.
4 Press DIAL.
The call is removed from the hold position, and put in the park position.
To answer a parked call
1 Typically, a company announcement informs you that a call is on hold for you.
2 Dial *98.
The system prompts you for the park hold position.
3 Dial the number of the park hold position.
The system disconnects the current call and presents a new call.
4 Answer the new call to speak to the parked caller.
NOTE: If nobody answers the parked call, the call rings the extension
that originally put the call on system park.
3.3 Picking up Calls Ringing at Another Extension
Ringing call pick up allows you to answer other ringing telephones, which means
that you no longer have to run to answer another person’s telephone. You can divert
a ringing call from another telephone, typically within earshot, to your own
telephone to answer.
To use ringing call pick up, you must know the extension of the phone that is
ringing.
Objectworld Unified Communications Server
21
3 Using UC Server Features
This feature also allows for night bell support. Many small companies have an
audible bell that rings after business hours. Night bell support can also allow
employees to contact security after hours. This feature can allow employees, for
example on manufacturing floors, who are not stationed at a particular desk to
answer any telephone.
NOTE: To use ringing call pick up, your phone must be configured to
receive incoming calls. Make sure that such features as call
forwarding and do not disturb are not enabled on the phone.
To answer a call on another user’s phone
1 When you hear a phone that you want to answer, dial *78<Extension>.
Make sure that you dial, on your own phone, *78 plus the extension of the
phone that is ringing.
2 If the phone has stopped ringing by the time you dial the *78 code, the system
prompts you to enter your pickup ID.
NOTE: If the pickup ID that you enter is invalid, the system prompts
you with “That is not a valid pickup ID,” and asks you to enter a valid
pickup ID.
3.4 Using the UC Server Conference Bridge
UC Server has the ability to support a limited-sized conference bridge application.
The number of participants is limited to the number of licenses available, however
additional conference expansion licenses can be purchased. Use your SIP phone
during the conference to access several options, such as muting or adding
participants.
To access the conference bridge
1 From an internal telephone, dial 7050.
TIP: You can also dial 7050 to access the conference bridge from the
dial by extension or dial by name directory.
2 Enter the 4-digit conference ID.
3 Follow the prompts to access the conference bridge.
TIP: To access the list of options, you can press * while the
conference is in progress.
22
Objectworld Unified Communications Server
Queuing Calls
Conference option list
When you press * during a conference, the following options are available. The
available options depend on at which point during the conference you press *. Only
relevant options are available.
• Press 1 to mute yourself. Response: “You are now muted.”
• Press 2 to unmute yourself. Response: “You are now unmuted.”
• Press 3 to disable entry and exit notifications. Response: “Entry and exit
notifications have been disabled.”
• Press 4 to mute all other participants. Response: “All others have been muted.”
NOTE: When you press 4 to mute all participants, this does not apply
to new callers who join the conference. To mute new callers, press 4
again.
• Press 5 to unmute all other participants. Response: “All others have been
unmuted.”
• Press 7 to toggle between closing and opening the conference to additional
participants. Response: “The conference is now closed to additional
participants.” Response: “The conference is now reopened to additional
participants.”
• Press 9 to end the conference.
• Press 0 to report the number of participants. Response: “Including yourself, there
are x participants.”
• Press # to return to the conference.
3.5 Queuing Calls
Call queuing allows callers to remain in a queue while they wait for their call to be
answered. If callers know the queue number, they can dial directly into the queue.
The company agent is typically associated with a particular area of expertise, for
example, sales or support. A support agent who is ready to answer calls can log into
the support agent queue and receive support calls in order of arrival. Call queuing
allows calls to be distributed evenly among the agents that are logged into the queue.
For more information on queuing calls see the following sections:
• Logging in and out of a call queue
• Temporarily stop accepting queued calls
• Checking your agent status in a call queue
Objectworld Unified Communications Server
23
3 Using UC Server Features
Logging in and out of a call queue
NOTE: The call queuing codes, in particular, the code to Log out of a
call queue (*82) conflicts with one of the Grandstream feature codes,
Send Caller ID. Therefore your system administrator may have
changed the call queuing codes from their default values listed below.
For more information see your system administrator.
To log in to a queue as an agent
1 Dial *81<QueueNumber>.
2 Hang up.
To log out of a queue as an agent
1 Dial *82<QueueNumber>.
As previously noted, your system administrator may have changed the code
number from the default value of *82. For more information see your system
administrator.
2 Hang up.
To dial directly into a queue as a caller
1 Dial *80<QueueNumber>.
2 Hang up.
NOTE: Contact your system administrator to obtain the queue number
for your queue.
Temporarily stop accepting queued calls
If you are logged into a queue to accept incoming queued calls, there may be times
when you wish to temporarily stop accepting queued calls, without logging out of
the queue. You can manually set your status to unavailable to prevent accepting
further incoming queued calls, without logging out of the queue.
Temporarily setting your status to unavailable does not change your "longest idle"
position in the agent group. When you make yourself available again by logging
back into the queue, your idle time is based on the time since your last call, including
the time that you were unavailable.
To set your agent status to unavailable
1 Dial *83.
2 Press a number from 1 to 9 to indicate your reason for being unavailable.
24
Objectworld Unified Communications Server
Paging
3 Hang up.
To set your agent status to available
1 Dial *83.
2 Press "0" at the prompt.
3 Hang up.
Checking your agent status in a call queue
You can check your agent status to verify whether you're currently logged into a call
queue, whether your status is set to temporarily unavailable, or whether you're
currently logged out of the call queue.
To check your agent status
1 Dial *84<QueueNumber>.
2 Ensure that you enter the correct queue number.
The system will indicate your current status as:
• Logged in
• The agent is not available, service code <#>
• Not Logged in
3 Hang up.
3.6 Paging
You can send a live page, which allows you to instantly broadcast a page. For
instructions on sending recorded pages, see your system administrator.
NOTE: In order to send a live page, your system administrator must
have enabled access for you to do so. For more information see your
system administrator.
Sending a live page
To send a live page
1 From your phone, dial *72 (or *PA).
2 After you hear the tone, begin speaking.
3 When you are finished with the page, hang up or use the end call function on
your phone.
Objectworld Unified Communications Server
25
Objectworld Unified Communications Server
27