1
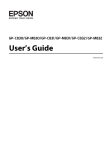
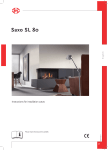
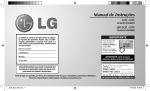
THE PASSION PEOPLE www.magura.com Owner's manual English Thor · Durin · Menja 2012 Contents Introduction Preface..................................4 Legend..................................4 Technical Specifications Specifications.......................6 Dimensions...........................6 Air pressure guidelines.........7 English Safety Intended use.........................8 Basic safety instructions.......8 Installation Installing the suspension forks....................................10 Fit the front wheel...............12 Fit the remote control lever (RCL²)..................................14 SetUp Adjusting the suspension . (air pressure).......................16 Adjusting the damping (rebound damper)...............18 Adjusting the damping (compression damper)........19 On the Road Before each trip..................20 Locking out the suspension forks – DLO²........................21 Locking out the suspension forks – Albert Select+.........21 Reducing the suspension travel – Lift Select...............22 Maintenance After each trip.....................23 Regular................................24 Rules Warranty.............................25 3 Introduction Preface Welcome to the PASSION PEOPLE, Congratulations on your purchase of the latest generation MAGURA suspension forks – developed in Germany. This User Manual is an integral part of your MAGURA product and gives you details of the required tools, correct installation, safe use, maintenance and setup options. Please read this Manual carefully before you install or use your MAGURA product. Always observe and follow all instructions on installation, use and maintenance provided in this Manual and in manuals by third-party manufacturers whose products you use on your bicycle (headset, stem, wheels, brakes, etc.). Remember that the mechanic who installs your MAGURA product is responsible for the suitability and compatibility of all the components technically linked to your MAGURA product. Failure to observe the instructions in this Manual can lead to serious or fatal accidents. Legend )) The pointing finger prompts you to perform an action. ÎÎ The arrow shows results or requirements. LLThis notice gives you additional information or tips. This notice warns you about a dangerous situation which can lead to serious or fatal injury if not avoided. This notice warns you about a dangerous situation which can lead to minor or slight injury if not avoided. This notice warns you about the risk of material damage. 4 THE PASSION PEOPLE www.magura.com Introduction The figures in this Manual may differ slightly from your MAGURA product, however, the required steps are the same for all types and variants – if not stated to the contrary. The type name (1) and variant (2) of your MAGURA suspension forks are located on the sliders on the lower leg (fig. 1). Please note that the geometry and riding behaviour of your bicycle may change due to installing new suspension forks. During the first few rides using your new MAGURA suspension forks, familiarize yourself with those characteristics of your bicycle (cornering, sag, braking, etc.), which may have changed. 1 2 Visit www.magura.com for more tips and information on your MAGURA product. You can also exchange experiences, ask questions and generally "talk shop" with many PASSION PEOPLE members on the MAGURA Forum. We wish you great success and a great ride Your MAGURA Team 1 5 English Keep this Manual for other users of your MAGURA product. Make sure that each user reads, understands and observes this Manual. If you sell or give away your MAGURA product, be sure to hand over this manual to the new owner. Technical Specifications LLSome of the features detailed are optional variants. Your MAGURA suspension forks are equipped as designed by your dealer or the bicycle manufacturer. Specifications Thor Type name T150 Lift Select -20 % Variant Suspension travel reduction, approx.* T140 Durin SL SL120 SL100 – Suspension Air pressure max. bar (psi) Damping Pressure level control Applications Total weight max.** Albert Select+ • DLO² AllMountain Albert SL Thor Durin SL kg (lb) Durin Race SL80 R120 R100 R80 Lift Select -30 % Air 10 (150) Oil Albert Select+ • DLO² XC Race 130 (287) Durin X X120 X100 Menja X80 M100 M85 – DLO² XC, XC Race XC Durin X Menja Dimensions Type name T150 T140 SL120 Durin Race SL80 R120 R100 R80 X120 X100 X80 M100 M85 1⅛" • 1⅛"/1.5" tapered • 1.5" 1⅛" (fig. 3) Steerer (A) mm 255 mm (in) 150 (5.9) 140 (5.5) 120 (4.7) 100 (3.9) 80 (3.1) 120 (4.7) 100 (3.9) 80 (3.1) 120 (4.7) 100 (3.9) 80 (3.1) 100 (3.9) 85 (3.3) Suspension travel (B) mm ±3 530 520 493 473 453 493 473 453 493 473 453 473 458 Height (C) Rim brake bridge – Cantilever Cantilever • FIRM-tech Disc brake bridge Postmount 7" Postmount 6" IS 2000 Ø Brake disc min.–max. mm 180–210 160–210 Tire dimension max. 26 × 2.6 26 × 2.4 mm 100 Installation dimens. hub (D) Maxle™ Quick release system Maxle™ (15 mm) QR (9 mm) (15 mm)• QR (9 mm) QR(9 mm) Variant SL100 * Depending on the air pressure. ** Maximum permitted total weight = rider + bicycle + luggage 6 THE PASSION PEOPLE www.magura.com Technical Specifications 1⅛" 1⅛"/1.5" tapered 1.5" Ø 28,6 mm Ø 38,1 mm Ø 30,0 mm Ø 39,8 mm Ø 39,8 mm English Ø 28,6 mm A B 3 Air pressure guidelines LLNote that the air pressure values detailed here are guidelines that can be adjusted to reflect your personal style of riding and preferences and the characteristics of the route – see Adjusting the suspension (air pressure), page 16. C Rider's weight D 2 kg 50–59 60–69 70–79 80–89 90–99 100–109 110–120 120–130 lb 110–124 125–149 150–174 175–199 200–224 225–249 250–274 275–286 Air pressure bar (± 0.5) 3.0–3.4 3.5–3.9 4.0–4.4 4.5–4.9 5.0–5.6 5.7–6.3 6.4–7.0 7.0–7.5 psi (± 7) 44–48 49–57 58–64 65–73 74–83 84–94 96–104 106–109 7 Safety Intended use Any use other than the intended use can lead to accidents that cause serious or fatal injury. MAGURA suspension forks are designed and intended only –– for installation on standard, commercially available bicycles designed for 26" wheels. –– for use with a 26" front wheel and the specified quick release system – see Dimensions, page 6. –– for use with the specified brake system – see Dimensions, page 6. –– for the specified application – see Specifications, page 6. –– for the maximum permissible total weight – see Specifications, page 6. MAGURA suspension forks must never be used in combination with front wheel motors! Basic safety instructions Always remember that riding a bicycle entails risk both for the rider and other road users, and for the bicycle and its components. Despite the use of safety gear and complete safety equipment, accidents that cause serious or fatal injury can occur. Always use your common sense and avoid any unreasonable actions! Installation & Maintenance Danger of accident due to damaged suspension forks caused by incorrect or impermissible installation work. –– Never overestimate your technical capabilities. Commission a bicycle workshop or an authorized MAGURA service centre with all installation and maintenance work. This is the only place where you are guaranteed correct implementation. –– Never make changes to your MAGURA product (e.g. tapping thread on the steerer, milling the disc brake bridge, removing the hanger on the drop- outs, drilling, painting, etc.). –– Always observe all min./max. values stated – see Technical Specifications, page 6. –– For assembly steps that require a specific tightening torque for a screw union, always use a torque wrench set up for the required torque. –– Always maintain your bicycle in technically perfect working order. Danger of accidents due to improper accessories. –– Always use MAGURA original parts and lubricants. –– Never install mounting clips, luggage carriers, mudguards or similar on your MAGURA suspension forks. . If needed, fit a MAGURA approved mudguard. 8 THE PASSION PEOPLE www.magura.com Safety On the road Danger of accidents due to component failure. –– Before each trip, make sure that the quick release system on your wheels is fitted correctly and that your wheels will not work loose. –– Before each trip, make sure that the handlebar and stem are correctly fitted and will not twist. –– Before each trip, work the suspension multiple times to make sure that your MAGURA suspension forks are leak tight and show no sign of oil leaks English on screws, sliders and seals, or any other visible mechanical damage. –– Before each trip, make sure that your brakes are working properly and that the brake pad thickness is sufficient. –– Never exceed the maximum permissible total weigh – see Specifications, page 6. –– During riding, avoid uncontrolled hard dipping/bottoming out of your MAGURA suspension forks. –– After a crash, check your MAGURA suspension forks for signs of damage and perfect function. –– Never use your MAGURA suspension forks in case of visible damage, unusual noise, or if you are unsure as to their condition. In this case, have your suspension forks checked in a bicycle workshop or directly by MAGURA Service. Danger of accidents due to improper behaviour or improper equipment during riding. –– Never use your MAGURA suspension forks for downhill, freeride, freestyle applications, or other disciplines that involve jumping with the bicycle, or where extreme loads are to be expected. –– Always observe the traffic regulations in the country where you are riding (lighting, reflectors, etc.) and the local regulations relating to mountain biking. –– When riding, always wear a high quality (e.g. ANSI certified), undamaged helmet and clothing that fits snugly but does not impair your actions. –– Only ride your bibicycle if you are in good physical condition and your bibicycle and all of its components are in perfect working order. Transport & Storage Danger of accident due to damaged components. –– Never transport your bibicycle using vehicle bicycle carriers that require you to secure the fork by its dropout without the front wheel. –– Always install a suitable spacer between the dropouts on your MAGURA suspension forks if you stow your bibicycle with the wheels removed (trans- port bag, carton, etc.) 9 Installation Installing the suspension forks )) Make sure that the frame, headset, stem, and adjusting nut match the steerer on your suspension forks – see Technical Specifications, page 6. V Shortening the steerer S Suspension forks unusable due to over-shortened steerer. A1 –– Measure carefully and check the calculated length before cutting. –– Originally allow for 1 additional spacer – you can always shorten again, but you can't L extend! H A2 1 Correct calculation of length L of your steerer (fig. 4): A1 upper height A2 lower height H Height of steerer (frame) S Total height of spacers 4 V Height (tube clamp) stem L = (A1 + A2 + H + S + V) – 2 mm )) Use a sharp, finely toothed metal saw, or pipe cutter, to shorten the steerer to the required length – deburr. Fitting the headset Damage to the suspension forks. –– When installing the bearing seat and adjusting nut do not rest the suspension forks on the dropouts. Increased bearing wear. –– Make sure that the lower bearing seat lies totally flat and flush against the headset. )) Grease the bearing seat (1) (fig. 5) and steerer contact area. )) Using a suitable installation aid tap the bearing seat into its position on the steerer – rotate the steerer through 5–10° after each tap. 5 10 THE PASSION PEOPLE www.magura.com Installation )) Using a suitable installation aid, tap the adjusting nut carefully and straight into the steerer (fig. 6). Installing the suspension forks 25 mm max.! English )) Install the suspension forks with headset components, spacers and stem. )) Adjust the headset so that it is free of play. )) Align the stem straight. )) Tighten the clamping screws on the stem with the tightening torque stated by the manufacturer. Fit the brake )) Make sure that the front wheel brake dimensions and type match your suspension forks – see Technical Specifications, page 6. LLSecure the front wheel brake with a low tightening torque at first. Granular adjustment and final installation with clean routing and possibly shortening of the brake tubing is performed with the front wheel fitted. 6 Danger of accident due to damaged components. –– Never exceed the maximum tightening torques of the fastening screws: –– Disc brake body (Postmount) max. 10 N·m (89 lbf·in). –– Cantilever brake max. 6 N·m (53 lbf·in). )) Secure the brake tubing for the front disc brake with the tubing guide (fig. 7). )) Tighten the screw on the tubing guide with a tightening torque of max. 2 N·m (18 lbf·in). 7 11 Installation Fit the front wheel 3 )) Make sure that the dimensions and type of the front wheel hub, wheel, quick release system and brake disc match your suspension forks – see Technical Specifications, page 6. )) If applicable mount the brake disc on the front wheel hub. 2 … using traditional quick release Danger of injury on sharp and/or hot brake disc when removing the front wheel. –– Always mount the clamping lever on the front wheel quick release on the right-hand side. LLInstalling the clamping lever on the right can also reduce brake disc squeal. 1 )) Centre the front wheel precisely in the dropouts of your MAGURA suspension forks – check for correct direction of rotation. )) Adjust and close the quick release in line with the manufacturer's manual. 8 … using the Maxle™ thru axle clamping system )) Insert the front wheel into the dropouts (1) on your MAGURA suspension forks – check for correct direction of rotation. )) Open the clamping lever (2) on the Maxle™ axle (OPEN) and place in the groove of the contact plate (3) (fig. 8). )) Push the Maxle™ axle from the right through the dropout and hub axle. Danger of accident due to damaged components. –– Never use tools when installing the Maxle™ axle. –– Never turn the clamping lever in closed state. )) Using the clamping lever, screw the Maxle™ axle clockwise into the left dropout on your suspension forks until it is hand tight. )) Close the clamping lever (CLOSE). clamping lever points horizontally to the rear and you can see the CLOSE mark (fig. 9). LLIf the clamping lever does not point horizontally to the rear, open the lever, turn it – 9 but not the contact plate – horizontally to the front, and close it again. THE PASSION PEOPLE ÎÎ The 12 www.magura.com Installation 4 15–20 kg (33–44 lb) by hand. . If you only sense slight resistance when closing the clamping lever or the clamping lever doesn't leave a clear imprint on your palm, you will need to increase the tension of the Maxle™ thru axle quick release system.. Gradually approach the correct tension by turning the adjusting screw (Allen, SW 2.5 mm) through one click (fig. 10)! )) Open the clamping lever (OPEN). )) Turn the adjusting screw (4) in clockwise direction. ÎÎ The tension of the Maxle™ thru axle quick release system increases. or: )) Turn the adjusting screw (4) in counter-clockwise direction. ÎÎ The tension of the Maxle™ thru axle quick release system decreases. )) Close the clamping lever (CLOSE). LLIf you are unsure as to the correct tension for your Maxle™ thru axle quick release 10 system, ask your bibicycle mechanic for advice. Danger of accident due to front wheel blocking because of faulty installation work. –– Make sure that a minimum gap of at 2 mm exists between rotating parts (hub, fastening screws on the brake disc, etc.) and the suspension forks. Replace the parts if needed. –– Make sure that the brake cable can never touch the tire. –– Make sure that, when fully depressed, your suspension form has a minimum clearance of 6 mm between the tire and the crown. Replace the tire if needed. –– Make sure that the front wheel brake system is correctly fitted and adjusted. Danger of accident due to quick release system failure due to impairment through soiling. –– Whenever you install the front wheel, make sure that the dropouts on your suspension forks and all the parts of your quick release system are clean. 13 English LLYou must be able to close the clamping lever by applying moderate pressure, approx. Installation 3 Fit the remote control lever (RCL²) 7 LLYou will notice that DLO² or Albert Select+ are suitable for remote control because the blue dials are returned to their original position by a return spring if turned by hand. Blue dials that do not have a return spring do not support remote control with RCL²! However, retrofitting is possible at a MAGURA service centre.. Lift Select can be operated both via RCL² and directly. Danger of accident due to faulty installation work. 4 –– Make sure that the RCL² cannot interfere with brake and gear shift actuation and function in any lever position. 2 1 Damage to material due to faulty installation work. 8 11 9 5 6 5 6 9 14 –– Never fit the clamps in the wider area of the handlebar. –– Never exceed the maximum tightening torques. There are 3 different fastening options for the RCL² (fig. 11): –– Standard clamp (1) – for fitting next to the brake lever. –– Standard clamp with spacer (2) and long clamping screw (3) – for fitting next to the brake lever in combination with twist shifters. –– Remote mix clamp (4) – only for direct fitting to brake levers of MAGURA MT Series and HS Series (MAGURA rim brakes) as of model year 2011. LLFit RCL² for Lift Select on the left; and for DLO²/Albert Select+ on the right (fig. 12). )) Define the position of the standard clamp on the handlebar. ÎÎ Make sure that the brake and gear shift actuation and function is not impaired in any RCL² lever position. ÎÎ The lever (5) and return dial (6) on the RCL² must be easily reachable. )) Tighten the clamping screw (7) (3) on the standard clamp with a tightening torque of max. 3 N·m (27 lbf·in). )) Tighten the sleeve nuts (8) on the Remote Mix clamp with a tightening torque of max. 3 N·m (27 lbf·in). 12 THE PASSION PEOPLE www.magura.com Installation Fit the RCL² Bowden cable Danger of accident due to faulty installation work. –– Make sure that the Bowden cables on the RCL² can never interfere with steering. outer sleeve must be laid via the shortest route, without torsion or kinking, between the stops on the (9) RCL² and the crown (fig. 12). )) Shorten the outer sleeve of the Bowden cable with suitable Bowden cable pliers. )) Make sure that the lever on the RCL² is relieved – press the return dial if necessary. )) Feed the inner cable through the RCL², outer sleeve and stop on the crown. )) Make sure that the outer sleeve is firmly seated in the stops. Fit the inner DLO²/Albert Select+ cable (fig. 13): )) Pull the "Albert Select+" adjusting dial off in upward direction or remove the cover on the "DLO²" by unscrewing counter-clockwise. )) Loosen the clamping screw (10) by 2–3 turns. 13 )) Tension the inner cable and insert it into the groove on the rotating dial and under the washer on the clamping screw and hold in place. )) Tighten the clamping screw with a tightening torque of max. 2 N·m (18 lbf·in). )) Trim the inner cable to a length of approx 2 cm after the clamping screw. )) Push the end of the inner cable through the cutout into the inside of the rotating dial. )) Press in the "Albert Select+" adjusting dial or replace the cover on the "DLO²" by screwing it on clockwise. Fit the Lift Select inner cable (fig. 14): )) Loosen the clamping screw (11) (12) by 2–3 turns. )) Tension the inner cable and insert it into the groove on the rotating dial and hold in place. )) Tighten the clamping screw (11) with a tightening torque of max. 2 N·m (18 lbf·in). )) Trim the inner cable to a length of approx. 3 mm after the clamping screw (12). )) Tighten the clamping screw (12) with a tightening torque of max. 2 N·m (18 lbf·in). )) Retension the inner cables after the first 10–20 actuations. 10 12 11 14 15 English ÎÎ The SetUp Before you go for your first ride with your new MAGURA suspension fork, take some time to adjust the suspension and damping to match your personal weight and style of riding. This is absolutely necessary to make best use of your suspension fork's characteristics. Adjusting the suspension (air pressure) LLThe air suspension on your MAGURA suspension forks helps to compensate for 15 uneven terrain and keeps your front wheel in contact with the ground at all times.. Insufficient air pressure causes a pronounced drop, frequent bottoming out and a spongy ride.. Excessive air pressure reduces the maximum suspension travel and provokes a hard response from your suspension forks.. Note that the air pressure values detailed here are guidelines that can be adjusted to reflect your personal style of riding, preferences and seating position, and the characteristics of the route – see Air pressure guidelines, page 7. As a general rule, the higher your weight and speed, and the rougher the terrain, the higher the air pressure will need to be. Material damage due to severe bottoming out caused by insufficient air pressure. –– Never use your suspension forks if there is insufficient or no air pressure. Material damage due to excessive air pressure. 1 –– Never exceed the maximum permissible air pressure of 10 bar (150 psi). Air leaking due to incorrect fitting of the valve cover. –– Never use the suspension forks without a valve cover. –– Always keep the valve cover seals clean. –– Always firmly close the valve cover. )) Make sure that Albert Select+ or DLO² is disabled (off) (fig. 15). )) Make sure that Lift Select is set to the maximum suspension travel (MAX) (fig. 16). )) Remove the valve cover (1) by turning counter-clockwise. 16 16 THE PASSION PEOPLE www.magura.com SetUp 20 )) Shift the lever (3) on the pump head to the upper position (Position A) (fig. 17). )) Screw the union nut (2) on the pump head onto the valve until hand tight (fig. 17). )) Shift the lever (3) on the pump head to the lower position (Position B). 0 A ÎÎ The valve pin is pressed in; the valve is open. can read off the current pressure on the pump pressure gage. )) Adjust the air pressure if needed – see Air pressure guidelines, page 7. LLPushing the ventilation button (4) fully gradually reduces the pressure. Pushing the ventilation button lightly completely evacuates the pressure. )) Shift the lever (3) on the pump head to the upper position (Position A). ÎÎ The valve pin is released; the valve is closed. ÎÎ No loss of pressure when you remove the union nut. )) Remove the union nut. Check the air pressure LLThe negative suspension stroke – or sag – designates the distance by which your suspension forks drops if you apply your own bodyweight to it; this gives you some 17 initial feedback as to whether the air pressure setting is in the right range. )) Push the rubber ring (5) (fig. 18) on the left stanchion right down. )) Make sure that Albert Select+ or DLO² is disabled (off) (fig. 15). )) Make sure that Lift Select is set to the maximum suspension travel (MAX) (fig. 16). )) Mount your bike carefully – don't bob up and down. ÎÎ The suspension sag will depend on your bodyweight. )) Carefully dismount. )) Measure the distance between the rubber ring and the scraper. ÎÎ The sag should be 20–30 % of the total possible suspension travel on your suspension forks – see Dimensions, page 6. )) Increase the air pressure if the sag is above 30 %. )) Reduce the air pressure if the sag is below 20 %. LLTo finely adjust the air pressure in your suspension forks, you will need to go for a trial run on a typical test route. )) Increase the air pressure if the suspension bottoms out more than 1 or 2 times. )) Reduce the air pressure if your suspension forks don't achieve the potential stroke (you can see this by checking the final position of the rubber ring). 18 B 4 3 2 5 sag 20–30 % 17 English ÎÎ You SetUp Adjusting the damping (rebound damper) LLThe rebound damping setting defines the speed at which your MAGURA suspension decompresses. . A high rebound damping setting (+) causes slower decompression thus reducing ground contact and possibly impairing traction and control. . Lower rebound damping (-) causes the front wheel to jump and can thus also impair traction and control. . As a general rule, the higher your bodyweight and speed, and the rougher the terrain, the higher the rebound damping will need to be. )) Make sure that Albert Select+ or DLO² is disabled (off) (fig. 19). )) Start by turning the red adjusting dial counter-clockwise to the stop (-) (fig. 20). )) Turn the red adjusting dial 6–7 clicks in clockwise direction (+). ÎÎ This sets the rebound damping to an average value. LLA short test is necessary for granular adjustment of the damping: while sitting on the saddle, ride off a low step (curb or similar). 19 )) Increase the rebound damping gradually by 1 click (+) – if the suspension rebounds more than 1–2 times. )) Gradually reduce the rebound damping by 1 click (-) – if your suspension decompresses too slowly. 20 18 THE PASSION PEOPLE www.magura.com SetUp Adjusting the damping (compression damper) be changed. . However, with Albert Select+ enabled, you can preset the compression damping on your MAGURA suspension to suit your own needs. . High compression damping (+) causes slower suspension deflection, which reduces sag and/or reduces the sensitivity of the suspension when you stand on the pedals.. Lower compression damping (-) causes more sensitive deflection, thus causing more frequent sag of the suspension fork when standing on the pedals. )) Make sure that Albert Select+ is enabled (on) (fig. 21). )) Start by turning the golden adjusting dial counter-clockwise to the stop (-) (fig. 22). )) Then turn the golden adjusting dial approx. 3 turns in clockwise direction (+). ÎÎ This sets the compression damping to an average value. LLTo finely adjust the compression damping (Albert Select+), you will need to go for a trial run on a typical test route. 21 )) Gradually increase the compression damping (+) – if your forks sag too frequently or too pronouncedly when standing on the pedals, or if you want to reduce the sensitivity. )) Gradually reduce the compression damping (-) – if your forks deflect too slowly, or if you want to increase the sensitivity. LLThe Albert Select+ preset, set on the golden dial, has no effect if Albert Select+ is disabled (off). In this case your suspension forks are fully activated. 22 19 English LLThe compression damping of all MAGURA suspension forks is factory set and cannot On the Road Before each trip Danger of accidents due to component failure. –– Before each trip, make sure that the quick release system on your wheels is fitted correctly and that your wheels will not work loose. –– Before each trip, make sure that the handlebar and stem are correctly fitted and will not twist. –– Before each trip, work the suspension multiple times to make sure that your MAGURA suspension forks are leak tight and show no sign of oil leaks on screws, sliders and seals, or any other visible mechanical damage. –– Before each trip, make sure that your brakes are working properly and that the brake pad thickness is sufficient. –– Never use your MAGURA suspension forks in case of visible damage, unusual noise, or if you are unsure as to their condition. In this case, have your suspension forks checked in a bicycle workshop or directly by MAGURA Service. )) Make sure that Albert Select+ or DLO² is disabled (off) (fig. 23). )) Deflect the suspension multiple times with the front wheel brake on. ÎÎ The damper unit is reliably flooded with oil. damping unit on the suspension forks will now work reliably from the start of your ride. )) Make sure that the suspension forks respond perfectly and with sufficient sensitivity. . If needed, do some "minor service work". . See the maintenance guide on www.magura.com >>> service >>> downloads. )) Check the air pressure – see Adjusting the suspension (air pressure), page 16. ÎÎ The 23 20 THE PASSION PEOPLE www.magura.com On the Road Locking out the suspension forks – DLO² sion damping to the maximum value. Your MAGURA suspension forks will hardly deflect when you stand on the pedals. )) Enable DLO² (on) (fig. 24). ÎÎ The negative suspension stroke – or sag – is kept. ÎÎ This improves ground contact compared with fully locked forks. LLYour suspension forks will still buffer and damp hard knocks in enabled state, if you forget to disable (off) before riding downhill. Locking out the suspension forks – Albert Select+ LLThe compression damping of all MAGURA suspension forks is factory set and cannot be changed. . However, with Albert Select+ enabled, you can preset the compression damping on your MAGURA suspension to suit your own needs – see Adjusting the damping (compres24 sion damper), page 19. Enabling Albert Select+ (on) and turning the golden dial clockwise (+) to the stop will help you save the most energy riding uphill. This sets the compression damping to the maximum value. Your MAGURA suspension forks will hardly deflect when you stand on the pedals. )) Enable Albert Select+ (on) (fig. 25). ÎÎ The negative suspension stroke – or sag – is kept. ÎÎ This improves ground contact compared with fully locked forks. LLYour suspension forks will still buffer and damp hard knocks in enabled state, if you forget to disable (off) before riding downhill . LLThe Albert Select+ preset, set on the golden dial, has no effect if Albert Select+ is disabled (off). In this case your suspension forks are fully activated. 25 21 English LLActivating Dynamic Lockout DLO² saves energy riding uphill. This sets the compres- On the Road Reducing the suspension travel – Lift Select LLLift Select reduces the suspension stroke on your MAGURA suspension forks by up to 20 % (THOR 150) or 30 % (DURIN RACE R120) – depending on the air pressure. However, your suspension forks will still give you fully active response despite reduced travel. )) Set Lift Select to reduced suspension stroke (MIN) (fig. 26). )) Briefly apply a load to the handlebar (e.g. ride over an obstacle). ÎÎ Reduced suspension travel is active. LLIf your bicycle is not equipped with the RCL² remote control lever, and you need to actuate Lift Select directly, turn the dial through its snap-in point to the stop. . If you use RCL², the setting is performed via the remote control lever; the dial will stop shortly before its snap-in point. . There is no difference with respect to suspension travel reduction. 26 22 )) Set Lift Select to the maximum suspension stroke (MAX) (fig. 26). )) Briefly relieve the handlebars. ÎÎ Full suspension travel is now available. THE PASSION PEOPLE www.magura.com Maintenance Danger of accidents due to pressurised parts. –– Never open your MAGURA suspension forks via the top screws in the crown or the screws at the bottom end of the stanchions. Contact your autho- rised MAGURA service centre if your suspension forks need a major service. This is the only place where you are guaranteed correct implementation. LLVisit www.magura.com >>> service >>> downloads for a maintenance guide for your MAGURA suspension forks in PDF format. The guide gives English you step by step instructions for easier maintenance work that you can perform on your suspension forks yourself. After each trip )) Clean the stanchions with a clean, dry cloth (fig. 27). Increased wear on seals due to soiling. –– Do not apply lubricants to the stanchions. 27 23 Maintenance Regular LLHow frequently you need to maintain your MAGURA suspension forks depends on how often you use them, but also on weather influences. Perform the following maintenance steps more frequently if you use your bicycle in extreme conditions (rain, dirt, high mileage, etc.). Corrosion and material damage due to water penetration. –– Never use a pressure or steam cleaner to clean your bicycle – the seals on your bicycle components are not built to withstand this pressure. –– You should even exercise care if you use a water hose. Never point the water jet directly at seal areas (fig. 28). )) Clean the suspension forks with water, detergent and a brush. 28 )) Make sure that Albert Select+ or DLO² is disabled (off) (fig. 29). )) Deflect the suspension multiple times with the front wheel brake on. )) Make sure that the suspension forks respond perfectly and with sufficient sensitivity.. If needed, do some "minor service work". . See the maintenance guide on www.magura.com >>> service >>> downloads. )) Check the air pressure – see Adjusting the suspension (air pressure), page 16. )) Check the tension and ease of operation of the RCL² inner cables – make sure that the corresponding dial immediately responds to you actuating the RCL² – see Fit the RCL² Bowden cable, page 15. LLMAGURA suspension forks have internal permanent lubrication and excellent sealing material so that very little maintenance work is required for the internal components. Once a year, you will need to have your MAGURA suspension forks serviced in a professional bicycle workshop or by an authorised MAGURA service centre.. If you are a frequent user, also consider the fact that this exposes your suspension forks to more wear and thus requires more frequent maintenance intervals and checks. 29 24 THE PASSION PEOPLE www.magura.com Rules Parts, components and assemblies subject to normal wear and tear are not covered under this warranty. The warranty can expire when use according to the terms is no longer applicable. To this appropriate use also belongs the conditions for operating, maintaining and servicing as prescribed in the manual. Like every other product, the fork also contains parts that wear out as time passes by. The life span of these parts depend on the type and frequency of use, as well on care and maintenance. Please note that the usual wear of parts is normal and therefore no reason for objection. This especially applies to: bushings, seals and the surface of the stanchions. Machining or facing of the disc mounts on the fork is not allowed, as the corrosion protection will be damaged. It’s not necessary, as the mounts are machined previously before coating. Warranty duration and laws may vary from state to state and/or country to country. Warranty cases should be dealt normally by your dealer. But you can send warranty cases also directly to MAGURA or the official service partners. We point out that a warranty case can only be handled with an enclosed proof of purchase. The warranty can expire when: - Abnormal strain, neglect, abuse and/or misuse - Accident or collision damage - Application of not-original MAGURA parts and lubrication products - Changing the surface (for instance painting, machining or facing of the disc mounts,...) - Changing of the structure (e.g. drilling holes, assembly of lowriders,...) - Removal or garble of the serial number - Incorrect maintenance - Transport damage or loss - Exceeding the system weight of 130 kg (287 lb) The staff at MAGURA work continuously on improving our products in the context of ongoing technical development. For this reason, we reserve the right to make changes compared to the figures and descriptions in this User Manual. This does not entitle you to claim for changes to products that we have already delivered. For up-to-date information, visit www.magura.com Technical dimensions and weights are to be understood subject to normal tolerances. Reproduction or translation of this User Manual, or parts of it, is subject to written permission by MAGURA. We reserve all rights under copyright law. 25 English Warranty LLUnsere weltweiten Handelspartner und Service Center finden Sie unter www.magura.com LLCheck out our worldwide partners and service centers at www.magura.com Deutschland MAGURA Bike Parts . GmbH & Co. KG. Heinrich-Kahn-Straße 24. D-89150 Laichingen phone+49 73 33 96 26-0. fax +49 73 33 96 26-17 [email protected] © MAGURA 2011 All rights reserved. Printed in Germany. 0 689 751 – 06-2011 Umschlag & Inhalt:. www.technische-redaktion.de LE SSION PEOP THE PAur a.com www.mag Asia MAGURA Asia Limited Co.. No. 9, Industrial Park, 10th Road Taichung City. 40755 Taichung City, Taiwan phone+886 4 23 59 85 55. fax +886 4 23 59 99 10 [email protected] USA MAGURA USA. 724 West Clem. 62450 Olney, Illinois. phone+1 618 395-2200. fax +1 618 395-4711 [email protected]