1
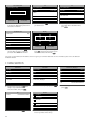
3.7 ACCESS CONTROL
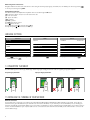
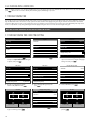
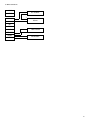
All access control related settings
1. Access Control Options
1.1.
Door Lock Delay (s). Set the number of seconds the lock stays unlocked after opening.
1.2.
Door Sensor Delay (s). Set the number of seconds the door can stay open before triggering the alarm. This will only function if a sensor is connected to the terminal.
1.2.
Door Sensor Type. Select the type of sensor to use with the terminal.
1.3.
Door Alarm Delay (s). Set the time before triggering the alarm if an abnormal door sensor state is detected.
1.4.
Retry Times to alarm. Set the number of rejected identifications before triggering the alarm.
1.5.
NC Time Period. Select the time period when the door is always closed.
1.6.
NO Time Period. Select the time period when the door is always open.
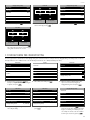
2. Time Schedule. It is possible to define up to 50 different time schedule (= time period). For each time schedule you can define the time frame when the door can be opened. It is possible to link up to three time schedules to an Access group, or user.
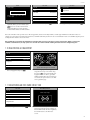
3. Holidays. In order to adapt to special holiday schedules, you can link a specific time schedule to a certain period.
3.1.
Add Holidays. Add a new holiday
3.2.
All Holidays. Display the list of all holidays.
4. Access Groups. Allow management of time zones and the identification methods by groups of employees. By default employees use their group time period settings. When a new user is created, they are linked to access group 1 by default. Users can be assigned to any given group from the user edit screen.
4.1.
New Group. Create a new group.
4.2.
All Groups. Display the list of all groups.
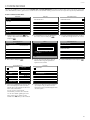
5. Combined Verification. Define the group(s) allowed to open the door.
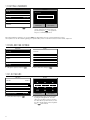
6. Duress Options. The terminal offers several ways of triggering an alarm if an employee has to open the door under duress (= being unwillingly forced to open the door).
6.1.
Duress Function. When enabled, pressing the “Duress Key” before clocking will open the door and trigger the alarm. The “Duress Key” can be linked to any function key of the device.
6.2.
Alarm on 1:1 Match. The alarm will be triggered every time a user uses the 1:1 Match authentication process.
6.3.
Alarm on 1:N Match. The alarm will be triggered every time a user uses the 1:N Match authentication process.
6.4.
Alarm on Password. The alarm will be triggered every time a user uses the password authentication process.
6.5.
Alarm Delay (s). Set the delay before the alarm is fired.
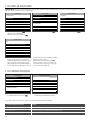
3.8 USB MANAGER
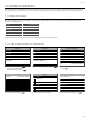
If you can not, or do not want to use a network connection to communicate with the PC software, the terminal allows you to retrieve or send the data via a
USB drive.
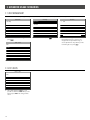
1. Download. Send the data from the terminal to the USB Stick.
1.1.
Attendance Data - The clocking data.
1.2.
User Data - All user related information.
1.3.
Short Message
2. Upload. Send the data from the USB drive to the terminal.
2.1.
User Data - Upload user data after editing in the software.
2.2.
Short Message
2.3.
Screen Saver
2.4.
Wallpaper
3. Download Options
3.1.
Delete ATT Data
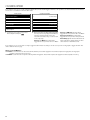
3.9 ATTENDANCE SEARCH
If you do not have access to the Safescan TA PC software, it is always possible to check the attendance logs directly on the terminal. Enter the ID of the
user of whom you want to check the data. If you do not provide a user ID, the system will display the clocking data of all users.
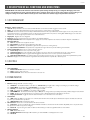
3.10 SHORT MESSAGE
You can display short messages to the users directly on the terminal screen. These messages can be displayed to one or several chosen users, or to everyone.
1. New Message - Create a new message.
1.1.
Message - Type the text of the message.
1.2.
Start Date - Define the date upon which the message will be displayed from.
1.3.
Start time - Define the time upon which the message will be displayed to.
1.4.
Expired Time (m) - Define for how long the message will be available for consultation.
1.5.
Message Type - Define the type of the message.
1.5.1.
Public - A public message will be displayed to everyone clocking on the terminal.
1.5.2.
Personal - A personal message will be displayed to one or several chosen user(s).
1.5.3.
Draft -Choose draft when you want the message to be stored in the terminal’s memory, but not displayed yet.
32