1
CompleteView
Video Client
User's Manual
Version 3.8
Table Of Contents
Introduction ................................................................................... 1
System Requirements .................................................................................................. 1
End User License Agreement ...................................................................................... 2
Operation ...................................................................................... 3
Getting Started ............................................................................................................. 3
Starting the CompleteView Client .......................................................................................................... 3
Logging In to the CompleteView Client.................................................................................................. 4
The Login Dialog ................................................................................................................................ 4
Client Application Update ................................................................................................................... 5
Contacting Video Servers .................................................................................................................. 5
Application Overview ............................................................................................................................. 6
Keyboard Shortcuts ............................................................................................................................ 7
Enlarging a Live Video Source ........................................................................................................... 7
File Menu ............................................................................................................................................ 7
View Menu .......................................................................................................................................... 7
Live View ...................................................................................................................... 9
Live View Controls ................................................................................................................................. 9
Toolbar ............................................................................................................................................... 9
Automatic Switching Between View Layouts .................................................................................. 9
Title Bar .......................................................................................................................................... 9
Tree View ......................................................................................................................................... 10
Zones/Sites ................................................................................................................................... 10
Views ............................................................................................................................................ 11
Custom Views ............................................................................................................................... 11
Maps ............................................................................................................................................. 12
Servers ......................................................................................................................................... 12
Pan Tilt & Zoom Control....................................................................................................................... 14
PTZ Control Bar ............................................................................................................................... 14
Immervision Panomorph Lens Support ............................................................................................ 15
Camera Status ..................................................................................................................................... 18
Quick Review ....................................................................................................................................... 20
Map View ............................................................................................................................................. 21
Map Icons & Controls ....................................................................................................................... 22
Map Control Panel............................................................................................................................ 23
Playback ..................................................................................................................... 24
Event Review ....................................................................................................................................... 24
ii
Table Of Contents
Overview .......................................................................................................................................... 24
Search Panel .................................................................................................................................... 24
Playback Panel................................................................................................................................. 25
Date Search ......................................................................................................................................... 26
Event Review ................................................................................................................................... 26
Filtering Results................................................................................................................................ 26
Smart Search ....................................................................................................................................... 27
First Steps ........................................................................................................................................ 27
Smart Search Wizard ....................................................................................................................... 27
Event Playback .................................................................................................................................... 29
Digital PTZ controls ................................................................................................................... 30
Video Event Export .............................................................................................................................. 31
Single Event Export .......................................................................................................................... 31
Export Destination ........................................................................................................................ 32
Export Video to File on Disk...................................................................................................... 32
Export Video to CD/DVD Now .................................................................................................. 32
Add Video to Queue for CD/DVD Burning Later ....................................................................... 33
Clip Length.................................................................................................................................... 33
Export Entire Clip ...................................................................................................................... 33
Export Part of the Clip ............................................................................................................... 33
Multiple Event Export ....................................................................................................................... 35
Export Queue ................................................................................................................................... 36
Exporting to CD/DVD .................................................................................................................... 36
Exporting Still Images....................................................................................................................... 38
Multi Playback ............................................................................................................ 39
Multi-channel Event Review ................................................................................................................ 39
Overview .......................................................................................................................................... 39
Event Playback .................................................................................................................................... 40
Quad Video Panel ............................................................................................................................ 40
Event Timeline View ......................................................................................................................... 40
Multi Playback Control Toolbar ........................................................................................................ 41
Appendices ................................................................................. 42
Appendix A. Multiple Client Operation ....................................................................... 42
Parameters for MainClient.exe ............................................................................................................ 42
Example ............................................................................................................................................... 42
iii
Introduction
System Requirements
• Operating Systems: Windows XP Professional, Windows 7 Professional or Ultimate, or Windows
Vista
• Core 2 Duo 2.0 Ghz or higher
• 2 GB RAM or higher
• Video Card w/ 256 MB RAM or higher
• 10/100/1000 Ethernet Controller
1
CompleteView Video Client User’s Manual
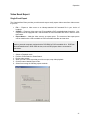
End User License Agreement
Salient CompleteView™ SOFTWARE LICENSE
1. GRANT OF LICENSE. Salient grants to you the right to use one (1) copy of the Salient
CompleteView Server SOFTWARE on one (1) computer. Salient grants to you the right to use one (1)
copy of the Salient CompleteView Client SOFTWARE on any numbers of computers, provided that
the Salient CompleteView Client is solely used to connect to a Salient CompleteView Server. The
SOFTWARE is in "use" on a computer when it is loaded into temporary memory (i.e. RAM) or
installed into permanent memory (e.g. hard disk, CD-ROM or other storage device) of that computer.
2. COPYRIGHT. The SOFTWARE is owned by Salient and/or its licensor(s), if any, and is protected
by copyright laws and international treaty provisions. Therefore you must treat the SOFTWARE like
any other copyrighted material (e.g. a book or a musical recording) except that you may either (a)
make a copy of the SOFTWARE solely for backup or archival purposes or (b) transfer the
SOFTWARE to a single hard disk provided you keep the original solely for backup purposes.
3. OTHER RESTRICTIONS. You may not rent, lease or sublicense the SOFTWARE but you may
transfer SOFTWARE and accompanying written materials on a permanent basis provided that you
retain no copies and the recipient agrees to the terms of this agreement. You may not reverse
engineer, decompile, or disassemble the SOFTWARE. If the SOFTWARE is an update or has been
updated, any transfer must include the most recent update and all previous versions.
4. THIRD PARTY Software. The SOFTWARE may contain third party software, which requires
notices and/or additional terms and conditions. Such required third party software notices and/or
additional terms and conditions are located in the readme file or other product documentation. By
accepting this license agreement, you are also accepting the additional terms and conditions, if any,
set forth therein.
5. TERMINATION. This License is effective until terminated. Your rights under this License will
terminate automatically without notice from Salient if you fail to comply with any term(s) of this
License. Upon the termination of this License, you shall cease all use of the SOFTWARE and destroy
all copies, full or partial, of the SOFTWARE.
6. GOVERNING LAW. This agreement shall be deemed performed in and shall be construed by the
laws of United States, Texas.
7. DISCLAIMER
THE SOFTWARE IS DELIVERED AS IS WITHOUT WARRANTY OF ANY KIND. THE ENTIRE RISK
AS TO THE RESULTS AND PERFORMANCE OF THE SOFTWARE IS ASSUMED BY THE
PURCHASER/THE USER/YOU. Salient Systems Corporation DISCLAIMS ALL WARRANTIES,
WHETHER EXPRESS OR IMPLIED, INCLUDING BUT NOT LIMITED TO, THE IMPLIED
WARRANTIES OF MERCHANTABILITY, FITNESS FOR A PARTICULAR PURPOSE, TITLE AND
NON-INFRINGEMENT, OR ANY WARRANTY ARISING OUT OF ANY PROPOSAL,
SPECIFICATION OR SAMPLE WITH RESPECT TO THE SOFTWARE.
Salient AND/OR ITS LICENSOR(S) SHALL NOT BE LIABLE FOR LOSS OF DATA, LOSS OF
PRODUCTION, LOSS OF PROFIT, LOSS OF USE, LOSS OF CONTRACTS OR FOR ANY OTHER
CONSEQUENTIAL, ECONOMIC OR INDIRECT LOSS WHATSOEVER IN RESPECT OF SALE,
PURCHASE, DELIVERY, USE OR DISPOSITION OF THE SOFTWARE.
Salient TOTAL LIABILITY FOR ALL CLAIMS IN ACCORDANCE WITH THE SALE, PURCHASE,
DELIVERY AND USE OF THE SOFTWARE SHALL NOT EXCEED THE PRICE PAID FOR THE
SOFTWARE.
2
Operation
Getting Started
Starting the CompleteView Client
You may launch the CompleteView Client application by double-clicking on the icon labeled Client, as
shown below:
Start » All Programs » CompleteView » Video Client
You may also find the Video Client icon located on your desktop, depending on the following factors:
1. The item "Create Desktop Icon" was selected during the installation of the application.
2. Windows has been configured to show desktop icons.
3
CompleteView Video Client User’s Manual
Logging In to the CompleteView Client
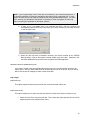
The Login Dialog
To log in to the CompleteView Client application, you must enter the user name and password that has
been assigned to you by an administrator of the Video Management System.
Note: The user name and password are case-sensitive.
1. Username — Enter your user name.
2. Password — Enter your password.
3. Auto-logon — Check this box if you wish to bypass the login dialog whenever you launch the
client application. The next time that you launch the client, it will automatically login using the
user name and password that were present when you selected the auto-logon feature.
Note: To turn off auto-logon, click the task button labeled "logoff" from the main application
screen. This will return you to the login dialog, where you may un-check the auto-logon box.
4. Use Configuration Server — If your administrator has supplied you with the IP address or
hostname of a configuration server, enter it here. The configuration server is a centralized
database containing your personalized camera view layouts.
5. Check for New Client Version — If you are using a configuration server, check this box to
automatically check for program updates whenever you login.
Note: CompleteView ONE client software is updated manually.
When you click on the button named "OK", the Client application will contact the configuration server (if
selected) in order to download your camera viewing layouts and check for program updates. After it has
4
Operation
retrieved your layouts, the application will prompt you if an updated version of the client application has
been found. Lastly, the client application attempts to contact each video server in order to obtain the
latest camera names.
Client Application Update
If a program update was found, select "Yes" when prompted to download the updated version of the client
application. The entire update process may take from as little as a few moments to as long as several
minutes, depending on the network bandwidth that is available to you at the time you begin the update
process.
Once the client application update has finished, you will be returned to the login dialog.
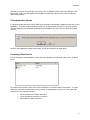
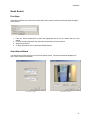
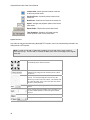
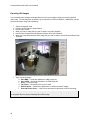
Contacting Video Servers
Prior to showing the main application screen, the client attempts to contact each video server, as shown
below:
The colored dot to the left of each video server indicates the connection status for that server. You may
cancel the connection process at any time by clicking on the application exit (X) icon in the upper righthand corner of the connection dialog.
Green indicates a successful connection.
Yellow indicates a connection in progress.
Red indicates a failed connection.
5
CompleteView Video Client User’s Manual
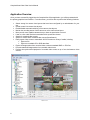
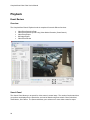
Application Overview
Once you have successfully logged into the CompleteView Client application, you will be presented with
the primary graphical user interface. From this screen, you will be able to perform the following functions:
Switch among live camera view layouts that have been configured by an administrator for your
use.
Create custom live camera view layouts.
Enable/disable automatic switching of live camera view layouts.
Monitor the recording status of each camera on a live camera view layout.
Move pan-tilt-zoom capable cameras that you have the permission to control.
Listen to a live audio feed that is associated with a particular camera.
Search for recorded video events.
Search for motion within recorded video events (SmartSearch).
Easily export video events to a standard .AVI file format on a variety of media, including:
Export to file.
Export to recordable CD or DVD data discs.
Export still images taken from recorded video events as standard .BMP or .JPG files.
Print annotated still images taken from recorded video events.
Perform time-synchronized playback of recorded video events on up to four simultaneous video
sources.
Main Screen
6
Operation
Keyboard Shortcuts
Full-screen mode causes the view layout to be scaled to fit your monitor. The graphical user interface
('GUI') will be hidden from view. Use the following keyboard shortcuts to control the Client application.
F11
ESC
TAB
SHIFT+TAB
ENTER
Enables / Disables full-screen mode.
Exits full-screen mode. (alternative to F11)
Selects the next video source.
Selects the previous video source.
Selects the previous view layout.
Selects the next view layout.
Causes the currently selected video source to fill the screen. Press again to return to
the original view layout.
Enlarging a Live Video Source
You may easily enlarge a live camera to VGA resolution by double-clicking on the video source. Doubleclick on the live camera view a second time to return to the original size.
File Menu
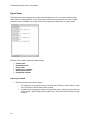
The File Menu contains two items:
1. Log out — Logs the current user out of the Client application.
2. Exit — Exits the Client application.
View Menu
The View Menu consists of the following items:
7
CompleteView Video Client User’s Manual
1.
2.
3.
4.
5.
6.
7.
8
Toolbar — Enables/disables the horizontal toolbar.
Status Bar — Enables/disables the status bar located at the bottom of the Client window.
Navigation Pane — Enables/disables the Tree View.
Live View Mode — Selects Live View.
Playback Mode — Selects Playback.
Multi Playback Mode — Selects Multi Playback.
Sequence Views — Enables/disables view layout sequencing.
Operation
Live View
Live View Controls
Toolbar
The toolbar is used for changing view layouts, enabling and disabling view layout sequencing, entering
into playback and multi-channel playback modes, and for opening the pan-tilt-zoom control panel. In
addition, you may logout of or exit the CompleteView Client application.
Toolbar
1. Tree View — Enables/disables the tree view.
2. View Name — Allows you to select a live view layout. The icon to the left of the name of the view
layout indicates the number, size and position of video sources on the view layout.
3. Sequence — Enables automatic switching between live view layouts.
Note: In order to utilize sequencing, your administrator must first enable this function for each
view layout to be included in the sequence. The administrator must also configure the length of
time to pause on each view layout in the sequence.
4.
5.
6.
7.
Title Bar - Enables/Disables overlay of title bars on video windows.
Live View — Enables viewing of live video.
Playback — Enables viewing of archived video.
Multi Playback — Enables viewing of archived video for multiple video sources.
Automatic Switching Between View Layouts
Automatic switching between live video view layouts is also referred to as "sequencing." To enable
sequencing, find and click on the button labeled "Sequence" that is located on the toolbar.
View layout sequencing is enabled.
View layout sequencing is disabled.
Title Bar
The Title Bar contains camera name and status information.
Titled Bars are enabled.
Titled Bars are disabled. Camera status is
shown as a border around the viewing window.
9
CompleteView Video Client User’s Manual
Tree View
The tree view is used for selecting view layouts, creating custom view layouts and selecting individual
cameras.
Tree View
Zones/Sites
Select the Site or Zone containing the view layouts and maps you wish to use. Sites and Zones allow the
administrator to organize view layouts and maps.
Note: Sites and Zones is a feature of CompleteView Enterprise. If you do not have
CompleteView Enterprise contact your Salient reseller for upgrade details.
10
Operation
Views
Select the view layout you wish to use from Views or Custom Views lists.
You may also select view layouts from the toolbar. To select a view layout, find the down-arrow located
on the left side of the toolbar. When you click on the down-arrow, a list of available live view layouts will
appear. Click on the name of the view layout that you wish to select.
Custom Views
Lists view layouts that have been created by you.
Creating a Custom View
1. Right-click on the tree item named "Custom Views". The following context menu will
appear:
2. Click on the item named "Create". The following dialog window will appear:
3.
4.
5.
6.
Enter a name that is meaningful to you in the field titled "View Name".
Select a view layout template.
Click 'OK'.
A custom view layout will now be available under the "Custom Views" tree item, using the
name that you provided in step 3.
11
CompleteView Video Client User’s Manual
Populating a Custom View with Live Video
Adding live video to your custom view layout is a simple process.
1. Expand a server in the "Servers" tree item.
2. Click on a camera in the list.
3. Without releasing the mouse button, drag the camera onto the view layout in the position
that you wish it to appear.
4. Release the mouse button when the camera is in the desired position.
Maps
Lists all maps that you have access to. Click on a map under the 'Maps' object to access that map.
You may also select maps from the toolbar. To select a map, find the down-arrow located on the left side
of the toolbar. When you click on the down-arrow, a list of available live view layouts and maps will
appear. Click on the name of the maps that you wish to select.
Servers
Lists all servers to which you have access. When you expand the node for a specific server, a list is
displayed of every camera on that server to which you have access.
Note: When connected to a CompleteView ONE multiple server can be connected in a single
client session, however cameras from multiple servers cannot be viewed simultaneously in a
single view layout.
12
Operation
Quick Selection of Cameras
To select a single camera for display, click on the camera name in the tree view. The currently
selected view layout will change to a single-camera view layout populated with the camera that you
selected.
13
CompleteView Video Client User’s Manual
Pan Tilt & Zoom Control
Certain camera models are capable of being controlled on one or more axes. The most prevalent of
these are more commonly referred to as 'PTZ' cameras. The term PTZ refers to the three axes that are
capable of being controlled — pan, tilt and zoom. In addition to being able to control the field of view,
these cameras often offer additional control mechanisms, such as opening and closing of the camera iris,
changing the focal length (focus in and out), and the ability to store one or more 'preset'
locations. Presets allow you to store the current position settings within the camera itself for easy recall at
a later time.
Additionally, CompleteView includes the ability to digitally control fixed cameras. Fixed cameras can only
be controlled when the administrator has configured the camera as a PTZ camera.
If a video source is configured as a controllable camera, you will see the following icon in the video
source information bar:
— Indicates that a video source is a controllable camera
Note: In order to control a camera, your administrator must first have granted you the
appropriate access.
PTZ Control Bar
PTZ Control Buttons: Each button will move the camera
incrementally in the direction clicked.
Virtual Joystick: When selected the PTZ Contol Buttons will be
changed to the Virtual Joystick Control (see below)
Virtual Joystick Control: This control will simulate a real
joystick. Left click and drag the center circle in the direction you
wish to move the camera. The further from the center the center
circle is move the faster the camera will move in that direction.
Auto Focus: enables automatic focus function on the selected
camera. This function does not apply to fixed cameras
configured as digital PTZ cameras.
Auto Iris: Enables automatic iris control on the selected
camera. This function does not apply to fixed cameras
14
Operation
configured as digital PTZ cameras.
Zoom: Incrementally changes the zoom level of the camera.
Focus: Manually adjusts the focus of the selected camera
incrementally. This function does not apply to fixed cameras
configured as digital PTZ cameras.
Iris: Manually adjusts the iris of the selected camera
incrementally. This function does not apply to fixed cameras
configured as digital PTZ cameras.
Preset: Changes the preset number to be controlled. Use the
Show and Set buttons to control the preset number selected.
Show: Moves the camera to the selected preset number.
Set: Sets the current camera position to the selected preset
number.
Tour: Enables an administrator-configured preset tour (if
configured).
Monitor: When a PTZ camera is controlled through a Pelco
ACSII compatible matrix switch this sets the monitor associated
with the camera. This function does not apply to fixed cameras
configured as digital PTZ cameras.
PTZ Speed: Sets the speed of the camera movement.
Note: In order to control a digital PTZ camera, you must first use the zoom control to zoom
into the image. The Pan and Tilt controls will allow you to move to the edges of the camera's
field of view.
USB Joystick Control
Any USB joystick can be used to control a PTZ capable camera using Video Client.
Immervision Panomorph Lens Support
15
CompleteView Video Client User’s Manual
Immervision lens functionality can be accessed by right-clicking on a video window of a camera
configured for Immervision support (see Administrators Manual for setup details).
PTZ View
PTZ View is the default viewing mode for an Immervision configured camera. Left click and drag will
rotate the image in the direction the mouse is dragged. Right click and drag left will zoom in
digitally. Right click and drag right will zoom out.
Quad View
Choosing Quad View from the right-click menu will split the camera display window into four sections
which can be independently panned and zoomed to different areas of the camera's field of view. Each
quadrant is independently movable and is controlled in the same way as PTZ View is controlled. Left click
and drag will rotate the image in the direction the mouse is dragged. Right click and drag left will zoom in
digitally. Right click and drag right will zoom out.
Perimeter View
16
Operation
Choosing Perimeter View will split the video windows into a top and bottom section corresponding to the
top and bottom of the field of view. Left click and drag right or left to move the perimeter view to the right
and left.
17
CompleteView Video Client User’s Manual
Camera Status
Information regarding camera status is shown within the title bar for each individual video source.
Live Video Source
At the top of each video source is an title bar. This bar contains the following camera status information
(left to right):
Friendly Name — Video sources may be labeled by the administrator to correspond to a
cameras physical location (example: 'Building II, Front Entrance', the camera "view" (example:
'Building Entrance'), or a combination of both. This is known as the friendly name of the video
source.
(Server Friendly Name) — Like the video source friendly name, the server friendly name is
configured by the administrator, and is shown bracketed by parenthesis. The server friendly
name will generally refer to a physical location (example: Building I, Server I) or follow an internal
naming convention.
[IP Address or host name] — The actual IP address or host name of the server is shown
between the square brackets.
Audio Status — If audio is available for the video source, you will see one of two icons, as
shown below. Clicking on the audio icon switches between mute and listen.
Indicates that audio is available for this video source, but is currently muted.
Indicates that audio is available for this video source and is currently enabled.
Pan-Tilt-Zoom —
Indicates that this is a controllable video source. Your administrator must have granted you the
appropriate permissions in order for you to control the camera.
N/A
18
Recording Status — The current recording status of the video source is indicated by a square
icon located to the far right of the information bar. The color of the square changes based on
what type of recording is currently occurring.
No recording is occurring.
Operation
Scheduled recording is active and the system is continuously recording video.
Motion is occurring in one or more motion zones and the system is recording the video as a
motion event.
An external alarm is active and the system is recording the video as an alarm event.
Pre-alarm recording has been enabled and is currently active. The system will record up to
two minutes of video prior to the start of a motion or alarm event.
The video signal has been lost or the camera is unreachable. The system is not recording
video, even if it has been configured to do so!
... and scheduled recording is currently active.
... and motion has been detected.
... and an external alarm is active.
... and pre-alarm recording has been enabled and is currently active.
Note: When the title bar is disabled, the video window will have a border when motion or an
alarm event occurs on the associated camera. The border will be either red or yellow to
correspond to the event type.
19
CompleteView Video Client User’s Manual
Quick Review
To quickly access video events for review, right-click on the live video window for the camera that you
wish to review. A "context-menu" will appear, as shown below:
Live Video Source with Context Menu
1. Search Video — Switches to "playback" mode with the current server and camera preselected.
2. Quick Review — Opens a new window with recently recorded video from the previous:
a. 30 Seconds
b. 1 Minute
c. 2 Minutes
d. 3 Minutes
e. 5 Minutes
f. 10 Minutes
3. Frame Rate — Allows you to set the frame rate for the current camera from among the
following choices:
a. 1 FPS
b. 4 FPS
c. 8 FPS
d. 15 FPS
e. 30 FPS
Note: The maximum number of frames-per-second delivered to the Video Client will never
exceed the rate configured by the administrator on the server. For example, if you select 30
FPS in step 3, but an administrator has set a maximum of 10 FPS on the server for that
camera, then the Video Client will only display live video at 10 FPS.
4. Reconnect — Initiates a reconnection attempt between the client application and the video
management server for the current camera.
20
Operation
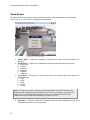
Map View
View camera locations on a series of hyperlinked maps. To access maps which have been loaded and
configured by the CompleteView administrator expand the 'maps' item in the Tree View and click on the
map you wish to start on.
Tree View with a map selected
This will display the selected map as shown below.
Video Client, displaying the selected map
21
CompleteView Video Client User’s Manual
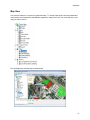
Map Icons & Controls
Displayed on the map are icons representing camera locations and other maps. The camera icons
additionally have cones which represent the field-of-view of the associated camera. Additionally the fieldof-view cones change color dynamically to indicate recording status, activity and camera status as
indicated below.
Map Link - Links to another map. Doubleclick the map icon to switch to the
associated map.
Camera Icon - Represents a camera position on the map. The camera icon will
have a field-of-view cone which is configured by the CompleteView
administrator. The cone will change colors dynamically to indicate status.
....Indicates motion was detected on the camera.
....Indicates scheduled recording is active on the associated camera.
...Indicates an external alarm associated with the camera has triggered
recording.
...Indicates a pre-alarm buffer is active on the associated camera.
...Indicates no activity on the associated camera.
...Indicates there is no video from the associated camera, This could be
no communication with an IP camera or a sync loss with an analog
camera.
22
Operation
Map Control Panel
To control the zoom level and display settings use the Map Control Panel located below the map.
Map Control Panel
Zoom In - Click to zoom in on the map.
Zoom Out - Click to zoom the map out.
Zoom Level - Drop down to select zoom level. 100% corresponds to the
original size of the image imported as a map. Zoom levels range from
10% of the original size to 200%. Choose 'Scale to Fit' to fit the entire
map into the viewing area.
Icon label On/Off - Enables/Disables the display of map and camera icon
labels
23
CompleteView Video Client User’s Manual
Playback
Event Review
Overview
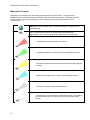
The CompleteView Client's Playback mode is comprised of several different functions:
Video Event Search by Date.
Video Event Search by Date using Video Motion Detection (Smart Search).
Video Event Export
Still Image Export
Video Event Review
Playback Interface
Search Panel
The Search Panel allows you to search for video events in several ways. The results of each search that
you perform are displayed in the Results list, and can be filtered using three criteria: Show Scheduled,
Show Motion, Show Alarm. The Queue tab allows you to select one or more video events for export.
24
Operation
Search Panel - Search Tab
Search Panel - Queue Tab
Playback Panel
When you select an event displayed in the results list for further review, the video will be displayed in the
Playback Panel. This panel consists of the Video window, Time slider, Playback toolbar, and Export
buttons.
Playback Panel
25
CompleteView Video Client User’s Manual
Date Search
Perform the following steps to begin a video event search by date.
Search Controls
1. From the Server drop-down list, select the appropriate Server for the camera that you wish
search.
2. From the Camera drop-down list, select the camera that you wish to search.
3. Using the Date Search pop-up calendar, select the date on which the event occurred.
4. The Results list will be filled with video events that match the criteria that you entered above.
Event Review
To review a video event, double-click on the event in the results list. The video will begin to play in the
Playback Panel.
Results List
Filtering Results
By default, the results list displays all of the archived video events for the selected day. You can filter
these results by recording type, as shown below.
Results List Filters
26
Operation
Smart Search
First Steps
Smart Search allows you to search for motion within video events. Perform the following steps to begin a
Smart Search.
Smart Search Controls
1. From the Server drop-down list, select the appropriate Server for the camera that you wish
search.
2. From the Camera drop-down list, select the camera that you wish to search.
3. Select Smart Search.
4. To begin the search, click on the button labeled Search.
Smart Search Wizard
You should now see the first screen in the Smart Search wizard. Follow the instructions displayed on
your screen to perform the search.
Smart Search - Step 1
Smart Search - Step 2
27
CompleteView Video Client User’s Manual
Smart Search - Step 3
Smart Search - Results
Note: As soon as you press the Finish button in step 3, the system will begin searching for
video events. Entries are displayed as they are found. Smart Search can be a lengthy
process, depending on the time period involved and the resulting amount of video that must be
searched through. You can cancel a Smart Search at any time by clicking on the button
labeled Stop. The search will terminate immediately. All entries currently in the results list
will remain until your next search.
28
Operation
Event Playback
Once you have selected a video event for review, it will appear in the Playback Panel.
Playback Panel
Located immediately below the video window is the playback control toolbar.
Seek Bar - Changes position within the current
video event. The time and date for the current
position are displayed to the right of the seek bar.
Play - Plays the current video event to the end and
then stops.
Play Sequential - Plays each video event in the
results list from the current selection onwards, and
then stops.
Stop - Stops playback.
Jump to Beginning - Moves position backwards to
the beginning of the current video event.
Step Backward - Moves position backwards in the
current video event by a single frame.
Step Forward - Moves position forwards in the
current video event by a single frame.
29
CompleteView Video Client User’s Manual
Jump to End - Moves position forwards to the end
of the current video event.
Previous Event - Loads the previous event in the
results list.
Next Event - Loads the next event in the results list.
Speed - Changes the playback speed of the current
video event.
Export Video - Exports the current video event.
Take Snapshot - Creates a still image from the
current position of the current video event.
Digital PTZ controls
Any video clip may be controlled using the digital PTZ controls, even if the camera being reviewed is not
configured as a PTZ camera.
Note: In order to Pan and Tilt within the recording, you must first use the zoom control to
zoom into the clip. The Pan and Tilt controls will allow you to move to the edges of the original
video clip.
PTZ Control Buttons: Each button will move the camera
incrementally in the direction clicked.
Virtual Joystick: When selected the PTZ Control
Buttons will be changed to the Virtual Joystick Control
(see below)
Virtual Joystick Control: This control will simulate a real
joystick. Left click and drag the center circle in the
direction you wish to move the camera. The further from
the center the center circle is move the faster the camera
will move in that direction.
Zoom: Incrementally changes the zoom level of the
camera.
Preset: Changes the preset number to be controlled. Use
the Show and Set buttons to control the preset number
selected.
Show: Moves the camera to the selected preset number.
PTZ Speed: Sets the speed of the camera movement.
30
Operation
Video Event Export
Single Event Export
The CompleteView Client provides you with several ways to easily export video events from video servers
to your PC.
File — Exports a video event to an industry-standard AVI formatted file in your choice of
locations.
CD/DVD — Exports a video event to a CD-recordable or DVD-recordable data-format disc. Your
computer must be equipped with a CD-recordable or DVD-recordable disc drive in order to utilize
this feature.
Export Queue — Adds the video event to an export queue. The contents of the export queue
can be transferred to a CD-recordable or DVD-recordable data disc at a later time.
Note: Video event DVD discs are created in DVD-data format. DVD-data discs can only be
read on personal computers equipped with a DVD-ROM or DVD-recordable drive. DVD-data
discs will not function in DVD-video devices, such as DVD players that are connected to
televisions.
1.
2.
3.
4.
5.
6.
Switch to Playback mode.
Perform a Date Search or Smart Search.
Review video events.
When you find a video event that you wish to export, stop video playback.
Click the button labeled Export Video.
Select from among the following export methods:.
31
CompleteView Video Client User’s Manual
Export Destination
Export Video to File on Disk
Exports the current video event from the video server to an AVI file in the location of your choice.
1. If the Clip Length is set to Export Part of the Clip, then you must first select the start and
end times for the exported video clip.
2. Browse to the location that you want to export the video event to.
3. Enter a name for the exported video event in the File name field.
4. Click Save to finish.
Export Video to CD/DVD Now
If you have chosen to "Export Video to CD/DVD Now", then you must complete a few additional
steps to create the CD-recordable or DVD-recordable data disc.
1. If the Clip Length is set to Export Part of the Clip, then you must first select the start and
end times for the exported video clip.
2. Provide a name for the video clip. This will be used in conjunction with the camera name
to create the filename for the video event.
3. Select the CD/DVD drive that you wish to record to.
4. Provide a Label (volume name) for the recordable media.
5. If you do not want to add additional video events to this recordable disc in the future, then
make certain that "Close Disk" is checked. Otherwise, leave it un-checked and you will
be able to add video events to the same disc at a later time.
6. If you wish to include a video player application with the exported video event, then check
the box titled Include Standalone Video Player.
7. Click the button labeled Burn when you are ready to create the disc.
32
Operation
Note: If you are generating a video event disc for evidentiary or law enforcement purposes, it
is generally advisable to include the standalone video player when creating the disc. In most
cases, the video events can easily be played back by using Windows Media Player. For some
PC's, however, the standalone video player is necessary in order to playback the video clip
without requiring the installation of third-party software.
8. If there is not a recordable disc in the selected disc drive, then the computer will
automatically eject the drive tray and prompt you to insert a blank (or previously recorded
to, but left 'open') disc.
9. When the disc has been successfully recorded, you will be returned to the CD/DVD
Burning dialog. Click on Burn again to create another copy of the disc. Otherwise, click
the button labeled Exit to go back to the CompleteView Client application.
Add Video to Queue for CD/DVD Burning Later
If you want to create a disc with multiple video events, then you must first add the events to the
export queue. After you have added all of the desired video events to the queue, then you will be
able to use the queue manager to create a video event disc.
Clip Length
Export Entire Clip
This option exports the entire time period for the currently selected video event.
Export Part of the Clip
This option enables you to export only the time period of a video event that is of interest to you.
1. Select the Start Time using the seek bar. This is what the export process will use as the
beginning time for the exported video event.
33
CompleteView Video Client User’s Manual
2. Select the End Time using the seek bar. This is what the export process will use as the
ending time for the exported video event.
3. Click Finish to proceed.
34
Operation
Multiple Event Export
You can easily export multiple video events in a single operation.
First, select the events that you wish to export.
For individual, non-contiguous events, hold down the [CTRL] key while clicking on each event in
the results list that you wish to export.
To add a range of contiguous events, click on the first event in the results list that you wish to
export. While holding down the [SHIFT] key, click on the last event that you wish to export.
Next, right-click on any of the video events that you selected. The following menu will appear:
Results Context-menu
1. Add to Queue — Adds all of the selected video events to the export queue.
2. Export to Disk... — Performs an immediate export to file operation for all of the selected video
events.
35
CompleteView Video Client User’s Manual
Export Queue
The Export Queue is a temporary list of video events created by the user. It is used to export multiple
video events in a single operation. These video events can be from any camera on any server to which
you have access. In addition, the events can be from a single day, multiple days, or a span of days.
Export Queue
Each entry in the queue contains the following data:
Camera name
Estimated file size
Server name
IP address or hostname
Starting date and time
Ending date and time
Exporting to CD/DVD
1. Select the events that you wish to export.
36
For individual, non-contiguous events, hold down the [CTRL] key while clicking on each
event in the Export Queue that you wish to export.
To add a range of contiguous events, click on the first event in the Export Queue that you
wish to export. While holding down the [SHIFT] key, click on the last event that you wish
to export.
Operation
2. Click on the button titled Burn to CD/DVD.
3. Click on the button labeled Burn Selected.
4. Refer to Single Event Export for additional information regarding the CD/DVD burning interface.
37
CompleteView Video Client User’s Manual
Exporting Still Images
You can easily export a single still image taken from the current position within the currently selected
video event. The still image can be saved to your local disk as a JPEG or BMP file. Additionally, you can
print the still image, along with annotations.
1.
2.
3.
4.
5.
6.
Switch to Playback mode.
Perform a Date Search or Smart Search.
Review video events.
When you find an image that you wish to export, stop video playback.
Use the Step Forward and Step Backward buttons refine your selection.
When you have determined the exact image that you wish to export, click the button labeled Take
Snapshot.
7. Save or print the image
a. Save BMP — Saves the snapshot to a BMP image file.
b. Save JPEG — Saves the snapshot to a JPEG image file.
c. Print — Prints the image.
d. Full Frame — Resets the zoom level to 100%.
e. Smooth Zoom — Reduces the appearance of within zoomed-in images.
f. Override Printer Driver — Uses a more accurate, though slower, method of printing.
Note: Saving a zoomed-in snapshot to an image file will save the entire image. Printing a zoomedin snapshot will print only the zoomed portion of the image.
38
Operation
Multi Playback
Multi-channel Event Review
Overview
The Multi Playback mode is comprised of several different functions:
Time-synchronized Event Playback from up to 4 Simultaneous Video Sources
Graphical Display of Video Events
Video Event Export
Still Image Export
Video Event Review
Multi Playback
39
CompleteView Video Client User’s Manual
Event Playback
Multi Playback consists of a Quad Video Panel, an Event Timeline View, and a Multi Playback Control
Toolbar
Quad Video Panel
Select the Server and the Camera for each position in the quad video panel that you wish to populate with
video.
Quad Video Panel
Event Timeline View
Event video is displayed in a graphical, time-oriented view for each of the quad video positions.
Event Timeline View - Empty
1. Select one or more cameras in the quad video panel.
2. Select the Date that you wish to display video for.
3. Video events will be displayed using the same color schema present in live video monitoring.
a. Red - video motion detection event
b. Yellow - external alarm event
c. Green - scheduled (continuous) recording
40
Operation
Event Timeline View - With events
4. Click the left mouse button on an area of interest. The position bar will automatically snap to the
location within a few seconds.
Multi Playback Control Toolbar
The playback control toolbar is located immediately below the event timeline view.
Multi Playback Control Toolbar
Play - Starts playback for all quad positions.
Stop - Stops playback for all quad positions.
Jump to Beginning - Moves position
backwards to the beginning of the current video
event.
Step Backward - Moves position backwards in
the current video event by a single frame.
Step Forward - Moves position forwards in the
current video event by a single frame.
Jump to End - Moves position forwards to the
end of the current video event.
Speed - Changes the playback speed for all
quad positions.
Export Video - Exports the video event from
the currently selected quad position.
Take Snapshot - Creates a still image from the
current position of the video event in the
currently selected quad position.
Burn to CD/DVD - Creates a data CD or DVD
containing the contents of the export queue.
Show/Hide Scheduled recordings
Show/Hide Motion recordings
Show/Hide Alarm recordings
41
Appendices
Appendix A. Multiple Client Operation
The CompleteView Video Client is designed so that, by default, only a single instance can be loaded into
memory. If a user attempts to launch the Video Client — and it is already resident in memory — then the
application focus switches to that instance.
To enable multiple simultaneous instances of the Video Client, it is necessary to supply a command-line
switch to override the default behavior, as follows:
1.
2.
3.
4.
5.
6.
7.
8.
9.
10.
11.
Right-click on the desktop.
Select New from the resulting context-menu.
Select Shortcut from the next menu.
Browse to the CompleteView application directory and select the file named MainClient.exe. (ex:
C:\Program Files\CompleteView\MainClient.exe)
Click Next.
Provide a name for the shortcut as it will appear to the user. (ex: Top Left)
A new icon will appear on the desktop with the name that you supplied in the previous step.
Right-click on the icon and select Properties from the resulting context-menu.
Position the cursor at the end of the text in the field titled Target.
Add a space and the following text: /ID "My Descriptive Label" (Include the quotation
marks. Replace the text between the quotation marks with your own descriptive name.)
Click OK.
Repeat the above procedure as necessary to create as many named instances as you require. As with
the default behavior, each instance can only be loaded into memory a single time. Subsequent launches
of the named instance merely switches the application focus to that instance. You can, however, create a
virtually unlimited number of named instances which can be resident in memory simultaneously.
In order to make the best use of the Multiple Client Operation capabilities, you should also consider
creating separate client user accounts, with each account having their own unique viewing layouts. By
doing so, you can define custom view layouts and view layout switching sequences on a per-monitor
basis.
Parameters for MainClient.exe
/ID "<string value>"
Starts a named instance of the CompleteView Client application.
Example
Window Title
Command Line
CompleteView Video Client (Top
Left)
"c:\program files\completeview\mainclient.exe" /ID "Top Left"
CompleteView Video Client (1)
"c:\program files\completeview\mainclient.exe" /ID "1"
42
Appendices
Note: When connected to a CompleteView ONE server, a maximum of one Video Client
instance can be opened at a time.
43