1
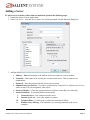
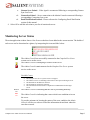
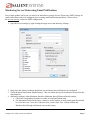
CompleteView™
Admin Console User Manual
CompleteView Version 4.3
i
Table of Contents
Introduction ................................................................................................................. 1
End User License Agreement ...............................................................................................................................1
Overview ..............................................................................................................................................................2
Configuration ............................................................................................................... 3
Starting the Admin Console .................................................................................................................................3
Adding a Server ....................................................................................................................................................4
Monitoring Server Status ......................................................................................................................................5
Monitoring Server Status using Email Notifications……………………………………………………………………………6
Menus .......................................................................................................................... 8
File Menu ..............................................................................................................................................................8
Server Menu .........................................................................................................................................................8
Settings Menu .......................................................................................................................................................9
Session Settings ................................................................................................................................................................................. 9
Operation ................................................................................................................... 10
Info Tab ..............................................................................................................................................................10
Cameras Tab .......................................................................................................................................................11
Volumes Tab.......................................................................................................................................................12
View Volume Contents .................................................................................................................................................................... 13
Events Tab ..........................................................................................................................................................14
Connections Tab .................................................................................................................................................15
Remote Software Updates ......................................................................................... 16
Push Update ........................................................................................................................................................16
ii
Introduction
End User License Agreement
Salient CompleteView™ SOFTWARE LICENSE
1. GRANT OF LICENSE. Salient grants to you the right to use one (1) copy of the Salient CompleteView Server SOFTWARE
on one (1) computer. Salient grants to you the right to use one (1) copy of the Salient CompleteView Client SOFTWARE on any
numbers of computers, provided that the Salient CompleteView Client is solely used to connect to a Salient CompleteView
Server. The SOFTWARE is in "use" on a computer when it is loaded into temporary memory (i.e. RAM) or installed into
permanent memory (e.g. hard disk, CD-ROM or other storage device) of that computer.
2. COPYRIGHT. The SOFTWARE is owned by Salient and/or its licensor(s), if any, and is protected by copyright laws and
international treaty provisions. Therefore you must treat the SOFTWARE like any other copyrighted material (e.g. a book or a
musical recording) except that you may either (a) make a copy of the SOFTWARE solely for backup or archival purposes or (b)
transfer the SOFTWARE to a single hard disk provided you keep the original solely for backup purposes.
3. OTHER RESTRICTIONS. You may not rent, lease or sublicense the SOFTWARE but you may transfer SOFTWARE and
accompanying written materials on a permanent basis provided that you retain no copies and the recipient agrees to the terms of
this agreement. You may not reverse engineer, decompile, or disassemble the SOFTWARE. If the SOFTWARE is an update or
has been updated, any transfer must include the most recent update and all previous versions.
4. THIRD PARTY Software. The SOFTWARE may contain third party software, which requires notices and/or additional terms
and conditions. Such required third party software notices and/or additional terms and conditions are located in the readme file or
other product documentation. By accepting this license agreement, you are also accepting the additional terms and conditions, if
any, set forth therein.
5. TERMINATION. This License is effective until terminated. Your rights under this License will terminate automatically
without notice from Salient if you fail to comply with any term(s) of this License. Upon the termination of this License, you shall
cease all use of the SOFTWARE and destroy all copies, full or partial, of the SOFTWARE.
6. GOVERNING LAW. This agreement shall be deemed performed in and shall be construed by the laws of United States, Texas.
7. DISCLAIMER
THE SOFTWARE IS DELIVERED AS IS WITHOUT WARRANTY OF ANY KIND. THE ENTIRE RISK AS TO THE
RESULTS AND PERFORMANCE OF THE SOFTWARE IS ASSUMED BY THE PURCHASER/THE USER/YOU. Salient
Systems Corporation DISCLAIMS ALL WARRANTIES, WHETHER EXPRESS OR IMPLIED, INCLUDING BUT NOT
LIMITED TO, THE IMPLIED WARRANTIES OF MERCHANTABILITY, FITNESS FOR A PARTICULAR PURPOSE,
TITLE AND NON-INFRINGEMENT, OR ANY WARRANTY ARISING OUT OF ANY PROPOSAL, SPECIFICATION OR
SAMPLE WITH RESPECT TO THE SOFTWARE.
Salient AND/OR ITS LICENSOR(S) SHALL NOT BE LIABLE FOR LOSS OF DATA, LOSS OF PRODUCTION, LOSS OF
PROFIT, LOSS OF USE, LOSS OF CONTRACTS OR FOR ANY OTHER CONSEQUENTIAL, ECONOMIC OR INDIRECT
LOSS WHATSOEVER IN RESPECT OF SALE, PURCHASE, DELIVERY, USE OR DISPOSITION OF THE SOFTWARE.
Salient TOTAL LIABILITY FOR ALL CLAIMS IN ACCORDANCE WITH THE SALE, PURCHASE, DELIVERY AND USE
OF THE SOFTWARE SHALL NOT EXCEED THE PRICE PAID FOR THE SOFTWARE.
CompleteView Admin Console User Manual
Page 1
Overview
CompleteView™ is a Digital Video Management System that is comprised of a comprehensive suite of clientserver software applications designed for operation in a Microsoft Windows environment.
The CompleteView Admin Console is an application that has been designed to allow system administrators the
ability to monitor and manage the video surveillance system. You can use this application to monitor
CompleteView servers for faults and be notified via email when they occur; push software updates to one or
more CompleteView servers; perform forensic analysis of server logfiles; and much more.
Note: Admin Console is a feature of CompleteView Pro and CompleteView Enterprise. CompleteView ONE
does not include multi-server management features such as Admin Console. For upgrade details and pricing
please contact your Salient Integration Partner.
CompleteView Admin Console User Manual
Page 2
Configuration
Starting the Admin Console
You may launch the CompleteView Admin Console application by double-clicking on the icon labeled Admin
Console, as shown below:
Start » All Programs » CompleteView » Admin Console
You may also find the Admin Console icon located on your desktop, depending on the following factors:
1. The item "Create Desktop Icon" was selected during the installation of the application.
2. Windows has been configured to show desktop icons.
The following window will appear after you have started the application:
CompleteView Admin Console User Manual
Page 3
Adding a Server
To add a server to the list of those that are monitored, perform the following steps.
1. Launch the Admin Console application.
2. Select New Server... from the Server menu. You will be presented with the following dialog box.
3. Add the following information.
a. Address – Enter the hostname or IP address of the server that you wish to monitor.
b. Username – Enter name of an existing user account on the server. This user must be an
administrator.
c. Password – Enter the password for the selected user account.
d. Administrative Service Port – If you have configured the CompleteView Administrative Service
with a custom TCP port assignment, enter it here.
e. Events to Monitor – Check the appropriate boxes for those events that you wish to log.
f. Alarm Conditions – Events that generate alarm emails.
i.
Connection Lost – Lost connection to the server.
ii.
Camera Sync Lost – Lost video signal to a camera.
iii. Volume Offline – A video archive volume has been placed offline.
iv.
Hardware Key Missing – The hardware key is no longer attached to the server
computer.
CompleteView Admin Console User Manual
Page 4
v.
Camera Sync Gained – Video signal is reconnected following a corresponding Camera
Sync Lost event
vi. Connection Gained – Server connection to the Admin Console reconnects following a
corresponding Connection Lost event.
vii. Email Notification Enabled – Please reference the Configuring Email Notification
section of this manual.
4. Select OK to add this selection to your list of monitored servers.
Monitoring Server Status
The main application window shows a list of servers that have been added to the current session. The health of
each server can be determined at a glance, by interpreting the icons and label colors.
The Admin Console has successfully connected to the CompleteView Server
system service on the server.
The Admin Console is attempting to connect to the server.
The Admin Console is not connected to the CompleteView Server system
service on the server.
Possible Causes
•
•
•
•
•
BLACK
text
RED
text
The CompleteView Server system service is stopped.
The Admin Console is connecting to the incorrect TCP port on the target server.
The hostname or IP address is incorrect.
The username or password is incorrect.
The selected user account is not a CompleteView administrator for the target
server.
The Admin Console is indicating that the item is performing normally.
The Admin Console is indicating that a non-critical error condition exists on
the server.
To provide assistance in locating the nature of the error condition, the Admin
Console will also use red text to label the information tab and item where the
error has occurred.
CompleteView Admin Console User Manual
Page 5
Monitoring Server Status using Email Notifications
Server status updates can be sent via email to an individual or groups of users. Please note; SMTP settings for
email notifications need to be configured prior to setting email notifications and limits. Please refer to
the Session Settings section for SMTP configuration.
1. Open the Server Settings by right clicking the target server and choosing ‘Settings…’.
2. Drop down the Alarm Conditions drop down box and choose the notification to be configured.
3. Check the Email Notification Enabled setting. This will enable the specific notification chosen from the
drop down list.
4. Optionally configure either Maximum Emails or Minimum Interval Between Emails settings.
a. Check the corresponding checkbox to enable to email notification limit.
b. For Maximum Emails use the arrow controls to set the number of email notifications that should
be set for the event. Note, the Connection Lost, Camera Sync Lost, Volume Offline and
Hardware Key Missing notifications can use this setting.
CompleteView Admin Console User Manual
Page 6
c. For Minimum Interval Between Emails enter the number of seconds between email alerts for the
same event. This will prevent many event alerts from being sent too rapidly. Note, the
Connection Lost, Camera Sync Lost, Volume Offline and Hardware Key Missing notifications
can use this setting.
CompleteView Admin Console User Manual
Page 7
Menus
File Menu
The Admin Console allows you to save the contents of your server list in a session file. You can use multiple
session files to easily group servers that are to be monitored.
Access the session options from the File menu, as shown below.
1. New Session – creates a new, empty session file.
2. Open Session... – opens a previously saved session file.
3. Save Session – saves the current session file using the current filename, if
assigned.
4. Save Session As... – Prompts for a new session filename then save the current
session file.
5. Save and Exit – saves the current session file, and then exits the Admin Console application.
6. Exit – exits the Admin Console application.
Server Menu
Select the item Server from the main menu of the Admin Console and the following items will be available. You
may also right-click any listed server to show the options in a context menu.
1.
2.
3.
4.
5.
6.
7.
8.
9.
New Server... – adds a new server to the server list.
Remove – deletes the selected server from the server list.
Settings... – edit the connection properties of the selected server.
Force Reconnect – forces the Admin Console to reconnect to the selected
server.
View Log – retrieves the log files from the selected server and allows you to
filter them for different events.
Configure Server – launches the Server Configuration application and
automatically logs in to the selected server.
Start Service... – starts the CompleteView Server system service on the selected computer.
Stop Service... – stops the CompleteView Server system service on the selected computer.
Push Update... – launches the remote software update procedure.
CompleteView Admin Console User Manual
Page 8
Settings Menu
Select Settings from the main menu of the Admin Console, and the following items will be available.
1. Session Settings... – Opens a dialog where you can specify global session settings, such as SMTP mail
server settings.
Session Settings
1. Send Email on Alarm Condition – Sends an email to one or more recipients when an alarm condition
exists, and the CompleteView server has been configured to respond to the alarm.
a. Recipients – Specify one or more email address separated by commas.
b. Mail Server (SMTP) – Enter the address of the SMTP mail server that you wish the alarm emails
to be delivered to.
2. Authentication – Select this item if your SMTP server requires that you login before you can send an
email.
a. Username – Enter the user name of an account that has permission to send email.
b. Password – Enter the account password.
3. Sender Name – Enter a name that the email should appear to come from.
4. Sender Email – Enter the email address that the sent email should appear to come from.
CompleteView Admin Console User Manual
Page 9
Operation
Info Tab
This tab contains general information about the selected server.
If the text of an item is colored red, then an alarm condition currently exists.
Server Info
1. Server Address – The
hostname or IP address of
the selected server.
2. Friendly Name – The
internal "Friendly Name"
of the selected server.
3. Version – The product
version of the
CompleteView Server
system service.
4. License Type – Indicated
the edition of
CompleteView installed
(ONE, Pro or Enterprise)
5. License Status –
Indicates the status of the hardware or software key.
6. Server Platform – If the CompleteView installation is 32 bit x32 will be displayed. For 64 bit
CompleteView, x64 will be displayed.
7. Connection Status – Indicates if a valid connection exists to the selected server.
System Stats
Items 1 through 4 can help you determine how Windows is using the memory in the selected computer and
whether it's accessing virtual memory too much, resulting in bottlenecks.
1. Total Physical Memory Available – Total amount of RAM installed in the server computer.
2. Total Physical Memory Used – Total amount of RAM currently in use.
3. Server Virtual Memory Limit – This shows the maximum virtual memory available. For 32 bit
systems the maximum value will be approximately 2000.
4. Server Virtual Memory Used – Displays the mound of virtual memory used. This value should not
exceed Server Virtual Memory Limit.
5. Total System CPU Usage – Shows the total CPU utilization of the selected computer as a percentage.
6. Server CPU Usage – Shows the CPU utilization of the CompleteView Server system service.
CompleteView Admin Console User Manual
Page 10
7. Server Start Time – The time the server was last started and how long it has been continuously
running.
Cameras Tab
This tab contains information about video sources installed in the selected server.
Analog Video Source
IP Video Source
Audio Stream is Available
PTZ Controls are Available
BLACK text
Normal
RED text
Alarm
DK RED text
GRAY text
Unable to reach the IP video source.
Video Source is Disabled
Scheduled Recording
Alarm Event
Video Motion Detection Event
CompleteView Admin Console User Manual
Page 11
Pre-Alarm Recording (Video Buffering)
Scheduled Recording + Video Signal Lost
Alarm Event + Video Signal Lost
Video Motion Detection Event + Video Signal Lost
Pre-Alarm Recording + Video Signal Lost
Video Signal Lost
Volumes Tab
This tab contains information about the configured video archive volumes for the selected server.
Provides a graphical indication of how much free
space remains on the volume
CompleteView Admin Console User Manual
Page 12
1. Volume Info
a. Status – Indicates whether the volume is online and available for recording, or has been placed
offline and is unavailable. At least one volume must be online in order for archiving of video
events to occur.
b. Total Size – The total size in kilobytes (KB) of the volume. If you are utilizing a quota system,
the total size generally indicates the total amount of space available to the user, rather than the
total size of the storage device.
c. Free Space – The total size in KB that is currently available for archiving video events.
2. View Volume Contents – Clicking this button retrieves the video archive contents for the selected
volume and displays them in a new window.
View Volume Contents
This window allows you to display and analyze the video archive contents for the volumes in the server. You
may view any item in the Video event list by using your left mouse button to double-click the item.
Video Event Filters
1. Camera – Limits the displayed video events to those on the selected camera.
2. Volume – Limits the displayed video events to those on the selected volume.
3. Date – Limits the displayed video events to those from the selected date. Days that appear in bold text
in the calendar contain video events. Note: The Video event list will only show events from a single day.
CompleteView Admin Console User Manual
Page 13
Video Types – Limits the display of video events in the Video list to only the event types that have been
selected.
• Scheduled
• Motion
• External Alarm
4. Video Days
a. First – The first date for which video events exist.
b. Last – The most recent date for which video events exist.
c. Total – The total number of days for which video events exist.
5. Video – Displays the video events and details. Note: In the "Size" column, 0MB indicates that the video
event is less than 1MB in size.
Events Tab
This tab shows the log entries that have accumulated since you started the Admin Console. These entries are not
the server log files.
CompleteView Admin Console User Manual
Page 14
Connections Tab
This tab contains a list of the currently open connections to the selected server.
CompleteView Admin Console User Manual
Page 15
Remote Software Updates
Using the Admin Console, it is possible to remotely distribute and apply software updates to each server in your
enterprise via an IP network.
Push Update
In order to distribute and apply a software update to your CompleteView servers, you must first perform the
following simple steps.
1. Obtain the latest CompleteView update from Salient Systems Support ([email protected] or 512617-4802)
2. Extract the server update binary from the zip file to a directory of your choice.
3. Launch the Admin Console.
4. Click on the server that you wish to update. If you would like to select more than one server, hold down
the CTRL key while clicking on additional servers.
5. Right-click on one of the selected servers, and the following context menu will appear.
6. Select the menu item named Push Update...
7. You will next be prompted to locate the server update binary that you extracted from the zip file.
8. After selecting the file that contains the software that you wish to upgrade to, you will be presented with
the following dialog.
CompleteView Admin Console User Manual
Page 16
a. Skip Version Check – Selecting this item will cause the update process to ignore the installed
software version. You will only need to check this item if you wish to reapply a software update
that is the same software version as the installed product, or are attempting to revert to a previous
software version.
b. Update All – Begins the update process for all systems in the server list.
c. Update Selected – Begins the update process for only the selected systems in the server list.
d. Save All Logs – Saves the update log for all servers in a single ASCII text file.
e. Save Selected Logs – Saves the update log for only the currently selected servers.
9. Click on the button named Update All to begin the update process.
10. The status of each update can be obtained by
selecting the individual servers. The update log for
that server will appear in the Log for Selected Server
section.
11. When each update has finished, its completion
status will be displayed as an icon that appears to
the left of the server name as shown below.
CompleteView Admin Console User Manual
Page 17
Additional Resources
Visit the Salient website, www.salientsys.com, for additional support and CompleteView training:
•
Manuals & Documentation (www.salientsys.com/support/manuals-documentationx/) – Includes
Administrator’s Manual, Client User Manuals (including Video, Alarm and Web clients), How To
Guides and Tips.
•
Online Tech Support (www.salientsys.com/elearning) – Get quick access to online tech support
modules that cover the most frequently asked product questions, such as “Adding and Moving IP
Camera Licenses.”
•
Salient University eLearning (http://salientsys.latitudelearning.com) – A convenient way to get trained
on CompleteView. Register online for access to interactive, user training modules covering the Video,
Alarm, Mapping and Web clients.
•
Classroom Training (www.salientsys.com/training) – Traditional, classroom training is available
throughout the United States. Please visit the Salient website for training calendar, agenda and
registration.
Salient Systems
10801 N. MoPac Expy.
Building 3, Suite 700
Austin, TX 78759
512.617.4800
512.617.4801 Fax
www.salientsys.com
©2012 Salient Systems Corporation. Company and product names mentioned are registered trademarks of their respective owners.
CompleteView Admin Console User Manual
Page 18