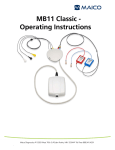
1
Hear
I
D5.
1Gener
a
l
Us
er
’
sManual
f
o
r
y
o
ur
Audi
t
or
yDi
a
gnos
t
i
c
sS
y
s
t
em
© 2014 Mimosa Acoustics, Inc.
This software package and documentation are copyrighted by Mimosa Acoustics, Inc.
All product names used herein are trademarks of their respective companies.
All patients named in examples are fictitious.
For Software Version: 5.1
Manual Version: 3.1.1
Date: October 22, 2014
C
0086
Printed in the U.S.A.
Using this manual
• Use the Find feature of Adobe Reader™ to search for specific words or phrases.
• Pay close attention to warnings, indicated with exclamation marks in the margin.
¢¢¢
• Handy hints are indicated in the margin with an asterisk.
] HINT
• Colored text indicate hyperlinks:
– Internal links take you to related content within the manual, including full references for citations.
– HearID links take you to one of the other HearID manuals.
– External links take you to a web page on an external web site (an active Internet link is needed to view
external web sites).
• Screenshots were captured using Windows™ 7 with the default display settings.
Symbols
The following symbols may be found in this manual, in the HearID program, and on the HearID hardware.
Contents
1 Patient Databases and User Accounts
1.1 Overview . . . . . . . . . . . . . . . . . . . . . . . . . . . . . . . . . . . . . . . . . .
1.2 Running HearID . . . . . . . . . . . . . . . . . . . . . . . . . . . . . . . . . . . . . .
1.2.1 Items in the Main Window . . . . . . . . . . . . . . . . . . . . . . . . . . . . .
1.2.2 Exiting HearID . . . . . . . . . . . . . . . . . . . . . . . . . . . . . . . . . . .
1.3 Administrating Users . . . . . . . . . . . . . . . . . . . . . . . . . . . . . . . . . . . .
1.3.1 Changing the Password . . . . . . . . . . . . . . . . . . . . . . . . . . . . . .
1.3.2 Resetting the Admin Password if Forgotten . . . . . . . . . . . . . . . . . . .
1.3.3 Administrator and User Privileges . . . . . . . . . . . . . . . . . . . . . . . .
1.3.4 Creating and Adding Users . . . . . . . . . . . . . . . . . . . . . . . . . . . .
1.3.5 Changing Users . . . . . . . . . . . . . . . . . . . . . . . . . . . . . . . . . .
1.3.6 Changing e-Signature . . . . . . . . . . . . . . . . . . . . . . . . . . . . . . .
1.4 Administrating Databases . . . . . . . . . . . . . . . . . . . . . . . . . . . . . . . . .
1.4.1 Creating a New Database . . . . . . . . . . . . . . . . . . . . . . . . . . . . .
1.4.2 Opening a Database . . . . . . . . . . . . . . . . . . . . . . . . . . . . . . . .
1.4.3 Detaching a database . . . . . . . . . . . . . . . . . . . . . . . . . . . . . . .
1.4.4 Restoring a Database from Backup . . . . . . . . . . . . . . . . . . . . . . . .
1.4.5 Restoring a Database from an earlier version of HearID or different computer
1.4.6 Default, Sample, and Install Databases . . . . . . . . . . . . . . . . . . . . .
4
.
.
.
.
.
.
.
.
.
.
.
.
.
.
.
.
.
.
.
.
.
.
.
.
.
.
.
.
.
.
.
.
.
.
.
.
.
.
.
.
.
.
.
.
.
.
.
.
.
.
.
.
.
.
.
.
.
.
.
.
.
.
.
.
.
.
.
.
.
.
.
.
.
.
.
.
.
.
.
.
.
.
.
.
.
.
.
.
.
.
.
.
.
.
.
.
.
.
.
.
.
.
.
.
.
.
.
.
.
.
.
.
.
.
.
.
.
.
.
.
.
.
.
.
.
.
.
.
.
.
.
.
.
.
.
.
.
.
.
.
.
.
.
.
.
.
.
.
.
.
.
.
.
.
.
.
.
.
.
.
.
.
.
.
.
.
.
.
.
.
.
.
.
.
.
.
.
.
.
.
7
10
10
11
14
14
15
16
17
17
17
18
18
19
21
22
22
23
23
CONTENTS
1.5
1.6
1.7
1.8
1.9
1.10
1.4.7 Backing Up a Database . . . . . . .
1.4.8 Database Details . . . . . . . . . . .
1.4.9 Directory . . . . . . . . . . . . . . .
Administrating Patients . . . . . . . . . . . .
1.5.1 Patient Administration Options . . .
1.5.2 Creating a New Patient Record . . .
1.5.3 Editing a Patient Record . . . . . . .
1.5.4 Deleting a Patient Record . . . . . .
1.5.5 Sorting Patient Records . . . . . . .
1.5.6 Finding a Patient Record . . . . . .
1.5.7 Printing a Patient Record . . . . . .
1.5.8 Exporting Patient Data . . . . . . . .
Managing Test Histories . . . . . . . . . . .
1.6.1 Viewing a Previous Test . . . . . . .
1.6.2 Editing a Test History . . . . . . . .
1.6.3 Deleting a Test History . . . . . . . .
1.6.4 Printing a Test History . . . . . . . .
1.6.5 Test History Category Maintenance
Measurement Modules . . . . . . . . . . . .
Tools . . . . . . . . . . . . . . . . . . . . . .
1.8.1 Defaults . . . . . . . . . . . . . . . .
1.8.2 General Defaults . . . . . . . . . . .
1.8.3 Activate HearID . . . . . . . . . . . .
1.8.4 Application Logging . . . . . . . . .
1.8.5 Probe Management . . . . . . . . .
1.8.6 Export Defaults . . . . . . . . . . . .
Help . . . . . . . . . . . . . . . . . . . . . .
Presto Mode . . . . . . . . . . . . . . . . .
1.10.1 Making a Presto Measurement . . .
5
.
.
.
.
.
.
.
.
.
.
.
.
.
.
.
.
.
.
.
.
.
.
.
.
.
.
.
.
.
.
.
.
.
.
.
.
.
.
.
.
.
.
.
.
.
.
.
.
.
.
.
.
.
.
.
.
.
.
.
.
.
.
.
.
.
.
.
.
.
.
.
.
.
.
.
.
.
.
.
.
.
.
.
.
.
.
.
.
.
.
.
.
.
.
.
.
.
.
.
.
.
.
.
.
.
.
.
.
.
.
.
.
.
.
.
.
.
.
.
.
.
.
.
.
.
.
.
.
.
.
.
.
.
.
.
.
.
.
.
.
.
.
.
.
.
.
.
.
.
.
.
.
.
.
.
.
.
.
.
.
.
.
.
.
.
.
.
.
.
.
.
.
.
.
.
.
.
.
.
.
.
.
.
.
.
.
.
.
.
.
.
.
.
.
.
.
.
.
.
.
.
.
.
.
.
.
.
.
.
.
.
.
.
.
.
.
.
.
.
.
.
.
.
.
.
.
.
.
.
.
.
.
.
.
.
.
.
.
.
.
.
.
.
.
.
.
.
.
.
.
.
.
.
.
.
.
.
.
.
.
.
.
.
.
.
.
.
.
.
.
.
.
.
.
.
.
.
.
.
.
.
.
.
.
.
.
.
.
.
.
.
.
.
.
.
.
.
.
.
.
.
.
.
.
.
.
.
.
.
.
.
.
.
.
.
.
.
.
.
.
.
.
.
.
.
.
.
.
.
.
.
.
.
.
.
.
.
.
.
.
.
.
.
.
.
.
.
.
.
.
.
.
.
.
.
.
.
.
.
.
.
.
.
.
.
.
.
.
.
.
.
.
.
.
.
.
.
.
.
.
.
.
.
.
.
.
.
.
.
.
.
.
.
.
.
.
.
.
.
.
.
.
.
.
.
.
.
.
.
.
.
.
.
.
.
.
.
.
.
.
.
.
.
.
.
.
.
.
.
.
.
.
.
.
.
.
.
.
.
.
.
.
.
.
.
.
.
.
.
.
.
.
.
.
.
.
.
.
.
.
.
.
.
.
.
.
.
.
.
.
.
.
.
.
.
.
.
.
.
.
.
.
.
.
.
.
.
.
.
.
.
.
.
.
.
.
.
.
.
.
.
.
.
.
.
.
.
.
.
.
.
.
.
.
.
.
.
.
.
.
.
.
.
.
.
.
.
.
.
.
.
.
.
.
.
.
.
.
.
.
.
.
.
.
.
.
.
.
.
.
.
.
.
.
.
.
.
.
.
.
.
.
.
.
.
.
.
.
.
.
.
.
.
.
.
.
.
.
.
.
.
.
.
.
.
.
.
.
.
.
.
.
.
.
.
.
.
.
.
.
.
.
.
.
.
.
.
.
.
.
.
.
.
.
.
.
.
.
.
.
.
.
.
.
.
.
.
.
.
.
.
.
.
.
.
.
.
.
.
.
.
.
.
.
.
.
.
.
.
.
.
.
.
.
.
.
.
.
.
.
.
.
.
.
.
.
.
.
.
.
.
.
.
.
.
.
.
.
.
.
.
.
.
.
.
.
.
.
.
.
.
.
.
.
.
.
.
.
.
.
.
.
.
.
.
.
.
.
.
.
.
.
.
.
.
.
.
.
.
.
.
.
.
.
.
.
.
.
.
.
.
.
.
.
.
.
.
.
.
.
.
.
.
.
.
.
.
.
.
.
.
.
.
.
.
.
.
.
.
.
.
.
.
.
.
.
.
.
.
.
.
.
.
.
.
.
.
.
.
.
.
.
.
.
.
.
.
.
.
.
.
.
.
.
.
.
.
.
.
.
.
.
.
.
.
.
.
.
.
.
.
.
.
.
.
.
.
.
.
.
.
.
.
.
.
.
.
.
.
.
.
.
.
.
.
.
.
.
.
.
.
.
.
.
.
.
.
.
.
.
.
.
.
.
.
.
.
.
.
.
.
.
.
.
.
.
.
.
.
.
.
.
.
.
.
.
.
.
.
.
.
.
.
.
.
.
.
.
.
.
.
.
.
.
.
.
.
.
.
.
.
.
.
.
.
.
.
.
.
.
.
.
.
.
.
.
.
.
.
.
.
.
.
.
.
.
.
.
.
.
.
.
.
.
.
.
.
.
.
.
.
.
.
.
.
.
.
.
.
.
.
.
.
.
.
.
.
26
26
26
27
27
27
29
30
30
30
32
32
37
37
38
41
42
42
44
45
45
45
47
48
48
50
51
52
53
CONTENTS
2 Preparing the Patient and Fitting Eartips
2.1 Otoscopic examination . . . . . . . . . . .
2.2 ER10C Probe and Eartip Usage . . . . .
2.3 Selecting an Eartip . . . . . . . . . . . . .
2.4 Fitting the Eartip on the Probe . . . . . .
2.5 Fitting a Rubber Eartip into an Ear Canal
2.6 Fitting a Foam Eartip into an Ear Canal .
2.7 Instructing the Patient . . . . . . . . . . .
2.8 Video Tutorials . . . . . . . . . . . . . . .
6
.
.
.
.
.
.
.
.
.
.
.
.
.
.
.
.
.
.
.
.
.
.
.
.
.
.
.
.
.
.
.
.
.
.
.
.
.
.
.
.
.
.
.
.
.
.
.
.
3 Hardware Setup and Operating Conditions
3.1 HearID hardware inventory . . . . . . . . . . . . . .
3.2 HearID hardware components . . . . . . . . . . . .
3.3 Computer hardware and system requirements . . .
3.4 Electrical Safety for the Patient and User . . . . . . .
3.5 Cleaning, preventative inspection, and maintenance
3.5.1 Linearity Check . . . . . . . . . . . . . . . . .
3.6 Environmental conditions . . . . . . . . . . . . . . .
.
.
.
.
.
.
.
.
.
.
.
.
.
.
.
.
.
.
.
.
.
.
.
.
.
.
.
.
.
.
.
.
.
.
.
.
.
.
.
.
.
.
.
.
.
.
.
.
.
.
.
.
.
.
.
.
.
.
.
.
.
.
.
.
.
.
.
.
.
.
.
.
.
.
.
.
.
.
.
.
.
.
.
.
.
.
.
.
.
.
.
.
.
.
.
.
.
.
.
.
.
.
.
.
.
.
.
.
.
.
.
.
.
.
.
.
.
.
.
.
.
.
.
.
.
.
.
.
.
.
.
.
.
.
.
.
.
.
.
.
.
.
.
.
.
.
.
.
.
.
.
.
.
.
.
.
.
.
.
.
.
.
.
.
.
.
.
.
.
.
.
.
.
.
.
.
.
.
.
.
.
.
.
.
.
.
.
.
.
.
.
.
.
.
.
.
.
.
.
.
.
.
.
.
.
.
.
.
.
.
.
.
.
.
.
.
.
.
.
.
.
.
.
.
.
.
.
.
.
.
.
.
.
.
.
.
.
.
.
.
.
.
.
.
.
.
.
.
.
.
.
.
.
.
.
.
.
.
.
.
.
.
.
.
.
.
.
.
.
.
.
.
.
.
.
.
.
.
.
.
.
.
.
.
.
.
.
.
.
.
.
.
.
.
.
.
.
.
.
.
.
.
.
.
.
.
.
.
.
.
.
.
.
.
.
.
.
.
.
.
.
.
.
.
.
.
.
.
.
.
.
.
.
.
.
.
.
.
.
.
.
.
.
.
.
.
.
.
.
.
.
.
.
.
.
.
.
.
.
.
.
.
.
.
.
.
.
.
.
.
.
.
.
.
.
.
.
.
.
.
.
.
.
.
.
.
.
.
.
.
.
.
.
.
.
.
.
.
.
.
.
.
.
.
.
.
.
.
.
.
.
.
.
56
57
57
58
59
66
66
69
69
.
.
.
.
.
.
.
70
71
72
75
76
76
77
77
A Troubleshooting
78
B Contact & Technical Support
82
Chapter 1
Patient Databases and User Accounts
Contents
1.1 Overview . . . . . . . . . . . . . . . . . . . . . . . . . . . . . . . . . . . . . . . . . . . . . . . . . . . . .
10
1.2 Running HearID . . . . . . . . . . . . . . . . . . . . . . . . . . . . . . . . . . . . . . . . . . . . . . . . .
10
1.2.1 Items in the Main Window . . . . . . . . . . . . . . . . . . . . . . . . . . . . . . . . . . . . . . . .
11
1.2.2 Exiting HearID . . . . . . . . . . . . . . . . . . . . . . . . . . . . . . . . . . . . . . . . . . . . . .
14
1.3 Administrating Users . . . . . . . . . . . . . . . . . . . . . . . . . . . . . . . . . . . . . . . . . . . . . .
14
1.3.1 Changing the Password . . . . . . . . . . . . . . . . . . . . . . . . . . . . . . . . . . . . . . . . .
15
1.3.2 Resetting the Admin Password if Forgotten . . . . . . . . . . . . . . . . . . . . . . . . . . . . . .
16
1.3.3 Administrator and User Privileges . . . . . . . . . . . . . . . . . . . . . . . . . . . . . . . . . . .
17
1.3.4 Creating and Adding Users . . . . . . . . . . . . . . . . . . . . . . . . . . . . . . . . . . . . . . .
17
1.3.5 Changing Users . . . . . . . . . . . . . . . . . . . . . . . . . . . . . . . . . . . . . . . . . . . . .
17
1.3.6 Changing e-Signature . . . . . . . . . . . . . . . . . . . . . . . . . . . . . . . . . . . . . . . . . .
18
1.4 Administrating Databases . . . . . . . . . . . . . . . . . . . . . . . . . . . . . . . . . . . . . . . . . . .
18
7
8
1.4.1 Creating a New Database . . . . . . . . . . . . . . . . . . . . . . . . . . . . . . . . . . . . . . . .
19
1.4.2 Opening a Database . . . . . . . . . . . . . . . . . . . . . . . . . . . . . . . . . . . . . . . . . . .
21
1.4.3 Detaching a database . . . . . . . . . . . . . . . . . . . . . . . . . . . . . . . . . . . . . . . . . .
22
1.4.4 Restoring a Database from Backup . . . . . . . . . . . . . . . . . . . . . . . . . . . . . . . . . . .
22
1.4.5 Restoring a Database from an earlier version of HearID or different computer . . . . . . . . . . .
23
1.4.6 Default, Sample, and Install Databases . . . . . . . . . . . . . . . . . . . . . . . . . . . . . . . .
23
1.4.7 Backing Up a Database . . . . . . . . . . . . . . . . . . . . . . . . . . . . . . . . . . . . . . . . .
26
1.4.8 Database Details . . . . . . . . . . . . . . . . . . . . . . . . . . . . . . . . . . . . . . . . . . . . .
26
1.4.9 Directory . . . . . . . . . . . . . . . . . . . . . . . . . . . . . . . . . . . . . . . . . . . . . . . . .
26
1.5 Administrating Patients . . . . . . . . . . . . . . . . . . . . . . . . . . . . . . . . . . . . . . . . . . . .
27
1.5.1 Patient Administration Options . . . . . . . . . . . . . . . . . . . . . . . . . . . . . . . . . . . . .
27
1.5.2 Creating a New Patient Record . . . . . . . . . . . . . . . . . . . . . . . . . . . . . . . . . . . . .
27
1.5.3 Editing a Patient Record . . . . . . . . . . . . . . . . . . . . . . . . . . . . . . . . . . . . . . . . .
29
1.5.4 Deleting a Patient Record . . . . . . . . . . . . . . . . . . . . . . . . . . . . . . . . . . . . . . . .
30
1.5.5 Sorting Patient Records . . . . . . . . . . . . . . . . . . . . . . . . . . . . . . . . . . . . . . . . .
30
1.5.6 Finding a Patient Record . . . . . . . . . . . . . . . . . . . . . . . . . . . . . . . . . . . . . . . .
30
1.5.7 Printing a Patient Record . . . . . . . . . . . . . . . . . . . . . . . . . . . . . . . . . . . . . . . .
32
1.5.8 Exporting Patient Data . . . . . . . . . . . . . . . . . . . . . . . . . . . . . . . . . . . . . . . . . .
32
1.6 Managing Test Histories . . . . . . . . . . . . . . . . . . . . . . . . . . . . . . . . . . . . . . . . . . . .
37
1.6.1 Viewing a Previous Test . . . . . . . . . . . . . . . . . . . . . . . . . . . . . . . . . . . . . . . . .
37
1.6.2 Editing a Test History . . . . . . . . . . . . . . . . . . . . . . . . . . . . . . . . . . . . . . . . . .
38
1.6.3 Deleting a Test History . . . . . . . . . . . . . . . . . . . . . . . . . . . . . . . . . . . . . . . . . .
41
1.6.4 Printing a Test History . . . . . . . . . . . . . . . . . . . . . . . . . . . . . . . . . . . . . . . . . .
42
1.6.5 Test History Category Maintenance . . . . . . . . . . . . . . . . . . . . . . . . . . . . . . . . . .
42
9
1.7 Measurement Modules . . . . . . . . . . . . . . . . . . . . . . . . . . . . . . . . . . . . . . . . . . . . .
44
1.8 Tools . . . . . . . . . . . . . . . . . . . . . . . . . . . . . . . . . . . . . . . . . . . . . . . . . . . . . . .
45
1.8.1 Defaults . . . . . . . . . . . . . . . . . . . . . . . . . . . . . . . . . . . . . . . . . . . . . . . . . .
45
1.8.2 General Defaults . . . . . . . . . . . . . . . . . . . . . . . . . . . . . . . . . . . . . . . . . . . . .
45
1.8.3 Activate HearID . . . . . . . . . . . . . . . . . . . . . . . . . . . . . . . . . . . . . . . . . . . . . .
47
1.8.4 Application Logging . . . . . . . . . . . . . . . . . . . . . . . . . . . . . . . . . . . . . . . . . . .
48
1.8.5 Probe Management . . . . . . . . . . . . . . . . . . . . . . . . . . . . . . . . . . . . . . . . . . .
48
1.8.6 Export Defaults . . . . . . . . . . . . . . . . . . . . . . . . . . . . . . . . . . . . . . . . . . . . . .
50
1.9 Help . . . . . . . . . . . . . . . . . . . . . . . . . . . . . . . . . . . . . . . . . . . . . . . . . . . . . . . .
51
1.10 Presto Mode . . . . . . . . . . . . . . . . . . . . . . . . . . . . . . . . . . . . . . . . . . . . . . . . . . .
52
1.10.1 Making a Presto Measurement . . . . . . . . . . . . . . . . . . . . . . . . . . . . . . . . . . . . .
53
1.1 Overview
1.1
10
Overview
This chapter covers setting up and maintaining User Accounts and Patient Databases, Patient Administration,
and Presto Mode. Ensure the HearID software is installed and that the software is activated (see the Installation
Manual) before beginning.
1.2
Running HearID
Run HearID by double-clicking the HearID icon
on your desktop or by choosing it from the Windows Start
menu. HearID hardware must be connected before starting the program if measurements will be made. Connecting
the hardware is not required for reviewing captured measurements. Once HearID has loaded, the Login Window
appears (see Figure 1.1). The first time you start the program, select the Default database and log in using the default
administrator username and password:
• Select “Default” from the list of databases.
• Type the user name “Admin” into the User Name textbox, and then type “password” into the Password textbox
(see Figure 1.1). The user name and password are case sensitive. The main window opens.
• It is strongly recommended that the “Admin” password is changed as soon as possible (see Section 1.3.1).
¢¢¢
Once the user accounts are set up (see Section 1.3), log into HearID using your own user name and password.
If you mistype the user name or password, you are prompted to Retry or Cancel. Three retries are allowed before ¢¢¢
HearID exits.
The About HearID window pops up while HearID is loading (see Figure 1.2). It shows the program and module
versions, and contact details. Load this window at any time by choosing About HearID off the Help menu.
1.2 Running HearID
1.2.1
11
Items in the Main Window
Once you successfully log into HearID you are presented with the main window. Figure 1.3 shows the main window
with key items indicated with arrows. Take a few minutes to familiarize yourself with the main window. The options
available depend on which HearID measurement modules are installed. The Patient List and Test History List may
be empty.
Figure 1.1: Enter the default user name and password in the Login window.
1.2 Running HearID
12
Main Menu
The main menu allows you to manage databases (menu option Database), manage patients (menu option Patient),
manage test histories (menu option Test History), set options (menu option Tools), and get help (menu option Help).
This manual covers these options. Depending which measurement modules are configured for your system, you may
also have MEPA, DPOAE, TEOAE, and other measurement module menus. Please see the MEPA3 Module Manual,
DP Module Manual and TE Module Manual, respectively, for options provided under these menus.
Figure 1.2: The About HearID window appears while HearID is loading.
1.2 Running HearID
13
Figure 1.3: Main window example with key areas labeled. The toolbar buttons on the left are for patient management, the other
toolbar buttons are for measurements. This example shows the MEPA3, DP and TE measurement toolbars.
1.3 Administrating Users
14
Main Toolbar
The main toolbar displays sets of buttons that activate commonly used operations (see Figure 1.3). They are a subset
of those options available from the Main Menu. The first button set is for patient administration:
• The New button opens the window to creating a new patient record (see Section 1.5.2).
• The Edit button opens the window to edit existing patient information (see Section 1.5.3).
• The Find button allows you to search for patient records (see Section 1.5.6).
• The Delete button allows you to delete a patient record (see Section 1.5.4).
The measurement button sets are displayed to the right of the patient administration button set. Click on the tab
to bring options for a given measurement type into view. The tabs visible depend on which measurement modules
you have purchased. Please see the MEPA3 Module Manual, DP Module Manual and TE Module Manual for more
information about the options provided by these button sets.
The mode field at the far right indicates which measurement module is currently active, which is especially useful ] HINT
to know when using keyboard shortcuts as each key may have multiple functions depending on the mode.
1.2.2
Exiting HearID
Exit HearID by choosing Exit from the Database menu, pressing [C TRL –Q], pressing [A LT–F4], or by selecting the
small ‘X’ in the uppermost top right of the window.
1.3
Administrating Users
In this section, the user administration options under the Database menu (see Figure 1.4) are reviewed. Activate the
Database menu by selecting it or by pressing [A LT–B], and then select User Administration. The User Administration window will appear, allowing you to add a new user, change user details including password, or delete an
existing user.
1.3 Administrating Users
15
(a) Database menu
(b) User Administration window
Figure 1.4: Database menu and User Administration options.
1.3.1
Changing the Password
To change your password, choose Edit User from the User Administration window (see Figure 1.4). We strongly ¢¢¢
recommend changing the default password for the Admin user name. The Edit User window appears (see Figure 1.5). Enter your new password, and then confirm your new password by typing it in again. Asterisks will appear
instead of the characters you type as a security measure.
1.3 Administrating Users
16
Figure 1.5: The Edit User window.
1.3.2
Resetting the Admin Password if Forgotten
If the username for the Admin user has been forgotten, it may be reset as follows. The process involves obtaining
a code from both HearID and from your vendor. Read through the following instructions, obtain the reset code, then
call your vendor. The reset code works only once and is case sensitive.
• From the HearID Login screen, choose Help and choose the Reset Password button.
• A window will appear providing a code.
• Copy the code down and contact your vendor.
• Your vendor will provide another code.
1.3 Administrating Users
17
• You will be prompted to input the code from your vendor and then the code generated from HearID.
• The Admin user’s password has been reset to “password.” We recommend changing this password as described
in Section 1.3.1
1.3.3
Administrator and User Privileges
Users can either have administrator privileges or user privileges. Only an Administrator can create other administrators. Admin users have exclusive privileges to create, detach, and restore databases; create administrator level
users; edit comments; use the TE module in Research Mode; and adjust the TE and DP test parameters.
1.3.4
Creating and Adding Users
To add a new user, activate the Database menu by selecting it or by pressing [A LT–B] and select User Administration (see Figure 1.4). Choose New User from the User Administration window. The Create User window appears
(see Figure 1.6). Enter a user name, e-signature (user identifier displayed on measurement printouts), password and
password confirmation, and set the privilege. Only an Administrator can create other administrators.
Users are specific to each database. If the same user requires access to multiple databases, their profile must be
entered separately for each database. To avoid confusion, it is recommended that the same user chooses the same ] HINT
user name and password for each HearID database.
1.3.5
Changing Users
To change the current user while HearID is running, choose Change User from the Database menu (see Figure 1.4).
The Login window appears (see Figure 1.1). Enter your user name and password. The database currently in use
is indicated (Choose Database Open instead to log into a different database). Ensure that you are logged in as the
correct user and into the correct database so that your name and e-signature are attached to the measurements that
you make, and so that the measurements are stored in the correct database. The current database and current user
are shown in the status bar (e.g.,
).
1.4 Administrating Databases
18
Figure 1.6: The Create User window.
1.3.6
Changing e-Signature
An e-Signature is a user identifier that is displayed on measurement printouts. To change your e-signature, choose
User Administration from the Database menu and then Edit User (see Figure 1.4). Enter a new e-signature in the
ESignature field (see Figure 1.6). Measurements made using the old e-signature are not modified.
1.4
Administrating Databases
In this section, the database options under the Database menu (see Figure 1.4) are reviewed. Activate the Database
menu by clicking on it or by pressing [A LT–B].
1.4 Administrating Databases
19
You can choose to use the Default database (an empty database), the Sample database (contains measurement
examples), or to set up a new database (or multiple databases). By setting up a new database, a more meaningful
name and description can be given. Multiple databases can be useful when managing multiple research studies or
patient groups (e.g., various clinics or work sites). All users must be entered manually for each database.
1.4.1
Creating a New Database
Figure 1.7: The Create New Database window with example details filled in.
Only administrators are allowed to create a new database. To create a new database, choose New from the
Database menu. The Create New Database window appears (see Figure 1.7). See Section 1.4.5 on how to open
an existing database from a previous version of HearID or from a different computer.
Navigate to the folder in which the database and associated data files are to be stored by choosing the browse
button (indicated in Figure 1.7). Type the new database name in the File field. Check that the Save as type: field
indicates Database (*.MDB). Choose Save to create the database. Alternatively, you can type the database path
and filename directly into the File field in the Create New Database window (see Figure 1.7). The path you specify
must exist. If you attempt to make a new database with the name of an already existing database, you will be warned.
1.4 Administrating Databases
20
Figure 1.8: Each database must reside in a folder with no other databases. The warning appears if you try to save to a folder
that already contains a database.
To avoid inadvertently overwriting data, HearID requires that each new database is created in a folder containing
no other database (*.MDB) files. Figure 1.8 displays the warning that pops up if an attempt is made to create a new
database in a folder that already holds a database. If you are importing database(s) created with earlier versions of
HearID, they may remain in their original folder with multiple databases and associated files.
The Identifier and Description fields in the Create New Database window will change to be the same name
as the new database. You can change both further as necessary. The Identifier is a short unique name for the
database. Use a name which readily identifies the database to users (e.g., Trial AC-003322). The Description is
used to provide additional descriptive information about the database. See Figure 1.7 for a filled-in example and
Figure 1.9 for an example of where this information is used. Choosing OK initiates database creation. The window in
Figure 1.10 appears to confirm that the database was created.
Once the database is initialized, the Create User window appears. Follow the instructions in Section 1.3.4 to
create one user. This user must be an administrator. If you add more users or do any other database operations at
this stage, you will change only the current database and not the new database. To add more users and to use a new ¢¢¢
database once it is created, switch to the new database by opening it (see Section 1.4.2).
1.4 Administrating Databases
21
Figure 1.9: The Login window showing multiple database choices. When you log in, open a database, or change user, the
Description is displayed on the system Login screen after a database Identifier is selected from the list.
1.4.2
Opening a Database
To open an existing database, choose Open from the Database menu or press [C TRL –O]. The Login window
appears. Fill in your user name, password, and choose the desired database (see Figure 1.9). If the database you
want to use is not shown, choose Other, which prompts you to choose New from the Database menu. Section 1.4.5
describes further how to link to an existing database.
1.4 Administrating Databases
22
Figure 1.10: Confirmation of successful database creation. To switch to this database, choose Open on the Database menu.
1.4.3
Detaching a database
Administrators may detach databases from HearID so that the database no longer appear as an option on the login
screen. The currently active database cannot be detached. To detach the currently active database, open a different
database first. To detach the database, choose Detach from the Database menu. The Detach Database window
appears showing a list of available databases. Select the database you wish to detach and choose OK. Choose
Close to return to HearID when you are finished detaching database(s). Detaching does not delete the database,
it merely disassociates the database from HearID. The database remains in the same location. Databases may be
reattached by following the instructions in Section 1.4.5.
1.4.4
Restoring a Database from Backup
Administrators may restore databases and the corresponding data files from the backup archive (backups are stored
in the Backups folder in *.zip format). This may be necessary if the database is corrupted. To restore a database,
choose Restore from the Database menu. The Restore Database window appears with further instructions. Zip
archives are named according to their Identifier and have a date/time stamp attached. Select the zip archive you
wish to restore and choose Open. The Identifier and Description fields in the Restore Database window are filled
in automatically but may be modified if desired. Choose OK to restore the database.
1.4 Administrating Databases
1.4.5
23
Restoring a Database from an earlier version of HearID or different computer
Administrators may restore a database that was accidentally detached or an existing database from a previous version
of HearID or one created on a different computer. To restore a database, choose Restore from the Database menu.
The Restore Database window appears with further instructions. Selecting the navigation browse button (indicated
in Figure 1.7) opens up a window where you can navigate to the folder in which the database and associated data files
are stored. Change the file type field to Database Files (*.MDB), as seen in Figure 1.11. Navigate to the database
location, select the database file you wish to restore and choose Open. If the database and associated data files
are on a different computer, you will need to first transfer the files to an appropriate folder on the current computer.
Alternatively, you may be able to connect to the database over a computer network. The Identifier and Description
fields in the Restore Database window are filled in automatically, but may be modified accordingly. Choose OK to
restore the database.
If the database was created in an older version of HearID, an upgrade to the database structure may be necessary.
The Update Database dialog will appear if a database upgrade is required (see Figure 1.12). New and upgraded
databases are not compatible with old versions of HearID. Please create a backup of the database using Backup ¢¢¢
Database before upgrading in case of an error during the upgrade process. Select Upgrade to permanently alter the
database structure.
1.4.6
Default, Sample, and Install Databases
HearID comes with three databases: Default, Sample, and Install. Both the Default and the Sample database have
the administrator Username “Admin” and Password “password.” It is recommended that the default password for both
is changed (see Section 1.3.1). The Default database is empty and may be used as the primary database. See
Section 1.4.1 on setting up new databases.
The Sample database provides measurement examples for the various measurement modules: MEPA3, DP, and
TE. These examples may only be opened for viewing if HearID is configured for that measurement. Included are data
sets for a normal-hearing adult male ear (TEOAE, DPOAE, and MEPA measurements using the factory-supplied
measurement protocols), a data set for a normal-hearing adult female ear (SOAEs), and MEPA data sets for ears
with various pathologies. Although data may be added to the Sample database, it is not recommended.
¢¢¢
1.4 Administrating Databases
24
Figure 1.11: Navigate to the folder where the database is stored and select Database Files (*.MDB) in the Files of type: field.
Choose the database then Open it to load it into the current version of HearID.
1.4 Administrating Databases
25
Figure 1.12: The Database Update dialog
The Install database is a special database that is not listed on the Login screen, but you may come across it if you
are looking in the Data folder. HearID uses the Install database for creating new databases. Do not delete or use the ¢¢¢
Install database. It is for internal system use only.
1.4 Administrating Databases
1.4.7
26
Backing Up a Database
To backup the currently active database, select Backup from the Database menu. The database is zipped along with
associated data files and saved to the Backups folder under the main HearID program folder with the name Database
name and date/time stamp as a filename, e.g., Trial AC-993300\_0804231147.zip, where AC-993300 is the
*.MDB database filename and 0804231147 is the year-month-day-time timestamp. Data can be backed up automatically after every session. See Section 1.8.2 for automatic backup settings.
1.4.8
Database Details
Figure 1.13: The Database Details window.
Database details can be accessed by selecting Database Details from the Database menu (see Figure 1.13).
1.4.9
Directory
To open a new explorer window to the current database location, select Directory from the Database menu.
1.5 Administrating Patients
1.5
1.5.1
27
Administrating Patients
Patient Administration Options
Figure 1.14 illustrates the patient administration options available for the main window. Either use the buttons on
the Patient toolbar or use the drop-down menu (choose Patient or press [A LT–P],) to create New, Edit, Delete, Find,
Print, or Export patient records in the database. Some menu options may be unavailable until there is at least one
patient record in the database.
(a) Patient toolbar
(b) Main menu
Figure 1.14: Patient administration options in main window.
1.5.2
Creating a New Patient Record
To create a new patient record, press [C TRL –N], or choose New from the Patient menu, or choose the New button
on the Patient toolbar (see Figure 1.14). The Patient Info window will appear (see Figure 1.15). Fill in each field.
Patient ID is an optional but recommended field. Age is automatically calculated from the Date of Birth. If a Date of
Birth is not entered, it defaults to the current date. Pathology Comment is also an optional, but recommended field.
When you have entered the patient’s information, choose Save to write the results to the database.
1.5 Administrating Patients
28
Figure 1.15: The Patient Info window with an example patient entered.
The Patient List summarizes each patient record (see Figure 1.16 for an example). Highlighting a record enables
editing.
It can be useful to create “patient” records for each measurement probe. Use the probe serial number as the ] HINT
Patient ID and First Name, and the type of probe (ER10C) as the Last Name. Use these profiles when you test the
probe in a coupler, such as a syringe cavity or artificial ear.
1.5 Administrating Patients
29
Figure 1.16: An example patient list.
1.5.3
Editing a Patient Record
To edit a patient’s details, first highlight the patient’s details in the patient record list, if it is not already highlighted,
(see Figure 1.16). Then either:
• double-click on the patient’s details,
• choose Edit from the Patient menu,
• choose the Edit button on the toolbar (see Figure 1.14), or
• right click in the Patient List and choose Edit Patient from the context menu.
The Patient Info window appears (see Figure 1.15). All details may be edited as necessary.
Note that Patient ID shown in Figure 1.16 is a user-assigned number that is set using the Patient Info window
(see Figure 1.15), whereas the ID# number shown in Figure 1.16 is an automatically-assigned database number that
cannot be edited (it is used for naming the DPOAE and MEPA data files).
1.5 Administrating Patients
1.5.4
30
Deleting a Patient Record
To delete a patient’s details — along with the patient’s test history — first highlight the patient’s details in the patient
list record. Multiple patients may be removed at one time by holding down the [C TRL ] key and using the mouse to
click the gray box on the left-hand-side to select multiple patients. The cursor changes into an arrow when you move
over the box to indicate that the record may be selected. To delete, either:
• choose Delete Patient from the Patient menu,
• choose the Delete button on the toolbar (see Figure 1.14),
• press [D ELETE ], or
• right click in the Patient List and choose Delete Patient(s) from the context menu.
A window will pop up asking you to confirm the deletion. Deleting a patient removes the patient and test history from
the database.
1.5.5
Sorting Patient Records
The patient records displayed in the patient record list (Figure 1.16) can be sorted by clicking on a gray column
header. Repeated clicking of a column header will toggle between sorting by ascending and descending order.
1.5.6
Finding a Patient Record
To find a patient record, press [C TRL –F], or choose Find Patient from the Patient menu, or choose the Find button
on the toolbar (see Figure 1.14). The Find patient window will appear (see Figure 1.17) where you can enter search
criteria. First check the boxes on the left to indicate which fields you would like entered into the search, then enter in
the search information. Search phrases are not case sensitive. Search options include Patient ID, First Name, Last
Name, and Month, Day, and/or Year of birth. The fields are combined by using AND (not OR such as commonly seen
in Internet searches), so a patient record must match all search conditions.
1.5 Administrating Patients
31
You may also use wildcards “*” or “?” in your search, except in the date of birth fields. Wildcard “?” represents a
single character while “*” represents multiple characters (including zero characters). Wildcards work in the beginning,
middle and at the end of phrases.
Figure 1.17: The Find patient window with search parameters entered. This search will find all patients born in 2003 with a last
name beginning with “K”.
Using the patient list in Figure 1.16 as an example and searching on Last Name:
a* will find patient Arbuckle.
*a* will find patients Arbuckle, Kanno, Ora, and Wang.
?a* will find patients Kanno, and Wang.
*a will find patient Ora.
1.5 Administrating Patients
32
Choose Find Next to find the next record in the patient list that matches the search criteria. If that is not the record
you are searching for, continue to choose Find Next until you locate the desired record. If no patient is found that
matches the search criteria, a notification window appears.
Choose Clear All to remove all the current search parameters. You may then enter new parameters. Choose
Cancel when you are finished.
1.5.7
Printing a Patient Record
Patient records can be printed, either for all patients or for a selection of patients. The printout includes the following
information: last name, first name, middle initial, sex, birth date, patient ID, and comments.
To print all patient records, press [C TRL –P] or choose Print Patient List on the Patient menu. A Print Patient
window appears. Choose Print all patients and click Print.
To print a selection of patients, first select the patient records in the Patient List window (see Figure 1.16) by
highlighting the patient’s details in the patient list record. Multiple patients may be selected at one time by holding
down the [C TRL ] key and using the mouse to click the gray box on the left-hand-side to select multiple patients. The
cursor changes into an arrow when you move over the box to indicate that the record may be selected. Once you
have selected the patients, press [C TRL –P] or choose Print Patient List on the Patient menu. A Print Patient
window appears (see Figure 1.18). Choose Print selected patient(s) and click Print. Records are printed in the
order in which they were selected.
1.5.8
Exporting Patient Data
Patient data can be exported to a Microsoft Excel (*.xls) file. Excel must be installed in order for this feature to ¢¢¢
work.
Choose Export Data on the Patient menu. The Data Export window will appear (see Figure 1.19). In the Export
Source section (upper half), choose to export either the test histories of selected patients in the Patient Window,
selected test histories in the Test History Window, or all test histories. In the Export To section (lower half) choose
a destination folder into which the exported data (*.xls file) will be saved by choosing Select Folder or by typing a
folder name in the text field. The full (*.xls) filename will be generated automatically.
1.5 Administrating Patients
33
Figure 1.18: Printing options for printing patient records.
Before exporting data, select measurement module data export options by choosing Export Configuration. The
Export Configuration module window will appear (see Figure 1.20). The TEOAE, DPOAE and MEPA modules
have different export configuration options. Select one of the measurement modules and click OK. The Export
Configuration windows for the selected module appears (see Figure 1.21). Each module has data fields that you
can choose to export. Please see the TE Module Manual, DP Module Manual and MEPA3 Module Manual for details
about these data fields. Tick or untick data fields as desired and click Save to save the Export Configuration for that
module. NOTE: this does not yet export the data (i.e. convert it to Excel).
The Data Export window reappears (see Figure 1.19). Click Export to export the data. This process may take
several minutes.
1.5 Administrating Patients
34
Figure 1.19: The Data Export window.
1.5 Administrating Patients
35
Figure 1.20: The Export Configuration module window.
1.5 Administrating Patients
(a) The DPOAE Export Configuration
window.
36
(b) The MEPA Export Configuration window.
(c) The TEOAE Export Configuration window.
Figure 1.21: Export Configuration options for the DP, MEPA3, and TE modules.
1.6 Managing Test Histories
1.6
37
Managing Test Histories
Below the patient record list in the main window is the test history for the currently highlighted patient (see Figure 1.22 for an example). To access the Test History options, choose Test History from the menu or press [A LT–E].
Figure 1.23 shows the Test History options.
1.6.1
Viewing a Previous Test
To view a previously saved test, double-click on the entry in the test history record list that you wish to view (click on
the Date, Tester, Ear, Type or Protocol fields), or select the entry then Select View from the Test History menu.
The test reopens in the measurement window. From the measurement window, the test may be printed or, depending
on the measurement module, the data may be redisplayed with different options, and the data may be exported.
Close the measurement window to return to the main window. Only one test session may be viewed at a time.
Figure 1.22: An example Test History list. Each record shows the date and time of the test, the tester, the ear(s) tested (L=Left,
R=Right, B=Both), the type of test, and the first comment. ID# is automatically assigned and cannot be edited.
Records can be sorted by clicking on a gray column header.
1.6 Managing Test Histories
38
Figure 1.23: Test History menu options.
1.6.2
Editing a Test History
You may add comments or edit properties of a previously saved test by three methods:
• double-click on the entry in the test history record list that you wish to view (click on the Category, Probe SN
or Comments fields),
• select the entry then Select Add Comments from the Test History menu, or
• right click on the entry then select Edit Test History from the context menu.
The Edit Test History window appears (see Figure 1.24). Through the dropdown dialogs, you may change the
patient associated with the test, the ear, the category, and the probe. You may add comments in the Add Comments
box. Select Save to save all changes to the parameters and add any comments entered to the measurement record.
The first comment shown in the test history window is the most recent comment.
You may change the patient associated with the the measurement without using the Edit Test History window.
Right click on the test history, then choose Change Patient, choose a patient from the list, then choose Select.
Only administrators can edit saved comments. To edit comments, select the entry in the test history record list
that you wish to edit, then Select Edit Comments from the Test History menu. The same Edit Test History window
appears, but with comment editing allowed (see Figure 1.25). Select Save to save edits to the comments.
1.6 Managing Test Histories
39
Figure 1.24: The Edit Test History window. The current tester is shown at the top. The comments history lists the previous
comments made about the test, who made the comments, and the date/time. Type in the Add Comments box to
add another comment.
1.6 Managing Test Histories
40
Figure 1.25: Editing the Comments window. Only an Administrator can edit previous comments. The previous comments are in
the Comments box and may be edited. Adding a comment is disabled while editing.
1.6 Managing Test Histories
1.6.3
41
Deleting a Test History
Figure 1.26: Selecting multiple test histories for deletion. Hold down the [C TRL ] key and use the mouse to click the box on the
left-hand-side to select multiple histories.
You may delete a test history by three methods:
• Select the entry in the test history list and press [D ELETE ],
• Choose Delete from the Test History menu, or
• Right click on the entry, then choose Delete Selected Tests from the context menu.
You will be prompted to confirm the deletion. Multiple test histories may be deleted at a time by holding down the
[C TRL ] key and using the mouse to click the box on the left-hand-side of the test history (see Figure 1.26). Deleting
a test history record removes it from the database, and also removes any associated data files.
1.6 Managing Test Histories
1.6.4
42
Printing a Test History
To print the entire test history for a patient, highlight the patient and choose Print List from the Test History menu.
You can choose to print histories of only the selected tests or all tests for the patient. The test history details, including
Test Date/Time, Tester, Ear, Test Type, and all Comments, will be printed. Pressing [C TRL –P] initiates printing the
Patient List, not the Test History. To obtain a printout of the actual measurement, see the relevant section in the
manual for that measurement module.
1.6.5
Test History Category Maintenance
User-defined categories can be associated with patient test records (e.g., Baseline, Follow-up, Retest, etc., as in
Figure 1.22), allowing the Test History list to be sorted by category. Categories can be defined and assigned to a
test history before a measurement occurs or may be defined, assigned or reassigned afterwards. Categories are
associated prior to a measurement by selecting the category type from a Category drop-down list located at the
upper right of the main program window (see Figure 1.3).
To edit, add, delete or reorder categories, choose Category Maintenance from the Test History menu (see
Figure 1.23). The Category Maintenance window appears (see Figure 1.27). Categories are displayed as a list on
the left. Each category may have an associated description, which displays when the category is selected from the
list.
• To reorder the categories, select a category and then choose the Move Down or Move Up button.
• Select a category then choose Select to set the selected category as the category for future measurements,
until this database is closed.
• Select a category then choose Set Default to set the selected category as the category for future measurement
now and every time this database is opened.
• To create a new category, choose New, assign a name to the new category and type a description into the text
fields, then choose Save (see Figure 1.28).
1.6 Managing Test Histories
43
Figure 1.27: The Test History Category Maintenance window.
• To edit an existing category, select the category from the list, choose Edit, change the name and/or description
in the text fields, then choose Save.
• To remove a category, select the category from the list, choose Remove. The category will no longer be
available for new measurements, but existing measurements will still display the removed category.
1.7 Measurement Modules
44
Figure 1.28: The New Category window.
1.7
Measurement Modules
The manuals for the MEPA3, DP and TE measurement modules are available through the Help menu, or these
hyperlinks: MEPA3 Module Manual, DP Module Manual, TE Module Manual.
1.8 Tools
1.8
45
Tools
Access defaults, HearID activation, probe parameters, and application logging on the Tools menu (see Figure 1.29).
Figure 1.29: Test History Category Maintenance window.
1.8.1
Defaults
Choosing Defaults from the Tools menu brings up the Define Defaults window. There are two tabs: General and
Export. Choose Apply to apply the settings and not exit the window, OK to apply the setting and exit the window, or
Cancel to exit the window without applying the settings.
1.8.2
General Defaults
Backup Mode: The user can select Automatic to make backups of the data automatically after every session,
Prompt on Exit to be prompted to make backups after every session, or Never to never make backups (not
recommended). The database and associated data files are backed up to a compressed *.zip file. The folder
where backup *.zip files are stored can be chosen by either typing a folder name in the given text field or by
choosing the folder selection button (with three dots) to the right (see Figure 1.30).
Hardware: Your version of HearID is pre-configured for the hardware it was shipped with. If you switch hardware,
select PCMCIA for a HearID PC-card or USB for a HearID Audio Processing Unit (see Figure 1.30).
1.8 Tools
46
Figure 1.30: The Defaults window showing the General tab settings.
Institution Name & Address: The institution name cannot be modified as it is linked to your product activation key.
Contact your vendor for a new activation key if you need to modify the institution name. You may modify the
institution address and phone number (see Figure 1.30).
1.8 Tools
1.8.3
47
Activate HearID
To activate HearID, choose Activation from the Tools menu. The Activation Screen appears (see Figure 1.31).
Input the activation details provided by your vendor exactly, in each of the appropriate text fields (case IS important).
Clicking on each text field updates the Activation Help notes shown on the right. For the Activation Key text field, delete
the existing characters (in particular the underscores and hyphens) and type in (or copy and paste) your Activation
Key. It should consist of 25 alphanumeric case-sensitive characters, grouped into five groups of five characters, each
group separated by a single hyphen, with no spaces. Click Activate Now to activate the program.
The activation screen is during installation to activate your copy of HearID. Thereafter it is used to add modules to
HearID. When module(s) are added, the program will automatically re-start.
Figure 1.31: The Activation Screen.
1.8 Tools
1.8.4
48
Application Logging
In the event that you are having problems with your system, and if instructed to do so by your customer service
representative, you may be asked to enable Application Logging features for the program by selecting Application
Logging from the Tools menu. This feature will create log files of internal program activity. The log files can then be
sent to the factory for analysis. Logging is disabled by default.
1.8.5
Probe Management
Probe Management lists the available probes by serial number. You can add a new probe, edit the probe settings,
or delete a probe. Use the dropdown list on the main toolbar to choose the current probe before each measurement.
MEPA3 measurements use the currently selected probe to load the correct factory calibration. For DP and TE
measurements, flagging the currently used probe is optional, but recommended.
Choose Probe Management from the Tools menu (see Figure 1.29). The Probe Management window appears,
showing a photo of available probes and displaying their current settings (see Figure 1.32).
• To add a new probe, choose New Probe. The New Probe window appears (see Figure 1.33). ER10C probes
are supported by HearID. Enter the probe serial number. The probe sensitivity is set at the factory for the probes
delivered with your system. You may modify the probe sensitivity value, but should not do so unless instructed ¢¢¢
to by your vendor, or if you have recalibrated the probe. Choose Save to save the probe settings.
• To edit existing probe settings, choose Edit Probe and follow the same steps described above.
• To delete existing probe entry, choose Delete Probe.
• Choose Close to exit probe management.
To change the probe associated with a measurement, from the test-history window double-click on the probe
column. The Comments window opens with the cursor in the Probe Serial # field. Type in the correct probe serial
number, then choose Save.
1.8 Tools
49
Figure 1.32: The Probe Management window.
1.8 Tools
50
Figure 1.33: The New Probe window.
1.8.6
Export Defaults
When Export to Hi*Track or OZ is checked, each time a DPOAE or TEOAE measurement is made, the patient
demographic information, test date, and pass/refer result is saved to that file for subsequent import into Hi*Track or
OZ. Use Export defaults (see Figure 1.34) to specify the location of the export files for DPOAE and TEOAE test
results. The default path is the HearID folder. For OZ, the filename is OZ.txt and for Hi*Track, the filename is
Mimosa.txt. For multiple databases, either the same export path or different export paths may be specified.
Public health, early childhood education, hospitals and other healthcare providers use OZ (www.oz-systems.com)
applications to complete their required activities and assure thorough and accurate care for each child. The Hi*Track
(www.hitrack.org) family of products is designed specifically to meet the data needs of state Early Hearing Detection
& Intervention (EHDI) and hospital-based hearing screening Program Coordinators. Hi*Track imports demographic
data and screening results from HearID, track children who need services, and report information on child progress.
1.9 Help
51
Figure 1.34: Export options include exporting to Hi*Track and to OZ.
1.9
Help
The Help menu (see Figure 1.35) provides access to digital manuals, Quick Start notes, videos, and other information. The User’s Manual, MEPA3 Module Manual, DP Module Manual, TE Module Manual and Installation Manual are available from the User Manuals sub-menu. Quick Start notes are available from the Quick Start Notes
1.10 Presto Mode
52
Figure 1.35: The Help menu options.
sub-menu. Tutorial videos are available by selecting the Tutorial Videos option and choosing a video from the
drop-down menu. The Mimosa Acoustics on the Web option is a hyperlink to the Mimosa Acoustics website at
www.MimosaAcoustics.com; an active Internet connection is required for this option to work. The About HearID option provides information about the HearID software version, and the technical support contact details. The System
Info option creates a snapshot of relevant information about your computer in text document form. This information
is useful in the event that troubleshooting is necessary.
1.10 Presto Mode
Presto is a user interface mode that, when enabled, allows the tester to make a DPOAE or TEOAE measurement,
then a MEPA measurement in the same ear with a minimum number of key presses and decision points. Presto mode
is designed to facilitate testing with difficult-to-test patients, where testing must be done quickly if it is to happen at
all. In order to use Presto, the tester must be fully familiar with making DP, TE, and MEPA3 measurements. Please
see the DP Module Manual, TE Module Manual, and MEPA3 Module Manual as necessary.
1.10 Presto Mode
1.10.1
53
Making a Presto Measurement
The following steps and figures demonstrate the process of preparing for and making measurements using Presto.
Steps one through five can be performed before the patient arrives.
1. Tick the Presto check box on the main toolbar under the patient buttons (See Figure 1.36).
Figure 1.36: The Presto check box.
2. Select the desired test parameters using the DP, TE, and MEPA3 menus and toolbars. For information on test
parameters, see the DP Module Manual, TE Module Manual, and MEPA3 Module Manual.
3. Select the current probe from the Probe Serial # drop down menu on the far right of the toolbar (See Figure 1.37).
4. From the MEPA toolbar, select the current eartip type and size. See Figure 1.38, and see also Figure 2.1 and
the Installation Manual for eartip types and codes.
5. Ensure that the probe has a current calibration. If not, perform the calibration procedure (see the MEPA3 Module
Manual).
6. Enter new patient information (see Section 1.5.2) or choose an existing patient from the patient list (see Figure 1.3).
1.10 Presto Mode
54
Figure 1.37: Probe selection menu in the main toolbar.
Figure 1.38: Eartip selection in the MEPA toolbar.
7. Prepare the patient for testing (see Chapter 2)
8. Select the desired test ear from the DP or TE toolbar to begin. For DPs, from the DP toolbar, choose either the
L-Calib or R-Calib button to measure the left or right ear, respectively (see Figure 1.39(a)). For TEs, from the
TE toolbar, choose either the L-TEOAE or R-TEOAE button to measure the left or right ear, respectively (see
Figure 1.39(b)).
9. Calibration begins immediately. If the calibration is not satisfactory, a warning will appear with suggestions. if
the calibration is satisfactory, the DP or TE measurement will begin automatically. Once completed, the DP
or TE measurement saves and exits, and the MEPA test begins automatically. Once MEPA is completed, the
measurement will save automatically.
1.10 Presto Mode
55
Figure 1.39: The DPOAE and TEOAE toolbars.
10. After the test, both measurements reopen for review. Use [Alt-Tab] to switch between the windows if the screen
is not big enough to display the measurements side-by-side.
11. Once the Presto measurement is complete, an entry appears for each measurement made in the Test History
section with the default comment “From Presto”. For how to view and use test histories, please see Section 1.6.
Chapter 2
Preparing the Patient and Fitting Eartips
Contents
2.1 Otoscopic examination
. . . . . . . . . . . . . . . . . . . . . . . . . . . . . . . . . . . . . . . . . . . .
57
2.2 ER10C Probe and Eartip Usage . . . . . . . . . . . . . . . . . . . . . . . . . . . . . . . . . . . . . . . .
57
2.3 Selecting an Eartip . . . . . . . . . . . . . . . . . . . . . . . . . . . . . . . . . . . . . . . . . . . . . . .
58
2.4 Fitting the Eartip on the Probe . . . . . . . . . . . . . . . . . . . . . . . . . . . . . . . . . . . . . . . .
59
2.5 Fitting a Rubber Eartip into an Ear Canal . . . . . . . . . . . . . . . . . . . . . . . . . . . . . . . . . .
66
2.6 Fitting a Foam Eartip into an Ear Canal . . . . . . . . . . . . . . . . . . . . . . . . . . . . . . . . . . .
66
2.7 Instructing the Patient . . . . . . . . . . . . . . . . . . . . . . . . . . . . . . . . . . . . . . . . . . . . .
69
2.8 Video Tutorials . . . . . . . . . . . . . . . . . . . . . . . . . . . . . . . . . . . . . . . . . . . . . . . . .
69
56
2.1 Otoscopic examination
2.1
57
Otoscopic examination
Before making any measurements using the HearID system:
• Perform an otoscopic examination to visualize the eardrum and to ensure the ear canals are free of debris.
• Any excess cerumen (earwax) near the opening of the ear canal or deep in the ear canal can affect the test
results. It is recommended that excess cerumen be removed by someone trained in cerumen management
prior to inserting the probe for testing.
• Failure to remove excess cerumen may cause the eartip openings to block, damage the probe, invalidate test
results, and exacerbate cerumen impaction.
2.2
ER10C Probe and Eartip Usage
• Always keep a clean eartip on the probe to help keep the tubes clean and to help protect the probe if dropped.
• The probe head is fragile. Avoid dropping or hitting the probe head against hard surfaces.
• Use the shirt-clip on the probe cable to secure the probe head whenever possible.
• For hygiene, the disposable eartips are designed for single-patient use only. Reusing eartips may also cause
cerumen to be pushed into the tubes on the front of the probe, and eventually damage the probe.
• Eartips are single patient use only. Contamination can occur if a single-use eartip is used across patients.
• Do not reuse an eartip once it has been removed from the probe. Removal can stretch and tear the tubes inside
the eartip, which may affect subsequent measurements.
• The disposable eartip is easily replaced, but it takes time and is costly to replace the probe. Should any water, ¢¢¢
dirt, or cerumen get into the probe head or the steel tubes on front of the probe, do not attempt to clear it
yourself. Please contact your vendor for further instructions.
2.3 Selecting an Eartip
58
• The exterior of the ER10C probe may be cleaned with a mild soap solution and soft cloth. Avoid touching the
tubes extending from the front of the probe. Do not allow solution or debris to enter the tubes.
• Keep the probe away from fluids, moisture, fumes, solvents, heat, and dust.
• Do not subject the probe to shock or vibration.
• Keep eartips and plastic bags away from children, as they can present a choking hazard.
• Do not attempt to open the ER10C probe or the probe-adaptor cable, as there are no user serviceable parts
inside. All service must be performed by an authorized dealer.
• There are no specific requirements for disposing of eartips.
2.3
Selecting an Eartip
Figure 2.1: Seven eartip types are available (the 06 eartip is not shown).
The HearID system offers six eartip sizes for MEPA systems, and seven eartip sizes for DP and TE systems (see
Figure 2.1 and the Installation Manual). The rubber tips and smallest foam tip are typically used for pediatric patients
and the foam tips for adult patients. If you are not sure which size to pick, start with the 04 for pediatric patients and
the 14A for adult patients.
2.4 Fitting the Eartip on the Probe
2.4
59
Fitting the Eartip on the Probe
To obtain accurate results your HearID system, it is essential that the eartip is inserted onto the probe properly. To
mount an eartip on the probe, follow the examples and suggestions in these figures:
Figure 2.2: Overview of fitting a foam tip to a probe. First, note the orientation of the tubes. Then, align and push the tip onto the
probe. Finally, compress the foam to prepare the tip to fit into an ear. The far right image shows an improperly fitted
and compressed tip.
2.4 Fitting the Eartip on the Probe
60
Figure 2.3: Three steel tubes extend from the probe; the larger and longer tube is for the microphone, and the two smaller and
shorter tubes are for the speakers. Corresponding to these tubes are the three holes in the eartip’s plastic tube. To
correctly mount the eartip tube, line up the red stripe on the eartip with the red dot on the probe. Push the plastic
tube of the eartip onto the steel tubes of the probe (right).
2.4 Fitting the Eartip on the Probe
61
Figure 2.4: Select the desired eartip. Only use new eartips. The eartips are designed for single patient use. Before inserting
the eartip onto the probe check the eartip: Are the holes clear of dust, dirt or glue? The plastic tube should be flush
with the front-edge of the eartip. If it is not, change the eartip and inform your distributor. Do not use a bad eartip to
conduct measurements.
2.4 Fitting the Eartip on the Probe
62
Figure 2.5: Before inserting the eartip onto the probe, gently push the front-edge of the foam backwards so that the foam will
maintain its proper shape when squeezed. Roll the foam between your index finger and the thumb to decrease the
diameter of the foam.
2.4 Fitting the Eartip on the Probe
63
Figure 2.6: Align the red dot on the probe with the red line on the eartip tube and push the eartip completely onto the probe. A
slight popping feeling indicates that the eartip is mounted. Be careful not to bend the eartip tube. The eartip tube
can be damaged due to the stiff edges of the steel probe-tubes.
2.4 Fitting the Eartip on the Probe
64
Figure 2.7: If the eartip is installed correctly, the foam should maintain its round shape. This is necessary for obtaining good
calibrations and measurements.
2.4 Fitting the Eartip on the Probe
Figure 2.8: A correctly squeezed foam eartip (left), and an incorrectly squeezed foam eartip (right).
65
2.5 Fitting a Rubber Eartip into an Ear Canal
2.5
66
Fitting a Rubber Eartip into an Ear Canal
First, perform otoscopy to verify the ear canal is healthy and that you can visualize the eardrum. Before the insertion,
work out any torque/twist in the probe cable, so that the torque force of the cable does not work against the probe
direction and insertion. If testing an infant, prepare the probe by laying the probe cable along the infant’s body
longitudinally with the probe head lined up with the infant’s test ear. An infant’s ear canal is soft and collapsible. Pull
the pinna upward and backward to allow the insertion of the small red tip into the ear canal. When the auricle is
released, the tip will sit firmly in the ear canal and the weight of the probe will be just enough to keep the probe in
place. The shirt-clip on the probe cable may come in handy to support the probe head in place. Ensure that you
have completely inserted the eartip into the ear canal. The end of the eartip should be flush with the opening of the
ear canal. A good insertion allows good seal of the ear canal and reduces external noise. Eartips are designed for
single-patient use, and should be disposed after each patient use or removal.
2.6
Fitting a Foam Eartip into an Ear Canal
First, perform otoscopy to verify the ear canal is healthy and that you can visualize the eardrum. Before the insertion,
work out any torque/twist in the probe cable, so that the torque force of the cable does not work against the probe
direction and insertion. Roll the foam between the thumb and the index finger to compress the foam. Pull up and
back on the pinna to straighten out the ear canal and then quickly insert the foam tip into the ear canal along the
direction of the canal as deeply as possible with at least half or 3/4 of the foam tip portion in the canal. Hold it in the
canal until the foam has expanded to secure the insertion. Use the shirt-clip on the probe cable to attach the cable
on the collar or clothes around the shoulder. This will support the probe to prevent it from dislodging from the ear
canal under its own weight. Wait a few seconds for the foam to expand before starting the test. Eartips are designed
for single-patient use, and should be disposed after each patient use or removal.
Figure 2.9 shows an example of a badly fitted probe. Figure 2.10 shows an example of a well fitted probe.
2.6 Fitting a Foam Eartip into an Ear Canal
(a)
67
(b)
Figure 2.9: Example of a bad probe fit. The foam ear-tip is not inserted deeply into the ear canal. The orientation of the probe is
good, but the ear-tip is clearly not inserted to the proper depth to obtain a good seal. The ear-tip should be inserted
into the ear canal past the edge of the tragus.
2.6 Fitting a Foam Eartip into an Ear Canal
(a)
68
(b)
Figure 2.10: Example of a good probe fit. The foam ear-tip is inserted well into the ear canal, past the tragus, and shows a good
seal. Note the orientation of the probe, which is perpendicular to the opening of the ear and is secure.
2.7 Instructing the Patient
2.7
69
Instructing the Patient
We suggest that the tester includes the following information in their patient instructions. These are only example ] HINT
instructions—adjust them to suit your needs.
• A probe covered by a rubber or foam eartip (like an earplug) will be inserted into your ear canal. This should
not hurt at all—at most it might feel a little scratchy. You should say if you are experiencing any discomfort from
the eartip.
• During the test you will hear sounds, for example, tones, clicks, warbles. The sounds are not loud. They will be
no louder than a doorbell.
• All you need to do is to sit quietly. You do not have to respond in any way. Try to keep relatively still so that the
probe and cable do not move.
• Test results will be more accurate if you relax, breath quietly, and swallow only between the presentation of
sounds. Try not to touch your ear, the probe, or the probe cable.
2.8
Video Tutorials
Choose Tutorial Videos on the main Help menu for multimedia tutorials on calibration and measurement, including
troubleshooting.
Chapter 3
Hardware Setup and Operating Conditions
Contents
3.1 HearID hardware inventory . . . . . . . . . . . . . . . . . . . . . . . . . . . . . . . . . . . . . . . . . .
71
3.2 HearID hardware components . . . . . . . . . . . . . . . . . . . . . . . . . . . . . . . . . . . . . . . .
72
3.3 Computer hardware and system requirements . . . . . . . . . . . . . . . . . . . . . . . . . . . . . . .
75
3.4 Electrical Safety for the Patient and User . . . . . . . . . . . . . . . . . . . . . . . . . . . . . . . . . .
76
3.5 Cleaning, preventative inspection, and maintenance . . . . . . . . . . . . . . . . . . . . . . . . . . .
76
3.5.1 Linearity Check . . . . . . . . . . . . . . . . . . . . . . . . . . . . . . . . . . . . . . . . . . . . . .
77
3.6 Environmental conditions . . . . . . . . . . . . . . . . . . . . . . . . . . . . . . . . . . . . . . . . . . .
77
70
3.1 HearID hardware inventory
3.1
71
HearID hardware inventory
The HearID system consists of the following components (see Figures 3.1 and 3.2):
• EN60950 (IEC950) compliant notebook computer (not shown). HearID may be purchased with or without a
notebook computer. If you supply your own computer, please see Section 3.3 for computer requirements.
• Audio Processing Unit hardware option:
– Audio Processing Unit. During installation, do not connect the Audio Processing Unit to the computer until ¢¢¢
instructed.
– USB cable.
• PC-card hardware option:
– PC-card. During installation, do not insert into the computer until instructed.
¢¢¢
– Probe-adaptor cable.
• Etymōtic Research ER10C probe containing: two transducers for delivering acoustic stimuli and one microphone for recording the sounds in the ear canal. The probe cord is 6 feet long, shielded, and has a shirt-clip.
The probe is equipped with a diode network to protect the probe from damage due to electrostatic discharge.
• Calibration cavity set (if the MEPA3 module was purchased). Also included is a piece of foam, which you can
use to isolate the calibration cavity set from vibration.
• Eartips. Caution: Do not re-use eartips
. The eartip set contains seven different bags of disposable eartips ¢¢¢
to accommodate most ear canals. The seven types are listed below in Table 3.1 and shown in Figure 3.1.
More eartips may be ordered from your vendor. ER10C-06 eartips cannot be used for MEPA measurements;
however, they may be used for OAE measurements.
• Cut-off syringe (not shown). The cut-off syringe is used as a test cavity to provide a quick and simple way to
ensure that the HearID system is functioning properly.
3.2 HearID hardware components
72
• Carrying case (not shown).
• CD-ROM (not shown) containing the software package and e-manuals in pdf format.
Eartip Code
ER10C-14A
ER10C-14B
ER10C-14C
ER10C-06
ER10C-05
ER10C-04
ER10C-03
Description
Yellow adult foam eartips
Beige baby/young children/adult foam eartips
Yellow extra large adult foam eartips
Red 6 mm pediatric tips
Red 5 mm pediatric tips
Red 4 mm pediatric tips
Red 3.5 mm pediatric tips
Tips per Bag
25
25
18
20
20
20
20
Measurements
OAE & MEPA
OAE & MEPA
OAE & MEPA
OAE
OAE & MEPA
OAE & MEPA
OAE & MEPA
Table 3.1: Eartips supplied with HearID and the measurements they may be used for.
3.2
HearID hardware components
Figures 3.1 and 3.2 illustrate the hardware components of the HearID system. For the Audio Processing Unit option,
a USB cable connects the unit to the computer, and the probe connects to the unit. See the User’s Manual for
the proper connection of the eartip. For the PC-card option, the card is inserted into a PC-card slot on the laptop,
the adaptor cable is plugged into the card, and the probe attached to the other end of the adaptor cable. For both
hardware options, an eartip is placed on the metal probe tubes to couple the probe to the ear canal or calibration
cavity set.
To calibrate the system (MEPA3 module only), the eartip covered probe is inserted into the calibration cavity set.
To make a measurement, the eartip-covered sound tubes of the probe are inserted into the patient’s ear canal. See
the MEPA3 Module Manual for instructions on the use of the calibration cavity. See the User’s Manual for how to
make measurements in human ears.
3.2 HearID hardware components
73
Figure 3.1: The HearID hardware system for the HearID Audio Processing Unit option. The calibration cavity set is included
in systems with the MEPA3 module. Product details may differ from the photo. The foam eartips are from left to
right: ER10C-14C, ER10C-14A, and ER10C-14B. The rubber eartips are from left to right: ER10C-06, ER10C-05,
ER10C-04, ER10C-03 (see Table 3.1).
3.2 HearID hardware components
74
Figure 3.2: The HearID hardware system for the HearID PC-card option. The calibration cavity set is included in systems with
the MEPA3 module. Product details may differ from the photo.
3.3 Computer hardware and system requirements
3.3
75
Computer hardware and system requirements
• The HearID system must be run from an IBM™ compatible laptop computer.
• Supported Microsoft Windows™ operating system.
Operating System
Windows 2000 and earlier
Windows XP 32-Bit SP1, SP2
Windows XP 32-Bit SP3
Windows XP 64-Bit
Windows Vista 32-Bit
Windows Vista 64-Bit
Windows 7 32-Bit
Windows 7 64-Bit
Support Status
Not Supported
Not Supported
Supported
Not Supported
Supported
Supported
Supported
Supported
Hardware Compatiable
PC-Card and Audio Processing Unit
PC-Card and Audio Processing Unit
Audio Processing Unit Only
PC-Card and Audio Processing Unit
Audio Processing Unit Only
• For the HearID PC-Card, an available PC-card Cardbus (Type II) slot is required.
• For the HearID Audio Processing Unit, an unused USB 2.0 slot (or better) must be available.
• The computer must be EN60950 (IEC950) compliant. If the laptop is not EN60950 compliant, it must be used
in battery mode only.
• Pentium™ class processor at least 1.80 GHz.
• For Windows™ XP systems: at least 512 MB RAM and at least 20 GB hard drive.
• For Windows™ Vista systems: at least 1 GB RAM and at least 50 GB hard drive.
• For Windows™ 7 systems: at least 2 GB RAM and at least 80 GB hard drive.
• Recent version of Adobe Reader™ (for displaying the electronic manuals). The reader may be downloaded and
used for free from http://get.adobe.com/reader/.
3.4 Electrical Safety for the Patient and User
3.4
76
Electrical Safety for the Patient and User
Protection against electric shock for the patient and user is provided primarily by the power supply that connects
the laptop computer to the main power supply. This power supply must be double insulated EN60950 (IEC950)
indicates double insulation. Lack of the double insulation symbol
compliant. The presence of a double box symbol
implies that the power supply is not likely to meet safety standards. If the power supply can not be verified as double
insulated EN60950 safe, then the laptop must be run on internal battery power while in clinical use.
The foam or rubber eartip forms an additional layer of electrical safety. Since this layer can be removed and
may be circumvented by humidity, it cannot be depended upon in the absence of a double-insulated power supply.
In general, do not use the probe without an eartip in place, and avoid touching the metal tubes of the probe when
replacing the eartip.
The system has been tested for electromagnetic compliance (EMC) and there are no known susceptibility or
interference issues. No special procedures are required to avoid EMC problems. However, it is recommended that to
ensure quality measurements, avoid plugging the laptop in to a circuit that has other high-draw devices active (e.g.,
laser printers, photocopiers), or instead, run the laptop using the internal battery.
3.5
Cleaning, preventative inspection, and maintenance
There are no user serviceable parts. Disassembly of the Audio Processing Unit is not permitted, and will void the
warranty. Eartips are single-use only and must be replaced between patients. Do not reuse eartips on the same
patient once the eartip has been removed from the probe as the eartip can be damaged during removal. Each time
the eartip is removed, the metal tubes should be visually inspected for obstructions (for instance, with an otoscope).
Do not touch the metal tubes. In the event of tube obstruction, the probe must be returned to the manufacturer for
cleaning and repair. Maintenance cleaning of the outside plastic casing of the probe and unit with alcohol pads or
cotton buds should be conducted as necessary. Additionally, at least once per year all connections should be visually
inspected for bent or damaged pins.
3.6 Environmental conditions
3.5.1
77
Linearity Check
Users making DPOAE or TEOAE measurements should perform a linearity check once every 3 months. This check
will detect non-linear elements in the system and probe that could result in false negative measurements of cochlear
problems. This check can be performed more often if the system is in heavy use or if some problem with the system
is suspected. For details on how to perform the check, consult the DP Module Manual or TE Module Manual.
3.6
Environmental conditions
The following ambient conditions must be met for valid measurements:
• The air temperature must be within +15° C to +35° C (+59° F to +95° F).
• The relative air humidity must be within 30% to 90%.
• Ambient noise should be minimal; however, a sound-treated booth or room is not necessary.
Appendix A
Troubleshooting
The majority of difficulties experienced while making measurements are due to a noisy patient or environment, or a
poorly fitted probe in the ear canal. The acoustical equipment is very sensitive. We recommend running the laptop ¢¢¢
on battery power during testing, and disconnecting any peripheral devices (such as laser printers).
1. If the measurements are noisy and/or no data is collected:
(a) Ensure the environment is as quiet as possible. Sometimes no data is collected because all measurements
are rejected for high noise levels.
(b) Ensure the probe cable is not moving against the patient. Use the shirt clip or Velcro pad to stabilize the
cable. Drape the probe cable over the back of the chair, or suspend it so it doesn’t touch the patient. A
cable-holder such as those used to hold up the cable of a domestic iron can be clipped onto a table to
help keep the cable clear of the patient. The cable should not rest on the patient as small movements can
cause noisy measurements. The cable should not be moved during a measurement.
(c) If the patient breathes noisily, instruct the patient to breath through their mouth. Sometimes this reduces
noise.
(d) Check that the eartip is fully inserted and that the foam has expanded to fill the ear canal. Gaps can cause
low-frequency noise leakage.
78
79
(e) Run the laptop from battery power. Electrical noise, interference, surges, and drops on the main AC power
supply can affect the sensitive MEPA and OAE measurements.
(f) Reset the noise rejection level to a higher level.
2. If there appear to be artifactual responses:
(a) Test the probe in an artificial ear, a MEPA cavity set, or 2cc syringe tube. There should be no significant
artifact when running any of the factory-supplied measurement protocols.
(b) Run the laptop from battery power. Electrical noise, interference, surges, and drops on the main AC power
supply can affect the sensitive MEPA and OAE measurements.
(c) Disconnect any peripheral devices, such as printers. The high power-draw of a printer (especially a laser
printer) could potentially cause electrical interference that may affect the sensitive MEPA and OAE measurements. Consider instead:
i. Turning the power off to the printer while taking the measurements.
ii. Print the results to a file (e.g., a PDF file) and then printing all records in one batch.
iii. Connecting to a network printer using a wireless link
3. If the stimulus levels or responses are too low:
(a) Check that there is no cerumen blocking the eartip holes.
(b) Not all ear canals are straight. It may happen that the sound outlet/receiving ports of the eartip are facing
the wall of the ear canal, which could have an effect on the measurement. Try using a larger or smaller
eartip and inserting the eartip more deeply or more shallowly. Try changing the angle of the eartip by
draping the probe cable differently.
(c) Re-fit all connections:
i. Remove the probe from the patient’s ear.
ii. Replace the eartip on the probe. Pulling off the tip can stretch and tear the delicate inner tubes of the
eartip, so do not reuse the tip once it has been removed.
80
iii. For a PC-card system, refit the connections between the probe, the probe-adaptor cable, and the
PC-card.
iv. For a USB Audio Processing Unit system, refit the connections between the probe, the Audio Processing Unit, and the laptop.
(d) Try reconnecting the hardware (Audio Processing Unit or PC-card).
i. If the software is running, save all important data and close the program.
ii. Safely disconnect the hardware following the instructions in the Installation Manual.
iii. Wait a few seconds and connect the hardware. Make sure that Windows™ recognizes the hardware:
the computer will beep, or display a notification on the Task Bar. The Audio Processing Unit will not be
recognized by the computer until the status LED changing from flashing blue to solid green.
4. If you get intermittent error messages warning that there is a timing error:
(a) These errors can occur when HearID is not given sufficient processing time because other higher-priority
applications are running. The solution is to exit the other applications. Also check that your laptop meets
the minimum specification.
(b) Some users have reported intermittent measurement errors that were traced back to a virus scanner. You
should be able to safely run real-time virus protection at the same time as data collection with HearID, but
measurement errors may occur if a scheduled disk scan runs (depending on scheduled priority) during
data collection. The disk scan may interrupt/timeout the data collection. Solution: schedule disk scans
during times when the laptop is not being used for data collection.
5. How do I know my HearID system is working correctly?
(a) Each system is tested before leaving the factory. Subsequently, the system can be verified to be working
by using the calibration features in each module.
(b) If you have the MEPA3 module, run a calibration using the MEPA cavity set. The calibration will pass if the
system is working correctly.
81
(c) If you are running only DP, TE, or SF modules, use the factory default test protocol and run an in-the-ear
calibration using the cutoff 2cc syringe supplied with your system (you can also use the MEPA calibration
cavity set at position 1). After inserting the probe tip fully into the syringe, ensure there is an approximate
1cc gap between the tip of the probe and the head of the plunger. The calibration should run without errors.
Continue on and make the OAE measurement in the syringe. There should be little to no OAE response
and the noise floor should be low (assuming testing is done in a quiet room).
(d) If you are a research user and have access to an artificial ear and sound level meter (or equivalent), you can
independently test and calibrate your system. The default probe sensitivity can be modified independently
for each probe in the Probe Management section in the Tools menu. Contact Mimosa Acoustics or your
vendor for more information if you have concerns about your system.
(e) A biological listening test can also be made by making measurements in the same normal-hearing ear
on a regular basis. Do note that results may vary over time due to natural variations and changes in the
middle and inner ear, or due to illness. However, a listening test can be useful to detect problems like a
loose cable connection or interference, which might not be immediately apparent during a calibration.
Appendix B
Contact & Technical Support
Mimosa Acoustics, Inc.
335 Fremont St.,
Champaign, IL 61820
USA
Phone: +1-217-359-9740
Fax: +1-217-359-9741
Email: [email protected]
Web: www.mimosaacoustics.com
Facebook: www.facebook.com/MimosaAcoustics
Twitter: @MimosaAcoustics
EU Representative
Emergo Europe
Molenstraat 15
2513 BH, The Hague
The Netherlands
Phone: +31 (0)70 345 8570
Fax: +31 (0)70 346 7299
82