1
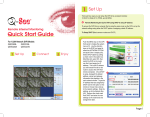
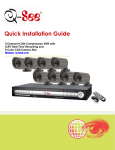
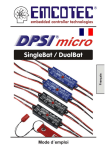
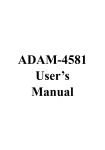
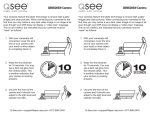
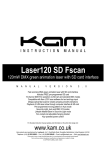
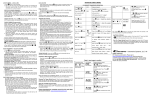
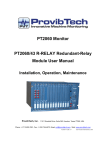
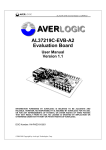
QSDT404C User’s Manual Contact US: Q-see Products 8015E.Crystal Dr Anaheim, CA 92807 Website: http://www.q-see.com Customer Service: Phone: 877-998-3440 x 538 Email:[email protected] Tech Support: Phone: 877-998-3440 x 539 Email:[email protected] Fax: 714-998-3509 Rev 032109 TABLE OF CONTENTS FCC STATEMENT………………….………………………………….……3 1. INTRODUCTION.…………………………………..…………………....3 2. WHAT’S INCLUDED…..…………………………………………………3 3. MAIN FEATURES……………………………………..………………....3 4. BUTTONS ON RECEIVER………………….…………………………..4 5. SIDE PANEL………………….…………………………..………………5 6. CAMERA INSTALLATION………………….……………………………6 7. MENU…………………………………………………………………….. 7 8. TROUBLESHOOTING………………….…………………………..……8 9. TECHNICAL SPECIFICATIONS……………………………………….. 9 10. NOTES…………………………………………………………………. 10 Q-SEE PRODUCT WARRANTY………………….……………….…….. 10 2 FCC STATEMENT This equipment has been tested and found to comply with the limits for a Class A digital device, pursuant to Part 15 of the FCC Rules. These limits are designed to provide reasonable protection against harmful interference when the equipment is operated in a commercial environment. This equipment generates, uses, and can radiate radio frequency energy and, if not installed and used in accordance with the instruction manual, may cause harmful interference to radio communications. Operation of this equipment in a residential area is likely to cause harmful interference in which case the user will be required to correct the interference at his own expense. 1 Introduction This miniature size product adopts an advanced microwave and wireless transfer technology developed and manufactured with 2.4GHz wireless digital receiving modules, which has stable performance and a strong anti-interference function. This product can be used with wireless cameras to record wireless camera signals. 2 What's included: The following items should be included in the box. Please check that you have them all before installation. A One receiver B One power adapter for the receiver C 1 camera with power adapter D One RCA cable E stands of camera and receiver F screws for camera mounting 3 Main features. 3.1 Supports up to 4 cameras simultaneously. 3.2 Digital 2.4G wireless modules. 3.3 Supports A/V output from receiver 3.4 Supports AE and AWB 3.5 Supports OSD (On Screen Display) screen-controlled operation 3.6 Supports 4 Channels displayed in order 3.7 Supports automatic channel switch 3.8 Transmission distance up to 100M (Tested in open air) 3.9 M-JPEG format Compression 3 4 Buttons On Receiver 4.1 Mode switching Switch between quad mode and single channel mode 4.2 Pairing Pairing the cameras and receiver 4.3 Menu OSD menu display 4.4 Auto Scan Switching the channels automatically with set time interval 4.5 Right/CH2 Move to the Right / Switch to Channel 2 4.6 Up/CH1 Move Up / Switch to Channel 1 4.7 Manual Scan Switching the channel manually 4.8 Down/Ch3: Move Down / Switch to Channel 3 4.9 Left/CH4 Move to the Left / Switch to Channel 4 4.10 SMA Antenna SMA antenna plug in 4.11 Power LED Red Light when power on 4 5 Side panel 5.1 A/v output 5.2 Power input (DC 9V) 5 6 Camera Installation 6.1 Camera stand mounting screw (for ceiling mount) 6.2 Power in cable (DC 5V input) 6.3 Pairing button 6.4 SMA antenna plug 6.5 Camera stand mounting screw (for desk top mount) 6.6 Microphone 6 7 Menu Enter the Menu option to setup the main feature of this product. Through Right/Left button can adjust parameters, and through Up/Down button can select the features to set. 7.1 Resolution (High / Low): When set to low, the image is not as clear, but it displays more frames per second. When set to high, the image will be clearer, but it displays fewer frames per second. 7.2 SCAN TIME: This option sets the time interval between cameras when switching channels automatically. OFF,Scan is inactive. When on options are: 5 seconds to 20 seconds between cameras. 7.3 AUDIO VOL: Adjust the volume of the audio from 0 to 20. Use the Left/right button to reduce/increase the volume. 7.4 BRIGHTNESS: Adjust the brightness of images, range of brightness is from 0 to 5, use the Left/right button to adjust it. 7.5 PAIR: Use this option to pair the cameras with specific channels, press the Pair button, use the Right/Left button to choose the channel; one channel can only pair with one camera. After selecting the specific channel and pressing the pair button again the window below will appear: 7 Press the Pair the button on corresponding camera and wait for a while, the monitor connected to the receiver will display the images from the cameras that have been matched. Pairing succeeded. 7.6 TV OUT: This option allows you to select the video format (NTSC/PAL) for video output resources. In the United States we use NTSC format. 7.7 Channel selection keys You may select channels by using the corresponding keys on the receiver to manually choose channel. Channel 1:Up Channel 2:Right Channel 3:Down Channel 4:Left; Circulation Button : Monitor screen circulates the image from Channel 1 to Channel4 then back to Channel1. The receiver will skip the channels that do not have cameras assigned to them. 8 Troubleshooting Symptom Remedy The power does not Check that the AC power cord is connected securely. turn on. (In case of power failure) Check the breaker. Check if Monitor is on and video format (NTSC / PAL) No image display on monitor There is no sound. is correct. Check monitor’s video cable and connections. Confirm that the camera has power. Check if the audio cable is well connected to monitor. If there is a microwave oven close by, turn the microwave oven off. Interruption in You may have other units that run on the 2.4GHz signal. Move their base away from both the transmitter and/or the receiver Image and Sound Your home may have a metal frame that reduces the range of the unit. Poor Reception Quality Move the Cameras and/or the receiver around to see it reception improves. 8 Try resetting Pairing between camera and receiver 9 Technical specifications 9 10 Notes 10.1 This product can be damaged by pressure or impact. 10 10.2 Any repair of this product should only be done by Professionals. 10.3 This product should only be opened by Professionals. 10.4 This product can not be used in high temperature environments. 10.5 Replacement Parts – When replacement parts are required, be sure the service technician has used replacement parts specified by the manufacturer or have the same characteristics as the original part. Unauthorized substitutions may result in fire, electric shock or other hazards. 10.6 Digital Peripheral Solutions does not accept responsibility for any illegal use of this product by the customer. Q-SEE PRODUCT WARRANTY Thank you for choosing our products. All of our product users have a conditional free warranty repair service for hardware within 12 months starting from the purchase date, and a free exchange service within one month (valid for manufacturing defects). Permanent upgrading service is provided for the software. Liability Exclusions: Any product malfunction, abnormalities in operation or damage caused by the following reasons are not within the free service scope of our company. Please select payable service. (1) Equipment damage caused by improper operation (2) Improper environment and conditions in/on which the equipment operates, e.g., improper power, environment temperature, humidity and lightening strike etc. that cause equipment damage. (3) Damage caused by acts of nature: earthquake and fire etc. (4) Equipment damage caused by the maintenance of personnel not authorized by our company. (5) Product sold over 12 months ago. In order for us to provide various services to you please complete the registration procedure after you purchase the product. Cut off or copy User’s Information Card and fax or mail it to us after the card is filled in. You can also register the product by going to the www.q-see.com website and clicking on the Register link. Customer Information Card User’s Name Mr./Mrs. Company 11 Name Postal Address Postal code Phone Number E-mail Model Number of Product Serial Number of Product Purchase Date Distributor If you have questions: Contact Us: Mailing Address: DPS Inc. 8015 E. Crystal Dr Anaheim, CA 92807 Customer Service: Phone: 877-998-3440 x 538 Email: [email protected] Website: http://www.q-see.com Fax: 714-998-3509 Tech Support: Phone: 877-998-3440 x 539 Email: [email protected] The material in this document is the intellectual property of our company. No part of this manual may be reproduced, copied, translated, transmitted, or published in any form or by any means without our company’s prior written permission. 1. Our products are under continual improvement and we reserve the right to make changes without notice, therefore no guarantee is given as to the correctness of its contents. 12 2. We do not accept any responsibility for any harm caused by using our product. 3. The product picture may differ from the actual product, which is only for your reference. The accessories may be different in different selling areas. For details of accessories, please refer to your local distributor. Copyright reserved 13