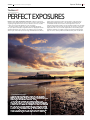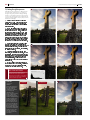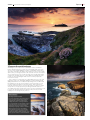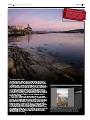
1
OUPHOIM I
R TOPRONS
EX S V ID
PE KI E E
RT LL YO
ADS WUR
VI ITH
CE
!
2nd Edition THE essential Guide to Landscape Photography
the essential guide to
Landscape
Photography
everything you need to shoot stunning images with your digital slr
2nd edition
ED
UPDATen
t!
contTECHNIQUE
AND
ADVICEOM THE UK’S S
RT
FR
G EXPE
LEADIN
from the experts at
p UKions
to cat
lo
it cs
t k eni
bes sc
r
fo
r s
te ill
as k
m lr s
ds
l
tia ues
q
essen
chni
te
Welcome 003
cover image: helen dixon
MARK BAUER
2nd Edition The Essential Guide to Landscape Photography
The Essential Guide to
Landscape Photography
Produced by Digital SLR Photography at:
6 Swan Court, Cygnet Park,
Peterborough, Cambs PE7 8GX
Phone: 01733 567401. Fax 01733 352650
Email: [email protected]
Online: www.digitalslrphoto.com
Editorial
To contact editorial phone: 01733 567401
Editor Daniel Lezano
Welcome...
[email protected]
Art Editor Luke Marsh
[email protected]
“Heading out to the great outdoors to capture stunning images is a
passion shared by millions of photographers from novices through
to enthusiasts and professionals. Heading to a location, where we
wait prepared for that fleeting moment where all the elements come
together to bless us with an incredible scene, is what draws so many
of us to landscape photography. Of course when that moment arrives,
you need to know what to do to ensure you capture the scene to its
maximum potential. The Essential Guide to Landscape Photography provides all the
information, advice and inspiration that you need to take great landscape images.
This guide is packed with expert guidance from some of the UK’s most successful
and popular outdoor photographers. Our emphasis is on in-camera techniques, in
other words, how to develop your creative eye and master your digital SLR, but we
also cover the key Photoshop techniques and tools you need to add that final touch
of class to your images. We hope this guide helps you improve how you compose a
scene so you can shoot landscape images like a pro. All the best!”
Daniel Lezano, Editor
Meet our landscape experts
All our experts are regular contributors to Digital SLR Photography magazine. For expert advice
and inspiration to help you improve your photo skills, pick up the latest issue, available on the
second Tuesday of every month. For further information, visit: www.digitalslrphoto.com
Mark Bauer
Ross Hoddinott
Helen Dixon
Lee frost
Former teacher Mark is now
one of the UK’s leading landscape
photographers and an expert
on Dorset’s Jurassic coastline
and the New Forest.
www.markbauerphotography.com
Ross is an award-winning
photographer with many years
of experience capturing the
diverse beauty of the Britain’s
landscapes and wildlife.
www.rosshoddinott.co.uk
Helen is living the dream,
having given up a full-time job
to become a professional
landscape photographer. She is
one of the UK’s brightest talents.
www.helendixonphotography.co.uk
A pro for two decades, Lee Frost’s
one of the best-known names in
the UK photography business,
with 20 books to his name and
worldwide image sales.
www.leefrost.co.uk
Editorial Co-ordinator Jo Lezano
[email protected]
Editorial contributors:
Ross Armstrong, Mark Bauer, Adam Burton,
Helen Dixon, Lee Frost, Matty Graham,
Ross Hoddinott, Joanna Marsh, John Patrick
& Caroline Wilkinson
Advertising & Production
To contact advertising phone: 01733 293913
Display & Classifield Sales: 0207 907 6651
Advertising Director Natasha Blatcher
[email protected]
Advertising Sales Guy Scott-Wilson
[email protected]
Production Controller Dan Stark
[email protected]
Publishing & Marketing
Nicky Baker Digital Production Manager
Dharmesh Mistry Bookazine Manager
Robin Ryan Production Director
Julian Lloyd-Evans MD of Advertising
Martin Belson Newstrade Director
Brett Reynolds Chief Operating Officer
Ian Leggett Group Finance Director
James Tye Chief Executive
Felix Dennis Chairman
All rights in the licensed material belong to
Felix Dennis, Halo or Dennis Publishing and
may not be reproduced, whether in whole or
part, without their prior written consent.
Digital SLR Photography is a registered trademark.
The publisher makes every effort to ensure the magazine’s content
is correct. All material published in Getting Started in Digital
SLR Photography and Digital SLR Photography is copyright and
unauthorised reproduction is forbidden. The editors and publishers
of this magazine give no warranties, guarantees or assurances and
make no representations regarding any goods or services advertised
in this edition. No responsibility can be accepted for images or
correspondence lost or damaged in post or transit.
To license this product, please contact Winnie Liesenfeld on
+44 (0) 20 7907 6134 or email [email protected]
The ‘Magbook’ brand is a trademark of
Dennis Publishing Ltd. 30 Cleveland St,
London W1T 4JD. Company registered in England. All material ©
Dennis Publishing Ltd, licensed by Felden 2009, and may not be
reproduced in whole or part without the consent of the publishers.
While every care was taken during the production of this
Magbook, the publishers cannot be held responsible for the
accuracy of the information or any consequence arising from
it. Dennis Publishing takes no responsibility for the companies
advertising in this Magbook.
The paper used within this Magbook is produced from sustainable
fibre, manufactured by mills with a valid chain of custody.
The Essential Guide to Landscape Photography ISBN
Printed by Benham Goodhead Print (BGP)
When you’ve finished enjoying
this magazine please recycle
The Essential Guide to
Landscape Photography
Contents
007 Introduction to landscapes
Be prepared to learn and exploit the
fundamentals of landscape photography
008 Composition
We reveal the key techniques you’ll need to
master to take perfectly-exposed landscapes
014 expert tutorial: Using lead-in lines
016 expert tutorial: foreground interest
019 Exposure
Master these simple techniques and your
handling of light levels will be right every time
024 expert tutorial: Aperture-priority
026 expert tutorial: Shutter speeds
028 photoshop tutorial: raw files
031 Sharpness
The best techniques for super-sharp scenes
032 expert tutorial: Hyperfocal focusing
034 expert tutorial: focus for sharpness
038 expert tutorial: Shake-free images
040 Lighting
Predict and exploit the best lighting
046 expert tutorial: Time of day
048 expert tutorial: Magic hour & sunsets
050 expert tutorial: Misty mornings
052 expert tutorial: Twilight seascapes
054 expert tutorial: star trails
057 Filters
Use filters to improve and enhance your shots
062 expert tutorial: Using an nd grad
064 photoshop tutorial: digital filter
066 Water in landscapes
Why water works so well in landscapes
070 expert tutorial: shoot moving water
073 Colour
Learn the relationship on colour in scenes.
076 expert tutorial: vaseline a scene
078 expert tutorial: white balance
080 expert tutorial: black & white
082 Photoshop tutorial: b&W conversion
086 Expert Gems: Seasons
Brilliant ideas to keep you busy all year round.
096 Photoshop tutorial: seasonal colour
099 Landscape gear
The best equipment for outdoor photography
100 ideal kits for YOUR requirements
106 wide-angle lenses
110 expert tutorial: wide-angle lenses
112 expert tutorial: telephotos
114 Choosing the right tripod
116 Choosing the right bag
119 landscape accessories
123 UK location guide
40 great UK locations for you to explore!
154 Perfect exposures
Cut out and use our free grey card!
156
pages
OF EXPERT
LANDSCAPE
ADVICE
ROSS HODDINOTT
Oh deer.
Get more from every shot with our expert advice and extensive range of cameras and accessories.
www.jessops.com
Introduction 007
2nd Edition The Essential Guide to Landscape Photography
the basics
Revised
& upda
TEcHN ted
ADVIcEIQUE &
THE EXPfROM
ERTS!
CAPTURE STUNNING LANDScAPES – we all want to be able to do it. Fantastic landscapes inspire more
photographers than any other type of image and on the face of it, well, it should be easy to do. Find an awesome
vista and point your digital SLR at it, press the shutter and that should do the trick. This simple approach will probably
bag you a decent snap, but often the image you capture will not do justice to the glorious scene in front of you.
We’ve all been a little bit disappointed by a photo that doesn’t quite live up to our great expectations. The difference
between a decent snap and a stunning image is often down to a few versatile ideas, some easily-learned expert
knowledge, the right equipment choice and careful planning. This inspirational guide will provide you with an excellent
grasp of these fundamentals and help you transform your shots from the ordinary into something very special indeed.
ADAM BURTON
Composition
MORE THAN ANY OTHER factor, composition can turn
an OK image into a masterpiece. There are a small
number of techniques that, once learned, will serve you
well in many different situations.
Composing the elements in the frame is the real ‘art’
of taking great pictures. Carefully consider how points of
interest are arranged and how they relate to each other.
Placing a subject centrally in the frame usually results
in a static rather than dynamic composition. Placing
the subject off-centre, encourages the eye to move
around the frame more. One way of dividing the frame
up to achieve harmony is to use the ‘rule-of-thirds’ (see
below). This proportion often occurs in nature, and there
is research to suggest that our brains are ‘hard-wired’ to
find these arrangements more attractive.
1) The ‘rule-of-thirds’
This is a simple way of organising the elements in the
frame so that they make a balanced composition. As a
compositional tool, it’s been around for a few centuries
and is a simplified version of the ‘golden section’ which
is used in art and architecture.
Imagine two vertical lines dividing the viewfinder into
thirds. Now do the same with two horizontal lines. You
then organise the main elements of the picture within
this grid. For example, with a simple landscape, place the
horizon on one of the lines, so that you have two-thirds
land and one third sky, or vice-versa.
If you have a strong focal point, such as a tree or
building, you can place it on one of the points where the
horizontal and vertical lines intersect. This will make a
much more dynamic composition than if you were to
place the focal point centrally, which can make a picture
look rather static. Inexperienced photographers often put
the subject right in the middle and it rarely works.
Moving an element of a scene to a different
intersection can create a startlingly different image,
such is the power of the rule-of-thirds. Don’t be afraid to
experiment with different variations on a theme.
RULE-OF-THIRDS GRID: This image follows the rule-ofthirds quite closely. There is approximately two-thirds land/
sea and one-third sky. The lighthouse and obelisk are
divided by the left vertical, each equi-distant from it.
MARK BAUER
The Basics #1
010 Composition
The Essential Guide to Landscape Photography 2nd Edition
HELEN DIXON
2) Foreground interest
BOTh: mARK BAUER
You see, the problem is, the world is three-dimensional and a photograph
is two-dimensional. One of the main reasons that landscape images fail is
that they don’t convey the sense of depth that our eyes see. Fortunately,
there are a few compositional tricks that we can employ to get round this
rather frustrating little problem.
A very effective way to create depth in a photograph is to include
a strong foreground, often in conjunction with a wide-angle lens.
Emphasising the foreground in this way will add depth to the picture by
creating an ‘entry-point’ for the eye, pulling the viewer into the scene and
giving the picture a sense of distance and scale.
Wide-angle lenses help this technique because they stretch perspective,
exaggerating the elements close to the lens and opening up the view
beyond the foreground.
But be careful, this can result in the middle distance looking empty
and lacking in interest so the trick is to shoot from a lower viewpoint.
This compresses the middle distance, so that there isn’t too much empty
space in the composition. You’ll also need to use a small aperture and
focus carefully to maximise depth-of-field, keeping foreground and distant
objects in focus (we’ll explain how to do this later).
Getting it right: The cow parsley and gorse both make an attractive foreground
to lead the eye into the scene and provide suitable frames for the view beyond. A
wide-angle lens and a small aperture of f/22 provides plenty of depth-of-field.
Big foreground or small detail: It’s not always necessary to have a ‘big’
foreground; colour, texture and patterns can all provide attractive foreground interest.
The delicate carpet of flowers is as effective as the strong shapes of rocks, opposite.
3) Lead-in lines
HELEN DIXON
Lines represent depth in a picture and can be used to lead your eye into
the picture and guide it around the scene.
Lines are everywhere: man-made, such as roads, paths and hedgerows,
or natural, such as rivers or the coastline – all will add dynamism to your
photographs. Lines don’t have to be real, they can be ‘implied’ like the
patterns created by waves over a longish exposure, or objects pointing into
the frame. Lots of things can bring linear energy into your work.
Straight, converging lines are very dynamic and can give a lot of
impact to a picture, but there is always the danger that the eye follows
the lines into and then very quickly out of the frame again. Pictures with
only converging lines might have immediate impact, but can still be
unsatisfying. It’s a good idea to try and place some object of interest within
the frame – a figure or a tree, for example – to give the eye something to
settle on within the scene.
Lines that curve gently in an ‘S’ shape lack the immediate impact of
straight, converging lines, but can result in a more satisfying image.
They can lead the eye gently through the whole picture, allowing the
viewer to take in other elements within the composition.
Another in-camera technique that can be used to add depth to an image
is to create a ‘layered’ effect. Layers in an image can be created by having
a series of overlapping shapes (see right) or by strong side-lighting,
creating alternative bands of light and shade that can give the effect of a
‘layering of light’.
This kind of technique works particularly well with longer lenses that
have the effect of compressing perspective and ‘stacking’ overlapping
forms. Each layer, or plane, appears thinner and closer to the next,
exaggerating the effect. Just remember longer lenses will produce less
depth-of-field so you’ll need to use smaller apertures, such as f/16, if
elements are in the foreground or near middle distance.
This shot was taken at dawn near Lyme Regis using a 70-200mm zoom
at around 100mm. The longer focal length compresses the distances
between the layers and the strong, directional light helps emphasise the
layers – the early morning mists add bags of atmosphere.
MARK BAUER
4) Layers and planes
HELEN DIXON
Protips
Keep it
simple
!
Co
mpos
choose ition is all abou
to
also wh include in the t what you
a
less is m t you choose to frame – and
unclutte ore and compo leave out. Ofte
n
red can
be the msitions that are ,
ost succ
essful
012 Composition
5) Break the rules!
Like all rules, the rule-of-thirds needs to be applied
with judgement rather than as a matter of course and
there will always be situations where it can be ignored.
For example, when shooting a scene where the sky is
reflected in water, you might want to place the horizon
across the middle of the frame, giving the two elements
of the shot – sky and reflection – equal weighting.
If there is no interest in the sky, place the horizon
higher in the frame or crop it out altogether. To increase
a sense of emptiness and isolation, the horizon can be
placed very low in the frame. The beauty of shooting
digitally is the ease at which you can review your efforts
and experiment to ensure the perfect composition.
The Essential Guide to Landscape Photography 2nd Edition
Composition 013
2nd Edition The Essential Guide to Landscape Photography
IAN WOOLCOCK
RIChARD JOhNSON
6) Find natural frames
A popular compositional ‘trick’ is to use something to
frame the view beyond, such as an archway, doorway,
window or the overhanging branches of trees.
Try using frost-covered plants and gateposts to create
a ‘natural’ frame for the main subject of your shot. Use
the ‘frame’ to lead the viewer’s eye into the shot for
some truly eye-catching results.
Control the amount of sharp focus carefully. Very outof-focus framing leaves help keep attention on the main
subject, slightly soft leaves might look like a mistake.
Use this idea with care as it can often be detrimental
to the scene and can suggest to the viewer that the view
beyond the natural frame is even more spectacular.
BOTh: mARK BAUER
7) Experiment with viewpoints
Finding the right viewpoint is key to successful landscape
composition. Rather than shooting everything from head
height, experiment with high and low viewpoints.
Higher viewpoints have the effect of opening up the
planes in the image and is useful with standard and
telephoto lenses. When photographing well-known
landmarks, it’s tempting to use the established viewpoints,
but spend time looking for a fresh view, as it’s much more
satisfying to capture something original.
While there’s nothing wrong with the first picture, it’s
the ‘standard’ view of Old Harry Rocks in Dorset. Without
having to move very far, however, a less photographed and
more dramatic viewpoint has been found.
014 Composition: Lead-in lines
The Essential Guide to Landscape Photography 2nd Edition
expert tutorial
How tocomposeascene
with Ross hoddinott Beautiful scenery and good
light are still no guarantee that a photographer will
take a great landscape image. While they might both
be essential ingredients to great scenic shots, you, the
photographer, still need to have the vision and ability to
create a strong image. When shooting landscapes, you’ll have ample
time to consider, arrange and fine-tune how you frame the scene.
Composition is the art of arranging the elements of a scene
in such a way that they are visually pleasing. It is an ability that
becomes instinctive the more you take photographs, so don’t
worry if this is a skill that doesn’t come to you naturally – just keep
practising and you will improve over time. By using two relatively
simple guidelines, based around the rule-of-thirds and lead-in lines,
you will see an immediate improvement in your landscapes.
The rule-of-thirds requires that you imagine the frame is split
into nine equal parts by two horizontal and two vertical lines. It’s
a technique I use for the majority of my scenics. A horizon that
cuts centrally through an image normally weakens a shot, but a
landscape composed of one-third sky and two-thirds foreground, or
two-thirds sky and one-third foreground, looks far more dynamic.
Another useful ‘rule’ is to use some sort of lead-in line within your
composition. A lead-in line uses the natural perspective of receding
or converging lines to create foreground interest. The technique
works well in tandem with the rule-of-thirds, so try combining the
two wherever possible.
Powerful compositions often have strong lines passing through
them, as they help to lead the viewer’s eye through the scene to
the point in the distance where the line diminishes – the ‘vanishing
point’. All types of subject can be used: a road, path, bridge,
walkway, river, ploughed field, crop lines or fence. By using such an
object in the foreground, leading into the picture, you can transform
an otherwise ordinary looking view. Often a lead in-line that
stretches diagonally works best, but don’t overlook positioning your
lead-in lines centrally, as this can also create striking results.
I spent an evening on Dartmoor photographing the moors.
Though the evening light was warm, the view looked quite ordinary,
but I knew that a nearby dry stone wall would create more interest.
A vertical format worked best, with the wall leading from the bottom
of the frame to the distant view. I tried taking a few shots looking
directly down its length, then changed my position so that the wall
led from one corner into the distance. I composed the shot with
one-third sky, two-thirds foreground, and, with my camera set to
aperture-priority mode, I selected a small aperture of f/22 to ensure
back-to-front sharpness thanks to lots of depth-of-field.
don’t panic!
8 no lead-in-lines
RIGHT: Some DSLRs allow you to display grid
lines in the viewfinder to assist composition.
This can normally be selected by accessing
one of the camera’s custom setting menus.
ABOVE: I used a Nikon D700 with a Nikkor
24-85mm zoom, set to f/22, on a Gitzo tripod.
I fired the shutter with a remote release. I also
used a Lee Filter system using a polarising
filter and 0.6ND graduate filters together.
4 with lead-in-lines
Positioning the horizon
Though it may seem natural to place the
horizon in the centre of the image, more
often than not, it will produce disappointing
results. In this instance, composing the shot
to be only one-third sky, as opposed to half,
gives greater emphasis to the foreground
and creates a better balance overall.
However, there isn’t a set rule to follow and
you should base your composition on the
merits of each scene. For instance, if the sky
had been more interesting, such as on a
stormy day, I may well have considered
giving it more emphasis in the frame.
ABOVE: Without a lead-in line, or any foreground interest, this scene lacks impact and depth. I moved closer to
the wall to use it as a lead-in-line and took this shot looking down its length. This leads your eye into the picture
and towards the horizon, but there is still too much empty, wasted space either side of the wall.
final image
By altering my shooting
position by a few steps, I was
able to compose the scene so
that the wall cut diagonally
across the frame. This lead-in
line creates an entry point and
leads the viewer’s eye on a
journey through the image.
Summary
How to compose
the scene
1) Stick to the rules!
Placing the horizon along
the centre of the frame will
normally create a poor
composition. Instead, try to
follow the rule-of-thirds
2) USE lines A lead-in line
will draw the viewer’s eye
through the image and
create interest. Almost
anything can be used
3) Diagonally does it!
Placing your lead-in lines
so that they run diagonally
often works better than if
they’re positioned centrally
016 Composition: Foreground interest
The Essential Guide to Landscape Photography 2nd Edition
expert tutorial
Using foreground interest
with Adam burton Because I’m hooked on
wide-angle photography, big foregrounds are a
constant feature in my landscape images. When
selected carefully and photographed well, a good
foreground will bring a landscape shot to life and
maximise its impact. Photographs with detailed foregrounds can
give the viewer a sense of ‘being there’, instantly drawing their
attention and gaze into the image. I should point out that I don’t
go out primarily searching for foregrounds. The most important
thing is always the main subject in your image, but for me, the
foreground comes in a close second. So whenever I head out to
take landscapes, I look for a location that has a lot of potential
shooting opportunities. On arrival, I’ll scout around the area,
looking for the most appealing subject and the best angle to
shoot it from. Once I have chosen the area in which I want to
shoot, I begin to search around for foreground interest.
There are no rules as to what qualifies as good foreground
interest but, as always, there are a few points to consider.
Only you can be the judge of what you want to focus on and,
obviously, this is also determined by which objects are close
at hand. But it is important to pay careful attention to which
objects you include, rather than just shooting the first thing
you stumble across. As I favour landscapes, I almost always
look for natural elements to make a foreground – rocks, flowers
and water being the usual suspects. These, I know, will fit into
the bigger picture that I am composing, whereas a man-made
object could look unbalanced.
Once you’ve decided what to include as foreground, consider
how to compose your shot to give the strongest possible result.
Ideally, the foreground leads the eye into the main subject, but
if composed wrongly, can become a distraction. One mistake
many photographers make is to always shoot at eye-level; if
you are including low-level rocks and shooting from a standing
position, your resulting image will lack impact. Try moving lower
and closer to your desired foreground, and your image will
spring to life! Having said that, be careful not to move too low
and close or you risk unbalancing your image by making the
foreground more dominant than your background. For this same
reason, try and keep your subject matter clean and simple – a
fantastic background will be lost behind a cluttered or messy
foreground! Finally, it’s important to use a small aperture and
focus a third of the way into the scene to provide a good depthof-field. By following these simple measures, you can greatly
improve the composition of your landscape images.
NO FOREGROUND INTEREST Without a foreground,
the image lacks impact and can look dull and
uninteresting. While water can make an attractive
subject, its muddy colour in this shot lacks appeal.
TOP: While your natural instinct may be to
extend your tripod and shoot from a standing
position, it’s worth trying low viewpoints too.
ABOVE & RIGHT: Using a tripod really helps
with landscape photography. I adjusted the
height until I was happy with the composition
and used a polariser to improve the colours. By
reviewing my shots on the LCD monitor, I was
able to check the exposure and depth-of-field
to ensure I got the best possible result.
WITH FOREGROUND By including a foreground, the
image immediately looks more balanced and
eye-catching. However, don’t just settle on the first
thing you find. This plant is quite unattractive.
LOW VIEWPOINT Composing from a low viewpoint
helps to pick out details in this mossy rock. It is
simple, uncluttered and provides a satisfactory
foreground; but it still lacks something special...
Summary
Foreground
interest
1) DO YOUR HOMEWORK
Spend some time
searching for the best
foreground interest in your
chosen area. Don’t just
shoot the first thing that
you stumble across
2) avoid clutter
Try to keep the foreground
simple and clutter-free
3) Get down! Get low
down and close to the
foreground to add impact
4) ensure sharpness
Set a small aperture and
focus a third of the way in
5) USe your lcd Review
results on the LCD, revise
composition and reshoot
final image
Adding a few leaves to the
rock adds interest and impact;
and by slightly adjusting my
viewpoint, the foreground
interest is moved into an
off-centre position, which
strengthens the composition.
Olympus E-P1. Not an SLR.
Not a Compact. It’s a PEN.
Exposure:TheBasics 019
2nd Edition The Essential Guide to Landscape Photography
The Basics#2
PERFECTEXPOSURES
DIGITAL SLRs HAVE EXTREMELY ACCURATE, multi-zone metering
systems, with a histogram function to help us check accurate exposure,
so getting it right has never been easier. However, for more creative
control, you need to take things into your own hands.
The basic problem is that as we gaze at a beautiful landscape
our eyes adjust constantly to register detail in the highlights and the
shadows. Our pupils open and close according to the level of light
and our optic nerve has impressive range and latitude. Our cameras,
despite their impressive technical specifications, make exposures
within fairly limited parameters – the aperture and shutter speed
combination will be chosen for the level of light in the scene. A
perfectly-exposed sky results in gloomy shadows; detail in the shadows
results in a burned-out sky. We need to help our camera to expose the
right part of the scene, or find the right balance. The following expert
techniques will help you capture perfect exposures by knowing what
types of scenes causes problems and what action you’ll need to take.
1)Getthebalanceright
/*,! (*'%,
!TR- RL8VZ 0.Z-Z2+- +TZ M82\-480Z 0T1+1V.80TZ. %R+T +TZ V.Z8+Z-+
4T8MMZ2VZ ZJ+.ZLZ MRVT+ MZ'ZM- %R+T 8 2ZZ\ +1 480+).Z \Z+8RM R2 +TZ
6.RVT+ -OH 82\ +TZ -T8\1%-9 ,2\ \12 + 6Z Y11MZ\ 6H +T8+ %Z+ -82\ R2 +TZ
Y1.ZV.1)2\9 F+ - .ZUZ4+R2V 8 M1+ 1Y MRVT+ Y.1L +TZ -OH9
BY 41).-Z; R+ %RMM 6Z 01--R6MZ +1 L82R0)M8+Z +TZ RL8VZ 12 H1).
41L0)+Z.; 6)+ X.-+ H1) L)-+ L8OZ -).Z +TZ ZJ01-).Z -Z++R2V- 8.Z V1R2V
+1 480+).Z +TZ L8JRL)L 8L1)2+ 1Y R2Y1.L8+R12 84.1-- +TZ %T1MZ RL8VZ9
B'Z.ZJ01-Z 82\ H1) %RMM M1-Z 4M1)\ \Z+8RM 82\ +TZ 6M)Z -OHK )2\Z.ZJ01-Z
82\ +TZ -T8\1%- 12 +TZ 0RZ. %RMM XMM R2 82\ 6Z41LZ -1MR\9 FY H1). \RVR+8M
"E# \1Z-2 + 480+).Z +TZ R2Y1.L8+R12; H1) %RMM T8'Z 21+TR2V +1 %1.O %R+T
12 +TZ 41L0)+Z.9 !TZ.Z %RMM 6Z 82 10+RL)L ZJ01-).Z -Z++R2V 6)+ R+ 41)M\
6Z 8 41L0.1LR-Z; -1 RY R2 \1)6+; )-Z H1). 48LZ.8 - 6.84OZ+R2V Y)24+R12
+1 +8OZ -Z'Z.8M RL8VZ-; -1LZ )2\Z.ZJ01-Z\ 82\ -1LZ 1'Z.ZJ01-Z\9
020 Exposure
The Essential Guide to Landscape Photography 2nd Edition
%
!
$
#
Mark Bauer was looking for a ‘different’ view
of Corfe Castle in Dorset, so he sauntered
along to the graveyard in the village. Having
found a composition based around one of the
crosses, the next problem was sorting out the
exposure. Mark explains, step-by-step, how he
tackled the challenge:
1) !TR- R- %T8+ +TZ 48LZ.8 - L)M+R G12Z
LZ+Z. 48LZ )0 %R+T; %R+T1)+ +TZ 8R\ 1Y 82H
XM+.8+R129 !TZ -4Z2Z R- 'Z.H 412+.8-+H; 82\
+TZ 48LZ.8 T8- -+.)VVMZ\ +1 480+).Z 8MM +TZ
+128M R2Y1.L8+R129
2) "01+ LZ+Z. .Z8\R2V- Y.1L +TZ 68-Z 1Y
+TZ 4.1-- 82\ +TZ -OH .Z'Z8MZ\ 8 \RYYZ.Z24Z
R2 6.RVT+2Z-- 1Y 861)+ W -+10-9 "Z++R2V 82
ZJ01-).Z Y1. +TZ M82\; F X++Z\ 8 79NC& V.8\
XM+Z. @+T.ZZ -+10-> 82\ 0)MMZ\ R+ \1%2 6ZM1%
+TZ MZ'ZM 1Y +TZ T1.RG12; +1 +TZ Z\VZ 1Y +TZ
\8.OZ-+ -T8\1% 8.Z8 8+ +TZ 61++1L 1Y +TZ
Y.8LZ9 F )-Z\ 8 -1Y+ V.8\; -1 +T8+ R+ %1)M\2 +
4)+ R2+1 +TZ 4.1--9 *)+ +TZ.Z R- M1-- 1Y \Z+8RM
R2 +TZ 6.RVT+Z. 08.+- 1Y +TZ -OH -1 F .Z\)4Z\
ZJ01-).Z 6H +%1 +TR.\- 1Y 8 -+10 82\ .Z-T1+9
3) !TZ .Z-)M+ R- ZJ01-Z\ +1 +TZ .RVT+ @-ZZ
1'Z. +TZ 08VZ> 8- Y8. 8- 01--R6MZ %R+T1)+
4MR00R2V +TZ TRVTMRVT+- +TZ TR-+1V.8L -T1%+TZ.Z 8.Z -+RMM \8.O +12Z-; 6)+ 8M-1 0MZ2+H 1Y
R2Y1.L8+R12 R2 +TZ +10 -Z4+R12; 82\ 4.)4R8MMH;
21 4MR00Z\ -T8\1%-9
4) , -+.8RVT+ 412'Z.-R12 1Y +TZ #8% XMZ
M11O- \)MM; +TZ 0R4+).Z M84O- 412+.8-+9 I1. +TZ
X28M 'Z.-R12; F 'Z 6.1)VT+ +TZ ZJ01-).Z \1%2
-MRVT+MH 82\ 8\\Z\ L1.Z 412+.8-+; Z-0Z4R8MMH
R2 +TZ -T8\1%-; +1 .Z4.Z8+Z +TZ \.8L8 1Y
+TZ 1.RVR28M -4Z2Z9 F 'Z 8M-1 +%Z8OZ\ +TZ
%TR+Z 68M824Z +1 8\\ %8.L+T 82\ R24.Z8-Z\
-8+).8+R12 +119
5) I1. 41L08.R-12 0).01-Z-; F 8M-1 +11O 8
-T1+ )2\Z.ZJ01-Z\ 6H 12Z -+109 !TR- MZ8'Z+TZ -T8\1%- L)\\H 82\ M84OR2V R2 \Z+8RM;
%TR4T R- 'Z.H 8008.Z2+ R2 +TZ 4.109
PROTIPS
MID-TONE METERING
Metering systems in digital SLRs are
calibrated to an 18% grey mid-tone.
Basing exposure readings on a mid-tone,
such as grass, provides a good starting
ing
point for accurate exposures
EXPOSURES
Shadows
These two examples on
the right show why it’s
not a good idea to
underexpose and then
try to pull up the
shadows in the
processing. The nearest
image is around one
stop underexposed (to
maintain highlight detail)
and the shadow curve
has been pulled up to
match the exposure in
the correctly exposed
version on the right. As
you can see, not only is
there ‘posterisation’ in
the shadows, rather than
smooth tonal transitions,
and tons of noise, but
also the sensor has
recorded significantly
less detail.
"
✘ UNDEREXPOSED
✔ CORRECT EXPOSURE
/*,! (*'%,
2)Gettingtherightexposure
Exposure 021
2nd Edition The Essential Guide to Landscape Photography
$%0%. &"#-.
Exposingtocapturemovement
One of the great things about taking photos
by the sea is the opportunities it gives for
capturing the movement of waves and
adding atmosphere. In low light, with the
lens stopped down to extend depth-of-field,
long exposures are a necessity. They may
range from several seconds to minutes,
depending on lighting conditions. As waves
wash around rocks or up and down the
shore while the shutter is open, they will
record as a romantic, mysterious mist. To
capture the drama of waves breaking on the
shore, speeds of ¼sec or slower works well.
*&*/ (',)-.
LONGEXPOSURES
,-++ $-&&".-))
3)Exposureforcoastallandscapes
Achieving the correct exposure in coastal shots can be a bit trickier
than for inland landscapes, as there are several things that can fool the
camera’s meter: bright highlights on water or bright white foamy waves
can lead to underexposure. On the other hand, if you have chosen a large,
dark rock for your foreground, this could cause the camera to overexpose.
So you need to keep an eye out for any large areas of particularly bright
or dark tones and apply exposure compensation accordingly. It is good
practice to check the histogram after each shot and be prepared to
re-shoot if necessary.
There can also be a huge range of contrast within any one scene, with
bright skies, dark rocks, and bright highlights on water. Neutral Density
(ND) graduate filters are essential, and depending on the conditions and
the brightness of the sky and sea relative to your foreground, you may
need to pull the grad down very low in the frame. This could even be
below the horizon, to the top of your foreground. If you don’t, you might
end up with a correctly-exposed sky and foreground with a band of
over-bright water in the middle of the picture. So when metering the scene
to choose the strength and placement of the filter, remember to take
readings from the foreground, sky and sea.
022 Exposure
The Essential Guide to Landscape Photography 2nd Edition
4)Histograms:Anaidtocheckingexposure
DON’TPANIC!
THE BASICS In basic terms, a histogram is a two-dimensional graph, often resembling a range of
mountain peaks, that represents an image’s tonal extent. Whilst, at first glance, histograms might
appear quite complex and confusing, they are actually very simple to read. They are an essential
aid for digital SLR photographers striving to achieve consistently correct exposures in-camera and
are a more accurate method of assessing exposure than looking at images you’ve taken on the LCD
monitor. Therefore, if you are not already in the habit of regularly reviewing your images’ histogram,
it is time you did so. With the help of this guide, you will soon feel confident assessing histograms.
WHAT IS A HISTOGRAM? A histogram is a visual representation of an image’s tonal range. The
horizontal axis indicates the picture’s extent from pure black (0, far left) to pure white (225, far right).
The vertical axis shows how many pixels have that particular value. Looking at an image’s histogram,
you can tell whether the picture is made up of predominantly light, dark or mid-tones.
Although its appearance is also dictated by the colour and tone of the subject, a histogram
with a large number of pixels (or a sharp peak) grouped at either edge is an indication of poor
exposure. For example, a histogram with a large number of black pixels (grouped to the left) often
signifies underexposure – subject detail will be obscured in the shadow areas. A large number of
pixels grouped to the right of the histogram normally indicates an image which is overexposed. The
image’s highlights will burn out (or ‘clip’) and this detail is irretrievable. A graph with a narrow peak
in the middle and no (or few) black or white pixels indicates an image lacking contrast.
SO WHAT SHOULD A HISTOGRAM LOOK LIKE? This is a tricky one to answer. Despite what some
people may say, there is no such thing as the ‘perfect histogram’. It simply tells us how a picture
is exposed, allowing photographers to decide whether – and how – to adjust exposure settings.
Therefore, a histogram of a light scene will be very different to one with predominantly black tones
or one with a mix of both. However, generally speaking, a histogram should show a good spread of
tones across the horizontal axis, with the majority of pixels positioned near to the middle, (100, midpoint). Normally, it is desirable to avoid peaks to the right-hand side of the graph, as this is usually
an indication of ‘burnt out’ (overexposed) highlights, resulting in lost detail.
When assessing a histogram, it is important to consider the brightness of the subject itself. For
example, a scene or subject boasting a large percentage of light or dark tones – like snow or a
silhouette – will naturally have an affect on the overall look of the resulting graph. Therefore, whilst it
is possible to make recommendations, it is impossible to generalise about what is and isn’t a good
histogram. Whist an even spread of pixels throughout the greyscale is often considered desirable,
you will also need to use your own knowledge gained through experience.
HOW DO I CHECK A PICTURE’S HISTOGRAM? Most digital SLRs allow you to view the histogram
on the LCD monitor during playback. To do this, press the playback button to view the image and
then cycle through the additional photo info screens until the histogram is displayed. It’s worth
making this your default setting, so that you can quickly access the histogram and assess exposure
immediately after taking the picture when required.
If the histogram indicates underexposure, apply positive exposure compensation. If pixels are
grouped to the right hand side and the image appears overexposed, dial in negative compensation.
Using the histogram is a far more reliable method of assessing exposure than looking at images
on the LCD screen, particularly when trying to view images outdoors in bright light when the light
reflecting from the LCD can prove deceptive.
Exposurewarnings
The majority of DSLRs are designed with a
playback function known as the ‘highlights
screen’. Whilst histograms provide a graphic
illustration of an image’s tonal extent, helping
you assess exposure overall, the highlights
screen – or highlights alert – is aimed
specifically at helping photographers to avoid
highlights burning out. White or very light
subjects in direct sunlight are especially prone
to this. A histogram with a sharp peak to the
far right will normally indicate that an image is
suffering from areas of overexposure. However,
the highlights alert actually identifies the
pixels that exceed the value for pure white
(255). Pixels that do so are not given a value,
meaning they cannot be processed and are
effectively discarded – having no detail or
information recorded. When the image is
replayed on the camera’s LCD monitor, the
pixels falling outside the camera’s dynamic
range flash or blink – providing a quick and
graphic illustration of where picture detail is
‘burned out’ and devoid of detail. To rectify
this, set negative exposure compensation so
that the next image is recorded darker.
A digital camera’s highlights alert is not
always switched on by default. Therefore,
consult your user’s manual and switch it on
when you feel this type of exposure warning
would prove useful. Normally this is done via
the camera’s Playback Menu.
,-++ $-&&".-))
PEAKS TO THE LEFT The histogram is skewed to the
left, as the dark backdrop means many of the pixels
are in shadow areas, but the image is well exposed.
PERFECT EXPOSURE A typical landscape scene gives
a so-called ‘perfect histogram’ as it has a good spread
of tones and peaks through the mid-tones.
PEAKS TO THE RIGHT A well-exposed shot of an
overly-light scene gives a histogram skewed to the
right, much like that of an overexposed image.
Exposure 023
2nd Edition The Essential Guide to Landscape Photography
PROTIPS
COLOUR
HISTOG
RAMS
Some D
SL
view sep Rs allow you
green an arate histogramthe option to
off ignori d blue channels s for the red,
standard ng this option . You’re better
an
greysca
le histog d using the
ram opti
on
5)Exposetotheright
MAIN IMAGE & INSET: Exposure to the right of the histogram will
capture maximum detail and minimum noise. Once in the Raw
converter the image will look too light and washed out so use the
brightness and contrast controls to adjust the image’s appearance.
/*,! (*'%,
$J01-R2V +1 +TZ .RVT+ R- Y8-+ 6Z41LR2V 8 %R\ZMH 844Z0+Z\ 800.184T +1
TZM0 L8JRLR-Z RL8VZ /)8MR+H 8M+T1)VT R+ 12MH 800MRZ- RY H1) -T11+ R2
#8%9 _R+T +TR- +Z4T2R/)Z H1) ZYYZ4+R'ZMH 0)-T ZJ01-).Z -Z++R2V- 8- 4M1-Z
+1 1'Z.ZJ01-).Z 8- 01--R6MZ %R+T1)+ 84+)8MMH 4MR00R2V +TZ TRVTMRVT+-9 !TZ
.Z-)M+ R- 8 TR-+1V.8L %R+T +TZ L8Q1.R+H 1Y 0RJZM- V.1)0Z\ +1 +TZ .RVT+ 1Y LR\
01R2+ TZ24Z +TZ 28LZ ZJ01-Z +1 +TZ .RVT+ 9 "1; %TZ2 H1) .Z 412X\Z2+
H1) )2\Z.-+82\ ZJ01-).Z- %ZMM Z21)VT; VR'Z +TR- +Z4T2R/)Z 8 +.H 82\
+.H 0)-TR2V +TZ ZJ01-).Z 8- Y8. +1 +TZ .RVT+ 1Y +TZ TR-+1V.8L 8- H1) 482;
%R+T1)+ 4MR00R2V +TZ TRVTMRVT+-9 !TZ RL8VZ %RMM 0.1686MH M11O 8 MR++MZ MRVT+
124Z R2 +TZ #8% 412'Z.+Z.; 6)+ +TR- R- Z8-RMH 41..Z4+Z\ %R+T +TZ 6.RVT+2Z-82\ 412+.8-+ 412+.1M- 82\ %RMM VR'Z L)4T 6Z++Z. .Z-)M+- +T82 +.HR2V +1
MRVT+Z2 8 \8.OZ. RL8VZ9
((& 82\ (DB" -Z2-1.- 41)2+ MRVT+ R2 8 MR2Z8. Y8-TR129 D1-+ \RVR+8M
"E#- .Z41.\ 8 5[ 6R+ RL8VZ 48086MZ 1Y .Z41.\R2V W;7NS +128M '8M)Z- 1'Z.
-RJ -+10-9 *)+ +TZ +128M '8M)Z- 8.Z 21+ -0.Z8\ Z'Z2MH 84.1-- +TZ -RJ -+10-;
Z84T -+10 .Z41.\- T8MY +TZ MRVT+ 1Y +TZ 0.Z'R1)- 12Z9 "1; T8MY 1Y +TZ MZ'ZM8.Z \Z'1+Z\ +1 +TZ 6.RVT+Z-+ -+10 @[;7WP>; T8MY 1Y +TZ .ZL8R2\Z. @5;7[W
MZ'ZM-> 8.Z \Z'1+Z\ +1 +TZ 2ZJ+ -+10 82\ -1 129 ,- 8 .Z-)M+; +TZ M8-+ 82\
\8.OZ-+ 1Y +TZ -RJ -+10-; 12MH 618-+- SW MZ'ZM-9 !TR- LRVT+ -ZZL 412Y)-R2V
6)+; -RL0MH; RY H1) \1 21+ 0.10Z.MH )-Z +TZ .RVT+ -R\Z 1Y +TZ TR-+1V.8L;
%TR4T .Z0.Z-Z2+- +TZ L8Q1.R+H 1Y +128M '8M)Z-; H1) 8.Z %8-+R2V )0 +1 T8MY
+TZ 8'8RM86MZ Z241\R2V MZ'ZM-9 "1 RY H1) \ZMR6Z.8+ZMH )2\Z.ZJ01-Z +1 Z2-).Z
\Z+8RM R- .Z+8R2Z\ R2 +TZ TRVTMRVT+- 8 41LL12 0.84+R-Z 8L12V L82H
\RVR+8M 0T1+1V.80TZ.- H1) 8.Z 01+Z2+R8MMH M1-R2V 8 M8.VZ 0Z.4Z2+8VZ 1Y
+TZ \8+8 +T8+ 482 6Z 480+).Z\9
024 Exposure
The Essential Guide to Landscape Photography 2nd Edition
f/4
,-++ $-&&".-))
Aperture-priority is
themodeforyou!
f/22
So what is it that makes the aperture-priority
mode more useful than any of the other
exposure modes when shooting landscapes.
Read on, and all will be revealed
APERTURE-PRIORITY GETS ITS NAME because it
allows you to decide which aperture (f/number) you
want to use to take a photograph, while the camera
automatically sets a shutter speed, based on light
levels, to achieve the correct exposure. In other words,
it lets you prioritise the aperture selection, and it
chooses the shutter speed accordingly.
As the lens aperture is the most influential factor
over the depth-of-field (the zone of sharp focus) in a
photograph, aperture-priority mode is the most
practical choice of shooting mode if you are
photographing a subject or situation in which control
over depth-of-field is important.
Landscape photography is the best example. Generally,
when shooting landscapes, you’ll want to make sure your
depth-of-field is broad enough to record the whole scene
in sharp focus, from the immediate foreground to infinity,
which means that you’ll need to set a small aperture, such
as f/11. Aperture-priority mode lets you do that easily,
because you have to actively set the required aperture.
When shooting portraits, the opposite tends to apply
– you want shallow depth-of-field, so that your subject is
recorded in sharp focus but the background is thrown out
of focus. That means making sure you take the picture at
a wide aperture such as f/4 or f/2.8, which again is easy
when shooting in aperture-priority mode because it’s you
and not the camera who decides which aperture to use.
That said, you can still control which aperture is set
using other exposure modes, but it just requires a slightly
different (and longer) way of working. In shutter-priority (S
or Tv) mode, for example, all you need to do is change the
shutter speed until the camera sets the aperture you want.
Similarly, in program mode, you can use the program shift
function to change the aperture and shutter combination
that the camera has set until you get the right aperture.
Where aperture-priority triumphs over these alternative
modes is that once you’ve set a particularly aperture,
the camera won’t change it, even if light levels change.
Instead, the shutter speed adjusts to maintain the correct
exposure. This wouldn’t be the case if you set the camera
to shutter-priority mode – if light levels change, your
DSLR automatically adjusts the aperture to maintain
correct exposure, giving the shutter speed priority, so your
control over the depth-of-field is diminished. Similarly, in
program mode, the camera would change the aperture/
shutter speed combination in response to changing light.
Aperture-priority is also a handy mode to set for
general use, when you’re just wandering around,
shooting anything that takes your fancy, whether it’s
architecture, details, abstracts or candids. Depth-of-field
requirements will vary depending on the shot – one
minute you need lots of it, the next, as little as possible
– but this can be quickly altered with the flick of the
camera’s input dial, and the viewfinder display will
keep you fully informed of exactly which aperture (and
corresponding shutter speed) you’re using.
Howother
exposure
modeswork
We’ve already established
that in aperture-priority
mode, you set the desired
aperture and the camera
sets the accompanying
shutter speed to give the
correct exposure. Here’s a
quick rundown of how the
other modes work.
Full-auto
Mode
The camera sets the
shutter speed and
aperture to achieve
correct exposure
and you can’t
change the
combination to use
a specific aperture
or shutter speed.
THE EFFECT OF APERTURES With depth-of-field having such an effect on the final image,
it’s no surprise that many experienced photographers rate aperture-priority as their favourite
mode. These two shots show how different apertures can produce very different results.
Settingaperture-priorityonyourDSLR
(T11-R2V 80Z.+).Z 0.R1.R+H L1\Z R- -RL0MZ 8MM H1) 2ZZ\ +1 \1 R- +).2 H1). ZJ01-).Z \R8M
@1. R2 -1LZ 48-Z- 0)-T +TZ ZJ01-).Z L1\Z 6)++12> 82\ -ZMZ4+ , 1. ,'9 ]1). &"E# %RMM
+TZ2 6Z -Z+ +1 80Z.+).Z 0.R1.R+H L1\Z 82\ 8MM H1) 2ZZ\ +1 \1 R- .1+8+Z +TZ -L8MM 8\Q)-+LZ2+
\R8M @Y1)2\ ZR+TZ. 12 +TZ T82\V.R0 1. 12 +TZ +10 .RVT+ 41.2Z. 1Y +TZ .Z8. 1Y H1). 48LZ.8>
+1 4T82VZ H1). 80Z.+).Z9 FY H1) MRVT+MH \Z0.Z-- +TZ -T)++Z. 6)++12 +1 84+R'8+Z +TZ ZJ01-).Z
-H-+ZL; H1) 482 OZZ0 8 4TZ4O 12 +TZ -T)++Z. -0ZZ\ +TZ 48LZ.8 T8- -ZMZ4+Z\9
Canon
Nikon
Sony
Olympus
Pentax
Samsung
Program
Mode
Program works in a
similar way to full
auto, but you can
usually alter the
aperture/shutter
speed combination
if you need to use a
specific aperture or
shutter speed.
Shutter
Priority
You set a shutter
speed and your
DSLR sets the
appropriate
aperture. If light
levels change, the
same shutter speed
is used and the
aperture changed.
Metered
Manual
You manually set
both the aperture
and shutter speed
independently of
each other, so
neither changes
unless you adjust
them, even if light
levels fall or rise.
Subject
Modes
These program
modes are tailored
to suit a specific
subject, with
various camera
functions like the
AF, flash and
exposure systems
set accordingly.
2nd Edition The Essential Guide to Landscape Photography
Exposure 025
/*,! (*'%,
PROTIPS
TS
REMEN
C
IN
E
UR
nge theck
APERT
e
u to cha
h
o
allow y crements. C SLR
meras
in
D
Most ca s in 1/2-stop enu on your t it to
aperturetom function myou to also se
the cus models allow you so wish
if
– manyp increments
1/3-sto
Shotatf/22
Aperture-priority allows
landscape photographers to
control how much of the
scene is sharply in focus.
026 Exposure
The Essential Guide to Landscape Photography 2nd Edition
EXPERT TUTORIAL
Shutter speeds&landscapes
WITH ROSS ARMSTRONG Landscape photographers
understandably give priority to apertures, but in some
situations, shutter speed is just as important, as it can be used
to capture the effect of movement within a scene. Because you
want to maintain sharpness in landscape images by maximising
depth-of-field, you can really make shutter speeds work for you as the
smaller apertures you’ll require also mean slower shutter speeds. This
is easily done by setting your camera to shutter-priority (Tv or S) on the
mode dial. This ensures you get the right exposure as you set the shutter
speed for the desired length of time, while your DSLR adjusts the aperture
accordingly. So why choose the shutter speed rather than the aperture?
Well, setting the slower speed means anything moving when you fire the
shutter, such as flowing water or foliage blowing in the wind, is captured as
a soft blur, while anything static, like a fence or rock, remains sharp and in
focus. The effect of setting a long exposure is to give images extra depth
and dimension whilst illustrating a real sense of movement. The result
is usually closer to how you remember the scene, rather than a lifeless
image of grass with every blade in focus.
But remember, even digital SLRs can be fooled. Be careful not to
overexpose an image when shooting, for example, a field of golden
sweeping grass in the evening sun. As you lower the shutter speed,
the camera’s chosen aperture will eventually flash, indicating that the
image will be overexposed. You can, of course, check the image and the
histogram on the LCD monitor for blown-out highlights.
For even slower shutter speeds and the chance to lift your landscape
photography to another level, use filters. A polariser will cut out reflections
and darken blue skies to give clouds that ‘wow’ factor, as well as reduce
the amount of light reaching your sensor by two stops at the same time.
You can further enhance movement and blur by using a Neutral Density
filter, which is a neutral grey filter that doesn’t affect colour balance but
has the effect of reducing the amount of light passing through it, allowing
you to select slower shutter speeds as a result.
For optimum results shoot at dawn and dusk and always use a tripod.
Shoot on darker, cloudy days, and let nature work for you – less light
means you’ll get slower shutter speeds. On windy days, hang your camera
bag from the tripod to keep your outfit stable. A helpful hint is to use a
remote release/self-timer and mirror lock-up to avoid contact with the
camera during the exposure to gain the maximum effect. Wait for the
wind, open the shutter and whatever happens, don’t get blown away!
ABOVE, POLARISER AND ND GRAD:
“I used a polariser combined with an ND
grad filter to hold back the bright sky and
ensure a well balanced, long exposure.
Shooting in Raw, I used the self-timer and
an exposure of 1.6 seconds.”
SHUTTER SPEED COMPARISON: “For this
series, the lens (10-22mm set to 13mm)
was focused on the long Marram grass in
the foreground. The only thing I changed
was the shutter speeds in a sequence
from 1/50sec to 1.6sec. Note how the
movement of the grass in the breeze
becomes increasingly blurry as the
shutter speed is slowed. My favourite
image from the sequence is the longest
exposure, which captures the movement
in the Marram grass exactly like I
remember it, in the low, winter sunshine.”
1/50sec
1/20sec
1/10sec
Exposure 027
2nd Edition The Essential Guide to Landscape Photography
FINALIMAGE
Dunstanburgh Castle, Northumberland.
“The movement in the foreground really
adds to the impact of the image. I used
the histogram and the image on the
review screen to check the exposure
and any blown-out highlights.”
1/5sec
0.3sec
0.8sec
1.6sec
028 Exposure: Photoshop skills
The Essential Guide to Landscape Photography 2nd Edition
Combining Raw files
original image
with LUKE MARSH Setting your DSLR to shoot in Raw means you’re able to
recover hidden detail from areas of the scene that are overexposed, such as bright
sky. Photoshop expert Luke Marsh shows how to use the Photoshop Elements Raw
converter to create two different images at different exposure levels exposures from the
same Raw file and then recombine them for the perfect result. Techniques used in this
easy-to-follow step-by-step tutorial include exposure adjustment, layer creation and editing, level
adjustment, sharpness control using the High Pass filter, opacity effects and colour adjustment.
This technique is especially satisfying as you are only working with image data captured in the
original single exposure. Elements 4.0 was used here, but more recent versions are suitable too.
1
2
I reopen the original Raw file, and again the Raw control window
appears with the image. This time, I use the Exposure control (circled)
and move the slider left, to underexpose the image, pulling back the
detail from the sky area hidden on the original image. Happy with the
results, I click Open to take the image into Elements.
If you’ve never used the Elements Raw converter before, the first thing
you’ll notice on opening files is the image opens in the Raw control
window (above). For the first step, I simply click Open, leaving the
settings as they are, then go File>Save As and create a Photoshop file
(.psd) as we are going to be working with layers.
3
4
With the two exposures in place I want to combine the correctlyexposed foreground with the newly-exposed sky. With the sky layer
active and using the Rectangular Marquee I select a large area of
foreground, just short of the horizon, and use Edit>Delete to remove
the area noting the effect in the layer palette preview (inset).
I now have two files open. One contains the original exposure and the
other is the new underexposed image. With the underexposed file
active, I go Select>All then Edit>Copy placing the image into the
pasteboard memory. Now I can close this file and use Edit>Paste to
place this image into a new layer on the original file.
5
6
Now it’s time to tidy up the horizon, so with the Eraser tool set to a
medium-sized, soft-edged brush at an Opacity of 55%, I gradually
erase areas of the newly-exposed layer, revealing the original horizon
exposure. The slight feathering effect between the two layers creates a
misty effect which further enhances the image’s mood.
The initial layer work is complete, so to save my work so far, I go
Layer>Flatten Image then File>Save As to create a new file. With both
layers merged, it’s time for some overall enhancement, so I go
Enhance>Adjust Lighting>Levels to lighten up the image and improve
the definition. I click OK to apply the changes.
Exposure: Photoshop skills 029
2nd Edition The Essential Guide to Landscape Photography
final image
stormy skies ahead!
It’s clear to see the benefits of
shooting your images in Raw,
as it’s possible to rescue more
detail than if you’d captured
the scene as a JPEG.
7
8
The High Pass filter is a far more forgiving way to enhance detail than
sharpening. To use it, I first go to Layer> Duplicate Layer to preserve
the original image. Then I go to Filter>Other>High Pass, adjusting the
Radius to around 20 pixels before clicking OK. I change the Blend
Mode in the layer palette to Soft Light.
9
Use Layer>Flatten Image again, saving a copy if required. Now, using
the Burn tool (inset right) with a large soft-edged brush and the
Opacity at approximately 25%, I darken the exposure of specific areas,
which helps to improve the depth of the image. I focus on the edges of
the frame and build the effect up gradually.
10
The image is predominately blue in hue and I’d quite like to inject a
different tone to the sky area. Using the Rectangular Marquee tool, I
select the area above the horizon and Select>Feather, entering an
amount of 50 pixels to soften the selection, then I go Edit>Copy then
Edit>Paste, placing the selection into a new layer.
Change the Blend Mode of the new layer to Soft Light, and then go to
Enhance>Adjust Colour>Adjust Hue/Saturation. In the window, I start
by clicking the Colorize box and immediately see the effect in the
preview. Finally, I adjust the Hue and Saturation sliders until I am
happy with the colour, and click OK.
2nd Edition The Essential Guide to Landscape Photography
Sharpness:The Basics 031
The Basics #3
Sharpness
LET’S IMAGINE YOU’VE JUST FOCUSED on an object that is five metres away.
How sharp will something be at six metres? Or even five-and-a-half metres?
The answer is governed by depth-of-field – the distance either side of the point
of focus that is deemed to be acceptably in focus. As long as you control the
aperture that you are shooting at, then you are in control of depth-of-field, and
you can use it creatively. There will be occasions when you don’t want much of
it at all, and you’ll get that effect by shooting with a large aperture like f/4.
However, for most of the time that you’re shooting landscapes you’ll want to
maximise depth-of-field to get as much of a scene in focus as possible. .
Foreground detail is important and has to be in focus, but so does the rest
of the scene. This means using small apertures to get good sharpness either
side of the focus point. But just consider this last phrase for a moment, and
then think about where you might focus when shooting a landscape. Many
novice landscape photographers are happy focusing at infinity when
shooting a landscape, but don’t forget that depth-of-field extends either side
of the point of focus. In fact the area of depth-of-field extends one-third in
front of the focused point and two-thirds behind, in other words, you get more
depth-of-field behind the subject than in front of it. Obviously there is no
benefit to having acceptable sharpness extending beyond infinity, but what
you can do is pull the point of focus back towards you, so it’s the end of the
depth-of-field zone that is at infinity instead. This way you’ll get more of the
scene sharp. This technique is called hyperfocal focusing, and has been used
by professional landscape photographers for decades. The optimum point of
focus for any particular scene relies on the choice of aperture setting and the
focal length of the lens you use – and changes for full-frame and cropped
sensor DSLRs! There are calculators and pocket reference tables you can
stash in your camera bag, or you can use a dependable rule-of-thumb that
suggests you aim a third of the way into the picture with your lens set to a small
aperture. We’ll be covering both focusing techniques, as well as providing
you with other expert advice to ensure you maximise image sharpness.
This includes revealing why using the smallest aperture won’t necessarily
produce the sharpest results, even though it gives the most depth-of-field!
ADAM BURTON
032 Sharpness
Focusingwiththe
hyperfocaldistance
The Essential Guide to Landscape Photography 2nd Edition
f/2.8
f/4
f/8
f/11
f/16
f/22
Landscape specialist Lee Frost explains how
to use the hyperfocal focusing distance and
aperture-priority for super-sharp scenics
One of the fundamentals of successful landscape
photography is being able to control and assess depth-offield to ensure that the image is sharp from front-to-back.
Aperture-priority mode helps you to achieve this, not
only by forcing you to think about which aperture to set,
but also by making sure that once it is set, that aperture
won’t change if light levels fluctuate or you put filters on
the lens. If the exposure has to be adjusted when shooting
in aperture-priority mode, the camera does it by changing
the shutter speed, so the aperture remains constant. This
is vitally important because achieving extensive depth-offield is not just about aperture selection, but also focusing
distance, and a careful balancing act between the two is
required to ensure the best possible results. You could
take every picture at f/22 with the lens set to infinity and
most wide-angle shots would be sharp from front to back.
Unfortunately, this simple approach won’t always work –
so you’re not going to get the best results. Wide-angles
and zooms tend to give their worst optical performance
when at minimum aperture and their best around f/11,
so ideally you should shoot as close to f/11 as you can to
achieve optimum optical quality, and focus the lens at a
distance that maximises depth-of-field at that aperture.
Over the page, Helen Dixon provides a simple focusing
method along these lines that yields excellent results.
My favourite technique is based around something
known as hyperfocal focusing, which involves focusing
on a point known as the hyperfocal distance, where
depth-of-field is maximised for the aperture in use. Lenses
used to feature a hyperfocal distance scale on the barrel
but virtually none do today. There is an equation for
calculating hyperfocal distance for any lens and aperture,
so in true Blue Peter fashion, I did just that and created
a hyperfocal distance chart, which you can copy and
refer to when you’re on location. The distances in feet (ft)
represent the hyperfocal distances for each focal length
and aperture. If you focus your lens on that distance and
set the corresponding aperture, depth-of-field will extend
from half the hyperfocal distance to infinity. So, if you’re
using an APS-C-sized sensor, shooting at 24mm and f/11,
focus on a point 9ft away and depth-of-field will extend
from 4.5ft (half the hyperfocal distance) to infinity – which
is more than enough depth-of-field in most situations.
Aperture-priority and multi-zone metering
Before finally ‘going digital’ back in the spring of 2008, I’d
spent 20 years shooting with film cameras that had no internal
metering, so I used a handheld spot meter to determine correct
exposure – which then had to be manually set on the camera.
Thankfully, those days are long gone. Digital SLRs have
fantastic integral metering systems that are capable of
producing perfectly exposed images in all but the most
demanding situations, so I can’t see the point in making my life
more complicated than it needs to be. These days my digital
SLR is set to aperture-priority mode and multi-zone metering
and generally stays that way. Combined with the feedback
provided by the camera’s preview image and the image
histogram, I’ve got all I need to ensure I get perfect exposures
in any shooting situation. The same applies to you.
Hyperfocal distance: APS-C sensors
Focal length
12mm
15mm
17mm
20mm
24 mm
28mm
35mm
50mm
70mm
100mm 135mm
Aperture f/8
3.2ft
5ft
6.4ft
8.9ft
12.6ft 17ft
27ft
55ft
105ft
218ft
395ft
f/11
2.3ft
3.5ft
4.5ft
6.2ft
9ft
19ft
39ft
75ft
155ft
280ft
54ft
12ft
f/16 1.7ft
2.5ft
3.3ft
4.4ft
6.4ft
8.6ft
14.5ft 27ft
f/22 1.2ft
0.9ft
2.3ft
3.2ft
4.5ft
6ft
9.5ft
19.2ft 38ft
110ft
198ft
77ft
140ft
Hyperfocal distance: Full-frame sensors
Focal length
16mm
20mm
24 mm
28 mm
35mm
50mm
70mm
100mm
135mm
Aperture f/8
3.8ft
5.6ft
8.0ft
11ft
17ft
35ft
68ft
138ft
250ft
f/11 panic!
2.6ft
don’t
f/16 1.9ft
f/22 0.4ft
3.9ft
5.8ft
7.8ft
12ft
25ft
48ft
98ft
178ft
2.9ft
4.0ft
5.5ft
8.5ft
17.5ft
34ft
70ft
125ft
2.0ft
2.9ft
3.9ft
6ft
12.5ft
24ft
49ft
89ft
Sharpness 033
2nd Edition The Essential Guide to Landscape Photography
protip
s
alway
s USE
A
TRIPO
If you w
D
good li ant to shoot
quality ght, without great landsc
so you , mount your compromisin apes in
shutte don’t have to camera on a g image
r speed
s caus worry about tripod
ing cam
slo
era sha w
ke
FINAL IMAGE: f/11
If you’re an absolute
beginner, start off by
shooting at f/11 if you
can, to optimise image
quality, and only use
a smaller aperture if
you need to get more
depth-of-field.
How easy is that!
034 Sharpness
experttutorial
Focus athird of the way into
the scene for sharp results!
with helen dixon The normal practice for beginners shooting
landscapes is to place their DSLR on a tripod, focus on infinity and
set a very small aperture to give enough depth-of-field to keep
most or all of the scene in focus. It’s a tried and tested method
that works well, but can be improved upon by fine-tuning focusing
technique and the choice of aperture.
Looking at focusing first, when you focus on ‘infinity’, i.e. on the distance,
the depth-of-field will extend a third of the way in front of the focusing point
and two-thirds behind. So while part of the foreground is sharp, the area
closest to you may well be out of focus. Also, you’ll have wasted two-thirds
of the available depth-of-field, which stretches beyond infinity. Instead, by
focusing part of the way into the frame, you can maximise depth-of-field so
that it covers the foreground and the distance.
The optimum distance at which you should focus is termed the hyperfocal
distance and there are various elaborate ways of calculating it. The simplest
method for focusing by far (and one that works 99% of the time) is to
focus one third of the way into the scene. By doing this, and setting a small
aperture, you’re ensuring that the depth-of-field in front of the focusing point
covers most, if not all, of the foreground, while the area behind is kept sharp
by the other two-thirds of the depth-of-field. If you want to be as precise with
your focusing as possible, use the table on the previous page.
With the focusing technique taken care of, we’ll move onto your choice of
aperture. While setting the smallest aperture (e.g. f/32) gives the most depthof-field, it doesn’t necessarily give the sharpest results. That’s due to two
main reasons: most lenses are optically designed to give the sharpest results
at apertures of around f/8 to f/13, while at smaller apertures the effects of
diffraction softens the image, thus negating any benefits provided by depth-offield. The optimum aperture to use varies from lens to lens so the only way to
discover for yourself is through trial and error, shooting at different apertures
and comparing the sharpness on your LCD monitor or ideally at home on you
computer, where you can magnify images for close scrutiny.
For the sharpest possible results, using the hyperfocal distance method
explained by Lee Frost on the previous pages is best. Of course, you must
make sure that you set your camera up on a tripod, to reduce the risk
of camera shake. But this process can be time-consuming and for most
people, my technique is ideal. The images shown here were shot using a
fairly dominant foreground to emphasise the effect of changing the focusing
distance. The aperture was f/13 for all three images.
taking the shots: Helen sets up a tripod, essential for preventing blurred shots
caused by shake, then uses Live View to check the depth-of-field of the shot on her LCD
monitor while selecting the aperture. After taking the shot, she can then check the
image’s sharpness on the LCD screen by magnifying different parts of the frame.
don’t panic!
Blurry viewfinder
When using the hyperfocal distance method, you’ll
notice that the viewfinder image looks unsharp
when you’ve focused a third of the way into the
frame. This is because your lens is always set to
the widest aperture to provide a bright viewfinder
image – depth-of-field will be minimal. Use the
depth-of-field preview button or take a shot at your
chosen aperture and you’ll see that the image
really has far more depth-of-field, because the
lens has closed down for the exposure.
The Essential Guide to Landscape Photography 2nd Edition
foreground FOCUS
SOFT BACKGROUND
Focusing on the post
kept the foreground
sharp but the boats in
the distance are soft.
infinity focus
SOFT FOREGROUND
Focusing on infinity,
as many beginners do,
gives a soft-looking
foreground.
Sharpness 035
2nd Edition The Essential Guide to Landscape Photography
BEST
METHOD
best method
sharp
sceneFOCUS
HYPERFOCAL
Focusing a third of the
way into the scene and
using f/13 ensured
maximum sharpness.
Summary
Howtomaximise
imagesharpness
✔ Set your DSLR up on a
tripod to minimise shake
✔ Focus one-third of the
way into the scene
✔ Choose a small aperture
like f/13-f/16 to get the best
possible optical quality
✔ Check depth-of-field
using Live View
✔ Check image sharpness
by zooming in to the image
on your LCD monitor
036 Sharpness
The Essential Guide to Landscape Photography 2nd Edition
protips
The effects of diffraction
The more you close the aperture down, the greater
the depth-of-field, so the usual advice given for
sharp results is to use very small apertures, such as
f/16 and f/22. However, stopping down too far can
actually be detrimental to image sharpness and this
is due to an optical effect called ‘diffraction’.
The simple explanation of diffraction is that
when light passes through the aperture of a lens,
the edges of the hole disperse the light waves.
As the aperture is stopped down, the amount of
diffracted light becomes a larger percentage of the
total amount of light being recorded and the image
becomes noticeably less sharp, meaning less detail
is resolved on the image.
APS-C and full-frame sensors are affected slightly
differently, and certain lenses will be more prone
to diffraction than others. But in general, with an
APS-C-sized sensor, you’ll start to notice the effects
of diffraction if you stop down beyond f/11 and with
a full-frame camera, once you go beyond f/16.
Of course, you can use apertures smaller than
that and decide between overall sharpness and
depth-of-field relevant to the amount of fine detail
you think it’s necessary to record in any one
particular image. That said, it’s worth remembering
that a 17mm lens on an APS-C-sized sensor will
give you a depth-of-field from 2¼ feet to infinity
when set to the hyperfocal distance at f/11 –
enough for most situations.
To illustrate the effects of diffraction at different
apertures, we’ve shown a series of pictures at f/8,
f/11, f/16 and f/22 – focusing and overall exposure
remained constant – the only change was the lens
aperture. The pictures were all processed using the
same software and settings when post-processing.
More sharpening than usual has been used to make
the effects more obvious.
What is
diffracto
n?
This opti
ca
image d l term refers
when ligetail. In simple to a loss in
te
in the le ht rays are disp rms, it occurs
commo ns, so diffractio ersed by the iris
n the sm
n becom
aller the
e
aperture s more
used
effects of DIFFRACTION: This image shows the full
frame. The box shows the cropped section used to
illustrate the effect of diffraction. It was taken with a
Canon EOS 20D and 17-40mm lens.
f/8
MARK BAUER
COMPARISON RESULTS: The results may not be so
obvious in magazine reproduction, but are very clear
in large prints. At f/8, everything looks pretty sharp,
with good detail in the background foliage. Things still
look good at f/11, but once stopped down further than
this, instead of becoming sharper as depth-of-field
increases, the image becomes noticeably less sharp
and detailed. This is crucial in landscape photography,
especially when making large prints, and it is this
‘mushy’ looking foliage that spoils digital landscapes
for many photographers.
f/11
f/16
f/22
2nd Edition The Essential Guide to Landscape Photography
Sharpness 037
GARY McPARLAND
Digital sharpening
Even after shooting, the quest for
sharpness, or, more accurately, its
control, can continue. All digital
images benefit from sharpening and
it’s best done in post-processing
for more control. If you are using
Photoshop’s Unsharp Mask (USM)
filter, a smallish pixel radius of 0.6 will
usually give the best results. Increase
sliders gradually, monitoring the effect
in the preview window as you do so.
038 Sharpness
The Essential Guide to Landscape Photography 2nd Edition
Shake-free landscapes
Landscape photographer Ross Hoddinott shows how
using a tripod and mirror lock-up is well worth the effort
There’s always a risk of camera shake spoiling landscape shots.
Setting a small aperture for lots of depth-of-field, along with a low ISO
rating for the best possible image quality, means that shutter speeds
are always likely to be slow, even in bright conditions. This is why a tripod
is seen as essential for this type of photography, but even then, there
is always the risk of shake. Let’s see how using a remote release or a
self-timer can help you to reduce the risk of blur, and how seeking out
your camera’s mirror lock-up facility can lead to sharper results too.
Essential kit for shake-free results
A sturdy tripod is an essential accessory and
the right one will last you for years. But just how
do you pick the right one? It’s all about
compromise: you want something solid, but not
so heavy that you always leave it at home. Turn
to page 114 for a selection of tripods at various
price points that are all ideal for landscape
photography. You should also look at investing
in a remote release, an inexpensive accessory
that offers an alternative to using the self-timer
for contact-free firing of the shutter.
Handheld
At 1/15sec at f/22, it’s not
surprising that handholding the camera
resulted in a lot of shake that has blurred
the image. I need a small aperture
though, to maintain front-to-back
sharpness. I could raise the ISO rating to
compensate, but I prefer to use a tripod
instead to preserve picture quality.
Tripod Putting the camera on a tripod
has made a huge difference to image
sharpness, but zooming on fine detail
reveals that there is still some blur
present. This is probably because
I’m wobbling the camera very slightly as
I press the shutter release. I need a way
of tripping the shutter without touching it.
Tripod & self-timer
An easy way to avoid
moving your camera while it’s on a tripod
is to fire it with the built-in self-timer.
This way you can touch the camera, but
any movement will have subsided by the
time the shutter fires. Many DSLRs give
you the option of setting the self-timer
delays at two or ten seconds.
Tripod & remote
Better still is a remote
release. This will also lets you trip the
shutter without wobbling the camera but,
because there is no delay involved, you
can be more precise with your timing.
This can be very useful if you have rapidly
changing lighting conditions, as I did
when shooting this location.
Sharpness 039
2nd Edition The Essential Guide to Landscape Photography
protip
s
IMAGE
STABIL
ISATIO
Many c
N
a
mera
a
s (and
shak
anothee reduction s lenses) now
r,
hand-h and this ca ystem of one feature
switch olding. How n be a real b type or
ed off w
ev
on
hen us er, this shou us if
ld be
ing a tr
ipod
Mirror lock-up
Even with a self-timer or
remote release, some shake can still
cause blur, thanks to the camera’s mirror
swinging violently as the shutter opens.
In my final picture, I’ve used my D700’s
mirror lock-up function to move the mirror
out of the way before firing the shutter with
the remote. It’s the sharpest result by far.