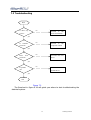
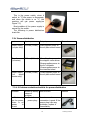
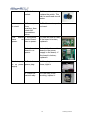
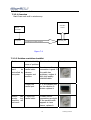
1
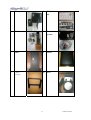
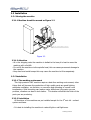
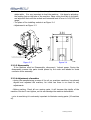
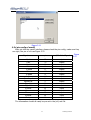
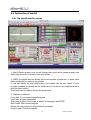
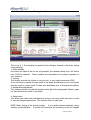
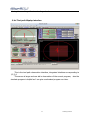
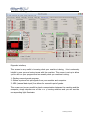
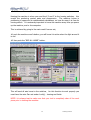
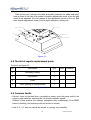
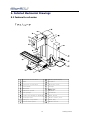
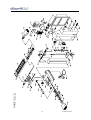
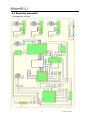
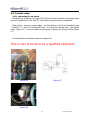
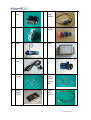
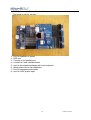
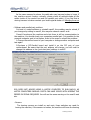
Index
1. Safety advice
1.1 Applications of the machine
1.2 Attention of the machine
1.3 Nameplate
1.4 Read before operating this machine
1.5 Safety warning logo
1.5.1 Observe all of the warnings and cautions below
1.5.2 Safety warning logo
1.6 Operator safety notes
1.6.1 Proper operators position
1.6.2. Operator safety notes
2. X4 series Specs
2.1 Technical parameters
2.2 Parts
2.3 Installation
2.3.1 Moving the machine
2.3.2 Installation
3. The operation of the machine
3.1 Instruction of the user interface panel
3.2 Pinout diagram for plug
3.3 Software setup
3.3.1 Mach3 driver
3.3.2 Interface of mach3
3.3.3 how to use xml file
3.3.4 pin config of mach3
3.4 Instruction of mach3
3.4.1 The Mach3 interface screen
3.4.2 MDI screen
3.4.3 X, Y, Z axis motor Tuning interface
3.4.4 Tool path Display interface
3.4.5 Mach3 Diagnostics
3.4.6 home the machine
4. Maintenance
4.1 Machine maintenance and cleaning
4.2 The adjustment of machine
4.3 The list of replacement parts
4.4 Common Faults
4.5 The list of tools for Maintenance
1
www.syil.com
5. Detailed Mechanical Drawings
5.1 Feature for x4 series
5.2 Parts feature
5.3 Parts list
6. Electrical Diagrams
6.1 Power input
6.2 Electrical schematic
6.3 Electrical layout plan
6.4 Coolant setup
6.4.1 cool setup for x4 series
6.5 Electrical parts list
6.6 Electrical parts instruction
6.6.1 Five axis interface board instruction
6.6.2 X4 plus control board instruction
6.6.3 Spindle control board instruction
6.6.4 Stepper motor driver instruction
6.6.5 Transformer instruction
6.6.6 4th Axis instruction
7. Troubleshooting
7.1 Overview
7.1.1 Attention
7.1.2 Troubleshooting overview
7.2 Troubleshooting
7.2.1 Power distribution
7.2.2 Computer control
7.2.3 Axis driver
7.2.4 Spindle driver
2
www.syil.com
1. Safety advice
1.1 Applications of the machine
The machine can be used for drilling and milling processing, the machine is
controlled Mach3 software which is install in the personal-computer with parallel port,
it’s applicable to producing the small parts, and it can be also used for Teaching
Training or a model machine.
1.2 Attention of the machine
·Do not exceed maximum processing capacity.
·Do not use in humid environment or in poor lighting
·Don’t start the Machine without lubrication.
·No one without professional training shall not be allowed to operating the machine
directly.
·Do not to operate the machine in the influence of alcohol, drugs or fatigue.
1.3 Nameplate
·Company Name: Syil Electronic&Hardware Co.,ltd
·Machine name: CNC milling machine drilling
·Machine types: x4+
·Machinery factory code:
·Machinery factory date:
·Machinery weight: 165 kg
·Machinery Size: (L-W-H) 1190 x780x960
·Address: 20# Yuyao City, Zhejiang Province Xiao Dong Fan Road industrial area
·Website: www.syil.cn
·Tel: +86-574-62735995/996/997
·Nameplate is shown in Figure 1-1
d
t
L
,
.
o
C
e
r
a
W
d
r
a
H
&
s
c
i
n
o
r
t
c
e
l
E
L
i
y
S
E
N
I
H
C
A
M
G
N
I
L
L
I
R
D
G
N
I
L
L
I
M
C
N
C
L
L
A
M
S
0
0
0
1
m
p
r
0
0
5
3
0
Z
H
0
5
V
0
2
2
0
6
9
X
0
8
7
X
0
9
1
1
n
o
i
s
n
e
m
i
d
l
l
a
r
e
v
O
g
k
5
6
1
d c t
e A h
g
e
i
p
e
S
W
e
o r t
N e
w a
o D
P
+
4
X
e
p
y
T
KW
a
n
i5
h
C9
,9
g5
n
a3
i7
j2
e6
h
Z.4
o7
a5
yu
Y6
,8
e
n+
o:
Z:
yl
re
tT
s
u
d
n
I
gm
no
oc
d
o.
al
i
Xi
,y
d
as
o.
RW
nW
aW
F
o:
ap
Gt
#t
0
2H
:
D
D
A
Figure 1-1
3
www.syil.com
Verification Of MD & LVD COMPLIANCE
LT VARIFICATION #MD080901-01CN , MD090513-03
Date issued: MAY/13/09
TCF# SL0805A27
Applicable Standards: ENISO 12100-1:2003 EN ISO 12100-2 EN 13128:2001 EN
60204-1:2006
1.4 Read before operating this machine
4
www.syil.com
·This machine is automatically controlled and may start at any time.
·This machine can cause severe bodily injury.
·Do not operate with the door open.
1.5 Safety warning logo
1.5.1 Observe all of the warnings and cautions below
5
www.syil.com
1.5.2 Safety warning logo
6
www.syil.com
Unattended Operation
7
www.syil.com
8
www.syil.com
9
www.syil.com
·Strong signs:
·Motors on the two-phase rotating signs:
·Grounding symbol:
Grounding signal
PE signal
1.5 Attention of the operator
1.5.1 Operators position: it’s shown in Figure 1-6.
machine
base
Figure 1-6
10
www.syil.com
1.6.2. Operator safety notes
·Machines in operation must be installed before the commissioning, and run-time
noise does not exceed 85 DB, can damage hearing.
·During the course of operation of machinery, the operator is required to wear
approved protective eye wear, to avoid foreign debris. Do not operate without gloves,
do not contact cutters / endmills without protective gloves, sharp endmills can easily
cut un protected skin.
·When the machine in starts it is imperative have all body parts out of the machines
work area.
·When the machine is powered, DO NOT open the back of the machine to expose the
electronics, as there as serious risk of electrical shock and could result in death.
·Always know where the emergency stop button is located (E STOP), in the event of
a emergency depress Emergency stop button. This button will terminate the electrical
current to the machine, including all stepper motors and the spindle. Be aware that
there is always a slight delay from the time the buttons is depressed to the actual stop
of the motors.
·Always wear approved steel toe safety boots.
·Make sure all long hair is tied back, and be cautious of loose clothing. As loose hair
or clothing could be come entangled in the spindle and cause serious injury or death.
·Always know what the machine is going to do prior to starting a program, this
achieved by knowing and understanding “g code”. if you are unfamiliar with G code,
it is strongly suggested the you do not operate a CNC (computer numerical control)
machine, until you full understand G code.
·Prior to operating a CNC understand speed and feeds, and the effect that improper
feed and speeds can impact your tooling . (ie) if your speeds and feeds are incorrect
it can break your tooling,HSS (high speed steel) or carbide tooling can be fatal when
it breaks.
11
www.syil.com
2. X4 series Specs
2.1 Technical parameters
Specification of X4 plus:
Max. drilling capacity:
End mill capacity
Face mill capacity
Max. distance spindle to table
Spindle taper
Spindle speed
Table effective size
T-slot size
T-slot number
Machining precision
Spindle box travel (z)
Table cross travel(x)
Table longitudinal travel(y)
Motor output power
Overall dimension(LxWxH)
Weight (Net/Gross)
Packing size(LxWxH)
25mm
16mm
50mm
350mm
MT#3orR8
100-3500rpm
550x160mm
12mm
3
0.02mm
170mm
280mm
150mm
1000W
685x560x830mm
175/208Kg
840x820x1040mm
2.2 Parts in packing
·Open the packing of X4.
·Checking products & parts.
·Parts in x4 plus
Include: Machine , parallel Cable, PC tray, Simple package, Salver
Options:Mill chuck set,
N
O
1
Parts
4th axis kit , Coolant system, stand
Picture
N
O
2
X4
Electronics
12
Parts
Picture
Cable
www.syil.com
3
PC tray
4
Mill chuck
set
5
4th kit
6
Coolant
system
7
stand
8
Salver
9
Simple
package
10
MPG
13
www.syil.com
2.3 Installation
2.3.1 Moving the machine
2.3.1.1 Machine should be moved as Figure 2-2
The four fixed symmetrical bolt
Figure 2-2
2.3.1.2 Attention
·At in the shipping crate the machine is bolted to the base,it is best to move the
machine with a forklift.
·Do not lift the machine via the spindle head, this can cause permanent damage to
the machine
·Keep level and avoid bumps this may cause the machine to tilt unexpectedy.
2.3.2 Installation
2.3.2.1 The working environment
This high-precision CNC machine require a dust-free working environment, other
things that will increase the production of high quality parts are good lighting,
adequate ventilation, no vibration, no corrosion and operating in normal room
temperature. Solid mounting can make a major difference it the parts you can
produce, vibration can lead to tool chatter. This chatter will affect the finish of the
parts you are producing.
2.3.2.2 Installation
All functions of this machine are pre installed except for the 4th axis kit、coolant
system and base.
·It is best to installing the machine in natural light or well light area.
14
www.syil.com
·In order to ensure the accuracy of machine, the machine should be installed in the
stable table. It is very important to level the machine, this done by adjusting
the leveling feet on the base of the machine. Place a long level flat on the table,
and adjust all feet until the vertical and horizontal level of error in 0.04/1000 mm
range.
·The place of the installing sockets is as Figure 2-4
·Adjustment is as Figure 2-3
A
4 adjustment Sizing Block
Figure 2-3
Figure 2-4
2.3.2.3 Disassembly
If the Machine must be Disassemble, disconnect / lockout power. During the
disassembly process the parts should placed by the order and labeled to avoid
confusion when assembly.
2.3.2.4 Adjustment of machine
·during the manufacturing process of the x4 our precision machinery has already
aligned and adjusted the machine, for initial use there is no need for any
adjustments.
·Before working, Check all non moving parts, it will increase the rigidity of the
machine. But don’t over tighten, as this can damage the machine deformation.
·prior to machining it is extremely important to lubricate moving parts (#2 machine
oil)
15
www.syil.com
3. Operation of the machine
3.1 Instruction of the user interface panel
· Interface panel for x4 plus
The keys of the panel is as Figure 3-2
Figure 3-2
·Mode cnc/manual: switch to cnc mode or manual mode
·Coolant on/off: turn on/off coolant pump by manual.
·Display mm/inch: switch to mm mode and inch mode
·Spindle on/off: turn on/off the spindle, when the green led is light ,the spindle is
run ,otherwise the spindle will stop.
·Direction Fwd/Rwd: control the spindle run forward or reserve.
·Axis X/Y/Z/A: choose the axis which you want to move in manual mode.
·Mode x1/x10/x100/cont: choose the moving mode which you want to.
This button can switch to MPG mode, MPG only be used in
manual mode.
·Axis Zero: make the coordinates of axis to zero.
·Axis+: make the axis move forward by manual.
·Axis-: make the axis move back by manual.
·Black switch: change the spindle rpm from 0 to 5000.
·E-stop switch(red button switch): when the switch is pressed, the machine will
emergency stop.
16
www.syil.com
3.2 Pinout diagram for plug
· The plug for x4 plus
Figure 3-6
The plugs is as Figure 3-6:
·plug1 is for x-limit switch
·plug2 is for y-limit switch
·plug3 is for 4th -axis
·plug4 is for x-axis
·plug5 is for y-axis
·switch6 is the switch for 4th –axis power supply
Attention: Pay special attention to the Connection, or the machine will not work.
17
www.syil.com
3.3 Software setup
If you don’t have a copy of mach3 first download a copy at
http://www.machsupport.com/downloads.php,
make sure to download the newest version * Lockdown: * Mach3 R2.63.
After downloading and installing the software it is vital to reboot the computer as the
installer will prompt. Do not start up mach3 without this vital reboot, if you do not do
this you will have to manually remove mach3 from your system and reinstall. It is
best to install mach3 in to the default directory , C drive as this can make things
easier for trouble shooting.
Figure 3-8
After install you may see this screen as Figure 3-8, if you don’t see this screen, don’t
worry about it.
Printer port operation will be set as then click OK and Don’t ask me this again.
18
www.syil.com
3.3.1 Mach3 driver
Figure 3-9
After you have completed the installation of mach3,see mach3 driver 'MACH3
DRIVER' in device manager(as Figure 3-9),or the machine will be out of control.
To check to see if the drive installed properly you then can confirm this by, “C drive”,
“mach3”, look down the list until you see:
By opening this software Mach3 will do a test on the driver, if this fails you must
reinstall Mach3 or use In the same directory.
19
www.syil.com
3.3.2 Interface of mach3
After you start the software ,the interface of mach3 is as Figure 3-10
Figure 3-10
Attention: Before you attempt to control the machine with mach3,the button of
RESET must be inactive.
3.3.3 how to use xml file
Your syil distributor should have provided you with a syil .XML file, this file is a
setup file for mach3. This file will make your installation plug and play. locate
this .xml file and copy it by right clicking and select COPY. Open “MY COMPUTER”
select the ``C DRIVE``, `mach3``. Paste this .xml file in to a open place in the
directory, do not paste in to any internal mach3 folders.
MACH3 LOADER
Open the mach3 loader and select the x4 profile(as Figure 3-11)
20
www.syil.com
Figure 3-11
3.3.4 pin config of mach3
After get into the mach3 interface, please check the pin config, make sure they
are right, the pin of x4 is as Figure 3-12
Figure
Signal name
pin
I/O of the Signal
3-12
X pulse
7
output
X dir
Y pulse
Y dir
Z pulse
Z dir
A pulse
A dir
Spindle pulse
Spindle dir
Signal 1
Signal 2
X home
Y home
Z home
A home
E-stop
17
6
8
5
16
4
14
2
1
3
9
12
13
10
15
11
output
output
output
output
output
output
output
output
output
output
output
input
input
input
input
input
The information should all ready be pre set in the (x4).xml file
21
www.syil.com
3.4 Instruction of mach3
3.4.1 The Mach3 interface screen
1: Mach3 Gcode window, user this will display the current active gcode program, the
white bars shows the line that is currently active.
2: (DRO) this digital read out shows the current location of each axis, in either work
piece coordinates or machine coordinates
3: this will display the tool cutting path, this window can be very useful. If your
program is loaded you should see the similar part. (if you do not you might not want to
push the start button).
The mouse can be used to change the perspective.
4: interface procedures:
Cycle start: To run current loaded program
Feed hold: program suspended
Stop: stop program (do not use as estop) in emergency use ESTOP
Edit G-code: Edit current program
Recent file: the recent run-off procedures document
Close G-code: Close the program
22
www.syil.com
Load G-code: loading program files
Set next line: a set of enforcement procedures
Line: is currently running a number of
Run from here: from the current line running show that in the white bar
Rewind: re-start procedures
Single BLK: a single operation (this will advance 1 line each time cycle start button
is pushed)
Reverse run: repeat run
Block delete: delete breakpoint
M1 optional stop: to stop the use of M1 code
Flood: turn on coolant
5: Tool information:
This information is crucial to proper tool changes and setting up tools in the tool table.
The tool displayed is the tool that is currently active, as well as the current height
offsets.
6: Feed interface:
FRO: this displays the current programmed feed. This number can be manually
changed only if a M48 is used in your starting lines of code.
7: spindle speed control interface:
Spindle F5 CW: this butto is used to start the spindle manually.
RPM: spindle speed feedback display interface. In the absence of spindle speed
feedback, which will appear as 0.
S-ov: Theory should reach spindle speed, RPM and that can be compared.
Spindle speed: spindle speed manual adjustment interface.
You can also manually enter the spindle speed.
8: Mach3 Tabs.
Program run: Comprehensive program control interface.
MDI: manual data Input.
Toolpath: tool path control interface.
Offsets; used to set up work piece cords (g54) and tool length offsets .
Settings: Alter mach3 settings
Diagnostic: Used to diagnose mach in case of problems.
23
www.syil.com
3.4.2 MDI screen
MDI (manual data input)
This screen is very helpful, simply type in the a code command in to the white line this
allow for quick and easy manoeuvrability. (eg) to move all axis to work piece home just
type in (g00 x0y0z0) or to send machine to home position type in (G28)
24
www.syil.com
This is a complete list of MACH3 gcodes
This a complete list of mach3 M codes
25
www.syil.com
3.4.3 X, Y, Z axis motor Tuning interface
-
This is the X, Y, Z axis adjust the speed of the interface, located in the motor tuning
config settings,
1: Pulse settings,
this drives the need to set for the syil products, the default setting is for 400 metric
and 10160 for imperial. These numbers are imperative to the proper operation of
your machine.
2: velocity,
This directly controls the inches or mm per min, in your rapid movements (G00)
If you tune this to quickly this can result in lost steps and damage to your work piece
and can result in a major crash. Contact your distributor prior to changing this setting.
3: Acceleration adjustment:
This setting controls how fast the stepper motor get to the designated Velocity, again
too fast and this can result in lost steps.
4: Switch-axis:
This allows you select each individual axis to tune, you must select save axis in order
to use the changed parameters. This must be done on each axis.
NOTE: Motor tuning is like tuning a guitar, it is a perfect balance between, steps,
velocity, and acceleration. If you do not know what you are doing, we do not suggest
26
www.syil.com
altering these setting without contacting a dealer.
3.4.4 Tool path Display interface
This is the tool path observation interface, integrated interface corresponding to
1,2,3,4.
This screen is larger and can aid in observation of the current program, also the
simulate program is helpful as I can give a estimated program run time.
27
www.syil.com
3.4.5 Mach3 Diagnostics
Digonstic interface,
This screen is very useful in knowing what your machine is doing, this is extremely
helpful in case you are having issues with the machine. This screen is set up to allow
you to still run your program and see exactly what you machine is doing.
1: Displays current gcode program.
2: Shows input and out put signals from your machine and computer.
3: MDI (manual data input) line allows for manual input of gcode.
This screen can be very useful to check communication between the machine and the
computer, simply depress one of the x or y homing switches and you will see the
corresponding light illuminate.
28
www.syil.com
3.4.6 home the machine
Homing the machine is when you send the X,Y and Z to the homing switches, this
crucial the producing precise parts and components. The machine knows is
positioning in space due to mathematical calculations, on how far away it is from its
homing switch. It is extremely important to home the machine every time you power
up the machine, and or the computer.
This is achieved by going to the main mach3 screen set,
#1 push the machine crord’s button, you will know it is active when the light around it
is red.
#2 then push the “REF ALL HOME” button.
This will send all axis home to the switches, for this function to work properly you
must have the auto Zero set under ‘config’, - homing and limits.
NOTE: it is always best to make sure that your tool is completely clear of the work
piece prior to homing the machine.
29
www.syil.com
You can change the direction of axis and home axis in the following screen:
30
www.syil.com
4. Maintenance
4.1 Machine regular maintenance and cleaning
·Keep the work place clear and dry ,make sure there is good lighting in working room.
·Make the machine keep clear of swarf, this is especially true if you are cutting hard
metals. These metals can over time act like sand paper and damage the machine.
Lubricate all moving parts before working, and run the machine three minutes
without cutting anything, this allow the machine to warm up.
·Clean the machine after working, pooling of some coolant can lead to rusting of the
machine·Maintain the machine table surface and rails. Periodocily you may need to
tighten the gibbs, Do not over tighten.
·After you have completed the program ,remember to shut down your machine , cut
off power supply And clean the excess coolant off the keyboard, monitor .
·Periodic removal of the table, check bed, table wear track surface conditions. If the
situation is not normal wear and tear, should be re-adjusted bed, table of lubricating
oil.
4.2 The adjustment of machines
When the machine was produced at the factory, it has been adjusted carefully, the
user does not need to do any adjustment. However, after using for a long time,
because of wear track, with rails Vice gap is too large, maybe it should be adjusted.
·Insert the head of the column with the adjustment, as shown in Figure 4-1
In the nose right in the nose and between the pillars, a long retreat of the Stubbs
inserts. Insert (40 parts) of a top adjustment screw (39 parts), the need to be
adjusted when the screw, a screw adjustment slowly, with computer-controlled side
of the head movement, until feel a slight resistance to.
e
g
d
e
w
d
e
t
l
i
T
w
e
r
c
s
g
n
i
t
s
u
j
d
A
Figure 4-1
·Workbench with the pallet, the pallet base and inlay of the adjustment, as shown in
31
www.syil.com
Figure 4-2
Table at the front, between the table and pallet (between the pallet and base)
have an inlay of the inlay of a number of positive adjustment screw, when the gap
needs to be adjusted, the first release of the adjustment screw on the nut And
then Xuanjin adjustment screw, I feel a slight resistance, locking nut .
Work table
Table locking nut
Saddle
Base
Adjustment nut
t
u
n
g
n
i
k
c
o
l
e
l
d
d
a
S
Bolt
Figure 4-2
4.3 The list of regular replacement parts
The list is as figure 4-3
No
Description
Q’ty
1
Verticality couping
3
2
Limit switch
2
3
Fuses
1
4
Z-axis spacing of a photoelectric
1
Units
Remarks
Figure 4-3
4.4 Common Faults
·Failure1: even on the data lines, connected to power, open the power switch, the
exigency stop switches, machines do not accept computer signals.
Solution: Check whether the software emergency stop is depressed, if the RESET
button is flashing, and machines will not cannot be moved.
·Fault 2: X, Y, Z axis one cannot be moved, or moving very smoothly.
32
www.syil.com
Solution: Check stepper motor drive and a connection between the general problem
for off-line.
·fault3: X, Y, Z axis can be moved smoothly, but cannot control the spindle.
Solution: Check front the panel switch has switched to computer-controlled state, if
switch fails the machine will not engage in cnc mode.
·failure 4: The ball screw is making noise?
Solution: add to the axle lubricant, adjusting the stepper motor drive output current
to an appropriate value, Ballscrew will be quieter. Also check for and metal chips
material lodged in the nut of the ballscrew.
·fault5: After time the machine has lost it’s percision ?
Solution: Adjustment of Gibbs (wedge tapers).
·Fault6: Table cannot be moved.
Solution: check table locking nut, or check the stepper motor wiring.
·Fault7: spindle using manual and computer control cannot be activated.
Solution: Open emergency stop switch.
4.5 The list of tools for Maintenance
The list is as Figure 4-4
No
Description
Q’ty
1
opening wrench
5
2
hexagonal wrenches
8
3
double-headed opening wrench
5
4
Plum screwdrive
5
5
special wrench 5
1
Units
Remarks
Figure 4-4
33
www.syil.com
5. Detailed Mechanical Drawings
5.1 Feature for x4 series
Cover for X axis motor
Rotate speed display
Base
Faceplate
Cover for Y axis motor
Protective cover
Lock handle
Fuselage
Worktable
Lubricate system
Plywood
Gas springs
system fan
Collet for milling or drilling
Power switch
Principal axis
Rotate connect plate
Emergency stop switch
Power plug
Touch switch panel
Bracket for PC
34
www.syil.com
5.2 Parts feature
· Parts list of x4 plus
35
www.syil.com
36
www.syil.com
PART LIST
No.
Description
Q'ty
No.
Description
Q'ty
1
Traper shank
1
25
LED-board
1
2
Spindle
1
26
Spindle box
1
3
Lock bolt
1
27
Check ring 35
1
4
Under oil seal Ι
1
28
Check ring 65
1
5
Taper bearing
1
29
Bearing
1
6
Under oil seal Π
1
30
Bearing seat
1
7
Spindle sleeve
1
31
Synchronization pulley
1
8
Sleeve limit pad
1
32
Spindle box cover
1
9
Bearing
1
33
Dustproof cover Ι
1
10
Under washer Π
1
34
Dustproof cover Π
1
11
Bearing
1
35
12
Under washer Ι
1
36
Hexagon
socket
head screws
Timing belt
13
Small round nut
2
37
Screm M16x10
1
14
Spingle peg sleeve Ι
1
38
Pin 3x10
1
15
Spingle peg sleeve Π
1
39
Washer
1
16
Lock bolt
1
40
Motor timing pulley
1
17
Touch board
1
41
18
Switch panel
1
42
Verticality
plate
Key 5x25
19
surface mask
1
43
Brushless motor
1
20
Emergency stop switch
1
44
Adjusting screw
1
21
Potentiometer
1
45
Tilted wedge
1
22
Hex Nuts
4
46
Vertical slide
1
23
Bolt
M4X30
4
47
Spindle box cover
1
24
Bolt
M3X25
4
48
Cover for cross motor
1
49
Cross step motor
1
75
Work table
1
37
motor
cap 4
1
support 1
1
www.syil.com
50
Cross motor support plate
51
Cross couping
1
1
76
Portrait screw support plate
1
77
Portrait bearing seat
1
52
Nut
1
78
Bearing
2
53
Cross bearing cover
1
79
Bush
1
54
Bush
1
80
Portrait motor support pole
4
55
Cross motor support pole
1
81
Nut
1
56
Bearing
2
82
Portrait couping
1
57
Cross bearing seat
1
83
Portrait motor support plate
1
58
Cross screw support plate
1
84
Portrait step motor
1
59
Cross wedge
1
85
Cover for portriat motor
1
60
Limit switch Ι
1
86
Bolt
4
61
Cover for screw
1
87
Interface board
1
62
Base
1
88
Hexagon Copper Cylinder
4
63
Cross ball bearing screw
1
89
X、Y、Z、A
4
64
Petrol pump
1
90
Bolt M3x5
2
65
Seat for cross nut
1
91
Filter
1
66
Gas springs
1
92
Transformer
1
67
Limit block
1
93
Bolt
M3x20
4
68
Saddle
1
94
Fixed rod M3X30
4
69
Limit switch Π
1
95
Mainboard
1
70
Seat for portrait nut
1
96
Fuse
2
71
Portrait ball bearing screw
1
97
Leakage Protector
1
72
Portrait wedge
1
98
Interface boardⅠ
1
73
Portrait bearing seat
1
99
Fixed rod M3X20
1
74
Bearing
1
100
Bolt
5
101
Power supply
1
115
Side support plate Π
1
102
Trunking
1
116
ballbearing crew
1
38
M3x15
motor driver
M3x10
www.syil.com
103
Power switch
1
117
Verticality bearing cover
1
104
Air Access Plug
5
118
Bearing
2
105
Shell
1
119
Verticality bearing seat
1
106
Power line
1
120
Veticality screw support plate 1
107
Cortrol box
1
121
Bush
1
108
Cooling fan
1
122
Nut
1
109
Parallel port
1
123
Verticality couping
1
1
124
Verticalitu
plate
110
Tube connecter
motor
support
1
111
Verticality bearing seat
1
125
Verticality step motor
1
112
Bearing
1
126
Verticality lead rail
1
113
Seat for verticality nut
1
127
Computer plank
1
114
Side support plate Ι
1
39
www.syil.com
6. Electricity instruction
6.1 Power input
Figure 6-1
Figure 6-2
40
www.syil.com
6.2 Electricity schematic
·Schematic for x4 plus
41
www.syil.com
6.3 Electrical layout plan
·Layout plan for x4 plus
The layout is as Figure 6-4
Figure 6-4
1. x-axis driver
2. y-axis driver
3. z-axis driver
4. switch
5. 4th-axis driver
6. filter
7. transformer
8. Leakage circuit breaker
9. Fuse
10. AC.contactor for e-stop
11. AC.contactor for coolant
12. connection for GND
13. spindle control board
14. five axis interfaceboard
15. Trunking
16. x4 plus control board
17. power supply(220v to 5v)
18. system fan
42
www.syil.com
6.4 Coolant setup
6.4.1 cool setup for x4 series
· Pump wiring:as Figure 6-5,supply 220v/110vto U1 and U2 which on the pump, then
connect Capacitance to W1 and Z2,the wiring of pump wiring is completed。
·Relay wiring:now we use two relays,the first relay is on the 5 axis interface board
(Figure 6-7),which is controlled by 5vdc,it control the s.econd relay,the second
relay(Figure 6-7)is use as switch for the power of pump, the wiring is follow Figure
6-7.
·The install place of coolant pump is as figure 6-8
This is only to be done by a qualified electrician
Figure 6-6
Figure 6-7
Figure 6-8
43
www.syil.com
6.5 Electricity parts list
·
The
N
O
1
Parts list for x4 plus
parts list is as follow:
Parts
Picture
spindle
control
board
N
O
2
Parts
spindle
motor
3
Key
board
4
LEDboard
5
five
interfac
e board
6
Trans
Former
7
Stepper
motor
driver
8
X,Y,A
stepper
motor
9
z
stepper
motor
10
Leakage
circuit
breaker
44
Picture
www.syil.com
11
15 pin
port
12
home/
limit
switch
13
fuse
14
E-stop
switch
15
plug
16
filter
17
power
wire
18
switch
19
Wire
(5 pin)
20
Key
board
power
supply
wire
21
Power
Supply
(5vdc)
22
7-pin
wire
(short)
45
www.syil.com
23
20 pin
cable
24
3 pin
plug
25
4
pin
plug
26
Parallel
port
27
4
pin
cable
28
Switch
for 4th
driver
power
supply
29
connect
ion
30
A.C
31
Trunk
ing
32
2o pin
cable
33
Potent
iomete
rs
34
16 pin
cable
(long)
Contactor
46
www.syil.com
6.6 Circuit board reference
6.6.1 Five axis interface board
This board is for x4 series
1:12VAC/VDC power input
2:Spindle control port
3:0~10v output signal
4:X-ref( +5V,S,GND)
5:Y-ref( +5V,S,GND)
6:Z-ref( +5V,S,GND)
7:A-ref( +5V,S,GND)
8:E-stop port(S,GND)
9:Connect to parallel port
10:Jumper: use pin 1、2, open charge pump; use pin 2、3: close charge pump
11:Port for X,Y,Z,A,B step motor driver
12: Relay for coolant pump
47
www.syil.com
6.6.2 X4 plus control board instruction
This board is only for x4 plus.
1:Port for feedback of speed
2:MPG port
3:Connect to the parallel port
4:connect to 5 axis interface board
5:port for the signals exchange with front keyboard.
6:afford power to the front keyboard
7:Port for connecting safe pump
8:port for 5VDC power input.
48
www.syil.com
6.6.3Spindle control board
6.6.2.1 View
1, the product must be installation, commissioning, operation and maintenance by
professional and technical person. the product is electrical equipment, incorrect
using or wiring will cause electrical shock, fire, explosion or other dangerous!
2, when the product is power on (the Power LED lit red), ban to contact with the circuit
board and interface
49
www.syil.com
6.6.2.2 spindle driver
voltage
Input current
AC220V(50Hz)
10A(AC220V)
AC110V(60Hz) 16A (AC220V)
rated
power
1100W
50
rated
speed
the
lowest
speed
motor
voltage
6000RPM
400RPM
DC300V
www.syil.com
6.6.2.3 Interface instruction
6.6.2.3.1 Control board for power
CN1
CN2
motor input
U
V
W
power
FG
N
S2
Hall sensor
L
SA
SB
SC
Limit switch
+5V
GND K1
K2
CN1
-mo
tor
inp
ut
and power input, FG is connect to earth
CN2-hall sensor, connect to motor
S2- when you k1,k2 is off, the control board will stop working, when k1,k2 is
close-circuit, the board will work.
F1- Fuse
6.6.2.3.2 control board(small)
CN10
CN11
CN12
CN13
485 serial
communication port
TTL serial
communication
RPM feedback
Error signal
output
5V
5V
NC
NC
CN14
TR
RX
GND
TR RX
GND
Fout GND
CN15
Err GND
CN16
Enable port for
port for external
external user
user
Close-circuit
12V PWM F/R S/P TP
K2 and k2,the
port will enable
51
5V
GND
Torque output
port
5V Nout GND
GND
www.syil.com
CN17
CN18
0V—10V analog
output
motor temperature detection motor temperature
signal input port
protection output
GND
To NTC thermistor
input
CN19
GND
Tout
5V
CN10—485 serial communication port
CN11—TTL serial communication
CN12—give the RPM feedback,1 pulse to 1 rpm, you must give 5vdc on the port
CN15,or the port will not work.
CN13—error signal output, you must give 5vdc on the port CN15,or the port will
not work.
CN14—Enable port for external user,if this port is close-circuit,CN11 will
be unable,CN15 will be enable。
CN15—port for external user
1
2
3
4
5
6
+12VDC
+5VDC
None
None
direction signal, low active for forward, high active for reserve
PWM input, Control signal for 10%--90% for pwm (Recommended
Frequency:1KHz)
7 GND
CN16—Torque output port
52
www.syil.com
CN17—0V—10V analog output, to control the RPM of spindle.
CN18—motor temperature detection signal input port
CN19—motor temperature protection output
6.6.2.3.2 keyboard instruction
CN1- LCD port
CN3- 485 serial communication port, connect to CN10 of control board.
CN4- TTL serial communication port, connect to CN11 of control board.
JP1,JP2-jumper for choosing the 485 serial communication port or TTL serial
communication port
53
www.syil.com
6.6.2.4
mounting dimensions
54
www.syil.com
6.6.2.4
characteristic curve
DC300V
DC300V
1100W 3500RPM
1100W 6000RPM
55
www.syil.com
DC300V
2200W 6000RPM
56
www.syil.com
6.6.4 Stepper motor driver instruction
The driver is for x4 series
6.6.4.1 Specialty
• AC20 ~ 50V or DC24 ~ 70V Power Supply.
• Maximum output current of 3A.
• AC servo motor using the current control
mode, accurate sinusoidal current output,
so that the performance of stepper motor
will be close to AC servo motor.
• The performance of motor driver is only a
little dependence of different motors,
different stepper motor will work well.
• Have a variety of sub-mode
• Have the off-line (FREE) control signal
• Memory location when Electrical power
failure
• Auto lock of half-current when stop
• Input and output signal is isolation.
6.6.4.2 Motor Adapter
42、57、86BYG Series Two-phase hybrid stepping motor
6.6.4.3 Input and output signals
Symbol
CP+
CPDIR+
DIRFREE+
FREEPOWER
TIMING
ERROR
A
/A
B
/B
Function
Step signal input +
Step signal input Direction signal input +
Direction signal input Off-line signal input +
Off-line signal input Power directive
Phase origin directive
Failure
A pulse output
A pulse output
B pulse output
B pulse output
AC40V
Power input
Instruction
Optocoupler opened is effective,
minimum pulse width is 2us.
Optocoupler closed is forward,
opened is reverse.
When Optocoupler opened, the
current output is 0A.
Normal power LED light (red)
Phase origin LED light (green)
Driver fault LED light (red)
Rated voltage:AC40V(AC20~50V
或DC24V~70V),3A
Attention:Optocoupler is for 5V signal.
57
www.syil.com
6.6.4.4 Single or double pulse setting
Switch(DIP1)
0
1
Signal setting
CP+/CP- is pulse +,DIR+/DIR- is pulse CP+/CP- is pulse signal, DIR+/DIR- is direction signal
6.6.4.5 Output current
Switch(DIP2 3 4)
Output current(max,units:A)
000
001
010
011
100
101
110
111
3.00
2.75
2.50
2.25
2.00
1.75
1.50
1.25
6.6.4.6 Sub-setting
Switch(DIP5 6 7 8) Sub-setting
Pulse number/round
0000
256
12800
0001
200
10000
0010
160
8000
0011
128
6400
0100
100
5000
0101
80
4000
0110
64
3200
0111
50
2500
1000
40
2000
1001
32
1600
1010
25
1250
1011
20
1000
1100
16
800
1101
10
500
1110
8
400
1111
4
200
Attention:Switch “ON” is “0”.
58
www.syil.com
6.6.4.7 Hardware connection
6.6.4.8 Installation size
59
www.syil.com
6.6.5 Transformer instruction
The Transformer is for x4 series
·The transformer is Isolation transformer, the power is 550w
·It support 220vac/110vac input
·It has three output:
12vac output, the power is 20w.( the point of 12)
24vac output, the power is 50w.( the point of 24)
40vac output, the power is 480w(the point of 40)
60
www.syil.com
6.6.6 4th Axis instruction
The 4th axis is Optional Accessories, and it’s for x4 series
The rotary table are mainly accessories for milling machine, boring machine and
drilling machine, they can be used for listing things:
1. circular cutting, the table in graduated with a 360°scale
2. angle setting
3. boring
4. spot facing operations
5. similar work in conjunction with a milling machine
6. indexing
7. in a vertical position to enable to carry out center work with the help of tailstock
8. the dividing plate accessory allows the operator to accurately divide the 360°
rotation of the clamping surface into divisions of all divisible of 30'
Specifications:
Diameter of rotary table:
Height of center for horizontal mounting:
Taper of center bore:
Width:
Width of locating key:
Angle of T-slot:
Height of center for ver.Mounting:
Driving ratio of worm gear:
Module of worm gear:
Graduation on table circumference:
Max feedrate:
61
¢100 mm
73 mm
MT#2
8mm
8mm and 10mm
90°
68mm
1:72
1
360°
600mm/min
www.syil.com
7. Troubleshooting
7.1 Overview
This section is very important, if your machine has issues.
7.1.1 Attention
Our machine is an intergration of mechanical components, Digital components,
electrical components, personal computer and software.
The following are some events which may cause the machine not work correctly.
·The machine was transported, and wiring may have come loose
·There was a thunderstorm w/ lightning since the machine was last used and now
the electronics do not work.
·There has been water in the area where the machine is located
·The machine is in unheated outside building.
7.1.2 Troubleshooting overview
Tools for troubleshooting
Frequently problems
yes
Do you need
schematic?
Refer to schematic (6.2)
no
no
If the problem
solved ?
Refer to troubleshooting
If the problem
yes
yes
Well done
solved ?
no
Call syil support
Figure 7-1
This is the troubleshooting overview, as Figure 7-1,you can try to solve the problem
as above, the next will instruct the all process detailed.
62
www.syil.com
Attention for troubleshooting:
·Have knowledge of how machine is supposed to work.
·Divide and conquer—focus on one area
·Analyze what has changed
·Work smart—do the easy and obvious tests first
·Complete one test before starting another.
7.1.2.1 Tools for troubleshooting
7.1.2.1.1 Safety
· Never do anything with machine power on that can be done with
machine power off.
·Wear eye protection and use appropriate protective clothing such as
gloves
·Don’t wear loose clothing
·Don’t wear jewelry as this can contact electrical componants.
·Do not do any electrical testing if the floor is wet.
·Do not plug machine in to receptacle if floor is wet.
·Be very cautious on which electrical components your are going to touch, as
capacitors can hold a charge even with the machine powered off.
·Think about each move you are going to make prior to doing so, and if
you are unsure do not proceed.
·Focus on the specific task, as working on electrical components can be
very dangerous.
7.1.2.1.2 Tools for troubleshooting
·Good lighting (trouble light or a headlamp or flashlight)
·A digital multi-meter that can test AC volts, DC volts and resistance.
·Assorted non magnetic rubberized screwdrivers.
·A wire stripper
·Measuring tools: Tape measure, Calipers, Dial Indicator(Optional).
7.1.2.1.3 Frequently problems
There are several problems frequiently, if your machine has issues, you can try to
solve the problem by doing the following.
·Loose wires:
There are many wiring connections, it only takes one loose connection to cause
the whole machine to fail. Syil has ensured the wiring connections are tight at the
factory, but when the machine is shipped to you ,the connection may come loose.
The first thing to always check is the wiring connections, tighten all harnesses.
63
www.syil.com
·Poor cable connections:
As the same reasons for above, the cable also may become broken or loose, if
the machine cannot function normally, please check all cables(include all the
cables inside of the control box and the parallel port cable), if you find that a
wiering harness is broken contact your local regional dealer or [email protected]
·Software and parallel port problem:
It is best to, restart software or reinstall mach3, the problem may be solved ,if
you change any setting in mach3 ,this may also cause a mach3 error.
If mach3 works and the machine works but there is still no communication to
the machine, You should check your computers parallel port. It is possible for the
personal computer port to be broken ,there is two ways to solved the problem:
1.Change the mother board of your computer or change another computer and
test again.
2.Purchase a PCI-Parallel board and install it on the PCI port of your
motherboard. Be aware that the port address will change, you will need to
change this address in the (ports and pins) settings in mach3.
SYIL DOES NOT ADVISE USING A LAPTOP COMPUTER TO RUN MACH3, AS
LAPTOP COMPUTERS PARELLEL PORTS CAN HAVE ISSUES WITH KEEPING THE
PROPER 5V SIGNAL REQUIRED. You will see the same warning on the mach3 web
site.
·Sensors
The homing sensors are install on each axis, these switches are used for
homing the machine, if the sensors is broken, the machine will loose the homing
64
www.syil.com
function. To Test go to the diagnostic screen in mach3, depress the switch on the
x or y axis. You will see the lights light up.
These are not limit switches and by default will not stop you machine from going
past them. Mach3 has a function called (soft limits) this function can be turned
on from the main screen for mach3 and set up in the homing/limits settings. This
is found under the “Config” menu in mach3. For more reference please check
the
mach3 manual, this can be found @
http://www.machsupport.com/documentation.php
This is also a good way to test the communication to the computer.
·Computer
The recommended configuration of computer: CPU is 1GHZ, EMS memory is
256MB, hard disk space is 150MB,if the computer is old, mach3 may not will run.
·unlicensed software
When you run program in mach3,the program may limited in 999 lines,
because yours is demo version, you will need to buy the license, and there will
no line limiting.
65
www.syil.com
·Unexplained stop
This may be caused by electrical noise, this can be caused by the homing
switch, it is important to use good quality shielded cables.
7.1.2.1.4 Syil support
[email protected]
[email protected]
0086-574-62735995
You can send email for troubleshooting in anytime, or call us in work time, the
work time is 8:00-17:00(GMT+08:00),prior to contacting us ,be sure you have the
following information.
·Serial number of your machine.(Located on the top of column)
·If you have found a problem the machine, and may need to replace some parts
from Syil, we will need to know the date of purchase you, the syil Machines carry
a One-year warranty. If the warranty has expired you will need to purchase
new components.
·Analyze what might have changed since the machine worked properly.
·Make sure you can repeat the problems.
·Describe the problem as detailed as possible, it will help us to diagnose what will
need to be fixed.
66
www.syil.com
7.2 Troubleshooting
Start
Is there any
power?
no
Proceed to the
Power distribution
yes
Is software
work ok?
no
Proceed to the
Computer control
yes
Does Axis
work ok?
no
Proceed to the Axis
driver
yes
no
Is spindle
ok?
Proceed to
Spindle driver
the
yes
end
Figure 7-2
The flowchart in figure 9.18 will guide you where to start troubleshooting the
electrical system.
67
www.syil.com
This is the power switch, when it
switch to “0”,the power is disconnect,
and when the switch is on “1”, the
machine will get power supply.(as
Figure 7-3)
Most problem of the power supply is
caused by the switch.
The following is power distribution
check list:
Figure 7-3
7.2.1 Power distribution
parts
Input power
Output power
Power supply
(x4 plus only)
220vac(110vac)
5vdc:supplies power to
the x4 plus control board
Transformer
(x4 series)
220vac(110vac)
40vac:Supplies power to
the stepper motor driver
24vac:supplies power to
the A.C.contactor
12vac:supplies power to
the interface board
12vdc:supplies power to
the x4 plus control board
Power supply 220vac(110vac)
(x4
speed
master only)
Remark
7.2.1.2 Problem resolution checklist for power distribution
Problem
Action to identify How to solve
Remark
cause of
problem
·After turning 1. Check the
1. make sure the
on the power,
power plug.. connection is good. If the
there is no
power plug have any
power
in
problems, replace it
circuit
immediately.
68
www.syil.com
2.Check the
switch.
·Loose wires 1.Remove power
in circuit
from
machine ,than
check ALL
connections
wires.
The
boards 1. the spindle
have
no control board
power.
has no power .
2.the five axis
board in no
power.
Coolant pump 1.Check the
is no power power plug..
supply
2. Check the
second relay.
2.if the switch is broken
replace the switch. This
can be confirmed via volt
meter
1. Find loose wires, and
re insert.
1.Check the fuse or filter,
if the board is broken,
replace it.
2.check the fuse on the
board or the power
supply to the board,. if
the board is broken,
replace it.
1.if the plug is
loose ,tight it.
2.If the relay is not
working, replace it.
69
www.syil.com
7.2.2 Computer control
7.2.2.1 Overview
Mach3 can work well in windows xp.
5 axis
interface
board
Mach3 cnc
controller
Computer
Parallel port cable of 25pin
Parallel port
Figure 7-4
7.2.2.2 Problem resolution checklist
Problem
Action to identify How to solve
cause of problem
The machine
can’t
be
controlled by
computer
1.check the
parallel cable
between
computer and
machine.
1. make sure the
connection is good. If
the cable has
problems, replace it
with high quality
shielded cable.
2.check the
parallel port
2. If the parallel port
on the machine is
broken replace it.
Mach3
can 1. check the
works,
but parallel cable
machine will
not work.
Remark
1.Make sure all
connections are tight.
If the parallel cable
appears to have
issues, replace it.
70
www.syil.com
2. Make sure the
mach3 driver
installed. In the
mach3 folder there is
a test program ,for
the driver
3.Make sure that 3.if suspected that
mach3 is working mach3 is not working
correctly.
properly reinstall
2. Check that if
the mach3 Driver
has install
properly.
If
the
machine and
the computer
is ok, but the
machine
is
still not able
to
be
controled
1.check the
power for
interface board .
1.if there is no power,
check the power
supply.(as 6.6.1)
2. check the
charge pump.
2 make sure the
charge pump is
working, if the charge
pump is not working
refer to 6.6.1 as the
entire machine will
not work
3.if you are using 3.make sure your
a parallel port
address is as same as
card, check the
the parallel port card.
address of port1
71
www.syil.com
7.2.3 Axis driver
7.2.2.1 Overview
Control
signal
x-axis driver
X- axis
command
x-axis
M
Control
signal
y-axis driver
Y- axis
command
Z- axis
command
y-axis
M
Control
signal
z-axis driver
z-axis
M
Control
signal
a-axis driver
A- axis
command
a-axis
M
Figure 7-4
72
www.syil.com
7.2.2.2 Problem resolution checklist
Problem
Action to identify
cause of problem
How to solve
A
specific
axis can’t be
controlled
by computer
1.check the
parallel cable
between
computer and
machine.
2.check the
parallel port
1. make sure the
connection is good. If
the cable has issues,
replace it.
3.check mach3
3.if the software is
broken by unknown
problem, reinstall it
1.check mach3, and
reinstall.
stepper
1. check mach3
motor
looses steps
2.check step
when
motor and wiring,
machining.
For example, x,
axis have some
problem, you can
do as Figure 7-6
Remark
2. if the parallel port
is broken replace it.
2. if stepper motor
have having
issues, replace it.
Do not unplug
stepper motor
with machine on
and computer on.
This will cause 5
axis card to not
work
stepper
1.check the power 1.if the driver is no
motor driver supply for driver
power, check the
is not work.
wiring.(refer to
6.6.3 )
2. do as Figure
7-5 to check the
cable of control
signal.
2 .if the cable is
broken, replace it
73
www.syil.com
The driver
and
the
stepper
motor
are
working, but
the axis is
not moving.
axis
is
limited
by
limit switch
or
e-stop
switch
Mechanical
problem
1. Check the
coupling on the
motor.
1. if the coupling is
broken, replace it.
1.check the
homing switch
1.If the homing
switch not working
replace it. Refer to
7.1.2.1.3 Frequently
problems
2.check the e-stop 2. if the e-stop switch
switch
is not working replace
immediately, do not
change settings in
mach3 to disable
switch!
1.Gibbs are too
1.Adjust Gibb set
tight or too loose screws
2.oil not getting to 2.investigate oiling
the ways
system for lack of oil
and/or plugged lines
3.debris on
ballscrew.
3.clean ballscrew
74
www.syil.com
Control
signal
X- axis
command
x-axis driver
x-axis
M
Y- axis
command
Z- axis
command
Control
signal
y-axis driver
y-axis
M
Control
signal
z-axis driver
z-axis
M
Control
signal
A- axis
command
a-axis driver
a-axis
M
Figure 7-5
75
www.syil.com
Control
signal
x-axis driver
X- axis
command
x-axis
M
Control
signal
y-axis driver
Y- axis
command
Z- axis
command
y-axis
M
Control
signal
z-axis driver
z-axis
M
Control
signal
A- axis
command
a-axis driver
a-axis
M
Figure 7-6
76
www.syil.com
7.2.4 Spindle driver
7.2.4.1 Overview
220v/110v
power input
filter
X4 plus control board
Spindle control board
7 pin wire
5 axis
Interface board
Computer
M
Figure 7-8
77
www.syil.com
7.2.4.2 Problem resolution checklist
Problem
Action to identify
cause of
problem
The
spindle 1.check the
can’t
be parallel cable
controlled by between
computer.
computer and
machine.
How to solve
1. make sure the
connection are good.
If the cable have
suspected problems,
replace it.
2.check the
parallel port
2. if the parallel port
is broken replace it.
3.check mach3
3.if the software is
broken by unknown
problem, reinstall it
4.check the 7
pin wire
4.if the wire is
broken, replace it
5.check the x4
plus control
board
5.If the board have
some problem,
replace it
6.check the
spindle control
board
6.if the spindle
control board is
broken, replace it.
To test check that the
board is getting
power.
7.if the motor is
broken ,replace it
7.check the
spindle motor
Remark
78
www.syil.com
The
spindle
can’t
be
control
by
manual mode
8.check the wire
which connect
to keyboard
8.If the switch is
broken, replace it.
1. check the
wire which
connect to
keyboard
1.If the switch is
broken, replace it.
2.check the x4
plus control
board
2.If the board have
some problem,
replace it
3.check the
3.If the
Potentiometers
Potentiometers
have some problem,
replace it
4. check the 20 4.If the 20 pin cable is
pin cable which broken, replace it.
connect to 5 axis
interface board
and parallel port
The
spindle
does
not
achieve
programmed
RPM.
For example,
use“m3s1500”,
but the true
RPM is only
1000
1. check set of
1.Make sure the
pulleys in mach3 pulley is 200 to 3600
2.check motor
2.Make sure the
control in mach3 PWMbase freq. is
1000 to 1500.
79
www.syil.com