1
Bell Laboratories
Murray Hill, New Jersey 07974
Computing Science Technical Report No. 116
PIC A Graphics Language for Typesetting
Revised User Manual
Brian W. Kernighan
December, 1984
PIC A Graphics Language for Typesetting
Revised User Manual
Brian W. Kernighan
Bell Laboratories
Murray Hill, New Jersey 07974
ABSTRACT
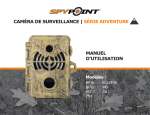
PIC is a language for drawing simple figures on a typesetter. The basic objects in
PIC are boxes, circles, ellipses, lines, arrows, arcs, spline curves, and text. These may be
placed anywhere, at positions specified absolutely or in terms of previous objects. The
example below illustrates the style and basic capabilities of the language.
document
PIC
TBL/EQN
(optional)
TROFF
typesetter
This picture was created with the input
.PS
ellipse "document"
arrow
box "PIC"
arrow
box "TBL/EQN" "(optional)" dashed
arrow
box "TROFF"
arrow
ellipse "typesetter"
.PE
PIC is a TROFF preprocessor; it passes most of its input through untouched, but
translates commands between .PS and .PE into TROFF commands that draw the pictures.
This manual describes the version of PIC made available in December, 1984.
December, 1984
PIC A Graphics Language for Typesetting
Revised User Manual
Brian W. Kernighan
Bell Laboratories
Murray Hill, New Jersey 07974
1. Introduction
PIC is a language for drawing pictures. It operates as yet another TROFF [ %R Comp. Sci. Tech.
Rept. 54 %I Bell Laboratories %C Murray Hill, New Jersey %A J. F. Ossanna %T NROFF/TROFF User’s
Manual %D October 1976 %C Murray Hill, N.J. %D January 1979 preprocessor (in the same style as EQN
[ %A Brian W. Kernighan %A Lorinda L. Cherry %T A System for Typesetting Mathematics %J Communications of the ACM %V 18 %N 3 %D 1975 %P 151-157 %K cacm acm TBL [ %R Comp. Sci. Tech.
Rept. 49 %I Bell Laboratories %C Murray Hill, New Jersey %A M. E. Lesk %T Tbl A Program to Format Tables %D September 1976 %J UNIX Programmer’s Manual %V 2 %O Section 10 %I Bell Laboratories %C Murray Hill, N.J. %D January 1979 and REFER [ %R Comp. Sci. Tech. Rept. 69 %A M. E. Lesk
%T Some Applications of Inverted Indexes on the UNIX System %D 1978 %J UNIX Programmer’s Manual %V 2 %O Section 11 %I Bell Laboratories %C Murray Hill, N.J. %D January 1979 with pictures
marked by .PS and .PE.
PIC was inspired partly by Chris Van Wyk’s early work on IDEAL [ %T A High-Level Language for
Specifying Pictures %A C. J. Van Wyk %J ACM Transactions on Graphics %V 1 %N 2 %D 1982 %P
163-182 it has somewhat the same capabilities, but quite a different flavor. In particular, PIC is much more
procedurala picture is drawn by specifying (sometimes in painful detail) the motions that one goes
through to draw it. Other direct influences include the PICTURE language [ %A John C. Beatty %T PICTURE A picture-drawing language for the Trix/Red Report Editor %R Lawrence Livermore Laboratory
Report UCID-30156 %D April 1977 the V viewgraph language [ %A Anon. %T V A viewgraph generating language %R Bell Laboratories internal memorandum %D May 1979 and, more recently, new features from the GRAP language [ %A J. L. Bentley %A B. W. Kernighan %T GRAP A Language for
Typesetting Graphs %R Bell Laboratories Comp. Sci Tech. Rept. 114 %D December, 1984 for typesetting
graphs.
This paper is primarily a user’s manual for PIC; a discussion of design issues and user experience
may be found in [ %A B. W. Kernighan %T PIC A Language for Typesetting Graphics %J Software
Practice & Experience %D January, 1982 %V 12 %N 1 %P 1-21 The next section shows how to use PIC in
the most simple way. Subsequent sections describe how to change the sizes of objects when the defaults
are wrong, and how to change their positions when the standard positioning rules are wrong. An appendix
describes the language succinctly and summarizes changes since the last manual.
2. Basics
PIC provides boxes, lines, arrows, circles, ellipses, arcs, and splines (smooth curves), plus facilities
for positioning and labeling them. The picture below shows all of the fundamental objects (except for
splines) in their default sizes:
box
line
arrow
circle
ellipse
arc
Each picture begins with .PS and ends with .PE; between them are commands to describe the picture.
Each command is typed on a line by itself. For example
-2-
.PS
box "this is" "a box"
.PE
creates a standard box (¾ inch wide, ½ inch high) and centers the two pieces of text in it:
this is
a box
Each line of text is a separate quoted string. Quotes are mandatory, even if the text contains no
blanks. (Of course there needn’t be any text at all.) Each line will be printed in the current size and font,
centered horizontally, and separated vertically by the current TROFF line spacing. PIC does not center the
complete drawing itself, but the default definitions of .PS and .PE in the -ms macro package do.
You can use circle or ellipse in place of box:
this is
a box
this is
a box
Text is centered on lines and arrows; if there is more than one line of text, the lines are centered
above and below:
line "this is" "a line"
this is
a line
arrow "this is" "an arrow"
this is
an arrow
Boxes and lines may be dashed or dotted; just add the word dashed or dotted after box or line:
line dashed "dashed" "line"
dashed
line
Arcs by default turn 90 degrees counterclockwise from the current direction; you can make them turn
clockwise by saying arc cw:
line; arc; arc cw; arrow
A spline might well do this job better; we will return to that shortly.
As you might guess,
arc; arc; arc; arc
draws a circle, though not very efficiently. Notice that several commands can be put on a single line if they
are separated by semicolons.
Objects are normally drawn one after another, left to right, and connected at the obvious places:
arrow; box "input"; arrow; box "process"; arrow; box "output"; arrow
-3-
input
process
output
One way to leave a space is with move:
box; move; box; move; box
Although objects are normally connected left to right, this can be changed. If you specify a direction
(as a separate object), subsequent objects will be joined in that direction:
down; box; arrow; ellipse; arrow; circle
left; box; arrow; ellipse; arrow; circle
Each new picture begins going to the right.
Normally, figures are drawn at a fixed scale, with objects of a standard size. It is possible, however,
to arrange that a figure be expanded or shrunk to fit a particular width. If the .PS line contains a number,
the drawing is forced to be that many inches wide, with the height scaled proportionately. Thus
.PS 3.5
causes the picture to be 3.5 inches wide.
PIC is pretty dumb about the size of text in relation to the size of boxes, circles, and so on. There is
no way to say ‘‘make a box that just fits around this text’’ or ‘‘make this text fit inside this circle’’ or
‘‘draw a line as long as this text.’’ Tight fitting of text can generally only be done by trial and error.
Speaking of errors, if you make a grammatical error in the way you describe a picture, PIC will complain and try to indicate where. For example, the invalid input
-4-
box arrow box
will draw the message
pic: syntax error near line 5, file context is
box >>> arrow <<< box
The brackets point to the place where the error was first noted; it sometimes follows the word in error,
although in this example it’s right on target.
3. Controlling Sizes
This section deals with how to control the sizes of objects when the ‘‘default’’ sizes are not what is
wanted. The next section deals with positioning them when the default positions are not right.
Each object that PIC knows about (boxes, circles, etc.) has associated dimensions, like height, width,
radius, and so on. By default, PIC tries to choose sensible default values for these dimensions, so that simple pictures can be drawn with a minimum of fuss and bother. All of the figures and motions shown so far
have been in their default sizes:
box
circle
ellipse
arc
line or arrow
move
¾" wide × ½" high
½" diameter
¾" wide × ½" high
½" radius
½" long
½" in the current direction
When necessary, you can make any object any size you want:
box width 3 height 0.1; circle radius 0.1
All positions and dimensions are in inches, so the box is 3 inches wide and 1/10 inch high and the circle has
radius 1/10 inch.
An attribute like width changes only the one instance of the object. You can also change the
default size for all objects of a particular type by assigning values to PIC variables; this will be discussed in
Section 6.
The attributes of height (which you can abbreviate to ht) and width (or wid) apply to boxes,
circles, ellipses, and to the head on an arrow. The attributes of radius (or rad) and diameter (or
diam) can be used for circles and arcs if they seem more natural.
Lines and arrows are most easily drawn by specifying the amount of motion from where one is right
now, in terms of directions. Accordingly the words up, down, left and right and an optional distance
can be attached to line, arrow, and move:
line up 1 right 2
arrow left 2
move left 0.1
line <-> down 1 "height " rjust
height
-5-
The notation <-> indicates a two-headed arrow; use -> for a head on the end and <- for one on the start.
Lines and arrows are really the same thing; in fact, arrow is a synonym for line ->.
If you don’t specify any distance after up, down, etc., PIC uses the standard distance:
line up right; line down; line down left; line up
If you omit the direction associated with a distance, the current direction is used.
Boxes and lines may be dotted or dashed:
box dotted; line dotted; move; line dashed; box dashed
................
.
.
.
.
.
.
.
.
.
...........
.
.
.
.
.
.
.
.
................
If there is a number after dot, the dots will be approximately that far apart. You can also control the size
of the dashes (at least somewhat): if there is a length after the word dashed, the dashes will be that long,
and the intervening spaces will be as close as possible to that size:
line
line
line
line
right
right
right
right
5
5
5
5
dashed; move left 5 down .25; right
dashed 0.25; move left 5 down .25; right
dashed 0.5; move left 5 down .25; right
dashed 1
Dotted or dashed attributes apply only to lines and boxes.
You can make any object invisible by adding the word invis after it. This is particularly useful for
positioning things correctly near text:
box invis "input"; arrow; box invis "output"
input
Text may be positioned on lines and arrows:
arrow
arrow
arrow
arrow
arrow
"on top
"above"
"above"
"below"
"above"
of"; move
"below"; move
above; move
below; move
"on top of" "below"
output
-6above
above
above
on top of
below
below
below
The ‘‘width’’ of an arrowhead is the distance across its tail; the ‘‘height’’ is the distance along the
shaft. The arrowheads in this picture are default size and shape.
on top of
As we said earlier, arcs go 90 degrees counterclockwise from where you are right now, and arc cw
changes this to clockwise. The default radius is the same as for circles, but you can change it with the rad
attribute. It is also easy to draw arcs between specific places; this will be described in the next section.
To put an arrowhead on an arc, use one of <-, -> or <->, as with lines.
In all cases, unless an explicit dimension for some object is specified, you will get the default size. If
you want an object to have the same size as the previous one of that kind, add the word same. Thus in the
set of boxes given by
down; box ht 0.2 wid 1.5; move down 0.15; box same; move same; box same
the dimensions set by the first box are used several times; similarly, the amount of motion for the second
move is the same as for the first one.
You can change the default sizes of objects by assigning values to the variables that define their values. Here is the list, with their default values:
boxwid = 0.75;
linewid = 0.75;
circlerad = 0.25;
ellipsewid = 0.75;
movewid = 0.75;
textwid = 0;
arrowwid = 0.05;
dashwid = 0.05;
boxht = 0.5
lineht = 0.5
arcrad = 0.25
ellipseht = 0.5
moveht = 0.5
textht = 0
arrowht = 0.1
arrowhead = 2
(These refer to the arrowhead.)
(Arrowhead fill style)
So if you want all your boxes to be long and skinny, and relatively close together,
boxwid = 0.1; boxht = 1
movewid = 0.2
box; move; box; move; box
Setting the variable arrowhead to a value like 7 causes arrowheads to be filled by overstriking; the
default is 2:
arrowhead = 7; arrow; move; arrowhead = 2; arrow
-7-
PIC works internally in inches. Setting the variable scale to some value causes all dimensions to be
scaled down by that value. Thus, for example, scale=2.54 causes dimensions to be interpreted as centimeters.
The number given as a width in the .PS line overrides the dimensions given in the picture; this can
be used to force a picture to a particular size even when coordinates have been given in inches. Experience
indicates that a good way to get a picture of the right size is to enter its dimensions in inches, then if necessary add a width to the .PS line.
Once set, variables like boxht retain their values from one picture to the next. You can reset variables to their default values by listing them in a reset statement:
reset boxht, boxwid
A bare reset resets all variables.
4. Controlling Positions
You can place things anywhere you want; PIC provides a variety of ways to talk about positions. PIC
uses a standard Cartesian coordinate system, so any point or object has an x and y position, measured in
inches. The first object is placed with its start at position 0,0 by default. The x,y position of a box, circle or
ellipse is its geometrical center; the position of a line or motion is its beginning; the position of an arc is the
center of the corresponding circle.
Position modifiers like from, to, by and at are followed by an x,y pair, and can be attached to
boxes, circles, lines, motions, and so on, to specify or modify a position.
You can also use up, down, right, and left with line and move:
box ht 0.2
move right
box ht 0.2
move right
box ht 0.2
wid 0.2 at 0,0 "1"
0.5
wid 0.2 "2"
0.5
wid 0.2 "3"
# or "move to 0.5,0"
1
# or "move 0.5" or "move same"
2
3
Comments can be used in pictures; they begin with a # and end at the end of the line.
Attributes like ht and wid and positions like at can be written out in any order. So
box ht 0.2 wid 0.2 at 0,0
box at 0,0 wid 0.2 ht 0.2
box ht 0.2 at 0,0 wid 0.2
are all equivalent, though the last is harder to read and thus less desirable.
The from and to attributes are particularly useful with arcs, to specify the endpoints. By default,
arcs are drawn counterclockwise,
"+" at 0,0
arc -> from 0.5,0 to 0,0.5
arc -> cw from 0,0 to 1,0.5
+
The radius can be made large to provide flat arcs:
arc -> cw from 0,0 to 2,0 rad 15
-8-
If the circle is under-specified, PIC guesses a radius and/or center; you will have to provide them explicitly
if the guess is wrong.
We said earlier that objects are normally connected left to right. This is an over-simplification. The
truth is that objects are connected together in the direction specified by the most recent up, down, left or
right (either alone or as part of some object). Thus, in
arrow left; box; arrow; circle; arrow
the left implies connection towards the left:
This could also be written as
left; arrow; box; arrow; circle; arrow
Objects are joined in the order determined by the last up, down, etc., with the entry point of the second object attached to the exit point of the first (which is fixed at the time of entry). Entry and exit points
for boxes, circles and ellipses are on opposite sides. This automatic connection and direction selection
works well if the direction doesn’t change but it will occasionally surprise you:
arrow; circle; down; arrow
The arrow comes out of the right side of the circle, not the bottom, as might be expected.
If a set of commands is enclosed in braces {...}, the current position and direction of motion when
the group is finished will be exactly where it was when entered. Nothing else is restored. There is also a
more general way to group objects, using [ and ], which is discussed in Section 9.
5. Labels and Corners
Objects can be labelled or named so that you can talk about them later. For example,
Box1:
box
# ... other stuff ...
move to Box1
Place names must begin with an upper case letter (to distinguish them from variable names, which begin
with lower case letters). The name refers to the ‘‘center’’ of the object, which is the geometric center for
most things.
Other combinations also work:
line
move
move
line
from Box1 to Box2
to Box1 up 0.1 right 0.2
to Box1 + 0.2,0.1 # same as previous
to Box1 - 0.5,0
The reserved name Here may be used to record the current position of some object:
Box1:
Here
-9-
Labels are variables they can be reset several times in a single picture, so a statement like
Box1:
Box1 + 1,1
is perfectly legal.
You can also refer to previously drawn objects of each type, using the word last. For example,
given the input
box "A"; circle "B"; box "C"
then ‘last box’ refers to box C, ‘last circle’ refers to circle B, and ‘2nd last box’ refers to box
A. Numbering of objects can also be done from the beginning, so boxes A and C are ‘1st box’ and ‘2nd
box’ respectively.
To cut down the need for explicit coordinates, objects have ‘‘corners’’ named by compass points:
B: box "B.c" ht 1 wid 1.5
" B.e" at B.e ljust
" B.ne" at B.ne ljust
" B.se" at B.se ljust
"B.s" at B.s below
"B.n" at B.n above
"B.sw " at B.sw rjust
"B.w " at B.w rjust
"B.nw " at B.nw rjust
B.nw
B.w
B.n
B.c
B.ne
B.e
B.sw
B.se
B.s
Note the use of ljust, rjust, above, and below to alter the default positioning of text, and of a blank
within some strings to help space them away from a vertical line.
Lines and arrows have a start, an end and a center in addition to corners. Circles and ellipses
have corners too; an arc has the same corners as the circle of which it is a part. The words left, right,
top, and bottom are synonyms for west, east, north and south.
It is sometimes easiest to position objects by positioning some part of one at some part of another, for
example the northwest corner of one at the southeast corner of another. The with attribute permits this
kind of positioning:
box ht 0.75 wid 0.75
box ht 0.5 wid 0.5 with .sw at last box.se
Notice that the corner after with is written .sw.
As another example, consider
ellipse
ellipse ht .2 wid .3 with .se at 1st ellipse.nw
ellipse ht .2 wid .3 with .sw at 1st ellipse.ne
- 10 -
Sometimes it is desirable to have a line intersect a circle at a point which is not one of the eight compass points that PIC knows about. In such cases, the proper visual effect can be obtained by using the
attribute chop to chop off part of the line:
circlerad = 0.15; arrowhead = 7
circle "a"
circle "b" at 1st circle - (0.4, 0.6)
circle "c" at 1st circle + (0.4, -0.6)
arrow from 1st circle to 2nd circle chop
arrow from 1st circle to 3rd circle chop
a
b
c
By default the line is chopped by circlerad at each end. This may be changed:
line ... chop r
chops both ends by r, and
line ... chop r1 chop r2
chops the beginning by r1 and the end by r2. More complicated intersections can be computed with the
built-in trigonometric functions listed in the next section.
There is one other form of positioning that is sometimes useful, to refer to a point some fraction of
the way between two other points. This can be expressed in PIC as
fraction of the way between position1 and position2
fraction is any expression, and position1 and position2 are any positions. You can abbreviate this rather
windy phrase; ‘‘of the way’’ is optional, and the whole thing can be written instead as
fraction < position1 , position2 >
As a pair of examples:
box
arrow right from 1/3 of the way between last box.ne and last box.se
arrow right from 2/3 <last box.ne, last box.se>
- 11 -
A:
ellipse
ellipse ht .2 wid .3 with .se at 1st ellipse.nw
ellipse ht .2 wid .3 with .sw at 1st ellipse.ne
circle rad .05 at 0.5 <A.nw,A.c>
circle rad .05 at 0.5 <A.ne,A.c>
arc from 0.25 <A.w,A.e> to 0.75 <A.w,A.e>
Naturally, the distance given by fraction can be greater than 1 or less than 0.
6. Variables, Expressions and Built-in Functions
It’s generally a bad idea to write everything in absolute coordinates if you are likely to change things.
PIC variables let you parameterize your picture:
a = 0.5;
b = 1
box wid a ht b
ellipse wid a/2 ht 1.5*b
Box2: Box1 - (a/2, b/2)
Expressions may use the standard operators +, -, *, /, and %, and parentheses for grouping.
The most important variables are the predefined ones for controlling the default sizes of objects,
listed in Section 3. These may be set at any time in any picture, and retain their values from picture to picture until reset.
You can use the height, width, radius, and x and y coordinates of any object or corner in an expression:
Box1.x
# the
Box1.ne.y
# the
Box1.wid
# the
Box1.ht
# and
2nd last circle.rad
x coordinate of the center of Box1
y coordinate of the northeast corner of Box1
width of Box1
its height
# the radius of the 2nd last circle
Any pair of expressions enclosed in parentheses defines a position; furthermore such positions can
be added or subtracted to yield new positions:
(x, y)
(x 1 , y 1 ) + (x 2 , y 2 )
If p 1 and p 2 are positions, then (p 1 ,p 2 ) refers to the point (p 1 .x, p 2 .y).
PIC provides a small collection of standard functions:
sin(expr), cos(expr), atan2(y,x)
log(expr), exp(expr)
sqrt(expr), max(e 1 ,e 2 ), min(e 1 ,e 2 )
int(expr)
rand( )
(angle in radians)
(Beware: both base 10)
(integer part of expr)
(random number between 0 and 1)
7. More on Text
Normally, text is centered at the geometric center of the object it is associated with. The attribute
ljust causes the left end to be at the specified point (which means that the text lies to the right of the
specified place!), and rjust puts the right end at the place. above and below center the text one half
line space in the given direction.
- 12 -
Text attributes can be compounded:
arrow 1 "ljust above" ljust above
ljust above
Text is most often an attribute of some other object, but you can also have self-standing text:
"origin" "(0,0)" at 0,0
"this is" "(1,1)" at 1,1
box ht 1 wid 1 dotted with .sw at 0,0
this is
.....................
.
.
.
.
(1,1)
.
.
.
.
.
.
.
.
.
.
.
.
.
.
.
.
.
.
.
.
.
.
.
.
.
.
.
.
.
.
.
.
origin
.
.
.....................
(0,0)
In effect, n text strings are contained in an invisible box of width textwid and height n × textht. The
variables textwid and textht may be set to any values; they are normally zero.
A list of numeric expressions can be converted to a formatted string with the sprintf function and
used anywhere a quoted string can be:
B: box wid log(20)
sprintf("width = %g, height = %g ", B.wid, B.ht) rjust at B.w
width = 1.30103, height = 0.5
8. Lines and Splines
A ‘‘line’’ may actually be a path, that is, it may consist of connected segments:
line right 1 then down .5 left 1 then right 1
A spline is a smooth curve guided by a set of straight lines just like the line above. It begins at the
same place, ends at the same place, and in between is tangent to the mid-point of each guiding line. The
syntax for a spline is identical to a (path) line except for using spline instead of line:
line dashed right 1 then down .5 left 1 then right 1
spline from start of last line \
right 1 then down .5 left 1 then right 1
(Long input lines can be split by ending each piece with a backslash.)
- 13 -
The elements of a path, whether for line or spline, are specified as a series of points, either in absolute
terms or by up, down, etc. If necessary to disambiguate, the word then can be used to separate components, as in
spline right then up then left then down ->
which is evidently not the same as
spline right then up left then down ->
Notice that arrowheads may be put on the ends of a line or spline.
9. Blocks
Any sequence of PIC statements may be enclosed in brackets [...] to form a block, which can then
be treated as a single object, and manipulated rather like an ordinary box:
box "1"
[ box "2"; arrow "3" above; box "4" ] with .n at last box.s - (0,0.1)
"Thing 2: " rjust at last [].w
1
Thing 2:
2
3
4
Notice that ‘‘last’’-type constructs treat blocks as a unit and don’t look inside for objects: ‘‘last box.s’’
refers to box 1, not box 2 or 4. You can use last [], etc., just like last box.
Blocks have the same compass corners as boxes (determined by the bounding box). It is also possible to position a block by placing either an absolute coordinate (like 0,0) or an internal label (like A) at
some external point, as in
[ ...; A: ...; ... ] with .A at ...
By default, blocks join with other things as boxes do, at the center of the appropriate side.
Names of variables and places within a block are local to that block, and thus do not affect variables
and places of the same name outside. (In particular, that includes the built-in variables like boxwid, etc.;
if they are set within a block, they revert to their original values when the block is left.) You can get at the
internal place names with constructs like
last [].A
or
B.A
where B is a name attached to a block:
- 14 -
B:
[ ... ;
A: ...;
]
When combined with define statements (next section), blocks provide a reasonable simulation of a procedure mechanism.
Although blocks nest, it is currently possible to look only one level deep with constructs like B.A,
although A may be further qualified by a corner name (i.e., B.A.sw or top of B.A are legal).
The following example illustrates most of the points made above about how blocks work:
h = .5;
[
dh = .02;
dw = .1
Ptr: [
boxht = h; boxwid = dw
A: box
B: box
C: box
box wid 2*boxwid "..."
D: box
]
Block: [
boxht = 2*dw; boxwid = 2*dw
movewid = 2*dh
A: box; move
B: box; move
C: box; move
box invis "..." wid 2*boxwid; move
D: box
] with .t at Ptr.s - (0,h/2)
arrow from Ptr.A to Block.A.nw + (dh,0)
arrow from Ptr.B to Block.B.nw + (dh,0)
arrow from Ptr.C to Block.C.nw + (dh,0)
arrow from Ptr.D to Block.D.nw + (dh,0)
]
box dashed ht last [].ht+dw wid last [].wid+dw at last []
This produces
...
...
10. Macros
PIC provides a basic macro facility. In the simplest form,
define
name
X replacement text X
defines name to be the replacement text; X is any character that does not appear in the replacement. Any
subsequent occurrence of name will be replaced by replacement text.
Macros may have arguments. If the replacement text of a macro definition contains occurrences of
$1, $2, etc., these will be replaced by the corresponding actual arguments when the macro is invoked. The
invocation for a macro with arguments is
name(arg1, arg2, ...)
Non-existent arguments are replaced by null strings. Macro definitions last from picture to picture; a macro
- 15 -
definition can be removed by
undef macro-name
As an example, one might define a square by
define square X box ht $1 wid $1
$2 X
and use it as
square(1, "one" "inch")
square(0.5)
square(0.25, "\s-4tiny\s+4" dashed)
one
inch
tiny
Notice how the second argument may be used to pass in arbitrary contents.
Coordinates like x,y may be enclosed in parentheses, as in (x,y), so they can be included in a macro
argument.
11. File Copy
The statement
copy "filename"
inserts the contents of the named file at that point in the input. Any .PS or .PE lines within the file are
ignored, so previously prepared pictures can be used as parts of larger ones without editing.
PIC also provides the copy thru mechanism found in GRAP:
copy "file" thru macro-name
copies file, treating each line as an invocation of the named macro (each field being an argument). A literal
macro may be used instead of a name:
copy "file" thru X macro replacement text X
and if no file name is given, the remainder of the input until the next .PE is used. So to plot a set of circles
at points whose coordinates and radii are included in-line:
copy thru / circle rad $3 at $1,$2 /
0 0 .05
1 1 .1
...
- 16 -
The sh command executes an arbitrary commandline:
sh X anything X
As always, X is any character not in anything.
12. Loops and Conditionals
PIC provides an if statement and a for loop.
.ps -2
pi = atan2(0,-1)
for i = 0 to 2 * pi
"" at i/2,
"s" at i/2,
"c" at i/2,
X
.ps +2
by 0.1 do X
0
sin(i)/2
cos(i)/2
sss
ccc
cc s s s s s s s s s s s
ccc
ccs
ss
cc
s cc
c
ss
s
s
cc
cc
ss
ss
cc
cc
ss
s
c
ssccsscccs
cc
ss
s
c
cc
ss
ss
cc
s
cc
s s cc
ss
c
cc
ss
ccs s s s
ccc
sssssssssss
cccccccccc
ccccc
The by clause is optional; if the value is preceded by a *, the steps are multiplicative, not additive. The
body of the loop is delimited by any character not found within it, or, in a special dispensation for programmers, by braces, which may also be used for definitions, copy, sh and if statements.
The if statement is
if expression then X anything X else X anything X
where the else clause is optional. The expression may use the usual relational operators: ==, !=, >, >=,
<, <=, &&, and ||.
pi = atan2(0,-1)
for i = 0 to pi by 0.1 do {
if (s = sin(i)) > 0.8 then { s = 0.8 }
"x" at i/2, s/2
}
xxxxxxxxxxxxxxxxx
xx
xx
x
xx
xx
xx
x
x
x
x
A string comparison using == or != is also permitted, to compare quoted strings:
if "string1" == "string2" then ...
13. TROFF Interface
PIC is usually run as a TROFF preprocessor:
pic file | troff -ms
Run it before EQN if it is also present.
If the .PS line looks like
.PS <file
- 17 -
then the contents of file are inserted in place of the .PS line, whether or not the file contains .PS or
.PE. (This feature is deprecated in favor of the copy statement.)
PIC copies the .PS and .PE lines from input to output intact, except that it adds two things on the
same line as the .PS:
.PS h w
h and w are the picture height and width in units. The -ms macro package has simple definitions for .PS
and .PE that cause pictures to be centered and offset a bit from surrounding text. (See the appendix.)
If ‘‘.PF’’ is used instead of .PE, the position after printing is restored to where it was before the picture started, instead of being at the bottom. (‘‘F’’ is for ‘‘flyback.’’)
Any input line that begins with a period is assumed to be a TROFF command that makes sense at that
point; it is copied to the output at that point in the document. It is asking for trouble to add vertical space or
in any way fiddle with the line spacing here, but point size and font changes are generally harmless:
.ps 24
circle
.ps 12
circle
.ps 8
circle
.ps 6
circle
.ps 10
radius .4 at 0,0
radius .2 at 0,0
radius .1 at 0,0
radius .05 at 0,0
\" don’t forget to restore size
PIC does preserve the state of TROFF’s fill mode across pictures.
It is also safe to include sizes, fonts and local motions within quoted strings ("...") in PIC, so long
as whatever changes are made are unmade before exiting the string. For example, to print text in Old
English 2 points larger:
ellipse "\s+2\f(OESmile!\fP\s-2"
Smile!
This is essentially the same rule as applies in EQN.
There is a subtle problem with complicated equations inside PIC pictures they come out wrong if
EQN has to leave extra vertical space for the equation. If your equation involves more than subscripts and
superscripts, you must add to the beginning of each equation the extra information space 0:
arrow
box "$space 0 {H( omega )} over {1 - H( omega )}$"
arrow
H(É)
_________
1 − H(É)
- 18 -
PIC output is largely independent of any particular typesetter, but in the rare case that you have to say
something to it, the -T option makes the choice, as in
pic -Taps ...
The typesetter type may also be set with the environment variable TYPESETTER.
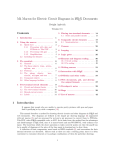
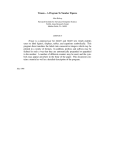
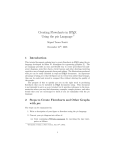
14. Some Examples
Herewith a handful of larger examples:
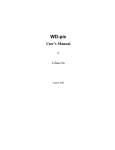
ndtable:
...
n1
d1
n3
d3
...
n2
d2
hashtab:
.
.
.
ndblock
define ndblock {
box wid boxwid/2 ht boxht/2
down; box same with .t at bottom of last box;
box same
}
boxht = .2; boxwid = .3; circlerad = .3; dx = 0.05
down; box; box; box; box ht 3*boxht "." "." "."
L: box; box; box invis wid 2*boxwid "hashtab:" with .e at 1st box .w
right
Start: box wid .5 with .sw at 1st box.ne + (.4,.2) "..."
N1: box wid .2 "n1"; D1: box wid .3 "d1"
N3: box wid .4 "n3"; D3: box wid .3 "d3"
box wid .4 "..."
N2: box wid .5 "n2"; D2: box wid .2 "d2"
arrow right from 2nd box
ndblock
spline -> right .2 from 3rd last box then to N1.sw + (dx,0)
spline -> right .3 from 2nd last box then to D1.sw + (dx,0)
arrow right from last box
ndblock
spline -> right .2 from 3rd last box to N2.sw-(dx,.2) to N2.sw+(dx,0)
spline -> right .3 from 2nd last box to D2.sw-(dx,.2) to D2.sw+(dx,0)
arrow right 2*linewid from L
ndblock
spline -> right .2 from 3rd last box to N3.sw + (dx,0)
spline -> right .3 from 2nd last box to D3.sw + (dx,0)
circlerad = .3
circle invis "ndblock" at last box.e + (1.2,.2)
arrow dashed from last circle.w to last box chop 0 chop .3
box invis wid 2*boxwid "ndtable:" with .e at Start.w
- 19 -
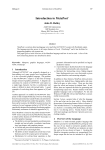
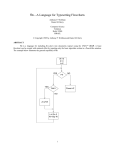
diagnostic
message
printer
lexical
corrector
source
code
lexical
analyzer
symbol
table
syntactic
corrector
tokens
parser
intermediate
code
semantic
checker
.PS 5
.ps 8
LA:
P:
Sem:
LC:
Syn:
DMP:
ST:
arrow "source" "code"
box "lexical" "analyzer"
arrow "tokens" above
box "parser"
arrow "intermediate" "code"
box "semantic" "checker"
arrow
arrow <-> up from top of LA
box "lexical" "corrector"
arrow <-> up from top of P
box "syntactic" "corrector"
arrow up
box "diagnostic" "message" "printer"
arrow <-> right from right of DMP
box "symbol" "table"
arrow from LC.ne to DMP.sw
arrow from Sem.nw to DMP.se
arrow <-> from Sem.top to ST.bot
.PE
There are eighteen objects (boxes and arrows) in the picture, and one line of PIC input for each; this
seems like an acceptable level of verbosity.
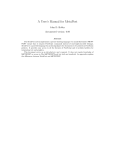
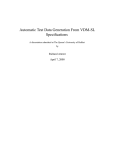
- 20 -
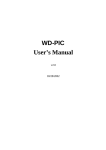
input
DISK
character
defns
CPU
(16-bit mini)
rollers
CRT
... paper
Basic Digital Typesetter
.PS
.ps -2
CPU:
CRT:
Paper:
circle "DISK"
arrow "character" "defns"
box "CPU" "(16-bit mini)"
{ arrow <- from top of CPU up "input " rjust }
arrow
"
CRT" ljust
line from CRT - 0,0.075 up 0.15 \
then right 0.5 \
then right 0.5 up 0.25 \
then down 0.5+0.15 \
then left 0.5 up 0.25 \
then left 0.5
CRT + 1.05,0.75
arrow <- from Paper down 1.5
" ... paper" ljust at end of last arrow + 0, 0.25
circle rad 0.05 at Paper + (-0.055, -0.25)
circle rad 0.05 at Paper + (0.055, -0.25)
"
rollers" ljust at Paper + (0.1, -0.25)
.ps +2
.PE
.ce
Basic Digital Typesetter
15. Final Observations
The fundamental approach in PIC Cartesian coordinates and real measurements is not the easiest thing in the world to work with, although it does have the merit of being in some sense sufficient. Much
of the syntactic sugar (or corn syrup) corners, joining things implicitly, etc. is aimed at making positioning and sizing automatic, or at least relative to previous things, rather than explicit.
Nonetheless, PIC does offer some positive values. Most notably, it is integrated with the rest of the
standard Unix document preparation software. In particular, it positions text correctly in relation to graphical objects; this is not true of any of the interactive graphical editors that I am aware of. It can even deal
with equations in a natural manner, modulo the space 0 nonsense alluded to in Section 13.
A standard question is, ‘‘Wouldn’t it be better if it were interactive?’’ The answer seems to be both
yes and no. If one has a decent input device such as a mouse, interaction is certainly better for sketching
out a figure. But it is hard to state and preserve relationships between objects with purely graphical input,
and it is tedious to do precision drafting, especially of repetitive constructs. These are easy with textual
descriptions. Finally, and perhaps most important, it is possible to generate PIC input from a program.
GRAP is merely the most recent in a set of such programs, none of which would be feasible with the interactive systems I know of.
- 21 -
In any case, the issue is far from settled; comments and suggestions are welcome.
Acknowledgements
I am indebted to Chris Van Wyk for ideas from several versions of IDEAL. He and Doug McIlroy
have also contributed algorithms for line and circle drawing, and made useful suggestions on the design of
PIC. Theo Pavlidis contributed the basic spline algorithm; Eric Grosse provided code to compute the
bounding box of an arc. Charles Wetherell pointed out reference [6] to me, and made several valuable criticisms on an early draft of the language and manual. The exposition in this manual has been greatly
improved by suggestions from Jim Blinn and Mark Miller. I am grateful to my early users Brenda
Baker, Dottie Luciani, and Paul Tukey for their suggestions and cheerful use of an often shaky and
clumsy system.
The most recent version of PIC has benefited greatly from adventurous use by Jon Bentley and Ravi
Sethi; their comments on this edition of the manual are also much appreciated.
References [ LIST ]
- 22 -
Appendix A: PIC Reference Manual
Pictures
The top-level object in PIC is the ‘‘picture’’:
picture:
.PS optional-width optional-height
element-list
.PE
If optional-width is present, the picture is made that many inches wide, regardless of any dimensions used
internally. The height is scaled in the same proportion unless optional-height is present. If instead the line
is
.PS <f
the file f is inserted in place of the .PS line. If .PF is used instead of .PE, the position after printing is
restored to what it was upon entry.
Elements
An element-list is a list of elements (what else?); the elements are
element:
primitive attribute-list
placename : element
placename : position
var = expr
direction
{ element-list }
[ element-list ]
for var = expr to expr by expr do X anything X
if expr then X anything X else X anything X
copy file
copy thru macro
copy file thru macro
sh X commandline X
print expr
reset optional var-list
troff-command
Elements are separated by newlines or semicolons; a long element may be continued by ending the
line with a backslash. Comments are introduced by a # and terminated by a newline.
Variable names begin with a lower case letter; place names begin with upper case. Place and variable
names retain their values from one picture to the next.
The current position and direction of motion are saved upon entry to a {...} block and restored
upon exit.
Elements within a block enclosed in [...] are treated as a unit; the dimensions are determined by
the extreme points of the contained objects. Names, variables, and direction of motion within a block are
local to that block.
troff-command is any line that begins with a period. Such a line is assumed to make sense in the context where it appears; accordingly, if it doesn’t work, don’t call.
Primitives
The primitive objects are
- 23 -
primitive:
box
circle
ellipse
arc
line
arrow
spline
move
text-list
arrow is a synonym for line ->.
Attributes
An attribute-list is a sequence of zero or more attributes; each attribute consists of a keyword, perhaps followed by a value.
attribute:
h(eigh)t expr
rad(ius) expr
up opt-expr
right opt-expr
from position
at position
by expr, expr
dotted opt-expr
chop opt-expr
invis
text-list
wid(th) expr
diam(eter) expr
down opt-expr
left opt-expr
to position
with corner
then
dashed opt-expr
-> <- <->
same
expr
Missing attributes and values are filled in from defaults. Not all attributes make sense for all primitives;
irrelevant ones are silently ignored. The attribute at causes the geometrical center to be put at the specified
place; with causes the position on the object to be put at the specified place. For lines, splines and arcs,
height and width refer to arrowhead size. A bare expr implies motion in the current direction.
Text
Text is normally an attribute of some primitive; by default it is placed at the geometrical center of the
object. Stand-alone text is also permitted. A text-list is a list of text items; a text item is a quoted string
optionally followed by positioning requests:
text-item:
"..." positioning ...
sprintf("format", expr, ...) positioning ...
positioning:
center ljust rjust above below
If there are multiple text items for some primitive, they are centered vertically except as qualified. Positioning requests apply to each item independently.
Text items can contain TROFF commands for size and font changes, local motions, etc., but make
sure that these are balanced so that the entering state is restored before exiting.
Positions and places
A position is ultimately an x,y coordinate pair, but it may be specified in other ways.
- 24 -
position:
expr, expr
place ± expr, expr
place ± ( expr, expr )
( position, position )
expr [of the way] between position and position
expr < position , position >
( position )
place:
placename optional-corner
corner of placename
nth primitive optional-corner
corner of nth primitive
Here
An optional-corner is one of the eight compass points or the center or the start or end of a primitive.
optional-corner:
.n .e .w .s
corner:
top bot left
.ne
right
.se
.nw
start
.sw
.c
.start
.end
end
Each object in a picture has an ordinal number; nth refers to this.
nth:
nth
nth last
Since barbarisms like 1th and 3th are barbaric, synonyms like 1st and 3st are accepted as well.
Variables
The built-in variables and their default values are:
boxwid 0.75
circlerad 0.25
ellipsewid 0.75
linewid 0.5
movewid 0.5
textwid 0
arrowwid 0.05
dashwid 0.1
scale 1
boxht 0.5
arcrad 0.25
ellipseht 0.5
lineht 0.5
moveht 0.5
textht 0
arrowht 0.1
arrowhead 2
These may be changed at any time, and the new values remain in force from picture to picture until changed
again or reset by a reset statement. Variables changed within [ and ] revert to their previous value upon
exit from the block. Dimensions are divided by scale during output.
Expressions
Expressions in PIC are evaluated in floating point. All numbers representing dimensions are taken to
be in inches.
- 25 -
expr:
expr op expr
- expr
! expr
( expr )
variable
number
place .x
place .y
place .ht
place .wid
place .rad
sin(expr) cos(expr) atan2(expr,expr) log(expr) exp(expr)
sqrt(expr) max(expr,expr) min(expr,expr) int(expr) rand()
op:
+
<
- * / %
<= > >= ==
!=
&&
||
Definitions
The define and undef statements are not part of the grammar.
define:
define name X replacement text X
undef:
undef name
Occurrences of $1, $2, etc., in the replacement text will be replaced by the corresponding arguments if
name is invoked as
name(arg1, arg2, ...)
Non-existent arguments are replaced by null strings. Replacement text may contain newlines. The undef
statement removes the definition of a macro.
The .PS and .PE Macros
This is the default definition of the .PS and .PE macros:
.de
.sp
.in
.ne
..
.de
.in
.sp
..
PS \" start picture; $1 is height, $2 is width, in inches
.3
(\\n(.lu-\\$2)/2u
\\$1
PE \" end of picture
.6
Summary of New Features
The built-in functions sin, cos, atan2, log, exp, sqrt, max, min, int, and rand are available.
The copy statement includes data from a file or that follows immediately:
copy "filename"
copy thru macro
copy "filename" thru macro
The macro may be either the name of a defined macro, or the body of a macro enclosed in some character
not part of the body. If no filename is given, copy copies the input until the next .PE.
- 26 -
The for and if statements provide loops and decision-making:
for var=expr to expr by expr do X anything X
if expr then X anything X else X anything X
The by and else clauses are optional. The expr in an if may use the usual relational operators or the
tests str1 == (or !=) str2 for two quoted strings.
The sh command executes any sequence of commands:
sh X anything X
In all of the above, braces {...} may be used in place of X...X.
Text strings are now first-class citizens: a statement beginning with a sequence of text strings is
treated as an invisible box with the strings positioned at its center. The variable textht and textwid
may be set to any values to control positioning. The height of n such strings is n × textht.
It is possible to convert expressions to formatted strings:
sprintf("format", expr, expr, ...)
is equivalent to a quoted string in any context. Variants of %f and %g are the only sensible format conversions.
Built-in variables may be reset to default values with reset.
The undef statement removes a macro definition.
Arrowheads may be filled with the arrowhead variable; their positioning is improved on arcs.
The width and height of the generated picture may be set independently from the .PS line.
The state of fill or no-fill mode is preserved around a picture.
Input numbers may be expressed in E notation.
Numerous internal changes have been made as well. Any number of objects, text strings, etc., may
be used; the only limit is total available memory. Output is now produced in inches instead of units for a
particular typesetter, so most need for the -T option has gone away.