1
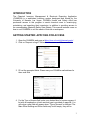
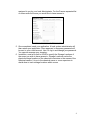
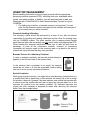
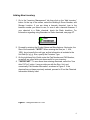
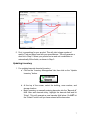
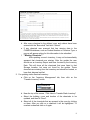
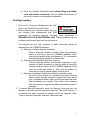
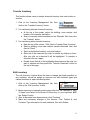
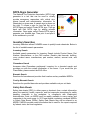
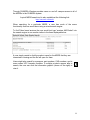
Academic Environmental Health and Safety The Chemical Inventory Management & Electronic Reporting Application (CHIMERA) Manual 1 Chemical Inventory Manual Table of Contents 3 3 Introduction Getting Started: Applying for Access 5 Inventory Management 6 Adding 7 Updating 9 Deleting 11 Transferring 11 Editing 12 13 13 13 CHIMERA Reports NFPA Sign Generator Inventory Search SDS’s 15 Other Functions for Regulators and Users 15 Regulator Functions 16 User Functions 16 17 18 18 19 20 Inventory Equipment Barcoded vs Static Items CHIMERA Access Types Chemical Receiving Process Frequently Asked Questions Contact Information 2 INTRODUCTION The Chemical Inventory Management & Electronic Reporting Application (CHIMERA) is a web-based inventory system developed and hosted by the University of Nevada, Las Vegas. CSUMB’s Health and Safety office has purchased access to this program to assist chemical users in inventorying, maintaining, and searching their inventories, in addition to providing access to the corresponding (Material) Safety Data Sheets. This manual instructs users on how to use CHIMERA to suit the needs of their lab or workspace. GETTING STARTED: APPLYING FOR ACCESS 1. Open the CHIMERA web page at https://rms.unlv.edu/chimera/csumb/ . 2. Click on ‘Request a Login?’ below the Username and Password fields. 3. Fill out the prompted fields. Please use your CSUMB e-mail address for the e-mail field. 4. For the Type of Access field, enter your desired level of system access. A list with an explanation of each account type is provided on page 18. You will notice a new field will appear when “Type of Access” is selected. The Main Office Building and Room fields may be left empty, they will be 3 assigned to you by your local Administrator. For the Comma-separated list of rooms enter the rooms you would like to have access to. 5. Once completed, send your application. A local system administrator will then review your application. Once approved, a temporary password will be sent to your e-mail account. Use it to log in and change your password. You can now manage your inventory. 6. In addition, send an e-mail to AEHS to specify the Storage Locations of the rooms you wish to have access to. Storage Locations can be the physical storage locations of the chemical inventories or the names of the chemical owners. It is up to the chemical owner or room supervisor to decide how to track storage locations within rooms. 4 INVENTORY MANAGEMENT Before handling chemicals, be sure to equip yourself with the appropriate personal protective equipment (PPE), including a lab coat, disposable nitrile gloves, and safety goggles. In addition, you will need barcodes to label your chemicals with. Contact AEHS to obtain these barcodes. Proceed to log into CHIMERA. For adding new inventory, a barcode scanner is not required. You can enter the first Barcode number manually and the software will increment it by one each time you add a chemical. Chemical Handling & Reading The inventory routine should be performed by a team of two, with one person responsible for handling and reading chemicals and the other for entering them into the CHIMERA system. The team member who is reading should handle each chemical with care and always use two hands while using appropriate PPE. When reading the chemical information, make sure to take as much time as necessary to read all the information correctly. Incorrect or incomplete information will create a need for the inventory team to go back to the area of interest and verify the data that they have provided. Barcode Process for Laboratory Chemical In order to maintain continuity, the barcode should always be applied on the left-hand side of the product label. In the instance that a container is too small, the barcode should be cut down to fit onto an acceptable location taking care not to cover up any important information. Sealed Containers While going through inventory, one might find a new laboratory chemical that is in a sealed metal can or plastic bag. In this instance, the teams' job is still to assign the product a barcode. However, the team member must attach the barcode with a second note that notifies the end user to apply the barcode when he or she removes the product from the sealed container. No duplicate barcodes are issued; the outer container is disposed as waste after removing the chemical bottle. Note the example below: 5 Adding New Inventory 1. Go to the “Inventory Management” tab then click on the “Add Inventory” button. At the top of the screen, select the Building & Room Number, and Storage Location. If you are doing a barcode chemical, type in the barcode number you intend to use, or scan it with a barcode scanner. If your chemical is a Static chemical, check the Static checkbox. For information regarding using Barcodes vs Static chemicals, see page 17. 2. Proceed by entering the Product Name and Manufacturer. Next enter, the Size of the container. **NOTE** When entering the Size (ex. 1, .454, 1000), do not specify the unit type, as that information is included in the Unit field (lb, kg, g). Also, specify the Container Type. 3. On the right-hand list of fields, enter the Part Number and CAS Number, as well as any other fields you deem useful for your inventory. 4. **IMPORTANT** To save some time entering chemicals, select the “Use Auto Fill Tool” option. It may provide you with the Size, Unit, and occasionally Part Number information, as shown in Figure 1. If the chemical has not been previously entered, proceed to fill out the Chemical Information fields by hand. Figure 1. Using the Auto-Fill Tool. 6 5. First, try searching for your product. This will yield a large number of results. Find and select one with your manufacturer. This will generate a short list in Step 2. Select your product’s size and unit combination to automatically fill the fields, as shown in Step 3. Updating Inventory 1. For updating barcode chemical inventory: a. Click on the “Inventory Management’ tab, then click on the “Update Inventory” button. b. At the top of the screen, select the building, room number, and storage location. c. Begin scanning or manually entering barcodes into the “Barcode #” field. After each barcode entry, highlight the barcode field and hit “Enter”. This will generate a new barcode field below. Do NOT hit the “Submit” button until you have entered all the barcodes. 7 d. After every chemical in the defined room and cabinet have been entered into the “Barcode #” field click “Submit”. e. If any chemical was scanned that has missing data in the CHIMERA database, such as Product Number or Container Type, a pop-up will appear asking for this information to be submitted. f. **Missing Chemicals** After updating a room’s inventory, it may not be immediately apparent that chemicals are missing. After the update the user should run an Inventory Report and have it sorted by the Inventory Date. This will show all the chemicals that were listed in that Storage Location, but were not found for the update. These chemicals are missing from the inventory and should be located, or have their disposal verified. 2. For updating static chemical inventory: a. Click on the “Inventory Management’ tab, then click on the “Transfer Inventory” button. b. Near the top of the screen, “Click Here to Transfer Static Inventory” c. Select the building, room and location of the chemicals to be updated, and then hit “Send”. d. Select all of the chemicals that are present in the room by clicking on them. After you click on a chemical it will be highlighted. To unselect a chemical click on it again. 8 e. Press the Transfer Chemicals button without filling in building, room and location information. This will update the inventory of the room to contain only the selected chemicals. Deleting Inventory 1. Click on the “Inventory Management’ tab, then click on the “Remove Inventory” button. 2. Before removing any chemical, ensure that you are following your departmental and EHS procedures for chemical disposal. Following these procedures is REQUIRED BY STATE AND FEDERAL LAW. These procedures vary by container and chemical type, and can be found at: The following are the only scenarios in which chemicals should be removed from the CHIMERA database: a. Disposing of empty chemical containers: When a chemical container is empty, follow the procedures below for removing it from the CHIMERA database. Then, remove the barcode sticker and dispose of it in accordance with departmental procedures and state laws. b. Removing lost chemical bottles from inventory: Find the barcode number (for barcode chemicals) or part number (for static chemicals) for the lost bottle by using the ‘Inventory Report’ function of the CHIMERA database for the room the bottle was stored in. Then use the number to remove the inventory as described in steps 5 and 6. c. Disposing of partially full chemical bottles as hazardous waste: As soon as the contents of a container have been declared waste, ensure that the chemical container has been affixed with a Hazardous Waste Label, and that the label has been filled completely and correctly. Then, remove the container from the inventory using the procedures described in steps 3 through 6. 3. To remove Barcode chemicals, select the ‘Barcode’ field and scan the barcode or manually type the number into the field. Then click ‘Remove’. If a chemical has been removed by mistake, select the chemical under ‘Today’s Inventory Removals’ and click ‘Undo Removals’. 9 4. To remove Static chemicals, first ‘Click Here to Delete Static Chemicals’ at the top of the page. 5. Then, select the building and room where the Static chemicals are located from the drop down menu. The location may then be further refined by selecting from the ‘Storage Location’ drop-down menu. 6. Click to select the chemicals to be removed from the location – selected chemicals will remain highlighted. After selecting the chemicals to be removed, click ‘Delete Chemicals’. 10 Transfer Inventory This function allows users to transfer chemical inventory from one location to another. 1. Click on the “Inventory Management’ tab, then click on the “Transfer Inventory” button. 2. For transferring barcode chemical inventory: a. At the top of the screen, select the building, room number, and location of the transfer destination. b. Scan or manually enter barcodes into the “Barcode” field, then click the “Transfer” button. 3. For transferring static chemical inventory: a. Near the top of the screen, “Click Here to Transfer Static Inventory” b. Select a building, room and location transfer chemicals from, and then hit “Send”. c. Select a destination building, room and location. d. Select all of the chemicals you wish to transfer by clicking on them. After you click on a chemical it will be highlighted. To unselect a chemical click on it again. e. Double check that all of the highlighted chemicals are the ones you wish to transfer and then press the “Transfer Chemicals” button at the top of the page. Edit Inventory The edit inventory function allows the user to change the listed quantities on any container, as well as assign an optional cost, edit container types and cabinet locations for each individual product. 1. Click on the “Inventory Management’ tab, then click on the “Edit Inventory” button. 2. Begin scanning or manually entering barcodes into the “Barcode #” field. To open more fields, hit the Enter or Return key on your keyboard, NOT the “Submit” button. 3. After all barcodes have been entered, click “Continue”. 4. Make any necessary changes to the Amount, Cost, Cabinet #, and Container Type information for each chemical, then click Submit. 11 CHIMERA REPORTS CHIMERA provides users access to crucial chemical inventory information, giving quick access to reports, inventory management tools, relevant first responder information, and (material) safety data sheets. Various report types are available to meet the needs of federal, state, and local regulators, as well as the faculty and staff. The CHIMERA development team can also be asked to create new report types. Contact the EHS office if you would like additional information. Available report types are listed below. Inventory Report The most commonly used report provides a chemical inventory at the specified location along with manufacturer and part information, among others. This report can be sorted by any field type (chemical name, receiving date, state, etc.). This report can also be exported to Excel or PDF’s for paper records. Hazard Class Report The Hazard Report gives an inventory along with Health, Fire, and Reactivity hazard information. Cost Report The Cost Report provides an inventory with the per-unit and total cost for chemicals. Cost may be tracked by request of the user in charge of your laboratory or stockroom inventory. Cost information can also be added to an inventory, in part or in whole, at any time using the Edit Inventory feature. P-Code Report The P-Code refers to a hazardous waste designation for a regulatory list of acutely toxic chemicals. This report provides the total quantity of P-Code chemicals grouped and totaled by the Chemical Abstract Service (CAS) number. Non-Scanned Products Report Given a date, this report provides an inventory of barcodes entered before the specified date. IARC Report The International Agency for Research on Cancer (IARC) report provides an inventory containing chemicals known or suspected to be a cancer hazard for the specified location. See the following link for more information. http://monographs.iarc.fr/ENG/Classification/ 12 NFPA Signs Generator The National Fire Protection Association (NFPA) sign generator is a tool that can be used to visually provide emergency responders with critical at-aglance hazard and administration information for chemicals in a given area. A sample sign is shown on the right. To create a sign for your lab first go to NFPA Signs and select Create NFPA sign. Then go back and Edit NFPA sign by adding relevant information. Once again, select Create NFPA sign to generate your finished sign. Then print it and post it at the entrance to your lab. Inventory Searches Inventory Searches allows CHIMERA users to quickly locate chemicals. Below is the list of available search parameters: Inventory Search Available search parameters for Inventory Search include Product Name, Part Number, Manufacturer, or the CAS number. Results yield barcode, building, room, product name, manufacturer, part number, amount, amount units, and location. Chemshare Search Accesses other Chemshare participants’ inventory for a chemical search and provides you with the contact information of the owner. If you would like join ChemShare, please contact the EHS office. Barcode Search Searches for barcodes and provides their location and any available MSDS’s. Cost by Barcode Search Searches for specified barcodes and provides available cost per unit data. Safety Data Sheets Safety data sheets (SDS), in either paper or electronic form, contain information about the reactivity, health, exposure, and first responder procedures for safely handling chemicals in the workplace. In compliance with Washington Administrative Code, an MSDS must be readily available to every worker and researcher in the work space. In 2013 new federal regulations renamed MSDSs to Safety Data Sheets (SDSs). Safety Data Sheets may still be referred to as MSDS’s. MSDSs provide crucial information that is used for the reports required by federal, state, and local regulators. 13 Through CHIMERA, Western provides users on- and off- campus access to all of the MSDSs in the CHIMERA system. A quick MSDS search tool is also available at the following link: http://rms.unlv.edu/msds/ When searching for a particular MSDS, a user has much of the same functionality that one would have using a normal search engine. To find Fisher brand acetone the user would just type “acetone AND fisher” into the search engine to see results similar to the ones displayed below: A user simply needs to click the product name for the MSDS that they are interested in viewing and the file will open for them. Users might also search for synonyms, part numbers, CAS numbers, and in some cases UPC barcode numbers. If multiple products appear after a search, the user can click the information graphic (shown on the right) to view it. 14 Other Functions for Regulators and Users In addition to the main functions, a number of additional utilities are available to assist CHIMERA users. Regulator Functions Building Floor Plans For regulators and administrators, the building floor plans function contains quick access to available maps for every building. Update RPD/RAM Rooms & Update Biohazard Rooms Administrators or regulators who oversee radioactive and bio-hazardous materials have the capability to update rooms containing those materials, as well as label the corresponding NFPA signs. Hazard Codes The hazard codes function provides regulators a list of the specific International Fire Code (IFC) hazard abbreviations and their corresponding full names. Chemical Room Totals The Chemical Room Totals tool provides regulators and administrators with the ability to list a building’s current inventory by total products, unique static chemicals, and/or total barcode counts. This information provides a useful overview of the activity within an entire building at once. User Functions Contact Support Contact Support to give feedback, report bugs or unexpected behavior, and to resolve account issues. In addition, users may also contact the EHS office. Hazard Class Systems Hazard Class Systems provides an overview of distinctions between the GHS, NFPA, and HMIS hazard categorization systems. Chemical Storage Chemical Storage provides a set of guidelines and corresponding codes for safe storage of hazardous and reactive chemicals. 15 NFPA Hazard Codes The NFPA Hazard Codes provide regulators a list of specific hazard abbreviations, their corresponding names, and threat level. Also see Chemical Storage. NFPA Classifications The NFPA Classifications shows chemical dangers corresponding to the assigned numbers on the NFPA hazard diamond. INVENTORY EQUIPMENT Inventory Equipment covers all the items necessary to quickly and efficiently inventory chemicals in a safe manner. Personal Protective Equipment As a safety-oriented program, it is crucial to wear the appropriate personal protective equipment (PPE) while performing a chemical inventory. Not only will it protect those who are taking the inventory, but it also sets an example for faculty, staff, and students throughout campus. Minimum required PPE for an inventory includes: a lab coat, disposable nitrile gloves, and safety goggles. Laptop/Tablet Laptops are the core of the inventory program. Each laptop must have internet access at all times during the chemical inventory process. Barcodes The barcodes that are used for all laboratory chemicals are specially made with a chemical-resistant polyvinyl compound. These barcodes are formatted to provide a unique number for each lab chemical inventoried. This method is used to help facilitate accurate chemical tracking. Barcode Scanning Equipment You can use any laser-based barcode scanner to aid you in barcode extraction during the inventorying process. Compatible scanners include the Motorola Solution’s Symbol LS4208. CSUMB is currently using Motorola LS4208 scanners and a limited amount of Socket Mobile Bluetooth scanners. There are also other equipment and software combinations you can explore, such as using a Mobile phone and Bluetooth technology if a dedicated scanner isn’t convenient. 16 The Differences Between Barcoded and Static Chemicals CHIMERA has two separate chemical categorizations that are used during the inventory process: barcode and static. Users choose whether to enter a chemical/chemical container as either barcode or static as described below. Barcode Chemicals Users enter a chemical container as a barcode chemical if they want to track that individual chemical container until it leaves the University. Generally these are laboratory chemicals that are going to be around for quite a while (a year or more). If the user thinks that the effort to track a chemical container with a barcode is useful, it is a barcode chemical. The user determines that the effort is worthwhile to place a barcode initially and enter the barcode into the CHIMERA system plus remove the barcode from both the container and the CHIMERA system when the container is empty or to be disposed. This type of chemical container is a barcode chemical. Barcode chemicals can be scanned during an annual inventory of chemicals. Static Chemicals A static chemical is the name given to chemicals for which the user does not want to track an individual container. These static chemical containers do not get barcodes on individual bottles, cylinders or drums. The chemical name and information is entered and the chemical is tied to an MSDS. Static chemicals include the following: • Products that will be totally used up at one time and replaced, • Some gas and other cylinders that are periodically replaced when empty or spent (for example: liquid nitrogen), • Non-laboratory chemicals (for example, hand soap, lab glassware cleaner, latex paints), • Laboratory chemicals, like solvents, where containers are frequently reordered to keep the chemical in a constant supply in a particular room or area. For example, if a department knows that it uses approximately four liters of acetone a month in a lab, it is easier to choose static status for the acetone. This selection keeps an MSDS on file for the department provided that manufacturer and part/lot numbers are the same. Secondly, it saves personnel time by bypassing the barcoding step and removing each barcoded bottle of acetone from inventory when it is used up. If you’re unsure of which designation to use, then use barcodes. This will make the chemicals easier to track. 17 • Departments may wish to consider other factors, such as financial tracking of particular chemicals. Please discuss this option further with your stockroom manager to ensure that you are selecting the best choice for your department. CHIMERA ACCESS TYPES Staff Access Staff Access is intended for use by stockroom managers; hazardous waste disposal personnel; and by faculty, staff or student employees who have been tasked with maintaining a chemical inventory. These users are able to add, remove, edit, and transfer chemicals, as well as search for and generate reports for authorized locations. Custodial/Facilities Access Custodial and Facilities accounts provide read-only access to CHIMERA. In general, it is intended for use by custodial staff and student researchers. These users may view inventories and generate reports for authorized locations, but may not alter inventories or use the search function. ChemShare Participants ChemShare users allow their chemical inventories to be viewed by other ChemShare participants. It is designed for faculty use in order to quickly search and find chemicals they may need from other research groups. This provides a way for chemical inventories to use up excess stock and for users to get needed chemicals more rapidly and cheaply. Regulatory Access Regulatory Access is intended to be used by safety compliance inspectors, emergency responders, and department heads. It allows the user to run reports for any on-campus location to assess content and hazards of chemical inventories. THE CHEMICAL RECEIVING PROCESS For its own chemical receiving process, each department should write a set of instructions in this section of the manual. The department’s members can then follow these instructions and comply with the department’s procedures. 18 Frequently Asked Questions Q: When should a chemical be given a Static designation instead of a Barcode one? A: A chemical should be labeled as Static when it is expected to be used up within one year, and then replaced with a new bottle. For example, this typically includes soaps, paints, and solvents. Q: “I am inventorying a laboratory where a researcher has made a solution from two different barcoded chemicals. Should I apply a brand new barcode to the solution?” A: No. Secondary solutions are typically generated and used within a short timeframe. Their hazards were already accounted for when the stock chemicals were entered. Possible chemical interactions are ignored. Q: “I have another room to add to my access list. How do I do that?” A: Send your request to AEH&S. Q: “I have a barcoded chemical that’s been used up. Can I re-use that barcode for a different bottle?” A: No. Each barcodes is one-time use and are permanently associated with a given chemical bottle. Q: “Do CHIMERA inventories accurately represent the up-to-date contents of my workshop or lab?” A: A CHIMERA inventory report accurately shows all the chemicals belonging to you at the time they were catalogued. The level of accuracy therefore depends on the vigilance of the personnel in charge of adding, transferring, updating, and removing chemicals in a prompt and timely manner. Q:”What chemicals should be entered into CHIMERA?” A: All items containing hazardous chemicals should be entered into CHIMERA. This includes cleaning products and biological enzymes. Q:”My inventory contains a wide variety of chemical products that have a high turnover rate. Barcoding them is not convenient, but they have UPC barcodes. Can I use the UPC barcodes to help track my Static inventory?” A: Yes. Although Chimera doesn’t have access to the manufacturer data, the UPC barcodes can still be scanned in place of CHIMERA barcodes to search your inventory. When adding the new Static items into your inventory, scan the item’s barcode into the Part # field to enable future UPC lookups. 19 Contact Information Website: http://aehs.csumb.edu E-mail: [email protected] Phone: (831) 582-4630 20