1
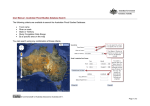
POLARIS INVENTORY MANAGER EASY AS 1-2-3 User Manual Provided to member libraries courtesy of: Copyright Yellowhead Regional Library 2011 Provided by Yellowhead Regional Library Page 1 INTRODUCTION: What YOU Need to Know About PIM (Polaris Inventory Manager) What will you need? All required equipment will be provided to your library by YRL. You should receive a laptop equipped with PIM, a USB stick and a wireless barcode scanner. You can do the inventory visually (by checking boxes rather than scanning) but this is not recommended. You will need a network connection to update the inventory data into Polaris but not while you take the inventory. What will PIM do? PIM will identify items that are misshelved, have a status other than “IN”, or satisfy hold requests. You can also mark items for weeding. You CAN stop or resume your session at any time. You can close and re-open PIM without losing data. When you are finished a section, PIM updates to the Polaris database when prompted. (This is when you need the network connection) A PDF report is automatically generated along with an optional .txt file (you might want a .txt file if you want to upload the data into excel at a later date). You set the parameters for the reports and PIM in general to ensure you are only getting information that matters to YOU. PIM can create record sets in Polaris if you choose. Additional standard/custom reports can be run in the Polaris staff client after. PIM also has a cart feature. Before You Begin… Are your shelves in good order? Are items consistently catalogued? You should ensure that collection codes and shelf locations are consistent… for example; J and Juv may have been used interchangeably over the years… you may want to create Polaris record sets and do some bulk changes to make one collection. A good place to start would be to run a report of current collection codes and compare with the sections in your library. YRL can help you with this if needed. Provided by Yellowhead Regional Library Page 2 EASY AS 1-2-3 Step 1 LOAD Double click on the Polaris Inventory Manager (PIM) Icon to open the PIM up. From the File Menu, Choose LOAD. Provided by Yellowhead Regional Library Page 3 As shown below, you choose your branch at the top… then your available shelf locations and collections will populate. There are 3 ways to LOAD data from Polaris… choose one. 1. By Record Set… You may use this feature for items that may not necessarily follow regular Call # formats… scan them into a record set and inventory them that way. It is also a good way to polish off your inventory if there are random items left over once the collections have been completed. 2. By Shelf Collection… You can also choose to exclude selected shelf locations For example: If you have a travel section somewhere in your library not interfiled with your non-fiction… you could inventory the NF excluding the Travel shelf location. Record Sets and Bulk changes are a good way to set shelf locations. Ask YRL for assistance if required. 3. By Collection… You can choose from a list of collections that are specific to your library. Provided by Yellowhead Regional Library Page 4 Notes: You may select more than one collection or shelf location at a time by highlighting it and moving them all to the LOAD field. It is important to ensure collection codes are correct. For example: When I started at my library, we had 67 collection codes, now we have 30. This can be corrected by using the Polaris Record Sets and Bulk change features. Click LOAD on the bottom right hand corner to gather the data from Polaris. A pop up will appear saying Call Range Loaded. Click OK. Select Close from the File Menu. Provided by Yellowhead Regional Library Page 5 Now you are back to the PIM Main Window (below). Step 2 SCAN Choose Scan from the File Menu. Provided by Yellowhead Regional Library Page 6 This is where you will see the list of titles that you just loaded. This is called the Process Items Window/Inventory List. **Before you start scanning the first thing you will want to do is change the preferences so that if your items are not in perfect shelving order a pop up will not appear after each item you scan. To do this go to File>Preferences.** Under Alerts checkmark Misshelved then press OK. Provided by Yellowhead Regional Library Page 7 Scroll to the bottom of the list of items and click on the box marked done for the last item on your list. **You will need to keep track of this item and confirm that you do in fact have it.** A pop up will appear asking “You have skipped a number of items? Is this item misshelved?” Click No Provided by Yellowhead Regional Library Page 8 Click on File>Preferences again. Now you will uncheck Misshelved and press OK. Provided by Yellowhead Regional Library Page 9 Now – Scan your items in (or check them off using the check boxes – not recommended). Notes: If a barcode does not scan properly, you can key in a barcode. Then select Process. The list jumps to the position of the keyed item and the Done box is checked for that item. If you want to mark items for weeding, select the appropriate check box for that item. These items can be listed on a report when you upload your inventory data into the Polaris database, and you can create a record set of the items at that time. Provided by Yellowhead Regional Library Page 10 The following messages may appear in a popup while scanning items (the computer will make a different sounding beep if one of these messages comes up): Item not found in the current call number range – Select OK on the message box and set the item aside. When you update the Polaris database, a .txt file that lists the out-of-range barcodes is automatically created. This means the item currently has another collection code or shelf location listed for it and will need to be corrected. You can view and update these items in the Polaris Staff Client later. Item’s status is not IN – For example: the item may be checked out or marked LOST. Select OK on the message box and set the item aside. These items should be checked in using circulations functions in the Polaris Staff Client later. The status of this item is [status] – Select OK on the message box and set the item aside for appropriate processing later. Item fills a hold request – Select OK on the message box and set the items aside. Check them into the Polaris Staff Client later to transfer the item for ILL. Select File, Close, or select X in the upper right hand corner of the Process Items window when you are finished scanning the section for the day or if you are finished the section entirely. Provided by Yellowhead Regional Library Page 11 The main window appears. You can resume the inventory at any time. To resume the inventory you will just go back to File>Scan and you will see the listing of items with the items already scanned checked off. When you have finished the set of items, you are ready for Step 3 Step 3 UPDATE THE DATABASE When you update the Polaris database with your inventory data, the inventory date for the relevant items is updated and an Inventory Statistics report is automatically generated as a .pdf file. The report contains information such as the update date and time, the date and time the item information was loaded, branch and call number range or record set, and totals. ** If you have not attached the USB stick that came with the PIM attach it now** To update first make sure you have a network connection. Next click on File>Update. Provided by Yellowhead Regional Library Page 12 You can select any or all of the following sub-reports to include in the Inventory Statistics report: Misshelved sub-report Out-of-range sub-report Items Not In sub-report Expected Items Not Processed sub-report Weeding sub-report Most commonly you will uncheck the Misshelved subreport and the Weeding subreport and leave the middle three checked. (If you marked off items during the scan for weeding you will want to leave the Weeding subreport checked. Next you will click on Update. Provided by Yellowhead Regional Library Page 13 A screen may pop up stating “Would you like to copy the OutOfRange.txt file to another location?” Click on Yes. A new screen will pop up letting you choose where you would like to save the .txt file. Locate the USB by double clicking on My Computer on the left. You will see the USB key (it may be called Kingston or YRL2010). Double click on it so that you see the name of the USB key in the Save in: section. For the File name: Add your library code and collection name or collection code to the beginning of the file name OutOfRange. Click on Save. Provided by Yellowhead Regional Library Page 14 If you checked off items for a weed a pop up will appear asking if you would like to have a record set created containing items flagged for weeding. Click on Yes. A new pop up will appear letting you add in a name for the record set. Again add your library code and collection name or collection code to the beginning before the rest of the information listed. Click on OK. Next a pop up will come up asking if you would like to have a record set created of expected items not processed. Click on Yes. A new pop up will appear letting you add in a name for the record set. Again add your library code and collection name or collection code to the beginning before the rest of the information listed. Click on OK. Provided by Yellowhead Regional Library Page 15 A new window will appear of a PDF document of the Inventory Statistics Report. This report gives you detailed information about your collection. Click on the Save icon. Save the PDF file on the USB key like you did with the OutOfRange.txt file. Include your library code and collection name or collection code to the beginning before the rest of the information listed. Provided by Yellowhead Regional Library Page 16 You can now close the PDF window. Once the update is finished you will see some information appearing. Make sure before you press OK that you see that it says: Updating Polaris Updating Complete Once you see this you can press OK. You can now load the next collection to inventory or if you are finished you can exit PIM. To exit select File, Exit to quit PIM. Provided by Yellowhead Regional Library Page 17 **When you are finished inventorying all of the collections you will need to take the USB key and load all of the files onto your own computer. Once this is done you will need to update the inventory date of all of the Out-of-Range Items.** How to update the inventory date of the Out-of-Range Items 1. Log into the Polaris Staff Client on your computer that now has all of the files from the USB key loaded onto it. 2. Select Circulation, Check In 3. Select View, Update Inventory Date Provided by Yellowhead Regional Library Page 18 4. When the below screen appears press CTRL+ALT+I (An explorer window will open.) 5. Locate where you put all of the files and select the first OutofRange.txt file. Next click on Open. Provided by Yellowhead Regional Library Page 19 6. All of the Out of Range items will be inventoried. A number of pop ups may appear. You can just keep pressing OK. For each item, the Comments column lists whether the inventory date was updated successfully and any other pertinent information. Repeat steps 4 and 5 for every single Out of Range file that you have. CONGRATULATIONS! YOU HAVE NOW COMPLETED THE INVENTORY! WELCOME TO POLARIS INVENTORY MANAGER! Easy as 1-2-3 Provided by Yellowhead Regional Library Page 20