1
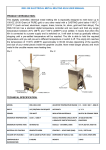
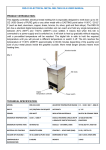
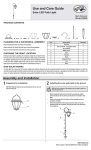
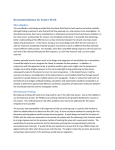
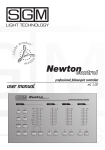
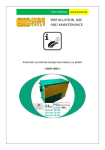
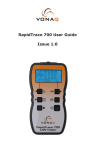
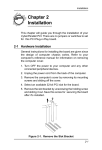
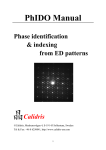
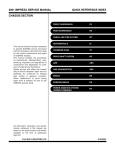
1 R14-L ELECTRICAL MUFFLE KILN USER MANUAL PRODUCT INTRODUCTION: This digitally controlled, electrical muffle kiln is especially designed to heat up to 950 C / 1772 F and work with most popular materials and processes such as: annealing metals, enamelling, metal clays firing, glass fusing etc. This R14-L kiln has a standard digital temperature controller that can reach any single temperature between a room temperature and 950°C (1772°F) once settled. It will hold the reached temperature until you will pre-set a different temperature or switch the kiln off manually. This model of kiln is supplied with two ventilation holes with a shutters on the door to help you monitor the heating objects within during the heating process and ventilate the chamber. This kiln reaches the maximum possible temperature of 950°C (1772°F) approximately in one hour depending of the quantity and size of the heating objects inside the chamber. This kiln has also a toggle clamp on the door which can be used as a door’s handle and, at same time, as a latch that allows you to open/close the door by one hand. The new type of digital temperature controller is useful as well because it will shows you at same time the current temperature inside the chamber (on top line) and the pre-settled temperature on bottom line simultaneously for your convenience. The stainless steel rings on the toggle clamp and both ventilation hole’s shutters will help you safety catch the clamp/shutters by gloves on top temperatures. This kiln also has a secure switch under the door that, for your safety, will disconnect a heating element/s inside the chamber when the door opens or when it isn’t closed properly. Pic:1 Pic: 2 MODEL: R14-L-950C-2016 ADJUSTED TEMPERATURE RANGE 0 C - 950 C (32 F - 1772 F) INPUT: 115/220/240V ON REQUEST ACCURACY: +/- 1 % POWER: 850 WATT INSULATION MATERIALS: MUFFLE & CERAMIC FIBER MAXIMUM TEMPERATURE: 950 C / 1772 F CRUCIBLE DIMENSIONS (MM): 175(W)x140x175(H) (INCH): 7”(W)x5.1/2”x7”(H) ESTIMATED HEATING TIME TO 1000 C: 60 MINUTES KILN DIMENSIONS WITH DOOR’S HANDLE (MM/INCH): 265(W)x300x350(H) MATERIAL OF CHAMBER: MUFFLE (no asbestos) SECURE SWITCH UNDER DOOR Yes VENTILATION HOLE: X2 BOTTOM TILE PLATE: 1 CONTINUOUSLY WORKINGTIME: 8 HOURS WEIGHT: 5.2 Kg 10.1/2”(W)x12”x14”(H) T S 2 PREPAIRING FOR WORK and FIRST STEPS: - Remove the kiln from its original box/s. - Put this kiln on a heat-resistant work-top such as sheet of metal or a ceramic tile. INFO - Originally brand new kiln’s controller is already settled at 950° C (1772 F) on factory. If the required temperature is different you can pre-set it yourself at any time in the future. The information is provided on the next page in step-by-step instruction: how to pre-set a required temperature. At this moment please still keep the factory setting of 950 C (1772 F). INFO - When used for the first time take out the top ventilation plug, close quartz window by moving the window’s shutter anti-clockwise by its ring and heat up the kiln for approximately 2-3 minutes to 200°C-300°C(392 F-572 F) to evaporate water, oil and other materials from the chamber and the inside of the kiln (light smoke can be seen in few minutes). Otherwise there is a risk of causing small cracks to the chamber. Let the kiln cool down in fully before starting your work. If this kiln will be used less than once per month please repeat this process each time before use. Now you can connect your kiln to a power source and start your work. For this: Before connecting it to a power source please check that the kiln’s power switch on front panel is turned ‘OFF’ and all packing materials are removed from the chamber. Open the kiln’s door by pooling a red-handle toggle clamp on right side of kiln (See Pic 2) by stainless steel ring. If you need it - insert inside the chamber bottom tile-plate or/and shelves. Place inside the chamber your firing object/s. To avoid an electrical shock please make sure that these object/s or accessories inside the chamber accidentally do not contact heating element on back of the chamber when the door will be closed. Now close the door by its toggle clamp. Before close the door please ensure that the secure switch on right side of kiln under the door will be properly pressed down by the door until “Click” and is NOT smashed between the door and body of kiln. Please do NOT unbend or disconnect this switch by any purpose - it can cause an electrical shock later if you will accidentally contact the heating element by, for example, hand or by a metal tweezers. Remember: this is a secure switch that was installed on your kiln by a reason. Close all ventilation shutters on the door by its stainless steel rings moving them anticlockwise: it will help you to avoid heat leaking through the holes to reach a required temperature inside the chamber quicker and cheaper. Open this ventilation holes only when checking firing objects or for ventilation purpose. Now press on Power switch (Pic 1) - to pre-set required temperature and start your work. SAFETY AND USEFUL TIPS FOR BEGINNERS: Always work with heat-resistant gloves because this kiln is very compact and gets hot whilst working on high temperatures. Always place this kiln on a heat resistant work-top. A masonry or concrete floor is recommended, but other protective material like metal or ceramic tiles can be used as well. Do not open ventilation holes too often. Each time you open them temperature inside the chamber drops and it will require more time to re-heat. If kiln is not in use please disconnect it from a power supply. Keep away from all inflammable materials and from any heating devises. Never leave it in work unattended. Keep out of reach of children! 3 WORKING WITH TEMPERATURE CONTROLLER: Pic: 3 Digital temperature controller: (Shows temperatures only in C) 1. Setting/Confirmation button. To be used for the setup of controller’s parameters. 2. “Arrow Left” - segment’s selector (any one from four segments). 3. “Arrow Down” - value decrement (Use to setup a required temperature). 4. “Arrow Up” - value increment (Use to setup a required temperature). NOTE: You can find more information about available controller’s settings and functions in an instruction manual provided, but we do not recommend that you change the manufacture’s setting yourself as it can cause the loss of factory settings that will require re-setting and/or re-calibration in future. HOW TO PRE-SET A REQUIRED TEMPERATURE: 1. Connect your furnace to a power supply. 2. Open kiln’s door (to avoid starting a heating process) and switch it ‘On’. 3. Short-press button ‘1’ (“Set”) - the bottom line of display will starts twinkle. 4. Use buttons 3 and 4 to change temperature on the bottom line of display (up or down). Use button 2 (Arrow Left) to change segments for changing digits on display during it is twinkle (30 seconds). 5. When required temperature is pre-settled just release all button and wait about 30 seconds. During that time the controller will remember new setting and return back to show you on the top line a real temperature inside the chamber. Or short-press button 1 (“Set”) again if you do not want to wait. 6. Now you can close the door and start heating up your objects inside the kiln to the required temperature. 7. Please note that the factory’s setting of this controller is for 950 C (1772 F). Physically you can re-set this controller for higher temperatures, but for avoiding heating element’s burning out - it still will heating up only to 950 C (1772 F) maximum. 4 TEMPERATURE STABILISATION PROCESS: Pic 4: Sample of stabilisation process: Temperature process for require time the required control chart 950 C: stabilisation process is normal temperatures below 200 C and for soak required temperatures on level. Please see the temperature sample of stabilisation process on DELIVERY SPECIFICATION: R14-L-950C-2016 electrical muffle kiln; One bottom tile-plate; User manual and useful information; One year manufacturer warranty. DANGER: This is an electrical, high temperature equipment: always follow all health and safety rules and regulations for this equipment in your country. MADE IN UK