1
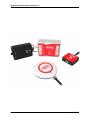
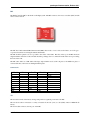
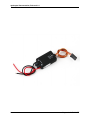
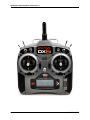
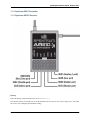
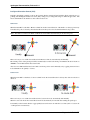
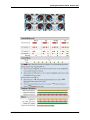
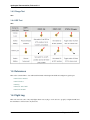
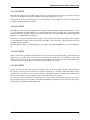
quadcopter Documentation
Release 0.0.1
Chris Laws
November 30, 2015
Contents
1
NAZA M LITE
1.1 Hardware .
1.2 Software .
1.3 Transmitter
1.4 Flight Test
1.5 References
1.6 Flight Log
.
.
.
.
.
.
.
.
.
.
.
.
.
.
.
.
.
.
.
.
.
.
.
.
.
.
.
.
.
.
.
.
.
.
.
.
.
.
.
.
.
.
.
.
.
.
.
.
.
.
.
.
.
.
.
.
.
.
.
.
.
.
.
.
.
.
.
.
.
.
.
.
.
.
.
.
.
.
.
.
.
.
.
.
.
.
.
.
.
.
.
.
.
.
.
.
.
.
.
.
.
.
.
.
.
.
.
.
.
.
.
.
.
.
.
.
.
.
.
.
.
.
.
.
.
.
.
.
.
.
.
.
.
.
.
.
.
.
.
.
.
.
.
.
.
.
.
.
.
.
.
.
.
.
.
.
.
.
.
.
.
.
.
.
.
.
.
.
.
.
.
.
.
.
.
.
.
.
.
.
.
.
.
.
.
.
.
.
.
.
.
.
.
.
.
.
.
.
.
.
.
.
.
.
.
.
.
.
.
.
.
.
.
.
.
.
.
.
.
.
.
.
.
.
.
.
.
.
.
.
.
.
.
.
.
.
.
.
.
.
.
.
.
.
.
.
.
.
.
.
.
.
.
.
.
.
.
.
.
.
.
.
.
.
.
.
.
.
.
.
.
.
.
.
.
.
.
.
.
.
.
.
.
.
.
.
.
.
3
3
10
13
16
18
18
i
ii
quadcopter Documentation, Release 0.0.1
I received a DJI Flame Wheel F450 multi-rotor drone along with a Spektrum DX6i transmitter as a birthday gift. The
drone came un-assembled as my wife new that I would enjoy building it up from scratch and learning all about it.
I don’t personally know anyone who has built up a drone so I haven’t got anyone to ask about their setup. Also, from a
brief search of the internet it looks like there are a few different ways to set up the same transmitter and flight controller
into a working drone.
There is a lot to learn and a lot to set up so I’m using this project to hold my working notes as I build the quadcopter
and configure the transmitter and associated main controller (MC) software. This will help me remember how to do it
all again if I need to and may even help someone else embarking on a similar journey.
The MC I’m using is a DJI NAZA-M LITE. It’s possible that in future I may get another flight controller so I’ll group
all of the current information under the NAZA-M LITE section.
Contents
1
quadcopter Documentation, Release 0.0.1
2
Contents
CHAPTER 1
NAZA M LITE
This section covers the installation and configuration of the NAZA M LITE hardware and software.
1.1 Hardware
This section of the documentation covers how I installed the MC and the associated GPS receiver, LED status device
and connected the Spektrum AR610 receiver that came with the Spektrum DX6i transmitter.
1.1.1 Flame Wheel F450
My F450 came with red and white motor struts. There was no instruction about which color should be used for the
front and the rear and I didn’t find any common convention from some brief internet searches. I used the white struts
for the two front motors and the red struts for the two rear motors.
Motors
The F450 is a QuadRotorX configuration and when coupled with the NAZA M the motor numbering is as follows:
2
1
\ /
X
/ \
3
4
Motor
1
2
3
4
Direction
CCW
CW
CCW
CW
Prop Color
Silver
Black
Silver
Black
Discuss how to check the motors are turning the correct way using a small piece of paper. Switch two of the ESC
wires to alter the direction if necessary.
1.1.2 DJI NAZA-M LITE
The NAZA-M LITE provides the brains of the quadcopter. It comes as a set of discrete devices that are covered in
more detail below.
3
quadcopter Documentation, Release 0.0.1
4
Chapter 1. NAZA M LITE
quadcopter Documentation, Release 0.0.1
MC
The Main Controller (MC) is the brains of the flight system. The MC connects to the motor controllers (ESC) and the
remote control receiver.
The MC has a built-in Inertial Measurement Unit (IMU) that consists of one 3-axis accelerometer, one 3-axis gyroscope and a barometer for sensing the attitude and altitude.
The MC should be placed as close as possible to the center of the frame. The line on the top of the MC should be
aligned with the center line of the craft and should be pointing to the nose. This will result in the motor ports facing
the front of the craft.
The MC came with lots of 3M double sided tape strips which I used to stick it in place to the F450 base plate. I
connected the motor wires before sticking the MC in place.
Connections
NAZA MC
A
E
T
R
U
X1
X2
X3
LED
EXP
NAZA VU
NAZA LED
NAZA GPS
Spektrum AR610
AILE
ELEV
THRO
RUDD
GEAR
AUX1
VU
LED
GPS
VU
The VU device monitors the battery Voltage and provides a regulated power feed to the MC.
The VU device can be connected to a variety of batteries from a 2S (7.2V) to a 6S (26.0V). I have a 2200mAh 3S
battery.
The VU module connects to the X3 port on the MC.
1.1. Hardware
5
quadcopter Documentation, Release 0.0.1
6
Chapter 1. NAZA M LITE
quadcopter Documentation, Release 0.0.1
GPS
The GPS/Compass module provides the MC with position and direction information.
The NAZA logo marked on the module should face the sky and the orientation arrow should point forward.
The GPS/Compass module came with a little carbon rod and two end pieces. I glued the end pieces to the carbon rod
and stuck the GPS/Compass module to the top using a piece of 3M double sided tape. I then secured the base to one
of the rear facing motor struts using the strut screws. This placed it towards the back of the craft close to the EXP port
on the MC that it plugs in to. All the loose cable was secured with cable ties to make it tidy.
LED
The LED unit provide visual status while operating the quadcopter and the USB interface for connecting the MC to
the NAZA Software Assistant program.
1.1. Hardware
7
quadcopter Documentation, Release 0.0.1
8
Chapter 1. NAZA M LITE
quadcopter Documentation, Release 0.0.1
1.1.3 Spektrum DX6i Transmitter
1.1.4 Spektrum AR610 Receiver
Binding
Follow the bind procedure detailed in the section Binding Receiver.
Now that the receiver is bound the actions on the transmitter will be relayed to the receiver and passed on to the MC.
We can now start configuring the transmitter settings.
1.1. Hardware
9
quadcopter Documentation, Release 0.0.1
1.1.5 Battery Charger
I have purchased a Casal C66 battery charger. This takes a DC input anywhere from 11 - 30V. I can easily use this
charger at home and, more importantly, I can take this charger along with a small 12V battery to the park so I can
charge a battery while I’m flying with the other one.
I cut the end off the fly-lead and soldered on a connector matching my batteries.
1.2 Software
The DJI NAZA-M LITE Assistant software is used to configure the MC. I downloaded the OSX version of the DJI
NAZA-M LITE Assistant and installed it on my Macbook Pro.
The following sections covers how I configured each panel within the DJI NAZA-M LITE Assistant application.
Connect a USB cable between the NAZA-M LITE’s LED unit and a PC. The LED will display a green steady light.
1.2.1 Basic
This section of the documentation covers how I configured settings in the Basic panel of the DJI NAZA-M LITE
Assistant application.
Aircraft
I selected the QuadRotorX configuration which was the second option.
M2 M1
\ /
X
/ \
M3 M4
Mounting
In the hardware section I mentioned that I had set up the MC in the centre of the bottom plate with the line on the MC
pointing out the nose of the multi-rotor.
RC
I set the Receiver Type to Traditional.
When the transmitter has been successfully bound to the receiver then moving the control sticks will result in the
sliders moving in the Command Sticks Calibration area.
I chose to leave the REV/NORM settings set to NORM and made an reversing changes on the transmitter.
Note: If you modify and channel settings (especially the throttle) you should re-bind the receiver so that the failsafe
throttle setting is properly set.
10
Chapter 1. NAZA M LITE
quadcopter Documentation, Release 0.0.1
Gain
I did not mess around with the gain settings.
1.2.2 Advanced
This section of the documentation covers how I configured settings in the Advanced panel of the DJI NAZA-M LITE
Assistant application.
Motor
In this area of the Advanced Panel you can alter the motor idle speed and set motor cut-off type.
Motor Idle Speed
The Motor Idle Speed can be modified between 5 different settings, from Low through to High.
I left mine set to Recommended which is the default setting.
Cut Off Type
The motor Cut Off Type can be altered between Immediately and Intelligent.
I set mine to Intelligent.
Immediate When the Cut Off Type is set to Immediate, once the motors have started and the throttle has gone over
10% then the motors will stop immediately (irrespective of Control Mode; e.g. GPS Atti, Manual) when the throttle
stick is brought back under 10% again.
In this mode if you move the throttle stick over 10% within 5 seconds of the motors stopping the motors will re-start
(no CSC action is needed).
Intelligent In this mode different control modes use different ways of stopping the motors.
In Manual Mode, only executing the CSC action can stop motors. In Atti Mode or GPS Atti Mode, any one of
following four cases will stop motors:
1. You don’t push throttle stick after motors start in three seconds.
2. Executing CSC.
3. Throttle stick under 10% for more than 3 seconds and after 3 seconds landing.
4. The slope angle of the multi-rotor is over 70°, and throttle stick under 10%.
Failsafe Settings (F/S)
TBD
1.2. Software
11
quadcopter Documentation, Release 0.0.1
Intelligent Orientation Control (IOC)
Typically when flying a multi-rotor drone the forward direction remains aligned with the direction that the nose is
pointing. The Intelligent Orientation Control (IOC) settings let you change this using two different approaches. The
first is called Home Lock and the second is called Course Lock.
Home Lock
When the Naza MC is switched to Home Lock IOC mode the forward direction of the multi-rotor always points away
from the home point. Conversely, the backward direction always moves back toward the Home Lock position.
Note: The multi-rotor must be in ATTI or GPS mode and be further than 10m away from the home point.
There are 2 ways to record the forward direction in Home Lock mode; automatically and manually.
The current position of the quadcopter will be automatically recorded as the home point when the throttle is first move
AFTER 6 or more GPS satellites have been found.
After 6 or more GPS satellites have been found a new home position can be manually set by toggling between Course
Lock and Home Lock quickly 3 - 5 times.
Course Lock
When the Naza MC is switched to Course Lock IOC mode the forward direction is always that of the recorded nose
direction.
There are 2 ways to record the forward direction in Course Lock mode; automatically and manually.
When in course lock mode the forward direction will be automatically recorded 30s after starting the quadcopter.
To manually set the forward direction toggle quickly between Course Lock and Off 3 to 5 times (Off -> Course Lock
-> Off represents one transition).
12
Chapter 1. NAZA M LITE
quadcopter Documentation, Release 0.0.1
1.3 Transmitter
In this section I describe how I configured the Spektrum DX6i to control the NAZA-M LITE on my DJI F-450 multirotor drone.
The first step is to create a profile in one of the 9 available slots in the DX6i’s model memory.
1.3.1 Initial Setup
1. Power on the transmitter.
2. Press the Scroll button to bring up the ADJUST LIST menu.
3. Scroll to select the MODEL SELECT option and select a free slot.
4. Once the profile has loaded scroll to the end of the list of options and select SETUP LIST.
5. Set MODEL TYPE to ACRO.
6. Scroll back to List to go back to the previous menu.
7. Select MODEL NAME and give the model a description. I named mine DJI-F450.
Now that we have a dedicated profile in the transmitter we can bind the receiver to this transmitter.
1.3.2 Binding Receiver
Insert the Bind plug into the BIND/BATT port of the AR610 receiver. Power up the receiver. I powered it up using the
throttle cable from the MC and connected a battery to the MC via the VU device. The receiver starts to flash with its
orange LED. While holding the Trainer switch on I then powered on the transmitter. The transmitter starts in binding
mode and after a short while the receiver stopped flashing and then the orange LED came on steady on the receiver.
This indicates that it has successfully bound with the transmitter. Take power away from the receiver and then turn off
the transmitter.
It is recommended that you bind the receiver twice. The binding procedure locks in the throttle level setting that will
be applied in the case that the transmitter signal is lost.
The first bind establishes the communication channel from the transmitter to the receiver so you can begin configuring
your device. After you play around with the various settings you may end up reversing one or more of the channels.
This may reverse the original throttle setting saved during the initial bind. It is important to re-bind to ensure that the
correct throttle signal will be applied if the transmitter signal is lost.
1.3.3 Configure Transmitter
It is best to connect the NAZA Assistant software while performing this configuration step so that the results are
immediately visible. So, connect the MC with the NAZA Assistant software by plugging a USB cable from the PC to
the LED device. Power on the transmitter and check that the transmitter stick controls move the channel sliders on the
NAZA Assistant’s Basic -> RC display.
Control Sticks
Moving the Aileron and Rudder control sticks on the transmitter resulted in the opposite action happening at the MC.
This can be resolved by reversing the direction in the NAZA Assistant software or on the transmitter. I made a choice
to keep the software assistant channel settings in the NORM mode so I reversed the AILE and RUDD channels on the
transmitter.
1.3. Transmitter
13
quadcopter Documentation, Release 0.0.1
1. Enter the ADJUST LIST menu by clicking the scroll button.
2. Enter the SETUP LIST menu.
3. Enter the REVERSE menu.
4. Reverse the AILE channel.
5. Reverse the RUDD channel.
6. Exit the REVERSE menu.
7. Exit the SETUP LIST menu.
Control Modes
Now we come to configuring the MC Control Mode. The DX6i has a number of 2 position switches but the Control
Mode has 3 states so really requires a 3 position switch to move between Manual, Atti and GPS attitude control modes.
We will have to use more than one switch on the transmitter to create a three position effect.
The configuration that we’re aiming for is to be in GPS Attitude mode when all the switches are off. Flipping the
GEAR switch on will move the Control Mode into the Manual mode. So, when all switches are off we can use the
GEAR switch to move between GPS and Manual. If we now switch the MIX switch on we can use the GEAR switch
to move between GPS and Attitude. Turning the ELEV D/R switch on in any of the modes will move the Control
Mode into the Failsafe mode.
Assuming the transmitter is on and the correct profile is loaded, let’s get going...
1. Enter the ADJUST LIST menu by clicking the scroll button.
2. Enter the SETUP LIST menu.
3. Enter the REVERSE menu.
4. Reverse the GEAR channel.
5. Exit the REVERSE menu.
6. Scroll to the end and select ADJUST LIST menu.
7. Enter TRAVEL ADJ menu.
8. Ensure that the GEAR switch on the transmitter is off.
9. Monitor the NAZA Assistant’s Basic -> RC -> Control Mode Switch display and modify the GEAR Travel
Adjust to move the Control Mode selection to GPS (the GPS item will be highlighted blue). I ended up using
+85%.
TRAVEL ADJ
THROv100% AILE>100%
ELEV^100% RUDD>100%
GEAR^ 85% FLAP^100%
10. Now flip the GEAR switch on. The goal here is to adjust the GEAR settings so that the Control Mode goes into
Manual mode. I ended up using -75%.
TRAVEL ADJ
THRO^100% AILE>100%
ELEV^100% RUDD>100%
GEARv 75% FLAP^100%
14
Chapter 1. NAZA M LITE
quadcopter Documentation, Release 0.0.1
11. Exit the TRAVEL ADJ menu.
12. Enter the MIX1 menu. The goal here is to alter the settings such that when the MIX switch is off the GEAR
switch moves between GPS and Manual and when the MIX switch is on the GEAR switch moves between GPS
and Attitude modes. Flip the MIX and GEAR switch on and modify the settings until the Attitude mode is
selected.
MIX1
GEAR>
Rate D
SW MIX
GEAR ACT
0% U -106%
TRIM INH
13. Exit the MIX1 menu.
14. Enter the MIX2 menu. The goal here is to configure the settings such that the Failsafe mode is selected irrespective of whether the Control Mode was GPS, Attitude or Manual.
MIX2
GEAR -> GEAR ACT
Rate D - 50% U - 53%
SW ELE D/R TRIM INH
15. Exit the MIX2 menu.
For reference, I found the following video helpful for configuring parts of my system though I managed to simplify it
a little by not needing any sub-trim modifications. This video did not cover setting the IOC configuration.
Intelligent Orientation Control
I used the flaps channel to configure the IOC settings. The IOC settings supports 3 modes; Home Lock, Course Lock
and Off. Once again the DX6i only has 2 position switches so I’ll be using the FLAP switch to alternate between Off
and Home Lock. I can’t really see me using the Course Lock option so this is not a great loss.
1. Enter the ADJUST LIST menu by clicking the scroll button.
2. Enter FLAPS menu.
FLAPS
NORM
LAND
FLAP
v 86
^ 80
ELEV
0
0
1.3.4 Test Configuration
With all the transmitter switches off, power on the transmitter and connect the MC to the NAZA Assistant software
using the USB cable so we can verify the correct Control Modes are being used.
Monitor the NAZA Assistant’s Basic -> RC display. By default, with the GEAR switch in the off position, the Control
Mode should indicate GPS mode. Flip the ELEV D/R switch and the Control Mode should move to Failsafe. Turn the
ELEV D/R switch off, the mode should return to GPS.
Turning the GEAR switch to on should move the Control Mode to Manual. Flip the ELEV D/R switch and the Control
Mode should move to Failsafe. Turn the ELEV D/R switch off, the mode should return to Manual.
Turn the Gear switch off again to return to GPS.
Now Flip the Mix switch on. The Control Mode should remain in GPS Mode.
1.3. Transmitter
15
quadcopter Documentation, Release 0.0.1
Flip the GEAR switch on and the mode should now change to Attitude Mode. Flip the ELEV D/R switch and the
Control Mode should move to Failsafe. Turn the ELEV D/R switch off, the mode should return to Attitude.
With this test we can see how to change into any of the Control Modes and how the ELEV D/R switch changes MC
into Failsafe mode from any of the GPS, ATTI or Manual control modes.
In summary:
GPS:
Manual:
GPS:
Attitude:
Failsafe:
GEAR
GEAR
GEAR
GEAR
ELEV
0 MIX:0
1 MIX:0
1 MIX:0
1 MIX:1
D/R
Now move to the NAZA Assistant’s Advanced -> IOC display. With the FLAP switch in the off position the IOC
mode should show that it is in the Off mode. Flip the FLAP switch and the IOC mode should change to the Home
Lock mode.
1.3.5 Configure Failsafe Settings
The failsafe settings will be applied when the receiver loses connection with the transmitter.
With the transmitter turned off set the throttle level to about 30-40%. This throttle level will become the failsafe setting
applied by the receiver when it detects a loss of connection with the transmitter.
The Spektrum AR610 receiver that I’m using apparently only supports failsafe settings on the throttle channel. Other
device can support other channels.
Follow the bind procedure detailed in the section Binding Receiver.
1.3.6 Test Failsafe Settings
TBD
TODO: Discuss how to manually set the forward direction and the home point using this transmitter configuration.
1.4 Flight Test
This section covers the intial flight testing actions that I performed.
1.4.1 Starting the Motors
Use the Combination Stick Commands (CSC) to start motors. Simply pushing the throttle stick before takeoff will not
start motors. You have to execute any one of following four Combination Stick Commands (CSC) to start motors.
1.4.2 Status LED
I’ll typically be flying the GPS control mode so I wait until the status LED is showing a single green flash. It typically
starts out with red flashes followed by a green and slowly the number of red flash dissappear as the better GPS satellite
lock is achieved.
See the LED status chart below for the different indicators.
16
Chapter 1. NAZA M LITE
quadcopter Documentation, Release 0.0.1
1.4. Flight Test
17
quadcopter Documentation, Release 0.0.1
1.4.3 Range Test
TBD
1.4.4 IOC Test
TBD
1.5 References
This section contains links to sites with useful information that helped me build and configure my quadcopter.
• DJI F450 User Manual
• DJI F450 Videos
• DJI FAQ
• DJI Flame Wheel Wiki
• DJI NAZA M Wiki
1.6 Flight Log
This section records some of my early flights where I was trying to work out how to properly configure the MC and
the transmitter as well as learn to fly the drone.
18
Chapter 1. NAZA M LITE
quadcopter Documentation, Release 0.0.1
1.6.1 26/12/2015
This flight was just trying to get the thing off the ground so I could say I had made some progress. I had no idea what
mode it was in (I think it was in manual). I had previously checked that the motors were
I managed to get it off the ground and up to about 3 metres high. I very gradually manoeuvred it around and then
brought it down thankful I hadn’t crashed it.
1.6.2 28/12/2015
This flight was aimed at testing the GPS Attitude mode. By this time I had finally configured the transmitter to be able
to set the NAZA MC into GPS Attitude mode. I plugged in the battery and got the ESC tune. I observed the LED
flashing green and red giving me an indication that it was in GPS mode. After a little while the red flashed disappeared
indication a good GPS signal by staying green.
I then tried to slowly increase the throttle in an attempt to take off but the drone seemed very unstable and was making
a weird whistling noise that I did not recall from the first flight. I tried a few times to increase the throttle but the
instability and noise remained.
Eventually the drone tilted too far and then flipped over. Nothing was broken but I think I’ve got some investigating to
do.
1.6.3 29/12/2015
I tried to fly the drone again but the wobble remains. As I power up the motors the struts begin to wobble and the strut
holding motor 1 get quite violent. I’m not sure if it is cavitating. It looks like there is some kind of resonance that
builds up and reinforces the wobble. Some internet searching indicates that it might be related to the flexible DJI legs
connected to the bottom of the drone. I’ve taken these off and will try to fly it again.
1.6.4 30/12/2015
Success, I got it flying. There was still a bit of a wobble on take off. It’s like the M1 strut takes off first which tilts
the craft a bit. If I slowly increase the throttle it seems like it will flip over. If I really commit and push the stick up
quickly it takes off and levels out. It’s probably a mixture of inexperience and me not wanting the smash that drone
before I’ve had a chance to fly it around. The longer legs definitely increase the wobble.
Now that I’ve got it flying I’ll spend a bit of time doing lots of take off and some simple manoeuvring to get used to it.
Then I’ll begin testing out the capabilities of the MC and checking that the Failsafe works. Once that’s done I guess
I’ll start flying it a bit higher and a bit further away.
1.6. Flight Log
19