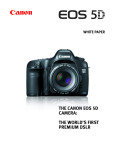
1
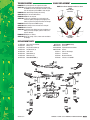
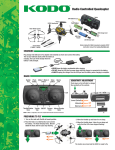
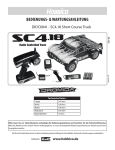
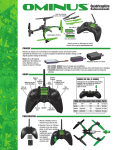
™
Radio
AAA Batteries (2)
Radio Controlled
Quadcopter
Flight Battery
Rotor Blade Guards
KODO Quadcopter
USB Card
Reader
2G Memory Card
USB Charge
Cord
Spare Blades
(2 black, 2 white)
RADIO
For Mode 2 operation, slide the mode
switch to the MD2 position and hold the
controller with the throttle on the left side.
For Mode 1 operation, slide the mode
switch to the MD1 position and hold the
controller with the throttle on the right side.
CHARGING THE FLIGHT BATTERY
Plug the charger into a USB to AC adapter
or USB port on a computer as shown
and connect the battery. The red LED
will flash slowly while charging and be
steady when the charge is complete.
• NEVER leave the battery unattended while
charging.
• DO NOT allow the USB port to power down
while the charger is connected to the battery.
• ALWAYS unplug the charger from the USB port
and the battery when charging is complete.
RADIO SETUP
Remove the screw on the
battery compartment cover.
Take the cover off and insert
2 AAA batteries.
PROP GUARD INSTALLATION
To protect the propellers from crash damage, attach
the prop guards before flight.
1. Carefully pry off the prop
using a screwdriver.
NOTE: Do one corner at a time so you
don’t accidentally mix up the props
2. Push the prop guard in place.
3. Push the prop onto the motor
so it is tight on the shaft.
PREPARING TO FLY
Your KODO is fitted with a Power-On failsafe. This is designed to ensure that the motors will not start until the KODO has detected the controller.
1. Move the throttle stick to the lowest position.
Power on the controller. (Mode 2 shown.)
2. Place the KODO on a level surface and connect the
battery. Do not move the KODO until you hear two
beeps and the LEDs have stopped flashing.
3. Advance the throttle to the highest position.
The controller will beep once.
4. Move the throttle back the lowest position.
The controller will beep once. The KODO is
now ready to fly.
3
2
4
1
Important! When you are finished with your flight, immediately UNPLUG the battery.
LOW BATTERY INDICATOR
The LEDs on the KODO will flash when the battery voltage is low and the model should land as soon as possible to avoid damaging the battery. Always unplug
the battery after flight. The battery needs to be charged before the quadcopter is stored.
M
E
C M
AR O
D RY
CAMERA OPERATION
To record a video, press the “V” button. The red
LED next to the blue LED above the card will
flash slowly to indicate that the camera is
recording. Press the “V” button again to stop
the recording and store the video on the card.
If the KODO battery is unplugged while the camera is
recording, the video will not be saved onto the card.
Please disconnect the battery before the memory card is inserted or removed from the camera.
When KODO is linked with the controller and the card is installed correctly, there will be a
steady blue LED just above the card. A red LED flashing next to the blue LED when the camera
is not operating indicates that the card is missing or not installed correctly.
To capture a photo, press the “P” button. The
red LED on the quadwill flash once to indicate
that a photo has been captured and stored.
The camera will not capture a photo while it
is recording a video.
MOTOR REPLACEMENT
1. Remove the propeller from the motor.
2. Remove the motor cover from the bottom of the
motor holder.
3. While holding any two of the clamping arms away
from the motor, press the motor shaft down on the
workbench until the remaining clamp comes loose
so the motor can be removed from the holder.
4. Unsolder the wires from the frame and remove the
motor from the holder.
5. Verify that the wires on the new motor are the same color.
6. Push the new motor down in the holder until the clamping arms are back in position over the end of the motor.
7. Solder the wires to the frame. The wire on the right side of the frame should always be blue or white.
8. Install the motor cover and replace the propeller if it is undamaged.
PUSH
The motors are not hard to replace, but a soldering
iron will be required to remove and replace the wires.
TROUBLESHOOTING
BLADE REPLACEMENT
PROBLEM: The quadcopter will not respond to the radio.
SOLUTION: (1) Turn off the radio and disconnect the battery for
the KODO. Re-link the quadcopter and radio. (2) Make
sure that the battery on the KODO is fully charged.
NOTE: Rotor blades must be installed as shown.
FRONT
White Blades,
Blue LEDs
PROBLEM: Red radio LED light flashing after linking.
SOLUTION: Replace with new AAA batteries.
PROBLEM: KODO will not stay level.
SOLUTION: (1) Place the quadcopter on a level surface and
restart the quad by unplugging and plugging in the
battery. (2) Check the props and motors for damage.
B
A
PROBLEM: Unable to Flip but the KODO is flying.
SOLUTION: Battery voltage is low and needs to be charged.
PROBLEM: Will not take off.
SOLUTION: (1) Check the rotor blades for proper installation. (2)
Battery is not fully charged. (3) Check motors and
props for damage.
B
PROBLEM: Quadcopter is shaking.
SOLUTION: Check the canopy, chassis, motors and rotor blades
for damage.
REAR
Black Blades,
Red LEDs
A
REPLACEMENT PARTS
1
2
3
4
5
6
7
8
DIDE1500
DIDE1501
DIDE1502
DIDE1503
DIDE1504
DIDE1505
DIDE1506
DIDE1508
9
10
11
12
Upper Shell Black/Yellow
Battery Tray
Prop Set Black/White (4)
Prop Guard Set (4)
Lower Shell
Motor Holder (4)
Motor Cover (4)
Motor CW L/F R/R (2)
DIDE1509
DIDE1510
DIDM1500
DIDZ1500
DIDE1511
DIDE1512
DIDZ1501
DIDE1507
Motor CCW R/F L/R (2)
Screw Set
Flight Control Board w/Arms
Camera
USB 1S LiPo Charger
Transmitter
Micro Card Reader
LIPO 1S 3.7V 390MAH
10
10
4
1
4
3
12
3
4
10
10
9
3
10
6
3
10
8
2
11
8
7
4
6
9
5
6
7
6
7
7
dromida.com
DIDE0005 v1.0 MNL © 2014 DROMIDA, A HOBBICO COMPANY