1
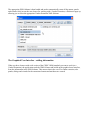
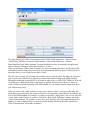
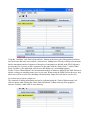
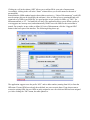
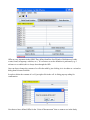
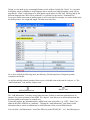
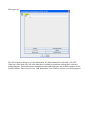
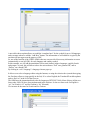
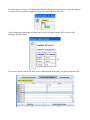
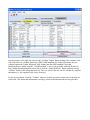
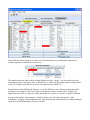
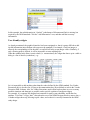
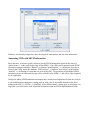
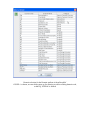
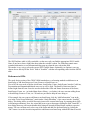
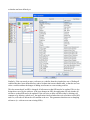
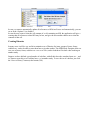
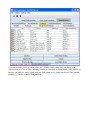
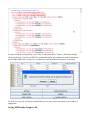
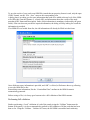
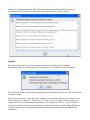
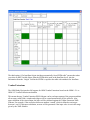
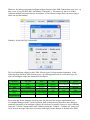
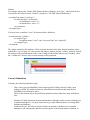
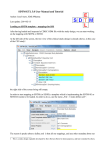
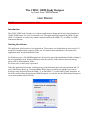
The CDISC ODM Study Designer
by Jozef Aerts, XML4Pharma
User Manual
DRAFT: latest version: November 11, 2006
Introduction
The CDISC ODM Study Designer is a software application to design and develop clinical studies in
CDISC ODM format, in a very user-friendly way. The application fully supports the ODM 1.2 and
ODM 1.3 standards, as well as any vendor extension based on the ODM1-2-1 or ODM1-3-0 XMLSchema mechanism.
Starting the software
The application is delivered as a Java application. This means a Java installation (at least version 1.5)
needs to be installed on the computer of the user. For details about installation of Java and of the
application itself, see the Installation Guide.
For Windows users, a file ODMDesigner.bat is delivered as part of the distribution. Double-clicking it
the corresponding icon in Windows Explorer starts the software. If the software does not start up,
please refer to the Installation Guide.
For Linux users, a shell script is provided.
When the application has started, a dialog giving you details about the owner and expiration date (if
any) of the license shows up. Secondly another dialog shows up asking you whether you want to
develop a study design based on the ODM 1.2, on the ODM 1.3, or on a ODM Vendor Extension. As
the define.xml has been designed as an ODM Extension, you can also use the ODM Study Designer to
create and assemble define.xml files.
The appropriate XML-Schema is then loaded and used to automatically create all the menus, panels
and wizards. Only in case the user choose for working with a Vendor Extension, a filechooser pops up
allowing you to select the appropriate Vendor Extension XML-Schema.
The Graphical User Interface – adding information
When you have choosen with wich version of the CDISC ODM standard you want to work (or a
Vendor Extension), the application reads the XML-Schema and builds up the graphical user interface,
from the information in the XML-Schema. This ensures that in the case of a vendor extension, also
panels, dialogs and wizards for the extension elements and attributes are created.
The Study Design part (XML element Study) of the CDISC ODM standard has 3 main sections:
“Global Study Variables” (element GlobalVariables), “Basic Study Definitions” (element
BasicDefinitions) and “Study Metadata” (element MetaDataVersion). Accordingly, the application
shows 3 buttons, allowing to switch between these 3 sections.
When e.g. the button “Global Study Variables” is selected, a tabbed panel shows up allowing to add
information about the Study Name, the Study Description and the Protocol Name. Clicking on one of
these tabs allows you to switch between these 3 items.
The tabs can be colored. The currently selected tab is always colored yellow, the other tabs can have a
gray or green color. When a tab is colored green, this means that according to the ODM standard,
information within that section MUST be provided in order to have a valid CDISC ODM file. If the tab
is colored gray, adding information to that section is optional. Please be aware however, that even
when a section is optional according to the ODM standard, it can contain essential information about
your clinical study setup!
When you select a tab, a table with one or more rows is shown. If there is only row in the table, this
means that you can only have one instance of the piece of information in the ODM file according to the
rules of the ODM standard. For example, if you have selected the “Study Name” tab, you can only add
1 name for the study. If however, you have clicked the “Basic Study Definitions” button, and use the
“Units of Measurement” tab, initially, 10 rows show up in the table, allowing to add information for a
number of “Units of Measurement” up to the maximum number allowed in the XML-Schema (for “
Units of Measurement” this number is infinite).
Using the “Add Row” and “Delete Selected Row” buttons in the lower part of the graphical interface,
one can always add extra rows or delete a selected row. Adding rows will only work up to the moment
that the maximum number of instances of that piece of information as defined in the XML-Schema is
not exceeded. So if you try to add a second row to the panel with tab “Study Name” (“under Global
Study Variables”), the application will refuse to add another row, and nothing happens.
For the “Units of Measurement” tab, the maximum number of instances defined in the XML-Schema is
infinite, so that you can add as many rows as you want. When saving the ODM file later however, only
those rows will be saved to file containing real information. Empty rows will not be saved to file.
Let us now have a look at a single row.
The essentials of adding information can best be explained using the “Units of Measurement” tab
which is shown when clicking the “Basic Study Definitions” button at the top of the graphical
interface. Initially, a table with 10 rows shows up.
Clicking in a cell in the column “OID” allows you to add an ID for your unit of measurement.
Accordingly, clicking in the cell in the “Name” column allows you to add a name for the unit of
measurement.
Remark that the ODM standard requires that within a section (e.g. “Units of Measurement”) each OID
must be unique (this can be checked by the software). Also, in order to have a meaningfull and wellorganized set of OIDs in an ODM file, it is good practice to use a prefix for OIDs, e.g. “MU.” for
MeasurementUnit, or “IT.” for ItemDefs (see later). The application allows you to define a prefix (it
even suggests one in many cases) and automatically fill the rows with OIDs for the section that is
treated. For example, in one wishes to define 10 Units of Measurement, click the “Suggest OIDs”
button in the lower part of the interface. The following dialog shows up:
The application suggest to use the prefix “MU.” and to add a number (starting from 001) to form the
OID name. If some OIDs have already been defined, one can overwrite them. If one chooses not to
overwrite existing OIDs, the new OIDs are only assigned to rows for which no OID has been assigned
yet. After clicking the “OK” button, the table updates to:
OIDs are very important in the ODM. They define identifiers for all kinds of definitions (of study
events, forms, itemgroups, codelists, etc..). If a reference to such a definition is performed (e.g. a
reference to a codelist) this is always done through the OID.
One can always change the contents of a cell in the table by just clicking in it. An editor or a wizard or
dialog then becomes available.
In order to delete the contents of a cell, just right-click in the cell. A dialog pops up asking for
confirmation.
Now that we have defined OIDs for the “Units of Measurement” that we want to use in the Study
Design, we also need to give a meaningfull name to each of them. Usually the “Name” is a very short
description, mostly in English or in the language that is usually used when designing a study. Please
note that the “Name” is not meant to be what appears on the paper or eCRF later. For this (and for the
different languages the CRFs will be produced), we will later use the section “TranslatedText”.
Let us give names to the units of measurement we will work with. For example, we need to define units
for blood pressure, for weight and length. The table now looks like:
So we have defined the following units: mm Mercury (for blood pressure), kilograms, pounds,
centimeters and inches.
As one has probably already remarked, there are two clickable icons at the start of each row, i.e. The
“Add Information” icon, and the “Inspect icon”.
Add Information icon
Inspect icon
The “Add Information” icon does exactly what it means. It allows to add extra information to an
instance of a section (element) of the ODM. The “Inspect” icon allows to see all the information that
has been added to an instance in a tabular way.
Technically spoken, the information that is added in the cells of the table (e.g. “OID”, “Name”) are
added to the XML ODM file as “attributes”. Clicking the “Add Information” icon allows to add
information that is stored as subelements (or child elements) of the current ODM element.
If we click the “Add Information” icon of the fifth row (with OID MU.005 - “in”), the following new
dialog pops up:
The title of the new dialog says “Extra information for: MeasurementUnit, with OID = MU.005”.
When one clicks in the only cell of the table that is available (remark that it doesn't have a header),
nothing happens. This means that no information can be added that goes into an XML attribute for the
Symbol element. There is however an “Add Information” icon. If that is clicked, a new dialog appears:
A new table shows up that allows us to add the “translated text” for the symbol for up to 10 languages,
and even more when we add the “Add Row” button. The information we will add here is typically the
one that will later appear on the paper or eCRF.
So, one of the benefits of the CDISC ODM is that one can provide all necessary information to create
(automatically or not) all CRFs for each language and country needed.
In this example, we will add the translations for our unit (inches) in three languages: english, french
and german. As such, this will allow to have the unit written as “Zoll” on a german CRF, and as
“Pouces” on a french CRF.
By clicking in a cell “Language” a language chooser pops up:
It allows us to select a language either using the buttons, or using the selection box (remark that typing
the first letter allows to jump quickly in the list). If we select English, the TranslatedText table updates
and we find “en” in the cell of the first row.
The ODM uses the internationalized codes for languages (IETF RFC 3066). Most of these (all the twoletter codes, ISO-639) have been implemented in the software. So the two-letter code for English is
“en”, for French is “fr” and for German is “de” (Deutsch).
We can now do the same for French and for German:
For each of these languages, we now still need to add the translated text (as we like it to appear on the
CRF). As usual, we can add extra information by clicking the “Add Information” icon. If we do this for
the “english” row, a text field appear where we can add the text “Inches”. For the “french” row, we add
the text “Pouces” and for the “german” row, we add the text “Zoll”.
After we have done so, we also see that the background color of the “Add Information” icon has
changed to orange. This means that information has been added and is stored.
Let us now click the “OK” button in the “TranslatedText” dialog, so that we return to the “Symbol”
dialog (remark that when using the “Cancel” button, none of the underlying information is stored).
In order to get an overview of all the translated texts for the measurement unit “in”, click the “Inspect”
icon (this is the icon with the magnifying glass, the second one from the left):
A new dialog pops up showing us all the texts (as they will appear on the CRF) for each of the
languages that we defined.
We can now do the same for all other Units of Measurement in the study. A typical result looks like:
If one now clicks on the “Inspect” icon for the row with OID “MU.005”, one gets a tabular view of all
the translations entered.
Local validation
So, using the combination of the table cells and the “Add Information” icons, we can add all
information necessary to set up and define and a clinical study in CDISC ODM format. But how can
we now see whether the information added is in agreement with the CDISC ODM standard ? We need
some way of validation.
In the ODM Study Designer, conformity checking is done on two levels. A first, very local and rather
simple checking is done using the “Validate” button which appears in allmost every panel and dialog.
Let us look at a typical panel where all the individual items that can be used in the CRFs are defined
(ODM ItemDef).
Near the bottom, at the right, one observes the “Validate” button. When clicking it, the contents of the
cells in the table are validated against the CDISC ODM standard (for Vendor Extensions, they are
validated against the Vendor Extension XML-Schema and the ODM standard). Note that
subinformation (as added using the “Add Information” icons) is only partially validated. In order to
fully validate the subinformation, one needs to click the “Add Information” button, and then use the
“Validate” button in the dialog that shows up. Later we will see that one can also validate the complete
information, i.e. the complete study setup, in one go).
For the above example, when the “Validate” button is clicked, one observes that some of the cells are
colored red. This means that information is missing, or that invalid information has been provided.
If one holds the mouse pointer over such a cell, more information is provided about what kind of
violation against the standard has occurred, e.g.:
The standard says that when an Item is being defined as of type “integer”, one also needs to provide
information about its maximum value, as defined by 10n, where n in the integer number to be provided
in the cell “Length” (note that this is not the case anymore in the ODM 1.3).
Remark that with the ODM Study Designer, it is pretty difficult to enter nonsense information (idiotproofness). For example, if one tries to enter a non-numeric character into the field “Length”, the
application just refuses it, so that it is really impossible to e.g. enter “aa” into the “Length” field (link).
In some of the dialogs, when using the “Validate” button, one will remark that also the “Add
Information” icon gets a red background color. This means that the subinformation is lacking (although
required by the ODM standard), or that it is invalid.
In this example, the subinformation in “Symbol” (subelement of MeasurementUnit) is missing, but
required by the ODM standard. Click the “Add Information” icon, and then add the necessary
information.
User friendly widgets
As already mentioned, the graphical interface has been concipated so, that it is pretty difficult to add
invalid information (non-conform with respect to the standard). For example, if only an integer is
allowed, the corresponding cell in the table, or textfield will only accept integer values. Similarly, if
only a floating point is allowed, it will be impossible to enter anything else.
When the standard only allows certain values (i.e. enumerations), the widget that shows up in a table or
dialog is a list of choices (combobox), e.g.:
So it is impossible to add anything other than the values defined by the ODM standard. For Vendor
Extensions, this is also the case, as long as the enumerations have been defined as such in the Vendor
Extension XML-Schema. Also, for Vendor Extensions, much effort has been done to cover as many
possible situations and datatypes as possible, and to provide a palette of inteligent widgets.
For example, if a company has designed an extension for study event scheduling, and defined an
attribute “Visit Date” of type “date”, then when the user of the ODM Designer needs to enter a date, a
Calendar widget shows up, allowing to pick a date, and so that it is correctly formatted in the ODM
study design.
Similarly, user-friendly widgets have been developed for entering time and date-time information.
Annotating CRFs with SDTM information
More and more, it becomes (good) custom to provide SDTM information right from the start of a
clinical study, i.e. at the study design stage. In the ODM 1.2, the CRFs can be annotated with SDTM
information using the attributes “Domain” (in element “ItemGroupDef”, i.e. definitions of groups of
items for the CRFs), and in the attributes “SDSVarName”, “Comment” and “Origin” in the element
“ItemDef” (i.e. definitions of items that can occur in the CRF). The possibility to add further SDTM
information to the an ODM study design will be available in the ODM 1.3, and will be fully supported
by our application.
Dialogs for adding SDTM annotation information have already been implemented: when one clicks in
a cell to add Domain information, a dialog pops up, with a list of all possible domains as has been
defined in the SDS 3.1 (SDTM 1.1). Similarly, for the SDSVarName, a dialog pops up showing a very
large table (over 600 entries) with all possible information from the SDTM Implementation Guide.
Domain selection for the Domain attribute in ItemGroupDef
if SUPP-- is chosen, an extra dialog pops up for allowing to add an existing domain code,
so that e.g. SUPPAE is formed
The SDSVarName table is fully searchable, so that one easily can find the appropriate SDS Variable
Name if one has at least a slight idea about what the variable is about. For fields that contain more
extended information, a text information dialog pops up when the user selects that field.
This makes it very easy to select the correct SDS Variable Name. Optionally (see Options), one can
choose also to directly fill the “Role” field of “ItemDef” with the corresponding value from the SDTM
table.
References to OIDs
The study design section of the CDISC ODM standard uses a referening method to add Items to an
ItemGroup, to add ItemGroups to a Form, Forms to a StudyEvent, etc..
First of all, the user needs to define which Items, ItemGroups, Forms, StudyEvents, but also CodeLists,
Presentations and ImputationMethods can occur or will be used. The details of these need not be
defined right from the start. Once the user has defined the OIDs and Names from most of the Items,
ItemGroups, Forms, etc.. (or loaded them from a library – see further), the user can start adding Items
to ItemGroups, Forms to Visits, etc.. Wizards are provided to help the user doing so.
If for example, the user want to add Items to an ItemGroup, click the “Add Information” icon in the
row in the “Item Group Definitions” panel (under “Study MetaData”). One comes into the “ItemRef”
dialog. This dialog allows to add all necessary items to the current ItemGroup, by entering theoir OID
(referencing mechanism), Now, the wizard has been set up so that upon clicking the field “ItemOID”, a
new dialog shows up with a non-editable table listing all currently defined Items, and their respective
names. The user can then easily select one of the Items and add it to the ItemGroup by clicking the
“OK” button. As such it becomes impossible to add Items to an ItemGroup with an OID that is invalid
or that has not been defined yet.
Similarly, if the user needs to enter a reference to a codelist, then the wizard takes care of finding all
codelists that have been defined before, and to list them into a non-editable table, so that the user can
select a codelist without the danger of adding an reference to a non-existing codelist.
This also means that if an OID is changed, all references to that OID need to be updated. This is also
being taken care of by the software: if the user changes an OID, the application will ask whether all
references to that OID need to be updated. If the user tries to delete an OID (either by deleting cell
contents or by deleting a whole row), the application checks whether there are references to this OID,
and if so, will refuse to delete the cell contents or the row. This guarantees that there are no dangling
references (i.e. references to non-existing OIDs).
In case you want to automatically update all references to OIDs in all cases and automatically, you can
set so in the “Options” (see further).
In case the user wants to clear the cell contents of a cell containing an OID, the application will give a
warning that all references to that OID may be lost, and give the user another chance not to clear the
contents of that cell.
Creating libraries
In many cases it will be very useful to maintain a set of libraries for items, groups of items, forms,
codelists etc.. and to be able to reuse them later or in other studies. The ODM Study Designer allows to
save sets of items, forms, codelists etc.. to a set of files, and to load these files later when working on
another study.
Suppose we have defined a good number of codelists, with all their decodes, translated texts etc..., and
we want to reuse this set of codelists later, e.g. in another study. To save the set of codelists, just click
the “Save to Library” button (at the bottom, left).
A filechooser dialog shows up asking where for a filename and location where the library with
codelists need to be stored. Files containing libraries are formatted in CDISC ODM (XML) format, so
that they can easily be read or edited using any XML-editor, or e.g. being stored in an XML-enabled
database (e.g. Oracle) or native XML database.
In order to load an existing library, just use the “Load from Library” button. A filechooser dialog
shows up allowing to choose an XML file, and then the dialog asks whether the loaded information
must be appended to the existing one, or whether the existing information must be overwritten.
As such, it is very easy to build up reusable libraries over time, and to reuse them in new studies if
appropriate.
Saving ODM study designs to file
To save the results of your work to an ODM file (remark that no propriety format is used, only the open
CDISC format), use the “File – Save” menu or the corresponding icon.
A dialog shows up asking you for some information that needs to be added at the top level of the ODM:
a file OID (this is not the filename !), a Study OID, and information about the version of the study
metadata (OID, Name and Description). Some of this information is mandatory (indicated by the green
fields): if the user does not provide the required information, the dialog will keep asking for it until the
information is provided.
If an ODM file was loaded from disc, the old information will already be filled in in the forms.
Once all the necessary information is provided, and “OK” is clicked, a filechooser shows up, allowing
to save the ODM file to disc.
Remark that some information, like the “CreationDateTime” attribute in the ODM element is
automatically generated.
Before saving to file, it is always good custom to do a full validation of the ODM contents.
Performing full validation
Besides performing a “local” validation of each of the panels (using the “Validate” button near the
bottom of the panel), it is also recommended to perform a full validation of all the work that has been
done so far. Using the “Validate – Validate All” menu, the full ODM is assembled and conformity
checking is performed against the XML-Schema, but also against all other ODM rules that are
mentioned in the specification, but that could not be implemented in an XML-Schema.
Options
The Options menu allows you to set a number of options for working with the software.
The number of them is currently pretty low, but with time, we will add more and more options.
The first option allows to indicate that the application should remember the directory that was last used
for input or output.
The second option allows you to get a more extended view on the data when using the “Inspect” icon
when working at the “Protocol”, “StudyEvent” or “Form” level. For example, when working at the
“StudyEvent” level and inspecting the information for the StudyEvent “Week 1”, a table (matrix) is
shown which forms are used in this StudyEvent, and which ItemGroups are used within which forms.
Using this feature, one sees immediately whether all envisaged information has been added to the
StudyEvent.
The third option (“Get ItemData Origin Attribute automatically from SDTM table”) means that when
you select an SDS Variable Name from the SDTM table (used at the ItemData level), also the
information from the “Origin” field in the SDTM is copied to the table with attributes for ItemData.
Vendor Extensions
The ODM Study Designer has full support for ODM Vendor Extensions based on the ODM 1-2-1 or
ODM 1-3 Vendor Extension mechanism.
This means that any Vendor Extension XML-Schema can be read upon startup of the program and that
all necessary table fields, wizards and widgets will be created automatically by the software. Also,
upon validation of the created input, the latter will be validated against the Vendor Extension XMLSchema. For example, if the extension defines an attribute “month” which is defined as an integer
between 1 and 12, then upon validation, an error will be generated if the input value is not in the range
given by the XML-Schema.
Moreover, the software generates intelligent widgets for most of the XML-Schema base types (see e.g.
http://www.w3.org/TR/2001/REC-xmlschema-2-20010502/ ). This means e.g. that if an vendor
extension attribute has been defined as an xsd:time, a TimeChooser widget shows up when trying to
add a time for that attribute.
Similarly, for the base type xsd:duration:
The list of intelligent widgets for base XML-Schema types is being extended continously. In the
following table with base XML-Schema types, a green background color is set for those types for
which an intelligent widget has already been developed.
duration
dateTime
time
date
gYearMonth
gYear
gMonthDay
gDay
gMonth
boolean
base64Binary
hexBinary
float
double
anyURI
QName
NOTATION
decimal
int
long
short
integer
byte
nonPositiveInteger negativeInteger
nonNegativeInteger positiveInteger unsignedByte unsignedLong
unsignedInt
unsignedShort
Please note that for the datatypes involving time, the timezone has not been implemented (yet).
For extended datatypes in the Vendor Extension XML-Schema derived from these base datatypes,
automatic generation of an intelligent widget will not always be possible. However, local validation
(using the “Validate” button) and overall validation (using the “Validate – Validate All” menu), will
create an error message if the value is incorrect with respect to the datatype as defined in the XML-
Schema.
For example, suppose the Vendor XML-Schema defines a datatype “scoreType” which needs to be a
xs:decimal with a value between 2.0 and 5.0 (inclusive). The XML-Schema definition is:
<xs:simpleType name="scoreType">
<xs:restriction base="xs:decimal">
<xs:minInclusive value="1"/>
<xs:maxInclusive value="5"/>
</xs:restriction>
</xs:simpleType>
If we now have an attribute “score” in element subsub, defined as:
<xs:element name="subsub">
<xs:complexType>
<xs:attribute name="score" type="my:scoreType" use="required"/>
</xs:complexType>
</xs:element>
The widget created for this attribute, will be accepting decimal values only, but this including values
outside the 1.0 to 5.0 range. If a value outside this range is entered, and the “validate” button is clicked,
the software will complain that the value is out of range for the defined schema type. Similarly, when
the “Validate All” menu is used, an error message will be generated.
Current Limitations
Currently, the following limitations apply
•
There can be only one MetaDataVersion element (child of Study element). When, upon
loading an ODM file with more than one MetaDataVersion element, then only the last
MetaDataVersion element is taken.
Thus, for the moment, please keep different metadataversions of the same study in different
files.
•
Naming of Vendor Extension elements and attributes: although vendor extension elements live
in separate namespaces, it is good custom not to give them identical names as existing ODM
elements and attributes.
In almost all cases, the software checks whether an element or attributes lives in another
namespace, and consequently adds the necessary prefix to the element name or attribute. In
very special cases however, when a Vendor Extension element or attribute has the same name
as a regular ODM element, some confusion may still arise, leading to problem.
We are currently working on removing this limitattion.
It remains however good practice NOT to give Vendor Extension elements and attributes
identical names as existing ODM elements and attributes.
•
Vendor Extension elements that are child elements of the ODM Study element: currently, of
each of such Vendor Extension child elements, only one instance is created by the software.
Please note that this is NOT applicable to other Vendor Extension elements or subelements.
For example, if you have the following extension schema:
<xs:group name="StudyElementExtension">
<xs:sequence>
<xs:group ref="StudyElementExtension"/>
<xs:element ref="my:StudyChild" minOccurs="0" maxOccurs="unbounded"/>
</xs:sequence>
</xs:group>
then only one instance of my:StudyChild will be created.
But if this element itself can have more than one child, as in:
<xs:element name="StudyChild">
<xs:complexType>
<xs:sequence>
<xs:element ref="my:subsub" minOccurs="1" maxOccurs="unbounded"/>
</xs:sequence>
<xs:attribute name="subattribute" use="optional"/>
</xs:complexType>
</xs:element>
then the software will allow to create an unlimited number of instances of the my:subsub element.
So the limitation only applies to elements that are direct children of the ODM Study element.
Also currently, attributes for the my:StudyChild element cannot yet be created. This is a limitation that
will be removed soon
•
Vendor extensions - declaration of namespace: In order to find the binding between namespace URI and
the prefix, the software currently looks in the top schema file for the Vendor Extension only. If e.g. the
Vendor Extension is composed of the following schema files (according to the ODM1-2-1 extension
mechanism)
•
Foo.xsd
•
Foo-ns.xsd
•
Foo-extension.xsd
Then the software scans the Foo.xsd file to find the binding between the Vendor Extension namespace
URI (e.g. http://www.mycompany.com/Foo/ODM/XMLSchema) and the prefix (e.g. foo:). So the
Foo.xsd file MUST contain the statement:
<xs:schema targetNamespace="http://www.cdisc.org/ns/odm/v1.2"
xmlns="http://www.cdisc.org/ns/odm/v1.2"
xmlns:xs="http://www.w3.org/2001/XMLSchema"
xmlns:xlink="http://www.w3.org/1999/xlink"
xmlns:foo="http://www.mycompany.com/Foo/ODM/XMLSchema"
elementFormDefault="qualified" attributeFormDefault="unqualified">
We realize this is not a rule implied by XML-Schema (if the statement does not appear in the Foo.xsd
file but does appear in the Foo-ns.xsd file, then instance files will correctly validate against the XMLSchema) so we will remove this limitation soon.