1
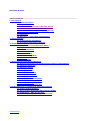
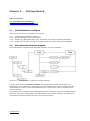
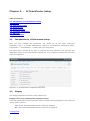
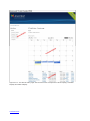
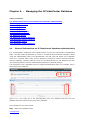
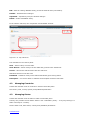
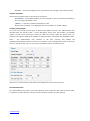
JomLand Ticket Center User Manual Powered by Revision History Table of Contents 1. Introduction 1.1. Short Description 1.2. Legality of Use 1.3. Joomla Integration and Component Design 1.4. Features – Community Version 1.5 1.5. Features – Community Version 1.7 (and up) 1.6. Features – PRO Version 1.7. Languages 1.8. Showcase – Sites using JLTicketCenter 2. Getting Started 2.1. JLTicketCenter Installation 2.2. Data Model and Entities Diagram 3. JLTicketCenter Setup 3.1. Introduction to JLTicketCenter Setup 3.2. Display 3.3. Cart and Currency 3.4. General Text 3.5. General Setting 3.6. FaceBook Integration 3.7. QR Code 3.8. Menu Manager 4. Managing the JLTicketCenter Database 4.1. General Information on JLTicketCenter Database administration 4.2. Managing Countries 4.3. Managing States 4.4. Managing Cities 4.5. Managing Venues 4.6. Managing Categories 4.7. Managing Performers 4.8. Managing Events 4.9. Managing Payment Methods 4.10. Managing Delivery Methods 4.11. Managing Orders 4.12. Managing Ticket Templates 5. Advanced Issues on Tickets and Orders Management 5.1. Unique Tickets Numbers 5.2. Smart Tickets Availability Management (STAM) 5.3. STAM Setup – PRO Version Only 5.4. Cancel Expired Orders – PRO Version Only JLTicketCenter List of Figures 2.2.1. JLTicketCenter Entities diagram 3.1.1. JLTicketCenter Setup form 3.2.1. An example of tickets availability table 3.4.1. An example of an eTicket 3.8.1. Events Main Page 3.8.2. Menu Item Edit Form 4.1.1. The Cities List in the Administration Area 4.1.2. City Edit Form 4.6.1. An Example of Hierarchical Categories List 4.8.1. Events List 4.8.2. Tickets and Pre Sale Discount Management 4.8.3. An Example of Event's Tickets with Pre Sale Discount 4.11.1. An Example of an Order Form 4.12.1. A Part of the Ticket Template Edit Form 4.12.2. Pre Defined Paid Event Ticket Template 4.12.3. Pre Defined Free Event Ticket Template JLTicketCenter Chapter 1. - Introduction Table of Contents 1.1. Short Description 1.2. Legality of Use 1.3. Joomla Integration and Component Design 1.4. Features – Community Version 1.5 1.5. Features – Community Version 1.7 (and up) 1.6. Features – PRO Version 1.7. Languages 1.8. Showcase – Sites using JLTicketCenter 1.1 Short Description Jomland Ticket Center (which later on is addressed as JLTicketCenter) is a Joomla extension that manages tickets shopping center for different kind of events. The site manager can create performers and assign them to categories. Events are presented to the end-user and are categorized by performer and performer category, event location (country, state, city, and venue) and event date. A smart order management system lets the end-users book and buy tickets. Various payment methods are supported and eTickets are sent directly to the end-users email addresses. 1.2 Legality of Use JLTicketCenter component community versions are free to use and can be downloaded from JomLand extension page. The JLTicketCenter component PRO version contains many extra features (please see full list in section 1.6 "Features – PRO Version") and may be used after purchasing a license fee. Please contact us at [email protected] for package rates and further details. Note – The component's community versions include JomLand Credit. To remove the credit you must upgrade to PRO version. 1.3 Joomla Integration and Component Design The way JLTicketCenter and JLTicketCenter PTO are integrated into Joomla is like any other Component and complies with Joomla's Component Coding Standards. The community license component has two versions: one for Joomla 1.5 and the other for Joomla 1.7/2.5 . The PRO version complies with Joomla 2.5. The component design is almost flat and would get the site design: colors, fonts and so. The component is built in MVC architecture and let template override (like any other Joomla MVC component). 1.4 Features – Community Version 1.5 JLTicketCenter component version 1.5 has the following features: JLTicketCenter Events: manage and view events in various formats include category, performer, venue, city, state and country. Venues: manage and view venues in various formats include city, state and county. Performers: create and manage performers, assign performers to categories and create event to performers. Events page: display events by a place (Venue, City) or by performers. Order: order control and information. Tickets: tickets vouchers. Breadcrumbs Support. Cart Module. Smart Tickets Availability Management (STAM). Easy customization for your site. Complete MVC structure. Payment methods: PayPal, Cash On Delivery, PayPal Pro (credit cards). 1.5 Features – Community Version 1.7 (and up) JLTicketCenter component version 1.7 (and up) have the following features: Event image - setting image for each event. Unique Tickets numbers. Feature event and Popular event modules Print event guests list. Ticket validation with QR Code. Ability to display stock (available tickets per event). Feature events module. 1.6 Features – PRO Version JLTicketCenter component PRO version extends the components community versions and has the following features: Multi tickets per event. Administrator - Event Duplication. Notification administrator on new order. Free events registration - create free events with registration presses. (J1.7+) Tickets on Door event - create event with without selling tickets. (J1.7+) Pre Sale discount - create pre sale discount limit by date. (J1.7+) FaceBook integration - automatic create any event on your FaceBook Profile or Fans Page. Calendar view - displays events on interactive calendar. (J1.7+) Ability to set "Term of Service" in checkout. (J1.7+) Ticket Templating - ability for administrator to create a difference ticket template for each event and easy editing tickets template. (J1.7+) JLTicketCenter Sending tickets as PDF files. (J1.7+) CSV event guests list. (J1.7+) Clear Cart using CronTab + Clear Pending orders using CronTab. (J1.7+) Remove JomLand Credit Link 1.7 Languages The following languages are supported: English – default. Spanish (J1.7+) Dutch (J1.7+) Netherlands (J1.7+) French (J1.7+) Italian (J1.7+) 1.8 Showcase – Sites using JLTicketCenter Please visit the featured sites below to get a first impression on the component capabilities: www.vsi-flames.com thoushaltlol.com myflowerhouse.com.au www.scottishhomeshow.com JLTicketCenter Chapter 2. - Getting Started Table of Contents 2.1. JLTicketCenter Installation 2.2. Data Model and Entities Diagram 2.1 JLTicketCenter Installation Please follow the following installation instructions: 2.1.1 2.1.2 Download JLTicketCenter package. Extract package in your local machine 2.1.3 2.1.4 Install com_jlticktcenter.zip in your Joomla site via Joomla extensions installation. Install mod_jltcenter_cart.zip in your Joomla site via Joomla extensions installation. 2.2 Data Model and Entities Diagram The JLTicketCenter Component's data model maintains 12 types of entities. Figure 2.2.1: JLTicketCenter component's entities diagram. The two main entities are Event and Order. The administrator creates events which are identified by venue, performer, ticket type and ticket template. The end-user creates an order which points to a certain event and identified by one or more tickets, delivery method and a payment method. The system's user interface let the administrator and the end-users create and maintain entities which are under their responsibility. The administrator, as a system manager, may interfere in the business process of creating an order, and change its state. JLTicketCenter Chapter 3. - JLTicketCenter Setup Table of Contents 3.1. Introduction to JLTicketCenter Setup 3.2. Display 3.3. Cart and Currency 3.4. General Text 3.5. General Setting 3.6. FaceBook Integration 3.7. QR Code 3.8. Menu Manager 3.1 Introduction to JLTicketCenter Setup Once you have installed the component, you should set up the basic component parameters. Log in to Joomla administrator. Switch to JLTicketCenter Component (Menu: Components -> JLTicketCenter -> Setup) and go to setup menu. The setup menu consists of six tabs. It controls the basic behavior, look and feel and integration issues of the JLTicketCenter component. In the following sections the six setup topics are explained. Figure 3.1.1: JLTicketCenter component setup form. 3.2 Display The display parameters control the main window look: Display Venue, City, Display State, Display Country: These four parameters control if and how event's location would be displayed in the events list on the "where" column. Yes - Event Venue/City/State/Country would be displayed. No - Event Venue/City/State/Country would not be displayed. JLTicketCenter Events Link - Event Venue/City/State/Country would be linked to Venue/City/State/Country events page. For example: if you choose this option on city, and event's city link is clicked, then all the events in this city would be displayed. Venues Link - Event City/State/Country would be linked to City/State/Country venues page. For example: if you choose this option and event's City is clicked, then all the Venues in this city would be displayed. Hide sold out: This parameter controls the displaying of sold out events. Yes – Sold out events would not be displayed in the events list. In this case, if the end- user clicks a sold out event's link, he would be notified that the event is sold out. No – Sold out events would be displayed in the events list. Display stock: This parameter controls the displaying of the availability of tickets (see example below). Figure 3.2.1: An example of tickets availability table from an event page. Yes – In the event page, the number of available tickets would be displayed. Figure 3.2.1 illustrates an example for an event with different kind of tickets and the availability of each ticket type. No –The number of available tickets would not be displayed in the event page. Note – The available tickets calculation reduces from the tickets pool: a. Tickets which were actually sold. b. Booked tickets (booked tickets are tickets which are booked, but for some reason no finance transaction had made upon them). Section 5.4 "Cancel Expired Orders – PRO Version Only" describes a mechanism which returns those tickets to the available tickets pool. Images on events list: This parameter controls if the event's image would be displayed in the events list on the "What" column. Yes – That event's image would be displayed. Please see section 4.8 "Managing Events" for setting event's image. No – event's image would not be displayed. JLTicketCenter 3.3 Cart and Currency The Cart and Currency tab maintains a set of parameters which control the tickets order mechanism. Note – For further details on tickets management, see chapter 5 "Advanced Issues on Tickets and Orders Management". Cart countdown (Min): The maximum time (in minutes) the JLTicketCenter preserves tickets (which were booked) in the cart that were not actually ordered. Set cart countdown to zero to avoid countdown. Note - This parameter is part of the STAM mechanism. See section 5.2 "Smart Tickets Availability Management (STAM) – PRO Version Only" for more information about how cart countdown is working. Max ticket quantity: The maximum amount of tickets which is shown on the booking form. This value limits the number of tickets which can be ordered in a single order. Default ticket quantity: The default amount of tickets which is shown on the booking form (drop-down box). Currency symbol: Displayed currency symbol near prices (For example: $ or €). Currency code: The currency code that is used for payment system (for example: USD or EUR). Tax rate: Tax rate is added to the cart total (include tickets and delivery cost). Commission type: Defines the commission calculation which takes place upon a single order. Commission is added to the cart total. No Commission – No commission is added. Per Ticket – Fix value – A fix commission value is calculated for every ticket in the order. Per Ticket – Percent – A relative commission is calculated for every ticket in the order. It is calculated in relate to the base ticket price. Per Order – Fix value – A fix commission value is added to the cart total. Commission value: Sets the commission value according to the commission type. In case of ticket/order fix value: in currency units (e.g. 10$). In case of ticket percent: the percentage value (e.g. 10%). Advanced parameters: These parameters are discussed in chapter 5 "Advanced Issues on Tickets and Orders Management". JLTicketCenter 3.4 General Text On this tab, three texts fields could be edited using a rich text editor. Order signature: This signature is placed in the order notification which is sent to the end user inbox. Ticket remarks: The remarks which are placed on tickets email vouchers. Ticket site Description: Site description is placed on tickets email vouchers, below site logo. An example of an eTicket: Figure 3.4.1: An example of an eTicket. Fields which are emphasized in red – site logo, ticket site description, QR code. 3.5 General Setting The general setting tab contains several parameters which are related to tickets and orders management. Logo: A logo (graphic element) which is placed on the email voucher. Free events delivery method: Tickets for free events may be delivered in various methods. These methods are set in the Delivery Methods from. Please see section 4.10 "Manage Delivery Methods" for further details. Notify administrator on order: A notification may be sent to the administrator upon every order. Set hear email address for order notifications. Several email addresses may be set separated with semi-comma (";"). Individual tickets: JLTicketCenter When ordering a ticket with quantity > 1, tickets and email notifications may be sent per ticket or per event (i.e. if the end-user place an order with two tickets for a single event, he would get a single ticket/voucher with two seats). Yes – send a distinct ticket/voucher for every seat. No – send a distinct ticket/voucher for every event (quantity >1). Terms of service: An order may contain a link which points to a "Term of Service" article. In this case, the end user must check the "I agree to the Terms of Service" check-box, before submitting the order. In this parameter, the administrator selects the required article which is managed in the "Article Manager". Leave this parameter empty to avoid "Terms of Service" agreement. Note – Articles management is beyond the scope of this document. Send eTickets as PDF: Defines the method for sending eTickets. Yes – eTickets is sent as a PDF attachment in the voucher email. No – eTickets are placed in voucher's body. Note – eTickets design is discussed in section 4.12 "Ticket Template". 3.6 FaceBook Integration The JLTicketCenter component PRO version allows the administrator to integrate events to FaceBook Profile or Page. When FaceBook integration is enabled and an event is added or edited, the JLTicketCenter component updates event data in FaceBook profile or Page. FaceBook App ID: Register to FaceBook as developer and then create FaceBook application on this page: http://developers.facebook.com/setup/. FaceBook App secret: Type your FaceBook App secret. FaceBook page ID: Read this guide on finding FaceBook page ID: http://socialmouths.com/blog/2009/11/03/facebook-page-id/ 3.7 QR Code JLTicketCenter component uses QR code to encode eTickets information which in turn may be validated on site (venue) by using a standard QR decoder. A QR code is placed on any eTicket. QR code setup: Enable QR code: Yes – QR code validation is enabled. A QR code would be placed on any eTicket. No – QR code validation is disabled. QR code image size: The QR code size (in pixels). JLTicketCenter Usage Guidelines for eTickets validation using QR code: 3.7.1 Scan the QR code with your smart phone and get a URL. 3.7.2 Open the URL with an internet browser. A respond is sent from the JLTicketCenter server. 3.7.3 The first time a unique QR code is scanned, the JLTicketCenter server creates a new record which marks the ticket as used. If the unique QR code is scanned again (e.g. malicious duplicate usage), the system 3.7.4 would raise an alert. 3.8 Menu Manager The menu manager lets the administrator to define the menu items which are displayed on the events page. Furthermore, the menu manager controls how the filtered events would be displayed – a calendar display and/or a table display (see an example in figure 3.8.1). Creating a new menu item: On the administration page main menu, click Menu -> Main Menu. A list of existing menu items is displayed. By using the main function buttons on the top-left corner, menu items may be add, edited, deleted, published and unpublished. Menu Manager: Edit Menu Item After selecting a menu item, a menu item edit form is opened. Figure 3.8.2 shows the menu item edit form. Relevant Fields are marked in red. Menu Item Type: The menu item type is selected from a list. Press the "Select" button and scroll down to the JLTicketCenter available menu items list. You may select one of the existing items. Menu Title: The menu title which is shown to the end-user. Required Settings: Each menu item acts as a pre defined filter. For example, the "Events by City" menu item displays only the events which take place in the desired city. The filter's value is set in the Required Settings field. Continue with the above example, in order to create a menu item "Events in London", we would: a. Set the Menu Item Type field to "Events by City". b. Set the Menu Title field to "Events in London". c. Set the Required Settings field to "London – United Kingdom" (assuming United Kingdom and London are defined in the system). Advanced Setting – PRO Version Only: In this area, the administrator controls the way events are displayed. Display Type: Table – Events are displayed only in table. Calendar – Events are display only in calendar. Calendar and Table – Events are displayed both in calendar and table (see example in figure 3.8.1). Calendar Width – Controls the calendar display with. Navigation, Title Positions, View Chooser Position – Controls the arranging of the calendar's title and control buttons. JLTicketCenter Figure 3.8.1: The Events main page with its three main components: Menu Display, Calendar Display and Table Display. JLTicketCenter Figure 3.8.2: Menu Item Edit Form (main fields are marked in red). JLTicketCenter Chapter 4. - Managing the JLTicketCenter Database Table of Contents 4.1. General Information on JLTicketCenter Database administration 4.2. Managing Countries 4.3. Managing States 4.4. Managing Cities 4.5. Managing Venues 4.6. Managing Categories 4.7. Managing Performers 4.8. Managing Events 4.9. Managing Payment Methods 4.10. Managing Delivery Methods 4.11. Managing Orders 4.12. Managing Ticket Templates 4.1 General Information on JLTicketCenter Database administration The JLTicketCenter component uses standard forms for the site administrator management tasks. The data model is described in section 2.2 "Data Model and Entities Diagram". While using the administration forms, the administrator can add, edit and delete every database entity (e.g. countries, state, cities, venues, categories, performers, events, payment methods, delivery methods). Changes which are done by the administrator are not affecting the enduser frontend interface until the administrator publishes the desired changes. The component uses a standard layout to support administration tasks. For example, take a look below at the cities list: Figure 4.1.1: The cities list in the administration area. Pay attention that the first city (Buffalo) had been edited but have not been published. List of buttons in the control panel: New – Add a new database entity. JLTicketCenter Edit – Edit an existing database entity (check the desired entity's checkbox). Publish – Publish desired changes. Unpublish – Unpublish (undo) the desired changes. Delete – delete a database entity. In the entities edit form, the component uses standard controls: Figure 4.1.2: City edit form. List of buttons in the control panel: Save – Saves entity's current state. Save & Close – Saves entity's current state and go back to the entities list Cancel – Cancels the edit task and close the edit form. Standard controls in the edit area: Published – Publishes entity's new state automatically upon saving action. Description - A rich text editor is available for description and free text fields. 4.2 Managing Countries Create and maintain a list of countries in which events take place. Set country code, country (name) and published parameters. 4.3 Managing States Create and maintain a list of states in which events take place. Country may contain several states. State is not a mandatory entity – a city may belong to a state or directly to a country. Set the state code, state name, country and published parameters. JLTicketCenter 4.4 Managing Cities Create and maintain a list of cities in which events take place. Set the city name, description, country, state code and published parameters. In case there are no states in the desired country – leave the state code field empty. 4.5 Managing Venues Create and maintain a list of venues in which events take place. Set the venue name, description, seats, country, state, city, address and published parameters. State field may be omitted. 4.6 Managing Categories Categories have a father-son relation in a hierarchical list. Every performer is connected to a single category. Categories are used to filter events according to a distinct category and performer. Figure 4.6.1: An example of hierarchical categories list. Note – Administrator may change the categories order by clicking the up and down arrows in the "Ordering" column. Title – Category title. Alias – Is set automatically by the system for inner use. Parent – The upper level in the categories list. Status – Published/Unpublished/Archive/Trash. Access – (Leave default value) Permissions – (Leave default value) Language – (Leave default value) Description – Category description. JLTicketCenter Image – An image that is shown in the performer categories page. 4.7 Managing Performers Create and maintain a list of performers which perform in events. Set the name, category, description, website and published fields. 4.8 Managing Events Event is one of the system's two most important entities. It takes place in a given venue and is connected to a single performer. The event life cycle starts when it is published. From this point in time, end-users may place ticket orders upon this event. While the event is "alive", the administrator may edit the event or interfere in the event's orders management. Event is a dynamic entity, its state is being modified over the time. Figure 4.8.1: Events list. Event's tickets may be sold until its date is over and under condition that there are available tickets. The value of the "Tickets" column is set by the administrator upon event's creation. The values of the "ordered" and "sold" columns are being modified by the system while the tickets sale is in progress. Event Edit form: The basic event's details fields are straight forward. The administrator should insert as much details as he can allowing the end-users to get all the information they need. The venue details are also straight forward – the event must be connected to a well pre defined venue. Defining tickets and pre sale discounts: Event Type: Defines the tickets sale policy. Paid – Tickets are ordered and paid in advance. Free – Tickets are issued upon availability, no payment is required. JLTicketCenter On Door – Events are displayed, the system does not manage a sell tickets process. Tickets Template: Defines the template which is used to form the tickets. Use Global – Two default temples are used for paid or free event tickets according to the event type parameter value. (Other) – A specific pre defined template is used. Please refer to section 4.12 "Managing Ticket Templates" for further details Tickets pricing table: An event may include several types of tickets with different prices. The administrator may maintain here the tickets types – ticket description, ticket price and number of available tickets. To add a new ticket type, press the "Add Line" button. While the tickets sale is in progress, the system updates the number of ordered tickets, sold tickets and available tickets. Note – The administrator may interfere in the sale progress and update the available/ordered/sold number of tickets. For example, if the administrator wants to stop the sale of a specific ticket type, he may set the available number of tickets to zero. Figure 4.8.2: Tickets and pre sale discount management in the event edit form. Pre Sale Discount: The administrator may define a pre sale discount which would be valid untill a specific date. To define a pre sale discount, set the pre sale end date and the pre sale discount. JLTicketCenter Figure 4.8.3: An example of event's tickets with pre sale discount. 4.9 Managing Payment Methods The JLTicketCenter component supports four pre defined payment methods. The payment methods are well defined, the administrator should edit only the parameters which are described below. PayPal: The JLTicketCenter supports financial transaction using PayPal api. a. PayPal Test Mode – the administrator may use test mode to perform test. b. PayPal Payment Email – notification email address. Order by Phone: Selecting this payment method results in preserving tickets to the end-user. The selling process must be initiated manually buy a customer care representative. a. Message – A massage which would be displayed after order is completed. Credit Card (PayPal PRO): The administrator should enter credentials from PayPal api account. Cash: In this method tickets are reserved, actual payment takes place on venue's door. a. Message – A massage which would be displayed after order is completed. Note – Security issues regarding payment methods parameter values which are entered by the end-users are beyond the scope of the JLTicketCenter component and must be addressed by the administrator. Note – Other payment methods may be defined by the administrator. Usually, an update in the code level is needed. Please contact support for further details. 4.10 Managing Delivery Methods The JLTicketCenter component may support several kinds of delivery methods which are used to dispatch tickets to the end-users. The delivery methods differ in two parameters: send by email (yes/no) and shipment price. In the best practice, the administrator should maintain one delivery method by email (for eTickets), and several delivery methods by mail according to the different kinds of mail services which are supported. JLTicketCenter 4.11 Managing Orders Orders are accessible at the orders list. The administrator may view and edit every order which have been submitted to the system. The fields which may be edited are marked in in figure 4.11.1. Figure 4.11.1: An example of an order form The administrator may interfere in the order process using buttons in the form's upper section. Order Paid – Marks the order as paid. Tickets Sent – If delivery method is by email, the tickets would be sent by email. Order Cancel – Cancels the order. The basic order's information is found in the orders list (client name, address, time created, order status and total cost). The order status may be one of the following ones: Pending – The order was submitted, but was not paid. Paid – The order was paid but it was not delivered (usually because the delivery method is by mail). Sent – The order was sent (updates automatic in case of email delivery, otherwise should be updated manually). Cancel – The order was canceled. 4.12 Managing Ticket Templates Ticket templates are used to form tickets. Each event may have a different ticket template. A ticket template may contain automatic ticket fields (ticket number, tickets amount, event name, client's first name, etc.), free text fields, image and graphic layout. The JLTicketCenter component has two pre defined ticket templates: one for paid events tickets, and the other for free events tickets. The administrator may create some other ticket templates by using the ticket template edit form. Ticket templates which were created by the administrator may be set as default for the JLTicketCenter paid or free events tickets. In the event edit form, the ticket template is selected by the "Tickets Template" parameter value. Please refer to section 4.8 "Managing Events" for further details. Using to tickets template edit form: Figure 4.12.1: A part of the ticket template edit form. The "Ticket Template Name" and "Published" parameters are straight forward. Template Type: Defines the template type. Normal – the ticket template is used only if it is selected in the event edit form, in "Tickets Template" parameter. Default Event – the ticket template is used as default for paid events. It overrides the system's pre defined default template. Default for Free Event - the ticket template is used as default for free events. It overrides the system's pre defined default template. Description: This is a light graphic designer which forms the ticket template design. The administrator may use automatic ticket fields by selecting from the list on the right side of the canvas (see figure 4.12.1, automatic fields are marked with the upper red square), free text and some other graphic elements (images, lines, etc.). Load Default Template, Load Default Free Events: These two buttons (placed in the lower red square in figure 4.12.1) are used to load the pre defined template designs onto the canvas. After the template has been loaded, the administrator may edit the design and save a new template based on the default design. Image: An image may be placed on the ticket's upper right handed corner. Ticket Remarks: Ticket Remarks may be placed beneath the ticket zone. JLTicketCenter Figure 4.12.2: Pre defined paid event ticket template, automatic fields are marked in bold and curly brackets (pay attention to the "Ticket Number" and "Total" fields which are omitted at the free event ticket template). Figure 4.12.3: Pre defined free event ticket template. JLTicketCenter Chapter 5. - Advanced Issues on Tickets and Orders Management Table of Contents 5.1. Unique Tickets Numbers 5.2. Smart Tickets Availability Management (STAM) – PRO Version Only 5.3. STAM Setup – PRO Version Only 5.4. Cancel Expired Orders – PRO Version Only 5.1 Unique Tickets Numbers Each eTicket has its own unique number. The ticket number format is made of three blocks of the following form: [XXXX]-[YYYY]-[ZZZZ] [XXXX] – Represents the event id. [YYYY] – Represents the order id. [ZZZZ] – Represents the ticket id. Ticket id is a sequential unique number which is managed globally in the system. Every ticket has a unique ticket id. In the paid events default ticket template, the ticket number is placed in the ticket's upper section (see example in figure 4.12.2). In Free events there is no need for unique tickets number, so the ticket number is omitted from the free events default ticket template. The administrator may create a new ticket template for free events with ticket numbers. 5.2 Smart Tickets Availability Management (STAM) – PRO Version Only The JLTicketCenter component PRO version has a Smart Tickets Availability Management (STAM) system which validates tickets availability and prevents tickets over bookings. The STAM system includes cart tickets reservation ability for defined time duration, based on timer mechanism. Cart has a timer. The administrator may define a time period in which the tickets in the cart (which have not been booked yet) are reduced from the available tickets amount. In case the end-user does not complete the order during that time period, the cart is cleared and the preserved tickets are pulled back to the available tickets pool for reuse. Note – The STAM system overrides the "Max ticket quantity" parameter value. For example, if "Max ticket quantity" parameter value is set to 10 but there are only 5 available tickets, the end-user would be able to book at most 5 tickets. 5.3 STAM Setup – PRO Version Only STAM system is managed in the "Cart and Currency" tab on the Setup form: The STAM system is enabled by setting the "Smart Cart Manage" parameter to yes. The reservation time period is set by the "Cart Countdown (min)" parameter. The parameters above define a time limit at the client side, but they do not handle the cart cleaning at the server side. To do so, the administrator must setup a CronTab job (or some JLTicketCenter other schedule tool) on the JLTicketCenter server. When the "Smart Cart Manage" parameter value is set to yes, the system reduces the tickets in the cart from the available tickets amount. For the best practice, the job should run every minute and check if there are any expired cart records. If an expired cart record was identified, it would be cleaned and its tickets would be available again for booking. Instructions to set a cleaning job on the server side: 5.3.1 Create the CronTab job – it is administrator's responsibility. 5.3.2 The CronTab job should run on http://[yoursite.com]/index.php?option=com_jlticketcenter&view=cart&task=cron&for mat=raw&pass=[myPassword] where: [yoursite.com] – is the site URL. [myPassword] – is the authorization password 5.3.3 On the "Cart and Currency" tab, set the "Cron Password" parameter vale to [myPassword]. 5.4 Cancel Expired Orders – PRO Version Only The JLTicketCenter component PRO version has the ability to cancel expired order after declared amount of days. In order to enable this ability, the administrator should set a CronTab job which runs once a day, and set the amount of days in the component setup. Instructions to set a cancel expired orders job: 5.4.1 On the "Cart and Currency" tab, set the "Pending Order Days" parameter value. 5.4.2 Set a CronTab job to run http://[yoursite.com]/index.php?option=com_jlticketcenter&view=cart&task=cron_ord 5.4.3 er&format=raw&pass=[MyPassword] On the "Cart and Currency" tab, set the "Cron Password" parameter vale to [myPassword]. JLTicketCenter