1
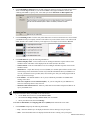
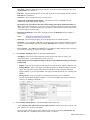
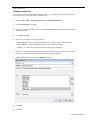
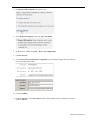
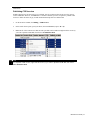
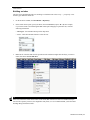
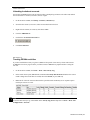
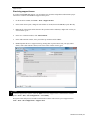
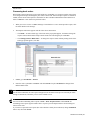
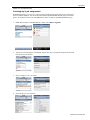
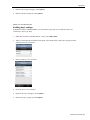
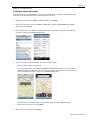
rbweb
RB Web 8 online office for office staff
User Guide
Introduction
Welcome to the RB Web User Guide for office staff
This guide is for office personnel who are in charge of setting up and maintaining your RB Web online
offices. It contains instructions for configuring and customizing your RB Web for your company. It also
contains instructions for managing and monitoring your RB Web after set-up. Plus it includes information
on basic HTML code you will need for some customization options.
RB Web works with your RB8 office management system, and it is in your RB8 system that you will find
the tools described in this guide.
For information on using RB Web online offices, please refer to the RB Web online office user guides for
attorneys, paralegals and other clients, and the user guides for reporters, sales reps and other resources.
These guides are available as PDF downloads from our website: www.omti.com
Table of contents
Web Site Configurations
Configuring RB Web options............................................................................................................................ 1
Custom Request Form/Custom Turn-in Form
Customizing online request forms.................................................................................................................... 7
Creating custom lists......................................................................................................................................... 8
E-commerce module
Create Account
Signing up with PayPal..................................................................................................................................... 9
Security
Creating & applying API credentials................................................................................................................ 9
COD Invoices
Publishing COD invoices................................................................................................................................ 11
Accessibility
Controlling online transcript access................................................................................................................ 12
Receivables
Crediting online payments.............................................................................................................................. 12
Full-text search plug-in
Requirements
Is your system ready?...................................................................................................................................... 13
Supported document types
Is your document compatible?........................................................................................................................ 13
Create Full-Text
Building an index............................................................................................................................................ 14
RB Web 8 User Guide | I
Media streaming plug-in
Requirements
Is your system ready?...................................................................................................................................... 16
Supported document types
Is your document compatible?........................................................................................................................ 16
Web Site Configurations
Setting up media streaming preferences......................................................................................................... 17
Contacts & Resources
Unlocking locked-out accounts....................................................................................................................... 18
Web Activity Log
Tracking RB Web activities............................................................................................................................ 18
Support Tickets
Resolving support issues................................................................................................................................. 19
Approve Time-off
Managing resources’ time-off requests........................................................................................................... 20
Request Orders
Processing back orders.................................................................................................................................... 21
RB Web 8 for Office/RB Web Mobile
Checking day’s job assignments..................................................................................................................... 22
Auditing day’s settings.................................................................................................................................... 23
Looking up client information ....................................................................................................................... 24
Looking up resource information .................................................................................................................. 25
HTML
Working with HTML...................................................................................................................................... 26
This manual, as well as the software described in it, is furnished under license and may be used and copied only
in accordance with the terms of such license. The content of this manual is furnished for informational use only, is
subject to change without notice, and should not be construed as a commitment by OMTI Inc. OMTI Inc. assumes no
responsibility or liability for any errors or inaccuracies that may appear in this book.
Any references to company names or persons in sample screens are for demonstration purposes only and are not
intended to refer to any actual organization or person.
ReporterBase, the ReporterBase logo, ReporterBase 8, RB Web and the RB Web design are trademarks of OMTI Inc. in
the United States and other countries. Microsoft and Outlook are trademarks of Microsoft Corporation registered in the
United States and other countries.
For current information on ReporterBase software and services, visit www.omti.com/rb.
© 2012-2015 OMTI Inc. All Rights Reserved.
OMTI Inc. • 851 California Drive, Burlingame, California 94010
RB Web 8 User Guide | II
Web Site Configurations
Configuring RB Web options
Before you can make RB Web available to your clients and resources, there are settings you must configure
and defaults you need to customize. Preferences entered here apply to the entire web site.
1. On the menu bar in RB8, click Tools > Web > Site Configurations.
2. If you have more than one RB Web license connected to the same RB8 database, select the name of the
web site you want to configure in the Site Name drop-down.
3. In the General window, specify the following information:
• Company Site URL – Enter your company’s main web site address here. When your company’s
logo is clicked within RB Web, the user will be redirected to the specified web site.
• Contact Email – Not used in RB Web at this time.
• Maximum Logon Count – This field specifies how many successive login attempts users can make
before they are locked out. After the specified number of attempts has been made, the user’s account
will be locked out. (See “Unlocking locked-out accounts.”)
• Session Time Out (min) – This field specifies how long a user remains logged into RB Web when
they have not clicked the screen or entered any text. Select a time in minutes from the drop-down.
• Activity Log Service – To track activities on your RB Web, select Enable in the drop-down. (See
“Tracking RB Web activities.”)
NOTES
Product Code, Client Site URL and Resource Site URL are not input fields. The values are set at the time
of installation by OMTI.
Product Version is not an input field. The value reflects the current version of RB Web that you are using.
RB Web 8 User Guide | 1
4. Click Cobranding-Content and enter text that will appear on the log-in pages for clients and resources.
These text fields support HTML, so you can insert HTML codes (tags) to format the content. (See
“Working with HTML.”) Specify sizes, colors and styles under Title Font and Description Font.
5. Click Cobranding-Color. Click the color palette button next to each section and select a color to brand
your RB Web with your company website’s look and feel. If you are unsure where a color will be used
in RB, find the color’s number in the key to the right to see an example of its location in RB Web.
6. Click Web Mail and specify the following information:
• Sender’s Display Name – Enter a name to use for sending an automatic response when a client
schedules online. This name will be displayed as the sender (From) in the email.
• Sender’s Email – Enter an email address to use for sending an automatic response when a client
schedules online.
• SMTP Server – Simple Mail Transfer Protocol (SMTP) is a common protocol that is used to send
email messages across the Internet. The best way to find the information about your SMTP server
is to ask your Internet service provider (ISP). You can also get it from your email program such as
Microsoft Outlook (see Tip).
• Port Number – The default number is 25. If you use a different port number for SMTP email
routing, enter it here.
• This server requires a secure connection (SSL) – If you are using SSL on your SMTP server,
select Yes in the drop-down. If not, select No.
• SMTP Account Name/Password – Enter any valid email account name and password that are set
up on your SMTP server.
TIP
To get the information about your SMTP server from Outlook:
1. On the Tools menu in Outlook, click E-mail Accounts.
2. Select View or change existing e-mail accounts, then click Next.
3. Select your ISP account, then click Change.
Under Server Information, the Outgoing mail server (SMTP) field contains the server name.
7. Click Calendar and specify the following information:
• City – Enter the default city to be displayed when the client is entering a new job request.
• State – Select the default state to be displayed when the client is entering a new job request.
RB Web 8 User Guide | 2
• Start Time – Enter the default start time for new jobs. If you do not want a default start time, click
the Start Time box to deselect it.
• End Time – Enter the default end time for new jobs. If you do not want a default end time, click the
End Time box to deselect it.
• Time Zone – Select a default time zone in the drop-down.
• Adjust clock for daylight savings changes – Check this box to have your RB Web system
automatically adjust for daylight savings time.
• Do not allow new job requests/cancel job requests/change job requests within this number of
days – In these three drop-downs, if you do not want your clients to sneak in requests in the middle
of the night, enter 1 or 2 in these field to give your staff 24 or 48 hours to process the requests. Enter
0 to accept requests no matter when.
• Instruction for Remarks – Enter text to be displayed above the Remarks field. An example is
shown below:
• Map Type – Select an online mapping service in the drop-down for calendar locations.
• Worksheet – If you subscribe to RB Web, you can choose the same customized worksheet reporters
receive via email from RB8, when they click View Worksheet in the Calendar > Detail window of
RB Web.
• Users to Notify – Click Add to select RB8 users to be notified by RB8’s Message Center when new
job, cancel job or change job requests are made via RB Web.
8. Click Calendar-AutoReply and specify the following information:
• Auto-Reply – Select Yes to send an automatic email response when a new job request, job
cancellation request, or job confirmation request is received.
• Email Settings for New Job/Email Settings for Request Cancel Job/Email Settings for Request
Confirm Job:
• Subject – Enter text that will appear in the Subject line when automatic response emails are sent.
• Message Header – Enter text to appear in the Message field as the header of automatic response
emails. The body of the message will contain all of the details of the job request. This field
supports HTML, so you can insert HTML codes (tags) to format the content. (See “Working with
HTML.”)
• Message Footer – Enter text to appear in the Message field as the footer of automatic
response emails. This field supports HTML, so you can insert HTML codes (tags) to format the
content. (See “Working with HTML.”)
9. Click Calendar-Custom Form to customize RB Web’s online order form:
• Under Uncheck items will not show on new request screeen, uncheck any items you do not want
your contacts to see on online order forms.
• To add your own custom options, enter a name for your custom section in the Section Name field,
then click New. See “Customizing online request forms” to continue.
RB Web 8 User Guide | 3
10. Click Repository-Email and specify the following information:
• Subject for Case-level/Job-level/Witness-level/Invoice-level – Enter text that will appear in the
Subject line when case/job/witness/ or invoice repository notification emails are sent.
• Message Header – Enter text that will appear in the Message field as the header of all repository
notification emails. This field supports HTML, so you can insert HTML codes (tags) to format the
header. (See “Working with HTML.”)
• Message Footer – Enter text that will appear in the Message field as the footer of all repository
notification emails. This field supports HTML, so you can insert HTML codes (tags) to format the
footer. (See “Working with HTML.”)
• Use HTTPS for download hyperlink – Check this box if you are using SSL for RB Web.
11. Click Repository-Others and specify the following information:
• Users to Notify for Repository Notification – When you send repository notifications to clients
from RB8, you have an option to send a copy to the office. Click Add to select users who should
receive copies of the notification.
• Users to Notify for New File Upload or Delete Request – When resources upload files in the
Repository section of RB Web, the office should be alerted. Click Add to select users who should
be notified.
• Enable option to set ‘Mark as reviewed’ flag at the time of downloading files – Check this box
to give users the option to mark a file as ‘reviewed’ when its download starts, eliminating a manual
step.
• Annotation Flag Name – If you have the Repository Annotation plug-in, enter text for the
annotation flag.
12. Click Business Units and specify the following information:
• Business Units Access for Contacts – Click Add. In the Lookup Business Units window, select
all of the business units that clients should have access to when using this web site. Normally, you
select all of your business units, unless you purchased additional RB Web licenses connected to
the same RB8 database. Highlight the main business unit, then click Set as Default. The default
business unit is displayed when the client is entering a new job request. (See Best Practices below.)
• Business Units Access for Resources – Click Add to select all of the business units that resources
should have access to when using this web site. Normally, you select all of your business units,
unless you purchased additional RB Web licenses connected to the same RB8 database. Highlight
the main business unit, then click Set as Default. The default business unit is displayed on billing
sheets and worksheets.
BEST PRACTICES
If you have multiple business units (branch offices), it will be difficult for clients to choose the right
business unit when they are entering job requests. For that reason, it is recommended that you create
a dummy business unit called Web Order and make it the default business unit. Back in the office, the
calendar staff will make a determination as to which business unit should handle the request.
13. Click Accessibility. By default, all modules and options are enabled when RB Web is installed. To
disable (turn off) any of the modules or options, check the corresponding box.
• Transcripts and Transcript Packages – Leave boxes checked to prevent contacts from accessing
transcripts before you receive payment. See “Controlling online transcript access.”
• Allow Prefill Parties – Leave this box checked to allow resources to add parties during turn-in
already in your RB8 database from the job, case or previous turn-ins. (Uncheck to make RB Web
turn-in less complicated for resources.)
RB Web 8 User Guide | 4
• Allow to add Attendance – Leave this box checked to allow resources to add attending parties who
did not order copies. (Uncheck to make RB Web turn-in less complicated for resources.)
• Firms – Leave this box checked to allow resources to look up firms in your RB8 database.
TIP
Encourage your resources to add attending parties to their turned-in jobs. You can contact these nonordering parties later to see if they would like to order copies. Give them their own RB Web user IDs and
passwords so they can purchase copies online.
14. Click News. In the Client News field, enter text that will appear in the My Web > News area for
clients. In the Resource News field, enter text that will appear in the My Web > News area for
resources. These fields support HTML, so you can insert HTML codes (tags) to format the news. (See
“Working with HTML.”)
15. Click Receive Notifications.
• If you use the Client Of/Sales Rep plug-in, click Add under Notifications for Request Assignment to
select users (e.g., a manager) who should be notified when resources request to be assigned to jobs
coming from their clients using the “Client Of” option in RB Web.
• Under Notifications for Turn-in, click Add to select users (e.g., the production manager) who should
be notified when resources turn in jobs online through RB Web.
• Under Notifications for Support Ticket for Attorney, click Add to select users who should be
notified when clients send in requests via RB Web’s support ticket system.
• Under Notifications for Support Ticket for Reporter, click Add to select users who should be
notified when resources send in requests via the support ticket system.
16. If you have RB Web Mobile, click Mobile Office. Click Add to select users who can access your RB
Web Mobile Office on their smartphones.
17. Click Pay Invoices to add e-commerce to your RB Web. (See “Signing up with PayPal” and “Creating
API Credentials.”)
18. If you have the reward points plug-in, click Points System and specify the following information:
• In the Header for Current Statement field, enter text that will appear as the header under My
Points > Current Statement in your clients’ RB Web. This field supports HTML, so you can insert
HTML codes (tags) to format the header. (See “Working with HTML.”)
• In the Footer for Current Statement field, enter text that will appear as the footer under My Points
> Current Statement in your clients’ RB Web. This field supports HTML, so you can insert HTML
codes (tags) to format the header. (See “Working with HTML.”)
19. If you have the media streaming plug-in, click Media Streaming. Check the box if you want clients
to view streaming media, but not download it from your RB Web. See “Setting up media streaming
preferences.”
20. Click Reset Password to customize the automatic emails that are sent when clients or resources click
the Forgot Password button on RB Web.
• Email settings for Forgot Password from Attorney/Reporter:
• Subject – Enter text that will appear in the Subject line of “Forgot Password” emails.
RB Web 8 User Guide | 5
• Body – Enter text to appear in the body of “Forgot Password” emails. This field supports HTML,
so you can insert HTML codes (tags) to format the content. (See “Working with HTML.”)
Add RB8 data fields to the body by clicking Actions > Add Data Field and select the desired
data field.
• Other options. If you want to force users to update their passwords periodically, select Yes in the
Enforce reset password drop-down. Then:
• Select a time limit per password in the Duration for set password drop-down.
• If you will allow users to continue using the same password, select Yes in the Allow same
password as current drop-down.
21. Click Transcript Package and specify the following information:
• Subject – Enter text that will appear in the Subject line when transcript package notification emails
are sent.
• Message Header – Enter text that will appear in the Message field as the header of all transcript
package notification emails. This field supports HTML, so you can insert HTML codes (tags) to
format the header. (See “Working with HTML.”)
• Message Footer – Enter text that will appear in the Message field as the footer of all transcript
package notification emails. This field supports HTML, so you can insert HTML codes (tags) to
format the footer. (See “Working with HTML.”)
22. Click Request Order Form. Under Users to Notify, click Add to look up and select users to be
notified via the Message Center when a client requests a transcript through RB Web for a previously
billed job. Under Custom Section, click New. See “Customizing online request forms” to continue.
23. Click Resource Availability. Select a number in the day(s) drop-down for the minimum time-period
between a resource’s time-off request and the start of their time off.
24. Click Custom Turn-in Form. Check the Read & Sign, Read & Sign Date box to have these fields
appear on the online turn-in form.To add a custom field to either the Job Step or the Witness Step of the
online turn-in form, click New above the approproate grid. See “Customizing online request forms” to
continue.
25. Click Save.
RB Web 8 User Guide | 6
Custom Request Form/Custom Turn-in Form
Customizing online request forms
You can customize RB Web’s online order form to match your company’s services and customize the
Request Order form to include details you need to process back orders, such as whether the job is a rush,
who was the judge, and any special remarks. Add your own text fields, drop-downs and buttons to the form.
1. In the New Custom Field window, select an entry field type in the Data Type drop-down. Depending
on the type selected, other options appear in the window:
• Field Name – Enter the new field’s name.
• Instruction – Enter brief directions that will appear with the new field.
• Length [Text field only] – Non-editable field.
• Required Field – Check this box if users must enter something in this field before their request can
be processed.
• Default [Yes/No drop-down only] – Select which option will be visible in the drop-down first.
• Lists [List menu only] – See “Creating custom lists.”
2. Click OK. Repeat steps 4 and 5 for each custom field.
3. To change the order of the fields in the custom section, click a field to select it, then click:
• Upward Sequence – to move the field up one row.
• Downward Sequence – to move the field down one row.
4. To edit a field, double-click it or click it, then click View. To delete a field, click it, then click Delete.
5. Click Save.
RB Web 8 User Guide | 7
Custom Request Form
Creating custom lists
If you add a custom section to RB Web’s online order form (see “Customizing your online request form”),
one of the options you can add is a list of selectable items.
1. In RB8’s Tools > Web > Site Configurations, click Calendar-Custom Form.
2. Under Custom Section, click New.
3. In the New Custom Field window, select List in the Data Type drop-down. Then enter the list’s name
and any instructions.
4. Under Lists, click New.
5. In the New List window, enter a listing and click:
• Save and New – to save the listing and keep the New List window open to add another item.
• Save and Close – to save the listing and go back to the Custom Field window.
• Cancel – to go back to the Custom Field window without saving the listing.
6. In the New Custom Field window, you can arrange the items in the list by selecting one and clicking
the up or down arrow at the right of the field to move it up or down in the list.
7. Select the default value for the list in the Default drop-down.
8. Click OK.
9. Click Save.
RB Web 8 User Guide | 8
E-commerce module
E-commerce (electronic commerce) is the buying and selling of goods and services on
the Internet, especially the World Wide Web. RB Web’s e-commerce module enables
clients to pay invoices (including COD invoices) online via PayPal, a trusted third party
for electronic payments, then download transcripts immediately.
Setting up your RB Web e-commerce is a 2-part process. First, set up a business account
with PayPal that allows you to accept online payments on your RB Web site. Then create
a link between your PayPal account and your RB Web site.
Create Account
Signing up with PayPal
For e-commerce, RB Web integrates with PayPal, which is the most widely recognized and respected
independent third-party company specializing in processing online credit card transactions.
If you don’t have a business account with PayPal, create one to accept payments on RB Web.
1. Launch your web browser and go to www.paypal.com.
2. Click the Business tab.
3. Select PayPal Payments Pro as your payment type.
4. Follow the onscreen instructions for creating a PayPal business account.
Security
Creating & applying API credentials
An Application Programming Interface (API) allows PayPal to communicate with your RB Web online
office directly so your clients do not leave your site to make an online payment. To integrate RB Web’s
e-commerce with PayPal, generate your API credentials, then add them to your RB Web.
1. Launch your web browser and go to www.paypal.com.
2. Log in to your account.
3. Click Profile under the My Account tab.
4. Click My Selling Tools, then click Update in API Access.
RB Web 8 User Guide | 9
5. Click Request API credentials in the Option 2 box.
6. Select Request API signature, then click Agree and Submit.
7. On the menu bar in RB8, click Tools > Web > Site Configurations.
8. Click Pay Invoices.
9. Copy API Username, API Password and Signature from the PayPal web page, then paste them into
the corresponding fields in RB8.
10. Click Accessibility.
11. Check the Allow box next to Pay Invoices (in the Contact Module section) to enable the e-commerce
module in RB Web.
RB Web 8 User Guide | 10
COD Invoices
Publishing COD invoices
In RB8, COD invoices are not posted, so as a default, they do not appear when clients go to the Activity
section of RB Web. However, with RB Web’s e-commerce module, you have an option to ‘publish’ COD
invoices to allow the clients to pay for and download transcripts that were billed COD.
1. On the menu bar in RB8, click Billing > COD Invoices.
2. In the Search Criteria pane, specify the filters, then click Search (or press Alt + S).
3. RB8 lists all of the COD invoices that meet the specified search conditions. Right-click the invoice(s)
you want to publish on RB Web, then choose Set Publish on Web.
NOTE
To ‘unpublish’ COD invoices, right-click the invoice(s) you want to unpublish on RB Web, then choose
Clear Publish on Web.
RB Web 8 User Guide | 11
Accessibility
Controlling online transcript access
When you add e-commerce to RB Web (see “Signing up with PayPal” and “Creating API Credentials”),
you can restrict file downloads to only those transcripts that are fully paid for.
1. On the menu bar in RB8, click Tools > Web > Site Configurations.
2. Click Accessibility.
3. In the Contact Module section, under Transcripts, you have four e-commerce options:
• Allow file downloads when the invoice (original) is fully paid – Check this box if the invoices
for originals must be fully paid before transcripts can be downloaded. Since originals are normally
billed to your good clients, you might want to leave this checkbox blank so as not to irritate your
client base.
• Allow file downloads when the invoice (copy) is fully paid – Check this box if the invoices for
copies must be fully paid before transcripts can be downloaded. Since copies are normally billed to
non-clients, you might want to check this box to improve your collections.
• Allow transcript package view when the invoice (original) is fully paid – Check this box if the
invoices for originals must be fully paid before transcript packages can be viewed.
• Allow transcript package view when the invoice (copy) is fully paid – Check this box if the
invoices for copies must be fully paid before transcript packages can be viewed.
NOTE
Client instructions for paying online through RB Web are in the latest RB Web user manual for attorneys.
paralegals and secretaries. Download the PDF from the Team RB downloads section of our website: www.
omti.com/rb
If you have Adobe Acrobat Professional, you can add the appendix to your RB Web User Guide before
giving the guide to your clients.
Receivables
Crediting online payments
RB generates payment transactions in Receivables automatically from online PayPal payments made by
clients in RB Web.
1. When a confirmation is received from PayPal that an online payment has been credited to your
business account, a payment transaction will be automatically generated in RB8 crediting invoices
selected by clients in their Pay Invoices screen of RB Web.
2. At the end of each day, post these credit card payments along with other payments you entered in
Receivables.
RB Web 8 User Guide | 12
Full-text search plug-in
In a full-text search, the search engine examines all of the words in every document
stored in a database, as it tries to match search words supplied by the user. However,
directly scanning the contents of each document looking for matches is very slow
and impractical. Instead, RB Web’s full-text search plug-in first scans the text of all
the documents and builds a list of search terms, called an index (concordance). Then,
when performing a specific search, only the index is referenced rather than the text of
the original documents. With this plug-in, your clients can search through hundreds of
transcripts belonging to a particular case in a matter of seconds.
Requirements
Is your system ready?
RB Web ’s full-text search plug-in utilizes the string-matching technology available in Microsoft SQL
Server. To activate the full-text search plug-in for RB Web, your SQL Server must be one of the following:
• SQL Server 2005 Workgroup, Standard or Enterprise Edition
• SQL Server 2008 Web, Workgroup, Standard or Enterprise Edition
Supported document types
Is your document compatible?
For RB8 to scan a document and build an index, the document must be one of the following file types:
• PDF (text portion only)
• MS Word
• MS Excel
• MS PowerPoint
• Rich Text Format (rtf)
• HTML
• All text formats
NOTE
At this time, image files (e.g., scanned exhibits) are not supported.
RB Web 8 User Guide | 13
Create Full-Text
Building an index
The first step in implementing full-text searching is to build an index. This is easy — you specify a case
and file types. RB8 will do the rest.
1. On the menu bar in RB8, click Production > Repository.
2. In the Search Criteria pane, specify the filters, then click Search (or press Alt + S). For example,
if your client wants to search through all PDF transcripts belonging to a particular case, enter the
following information:
• File Types – Select PDF Transcript in the drop-down.
• Case – Click the binoculars button to select the case.
3. RB8 lists all of the files that meet the specified search conditions. Right-click the file(s) you want to
index, then choose Create Full-Text.
TIP
If the Case field in the Search Criteria Pane is left blank, RB8 will build an index for all PDF transcripts
stored in the repository. However, this might take many hours, so it is recommended that you do the initial
building during non-business hours.
RB Web 8 User Guide | 14
4. As each file is indexed, the corresponding Full-Text checkbox is marked.
NOTES
To remove files from the index, right-click the file(s), then choose Remove Full-Text.
Client instructions for full-text search through RB Web are available as an appendix to the latest RB Web
user manual for attorneys. paralegals and secretaries. Download the PDF from the Team RB downloads
section of our website: www.omti.com/rb
If you have Adobe Acrobat Professional, you can add the appendix to your RB Web User Guide PDF before
giving the guide to your clients.
RB Web 8 User Guide | 15
Media streaming plug-in
With streaming media (audio or video), a web user does not have to wait to download
a file to play it. Instead, the media is sent in a continuous stream of data and plays as
it arrives.
Requirements
Is your system ready?
Providing true media streaming requires specialized software (known as media server software) and
dedicated hardware. RB Web’s media streaming plug-in utilizes Wowza Media Server software, which is
considered to be one of the best Flash streaming server software currently on the market. To provide media
streaming in RB Web, your media-dedicated system must include the following:
• Dual-core processor computer
• Minimum 1GB of RAM per core
• RAID 0 or RAID 10 configurations with at least 2 or more disks in the array
• Any Windows operating system
• Java Runtime Environment (JRE) 5 or 6
• Wowza Media Server (see note)
• Port 1935 (RTMP port) opened on your firewall
• Flash Player (on clients’ computers)
NOTES
RB Web’s media streaming plug-in comes with Wowza Pro10 edition (a free version) that supports
a maximum of 10 concurrent connections. To provide an unlimited number of concurrent streaming
connections, purchase Wowza Pro Unlimited edition. It is available from Wowza for $995.
Flash is an application that creates files that stream their content to browsers very quickly. It is an industry
standard for presenting media on the web.
Supported document types
Is your document compatible?
RB Web’s media streaming plug-in supports the following media types:
• Flash media content (.flv) – recommended
• MP3 content (.mp3)
• H.264/HE-ACC media content (.f4v, .mp4, .m4a, .mov, .mp4v, .3gp, and .3g2)
RB Web 8 User Guide | 16
Web Site Configurations
Setting up media streaming preferences
An important advantage of streaming media technology (unlike either traditional or progressive downloads)
is the copyright protection it provides. You can opt to have RB Web stream media leaving no copy of the
content on the end user’s computer or other receiving device. This way, the recipient can neither alter nor
redistribute the content in an unauthorized manner.
1. On the menu bar in RB8, click Tools > Web > Site Configurations.
2. Click Media Streaming.
3. Check the box if you want clients to view streaming media, but not download it from your RB Web.
NOTES
Client instructions for media streaming through RB Web are available as an appendix to the latest RB Web
user manual for attorneys. paralegals and secretaries. Download the PDF from the Team RB downloads
section of our website: www.omti.com/rb
If you have Adobe Acrobat Professional, you can add the appendix to your RB Web User Guide before
giving the guide to your clients.
RB Web 8 User Guide | 17
Contacts & Resources
Unlocking locked-out accounts
An account (for RB Web login) can get locked out due to multiple log-in failures. The office must unlock
the account before a contact (or resource) can use it again.
1. On the menu bar in RB8, click Setup > Contacts (or Resources).
2. Search for the contact (or resource) whose account has been locked out.
3. Right-click the contact (or resource), then choose View.
4. Click the Additional tab.
5. Uncheck the Account is locked out box.
6. Click Save and Close.
Web Activity Log
Tracking RB Web activities
If you have enabled the Activity Log Service, RB8 will keep track of activities by clients and resources
on RB Web. The activity log will show you what sections of RB Web are popular and who is using the
web site.
1. On the menu bar in RB8, click Tools > Web > Web Activity Log.
2. In the Search Criteria pane, Site defaults to MAIN and Activity Date From/To defaults to the current
month. Change the search filters as needed, then click Search (or press Alt + S).
3. RB8 lists all of the web activities that meet the specified search condition(s) as two separate reports.
Each report is shown as a tab.
NOTE
To use the Web Activity Log, select Enable in the Activity Log Service drop-down in Tools > Web > Site
Configurations > General.
RB Web 8 User Guide | 18
Support Tickets
Resolving support issues
If you have enabled RB Web Support, you can manage user questions and problems and maintain a paper
trail of their resolution with RB Web’s support ticket system.
1. On the menu bar in RB8, click Tools > Web > Support Tickets.
2. In the Search Criteria pane, change the search filters as needed, then click Search (or press Alt + S).
3. RB8 lists all of the support tickets that meet the specified search condition(s). Right-click a ticket you
want to follow up on.
4. In the View Comment window, click Add Comment.
5. In the Add Comment window, enter your follow-up comment and click Save.
6. RB Web updates the user’s support ticket log awating their response and records your reply and its
details, such as date and time entered, in the View Ticket window’s history grid.
NOTES
To use the support ticket system, check the Allow box next to Support in the Contact/Resource Module
grids in Tools > Web > Site Configurations > Accessibility.
Designate which staff person(s) should be notified when contacts and resources post a support ticket in
Tools > Web > Site Configurations > Support Alert.
RB Web 8 User Guide | 19
Approve Time-off
Managing resources’ time-off requests
Streamline the process of managing resources’ time-off requests with RB Web’s Availability feature and
RB8’s Approve TIme-off function.
1. On the menu bar in RB8, click Tools > Web > Approve Time-off.
2. In the Search Criteria pane, Status defaults to Pending. Change the search filters as needed, then click
Search (or press Alt + S).
3. RB8 lists all of the time-off requests that meet the specified search condition(s). Double-click a request
you want to follow up on.
4. In the View Time-off window, you can add a comment in the Comment field.
5. Click Approve or Deny.
6. RB8 updates the Status column for the request, records your name in its Modified By column, and
notifies the resource via RB Web’s support ticket system.
NOTES
If you approve a resource’s time-off request, but a job has already been scheduled, a warning window
appears and does not allow you to approve the request.
If you do not want to allow resources to request time off via RB Web, uncheck the Availability box in
Tools > Web > Site Configurations > Accessibility.
RB Web 8 User Guide | 20
Request Orders
Processing back orders
When clients request transcripts on previously billed jobs via RB Web, you can print an order request form
for creating the transcript and change the job’s status to back order. Once transcript requests are confirmed
in RB8, clients can track the requests as back orders on their calendar in RB Web and cannot delete back
orders on RB Web. A new function to print back orders
1. When you receive a notice via RB8’s Message Center that there is a new transcript order request, click
the order number in the message.
2. The Request Order Form appears with all of the client’s instructions.
• Click Print – To make a hard copy of the form. In the pop-up that appears, click Yes to change the
request’s status to Back Order and prevent the client from cancelling the job on RB Web.
• Click Change status to Back Order – To change the request’s status without printing out the form.
In the pop-up that appears, click Yes.
3. In RB8, go to Production > Turn-in.
4. Enter the order’s job number in Job No. and click Search. The job’s Job Status has changed from
Billed to Back Order.
NOTE
For the client in RB Web, the order request disappears from the Order Transcript screen and the job status
changes to Back Order, which they can see in the Calendar screen.
TIP
You can also find outstanding order requests in Tools > Web > Request Orders. Click Search. All
outstanding order requests appear. Double-click a request to print its Request Order Form and change its
status to back order.
If you want to reprint old order requests (the orders that have already been confirmed), change Confirmed
filter to Yes, then click Search.
RB Web 8 User Guide | 21
Appendices
RB Web 8 for Office/RB Web Mobile
Checking day’s job assignments
In RB Web for Office, you can review a day’s assigned, unassigned and canceled jobs on your laptop or
browser-enabled cellphone. You can do the same with the optional RB Web Mobile App on your smart
phone. (Screenshots on the left are from RB Web for Office, on right are from RB Web Mobile App.)
1. In RB Web for Office or RB Web Mobile > Office, select Daily Assignment.
2. Tomorrow’s job totals appear as the default. Page to other days’ assignments using the forward and
back arrows next to the date.
3. Select a category to view its entries.
4. Select an entry to view its details.
RB Web 8 User Guide | 22
Appendices
5. Return to the category listings by selecting Back.
6. Return to the day’s listings by selecting Back.
RB Web 8 for Office/RB Web Mobile
Auditing day’s settings
In RB Web for Office or RB Web Mobile, you can audit how many jobs were set and how many were
cancelled on a day-by-day basis.
1. In RB Web for Office or RB Web Mobile > Office, select Daily Audit.
2. Today’s job settings and cancellation totals appear as the default. Page to other days using the forward
and back arrows next to the date.
3. Select a category to view its entries.
4. Select an entry to view its details.
5. Return to the entry’s listings by selecting Back.
6. Return to the day’s listings by selecting Back.
RB Web 8 User Guide | 23
Appendices
RB Web 8 for Office/RB Web Mobile
Looking up client information
In RB Web for Office or RB Web Mobile, you can look up details about a client firm, including people who
work there, their contact information and driving directions to the firm.
1. In RB Web for Office, select Clients. In RB Web Mobile, select Firms.
2. Enter part of the client’s name in the Name field (RB Web for Office) or Firm Name field (RB Web
Mobile), and select Search.
3. In the search results, view details by selecting the firm name. (Screenshot on the left is from RB Web
for Office, on right is from RB Web Mobile App.)
4. The firm’s address, contact information, and other information appear:
• Select the phone number to call the firm.
• To get driving directions, select map in the Address field (RB Web for Office) or select the address
(RB Web Mobile). The map shows you the location and provides driving details. (Screenshot on the
left is from RB Web for Office, on right is from RB Web Mobile App.)
• To email a message, select the contact’s email address (under Contacts in RB Web Mobile).
• Return to the list of firms by selecting Back.
5. Return to the search field by selecting Back.
RB Web 8 User Guide | 24
Appendices
RB Web 8 for Office/RB Web Mobile
Looking up resource information
In RB Web Mobile, you can look up contact information for your resources. This can come in handy when
it’s after business hours and you need to contact someone.
1. In RB Web for Office or RB Web Mobile, select Resources.
2. Enter part of the resource’s name in the Name field (RB Web for Office) or Resource Name field (RB
Web Mobile), and select Search.
3. In the search results, view details by selecting the resource’s name.
4. The resource’s address, contact information, and other information appears:
• Select a phone number to call the resource.
• To get driving directions, select map in the Address field (RB Web for Office) or select the address
(RB Web Mobile). The map shows you the location and provides driving details.
• To email a message, select the email address.
• Return to the list of resources by selecting Back.
5. Return to the search field by selecting Back.
RB Web 8 User Guide | 25
Appendices
HTML
Working with HTML
A web page is simply a text document that contains instructions for web browsers. If you look at a typical
web page in a regular text editor, you see a bunch of code in angle brackets and a bunch of text; it’s not
very exciting. However, when a web browser “sees” a web page, it uses these bits of code, called tags, to
interpret how the document should look and what is to happen when certain things are clicked on.
Hypertext Markup Language (HTML) is the predominant markup language for web pages. HTML is
written in the form of tags, surrounded by angle brackets (<>). It is beyond the scope of this guide to cover
HTML in its entirety. Here are minimal basics you should know to format message headers and footers for
RB Web.
General Rule
HTML tags consist of a left angle bracket (<), followed by name of the tag and closed by a right angular
bracket (>). Tags are usually paired. The ending tag looks just like the starting tag except a slash (/)
precedes the text within the brackets.
Forced Line Breaks
The <BR> tag forces a line break with no extra space between lines. (By contrast, most browsers format the
<P> paragraph tag with an additional blank line to more clearly indicate the beginning the new paragraph.)
Character Formatting
<B>
Bold text
<I>
Italic text
Linking to Other Documents
The chief power of HTML comes from its ability to link regions of text (and also images) to another
document. The browser highlights these regions (usually with color and/or underlines) to indicate that they
are hypertext links (often shortened to hyperlinks or simply links).
HTML’s single hypertext-related tag is <A>, which stands for anchor. To include an anchor in your document:
1. Start the anchor with <A.
2. Specify the document that’s being pointed to by entering the parameter HREF=”filename” followed by
a closing right angle bracket >.
3. Enter the text that will serve as the hypertext link in the current document.
4. Enter the ending anchor tag: </A>.
RB Web 8 User Guide | 26
Appendices
Example 1: Repository notification message header
Copy the tags shown in bold and substitute your own company information to create your repository
notification message header.
<B>OMTI Court Reporting </B><BR>
The following files are available from <A href=’http://omti.reporterbase.com/rbweb/attorney’ target=_
blank>our web site</A>.
NOTE
The text, target=_blank, in the <A> tag tells the browser to open a new window when the hyperlink
is clicked.
Example 2: Repository notification message footer
Copy the tags shown in bold and substitute your own company information to create your repository
notification message footer.
If you don’t know your login information, contact <A href=’mailto:[email protected]’>support@omti.
com</A>.
RB Web 8 User Guide | 27