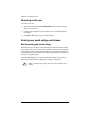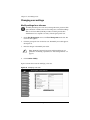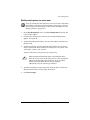
1
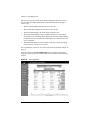
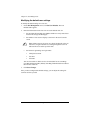
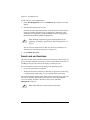
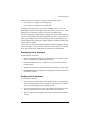
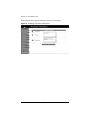
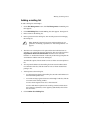
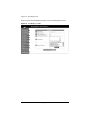
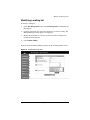
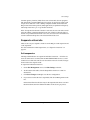
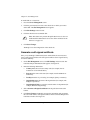
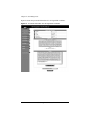
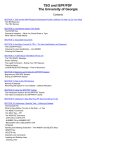
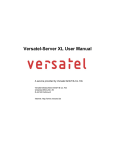
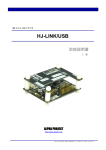
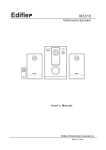
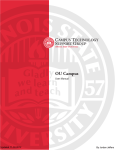
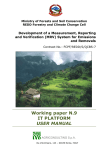
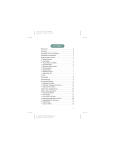
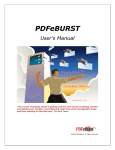
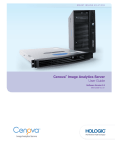
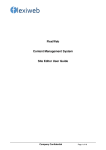
Chapter 4
Site Management
There are three types of users on the RaQ 4: the RaQ 4 Administrator, Site
Administrators and site users.
This chapter describes the functions that the Site Administrator normally
performs. As the Site Administrator, you access these functions from the Site
Management screen on the RaQ 4. The Site Management screen has a green
strip on the left side.
You can add or remove a site user, create a mailing list, manage disk space, back
up and restore files and perform other virtual-site-related administrative tasks.
(These functions can also be performed by the RaQ 4 Administrator.)
You can manage a virtual site using any standard Web browser. To access the Site
Management screen for your site, type the URL
http://<sitename>/siteadmin/ into your browser. The RaQ 4 user interface (UI)
prompts you for your site administrator user name and password.
✍
Note: The Site Management screen can only be accessed using the
fully qualified site name in the Web browser. The Site
Management screen is not accessible if an incomplete or aliased
site host name is specified.
To access the Site Management screen, click Site Management on the Server
Management screen. The Site Management screen appears. From this screen,
you can access the Site Administrator functions; see Figure 36.
The User Management section appears when you first access the Site
Management screen. The User List displays the site users by user name in
ascending order.
Cobalt RaQ 4 User Manual
95
Chapter 4: Site Management
The User List has five columns which display information about the each site
user, and allow the RaQ 4 Administrator or Site Administrator to manage or
remove a site.
•
The first column displays the full name of the site user.
•
The second column displays the user name of the site user.
•
The third column displays the email alias(es) of the site user.
•
The fourth column displays icons to indicate which services are enabled
(telnet/shell access, FrontPage Server Extensions or Secure POP3 [APOP]),
to indicate that a site user is the Site Administrator, or to indicate that a site
user is suspended.
•
The fifth column displays icons to manage a site user or the email settings
for the site user, or to remove a site user.
For an explanation of the icons, see “Icons used on the UI and in the manual” on
page 11.
To access a section of the Site Management screen, click the section button
along the left side of the screen. These functions are described in the following
sections.
Figure 36.
96
Site management
Cobalt RaQ 4 User Manual
User management
User management
The User Management section on the Site Management screen allows you to
perform administrative functions related to site users: setting the site user
defaults, adding or removing users; entering and modifying user names and
passwords; managing users’ disk space allocations, telnet access and email
aliases.
Setting defaults for a site user
Before assigning the default values for a site user, you must decide on the needs
of your users.
Both the Site Administrator and the RaQ 4 Administrator can configure the site
user default settings.
Figure 37 shows the screen for configuring the default settings of a site user.
Figure 37. Default settings for a site user
Cobalt RaQ 4 User Manual
97
Chapter 4: Site Management
Modifying the default user settings
To modify the default settings for a site user:
1.
On the Site Management screen, click Set User Defaults. The User
Defaults table appears.
2.
Enter the information for the site. You can set the default value for
•
the maximum allowed disk space (MB) available to a newly created user
for their file storage and Web pages
•
the number of sites users to display at one time in the user list on the
screen
✍
•
Note: If there are more site users on a virtual site than the value you
enter here, navigation buttons for scrolling through the User List
table become active at the top of the table.
the format for generating user login names
•
initial plus last name
•
last name
•
first name
You can also enable or disable services for telnet/shell access, FrontPage
User Web and Secure POP3 (APOP), if the RaQ 4 Administrator has enabled
them for the virtual site.
3.
Click Save Changes.
Once you have configured the default settings, you can adjust the settings for
each site user that you add.
98
Cobalt RaQ 4 User Manual
User management
Adding a site user
You can add or remove users for a virtual site, and assign a Site Administrator for
the site.
!
Caution: On the Site Management screen for the main site (for the
main site, the trashcan icon is grayed-out, meaning that you cannot
delete it), the user settings for the RaQ 4 Administrator can be
modified, including name and password.
Make sure you remember the RaQ 4 Administrator password. If
you forget the password, see “Resetting the RaQ 4 Administrator
password” on page 51 for instructions on resetting the password.
Figure 38 shows the screen for adding a site user or Site Administrator.
Figure 38. Adding a site user
Cobalt RaQ 4 User Manual
99
Chapter 4: Site Management
To add a site user or Site Administrator:
1.
On the Site Management screen, click Add User. The Add New User table
appears.
2.
Enter the information for the site user.
Enter the site user’s name and password, set the allocation of total disk space
for the user, enable telnet/shell access (if appropriate), make them a Site
Administrator (if appropriate), enable FrontPage user Web (if appropriate)
and enable Secure POP3 (APOP) (if appropriate).
✍
Note: The RaQ 4 supports long passwords through the UI. For
guidelines on choosing a password, see “Password guidelines” on
page 27.
You can also enter email aliases for this user. (For more information, see
“Entering user email settings and aliases” on page 102.)
3.
Click Confirm New User.
Search and sort functions
The User List table offers a search function and a sort function; refer to Figure 36
on page 96. These functions are useful if you have a large number of site users on
your RaQ 4 and you want to restrict the display to certain site users.
You can search the list of site users according to the following criteria:
•
by user name, full name or email alias
•
whether the user name, full name or email alias is equal to the search string,
is contained in the search string or is not contained in the search string
The screen regenerates and the results of the search are displayed in a table with
the same five columns. The heading of the table now states “Search Results
(<x> Users found). To return to the full list of site users, click User
Management on the left.
✍
100
Note: Suspended users are listed in the search results.
Cobalt RaQ 4 User Manual
User management
You can sort the list of site users according to the following criteria:
•
by full name, in ascending or descending order
•
by user name, in ascending or descending order
Ascending order means from lowest value to the highest value (a–z or 1–9).
Descending order means from highest value to the lowest value (z–a or 9–1). By
default, the User List table is sorted by user name in ascending order.
The screen regenerates and the results are displayed in a table with the same five
columns. In the heading of the column which has been sorted, a blue arrow icon
points up (ascending order) or down (descending order). In the heading of the
column which has not been sorted, a double-ended arrow indicates that the order
for the column is random.
You can use the search and sort functions together to produce the display that you
need. For example, you can search the list for all site users with “joe” in the full
name, and sort the results of that search by email alias in ascending order.
Searching a list of site users
To search the list of site users:
1.
In the first field of the Search User List window, select “User Name”, “Full
Name” or “Email Alias” from the pull-down menu.
2.
In the second field, select “is”, “contains” or “does not contain” from the
pull-down menu.
3.
In the third field, enter the string of characters for which you want to search.
4.
Click Search. The screen regenerates and displays the results in a table with
the same five columns.
Sorting a list of site users
To sort the list of site users:
1.
To sort according to Full Name, click on the blue arrow icon in the heading
of the Full Name column. To sort according to User Name, click on the blue
arrow icon in the heading of the User Name column.
2.
To sort in ascending (up arrow icon) or descending order (down arrow icon),
click on the blue arrow icon so that it points in the correct direction.
3.
The screen regenerates and displays the results in a table with the same five
columns.
Cobalt RaQ 4 User Manual
101
Chapter 4: Site Management
Removing a site user
To remove a site user:
1.
In the User List table on the Site Management screen, locate the site user
that you want to remove.
2.
Click the brown trashcan icon next to the site user. A confirmation dialog
box appears.
3.
Click OK to delete the site user’s account and files.
Entering user email settings and aliases
Mail Forwarding and Vacation Reply
Individual site users can choose to have their RaQ 4 email forwarded to another
email account. Site users can also choose to enable a vacation-reply message that
is automatically sent to each person who sends the user an email. This feature is
useful when users know they will not be reading or responding to incoming email
messages for a period of time.
As the Site Administrator, you can enter these email settings for site users (at
their request) as described in “Changing user settings” on page 104.
✍
102
Note: A vacation-reply email is sent only once per week to each
sender.
Cobalt RaQ 4 User Manual
User management
Email aliases
The Email Alias feature allows you to create an arbitrary e-mail addresses
without creating a user account on the RaQ 4. An email message addressed to the
alias is forwarded to an existing email address. For example, an email alias lets
you setup a temporary or permanent alias email address such as
[email protected] and automatically route messages to a specific email
user.
Each registered user on the RaQ 4 must have a user name that is unique across all
virtual sites on the RaQ 4. You cannot create two users with the same name on
different virtual sites because all users share the same password database file in
the underlying operating system. For example, if there is a user with the user
name <mary> on virtual site abc.com, no other registered user on the RaQ 4 can
have the user name <mary>. However, user names can be similar: mary, maryb,
mary1, mary2.
An email alias is a way to create an account so that more than one user can have
the same email name on different virtual sites (<mary> on abc.com and <mary>
on xyz.com). However, the underlying user name for each person must be
unique.
For example, the Site Administrator of abc.com can give Mary Brown the user
name <mary>; her email address is [email protected]. The Site Administrator of
xyz.com (on the same RaQ 4 server) can give Mary Smith the user name
<marys>; the Site Administrator for xyz.com can then set up an email alias
[email protected] for Mary Smith. The alias points her incoming messages to the
unique user name of <marys> at xyz.com.
A site user can have several email aliases that point to a unique user name. For
example, John Smith (user name <john1>) can have [email protected],
[email protected], [email protected], [email protected] and [email protected]
which all point to his user name of <john1> at abc.com.
A Site Administrator can also set up useful aliases such as [email protected],
[email protected], [email protected], [email protected] or [email protected] that
point to a specific user name.
Adding an email alias
To add an email alias for a site user, see “Modify email options for a site user” on
page 105.
To create a catch-all account on a virtual site, see “Catch-all email account” on
page 107.
Cobalt RaQ 4 User Manual
103
Chapter 4: Site Management
Changing user settings
Modify settings for a site user
To modify the settings for a site user (to change the name, password, disk
space allocation or telnet access for an existing user, to enable FrontPage
Web use or Secure POP3 [APOP], to make an existing user the Site
Administrator or to suspend a site user), click the green pencil icon.
1.
On the Site Management screen, click User Management on the left. The
User List table appears.
2.
Click the green pencil icon for the site user. The Modify User table appears.
See Figure 39.
3.
Enter the changes in the Modify User table.
✍
4.
Note: The RaQ 4 supports long passwords through the UI. For
guidelines on choosing a password, see “Password guidelines” on
page 27.
Click Confirm Modify.
Figure 39 shows the screen for modifying a site user.
Figure 39. Modifying a site user
104
Cobalt RaQ 4 User Manual
User management
Modify email options for a site user
To set up or modify the email options for a site user (to enter a forwarding
email address, email aliases and an automatic vacation reply), click the
blue envelope icon. These options are described in “Entering user email
settings and aliases” on page 102.
1.
On the Site Management screen, click User Management on the left. The
User List table appears.
2.
Click the blue envelope icon for the site user. The Email Settings table
appears. See Figure 40.
3.
To add a forwarding email address, enter the email address in the Forward
Email To field.
4.
To add an email alias, enter the additional names that the user will receive
email as in the Email Aliases window. For example, for user <john1>, enter
“john.smith”, “johnny” and “corvette”.
To add several aliases, enter each alias on a separate line.
✍
Note: DO NOT add the domain name to the additional names.
Since the site user is part of the virtual site, he or she automatically
inherits the domain name of the virtual site. If you do add the
domain name in the Email Aliases field (for example,
[email protected]), the software gets confused.
5.
To enable an automatic vacation reply, click the check box in the Vacation
Message field and enter your message in the window.
6.
Click Save Changes.
Cobalt RaQ 4 User Manual
105
Chapter 4: Site Management
Figure 40 shows the screen for modifying a site user’s email options.
Figure 40. Modifying a site user’s email options
106
Cobalt RaQ 4 User Manual
User management
Catch-all email account
A catch-all email account receives emails addressed to former users or
non-existent users on a virtual site. For example, if an email is addressed to
[email protected] but the user name “mary” does not exist on that domain, the
email is routed to the catch-all account.
A RaQ 4 Administrator or a Site Administrator can create a catch-all email
account. This involves simply creating a certain alias for a designated user on the
virtual site; this user does not have to be the Site Administrator.
For the user on a virtual site who will receive the messages routed to the catch-all
account, the RaQ 4 Admin creates an email alias of
“@<hostname.domainname>”. The <hostname.domainname> is the fully
qualified domain name of the virtual site.
1.
On the Site Management screen, click User Management on the left. The
User List table appears.
2.
Click the blue envelope icon for the site user who will receive the email for
the catch-all account. The Email Settings table appears. See Figure 40.
3.
Enter “@<hostname.domainname>” in the Email Aliases window.
If there is already an alias in the window, add this new alias on a separate
line.
4.
Click Save Changes.
Remove a site user
To remove a site user, click the brown trashcan icon. See “Removing a
site user” on page 102.
Cobalt RaQ 4 User Manual
107
Chapter 4: Site Management
Mailing list management
In the List Management section of the Site Management screen, you can create
and manage mailing lists for the virtual site.
A mailing list allows a discussion by email between a group of people; the email
addresses of the people in the group make up the list. The mailing list is given a
name, for example AlphaProject. The mailing list can include users on the RaQ 4
as well as external users.
A message addressed to the name of the mailing list is delivered to each person
on the list.
When replying to a mailing-list message, you can reply either to the original
sender only or to the entire mailing list. This function depends on the email client
that you are using.
Figure 41 shows the Mailing Lists table in the List Management section.
Figure 41. Mailing Lists table
108
Cobalt RaQ 4 User Manual
Mailing list management
Adding a mailing list
To add a mailing list on the RaQ 4:
1.
On the Site Management screen, click List Management. The Mailing List
table appears.
2.
Click Add Mailing List. The Add Mailing List table appears. See Figure 42.
3.
Enter a name for the mailing list.
4.
Enter a password for the mailing list. You need the password for managing
the mailing list.
✍
5.
Note: The RaQ 4 supports long passwords through the UI. For
guidelines on choosing a password, see “Password guidelines” on
page 27.
The Allow user subscriptions to list option allows the individual users to
subscribe to or unsubscribe from the mailing list. The user sends an email to
majordomo@<hostname.domainname> with the words “subscribe
listname” or “unsubscribe listname” in the body of the message. Replace the
word listname with the name of the mailing list.
To enable this option, click the check box next to Allow user subscriptions to
list.
6.
To accept email addressed to the mailing list from an email address that is
not a member of the list, click the check box next to Allow unsubscribed
posting to list.
7.
Add recipients to the mailing list.
•
To add external recipients to the mailing list, enter the email addresses in
the External Recipients field.
•
To include existing registered site users on the RaQ 4 in the list, click the
user name in the scrolling window.
To select all the registered site users, click Select All.
To select individual recipients in the scrolling window, hold the down
the Control key (Windows) or the Apple key (Macintosh) and click on
the user names.
8.
Click Confirm New Mailing List.
Cobalt RaQ 4 User Manual
109
Chapter 4: Site Management
Figure 42 shows the Add Mailing List table in the List Management section.
Figure 42. Add Mailing List table
110
Cobalt RaQ 4 User Manual
Mailing list management
Modifying a mailing list
To modify a mailing list:
1.
On the Site Management screen, click List Management. The Mailing List
table appears.
2.
Click the green pencil icon next to the mailing list you want to modify. The
Modify Mailing List table appears. See Figure 43.
3.
Modify the information as necessary (see the procedure for adding a new
mailing list for the options).
4.
Click Confirm Modify.
Figure 43 shows the Modify Mailing List table in the List Management section.
Figure 43. Modify Mailing List table
Cobalt RaQ 4 User Manual
111
Chapter 4: Site Management
Removing a mailing list
To remove a mailing list:
1.
On the Site Management screen, click List Management. The Mailing List
table appears.
2.
Click the brown trashcan icon next to the mailing list you want to delete. A
confirmation dialog box appears.
3.
Click OK to delete the mailing list.
Site settings
Only the RaQ 4 Administrator can modify virtual site settings. For Site
Administrators who are not the RaQ 4 Administrator, the Site Settings section is
a read-only status page.
For an explanation of the fields on the Site Settings table, see“Overview of virtual
sites” on page 41.
For a view of the Site Settings table, see Figure 44.
In the Site Settings section of the Site Management screen, you can:
•
view the IP address, host name and domain name of the virtual site
•
enable or disable Web server aliases
•
enable or disable email server aliases
•
change the maximum allowed disk space for the virtual site
•
limit the number of site users on a virtual site
•
enable or disable access to telnet/shell accounts, CGI scripts, SSL, server
side includes, FrontPage server extensions, Active Server Pages (ASP), PHP
and Secure POP3 (APOP)
•
suspend the virtual site
112
Cobalt RaQ 4 User Manual
Site settings
Changing site settings
To change the settings for a particular virtual site, click the green wrench
icon. For an explanation of the fields on the Site Settings table,
see“Overview of virtual sites” on page 41.
✍
Note: Only the RaQ 4 Administrator can modify the settings for a
virtual site. For Site Administrators who are not the RaQ 4
Administrator, the Site Settings section is a read-only status page.
Figure 44 shows the screen for changing the site settings of a virtual site.
Figure 44. Changing the site settings of a virtual site
Cobalt RaQ 4 User Manual
113
Chapter 4: Site Management
To change settings for a particular site:
1.
On the Site Management screen, click Site Settings on the left side. The
Site Settings table appears.
2.
In the Site Settings table, you can set the values of the fields or enable the
services:
a.
IP Address
b.
Host name
c.
Domain name
d.
Web server aliases
e.
Email server aliases
f.
Maximum allowed disk space (MB)
g.
Maximum number of users
h.
Enable FrontPage Server Extensions
i.
Enable Secure Sockets Layer (SSL)
j.
Enable Active Server Pages (ASP)
k.
Enable PHP Embedded Scripting
l.
Enable shell accounts
m. Enable Secure POP3 (APOP)
n.
Enable CGI scripts
o.
Enable Server Side Includes
p.
Suspend Site
✍
3.
114
Note: A Site Administrator does not see the Suspend Site option.
Click Save Changes.
Cobalt RaQ 4 User Manual
Site settings
Common gateway interface (CGI) allows users to have Web sites run programs
that dynamically generate HTML pages in response to specific user inputs. CGI
scripts can be created on a user’s desktop computer and then transferred to the
RaQ 4 with a file transfer protocol (FTP) application (as explained in Chapter 5).
CGI scripts must have a .pl or .cgi filename extension.
If the “Accept email for domain” function is selected, site users can retrieve email
using the address <username>@domain.com. For example, if the host name of
the site is raq1 and the domain name is abc.com, users can receive mail addressed
to both <username>@raq1.abc.com and <username>@abc.com.
Suspend a virtual site
There are two ways to suspend a virtual site on the RaQ 4: a hard suspension and
a soft suspension.
For more information on hard suspensions, see “Suspend a virtual site” on
page 85.
Soft suspension
The RaQ 4 Administrator can suspend an individual virtual site. All of the site
users are denied access to telnet, FTP and POP3/IMAP/APOP services, as well
as Web access to their files. The site user accounts do not receive email; messages
bounce back to the original sender.
To suspend an individual virtual site:
1.
On the Site Management screen, click Site Settings on the left.
2.
At the bottom of the table, click the Suspend Site check box so that it is
checked off.
3.
Click Save Changes. The RaQ 4 saves the new configuration.
4.
If you want to see that the site is suspended, click Server Management on the
left.
In the Virtual Site List table, the entry for the suspended site shows a red X in
the third column; the name and the IP address of the site are grayed-out.
Cobalt RaQ 4 User Manual
115
Chapter 4: Site Management
Suspend a site user
The Site Administrator or RaQ 4 Administrator can suspend a site user on a
virtual site. The site user is denied access to telnet, FTP, POP3/IMAP/APOP
services, as well as Web access to their files. The site user account however still
receives email.
To suspend a site user:
1.
On the Site Management screen, click the green pencil icon next to the site
user you want to suspend. The Modify User table appears.
2.
At the bottom of the Modify User table, click the Suspend User check box.
3.
Click Confirm Modify.
The User List table appears. The entry for the suspended user shows a red X in
the fourth column; the full name, the user name and the email alias of the user are
grayed-out.
FTP settings
☞
✍
Important: The RaQ 4 Administrator can enable anonymous FTP
access on only one name-based virtual site per IP address. The UI
does not allow the administrator to enable anonymous FTP on a
second name-based virtual site that shares the same IP address.
Note: Only the RaQ 4 Administrator can modify the virtual site
settings. For Site Administrators who are not the RaQ 4
Administrator, the FTP Settings section is a read-only status page.
The RaQ 4 Administrator can enable the anonymous FTP server for the site, set
limits on the size of files that can be uploaded and set the number of simultaneous
anonymous users. This feature allows users without passwords to download and
upload files with an FTP-based application, up to the specified disk-space limit.
To change the FTP settings for your virtual site:
1.
On the Site Management screen, click FTP Settings on the left. The FTP
Settings table appears; see Figure 45.
2.
Enter the settings you want. You can specify the number of megabytes of
incoming files to accept and the number of simultaneous users.
3.
Click Save Changes.
116
Cobalt RaQ 4 User Manual
Site settings
Figure 45 shows the FTP Settings table.
Figure 45. FTP Settings table
To download files by anonymous FTP, log on to the site with the user name guest
or anonymous—you do not need to enter a password. When you log on with one
of these user names, you enter the directory /home/sites/<sitename>/ftp/.
The Site Administrator can post files here for downloading through FTP client
software or a Web browser.
Site Administrators can access the anonymous FTP directory as “/ftp” during an
FTP session.
To upload files, you must use FTP client software (for example, Fetch or
WS-FTP) and access the directory /home/sites/<sitename>/ftp/incoming/.
Once you have uploaded a file, you (as a guest) cannot see it or access it on the
FTP site. All registered site users with telnet/shell privileges can access the file,
but only the Site Administrator can access the file through FTP.
The size limit specified for FTP uploads is the total amount of disk space
allocated for FTP uploads. If this number is set to 0, a guest cannot upload to the
FTP site.
Cobalt RaQ 4 User Manual
117
Chapter 4: Site Management
SSL settings
The RaQ 4 Administrator can administer the RaQ 4 through
secure sockets layer (SSL). SSL is provided in 128-bit
encryption code and offers a secure Web connection to the
end user. The implementation of SSL on the RaQ 4 is based
on mod_ssl and BSAFE cryptographic software from RSA
Security.
A secure connection means two things: encryption and authentication.
Encryption ensures that no one can snoop the connection between the browser
and the RaQ 4; authentication ensures the client, through a certificate, that the
server is who they say they are. The security is assured on two levels.
At the network level, the first time the browser connects to a server, the browser
stores the server’s certificate. This is the encryption part of the secure connection.
Each time the browser “thinks” that it is communicating with this same server, it
verifies that this same certificate is used to assure the secure connection.
At a higher level, a server’s certificate is “signed” by a trusted external authority
that the browser knows about, such as VeriSign. This is the authentication part of
the secure connection. The server information (country, state, city, organization)
is encoded into the certificate and certificate request. The external authority signs
your request and guarantees that your server information is legitimate.
For example, if a Web site sends a signed certificate saying that it comes from
Cobalt Networks in Mountain View, California, United States, the end user can
trust (due to the signed certificate from the external authority) that this Web site is
indeed run by this company located in this city.
A self-signed certificate is a certificate that has not been signed by an external
authority. A self-signed certificate simply ensures that an encrypted Web
connection is in place; it does NOT provide authentication to a user that the
server is who they say they are.
For more information on authentication, encryption and SSL, refer to
Appendix F, “Glossary”.
118
Cobalt RaQ 4 User Manual
SSL settings
Obtain an externally signed SSL certificate
Most users want to create an externally signed SSL certificate. For e-commerce,
an externally signed SSL certificate is required.
To do this, the RaQ 4 Administrator must perform the following steps. These
steps are explained in the following pages.
1.
enable the SSL feature on a virtual site (see page 119)
2.
generate a self-signed certificate (see page 120)
3.
submit the information from the self-signed certificate to an external
certification authority (see page 123)
4.
receive the response and information from the external certification authority
(see page 124)
5.
in the SSL settings screen on the RaQ 4, replace the self-signed certificate
with the information received from the externally signed certificate (see
page 124)
6.
save the changes on the RaQ 4
Enable SSL on a virtual site
☞
✍
Important: The RaQ 4 Administrator can enable SSL on only one
name-based virtual site per IP address. The UI does not allow the
administrator to enable SSL on a second name-based virtual site
that shares the same IP address.
Note: Only the RaQ 4 Administrator can modify the virtual site
settings. For Site Administrators who are not the RaQ 4
Administrator, the SSL Settings section is a read-only status page.
Cobalt RaQ 4 User Manual
119
Chapter 4: Site Management
To enable SSL on a virtual site:
1.
Go to the Server Management screen.
2.
Click the green wrench icon next to the virtual site on which you want to
enable SSL. The Site Management screen appears.
3.
Click Site Settings on the left side.
4.
Click the check box next to Enable SSL.
✍
5.
Note: This feature only enables the public Web server; it does not
enable the SSL administrative server. See “SSL certificate for the
main site” on page 123.
Click Save Changes.
The RaQ 4 saves the configuration of the virtual site.
Generate a self-signed certificate
Once you (as the RaQ 4 Administrator) have enabled SSL, the user must now
create a self-signed certificate. The self-signed certificate can be signed later by
an external authority.
1.
On the Site Management screen, click SSL Settings on the left side. The
Certificate Subject Information table appears. See Figure 46.
2.
Enter the following information:
•
Country Enter the two-letter country code (for example, AU for
Australia or US for United States).
•
State Enter the name of the state (for example, New South Wales or
California).
•
Locality Enter the city or locality (for example, Sydney or Toronto).
•
Organization Enter the name of the organization (for example, The
Widgets Corporation).
•
Organizational Unit As an option, enter the name of a department (for
example, Hardware Engineering).
3.
Select Generate self-signed certificate from the pull-down menu at the
bottom.
4.
Click Save Changes. The RaQ 4 processes the information and regenerates
the screen with the new self-signed certificate in the Certificate Request and
Certificate windows. See Figure 47.
120
Cobalt RaQ 4 User Manual
SSL settings
Figure 46 shows the certificate subject information table for an SSL certificate.
Figure 46. Certificate subject information table for an SSL certificate
Cobalt RaQ 4 User Manual
121
Chapter 4: Site Management
Figure 47 shows the processed information of a self-signed SSL certificate.
Figure 47. Processed information of a self-signed SSL certificate
122
Cobalt RaQ 4 User Manual